1
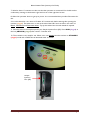
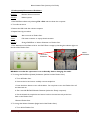
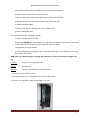
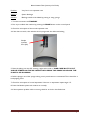
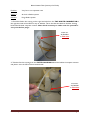
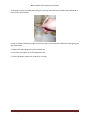
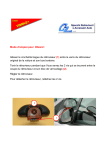
BD LSR II Flow Cytometer
Quick User Guide v.1.1.0
Blizard Institute Flow Cytometry Core Facility
PLEASE REFER TO THIS GUIDE FOR
ANY OUT OF HOURS PROBLEMS
Table of Contents
1.1 LSR II Start Up Procedure ................................................................................................................................. 2
1.2 LSR II Shut Down Procedure ............................................................................................................................ 5
1.3 Infrequently Encountered Problems................................................................................................................ 6
Blizard Institute Flow Cytometry Core Facility
1.1 LSR II Start Up Procedure
1. Turn on LSR II at the Power Switch (ringed, on right of the instrument).
LSR II
Cytometer
Computer
Fluidics Cart
2. Turn on the fluidics cart below the LSR II (ringed, top right). NB Press the button up to the “on”
(I) position (ringed, above).
3. Turn on computer below the work bench and LCD screens.
4. On prompt, type “BDIS” into password section (NB Case sensitive) and press “Return”.
5. After allowing the computer to boot up, double click the BD FACSDiva Software icon.
6. You will then see a log in option. Find your centre in the User Name box and again type “BDIS”
in upper case and press “OK” to log in.
BD LSR II Quick User Guide
Page 2
Blizard Institute Flow Cytometry Core Facility
7. Wait for about 1-2 minutes to make sure that the cytometer is connected. You should see this
confirmatory message in the bottom right hand corner of the right hand screen.
8. Allow the cytometer lasers to get up to power. It is recommended that you allow 30 minutes for
this.
9. It is also advised to run a series of 3 cleans of 5 minutes each before starting after priming the
machine (ringed). The tubes are in a rack at the side of the LSR II and run them in the order of
Bleach, FACS Rinse and Deionised Water. Top up the tubes from the wash bottles if required.
11. Place the tube on the sample injection port Sample Injection Port (SIP). Press RUN (ringed) at
the low (MEDIUM) (ringed) flow rate for 5 minutes each.
12. The machine is now ready for use. When not in use always leave the machine on STANDBY
(ringed) mode with a FACS tube of deionised water in the SIP.
Sample
Injection
Port (SIP)
BD LSR II Quick User Guide
Page 3
Blizard Institute Flow Cytometry Core Facility
13. When you are finished and if you are not the last booked user for the day, log out of your centre
folder by selecting File > Log Out. The screen should look like this ready for the next user.
NB PLEASE DO NOT LOG OUT OF THE FACS DIVA SOFTWARE AS THIS MAY
CAUSE CONNECTIVITY PROBLEMS FOR THE NEXT USER.
14. If you are the last user for the day, please perform the machine shutdown procedure.
BD LSR II Quick User Guide
Page 4
Blizard Institute Flow Cytometry Core Facility
1.2 LSR II Shut Down Procedure
1. Make sure the instrument is set to STANDBY mode.
2. Place the tube of deionised water on the SIP.
3. Shut down the FACSDiva software and then shut down the computer.
4. Turn off the LSR II and the Fluidics Cart at the green buttons.
BD LSR II Quick User Guide
Page 5
Blizard Institute Flow Cytometry Core Facility
1.3 Infrequently Encountered Problems
Problem:
Machine does not connect.
Solution:
Reboot system.
1. Exit FACSDiva software by selecting File > Exit and shut down the computer.
2. Turn off instrument.
3. Restart the LSR II and then reboot computer.
4. Repeat Start Up procedure.
Problem:
Alarm sounds on Fluidics Cart.
Cause:
Full waste container or empty sheath container.
Solution:
Change FACSFlow or Waste Cubitainer on Fluidics Cart.
1. First determine if the Waste is full or the FACS Flow is empty by checking the indicator lights on
the left of the Fluidics Cart:
Waste
Cubitainer
FACS Flow
Cubitainer
NB Make sure that the cytometer is set to Standby before changing the tanks.
2. To change the FACSFlow (Sheath) Cubitainer (Left hand of the Fluidics Cart):
a. Turn off Fluidics Cart.
b. Unscrew the lid and sensor carefully remove sample line.
c. Press the Alarm button to turn off the Alarm. You may have to turn the Fluidics Cart off
and then back on.
d. Get a new full BD FACS Sheath Cubitainer (below the FlowJo computer).
e. Put the lid with the sample line and sensor back on the new box and put the box
back on the Fluidics Cart.*
f. Restart Fluidics Cart.
3. To change the Waste Cubitainer (Right hand of the Fluidics Cart):
a. Turn off the Fluidics Cart.
BD LSR II Quick User Guide
Page 6
Blizard Institute Flow Cytometry Core Facility
a. Remove the black holder that holds up the opening of the waste tank
b. Unscrew the lid and sensor of the waste tank.
c. Get an empty waste tank from under the sink to the left of the LSR II.
d. Replace the sensor in the empty container and screw up the lid.
e. Replace the black holder.
f. Leave the full tank for disposal by the Core Facility staff.*
g. Restart the Fluidics Cart
4. Prime the fluidics after changing the tanks.
a. Install an empty tube on the SIP.
b. Press the PRIME fluid control button (on right hand side of the control panel – see above)
to force the fluid out of the flow cell and into the waste container.
c. Repeat the priming procedure.
d. Install a FACS tube (clear plastic) with 1ml of deionised water on the SIP and run it on high
flow rate for about 2min.
*NB Take care when lifting or moving full cubitainers. They are heavy and weigh >20
kg.
Problem:
Very low or no acquisition rate.
Cause 1:
Cracked tube.
Solution:
Transfer tube contents to fresh FACS tube.
1. Check the sample tube for cracks.
2. Transfer contents of to a new FACS tube and rerun the sample.
3. If there is no acquisition, check for blockage or air lock.
BD LSR II Quick User Guide
Page 7
Blizard Institute Flow Cytometry Core Facility
Problem:
Very low or no acquisition rate.
Cause 2:
System blockage.
Solution:
Blockage needs to be shifted by priming or using syringe.
1. Turn the instrument to STANDBY.
2. First try to unblock the machine by pressing the PRIME button on the control panel.
3. Check for resumption of the normal acquisition rate.
4. If this does not work, then take the 60 ml syringe with the rubberised tubing.
Sample
Injection
Port (SIP)
5. Place the tubing over the SIP, ensuring a tight seal around it. TAKE CARE NOT TO PUT
UNDUE STRESS ON THE SIP WHICH WILL BEND THE PROBE OR CRACK THE
PLASTIC SIP HOUSING.
6. Pull the plunger out of the syringe making sure a partial vacuum is maintained. There should be a
loud popping noise.
7. Check for resumption of normal acquisition. If there is no acquisition repeat stages 1-5.
8. Prime the fluidics system and continue as normally.
9. If the acquisition problem still is occurring check for air lock in the fluidics line.
BD LSR II Quick User Guide
Page 8
Blizard Institute Flow Cytometry Core Facility
Problem:
Very low or no acquisition rate.
Cause 3:
Air lock in fluidics system.
Solution:
Purge fluidics system.
1. Check the fluidics line coming on the right hand side from the TOP WHITE CONNECTOR at
the right hand side of the LSR II for any air bubbles. This is the tube that leads to the filter housing
behind the left hand computer monitor. Move this if necessary to make room for yourself to
carry out the line purge.
Check for
Air Bubbles
in This Line
2. Take the flow line coming from the FILTER HOUSING behind the left hand computer monitor
and place it over the 250 ml Schott waste bottle.
Check for
Air Bubbles
in This Line
BD LSR II Quick User Guide
Page 9
Blizard Institute Flow Cytometry Core Facility
3. Carefully remove the white plastic plug from the top of the flow line and allow the sheath fluid to
flow into the waste bottle.
4. Any air bubbles should be purged from the line and a constant stream of fluid should be going into
the waste bottle.
5. Replace the white plastic plug onto the flow line.
6. Check for resumption of normal acquisition rate.
7. Prime the fluidics system and continue as normally.
BD LSR II Quick User Guide
Page 10