1
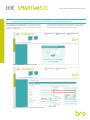
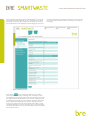
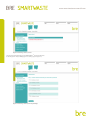
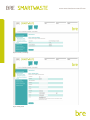
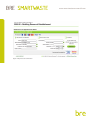
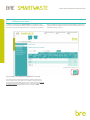
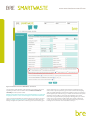
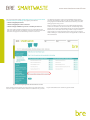
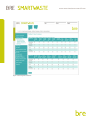
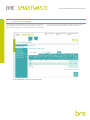
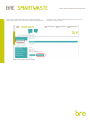
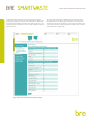
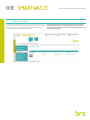
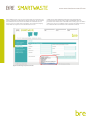
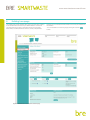
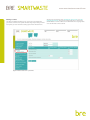
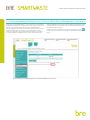
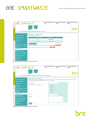
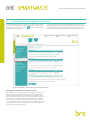
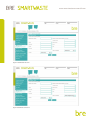
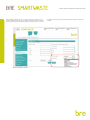
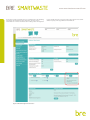
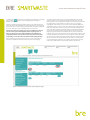
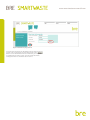
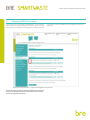
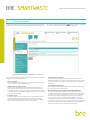
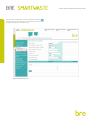
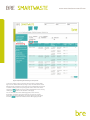
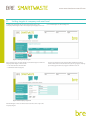
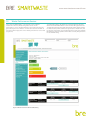
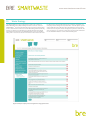
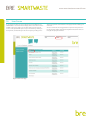
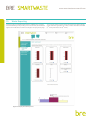
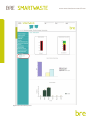
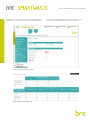
www.smartwastecommercial.com
SMARTwaste Commercial®
User guide
v2.0
Part of the BRE Trust
www.smartwastecommercial.com
1.Introduction
This SMARTWaste® Commercial user guide gives an overview of the features of the SMARTWaste® Commercial Tool, to allow those using it a
grounding of its workings and how it can best help their organisation.
This guide covers:
1. Introduction2
2. Registering and logging into your SMARTWaste Commercial account3
3.
Adding a new asset12
4.
Company Homepage16
5.
Adding new users19
6.
Building homepage21
7.
Inviting and adding Building Owners, Tenants, FMs, & Waste Management Contractors23
8.
Setting up waste management contractors26
9.
Assigning WMCs to an asset32
10.
Adding waste data33
11.
Setting targets at company and asset level36
12.
Waste Performance Review37
13.
Waste Strategy38
14.
User Forum39
15.
Waste Reporting40
If you require any further advce or guidance on using SMARTWaste
Commercial, please contact a member of the SMARTWaste team:
T +44 (0)1923 664471
[email protected]
www.smartwastecommercial.com
www.smartwastecommercial.com
2.
Registering and logging into your SMARTWaste Commercial account
You can register a new SMARTWaste® Commercial account at
www.smartwastecommercial.com. Click on ‘Not a member’?
Register – at the bottom on the screen, and complete the online
company registration form.
Figure 1: SMARTWaste® Commercial login screen
Figure 2: SMARTWaste® Commercial company registration page
If you have previously registered on SMARTWaste® Commercial then
simply enter your username and password to access your existing
account. Please avoid setting up more than one account.
www.smartwastecommercial.com
Upon registering and logging into your SMARTWaste® Commercial
account for the first time you will see the ‘customising the company
homepage’ screen page below (Figure 3). This allows you to set up
which information is to be displayed when first logging into the tool;
Figure 3: Initial log on screen
After clicking
on the company display screen you will be
presented with the company homepage. The next stage is to add
your buildings, however before this can be done the license fee needs
to be paid, which is calculated based on how many buildings you will
be adding. Figure 4 shows the screen that you will be presented with
when trying to add a building for the first time. Paying the annual
license fee is simple and can be done instantly with a debit or credit
card after following the screen steps below. Once you have activated
the tool by paying the license fee, you will be able to access the full tool
and set up your assets.
this can be altered at any point and certain boxes are pre-selected.
Section 4 contains more information on setting up the company
homepage.
www.smartwastecommercial.com
Figure 4: Purchasing a license, screen 1
The first step towards buying your SMARTWaste® Commercial license
is selecting how many buildings you are setting up (see Figure 5).
Figure 5: Purchasing a license; how many buildings
www.smartwastecommercial.com
Figure 6: Summary of buildings
Figure 7: Billing details
www.smartwastecommercial.com
Figure 8: Billing details confirmation
www.smartwastecommercial.com
Figure 9: Payment screen
www.smartwastecommercial.com
Figure 10: Payment screen
www.smartwastecommercial.com
Figure 11: Payment screen
www.smartwastecommercial.com
Figure 12: Payment screen confirmation
www.smartwastecommercial.com
3.
Adding a new asset
To add a new asset click the ‘Add building’ link in the bottom right
corner of the company homepage; now you have paid for your license
this will now take you through the steps to setting up your buildings.
Figure 13: Adding a new building/asset in SMARTWaste® Commercial
Complete the form with all the basic asset details including asset
name, address, asset type (there is an extensive drop down list of
property types) total building floor area m2 (which includes all shared
and serviced areas) and a brief description of the asset. Note that all
mandatory fields in SMARTWaste® Commercial are in bold.
Where a building is multi-tenanted the whole building is registered as
a single asset (not multiple assets). You can then allocate floor area to
individual tenants in the tool.
www.smartwastecommercial.com
Figure 14: Add/edit asset form in SMARTWaste® Commercial
Two questions at the bottom of the page are crucial to the entry and
reporting of waste and cost data in the tool. Please read these
carefully. The first question reads:
Will the waste data entered for this asset be based on an ‘average
weight per bin lift’ or the ‘actual weight’ of the waste collected?
There is an important difference between these two options. The first
option ‘Average weight per bin lift’ is derived from waste industry
average weights for a particular container type as determined by your
waste contractor e.g. a 1,100 litre wheeled bin containing general
office waste may be reported by your waste contractor as weighing
70kg in weight regardless of its ‘actual’ weight. So where your waste is
NOT weighed upon collection by your waste contractor the first option
should be selected. Where your waste IS weighed by your waste
contractor using onboard lorry weighing technology then you should
choose the second option ‘Actual weight of the waste collected’. If
you do not know the answer to this question please ask your waste
management contractor who will be able to tell you.
www.smartwastecommercial.com
The second question reads: Please select how you pay for the waste
removed from your building? The options provided are:
–– Waste charged per bin lift
–– Waste charged per tonne removed
–– Waste charges added as a part of a monthly service fee
Select the option that best characterises your contract agreement
with your waste provider or landlord. The answer to this question will
determine the type of cost data that you enter in to the tool.
The final two questions on the asset registration page capture
whether the building is single or multi-occupancy, and if the asset
being registered and data to be submitted is a dummy record for
testing purposes only, or real.
Step 2 of setting up the asset is to select all the applicable waste
streams for the asset. This form includes the 10 most likely waste
arisings from a commercial building. Simply ‘check’ all the applicable
boxes next to each waste stream. If you want to report on other
waste streams not included in this list then click on the ‘European
Waste Catalogue’ underneath and select the applicable section from
this extended list.
Figure 15: Selecting the applicable waste streams for an asset
After selecting which wastes your site produces you will need to then
select the types of container those wastes are collected in on your site.
Figure 16 illustrates how container types are listed.
www.smartwastecommercial.com
Figure 15: Selecting waste containers
www.smartwastecommercial.com
4.
Company Homepage
The Company Homepage displays the main waste and cost data and
KPIs across all assets set up in an account as illustrated in Figure 16
below. From this page the user can also click across the different tabs
Figure 16: SMARTWaste® Commercial company homepage
to access other company level data. This includes: Summary Charts;
Detailed Information; Company Targets; Reports; and Users.
www.smartwastecommercial.com
Users can tailor what is displayed on the Company Homepage –
Summary Information screen. To do this click on the company details
Figure 17: Tailoring the company homepage
tab and then click ‘Edit homepage’ at the bottom of the screen as
illustrated in Figure 17 below.
www.smartwastecommercial.com
As illustrated in Figure 18 below users simply need to check the
relevant boxes next to the items that they would like to display on the
company homepage. For example users will be able to define what
waste KPIs will be displayed, including waste arising in kg per m2, per
staff member (FTE), company turnover, number of visitors, number of
tables or beds etc.
Figure 18: Item list for customising the company homepage
One of the main waste KPIs in SMARTWaste Commercial is waste
generated expressed in kg/m2. This KPI is based on the total waste
generated by the asset divided by the total floor area occupied and
averaged for a single month period. The main cost KPI is similar in that
it is the total cost of the waste divided by the total floor area occupied
and averaged for a single month.
www.smartwastecommercial.com
5.
Adding new users
To manage users simply click on the ‘Company users’ tab on the left of
the company tool bar as illustrated in Figure 19. From here you can add
and edit your users to provide other internal staff with access to the
company account and individual asset records.
Figure 19: Adding a new user to your company account
Note that this function is intended to give access to internal
company staff only. If you want to grant access to external
users outside of your organisation then follow the guidance in
section 7 of this guide.
www.smartwastecommercial.com
When adding a new user you must select what ‘user permission’ you
want to grant them (as illustrated in Figure 20 below). The permission
level will determine how much information an individual user can
access e.g. do you want them to be able to view and edit company
information or only access an individual asset record?
Figure 20: Selecting user permission levels
A table can be downloaded by clicking on the link opposite the
permissions list which shows the functions available at each user
permission level. Please refer to this table when setting up a user. When
setting up a new user a suitable unique username and password must
be entered and then forwarded to the individual concerned.
www.smartwastecommercial.com
6.
Building homepage
The Building homepage displays all the pertinent information relating
to an individual asset record set up in SMARTWaste® Commercial.
The information presented on this page includes: Asset Details;
Waste Data; Cost Data; Details of Owners, Tenants, FMs, & Waste
Figure 21: SMARTWaste® Commercial Asset home page
Management Contractors that are linked to this record; and Additional
Information.
You can add data on an asset by simply clicking the relevant
button.
www.smartwastecommercial.com
Adding cost data
The add cost data form allows you to set up the costs charged by
your waste contractor for a particular date range. Depending on what
cost option you selected when setting up the asset will determine
Figure 22: Add cost data form – per bin lift
whether you enter these costs ‘per bin lift’, ‘per tonne’, or a ‘flat
monthly service fee’. Once these charges have been entered into
SMARTWaste® Commercial the tool will calculate the ongoing waste
costs for all waste entries entered.
www.smartwastecommercial.com
7.Inviting and adding Building Owners, Tenants, FMs & Waste Management Contractors
A key aspect of the SMARTWaste® Commercial tool is the interaction
of different companies on a single asset record. As the Asset ‘Record
Owner’ [the company that set up the asset on SMARTWaste®
Commercial] you have control over who you choose to invite to view
and/or add information on the asset. The Record Owner has the
choice of entering the required information themselves or sending
an email invitation to a Building Owner and/or Tenant and/or FM
(Building Management Company) and/or WMC (Waste Management
Contractor) to request that they enter the relevant information for the
asset directly into the system.
To add your own information or invite others simply click on the
button above the relevant company type as illustrated in Figure 23-25
below.
Figure 23: Adding or inviting Building Owners, Tenants, FM and WMCs to an asset record
www.smartwastecommercial.com
Figure 24: Adding or inviting a tenant on an asset
Figure 25: Sending an email invitation to a tenant
www.smartwastecommercial.com
When sending an email invitation to a company to interact with an
asset record and/or add information you can set their permission level.
There are six permission levels as follows:
–– Level 5 – Asset Admin User – Can undertake all tasks at the asset
level including amending asset details, adding waste and cost data,
adding targets, and inviting new users
–– Level 4 – Asset User 2 – Can undertake all tasks at the asset level
EXCEPT inviting other users and changing asset details
–– Level 3 – Asset User 1 – View all asset data AND can enter waste
data
–– Level 2 – Read only User 2– View all asset data only (summary
information, charts, detailed information, reports)
–– Level 1 – Read only User 1– View asset summary information page
only
–– Level 0 – Disabled – No access to company or asset information
Please note that there is no limit to the number of external
companies that you can invite to interact with an asset record.
For example, a multiple tenanted building can invite or add as
many tenants on an asset record as required.
www.smartwastecommercial.com
8.
Setting up waste management contractors
In order to add waste entries to an asset you must first set up details
of the waste management contractor/s including the waste carrier
and waste site. To do this click on the
button next to WMCs as
illustrated in Figure 26 below.
Secondly either add the details yourself by clicking the relevant ‘click
here’ link (see Figure 26) or send an email invitation to the contractor to
enter all the required information on the asset record themselves. This
is the same process as described above for inviting a tenant or FM.
Figure 26: List of WMCs – choice to invite or add the information yourself
Adding Waste Management Contractors’ details
When adding a new waste management contractor you are given the
option of adding a Waste Broker, Waste Carrier and/or Waste Site as
illustrated in Figure 26 above. The minimum you need to set up per
asset is at least one waste carrier and one waste site. Without this you
will be unable to add waste entry to an asset. Figures 27 – 29 below
show the forms for adding/editing Waste Brokers, Carriers and Sites.
The only mandatory fields in these forms are the ‘Company Name’ and
‘Company Type’, but you are encouraged to enter as much detail on
your waste contractors as possible.
www.smartwastecommercial.com
Figure 27: Add Waste Broker form
Figure 28: Add Waste Carrier form
www.smartwastecommercial.com
When adding a Waste Site you must also select the ‘Facility Type’ as
illustrated below in Figure 29. The different Facilities include: Transfer
Station, Material Recycling Facility (MRF), Incinerator (with or without
Figure 29: Add Waste Site form
energy/heat recovery), Composting, Anaerobic Digestion (AD), and
Landfill.
www.smartwastecommercial.com
Any broker, carrier and waste sites set up will appear on the ‘Building
homepage’ as illustrated in Figure 30 below. To enter further
information on a carrier and waste site including waste management
Figure 30: Waste Management Contractors
licence details and site recovery/recycling rates click on the relevant
WMC company name hyperlinked in the WMC list.
www.smartwastecommercial.com
To add waste management licence details and a waste site’s recycling
rates click the
button under the appropriate heading, as
illustrated in Figure 31.
From the ‘Building homepage’ (Figure 30) you can add and edit the
waste site licence details and the recycling rates for the site. Figure 32
shows the ‘add’ or ‘edit’ recycling rate form that should be completed
for every waste site set up in SMARTWaste® Commercial.
Please note that if recycling rates are not added for a waste
site then the system will apply default recycling rates of
50% recycling for all non-segregated waste and 80% for
segregated waste stream. Please note that these rates will
only apply to sites specified as a Material Recycling Facility.
When entering a recycling rate for a site you must enter both the
start and end date for which the rate being entered will apply
Figure 31: Add/edit waste site licences and recycling rates page
(see Figure 33). A waste entry can not be added otherwise as the
system needs to know what recycling rate to apply. You can enter
two separate % recycling rates for a waste site: one rate which would
be applied to any ‘mixed waste’ sent to the site e.g. not a single
segregated waste stream, and one rate which would be applied to
‘segregated waste’ sent to a waste site. Obviously the information on
these recycling rates needs to come from your waste management
contractor. All contractors should be able to provide this information
as they have a legal requirement to provide it to the Environment
Agency as a part of their Annual Waste Return, which specifies the
total tonnage received by the waste site, and the total tonnage sent to
Landfill. The difference between these two figures is what the waste
site has recovered and recycled and determines the overall recycling
rate for the waste site. Please therefore note that in most cases the
recycling rate that a contractor can supply is an average for the site,
and is not individual to the actual waste collected for an asset.
www.smartwastecommercial.com
Figure 32: Add/edit recycling rate form
Users also have the option of uploading scanned evidence into the
system of the recycling rates for a site. Simply click on the
button next to relevant field and select a file from your computer
to upload and save to the system. This can include site waste
management licences and waste site EA returns.
www.smartwastecommercial.com
9.
Assigning WMCs to an asset
Once you have set up your WMCs in SMARTWaste® Commercial they
can be assigned to any asset added to a company account. To do this
simply click on the ‘Manage waste management contractors’ tab and
check the box next to the WMC you wish to assign to the asset (see
Figure 33).
Figure 33: Asset drop down menu – Assign waste management contractors/sites
Please note that in order to enter waste data for an asset you
must as a minimum have at least one waste carrier and one
waste site assigned to an asset.
www.smartwastecommercial.com
10.
Adding waste data
To add waste data for an asset click on ‘Add waste data’ option, which
appears when selecting the ‘Waste data’ tab on the left hand side of
the screen, or alternatively click the
button under the waste data
on the asset summary information page (see Figure 34).
Figure 34: Adding waste data on SMARTWaste® Commercial
The ‘Add waste data’ form (Figure 35) is straight forward to complete.
Simply complete each field including:
–– Date of transfer If you are adding waste data for a whole month enter the 1st of the
month. The date format is DD/MM/YYYY
–– Waste carrier and destination Select the relevant waste carrier and waste destination from the
drop down list. If the drop down list does not include any carriers
or destinations then you need to go back and check that the waste
contractor has been set up AND assigned to the asset (see section 8
and 9 for further details)
–– Container type Select the relevant container type from the drop down list. Please
note: If the container type you require is not featured in this list
please feedback to the administrators via the User Forum page so
that it can be added (see section 0 for further details)
–– Company waste entered For multi-tenanted buildings you can add a waste entry for an
individual tenant by selecting the tenant name from the drop-down
menu. If the waste entry is for the whole building then leave this
field blank.
–– Is the waste segregated? If the waste removed is segregated i.e. the container contains only
one waste type then check this box
–– Waste Product (European Waste Catalogue Number) Enter the total tonnage of waste (T) removed AND number of
containers (N) next to the relevant waste stream. Please note that if
no waste types appear in the Waste Product list on the add waste
form then you need to go back and select these from the asset
set-up page (see Figure 31: Changing waste types on the asset
homepage). Please also note that a tonnage MUST be entered next
to each waste entry as there are currently no default tonnage amount
set within the tool. If the number of containers is not entered then it
will be assumed to be one and calculated on this basis.
www.smartwastecommercial.com
When you have completed the ‘Add waste data’ form click the
button at the bottom of the page. This will save the entry and refresh
the page ready for your next waste entry.
Figure 35: Add waste data form
www.smartwastecommercial.com
Figure 36: Updating waste data log for time periods
To view the waste entries entered for an asset click on ‘Waste data
log’ from the ‘Waste data’ tab (see Figure 35). This will load the waste
data log which summarises each waste entry as illustrated in Figure 36.
To edit an existing waste entry simply click on the date of the waste
entry that you would like to amend, edit as appropriate and re-save by
clicking the
button at the bottom of the page.
You can also filter the waste data log by date, waste carriers,
destination, container type and waste type to view only certain
information. Simply set the filters you require at the top of the page
and click
to provide a tailored waste data log (Figure 36).
www.smartwastecommercial.com
11.
Setting targets at company and asset level
To add waste targets at the company level simply click on the
‘Company waste targets’ tab on the Company Homepage. From here
you can add targets or edit existing ones.
Figure 37: Adding Company targets
When entering your company targets set the date range for which the
target(s) relate. Targets can be set for:
–– % of waste diverted from landfill
–– Total Waste Produced (kg/m2)
Figure 38: Add Company target form
Individual targets can be set at the asset level in the same way as the
company targets.
Please note that other waste targets will be added as and when
further waste KPIs are introduced to the system e.g. kg/per staff, kg/
per visitor, kg/per hotel room, kg/per restaurant cover etc.
www.smartwastecommercial.com
12.
Waste Performance Review
Every asset in SMARTWaste®Commercial is given a Waste
Performance Review (WPR) rating based on its overall
performance. This is calculated based on the total waste arisings
generated by the asset and the % waste diverted from landfill. To
access the WPR simply click on the ‘Waste performance review’ tab
(Figure 39).
Figure 39: Waste Performance Review (WPR) Rating
The WPR rating will be calculated once a quarter based on all waste
data entered into SMARTWaste® Commercial for all registered assets.
The Standard, Good and Exemplar benchmarks will be determined by
the bottom 50% quartile of all assets registered, the middle 25%, and
the top 25% respectively. The actual performance of the asset will then
fall within one of these quartiles which will be used to partly determine
the overall WPR rating.
www.smartwastecommercial.com
13.
Waste Strategy
The Waste Strategy section is split into two parts: Part 1 relates to
BRE’s BREEAM-In-Use (BIU) building assessment scheme. Assets in
SMARTWaste® Commercial which have been assessed under the BIU
scheme and have thus achieved a certain BIU Rating will automatically
achieve a number of credits (based on the BIU rating achieved) that
will contribute towards the overall SMARTWaste® Commercial WPR
rating. Part 2 covers those assets which have not been assessed under
the BIU scheme and instead will be assessed via the completion of a
company waste management questionnaire. This will capture specific
actions that have been taken by the individual asset owner/occupier
and/or tenant to improve waste management practices related to the
asset in question. The outcome of the Part 2 questionnaire will inform
the overall SMARTWaste® Commercial WPR rating also.
Figure 40: Example company waste management strategy questionnaire
www.smartwastecommercial.com
14.
User Forum
A user forum has been set up to capture all user feedback on the
SMARTWaste® Commercial Tool. Simply click on ‘User Forum’ in the
toolbar to access the page. You can then either post a comment
on one of the predefined Topics set up in the forum by clicking on
the topic title, or alternatively create a new topic by clicking on the
Figure 43: User Forum page
‘Add new topic’ link at the bottom of the page and then adding your
comment.
All user’s comments and suggestions for improvements posted on
the forum page will be responded to by BRE via the forum with our
thoughts and proposed actions.
www.smartwastecommercial.com
15.
Waste Reporting
Summary charts and detailed information is available at the company
and at the building level by clicking on the relevant tabs, as illustrated in
Figures 42 and 43 below, as well as viewing the company home page.
Figure 42: Company level summary charts
The summary charts compare the actual performance against targets
set for total waste generated (1st chart), % waste diverted from landfill
(2nd chart), and waste costs (3rd chart).
www.smartwastecommercial.com
Figure 43: Asset level summary charts
www.smartwastecommercial.com
SMARTWaste® Commercial also allows you the flexibility to select
which items you wish to report on and can export this data into a
Figure 44: Asset level detailed information
Figure 45: Exported data in PDF format
Microsoft Excel or Adobe PDF format for ease of communication
within the organisation, as illustrated in Figures 44 and 45.
www.smartwastecommercial.com
If you require any further advce or guidance on using SMARTWaste® Commercial,
please contact a member of the SMARTWaste team:
BRE
Bucknalls Lane
Watford
United Kingdom
WD25 9XX
T+44 (0)1923 664471
[email protected]
www.smartwastecommercial.com
BRE Trust
The BRE Trust uses profits made by BRE Group to
fund new research and education programmes, that will
help it meet its goal of ‘building a better world together’.
The BRE Trust is a registered charity in England & Wales:
No. 1092193, and Scotland: No. SC039320.