Transcript
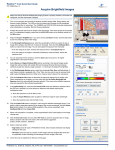
Operating Instructions for CCD3
•
Turn on arc lamp, power supply for Coolsnap digital camera, big green rocker switch
on microscope and, if live cell support is required, CO2 pump and valve in corner.
View image with binoculars:
• Turn knob on lower LHS of microscope to VIS
• Turn wheel on LHS to 100% setting
• Brightfield & Phase: press HAL button on bottom RHS of microscope (you will
probably need to turn the light intensity up with rocker switch on front of scope). If
doing phase, then remember to select the correct phase setting for your phase
objective.
• Fluorescence: press FL button on bottom RHS of microscope. Use the ND sliders at
the back of the microscope to control intensity. Select the appropriate filterset for
your probe. Only one of the white lines on the filter wheel will line up with your chosen
filter.
View your image in Metamorph:
• Open Metamorph and open the Acquire window from acquire on the main menu bar.
• Turn knob on lower LHS of microscope to BP
• In Metamorph, go to ‘illum’ drop-down menu in main menu bar and select ‘shutter’,
then go to ‘illumination’ drop-down menu in the Acquire window and select brightfield
or fluorescence.
• Click on the display tab in the Acquire window and tick the auto-scale box
• Click ‘Show Live’ button in the Acquire window. You can change the field of view and
focus using this ‘Show Live’ window. Use F2 to shut the live window.
• If the ‘Show Live’ window is completely black or white, the exposure time is probably
wrong, so either type a new exposure time into the exposure box, or click the
‘autoexpose’ button to automatically find the correct exposure time. Now ‘Show Live’
will use this corrected exposure time.
• If the shutter speed is too slow then increase the live binning value and/or reduce the
exposure time.
Capture high quality image using Metamorph:
•
•
•
•
Click the Acquire button in Acquire window. If acquired image is under/over exposed,
click the ‘autoexpose’ button to automatically capture another image with optimised
exposure time [TIP: establish the appropriate exposure time using your positive
control then use same exposure time for experimental samples]
To adjust contrast/brightness, click on the display tab in the Acquire window, uncheck
the auto-scale box and use sliders to adjust grey levels. This does not change
original grey values, just the display. If you re-save the image, the new display
settings will be saved along with the image. [TIP: establish appropriate display
settings using your positive control then apply them to your experimental samples].
Save the acquired image to your personal folder on the appropriate server
(permanent), or to SCRATCH disc (deleted every Monday).
Re-open saved images in Metamorph offline in order to check the settings (image
info), adjust the grey levels (image scale) or to export image with different file format.
After you’ve finished
•
•
•
•
Turn off CO2 pump and CO2 valve in corner, big green rocker button on
microscope, digital camera and arc lamp power supply. Leave heater on (set to 37
degrees)
Check CCD3 bookings in BRIAN; if microscope is booked during next couple of hours
then leave everything turned on, just log out of the computer, but if no-one is booked
after you for two hrs or more, then log out of computer and turn off microscope,
camera and arc lamp, and start the stopwatch.
Clean objectives with lens tissue, clean stage and bench with normal tissue. Throw
away tissues/lens tissue in green bins, slides and coverslips in orange glass bins and
contaminated culture dishes or samples in brown crates.
Put blue plastic cover over microscope, but please avoid contact of plastic with the
hot arc lamp!
© Bio-Imaging, SWDSOP, 2004