1
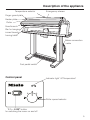
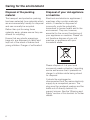
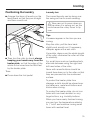
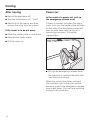
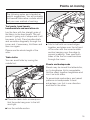
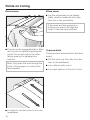
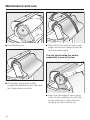
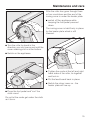
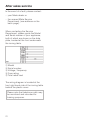
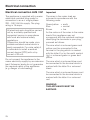
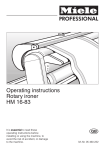
Operating instructions
Rotary ironer
HM 16-83
To avoid the risk of accidents
or damage to the machine it is
essential to read these instructions
carefully before installing and
using it for the first time.
G
M.-Nr. 05 460 232
Contents
Description of the appliance . . . . . . . . . . . . . . . . . . . . . . . . . . . . . . . . . . . . . . . . 3
Warning and safety instructions . . . . . . . . . . . . . . . . . . . . . . . . . . . . . . . . . . . . . 4
Caring for the environment . . . . . . . . . . . . . . . . . . . . . . . . . . . . . . . . . . . . . . . . . . 6
Moving the appliance. . . . . . . . . . . . . . . . . . . . . . . . . . . . . . . . . . . . . . . . . . . . . . . 7
Preparation of the working area. . . . . . . . . . . . . . . . . . . . . . . . . . . . . . . . . . . . . . . . 7
Before using for the first time . . . . . . . . . . . . . . . . . . . . . . . . . . . . . . . . . . . . . . . 8
Dust cover . . . . . . . . . . . . . . . . . . . . . . . . . . . . . . . . . . . . . . . . . . . . . . . . . . . . . . . . 8
Before ironing. . . . . . . . . . . . . . . . . . . . . . . . . . . . . . . . . . . . . . . . . . . . . . . . . . . . . 9
Preparing the laundry . . . . . . . . . . . . . . . . . . . . . . . . . . . . . . . . . . . . . . . . . . . . . . . 9
More advice on correct dampness. . . . . . . . . . . . . . . . . . . . . . . . . . . . . . . . . . . 9
Pulling into shape and smoothing out . . . . . . . . . . . . . . . . . . . . . . . . . . . . . . . . 9
Sorting . . . . . . . . . . . . . . . . . . . . . . . . . . . . . . . . . . . . . . . . . . . . . . . . . . . . . . . . 9
Checking the effectiveness of the finger guard. . . . . . . . . . . . . . . . . . . . . . . . . . . 10
Ironing . . . . . . . . . . . . . . . . . . . . . . . . . . . . . . . . . . . . . . . . . . . . . . . . . . . . . . . . . 11
Switching on and off . . . . . . . . . . . . . . . . . . . . . . . . . . . . . . . . . . . . . . . . . . . . . 11
Selecting the ironing temperature. . . . . . . . . . . . . . . . . . . . . . . . . . . . . . . . . . . 11
Selecting the roller speed. . . . . . . . . . . . . . . . . . . . . . . . . . . . . . . . . . . . . . . . . 12
Positioning the laundry . . . . . . . . . . . . . . . . . . . . . . . . . . . . . . . . . . . . . . . . . . . . . 13
Laundry bar . . . . . . . . . . . . . . . . . . . . . . . . . . . . . . . . . . . . . . . . . . . . . . . . . . . 13
After ironing . . . . . . . . . . . . . . . . . . . . . . . . . . . . . . . . . . . . . . . . . . . . . . . . . . . . . . 14
Power cut . . . . . . . . . . . . . . . . . . . . . . . . . . . . . . . . . . . . . . . . . . . . . . . . . . . . . . . . 14
Points on ironing . . . . . . . . . . . . . . . . . . . . . . . . . . . . . . . . . . . . . . . . . . . . . . . . . 15
Maintenance and care . . . . . . . . . . . . . . . . . . . . . . . . . . . . . . . . . . . . . . . . . . . . . 17
Problem solving guide. . . . . . . . . . . . . . . . . . . . . . . . . . . . . . . . . . . . . . . . . . . . . 20
After sales service . . . . . . . . . . . . . . . . . . . . . . . . . . . . . . . . . . . . . . . . . . . . . . . . 21
Electrical connection . . . . . . . . . . . . . . . . . . . . . . . . . . . . . . . . . . . . . . . . . . . . . . 22
Electrical connection U.K. . . . . . . . . . . . . . . . . . . . . . . . . . . . . . . . . . . . . . . . . . . . 22
Electrical connection AUS / NZ . . . . . . . . . . . . . . . . . . . . . . . . . . . . . . . . . . . . . . . 23
Technical data . . . . . . . . . . . . . . . . . . . . . . . . . . . . . . . . . . . . . . . . . . . . . . . . . . . 24
2
Description of the appliance
Temperature selector
Emergency release
Finger guard plate
Heater plate
Roller
Feed board
Bar for hanging
ironed laundry
Ironing table
Mains connection
cable
Foot pedal switch
Control panel
Indicator light "oC Temperature"
Roller speed selector
"I On - 0 Off" button
for switching the ironer on and off
3
Warning and safety instructions
To avoid the risk of accidents or
damage to the appliance it is
essential to read these instructions
carefully before installing and using
it for the first time. They contain
important information on its safety,
use and maintenance.
Keep these instructions in a safe
place for reference, and pass them
on to any future user.
Appropriate use
This rotary ironer is intended
exclusively for ironing textiles
which are suitable for machine ironing
and which have been washed in water.
Technical and electrical safety
Before setting up the appliance,
check it for any externally visible
damage.
Do not install and use a damaged
appliance.
A damaged appliance is
dangerous. Switch off at the mains
and call the Service Department for
assistance.
Before connecting the appliance,
ensure that the connection data on
the data plate (fusing, voltage and
frequency) match the mains electricity
supply. If in any doubt, consult a
qualified electrician.
The electrical safety of this
appliance can only be guaranteed
when continuity is complete between
the appliance and an effective earthing
system which complies with local and
national safety regulations.
4
It is most important that this basic
safety requirement is regularly tested
by a qualified electrician.
The manufacturer cannot be held
responsible for the consequences of an
inadequate earthing system.
The appliance is built in
accordance with current safety
requirements. Unauthorised repairs
could result in unforeseen dangers for
the user, for which the manufacturer
cannot accept responsibility. Repairs
should only be undertaken by a Miele
approved engineer.
Ensure current is not supplied to the
appliance while maintenance or repair
work is being carried out.
Faulty components must only be
exchanged for Miele original spare
parts. Only when these parts are fitted
can the safety standards of the
appliance be guaranteed.
The appliance is only completely
isolated from the electricity supply
when:
– it is switched off at the wall socket
and the plug is withdrawn, or
– it is switched off at the mains, or
– the mains fuse is withdrawn.
Warning and safety instructions
Do not damage, remove or bypass
the safety components or control
elements on the appliance.
Only operate the rotary ironer when
all removable outer casings are
fitted so that it is not possible to touch
any electrical component or moving
part.
This equipment may only be used
in mobile installations such as
ships, caravans, aircraft etc. if a risk
assessment of the installation has been
carried out by a suitably qualified
engineer.
Use
When the ironer is heated up there
is an acute danger of burning:
– if the heater plate is touched
– if the foot pedal is pressed down
while fingers or hands are positioned
between the raised roller and the
heater plate to smooth an article.
Never drape items over the heater
plate when it is heated up.
This is a fire hazard.
Do not lay the connection cable
over the heater plate when it is
heated up. This could damage the
cable - danger of electric shock.
Use the cable holders attached to the
appliance to wind the cable away.
In countries where there are areas
which may be subject to infestation
by cockroaches or other vermin, pay
particular attention to keeping the
appliance and its surroundings in a
clean condition at all times. Any
damage which may be caused by
cockroaches or other vermin will not be
covered by the appliance guarantee.
This appliance is not a toy! To
avoid the risk of injury do not allow
children to play on or near it or to play
with the controls. Supervise its use by
the elderly or infirm, and supervise
children whilst you are using it.
Accessories
Accessory parts may only be fitted
when expressly approved by Miele. If
other parts are used, guarantee,
performance and product liability
claims may be invalidated.
Hang laundry on the swing out bar.
Swing it back immediately after
use. Take care not to press down on the
bar when it is swung out. There is a
danger that this could tip the ironer
over.
Switch the appliance off before
removing the plug from the
electricity socket.
5
Caring for the environment
Disposal of the packing
material
Disposal of your old appliance
or machine
The transport and protective packing
has been selected from materials which
are environmentally friendly for disposal
and can normally be recycled.
Electrical and electronic appliances /
machines often contain materials
which, if handled or disposed of
incorrectly, could be potentially
hazardous to human health and to the
environment. They are, however,
essential for the correct functioning of
your appliance or machine. Please do
not therefore dispose of your old
machine or appliance with your
household waste.
Rather than just throwing these
materials away, please ensure they are
offered for recycling.
Ensure that any plastic wrappings,
bags etc. are disposed of safely and
kept out of the reach of babies and
young children. Danger of suffocation!
Please dispose of it at your local
community waste collection / recycling
centre and ensure that it presents no
danger to children while being stored
for disposal.
It should be unplugged or
disconnected from the mains electricity
supply by a competent person. The
plug must be rendered useless and the
cable cut off directly behind it to
prevent misuse. See the "Warning and
Safety" section of this booklet for further
details.
6
Moving the appliance
Moving the appliance
The rotary ironer is fitted with four
rollers.
^ Hold the ironer by the ironing table
and push or pull to move it.
Preparation of the working
area
A height-adjustable chair is useful and
also a flat surface, e.g. a table, to lay
the ironed laundry on.
To overcome obstacles such as carpet
edges and doorways but also to steer:
^ Tilt the appliance slightly.
Make sure the ironer is level and secure
and that it cannot roll sideways.
Place close at hand:
– a basket with the laundry ready for
ironing to the left of the rotary ironer,
– a surface for the ironed laundry to
the right of the rotary ironer.
Shirts, overalls and blouses etc., should
be hung on coathangers immediately
after ironing.
Small items can be hung over the swing
out bar.
Have some water ready for redamping
the laundry if necessary.
7
Before using for the first time
Dust cover
The dust cover which protects the roller
during transit has to be removed.
Then plug the appliance in and
switch it on. The heater plate will
then rise automatically.
Connection cable
The mains connection cable is wound
round a hook underneath the ironing
table.
^ Unwind the cable.
Do not insert the plug into the
electrical socket yet.
N.B. The plug shown is for illustration
only.
8
Before ironing
Preparing the laundry
Correct preparation of the laundry is
essential for successful ironing.
Before ironing, the laundry should be:
Pulling into shape and smoothing
out
Pull the dampened laundry into shape
as usual.
Smooth out ribbons, straps, seams and
hems.
– damped down
– pulled into shape and smoothed out
– sorted
Damping down
The laundry needs to be sufficiently
damp, so that when it is passed just
once through the rotary ironer at the
correct temperature, it will come out
smooth and dry. Dampen the laundry
as you would for hand ironing,
preferably several hours beforehand so
that the articles achieve a uniform
degree of dampness throughout.
If a tumble dryer is being used, select a
"Machine iron" programme.
Use warm water if preparation time is
short and also to redampen.
More advice on correct dampness
Material
Dampness for ironing
Silk
wrap in a damp cloth to avoid
water marks
Synthetics e.g.
Dralon, Nylon,
Polyester etc.
slightly damp to dry
Wool
(e.g. trousers)
press under a damp cloth
Cotton
slightly damp
Linen
quite damp
Large items such as table cloths, bed
linen etc should be folded lengthways
into a number of pleats so that they can
be ironed as easily as possible.
Sorting
Sort the laundry according to how
much heat is required for ironing. This
way you can start by ironing at a lower
temperature and then gradually
increase the temperature according to
the fabric being ironed.
First iron synthetic fibres such as nylon,
polyester and artificial silk which only
require a low temperature. Then iron
silk, wool, cotton and linen at increasing
temperatures.
Iron starched items last of all to avoid
any starch deposits from affecting the
finish of other items.
9
Before ironing
Checking the effectiveness of
the finger guard
Before using the ironer for the first
time:
The finger guard is a safety feature and
should be checked each time before
the ironer is used.
When the ironer is new, you may
experience difficulty at first when
feeding in delicate items of laundry.
This will become easier after the ironer
has been operating for between 5 - 10
minutes.
Laundry will pass smoothly over a new
ironer cover after it has been washed at
a temperature of 60°C.
^ With the ironer switched on, press the
foot pedal right down.
– the heater plate comes down onto
the rotating roller.
^ If you now lift the finger guard, the
roller stops rotating and the heater
plate rises up.
This shows that the finger guard is
working.
^ Let go of the finger guard and
remove your foot from the foot pedal.
^ Press the foot pedal right down agan.
– the heater plate lowers and the
roller rotates.
10
Ironing
Material
Dot
symbol
Polyester /
artificial silk
Silk /
Wool
Cotton /
Linen
Temperature
range
cool iron
(low temperature)
medium hot iron
(medium temperature)
hot iron
(high temperature)
Switching on and off
The rotary ironer is switched on and off
with the "I On / 0 Off" button.
To switch on
^ Press the button in
– the indicator light in the button
comes on.
To switch off
^ Press and release the button
– the indicator light in the button goes
out.
Selecting the ironing temperature
The temperature selector is used to set
the ironing temperature.
The individual temperature ranges are
marked by dots on the dial around the
temperature selector. These
correspond to the international clothing
care symbols for ironing.
^ Turn the temperature selector to the
temperature you require.
– The "oC temperature" indicator light
will come on whilst the heater plate is
heating up.
The light will go out when the
temperature selected is reached.
Where there is a combination of fibres,
e.g poly-cottons, the more delicate fibre
determines the ironing temperature.
However if there is more cotton than
polyester, the item can be ironed on the
ßß Silk / Wool setting. Do not use the the
cotton setting.
After ironing
^ Turn the temperature selector to
g - "cold".
11
Ironing
Selecting the roller speed
Ironing
There are 5 roller speed settings, from
low (approx. 2 metres per minute) to
high (approx. 4.5 metres per minute).
The ironing process is controlled by the
foot pedal which has three operating
positions:
A lower roller speed makes it easier to
iron complicated articles such as shirts
and blouses. It is also best to select a
lower roller speed when ironing folded
items, which may require more than one
pass through the ironer to get them
smooth and dry.
Thinner, single thickness items, e.g.
handkerchiefs and tea towels can be
ironed at a higher roller speed.
– raising the heater plate (rest)
– pressing
– ironing
To iron:
^ Press the foot pedal right down to the
floor.
,Do not put your fingers between
^ Set the roller speed selector to the
speed you require.
the heater plate and the roller.
Danger of burning and squashing
your fingers.
To press:
^ First press the foot pedal down to the
floor and then lift your foot up a little
so that the heater plate remains in
position but the roller does not rotate.
To raise the heater plate:
^ Take your foot off the pedal.
12
Ironing
Positioning the laundry
Laundry bar
^ Arrange the items of laundry on the
feed board so that they are straight
and then smooth out.
The ironed laundry can be hung over
the swing out bar to avoid creasing.
,Take care not to press down on
the bar when it is swung out, as this
could cause the rotary ironer to tip
over.
Tips
If creases appear in the item you are
ironing:
Stop the roller, pull the item back
slightly and smooth out. If necessary,
dampen again with a wet cloth.
^ Then turn the roller by hand, always
keeping your hands away from the
heater plate, so that the edge of the
article to be ironed can be held fast
by the heater plate.
Then:
^ Press down the foot pedal.
If possible, always use the whole length
of the roller, otherwise the roller will lose
its elasticity.
For small items such as handkerchiefs,
alternate between using the right and
left hand sides of the roller.
Items with raised buttons should be
ironed face down on to the roller so that
they are pressed into the cushioned
surface.
To protect the heater plate from
damage a cloth should be placed over
zip fasten-ers, metal and buttons and
hooks when ironing.
To protect the heater plate, do not iron
items with non-heat resistant or very
large buttons, e.g. knobbly buttons.
When you have nearly finished ironing
you can turn the temperature selector
to g "cold" and continue ironing small
items with residual heat.
13
Ironing
After ironing
^ Switch the appliance off.
^ Turn the temperature to g "cold".
^ Switch off at the mains and then
remove the plug from the socket.
If the ironer is to be put away:
^ Allow the heater plate to cool down.
Power cut
In the event of a power cut, pull up
the emergency release lever.
If there is a power cut when the rotary
ironer is in use, the heater plate will stay
on the roller. The item being ironed will
then be held there with the risk of it
becoming scorched. To free the
trapped item:
^ Wind up the mains cable.
^ Pull the cover on.
^ Pull up the emergency release lever.
– the pressure is reduced and the item
can then be removed.
When the current has been restored
(the indicator light in the main switch
comes on) push the emergency release
lever back down. You can now continue
ironing in the usual way.
14
Points on ironing
The following notes are intended as
helpful suggestions. You will probably
find several alternative routines which
suit your own method of working.
Tea towels, hand towels,
handkerchiefs and serviettes etc.
Lay the item with the straight grain of
the fabric to the feed board. This will
prevent it going out of shape and it will
be easier to fold. Pass handkerchiefs
and serviettes diagonally through the
ironer and, if necessary, fold them and
then iron again.
Please use the whole length of the
roller.
Table cloths
You can avoid folds by ironing the
middle first.
^ Fold in half with un-ironed edges
together and place over the left end
of the roller with the ironed middle
section hanging over the edge to
prevent creasing. Then pass both
sides of the the un-ironed sections
through the ironer.
Sheets and bedspreads
Sheets may be ironed like tablecloths,
or if a lengthwise fold is acceptable,
fold the sheet together lengthwise and
iron it on both sides.
To accentuate embroidery and raised
patterns on bedspreads to best
advantage, iron first in one direction
and then in the other.
^ Place the table cloth crossways so
that the ends hang over to the left
and right.
^ Iron the middle section.
15
Points on ironing
Duvet covers
Pillow cases
^ Lay the pillowcase on the feeder
plate, position under the hot plate
and iron in one procedure.
If the open end has poppers or
buttons only pass it through the
ironer if they are heat resistant.
^ First do up the poppers/buttons. Start
the first run by carefully feeding this
end in first on left side of the roller,
taking care not to damage any
buttons.
Note: Only pass this end through the
ironer if the poppers or buttons are
heat-resistant.
^ It is best to iron the cover in two runs
lengthwise.
16
To press skirts
These are best ironed without the feed
board.
^ Pull the skirt over the roller from the
hem to the waistband.
^ Lay a damp cloth over it.
^ Iron each section of the skirt in turn.
Maintenance and care
Cleaning the heater plate
Deposits such as from hard water,
starch or spray starch can be removed
from the heater plate using a suitable
proprietary cleaner. Avoid spraying
directly on to the heater plate.
Remove the feed board.
Do not use any abrasive cleaning
agents.
^ Make sure that the temperature
selector is set at " g " (cold).
°C
I-
O
Cleaning the casing
Depending on how dirty it is, the casing
can be wiped down with a dry or a
damp cloth.
^ First lift the feed board out of the right
hand holder and then pull it out from
the left.
Do not use any abrasive cleaning
agents.
Replacing the ironing cover
It is normal for the ironing cover to
become slightly brown with use. If,
however, the cover begins to look very
unsightly, it can be replaced easily.
Ironing covers are available from your
Miele dealer or the Miele Spare parts
department.
,The ironing cover should only be
changed when the appliance is
cold.
^ Undo the ironing cover cords at each
end of the roller.
17
Maintenance and care
^ Unwind the cover.
^ Take hold of the cloth by each side
edge, pull taut and keeping taut lay
over the heater plate.
The slot which holds the cotton
undercloth is now at the top.
^ Completely unwind the cotton
undercloth attached to the roller and
let it hang down smoothly.
^ Insert the raw edge of new ironing
cloth into the retaining slot with the
wrong side down. Keep side ties
hanging free and smooth out.
18
Maintenance and care
After the roller has gone through three
or four revolutions and the end of the
ironing cover is under the heater plate:
^ switch off the appliance while
keeping the foot pedal pressed
down.
The ironing cover is held firmly in place
by the heater plate which is still
lowered.
^ Turn the roller by hand in the
direction you iron (see arrow) until the
cover retaining slot is at the bottom.
^ Switch on the appliance.
^ Tighten the cords at the left and right
hand sides of the roller, tie together
and tuck in.
^ Put the feed board back in place.
^ Switch the rotary ironer on - the
heater plate will rise up.
^ Press the foot pedal and "iron" the
cloth round.
Do not let the cords get under the cloth
as it turns.
19
Problem solving guide
With the help of the following notes, minor faults in the performance of the
machine, some of which may result from incorrect operation, can be put right
without contacting the Service Department.
,Repair work to electrical equipment should only be carried out by a suitably
qualified person in accordance with local and national safety regulations.
Repairs and other work by unqualified persons could be dangerous. The
manufacturer cannot be held liable for unauthorised work.
Problem
Possible cause
Remedy
The ironer will not
operate.
There is no power to Check whether
the machine.
- the mains plug is plugged in and
switched on.
- the fuse or circuit breaker has
tripped.
Initial difficulty with
passing laundry
through the roller.
When the ironer is
new it may be
difficult to feed in
delicate items of
laundry.
This will become easier after the
ironer has been operating for
between 5-10 minutes.
Laundry will pass smoothly over a
new ironer cover after it has been
washed at a temperature of 60°C.
Laundry does not
pass smoothly
through the roller.
There are calcium
deposits (from hard
water) or starch
residues on the
heater plate.
Remove these with household
washing up liquid or a suitable
proprietary cleaning agent.
Folds have formed in The heater plate is
the ironer cover.
dirty (calcium
deposits).
Clean the heater plate with
household washing up liquid or a
suitable proprietary cleaning
agent.
The ironer cover is
very dirty.
Soiling.
Wash the cover at 60°C using a
proprietary detergent.
The heater plate has
no contact pressure.
The emergency
release lever has
been pulled up.
Push the emergency release lever
down (see also "Power cut").
20
After sales service
In the event of a fault, please contact:
– your Miele dealer or
– the nearest Miele Service
Department, (see address on the
back page).
When contacting the Service
Department, please quote the Model
and Serial number of your appliance,
both of which are shown on the data
plate, located at the front underneath
the ironing table.
a Model
b Serial number
c Voltage / frequency
d Fuse rating
e Total rated load
The wiring diagram is located at the
front right hand side of the ironing table
behind the plastic cover.
Please note that telephone calls may
be monitored and recorded for
training purposes.
21
Electrical connection
Electrical connection U.K.
The appliance is supplied with a mains
cable and moulded plug ready for
connection to an a.c. single phase
220 – 240 V 50 Hz supply. The fuse
rating is 13 amps.
All electrical work should be carried
out by a suitably qualified and
competent person in accordance
with local and national safety
regula-tions.
Connection should be made via a
fused plug and suitable switched
socket which is easily accessible.
For extra safety it is advisable to
install a residual current device
(RCD) with a trip current of 30 mA (in
accordance with DIN VDE 0664,
VDE 0100 Section 739).
Do not connect the appliance to the
mains electricity supply by an extension
lead. Extension leads do not guarantee
the required safety of the appliance
(e.g. danger of overheating).
Important
Non-rewireable plugs (BS 1363)
The fuse cover must be re-fitted when
changing the fuse, and if the fuse cover
is lost, the plug must not be used until a
suitable replacement is obtained. The
colour of the correct replacement cover
is that of the coloured insert in the base
of the plug, or the colour that is
embossed in words in the base of the
plug (as applicable to the design of the
plug fitted).
The correct fuse rating of the
replacement fuses that are ASTA
approved to BS 1362 should be fitted.
Replacement fuse covers may be
purchased from your local electrical
supplier, or Miele Service agent.
WARNING
THIS APPLIANCE MUST BE
EARTHED
22
Electrical connection
Electrical connection AUS / NZ
Important
The appliance is supplied with a mains
cable and moulded plug ready for
connection to an a.c. single phase
220 – 240 V 50 Hz supply. The plug
rating is 15 amps.
The wires in the mains lead are
coloured in accordance with the
following code:
All electrical work should be carried
out by a suitably qualified and
competent person in accordance
with local and national safety
regulations.
Connection should be made via a
suitable switched socket which is
easily accessible. For extra safety it
is advisable to install a residual
current device (RCD) with a trip
current of 30 mA.
Do not connect the appliance to the
mains electricity supply by an extension
lead. Extension leads do not guarantee
the required safety of the appliance
(e.g. danger of overheating).
Green/yellow = earth
Blue
= neutral
Brown
= live
As the colours of the wires in the mains
lead of this appliance may not
correspond with the coloured markings
identifying the terminals in your plug,
proceed as follows:
The wire which is coloured green and
yellow must be connected to the
terminal in the plug which is marked
with the letter E or by the earth symbol
(z) or coloured green or green and
yellow.
The wire which is coloured blue must
be connected to the terminal which is
marked with the letter N or coloured
black.
The wire which is coloured brown must
be connected to the terminal which is
marked with the letter A or coloured
red.
WARNING
THIS APPLIANCE MUST BE
EARTHED
23
Technical data
Height
96 cm
Width
105 cm
Depth
38 cm
Weight
ca. 38 kg
max. load
372 Newton
Voltage
see data plate
Rated load
see data plate
Fuse rating
see data plate
Test certificates awarded
Radio/TV suppressed, VDE
Australia
C-Tick Mark, acc. to AS/NZ S 1044
Noise level
53.5 dB(A)
(Noise emission in accordance with 3. GSGV)
24
25
26
27
Alteration rights reserved / 2805
M.-Nr. 05 460 232 / V05