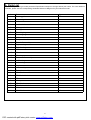
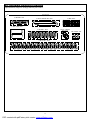
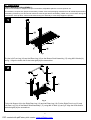
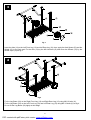
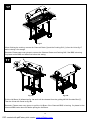
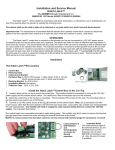
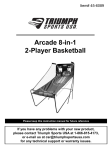
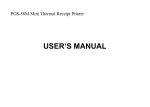
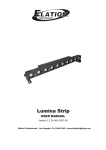
1
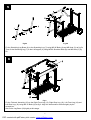
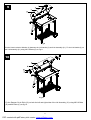
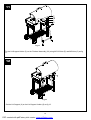
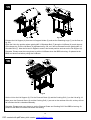
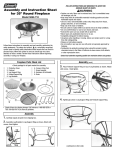
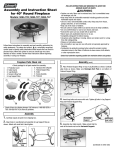
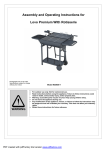
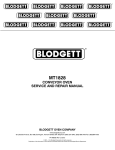
Assembly and Operating Instructions for
Lovo Party Charcoal BBQ
Photographs are not to scale.
Specifications subject to change
without prior notice.
•
•
•
•
•
WARNING
•
Model KS0800
For outdoor use only. Not for commercial use.
Read instructions before using the appliance. Failure to follow instructions could
result in death, serious body injury, and/or property loss.
Warning: accessible parts may be very hot. Keep young children away.
Do not move the appliance during use.
Any modification of the appliance, misuse, or failure to follow the instructions may
be dangerous and will invalidate your warranty. This does not affect your statutory
rights.
Retain these instructions for future reference.
PDF created with pdfFactory trial version www.pdffactory.com
A. Parts List
Quantities vary according to model purchased. Specifications subject to change without prior notice. For more details on
hardware, please see the corresponding Hardware Reference Diagram for your barbecue model.
Part
Qty
1
Cooking grill
2
2
Charcoal grate
2
3
Lid handle
1
4
Heat insulation washer
2
5
Lid support holder
1
6
Lid support
1
7
Stretching leg
2
8
Stretching leg brace
1
9
Lid brace
1
10
Damper circle dish
2
11
Side shelf assembly
2
12
Right rear leg
1
13
Right front leg
1
14
Axle
1
15
Wheel
2
16
Wheel cap
2
17
Bottom shelf assembly
1
18
Left front leg
1
19
Left rear leg
1
20
Leg brace
2
21
Lid assembly
1
22
Firebowl assembly
1
A
M5*45 bolt
2
B
M5*60 shoulder bolt
2
C
M5 nut
20
D
Axle spacer
2
E
M5*10 bolt
16
F
M5 *13 shoulder bolt
2
G
M8 Locknut
2
H
M6*12 bolt
32
Code
2
PDF created with pdfFactory trial version www.pdffactory.com
B1. Parts Diagram
Quantities vary according to model purchased. Specifications subject to change without prior notice. For more
details on hardware, please see the corresponding Hardware Reference Diagram for your barbecue mode
3
PDF created with pdfFactory trial version www.pdffactory.com
B2. Hardware Reference Diagram
Specifications subject to change without prior notice.
KS0800
A M5x45BOLT 2PCS
B M5x60 SHOULDER BOLT 2PCS
C M5NUT 20PCS
D AXLE SPACER 2PCS
E M5x10BOLT 16PCS
H M6x12 BOLT 32PCS
4
PDF created with pdfFactory trial version www.pdffactory.com
F M5*13 SHOULDER
BOLT 2PCS
G M8 LOCKNUT 2PCS
C. Assembly
TOOLS NEEDED FOR ASSEMBLY:
Medium size flat blade or Philips/cross-point screwdriver, adjustable spanner or metric spanner set
This barbecue requires two people for assembly. Please remove all packaging materials from all individual parts before
assembling. Please lay out all nuts and bolts and check lengths before assembling. Whilst every care is taken during the
manufacture of this product, care must be taken during the assembly in case sharp edges are present.
1
Fig 1
Put the Left Front Leg (18) and Left Rear Leg (19) on the Bottom Shelf Assembly (17) using M6*12 bolts (H)
as fig 1. Align the holes and fix the bolts tightly by the screwdriver.
2
Fig 2
Fix the Lid Support (6) to the Right Rear Leg (12) and Left Rear Leg (19). Put the Right Front Leg (13) and
Left Rear Leg (12) on the Bottom Shelf Assembly (17) using M6*12 bolts (H) as fig 2. Align the holes and fix
the bolts tightly by the screwdriver.
5
PDF created with pdfFactory trial version www.pdffactory.com
3
Fig 3
Insert the Axle (14) to the Left Front Leg (13) and Left Rear Leg (12), then, apply the Axel Spacer (D) and the
Wheel (15) to the Axle end. Fix the Axle (14) by the M8 Locknuts (G) and cover the Wheels (15) by the
Wheel Caps (16) as fig 3.
4
Fig 4
Fix the Leg Brace (20) on the Right Front Leg (13) and Right Rear Leg (12) using M6*12 bolts (H).
Fix the Leg Brace (20) on the Left Front Leg (18) and Left Rear Leg (19) using M6*12 bolts (H) as fig 4.
Do not fix the Leg Brace (20) tightly at this stage.
6
PDF created with pdfFactory trial version www.pdffactory.com
5
Fig 5a
Fig 5b
Fix the Stretching Leg Brace (8) to the Stretching Leg (7) using M5*45 Bolts (A) and M5 Nuts (C) as fig 5a.
Then fix the Stretching Leg (7) to the Lid Support (6) using M5*60 Shoulder Bolts (B) and M5 Nuts (C) fig
5b.
6
Fig 6
Fix the Firebowl Assembly (22) on the Right Front Leg (13), Right Rear Leg (12), Left Front Leg (18) and
Left Rear Leg (19) using M6*12 Bolts (H) as fig 6. Align the holes and fix the bolts tightly by the
screwdriver.
Also fix the Leg Brace (20) tightly at this stage.
7
PDF created with pdfFactory trial version www.pdffactory.com
7
Fig 7
Fix Lid Assembly (21) on Firebowl Assembly (22) using M5*10 Bolts (E) and M5 Nuts (C) as fig 7.
8
Fig 8a
Fig 8b
Align the holes on the Lid Brace (9) with the holes on the Lid Assembly (21) and Firebowl Assembly (22)
properly.
Fix the Lid Brace using M5*60 Shoulder Bolts (F) as fig 8a and fig 8b.
8
PDF created with pdfFactory trial version www.pdffactory.com
9
Fig 9
Put the Heat Insulation Washer (4) between the Lid Handle (3) and Lid Assembly (21). Fix the Lid Handle (3) on
the Lid Assembly (21) using M5*10 Bolts (E) as Fig 9.
10
Fig 10
Fix the Damper Circle Dish (10) on both the left and right sides of the Lid Assembly (21) using M5*10 Bolts
(E) and M5 Nuts (C) as fig 10.
9
PDF created with pdfFactory trial version www.pdffactory.com
11
Fig 11
Fix the Lid Support Holder (5) on the Firebowl Assembly (22) using M5*10 Bolts (E) and M5 Nuts (C) as fig
11.
12
Fig 12
Set the Lid Support (6) on the Lid Support Holder (5) as fig 12.
10
PDF created with pdfFactory trial version www.pdffactory.com
13
Fig 13
Fix the Side Shelf Assembly (11) on the left and right side of the Firebowl Assembly (22) using M5*10
bolts (E) and M5 Nuts (C) as fig 13.
14
Fig 14
Put the Charcoal Grate (2) and the Cooking Grill (1) on the Firebowl Assembly (22) as fig 14.
11
PDF created with pdfFactory trial version www.pdffactory.com
15
Fig 15a
Fig 15b
Release the Lid Support (6) from the Lid Support Holder (5) and set the Stretching Legs (7) on the floor as
fig 15a.
Open the Lid to the position where guiding M5*13 Shoulder Bolt (F) along the Lid Brace (9) reach the end
of the brace slot. Pull the Lid Brace (9) rightward as fig 15b, so it will be released from the guiding M5*13
Shoulder Bolt (F). Now the lid can be flipped to reach a horizontal position and rest on the Lid Support (6).
Remarks: Please wear the oven gloves to pull the Lid Brace when the BBQ is burning. Or please let the
BBQ cool down first before pulling the Lid Brace.
16
Fig 16
Set the Lid on the Lid Support (6). Put the Charcoal Grate (2) and the Cooking Grill (1) on the Lid as fig 16.
Make sure the Charcoal Grate (2) and the Cooking Grill (1) are set on the catches of the lid, so they will not
fall off when the lid is closed accidentally.
Remarks: Please wear oven gloves to set the Charcoal Grate and Cooking Grill if the BBQ is burning. Or
please let the BBQ cool down first before this setting.
12
PDF created with pdfFactory trial version www.pdffactory.com
17
Fig 17
When finishing the cooking, remove the Charcoal Grate (2) and the Cooking Grill (1) from the Lid as fig 17
before closing it for storage.
Remarks: Please wear oven gloves to remove the Charcoal Grate and Cooking Grill if the BBQ is burning.
Or please let the BBQ cool down first before this setting.
17
Fig 18b
Fig 18a
Pull the Lid Brace (9) leftward as fig 18a and it will be released from the guiding M5*60 Shoulder Blot (F).
Then the lid can be closed as fig 18b.
Remarks: Please wear oven gloves to pull the Lid Brace if the Charcoal BBQ is burning. Or please let the
Charcoal BBQ cools down first before pulling the Lid Brace.
13
PDF created with pdfFactory trial version www.pdffactory.com
or an even red glow is visible by night.
D. How to start your Charcoal BBQ
Warning: Whilst every effort has been made in
the manufacture of your BBQ to remove any
sharp edges, care should be taken in handling to
avoid any accidental inquiry.
1.
Make sure the assembly instructions have been
followed correctly.
2.
Set the Charcoal BBQ in a suitable position, on
a level surface away from areas likely to catch
fire. The base of the Charcoal BBQ will get hot
so ensure it stands on a suitable surface.
3.
Always stand your Charcoal BBQ outdoors and
on level ground away from trees and wooden
fencing. Ensure there is a least 1 metre
clearance around all sides of the Charcoal
BBQ. Keep away from fences, over hanging
branches and other combus tible materials.
4.
B.
Taking care not to spill any liquid/ gel onto your
hands or clothes. Apply carefully the lighting
fluid/ gel over the charcoal.
C.
If using lighting fluid, wait for 30 seconds to
allow the liquid to soak into the charcoal.
D.
Do not light the charcoal if you have spilt fluid or
gel onto your clothes. Light the charcoal using a
long taper or safety lighter. The charcoal will
then burn for a period with flames.
E.
When the flames die down, check the charcoal
is beginning to glow red. If your coals are going
out, you should open all the vents and allow to
cool down before trying to apply more liquid.
CAUTION: Apply carefully lighting fluid/ gel in
small amounts. Over application can be
dangerous.
F.
Do NOT squirt liquid onto burning charcoal.
G.
After lighting, the fire should be ready for
cooking in 30-40 minutes, or when even grey
ash is visible by day, or an even red glow is
visible by night.
6.
When the charcoal is alight, the smoke and
flames have died down and the charcoal has an
even layer of grey ash, rake the charcoal into a
level layer in the hearth.
7.
Small quantities of charcoal may be added on
top of the charcoal layer prior to cooking to
extend cooking time.
8.
To help prevent food sticking, apply a tin
coating of cooking oil on the grill prior to
cooking.
9.
To adjust the airflow using the air vent we
recommend to use of a heat resistant glove.
11. Recommend charcoal max 5(kg) to be used,
evenly distributed on 2 sides of the charcoal
grate.
Method 1. Charcoal & Lighting Fluid/ Gel
Set up your Charcoal BBQ in a safe place.
Place enough charcoal in the bowl to a depth of
3 - 5cm.
Make sure that the cooking grill is fully located
into the grill supports so that the cross bar
supports lock behind the retaining edges.
10. ALWAYS WEAR OVEN GLOVES WHEN
HANDLING THE CHARCOAL BBQ.
Use Charcoal and a suitable lighting method:
A.
5.
12. The max loading weight of the Right or Left
Shelf is 4kg.
E. Care and Maintenance
1.
To make it easier to clean your Charcoal BBQ
after use, line the firebowl with aluminium
cooking foil, shiney side up. Remember to leave
ventilation holes clear by piercing the foil where
necessary. This process will lengthen the life of
your Charcoal BBQ.
2.
Charcoal is available in lump wood from (large
irregular pieces) and as briquettes (uniformly
sized pieces).
3.
It is not advisable to completely fill the firebowl
as the BBQ may become far too hot to cook
sucessfully. As a guide a 3kg bag of charcoal in
a 43cm (17”) diameter BBQ should last for at
least 2 full BBQ fires.
4.
If the fires flares up due to dripping fat then
douse the flames lightly with a fine water spray.
5.
When you have finished using the Charcoal
BBQ, never pour cold water directly on the
coals to extinguish them as this may damage
your Charcoal BBQ. Use old cinder, sand or a
fine water spray.
6.
Empty the bottom bowl of ashes when they are
completely cold.
7.
To clean your Charcoal BBQ, soak the cooking
grill and tools in hot soapy water as soon as
possible after use. Dry thoroughly and store in a
dry place. Do not leave your Charcoal BBQ
outside unprotected.
Method 2. Lighting Blocks
A.
Place three or four Lighting Blocks in the centre
of the Charcoal BBQ firebowl and light with a
match.
B.
Place pieces of charcoal around each burning
block. Add more charcoal as required, in a
pyramid formation.
C.
When burning is established, spread the fuel
out evenly. After lighting, the fire should be
ready, or when even grey ash is visible by day,
14
PDF created with pdfFactory trial version www.pdffactory.com
F. Food Safety
•
Thoroughly defrost frozen meat and poultry in
the refrigerator before cooking. Keep raw meat
and poultry separate from cooked food.
•
Ensure that the grill is thoroughly cleaned
before cooking and lighting the barbecue.
•
Always wash Hands after handling raw meat
and poultry before handling any ready to eat
food.
•
Wipe and disinfect surfaces that have been in
contact with raw meat and poultry.
•
When barbecuing meat and poultry, make sure
the barbecue is really hot. Place the larger,
thicker portions furthest away from the most
intense heat to ensure thorough cooking
without burning and turn regularly.
•
Use separate utensils for handling raw meat or
poultry and cooked food on the barbecue, or
wash them thoroughly between use.
•
To check whether meat, particularly poultry, is
cooked, pierce the flesh with a skewer or fork:
the juices should run clear. Ensure the product
is piping hot throughout.
Attention! This BBQ will become very hot do not
move it during operation. Do NOT use indoors.
“Warning! Keep children and pets away!”
“Caution! Do not use spirit or petrol for lighting
or re-lighting! Use only firelighters complying to
EN 1860-3”
Argos Limited, MK9 2W
15
PDF created with pdfFactory trial version www.pdffactory.com