1
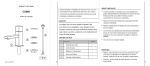
User Manual
© Copyright Cadscan Limited 2014
What's in the box?
Your CUBIK 3D Scanner comes with all the parts you need to get started straight away. Your box
contains:
•
CUBIK 3D Scanner x 1
•
USB Cable (Type A to Type B) x 2
•
IEC Power Cable (Country Specific) x 1
•
Power Adapter x 1
Spares and replacements are available. If needed, please contact [email protected].
IMPORTANT: ONLY USE THE CABLES THAT ARE SUPPLIED WITH YOUR SCANNER
TO AVOID DAMAGE TO THE EQUIPMENT.
© Copyright Cadscan Limited 2014
Setting up your CUBIK 3D Scanner
The rear of the scanner has the following connectors, shown in the diagram below:
•
USB Connector x2
•
Power Connector x1
USB Connector
1
Power
Connector
USB Connector
2
1. Download and install the CADScan CUBIK software. This software is available
from www.cad-scan.co.uk.
2. Connect USB connectors 1 and 2 to your computer. Please wait for the device to
be recognised. A pop-up window will appear while the drivers are installed. This
process may take a few minutes.
3. With the power supply unplugged, connect the power adapter to the scanner. Do
not turn on the power before connecting the power adapter to the scanner.
4. With the IEC power cable unplugged, connect the IEC power cable to the power
adapter.
5. Connect the IEC power cable to the wall outlet.
© Copyright Cadscan Limited 2014
Scanning your first object
Your scanner can be configured to scan large or small objects.
To scan a large object:
1. Open the scanner lid.
2. Place the object on the centre of the turntable.
3. Close the scanner lid.
© Copyright Cadscan Limited 2014
4. Double click the CUBIK icon on your desktop to open the CADScan CUBIK software.
Please note that for the Beta release this will be an executable file in the folder where Cubik
was installed.
The following dialogue window will appear:
5. Click the Settings Tab. The following window will appear.
© Copyright Cadscan Limited 2014
Three settings are available:
A) Scan Resolution: You can choose the resolution of the image captures made by the
scanner. Options available are low, medium and high. Low resolution scanning is
fast, while high resolution scanning offers four times the detail but is slower.
B) Number of Turns: The turntable rotates in steps so that each face of the object can
be scanned to build up a full reconstruction of the object. You can choose to have a
small number of turns for higher speed, or a high number of turns which takes longer
but increases the accuracy.
C) Noise reduction: You can improve the quality of the scan by using our noise
reduction algorithm. This algorithm averages the pixel values over several images to
increase quality but at a cost of speed.
6. Once the desired settings have been chosen, click scan.
This will now activate the scanner and your object will be scanned. Do not open the lid during
scanning as this will adversely affect scan quality.
Once complete a window will open displaying your scanned object.
© Copyright Cadscan Limited 2014
To scan a small object (Macro Mode):
You can adjust the position of the turntable and upper scanning head in your CUBIK system to scan
smaller objects. This configuration creates higher quality scans and is known as macro mode.
The adjustable parts are shown in the diagrams below:
Knobs to adjust
the top
scanning head
Knobs to move
the turntable
© Copyright Cadscan Limited 2014
To configure macro mode:
1. Loosen the turntable: Reach into the scanner and loosen the knurled knobs on either side of
the turntable, shown in the image above.
2. Use the two finger hooks on either side of the turntable to push the turntable forward
toward the scanning heads.
3. Loosen the upper scanning head: The upper scanning head is held in place by four knurled
knobs, two on either side. Slightly loosen these knobs until the scanning head is loose, being
careful not to remove them completely.
Knurled
knobs
Hockey stick
shaped slots
© Copyright Cadscan Limited 2014
4. Holding on to the knobs on either side of the scanning head, lift the scanning head up and
over the half loop, then slide it down the hockey stick shaped path until it comes to rest at
the bottom. Be careful not to let the scanning head fall.
5. Tighten the four knobs to fasten the upper scanning head into place.
6. Follow the instructions from the previous section above to complete the scan.
To return the scanner to normal mode:
1. Loosen the four knobs holding the upper scanning head.
2. Lift the upper scanning head up the hockey stick shaped path and over the half loop at the
top. The scanning head should come to rest with a click.
3. Tighten the four knobs to fasten the upper scanning head into place.
© Copyright Cadscan Limited 2014
Troubleshooting
Problem
Turntable does not rotate.
Cause
Power supply is not connected.
Solution
Connect the IEC power lead to
the power adapter, connect the
power adapter to the scanner,
and then finally connect the
power adapter to the wall.
Scanner case does not close There is a small chance that the Open the lid, then carefully
properly.
lid may become misaligned with close it making sure that both
the rest of the case, especially if sides mate with the case.
the unit has been handled
roughly.
Scans of matt black or very Some matt black objects do not Coat the object in a layer of
shiny objects show errors.
reflect enough light to be chalk spray. This is a safe, nonimaged by the scanner.
permanent coating which can
simply be wiped away after use.
Very shiny objects reflect too
much light, making them appear
further away to the imaging
system.
© Copyright Cadscan Limited 2014
Important Safety Information
Read this guide for important health and safety information that applies to the CUBIK 3D Scanner that
you have purchased.
Warning: Failure to properly set up, use and care for this product can increase the risk of injury to
personnel, or damage to the device. Read this guide and save it for future reference.
Do Not Attempt Repairs
Do not attempt to take apart, open, service or modify the scanner or power supply. Doing so could
present the risk of electric shock, fire or other hazard. Evidence of any attempt to open and/or
modify the device, including any peeling, puncturing or removal of any labels, will void the
Limited Warranty.
Usage and Cleaning
1. Only use accessories specified by CADScan.
2. Clean only with a dry cloth.
3. Do not allow this product to become wet. To reduce the risk of fire or electric shock, do not
expose this product to rain or other types of moisture.
Keep cables out of the way of people and pets
Arrange all cables and cords so that people and pets are not likely to trip over or accidentally pull on
them as they move around or walk through the area. When the product is not in use, you may need to
disconnect all cables from the front and rear of the product to keep them out of the reach of children
and pets. Do not allow children to play with cables and cords.
AC powered devices
These precautions apply to a product that plugs into a standard wall power outlet. Failure to take the
following precautions can result in serious injury or death from electric shock or fire, or in damage to
the device.
To select an appropriate power source for the device:
1. Use only the power supply unit and AC power cord that came with your device.
2. Use of any alternative power supply or cord may damage the device.
3. Confirm that your electrical outlet provides the type of power indicated on the power supply
unit (in terms of voltage (V) and frequency (Hz)). If you are not sure of the type of power
supplied to your home, consult a qualified electrician.
4. Do not use non-standard power sources, such as generators or inverters, even if the voltage
and frequency appear acceptable. Only use AC power provided by a standard wall outlet.
5. Do not overload your wall outlet, extension cord, power strip or other electrical receptacle.
Confirm they are rated to handle the total current (in amps (A)) drawn by the device (indicated
on the power supply unit) and any other devices that are connected to the same receptacle.
© Copyright Cadscan Limited 2014
To avoid damaging the power cords and power supply
1. Protect the power cords from being walked on.
2. Protect cords from being pinched or sharply bent, particularly where they connect to the
power outlet, the power supply unit, and the device.
3. Do not jerk, knot, sharply bend, or otherwise abuse the power cords.
4. Do not expose the power supply or power cords to sources of heat.
5. Keep children and pets away from the power cords. Do not allow them to bite or chew on the
cords.
6. When disconnecting the power cords, pull on the plug. Do not pull on the cord.
If a power cord or power supply becomes damaged in any way, stop using it immediately. Unplug
your device during lightning storms or when unused for long periods of time.
Always connect the power supply according to the following instructions
1. Plug the AC power cord into the power supply.
2. Plug the DC power cord into the scanner.
3. Plug the other end of the AC power cord into the wall socket.
© Copyright Cadscan Limited 2014