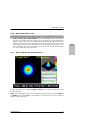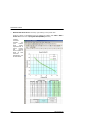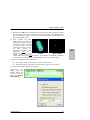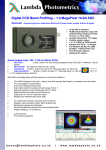
1
WinCamD WinCamD WinCamD WinCamD WinCamD WinCamD WinCamD WinCamD WinCamD WinCamD WinCamD WinCamD WinCamD Series WinCamD™-UXXX Series CCD/CMOS Beam Imagers User Manual VERY IMPORTANT Read 2 pages. This VITAL information is here so that you cannot miss it. QuickStart - in case you are one of those rare people who do not read manuals … 1. Install the software and run it. Check that your computer meets the Minimum PC Requirements on page 1-5. Install the software as Administrator - Sec. 2.4. Open it to load the driver. In the Device pull-down menu select WinCamD. Close the software. 2. Install the driver. Connect the camera head & follow the New hardware found wizard to install the driver. Do not let it go to the web to find a driver. Allow it to install automatically. 3. Start the software. The camera LED cycles Red - Off - Green - Red - Green. If it stays Red when the software is on, the port is not reporting itself as USB 2.0. In the pull-down menu go Device, WinCamD. The software detects the camera type. Remove the dust cap. Press . 4. -UCM series? Does not apply to other cameras. Go Alt S, set PLS factor = 0.9%. Calibrate it per App. D. of this manual 5. TaperCamD series? Go Alt S, set Pixel multiply factors to rear label value. You may hot-plug and unplug a camera head from its cable. The software will recognize it automatically after a few seconds. To avoid camera damage, observe the maximum irradiance limits, Section 1.7.2. Damaged imager chips can be replaced in the field, but at customer expense. Centering. Stay within the imaging area for accurate measurements. If energy spills outside the imaging area, erroneous measurements may result. Save files for future reference: Press Stop, then, in the Pull-down menu, go File, Save, Save current data … to save the single profile/image set, or Save all data in data buffer … to save a sequence of data, particularly if you are seeing instability. The saved file (*.wcf, format) includes setup data for your instrument. Anyone with the software can then view the data exactly as you see it. If you are getting strange results, or if screen layout is corrupted, press Stop. In the pull-down menu go File, Load defaults to reset the default settings, and/or restart the software. If you continue to get any result or inconsistency which you do not understand, before you report it, save a *.wcf file (see above) and email the result to your distributor or [email protected] with your commentary. Then call. See Section 3.6.3 for instructions on cleaning the ND filter &, in extremis, the chip. You may install a BeamMap, Beam’R, BeamScope & a WinCamD Series system in the same PC. Only one product type will operate at any one time. Read the Manual. If User Manual authors had their way, this paragraph would read: “If you read this manual first, you are entitled to free product support by phone or email. For those who decide not to bother to read the manual before calling for support, a Help line charged at a ‘per minute’ rate is available.”… seriously though, read this manual to enjoy the full benefit of your investment. Other Issues WinCamD-UXXX. Windows (not DataRay software) requires that the WinCamDUXX driver be installed separately for each newly used USB 2.0 port. -UCM at Short Exposures. Short exposures have some limitations. Download and read the important Application Note with this name at the website. -UCDXX ‘Comet’ Tail. At short exposures, a vertical ‘comet’ tail may appear for image sizes of 1024 x 1024 and higher and a detached tail for 752 x 752. At 512 x 512 and below, the tail virtually disappears. This is an unavoidable ‘feature’ of high resolution CCD chips. Incident light leaks through the metal over the Transfer Register. The effect is worse at longer wavelengths and for beams incident at other than normal incidence. To minimize the tail: 1) 2) 3) 4) 5) Use exposure times >few ms wherever possible. Ensure that the light is incident at 90o, wherever possible. Set up a Capture Block appropriate to the size of your beam. Use Inclusion region settings to exclude the tail region from the calculation. Rotate the crosshairs from 0o to move the measured profile off the tail. WinCamD-IR supplements are posted to Application Notes at the website. Software bugs? We attempt to deliver bug-free software, but, just like operating system providers, we find it hard to be perfect. It is impossible to test all possible permutations and combinations of beam size, capture block, processing option, etc. Some error messages are warnings only, some require the software to be restarted. Press Alt, PrtSc, to put the message to the clipboard. Then press OK and see whether you can continue to use the software. Ctrl V will paste the message into an email. If you find a problem, please note the details, wherever possible capture a relevant *.wcf image file, and email the file and the details of the PC and operating system to [email protected]. We will attempt to resolve the issue as soon as possible. Additional Information. At the website you can find the following Application Notes. WinCamD with Beam Expanders WinCamD with Lenses WinCamD Measurement of 337 nm N2 lasers WinCamD with Microscope Objectives WinCamD Signal-to-Noise Ratio WinCamD Series Sensor Replacement WinCamD use with Beam Expanders Gaussian Beam Divergence Measurement (Zipped Word doc + Excel spreadsheet) USB 2.0 Products Software & Hardware Compatibility Interfacing to DataRay Software WinCamD M2DU Stage Datasheet (Most recent version) WinCamD M2DU Stage User Guide Multiple Camera User Guide Measuring Large Beams with WinCamD WinCamD-M2DU Stage User Guide WinCamD-UXXX Series Laser Beam Imagers User Manual Serial Number: _____________________ Purchased by: _____________________ Date: ___________ Rev. 0705A ©2007 DataRay Inc. All rights reserved. DataRay Inc. 605 Stapp Road, Boulder Creek, California 95006, USA www.dataray.com Product Support: 1-866-WinCamD [1-866-946-2263] x702 From outside USA: (303) 543-8235 • [email protected] This page deliberately left blank Table of Contents 1. INTRODUCTION ................................................................. 1-1 1.1 1.2 1.3 1.4 1.5 1.6 WELCOME ................................................................................1-1 ABOUT WINCAMD SERIES .............................................................1-1 SYSTEM CONFIGURATION & DESCRIPTION ............................................1-2 CALIBRATION ............................................................................1-3 WINCAMD SERIES PRODUCT SPECIFICATIONS .......................................1-3 BEAM LIMITS........................................................................... 1-11 1.7 1.8 MANUAL CONVENTIONS ............................................................... 1-12 MANUAL AND COPYRIGHT NOTICE ................................................... 1-12 1.6.1 1.6.2 Beam Measurement Region .......................................................... 1-11 Beam Power Limits ...................................................................... 1-11 2. INSTALLATION ................................................................... 2-1 2.1 2.2 2.3 UNPACK THE HARDWARE................................................................2-1 MINIMUM COMPUTER REQUIREMENTS .................................................2-3 INSTALLATION ...........................................................................2-3 2.4 MOUNTING THE HEAD ...................................................................2-5 2.5 2.6 SOFTWARE INTERFACING. ..............................................................2-6 FIRMWARE UPGRADES ...................................................................2-6 2.3.1 Software Installation Instructions .................................................... 2-4 2.4.1 Connecting the Head. .................................................................... 2-5 3. QUICK-START TUTORIALS ................................................... 3-1 3.1 MAIN SCREEN............................................................................3-2 3.2 MANIPULATE THE IMAGE AND PROFILE ANALYSIS .....................................3-9 3.1.1 3.1.2 3.1.3 3.1.4 3.1.5 3.1.6 3.1.7 Start the Software ......................................................................... 3-2 Examine Previously Saved Data ...................................................... 3-3 Main Screen Top ........................................................................... 3-4 Main Screen Left Hand Side. ........................................................... 3-5 Main Screen Profile Display ............................................................. 3-6 Main Screen Bottom Line. ............................................................... 3-7 Main Screen 2D and 3D Display Area ............................................... 3-7 3.2.1 3.2.2 3.2.3 3.2.4 3.2.5 3.2.6 3.2.7 3.2.8 3.2.9 3.2.10 3.2.11 3.2.12 3.2.13 3D Display & Manipulation .............................................................. 3-9 Choose a Beam Width Definition.................................................... 3-10 Set Diameter Display Mode ........................................................... 3-12 Set Pass-Fail ............................................................................... 3-13 Change Profile Display ................................................................. 3-15 Pull-down Menus ......................................................................... 3-21 File ............................................................................................ 3-22 Device ....................................................................................... 3-23 Palettes ...................................................................................... 3-24 Average ..................................................................................... 3-24 Filter .......................................................................................... 3-25 Camera ...................................................................................... 3-26 View .......................................................................................... 3-26 3.3 3.4 3.5 3.6 SETUP .................................................................................. 3-27 TOOL BAR .............................................................................. 3-30 SHORT CUTS ........................................................................... 3-40 HARDWARE QUICK-START TUTORIAL ................................................ 3-41 3.6.1 3.6.2 3.6.3 3.6.4 Precautions and Safety Warnings .................................................. 3-41 Starting Up ................................................................................. 3-41 Artifacts and Cleaning of the ND filter & Imager chip. ...................... 3-43 TaperCamD Artifacts .................................................................... 3-44 4. CAPTURING PULSED LASERS................................................ 4-1 4.1 4.2 4.3 4.4 TERMS AND FEATURES ..................................................................4-1 PULSED BEAM CAPTURE INITIAL SETUP ...............................................4-2 AUTO TRIGGER MODE...................................................................4-4 EXTERNAL TRIGGER MODE .............................................................4-6 5. LASER ATTENUATION .......................................................... 5-1 5.1 5.2 5.3 5.4 5.5 IMPORTANT TERMS ......................................................................5-2 ATTENUATION OF YOUR BEAM ..........................................................5-3 ADDITIONAL BEAM SAMPLING/ATTENUATION .........................................5-3 UV LASERS. .............................................................................5-6 WORKING WITH BEAMS LARGER THAN THE CAMERA ................................5-7 5.5.1 5.5.2 5.5.3 Imaging of the laser beam scattered off a diffusing surface. ............... 5-7 Use of a long focal length mirror ..................................................... 5-7 Use of a long focal length lens......................................................... 5-8 APPENDIX A: Beamwidth definition & Measurement APPENDIX B: Accuracy, Precision & Resolution APPENDIX C: Support, Returns, Distributors, Reps APPENDIX D: WinCamD-UCM Offset Calibration APPENDIX E: Spatial Response Variation Compensation. 1.1 CHAPTER ONE 1. INTRODUCTION 1.1 1.2 1.3 1.4 1.5 1.6 WELCOME ................................................................................1-1 ABOUT WINCAMD SERIES .............................................................1-1 SYSTEM CONFIGURATION & DESCRIPTION ............................................1-2 CALIBRATION ............................................................................1-3 WINCAMD SERIES PRODUCT SPECIFICATIONS .......................................1-3 BEAM LIMITS........................................................................... 1-11 1.7 1.8 MANUAL CONVENTIONS ............................................................... 1-12 MANUAL AND COPYRIGHT NOTICE ................................................... 1-12 1.6.1 1.6.2 1.1 Beam Measurement Region .......................................................... 1-11 Beam Power Limits ...................................................................... 1-11 WELCOME Welcome to beam imaging. These innovative products define state-of-the-art, featurerich, real-time, camera based beam imaging in accordance with the ISO 11146 Standard*. They are Research, Development, QA and Manufacturing test tools combining easy-to-use intuitive software with proven beam profiling algorithms. With a little time and patience, we think you will be pleasantly surprised with how easy to use we have made it. This manual covers all WinCamD™-XXX Series products, of which TaperCamD™-UXXX and TaperCamD20-15-UXXX series are a part. We welcome requests for custom hardware configurations. The website is always the source for the most current versions of software, manuals, application notes, specifications, parts lists, etc. At any time, you may download the latest version of the software for free, plus manual updates and application notes. If you need a function that is not included in the current version, please contact us. Many requested software functions can be added with relative ease, and may be done for free and added to future releases. If the requested enhancement is extensive and/or obscure, we reserve the right to quote a fee for the requested change. We are committed to providing the ultimate in beam imaging performance, and welcomes constructive criticism of these products and of this manual. Please contact us. * International Organization for Standardization. ‘ISO 111146: Test methods for laser beam parameters: Beam widths, divergence angle and beam propagation factor.’ Available from: www.ansi.com 1.2 ABOUT WINCAMD SERIES WinCamD-UXXX Series are state-of-the-art, real-time, port-powered USB 2.0 cameras, optimized for beam imaging. They use high resolution progressive scan CCD & CMOS chips with small square pixels and 14-bit ADC’s. The CCD chips are directly addressed via customized FPGAs. WinCamD Series 1-1 Introduction The CMOS chips have on-board RAM, FPGA & USB 2.0 processor and 10-bit ADCs which are integral on the sensor chips. All cameras have window-less field replaceable imagers. Coupled with full auto-exposure on CW lasers, you know that you are always getting the best possible Signal-to Noise Ratio on your beam, without any effort on your part The FULL mode captures every line. The default FAST mode bins adjacent lines and adjacent pixels, creating a single effective pixel from four adjacent pixels. The size of the Capture Block can be changed from 32x32 to 1200 x 1024. CMOS Imagers. Because there is no charge transfer register, CMOS sensors do not suffer from the comet tail effects of CCD imagers at short exposure times. However, not all CMOS sensors are created equal. DataRay offer –UCM and _UHS CMOS imagers that have synchronous shutter (all pixels clocked simultaneously). The -UHR sensor has a rolling shutter, which can lead to horizontally chopped images of pulsed lasers. USB 2.0. This 480 Mb/s serial port, now standard on every new PC, uses flexible serial cables and compact connectors. WinCamD-UXXX cameras are port-powered. ‘Digital’ cameras. In WinCamD series cameras, the software talks directly to the chip. This enables external trigger, wide shutter speed control and user-defined image capture regions with higher update rates. The serial digital link from head to PC is insensitive to the EMI (Electro-Magnetic Interference) problems that used to plague analog video links in high power pulsed laser measurements. 1.3 SYSTEM CONFIGURATION & DESCRIPTION WinCamD-UXXX imaging systems consist of the (interchangeable) camera head, 3 m (10 ft.) long USB cable, and the software. The system is shipped ready to install on any 1 GHz or higher Pentium PC with 512 MB of RAM and an available USB 2.0 port. Longer cables runs up to 5 m are possible with extensions, or 25 m with booster cables/hubs. The imager chip is driven via a FPGA with embedded ‘firmware.’ WinCamD can: 1-2 … define the Capture Block, the area of the CCD from which the data should be taken, and the Inclusion Region for which the data should be analyzed. … use Fast mode, half Full resolution, for large beams &/or initial alignment. … automatically set the correct exposure time for CW lasers … vary the pre ADC gain for pulsed lasers. … via the BNC, accept an external trigger, or output a trigger to a pulsed laser. … automatically synchronize to the pulses from lasers with PRR’s (Pulse Repetition Rates) between 100 Hz and ~25 kHz. … advance or delay the capture timing with respect to an external trigger. … process and log acquired images WinCamD Series Introduction 1.4 CALIBRATION Dimensional beam calibration of a WinCamD Series camera heads is an intrinsic calibration based upon the precision of CCD and CMOS photolithography. The nominal dimensions of the chips and pixels are used in all calculations. The accuracy is believed to be much better than ± 0.5 %, and probably better than 0.1%. Dust on the ND filter or the chip affects the measured image and the accuracy. Dimensional accuracy of TaperCamD’s is limited by the Schott-specified ±3% pincushion or barrel distortion of the fiber optic tapers, primarily found towards the outside edges. 1.5 WINCAMD SERIES PRODUCT SPECIFICATIONS Specifications apply to all cameras in the series unless otherwise noted, and are subject to change without notice. WinCamD Pixel Count & H x V: Sensor image area: Pixel dimension: Min. beam (10 pixels): Shutter type: Max. full frame rate: Max. ‘every pulse’ PRR: Single pulse capture PRR: Signal to RMS Noise (Opt./Elec.* dB): Dynamic Range: Electronic Shutter + ND + SNR**: TaperCamD pixel: TaperCamD20-15 pixel: ADC: -UCD12 ½” CCD 1.4 M Pixel 1360 x1024 6.3 x 4.8 mm 4.65 x 4.65 µm ~47 µm Synchronous ~10 Hz ~10 Hz 20 kHz 1,000:1 -UCD23 2/3” CCD 1.4 M Pixel 1360 x1024 8.8 x 6.6 mm 6.45 x 6.45 µm ~65 µm Synchronous ~10 Hz ~10 Hz 20 kHz 1,000:1 -UCM 2/3” CMOS 1.3 MPixel, 1260 x 1024 8.6 x 6.9 mm 6.7 x 6.7 μm ~67 μm Synchronous ~10 Hz ~10 Hz ~300 Hz 500:1 -UHR CMOS. 1.3 MPixel, 1280 x 1024 6.6 x 5.3 mm 5.2 x 5.2 μm ~52 μm Rolling ~10 Hz ~10 Hz 20 kHz 1,000:1 (30/60* dB) (30/60* dB) (27/54* dB) (30/60* dB) -UHS High Speed 355 kPixel, 656 x 496 6.5 x 4.9 μm 9.9 x 9.9 μm ~100 μm Synchronous ~10 Hz ~10 Hz ~20 kHz 800:1 (29/58* dB) 43 dB 113** dB (2.1011:1) 10.5 x 10.5 μm 14.5 x 14.5 μm 14-bit (16,384 levels) 43 dB 113** dB (2.1011:1) 10.5 x 10.5 μm 14.5 x 14.5 μm 14-bit (16,384 levels) 43 dB 110** dB (1011:1) 11 x 11 μm 15 x 15 μm 10-bit (1024 levels) 43 dB 113** dB (2.1011:1) 12 x 12 μm 16 x 16 μm 10-bit (1024 levels) 43 dB 112** dB (1.6.1011:1) 22 x 22 μm 31 x 31 μm 10-bit (1024 levels) * OK, we agree that quoting electrical dB for optical SNR is a nonsense, but some suppliers do this, so we offer a comparable specification. ** OK, we agree that Dynamic Range that includes removable ND filters is also nonsense, but some suppliers do this, so we offer comparable specification with ND 4. ITEM SPECIFICATION Measurable Sources CW beams Pulsed sources. Isolated pulse I to 20 kHz single pulse isolation (~5 kHz for WinCamD-UCM at Short Exposures See Ap. Note) Software configurable Auto-trigger, Synchronous & Variable Delay Measured Beam Powers See the Saturation Power Graph and Notes, below. Wavelength Ranges: Standard camera ~350 to ~1150 nm -1310 ~350 to ~1350 nm. Residual silicon response. WinCamD Series 1-3 1.4 1.5 Introduction -IR 1480 to 1680 nm. IR Phosphor. 10% non-uniformity. 40 µm FWHM Cam-IR Adaptor 1480 to 1680 nm IR Phosphor. 10% non-uniformity. 180 µm FWHM UV UV converters for λ<350 nm (from StarTech Instruments) are available from DataRay, with options down to X-ray. Electronic Dynamic Range: CW: 43 dB (20,000:1) electronic shutter Pulsed: 7 dB (5:1) WinCamD gain control Manual Beam Attenuation: Provided ND 4.0 (10,000:1) C-mount Neutral Density filters. See transmission curves page 1-9. Accessories: ND 0.5, 1, 2, 4 & 5 Screw stackable C-mount filters available. EAM-2 4-wheel stepped variable attenuator, 0 to 90 dB CUB and CUB-UV ~5 %, 90o deviation wedge beam samplers Holographic Beam Samplers 1% & 0.05% (gentec-eo) HPDA High Power Dielectric Attenuators (CVI Laser) Displayed Profiles Line, 2D & 3D plots. Normalized or unnormalized. Linear or Logarithmic, Zoom x10 2D, 3D in 10, 32 or max. colors or grayscale. Contoured display at 10 and 32 colors. Measured & Displayed Raw and smoothed profiles Profile Parameters [Triangular running average filter up to 10% FWHM] Beam Diameter: Diameter at two user set Clip levels Gaussian & ISO 11146 Second Moment beam diameters Equivalent diameter above a user defined Clip level Equivalent Slit and Knife Edge diameters Beam Fits: Gaussian & Top Hat profile fit & % fit Equivalent Slit profile Beam Ellipticity: Major, Minor & Mean diameters. Auto-orientation of axes. Centroid Position: Relative and absolute Intensity Weighted Centroid and Geometric Center Beam Wander Display and Statistics Measurement Accuracy (See Appendix B. Accuracy is not limited to the pixel size.) 0.1 μm processing resolution for interpolated diameters. Absolute accuracy is beam profile dependent – ~1 μm accuracy is frequently achievable. Centroid accuracy is also beam dependent. It can be as good as ±1 μm since it is arithmetically determined from all pixels above the centroid clip level. Processing Options Image & profile Averaging, 1, 5, 10, 20, Continuous. Background Capture and Subtraction. User set rectangular Capture Block for capture User set or Auto ellipse Inclusion region for processing *.ojf files save all WinCamD custom settings for particular test configurations WinCamD update rate 1-4 ~5 Hz maximum for full frame, full screen on 1200 x 1024 WinCamD Series Introduction ~10 Hz max. rate for smaller capture regions Pass/Fail display On-screen selectable Pass/Fail colors. Ideal for QA & Production. Log data and statistics Min., Max., Mean, Standard Deviation. To 4096 samples (to be added shortly) Relative Power Measurement Rolling histogram based on user’s initial input. Units of mW, µJ, dBm, % or user choice (relative to a reference measurement input) Fluence Fluence, within user defined area Certification RoHS, WEEE, CE Multiple cameras 1 to 8 cameras. Serial capture or parallel triggered capture. Camera head dimensions Width x Height x Depth 115 x 61 x 23/29 mm (2.65 x 2.4 x 0.9/1.13“) without/with 5.7 mm high ND filter holder. Chip depth from housing/filter ±0.5 mm WinCamD-UCD12 7.3/15.1 mm WinCamD-UCD23 7.5/15.3 mm WinCamD-UHR, -UHS 8.7/16.5 mm WinCamD-UCM 8.2/16.2 mm Mounting – see drawing below ¼”-20 holes aligned with sensor center. 4-40 holes on camera rear Weight, Camera Head 155 gm (5.5 oz) Minimum PC Requirements: 1 GHz Processor* running Windows XP or Vista; 512 MB RAM; 10 MB Hard Drive space; 1024 x 768 monitor; USB 2.0 hi-power (500 mA) port (Mac version not currently available) *The software uses floating point calculation, therefore a processor with integral numeric coprocessor is required. Outline & Mounting – Scale 1:1 WinCamD Series 1-5 1.5 Introduction Saturation Power/Energy Graphs Imagers respond to irradiance (W/cm2)). We address CW and Pulsed lasers separately. The graphs are for the WinCamD with CCD sensor. Other chips are close to this. Graphs are good to within a factor of ~2. Beam power above the limits? See Chap. 5. @ λ nm = 400 500 1064 675 800 CW lasers: (Pulsed? See next page.) The graph shows saturation optical power that the standard camera configuration with ND4 filter can measure versus beam diameter and wavelength. The Saturation Limit assumes: - The ND 4.0 filter in place. - Electronic shutter set at 50 μs Relative Exposure vs. Wavelength 100 - The gain is set at 1 The Lower Limit is ~5.10-3 x the Saturation Limit. Total power in excess of 1 W may crack the ND filter. Use the graph (right) to estimate for wavelengths other than those shown. The variation is due to a combination of detector responsivity versus wavelength and ND 4.0 filter actual transmission versus wavelength. 1-6 10 1 300 500 700 900 Wavelength in nm WinCamD Series 1100 Introduction Pulsed Laser Saturation Limits - See Chapter 4 for setting up to capture pulsed lasers. The graphs are for the WinCamD with CCD sensor. - UCM limits are ~x2 higher. 1.6 @ λ nm = 400 500 1064 675 800 PRR is the Pulse Repetition Rate of the laser. PRR >20 kHz: Treat the laser as CW based on the mean mW. (= mJ/pulse x PRR). PRR ≤20 kHz: The single pulse saturation energy limit is noted on the upper graph in terms of μJ within the exposure time. To avoid multiple pulse capture, set the Exposure time at 0.95/PRR. If you set an Exposure time >(1/PRR), you will capture more than one pulse and the saturation limit will reduced in proportion to the number of pulses captured. The Saturation Limit assumes: - The ND 4.0 filter in place. Relative Exposure vs. Wavelength 100 - Single pulse capture with the electronic shutter set at <0.95/PRR. - The gain is set at 1. Total power in excess of ~1 W may crack the ND filter. Use the graph (right) to estimate for wavelengths other than those shown. 10 1 300 500 700 900 Wavelength in nm WinCamD Series 1-7 1100 Introduction ND filter transmission ND1 ND2 UG11 ND3 TaperCamD ND4 ND4 UG11 [Transmission values between 200 nm and 1100 nm values are derived every 5 nm from Schott program Filter ’98, Version 1.1US. Digitization of the ND4 transmission levels is due to the low resolution of the program. Values between 1100 and 1550 nm are based on two points measured at 1310 and 1550nm using an InGaAs detector beamprofiler.] ND = Neutral Density is specified traditionally at the 546.1 nm Hg line. However, whilst the visible region is flat, the transmission increases dramatically below 400 nm, and increases dramatically above 600 nm. See and use the graphs above. If T is the internal transmission (neglecting surface reflection losses), then: ND = -log10T e.g. at T = 1% = 0.01, ND = 2.0 ND is sometimes referred to as OD or Optical Density. ND is more correct for these filters since they have a relatively flat response with wavelength compared with the more peaked response of a typical OD filters. Internal transmission values are correct to an estimated ±5%. Front and back surface reflections lose another 8% on the values graphed. The -1310 versions of the cameras come with a long pass IR filter which has: <0.5 % transmission at <1280 nm, 5 % transmission at ~1288 nm 50 % transmission at ~1291 nm >75 % transmission from 1295 nm to >1600nm 1-8 WinCamD Series Introduction A Complete WinCamD-UXXX system comprises: Camera, ND 4.0 filter, Software, 3 m (10 ft) Cable, User Manual. 1.6 The Part Number on the rear label derives from the descriptions and in the table below. Part Number = Camera type + CMOS chip + Suffix (if required) WinCamD -UCD12 -UV TaperCamD -UCD23 -1310 TaperCamD20-15 -UCM -IR -UHR -UHS e.g. WinCamD-UHR is a complete working system with a High Resolution CMOS sensor with 5.2 μm pixels. TaperCamD-UHS-1310 is a complete working system with a 14.4 x 10.8 mm FO Taper for 1310 nm. Part Number component descriptions WinCamDTaperCamDTaperCamD20-15- Complete working USB 2.0 camera system. Add CMOS chip extension to generate Part #. WinCamD with 14.4 x 10.8 mm 1.6:1 FO taper on the CMOS sensor; –UHS & –UHR only. WinCamD with 20 x 15 mm 2.27:1 FO taper on the CMOS sensor; –UHS & –UHR only. UCD12 ½”CCD sensor for CW and Pulsed, 1360 x 1024 pixels, 4.65 x 4.65 μm UCD23 2/3” CCD sensor for CW and Pulsed, 1360 x 1024 pixels, 6.45 x 6.45 μm UCM 2/3” CMOS sensor for CW and low PRR, 1260 x 1024 pixels, 6.7 x 6.7 μm UHR ½” CMOS sensor for CW and low PRR, UHS ½” CMOS sensor for CW and high PRR, -1310 -UV -IR 1280 x 1024 pixels, 5.2 x 5.2 μm 656 x 496 pixels, 9.9 x 9.9 μm Adds 50 mm C-mount tube and long-pass filter for 1290 to 1350 nm work. Camera with 3 mm UG11 filter instead of ND 4.0. Works at 260 through 380 nm. On-chip IR to visible phosphor converter for 1480 to 1600 nm. Not available on TaperCamDs. WinCamD UCD12 Chip surface height, standard and options. To request a sensor height increment of 4.3 or 8.6 mm, add -S1 or -S2 to the P/N. E.g. WinCamD-UCD12-S1 There is an additional charge for these options. The case hole is 1.30”-20 tpi and the filter holder accepts C-mount accessories on its upper surface. WinCamD Series 1-9 Introduction TaperCamD Series Outlines Tapers are fused coherent fiber bundles, heated, drawn round to rectangular, and polished to give an output end the size of the imager chip. The image is demagnified (M<1) from the faceplate input to the imager end. NA at the imager end is 1.0. NA at the input faceplate is a factor of M smaller. Individual fibers at the input end are 6 um pitch with a 50% core/cladding area ratio. Refractive index is 1.81, leading to a front surface reflectivity of 8.3%. These taper ends are bonded to the surface of the imager chip. Empty filter holders are available for both TaperCam sizes. A 0.25” deep extension ring is available with male and female 1.30”-20 tpi threads. 1.0"-32 C-mount thread ND4 at 3° 13.0 mm 25.7 mm 20.0 mm TaperCamD, -UHR & -UHS PMF = 1.6 TaperCamD-UCM PMF = 2.25 TaperCamD20-15, -UHR and -UHS PMF =3.1 TaperCamD20-15-UCM PMF = 2.27 ND4 at 3° 16.7 mm 34.4 mm 1.30" 20 tpi thread 1-10 28.0 mm 1.0"-32 C-mount thread WinCamD Series Introduction 1.6 BEAM LIMITS 1.6.1 1.6 Beam Measurement Region Approximate imager dimensions shown actual size. See spec. tables for exact sizes. 6.5 ½” CCD & CMOS chips 4.8 8.8 2/3” CCD & CMOS chips 6.7 14 11 TaperCamD 20 (18) 15 TaperCamD20-15 For accurate beam measurement, the beam must lie totally within the area shown. For the most accurate measurements, center the beam at [x,y] = [0,0]. For true 4σ (Variance) measurement to the ISO 11146 standard, a Gaussian beam diameter at the 13.5% clip level, should be a maximum of 55% of imager size. 1.6.2 Beam Power Limits Measure your beam with a calibrated power meter before letting power fall on the head. The following head damage limits always apply: Total power on the head with ND filter must not exceed 1 W, or damage may occur. Imager chips can take a x1000 overload over the saturation level without damage. Beware of back reflections from the ND filter. Employ appropriate eye protection. Imager chip Irradiance limits, without ND filter. λ nm Damage Threshold 2 WinCamD Series 2 Saturation Irradiance mW/cm mJ/cm μW/cm2 μJ/cm2 * 355 Few ~0.3 ~0.3 ~0.01 630 >10 “ ~0.15 ~0.005 800 “ “ ~0.1 ~0.004 1060 “ “ ~10 ~0.4 1-11 Introduction 1.7 MANUAL CONVENTIONS ‘WinCamD Series’ refers to all DataRay cameras ‘WinCamD-UXXX’ refers to DataRay cameras directly interfaced to USB 2.0. ‘click’ always means ‘left-click the mouse button’. ‘double-click’ always means ‘double-click with the left button’. ‘click and drag’ means ‘left-click on the object indicated, hold down the button, drag the object across the screen to the desired position, and then release the button’. If a right-click is required this is clearly indicated as ‘right-click’. ‘select’ or ‘check’ means ‘left-click with the mouse button’. ‘press’ always means ‘press the keyboard key’ ‘enter’ means enter using the keyboard. e.g. ‘Enter Alt F, S‘ means ‘Press the F key while holding down the Alt key, then release the Alt key and press the key marked S’. Sometimes it is necessary to finish with the Enter key to complete a process. 1.8 8 pt. Verdana Bold indicates keyboard entry items or words etc. on the screen. MANUAL AND COPYRIGHT NOTICE This manual describes operation of WinCamD Series Imagers. We reserve the right to make changes to this manual & to the instruments described herein without notice. We have made considerable efforts to ensure that the information in this manual is accurate & complete. However, we will not be liable for any technical or editorial errors, omissions, or for any incidental, special or consequential damages of any nature resulting from the furnishing of this manual, or from the operation and performance of the instruments described herein. DataRay retains copyright to the contents of this manual. You may make two additional copies of this manual for use with the equipment. Copying for any other purpose is not allowed without the express written permission of DataRay Inc., Boulder Creek, CA. BeamScope-P7, BeamScope-P9, BeamMap, BeamMap2, Beam’R, Beam’R2, ColliMate, DataRay, TaperCamD, TaperCamD20-15, WinCamD, WinCamD-UXXX, WinCamD-UCD12, WinCamD-UCD23, WinCamD-UCM, WinCamD-UHR & WinCamD-UHS are trademarks of DataRay Inc. All rights reserved. Windows XP and Vista are trademarks of Microsoft Corporation. Pentium is a trademark of Intel Corporation. LabVIEW™ and LabWindows are trademarks of National Instruments. 1-12 WinCamD Series Installation CHAPTER TWO 2. INSTALLATION 2.1 2.2 2.3 UNPACK THE HARDWARE................................................................2-1 MINIMUM COMPUTER REQUIREMENTS .................................................2-3 INSTALLATION ...........................................................................2-3 2.4 MOUNTING THE HEAD ...................................................................2-5 2.5 2.6 SOFTWARE INTERFACING. ..............................................................2-6 FIRMWARE UPGRADES ...................................................................2-6 2.3.1 Software Installation Instructions .................................................... 2-4 2.4.1 Connecting the Head. .................................................................... 2-5 QuickStart - in case you are one of those rare (?) people who do not read manuals. 1. Install the software and run it. Check that your computer meets the Minimum PC Requirements on page 1-5. Install the software as Administrator - Sec. 2.4. Open it to load the driver. In the Device pull-down menu select WinCamD. Close the software. 2. Install the driver. Connect the camera head & follow the New hardware found wizard to install the driver. Do not let it go to the web to find a driver. Allow it to install automatically. 3. Start the software. The camera LED cycles Red - Off - Green - Red - Green. If it stays Red when the software is on, the port is not reporting itself as USB 2.0. In the pull-down menu go Device, WinCamD. The software detects the camera type. Remove the dust cap. Press . 4. -UCM series? Does not apply 0.9%. Calibrate it per App. to other cameras. Go Alt S, set PLS factor = D. of this manual 5. TaperCamD series? Go Alt S, set Pixel multiply factors to rear label value. Note: The BNC on the camera is a trigger input/output. It is not an analog video output. 2.1 UNPACK THE HARDWARE Please check your purchase. Locate and identify all items ordered. If any items appear damaged or missing or you have any other questions, please contact us. WinCamD Series 2-1 2.1 Installation Pictured: WinCamD with StarTech 1:1 UV adaptor For pictures of the following, see the website: TaperCamD TaperCamD20-15 WinCamD with Cam-IR Adaptor WinCamD with Expanders WinCamD with microscope adaptor and objective. WinCamD with C-mount lens x2 and x5 Beam WinCamD-UCM series 3 m. USB 2.0 Cable USB Mini-B5 to USB A (Up to 5m available. Longer with USB 2.0 port* on: - PC - Notebook/Tablet PC - Hub - Booster cable - PCI card on PC - Cardbus in Notebook WinCamD-UXXX Configuration * Standard 500 mA port required. 2-2 WinCamD Series Installation 2.2 MINIMUM COMPUTER REQUIREMENTS WARNING: PC’s with an unusual BIOS, particularly so-called ‘Industrial’ PCs, may be difficult to configure to work with the hardware. Stick with good name brand PCs wherever possible. Windows 2000 or XP. Only Windows XP is fully supported. Bugs which are only observed under the Windows 2000 operating system will no longer be fixed. [It may work under 98SE or Me, but if you have problems these are no longer supported.]. WinCamD is not currently available in a Mac-compatible version. Call in late 2005. A 1 GHz Processor faster. [The software uses floating point calculations, therefore a processor with integral numeric coprocessor is required.] ≥ 1024 x 768 display with ≥256 colors WinCamD-UXXX: USB 2.0 port with 500 mA capability (the standard except on unpowered hubs). A Microsoft compatible pointing device. ≥512 MB of RAM. A hard drive with 10 MB or more available space. A CD-R drive. 2.3 INSTALLATION Most installation problems are caused by not carefully following the instructions. Hardware installation is never as simple as software only installation. If you want to save time, read and follow the instructions. IMPORTANT: INSTALL THE SOFTWARE BEFORE THE HARDWARE. The software can be used to view data whether or not the camera is installed. You must install the software as ‘Administrator’. ‘User with Administrator Rights’ is not enough. [Windows requires that hardware drivers be installed by an Administrator. If you cannot even install the software, it may be that your Administrator (i.e. the actual IT person) has restricted your software installation rights, and must therefore be called in to install the software.] Software upgrades are free for the life of the product. The absolutely latest software is not necessarily the version that arrived with the hardware. Always visit Sales & Support, Software Upgrades at the website in order to determine whether a more recent version is available for download. Check the version and the date. If you do not already have it, download the latest version of iDataRay.exe from the website and place it in a temporary directory named, e.g. c:\Downloads In case you need to return to an older version of the software, rename any old Dataray directory, as c:\Program Files\DataRayxyyz, where x.yyz is the version number found on the top line of the opened program. E.g. c:\Program Files\DataRay500S8 for Version 5.00S8. WinCamD Series 2-3 2.2 Installation 2.3.1 Software Installation Instructions These instructions assume that: You are running Windows XP or Vista and using a PC that meets the minimum requirements listed in Section 2.3 of this manual. You are reasonably familiar with Windows. 1) Start your PC. You can avoid potential but unlikely installation problems, by turning off programs running in the background - e.g. Anti-virus software, Instant Messenger, automatic fax reception, etc. That said, to date such programs have given us no problems. 2) Insert the the CD in the drive. It should AutoRun. If it does not, go Start, Run.., Browse to d:\idataray.exe and press Open and then OK. The install program will allow you the Advanced Options of changing the drive and directory location of the software. The default is c:\Program Files\DataRay. [In Windows Explorer, from c:\Downloads, or whichever temporary directory you put the software in, double-click idataray.exe to install the software.] 3) Install the Driver as follows: Open the software. In the Device pull-down menu select WinCamD. close the software. This installs the driver. 4) Connect the camera. Plug the -UXXX camera into a USB 2.0 port. Follow through the New Hardware found procedure., but do not allow Windows to search on the web. If necessary, direct it to look in c:\Program Files\DataRay. If the card does not link properly, then at the desktop, right-click on My Computer, select Properties, Device Manager, click on the + sign next to DataRay Inc. USB2.0 Devices, and double-click DataRay … WinCamD-UCM … . Select Drivers and then click on Update Drivers … to get to the Update Device Driver Wizard again. 2-4 WinCamD Series Installation [If you need to install it manually, in c:\Program Files/DataRay, DataRayUsb.inf. Right-click the appropriate file and click Install. locate Cannot find *.inf files in Windows Explorer? To find *.inf files in Windows Explorer, you may need to change the default settings. In Windows Explorer, from the View pull-down menu select Details Then, from the Tools menu select Folder Options. Choose the View tab. Change the items shown to the settings shown. 2.4 2.4 MOUNTING THE HEAD 1. It is recommended that you mount the head before you connect it – Sec. 1.6. UXXX compact case cameras have integral ¼”-20 mounting holes in line with the sensor. 2. Since the sensitive area is only mm in dimension, ensure that either the head or the source assembly can be adjust in x, y and, as necessary, z. 3. Remove the thin screw-on or push-on cap from the front of the ND filter holder. Do not unscrew the ND filter. 2.4.1 Connecting the Head. 1. With WinCamD Series cameras you can ‘hot’ plug or unplug the head without damaging it in any way. 2. Connect the 3m (10ft) cable between the head and the PC card. For WinCamDUXX, booster cables or hubs are required for >5m (16ft); look under Accessories at the website. 3. Start the PC if it not already started. The software will automatically determine the camera type. 4. Start the software. The -UXX LED will sequence through: Off, Red, Green. start taking data, click on the Go or the Ready button, or press F1 or g on the keyboard. To If you try to start taking data with no head connected, you will get the message No camera detected! If the –UXX is connected to a USB 1.1 port, or there is any problem with your USB 2.0 port (e.g. low current), the LED will change to Red and stay Red. 5. If you have a WinCamD-UCM, calibrate it. See Appendix D. 6. If you have a TaperCamD series camera, press Alt S to reach the WinCamD Capture Setup dialog, and enter the appropriate PMF value in the WinCamD capture screen. TaperCamD-UCD12 -UHR, -UHS WinCamD Series Pixel multiply factor = 2.25 2-5 Installation TaperCamD-UCD23, -UCM Pixel multiply factor = 1.6 TaperCamD20-15-UCD12 -UHR, -UHS Pixel multiply factor = 3.1 TaperCamD20-15-UCD23, -UCM Pixel multiply factor = 2.27 Congratulations. You have successfully completed installation. Problems? Reread the instructions carefully, and start again from scratch. *If you are still unsuccessful, contact Technical Support. 2.5 SOFTWARE INTERFACING. For interfacing to LabVIEW™, Visual Basic, Visual C++, etc., we do provide the source code and applicable Application Notes are at the website. Contact Technical Support as necessary. 2.6 FIRMWARE UPGRADES What is Firmware? Firmware is software code that resides in the hardware rather than ‘running’ on the PC. Upgrades may be required to improve performance, add features, and/or to correct a bug. How frequent are upgrades? Firmware upgrades may happen during the year following introduction of a new product or a major upgrade. Subsequently they are rare events. How do I know if an upgrade is available? We contact you. 2-6 WinCamD Series Quick-Start Tutorial CHAPTER THREE 3. QUICK-START TUTORIALS 3.1 MAIN SCREEN............................................................................3-2 3.1.1 3.1.2 3.1.3 3.1.4 3.1.5 3.1.6 3.1.7 Start the Software ......................................................................... 3-2 Examine Previously Saved Data ...................................................... 3-3 Main Screen Top ........................................................................... 3-4 Main Screen Left Hand Side. ........................................................... 3-5 Main Screen Profile Display ............................................................. 3-6 Main Screen Bottom Line. ............................................................... 3-7 Main Screen 2D and 3D Display Area ............................................... 3-7 3.2.1 3.2.2 3.2.3 3.2.4 3.2.5 3.2.6 3.2.7 3.2.8 3.2.9 3.2.10 3.2.11 3.2.12 3.2.13 3D Display & Manipulation .............................................................. 3-9 Choose a Beam Width Definition.................................................... 3-10 Set Diameter Display Mode ........................................................... 3-12 Set Pass-Fail ............................................................................... 3-13 Change Profile Display ................................................................. 3-15 Pull-down Menus ......................................................................... 3-21 File ............................................................................................ 3-22 Device ....................................................................................... 3-23 Palettes ...................................................................................... 3-24 Average ..................................................................................... 3-24 Filter .......................................................................................... 3-25 Camera ...................................................................................... 3-26 View .......................................................................................... 3-26 3.6.1 3.6.2 3.6.3 3.6.4 Precautions and Safety Warnings .................................................. 3-41 Starting Up ................................................................................. 3-41 Artifacts and Cleaning of the ND filter & Imager chip. ...................... 3-43 TaperCamD Artifacts .................................................................... 3-44 3.2 MANIPULATE THE IMAGE AND PROFILE ANALYSIS .....................................3-9 3.3 3.4 3.5 3.6 SETUP .................................................................................. 3-27 TOOL BAR .............................................................................. 3-30 SHORT CUTS ........................................................................... 3-40 HARDWARE QUICK-START TUTORIAL ................................................ 3-41 WinCamD Series 3-1 3 Quick-Start Tutorial Do not just read this User Manual. Do sit at the computer and try out the software. Unfamiliar with the hardware, or just evaluating the software? Start at Section 3.1. Familiar with the software but never used the hardware? Go to Section 3.6. 3.1 3.1.1 MAIN SCREEN Start the Software Double-click the icon to start the software. [See Chap. 2 if software is not yet installed.] In the pull-down menu, under Device, select WinCamD. WinCamD main screen shown below appears. The software automatically detects the camera type. The screen appearance will change slightly depending upon you screen resolution. The required minimum is 1024 x 768 (H x V). 3-2 WinCamD Series Quick-Start Tutorial 3.1.2 Examine Previously Saved Data Click on this button, or enter Alt F, O , to open the Open dialog box. Select Sample.wcf file, and click OK to see a screen similar to that below. This real image is the 20 sample average of a single mode fiber output. As software upgrades occur, the detailed appearance and/or the initial settings may change. 3.1 When you simply open an image it does not change the current settings of the various display and measurement options. Put the cursor on the 2D image and press i on the keyboard to zoom up to x10 about the crosshair position., by default the centroid here. Press o on the keyboard to zoom out. i and o also work on profiles when the cursor is in the profile area. It is possible to change these settings as a group by saving an acquired image with specific display settings as a *.ojf file and then opening this file which contains display and analysis settings. See Sec. 3.3.1. WinCamD Series 3-3 Quick-Start Tutorial 3.1.3 Main Screen Top The blue streak of Caption bar at the top displays: - DataRay version x.yyz, The software version on your PC. - WinCamD 1 of n. The profile number ‘i of n’. - [email protected]. The exposure time of the saved image. - Filter=0.2%. The profile filter setting. - Wl=660.0nm. The set wavelength - Pixels=4.65x4.65um. The effective pixel size. [Twice the actual value in the default Fast mode. ] Pull-down Menus – have a quick look. Note the existence of keyboard short-cuts. Section 3.2 describes the pull-down menus in more detail. Toolbar/Button Bar: Accesses frequently used functions. Sec. 3.3 contains detailed descriptions. If you have no camera installed and are simply evaluating the software, then a number of buttons will be grayed out. Hover the mouse over any button to see a description of its function. If additional buttons appear in later software revs, hover the mouse over them to determine their function. 3-4 WinCamD Series Quick-Start Tutorial 3.1.4 Main Screen Left Hand Side. Clip levels User set profile clip levels that determine 2Wa and 2Wb. The Clip level is the % of the peak of the line profile along the crosshairs. See also Sec. 3.2.3. The current head status, …Starting…, or Running. 2w_Major xxx μm 2w_Minor xxx μm 2w_Mean xxx μm either Ready, 3.1 These diameters are calculated for Clip[a] about the beam centroid for the total image, whether or not the beam appears cicular. Samples profiles for the calculation are taken every 0.5o. The minor axis is the diameter at the center of the 45o sector that contains the smallest mean diameter at Clip[a]. The major axis is the diameter at 90o to the minor axis. The mean diameter is the mean for the whole beam. It may be higher than than the minor or the major values. If this seems not possible, consider a rectangular beam and the answer becomes clear. For ISO 11146 values go to the Setup pulldown menu and choose Use ISO 11146-compliant diameters and orientation. See the end of Section 3.3. Eff. Diam. Ellipticity = 2w[minor] / 2w[major] Orientationo xx.xo is the orientation of the major axis of the ellipse with respect to the horizontal x-axis. Crosshair Xc[abs] xxx μm & Yc[abs] (or [rel]) are the beam centroid positions. These are determined using all pixels in the image above the specified level. The default is 13.5%. See Section 3.3 for how to set alternative levels. When Xp, Xg or Xu are selected, the display changes accordingly. 0, 0 is the center of the array. Toggle Centroid: [absolute] or [relative] is a button that toggles between Absolute centroid and Relative centroid. [Pressing Z or A on the keyboard gives the same result.] Selecting Z resets the relative centroid [0,0] to the current centroid position. WinCamD Series the equivalent diameter of the area above the clip level. See p. 3-19. xx.xo is the angle at which the crosshairs are currently set. 3-5 Quick-Start Tutorial Peak xx.x% is the image peak level as a % of the ADC range, determined as the peak value for the average of any ‘L’ shaped group of three pixels within the image. Image zoom 3.1.5 N is the current 2D screen zoom. Main Screen Profile Display 2Wua & 2Wub: These are the profile widths at the Clip[a] & Clip[b] levels. Zero level. First note that the zero level is a three pixel wide line. The center is the actual zero set by the software after subtraction of the baseline. The line is set five pixels above the graph zero so that negative noise remains visible. The zero level is calculated by taking the maximum filled level of the histogram of intensities below 25% of peak. Default mode is background subtraction. To set a different zero level, see Section 3.3, Offset. Profile Scaling. Scale = xxx.x μm/div for the current Zoom setting. Zoom = 2X indicates horizontal zoom on a profile. (Blank if not selected). The scaling at x1 is set automatically by the program. Put the cursor on the profile and press i on the keyboard to zoom up to x10. Press o on the keyboard to zoom out.Hold down the mouse center button to pan left-right. Peak = xx.x%. Indicates the peak value of the (unnormalized) profile as a percentage of the 14-bit (16,392 levels) ADC range. Note: If the pull-down menu Filter value is the default value of 0.2%, this Peak will be less than the Peak seen on the left of the screen. Even with a 0% filter, since the Peak on the left is a three pixel average, the values will rarely be exactly the same. B = x.x% indicates the (subtracted) baseline level. 3-6 WinCamD Series Quick-Start Tutorial 3.1.6 Main Screen Bottom Line. Status Bar Help Hints. VERY USEFUL BUT MUCH IGNORED. Almost every area of the screen is a ‘Button’ which you may left-click or right-click to cause something to happen. Watch the Help Hints change on the Status Bar at the bottom of the screen as you move the cursor across the screen. Instructions for using the current function appear here. E.g. for the profile area. If at any time you are not sure how to do something, move to the relevant area of the screen, look at the Help Hints bar, and you will often find your answer. 3.1.7 Main Screen 2D and 3D Display Area 2D Image Area 3D Image Area Top line info shows: for –UCM series Effective Exposure. A corrected value. Not shoen for other cameras. Delta, the radial distance of the current crosshair position from the current (Absolute or Relative) zero point.Pixel I, the intesnsity of the pixel at the current crooshair position in ADC units and %. WinCamD Series 3-7 3.1 Quick-Start Tutorial Right-click on the 2D area to open the box below. This allows you to: Change the palette selection. Includes Inksaver option for printing - see Sec. 3.2.11. Auto orient crosshairs, Force Crosshairs to zero or 45 degrees, or Don’t Show Crosshairs. If you uncheck all these options, then you can orient the crosshairs yourself by clicking and dragging on the outer portion of the crosshair. Snap to centroid, geometric center, peak location or user placed. These functions are paralleled by tool bar buttons. 3-8 WinCamD Series Quick-Start Tutorial Set an Inclusion region for image processing. The area of the image outside the Inclusion Region will be color reversed. Click and drag a chosen shape or select Define Inclusion region shape, size and orientation in order to do precisely that. Checking the Automation boxes automates the inclusion region. The 1.55 default inludes 99% of the energy.for a Gaussian beam. Show & Use ‘effective slit” profiles. i.e. the profiles that would result from sweeping pixel width slits horizontally and vertically across the beam. Show merely superimposes them on the 2D screen. Use uses them in the profile area. Zoom the 2D profile area, x1 to x10. Pressing i and o (for ‘in’ and ‘out’) on the keyboard has the same effect. Hold down the mouse center button to pan leftright. Options: Profile to Clipboard, Save image as Bitmap file, and Export to Paint. Show Image Information gives the data shown right for a live or recalled image. 3.2 3.2 MANIPULATE THE IMAGE AND PROFILE ANALYSIS This takes you beyond the defaults described in Sec. 3.1. 3.2.1 3D Display & Manipulation Click and drag in the 3D box to change the view of the 3D image. Side-to-side motion rotates the image. Up-down motion changes the tilt angle. Zoom the 2D image area to palette options. Choose a higher Zoom setting to zoom the 3D image. Right-click the 3D image and a floating menu appears. Solid is visually best, but processor intensive, and can slow the update rate on slower PCs. Experiment. 96 wires is normally overkill. 64 wires are often enough. Auto rotate does precisely that, but is processor intensive. There are three image export options: Image to Clipboard, Save image as Bitmap file, and Export to Paint. WinCamD Series 3-9 Quick-Start Tutorial 3.2.2 Choose a Beam Width Definition. Click on the Clip[a] or Clip[b] ‘button’ to open a Clip level entry dialog box that allows you to choose a Beam Width definition for the displayed line profile.. Clip Level method set at 13.5% (1/e2) is the commonly employed ‘de facto’ standard. (Actually 13.53%). ‘Standard’ clip levels of 13.5% [1/e2], 50% [FWHM] (Full Width Half Maximum), or 86.5% can be selected from the menu. Any user set percentage ≥0.5 % can be entered in the Clip level input box. If ISO 11146 compliant Sigma X 4 (variance) method (Second Moment) is selected, the clip level is ignored. With a beam profile that is a pure Gaussian, the Variance definition is exactly the same as selecting a 13.5% Clip Level, but if your beam is non-Gaussian, and most beams are, the Variance method may be more consistent. An exception to this general rule is that the presence of a significant background level or background noise will skew the Variance reading to larger values. For full ISO 11146 compliance, select Average 5, see Section 3.3.2. In accordance with Section 6.2 of the ISO 11146 Standard, the software calculates the Second Moment by integrating over 99% of the total energy in the profile. In order to allow for any baseline tilt, the zero levels on either side of the center are treated separately and integration from the centroid is separately performed for 99% of the energy on each side of the centroid. See Section 3.5 of Appendix A for Beam Diameter definitions. For a broader discussion on Variance, see Appendix A, Sec. 4. To choose the area based option, go to the Setup pull-down menu and choose Use ISO 11146-compliant diameters and orientation. Enable knife edge mode will be grayed out in a future release. Beam Geometric Angular Divergence. Enter a Source to Image distance in mm. Remember that the camera chip sits 7.5 mm below the surface of the camera body Check Enable Angular Divergence. Choose the unit of measurement. Click OK. 3-10 WinCamD Series Quick-Start Tutorial The software automatically performs a cosine3 correction the data to allow for the use of a flat measurement plane to measure a spherically diverging beam. Gaussian Beam Divergence Measurement Gaussian beams do not follow the same rules as incoherent beams described by geometric optics. For a Gaussian beam, it may be shown that: When a Gaussian beam passes through a lens, the far field divergence of the input beam may be determined by measuring the Second moment beam diameter at the back focal distance from the lens. This is true irrespective of the distance of the source from the lens. Note that this is not the position of the beamwaist formed after the lens. It obviously assumes that the lens does not introduce additional aberrations, normally achieved by using a long focal length achromat coated for the wavelength(s) of interest. The far field divergence of the input beam, Θ mrad, is calculated as: Θ = 2W/F mrad Where: 2W μm is the measured Second moment (4σ) beam diameter in the Measurement plane. F mm is the focal length of the lens at the wavelength of interest. Modelling? See Gaussian Beam Divergence Measurement spreadsheet at the Measurement plane Beamwaist plane website. Application. This technique requires an appropriate lens and a beam diameter measurement instrument. The instrument may be a WinCamD series camera, or a BeamScope-P7 or Beam’R scanning slit XY profiler. The lens must have a known focal length, be coated for the wavelength(s) of interest, and be at least 1.5 times, and preferably 2 times the 1/e2 beam diameter at the lens. Errors in the lens focal length value or positioning of the instrument with respect to the back focal length will lead to errors in the divergence measurement. The spreadsheet models these errors. The beam must be centered on the lens. The beam centroid in the measurement plane does reflect the beam pointing. WinCamD Series 3-11 3.2 Quick-Start Tutorial The lens and instrument may be supplied by DataRay as a prealigned system, or may be mounted on an optical bench or table. Use the spreadsheet & contact the factory for details and lens suggestions for your beam. Accuracy. Typically an accuracy of 0.1 to 0.05 mrad should be achievable. To simply adjust an input beam assembly for best collimation, minimize the value of 2W in the measurement plane. Contact the factory for accuracy and misalignment sensitivity calculations for your beam. Ctrl Alt S pulls up the Parameter Input box shown. It allows you to set a different integral energy calculation percent. If you change this, the calculation is no longer ISO 11146 compliant. You may use this facility to exclude energy in the wings or in structure distant from the main beam. Once you get away from the 99% default value, it is your call what is appropriate - we cannot provide advice on the appropriateness or not of alternative percentage settings. Currently disabled, it will be revived in a future version. 3.2.3 Set Diameter Display Mode Under Setup choose Numeric display Display modes. XXX.Y um is the default choice. 3-12 WinCamD Series Quick-Start Tutorial 3.2.4 Set Pass-Fail Left-click on any result area of the screen to open a Pass/Fail parameters dialog box. You may set an Upper Limit and a Lower Limit for the particular parameter. Check the Enable Test box to enable the test. This is also the box to be checked for Log enabled data only. See Log Data in Section 3.4. When the test is enabled, the numbers will be displayed on-screen in the chosen Pass/Fail colors. The default colors are Green for Pass and Red for Fail. Right click on a result to change these colors. See 3.2.5, below. Check the Lock w/ Password box to lock the criteria. The box below appears. Remember the Password. It you change it, it cannot be retrieved. 3.2 If you put in the wrong password, the box shown right will appear. At the time of writing, the master password is ‘ peanuts ’, all lower case. If at some later time this does not work, contact Technical Support. WinCamD Series 3-13 Quick-Start Tutorial Right-click on any ‘result’ area of the screen to open Custom button colors select dialog box. Unless you have good reason, or good color sense, it is suggested that you stay with the default values. Note particularly that: If the software determines or suspects a result to be invalid for whatever reason, the numbers will appear in gold (yellow-orange). An example of ‘determines’ is when the profile peak is >100% (saturated) or <10%; in either case, the results will appear gold as a warning. If you are using laser glasses, select colors which maximize the visual contrast while wearing those glasses. If you wish to highlight a particular set of numbers, consider changing the background color. Ensure that it is not a color that is too close to the text and/or pass/fail colors, or the visual contrast will ‘wash out’. 3-14 WinCamD Series Quick-Start Tutorial 3.2.5 Change Profile Display Right-click on any 1D profile area to open the display selection box shown here. Defaults settings are as shown. 3.2 Checking Global selections applies the selected items to all the profiles. Choose Linear normalized or Log 40db mode profile display modes. Both linear modes set the baseline to zero to compensate for ambient lighting and preamplifier offset on a dynamic basis. Linear normalized normalizes the profile to 100%, and is the default display mode. Log modes are useful for assessing low-level structure and ‘ghosts’ in the wings. Choose between Thin Line, Thick Line and Fill mode to choose how the profile is displayed. The latter modes are particularly useful when adjusting a laser assembly and observing the display monitor from across the test bench, or when saving the screen data for a presentation. WinCamD Series 3-15 Quick-Start Tutorial Enter Intensity Multiplier opens the box shown which allows you to superimpose a magnified profile over the current profile. The multiplier may be any integer between 2 and 200. The legend Profile * XX will appear next to the red profile. Enter new gain value and Auto Gain do not apply to WinCamD and will be grayed out in a future version. Show clip levels through Show scale grids allow you to control how ‘busy’ the display appears. Uncheck what you do not need. When Show clip levels is selected, the variable clip levels are shown in blue on the profile. In future versions of the software you will be able to click and drag the levels shown on the screen. Beam fit algorithms. There are no formal ‘Standards’ on how fits should be done. Some aspects of our approach are generally accepted industry practice. Some represent specific customer requests that have been incorporated in the software. The Algorithms described here are for: Gaussian Fit, including GFit, G 2W Max. Deviation, Std. Deviation, Coefficient and Roughness. Top Hat Fit, including Max. Deviation and Std. Deviation Non-uniformity Effective Diameter In all modes, the software first determines and subtracts the baseline. If you need a function that is not included in the current version, please contact us. TIP: On slower PCs, to speed up the processing, do not show these options. 3-16 Show Gaussian fit. A GFit results line appears under the 2W results and a red line Gaussian appears superimposed over the profile. The Gaussian fit is based upon a fit algorithm that, whilst keeping the power under the curve constant, and the centroid the same as that of the profile, iteratively adjusts the height and width of the Gaussian until the Least Squares difference between the actual profile and the Gaussian profile is minimized. WinCamD Series Quick-Start Tutorial 3.2 Specifically, the steps are: − Set the centroid position of the fitted Gaussian the same as that of the actual profile. − Set the area under the fitted Gaussian equal to the area under the actual beam profile. i.e. an equal power requirement. If the area under the curve is ‘A’, and the actual 13.5% diameter is 2W, then for iteration purposes, the initial Gaussian height is set to: H = A.(2/2W).(2/π)0.5 = 1.596.A/2W. □ − The least squares fit iteration starts from the actual 13.5% diameter − G 2W is the calculated diameter of the least squares fitted Gaussian. − 1.596.A/(G 2W) Gaussian. − GFit in % = 100 x [1 - [(∑absolute differences)/(Gaussian profile area)]] is then the calculated height of the least squares fitted Show Max & Standard Deviation A vertical red line appears on the graph at the point of maximum deviation, and the Max Deviation = xx.x% and Std. Deviation = xx.x% are overwritten in red on the graph. Deviation is defined at each position on the profile, relative to the fitted Gaussian curve or relative to the fitted Top Hat line, depending on the fit chosen. i.e. at position ‘j’ on the profile, if the Gaussian level is Gj, and the profile value is Pj, then the deviation at that point is defined as: Deviation in % = 100*((Pj-Gj)/Gj) E.G. If Pj = Gj, the Deviation is 0%. If Pj = 2*Gj, then the Deviation = 100%. Therefore the Deviation value can be >100%, and as low as -100%. Max. Deviation is the maximum value (positive or negative) of the Deviation. Std. Deviation is calculated over the fitted region using the Deviation values as calculated above. WinCamD Series 3-17 Quick-Start Tutorial □ Show Coefficient & Roughness. Additional information is given by the alternative ‘Gaussian Fit Coefficient’ and the ‘Gaussian Roughness coefficient’, defined as follows: - Find the average difference between the Actual point, Pj, & the fitted Gaussian, Gj. A = [∑ (Pj – Gj)] / N (N is the # of points) - For each point determine the difference, Dj, from the average of the deviation: Dj = (Pj – Gj) - A 2 - Determine the sum of Dj : S = ∑ (Dj2) - Determine the Gaussian Fit Coefficient, C = 1 – ((S/N0.5)/N) - Determine the Gaussian Fit Roughness, R = 100 x [Max (Pj – Gj)]/[Max (Pj)] □ □ 3-18 Show Top-Hat fit The Top Hat fit: − Determines the ‘50% of peak’ outer edges of the profile. Defines the center (as opposed to centroid) of the beam as the midpoint between these two points. − Determines the mean level of the central 80% of this region. It plots a straight line at this level, and defines it as 100% for the purpose of subsequent TopHat fit calculations. − Shows Top-Hat fit in % = 100[1- (Total area of |deviations|/Area under line)]. − Show max deviation A vertical red line appears on the graph at the point of maximum deviation, and the Max Deviation = xx.x% and Std. Deviation = xx.x% are overwritten in red on the graph. Show Uniformity within Clip A Diameter − Found by right-clicking on the profiles area. − Determines the Clip A edges of the profile. For the central 90% of this region, it calculates the following function in % terms: WinCamD Series Quick-Start Tutorial Non-uniformity = (100-Min)/(100+Min) The values displayed on the profile are the values for the profiles shown. In the View menu you can also choose Show Non-uniformity (WinCamD only), the average non-uniformity value taken in 360 one degree slices about the centroid is displayed in the left hand panel. □ 3.2 Effective Diameter − Effective diameter, always shown in the left hand panel of results, is defined based upon the total area above a certain Clip level. Count the N pixels above 13.5%. Area of each pixel is Ap. Total area = N*Ap The effective beam diameter Deff is then: Eff. Diam. = [4*N*Ap/ ] In the Setup menu choose Set Effective Diameter Clip Level to change the clip level from its default value of 13.5%. The Zoom 1X to 16X allows you to zoom the profile area on which the cursor is currently sitting. If Global selections is checked, then all profiles will change, TIP: Pressing ‘i’ and ‘o’ on the keyboard zooms the profile ‘in’ or ‘out’ respectively, and is much faster than accessing the menu. Profile to Clipboard sends the profile on which the cursor is sitting to the Clipboard. Save image as Bitmap file does precisely that. Export to Paint opens Microsoft Paint and places the profile in the Paint screen. From there you can save as a *.gif or *.jpeg file. Save Profile data as text does precisely that as a *.txt file. WinCamD Series 3-19 Quick-Start Tutorial □ Beam Profile Fit to Excel is found by right-clicking in the profile area. Profile fit values in spreadsheet may be changed by editing cells F30 to H40 in Form1.xls found in the c:\Program files\DataRay directory. Contact Technical Support for your custom Excel export requirements. A future version will include active export to Excel so that real-time adjustment can be monitored. 3-20 WinCamD Series Quick-Start Tutorial Set profile colors allows precisely that. You can waste infinite amounts of time playing with this. Other profile manipulation features: Center profile. In order to center the profile in the profile area in which the cursor lies, press ‘c’ for ‘Center’ on the keyboard Pan profile. In order to pan the profile in the profile area in which the cursor lies, press ‘P’ for ‘Pan’ on the keyboard and the current cursor position in the profile box will be centered in the window. E.g. place the cursor to the left of the profile and when you press ‘p’ the profile will move right. Pan image. In order to center a part of the image in the image area, place the cursor on the part of the image that you wish to be centered, and press ‘p’ for ‘Pan’ on the keyboard. In live mode only, and if the Capture Block is less than 1024 x 1260, if you have a center wheel on your mouse, click and hold down the center wheel and drag the image under the cursor to where you want on the screen. Measure any distance on a profile. Click and drag a line between two features in the profile, in order to determine the (horizontal) distance between these features. This is shown as Dist. = xx.x μm on the bottom left of the table below the profile. Left click in the profile area to delete the line and the measurement. 3.2.6 Pull-down Menus The majority of the pull-down menus are only applicable to live sessions, but it is important to take a look at them and read the brief description to understand the versatile and intuitive nature of the software. If an item in a pull-down menu appears grayed out, it is non-functional either because of the chosen mode, or because it is inapplicable to the particular head connected, or because no hardware (head or card) is present. WinCamD Series 3-21 3.2 Quick-Start Tutorial 3.2.7 File Where there is a corresponding button on the button bar, it is illustrated below. Open… Ctrl+O Opens the Open dialog box for files. Save Ctrl+S Opens the Save As dialog box for files. Save current data saves the current on-screen profile/image. SELECT data from data buffer as WCF. opens a Beam Select Dialog box that allows you to select which profiles to save. Click on an image to deselect it, at which point a cross appears on the image. SAVE ALL data in data buffer as WCF. saves all the profiles in the buffer. Be warned that a single 1024 x 1024 image gives a 2MB image. Saving multiple images can lead to a very large file. If you are going to email files elsewhere, consider collecting files over a smaller area or at a lower resolution, and/or zipping the files prior to sending them. Save current data as binary does precisely that. Save current data as text. (Can be slow) saves a file in text format. These files may be imported into programs such as Excel using , and ; (comma and semi-colon) as delimiters. Save current data as 8 bit TIFF does precisely that. Save current data as 16 bit TIFF (non standard) does 3-22 WinCamD Series Quick-Start Tutorial precisely that. Note that there is no standard 16-bit TIFF format. These files do successfully import into Windows Paint. Screen to Clipboard sends the screen area between the Toolbar and the Status bar to the clipboard, allowing import into reports generated in other software. Other screen-saving options are Save current screen as bitmap file and Export screen to Paint. To save images as *.jpg (JPEG) or *.gif (Graphics Interchange Format) files, the simplest way is to use the Export to Paint feature in the DataRay software. If your version of Paint does not appear to support these file formats, see the Application Note at the website. Print… Ctrl P, Print Preview and Print Setup… are self-explanatory. The software will print the current screen, plus the date and a screen plot title. The profiles are deliberately printed with vertical elongation for greater visibility. To avoid soggy black paper with ink-jet printers, go to Palettes and choose Inksaver. Print with Notes allows you to do precisely that. The information is saved and may be modified for subsequent prints. Load Defaults does precisely that, useful if things seem ‘screwed up’. Holding the Shift key down while starting the software has the same effect. Load Job and Save Job… A Job file allows saving and opening particular software setups. It is especially useful when testing a variety of laser assemblies on a regular basis. Saving a complex setup with specific Pass/Fail criteria is a very effective way of saving time and establishing parameters for repeatable results. Multiple *.ojf files can be saved, each with a different set of settings. The next block shows the names and paths of the six most recent files that have been saved and/or opened. Where no file path is shown, then the file is in the c:\Program Files\DataRay directory where you originally installed the software. Exit does precisely that. 3.2.8 Device Select the hardware that you are working with. WinCamD will change to WinCamD Series in a future release. WinCamD Series 3-23 3.2 Quick-Start Tutorial 3.2.9 Palettes Select the palette that you require. High color palette is whatever your PC supports. Monochrome palette is whatever your PC supports. 32 color palette is precisely that 10 color palette is precisely that Ink Saver mode, changes the black and blue-black background (the lowest 2% of the levels after background subtraction) to a white background. This does what it says. It saves ink when you print, and minimizes that soggy floppy paper feeling. 3.2.10 Average Opens the Image Averaging menu. Choose either a running average based upon a specific number, Average 5 to 20, of profiles, or choose Continuous (accumulation) averaging of the profiles. An averaging mode indication will appear in blue on the profile graphic. The displayed results are derived from the averaged profile. Reset average [ESC]. Press or the keyboard to restart the 3-24 the Esc button on averaging. WinCamD Series Quick-Start Tutorial 3.2.11 Filter Selects profile and/or area smoothing. For beams below 30 times the pixel dimension the Filter should be set to No filtering. Filter selects a triangular weighting smoothing function performed as a running smooth of the profile. The default is 0.2% filter. Select Filter = 0.X% Full Scale. The actual FWHM of the triangular filter may be calculated as: FWHM = [% of full scale x Scale μm/div x Zoom factor]/10 3.2 FWHM Samples E.g., for: % of full scale = 0.2 Scale μm/div = 50 Zoom factor =4 FWHM = 4 μm Since smoothing causes an increase in the width of the smoothed profile, the displayed value for the beamwidth is corrected using the same algorithm as is used for slit width correction. The area image filter, for WinCamD series only, calculates the average of the sum of the pixels over the specified sample. E.g. on 3 x 3 pixels, it takes all nearest neighbor intensities, sums them, divides by 9, and places the result at the center pixel location. WinCamD Series 3-25 Quick-Start Tutorial 3.2.12 Camera Selects the camera to be used. If only a single camera is attached, it will automatically find that camera. If more than one camera is attached, it will default to the first camera on the list. For any other camera, you will need to manually select it. Alt N selects WinCamD cameras. Shift N selects WinCamD-UXX cameras. Use all USB cameras sets all connected USB 2.0 cameras to capture images in parallel (e.g. when triggered by the same trigger input pulse). Individual captured images are stored in the individual camera buffers and are then read out into the software buffer in a serial manner. See page 3-32 for how to scroll through the image buffer. There are subtleties to using multiple cameras. Download the Application Note at the website. 3.2.13 View Allow you to select what is occupying the screen. Some options may be grayed out if they are not available for the system that you are using. Open / Close Log Dialog does that. Open / Close M2 Dialog does nothing. Show Non-uniformity is now accessed by right-clicking on the profiles area. Open M2 Dialog does that. 3-26 WinCamD Series Quick-Start Tutorial 3.3 o SETUP Capture setup dialog Press ALT S to open the WinCamD Capture Setup dialog. The top of the dialog screen shows the Firmware version and the Clock source. If you see problems, Product Support may ask for this information. 3.3 This screen operates in live mode only (i.e. not on recalled images) and allows you to do the following: WinCamD Series 3-27 Quick-Start Tutorial 1) Capture resolution. At the expense of a factor of two in linear resolution, you may approximately double the speed of image capture by choosing FAST rather than FULL. -UHS cameras always operate in FULL mode. 2) Capture Block. Select the image size that you wish to capture. Using a smaller Capture Block may increase the frame rate on some PCs. Drag-and-click it on the small screen in the dialog box in order to place it over the beam area of interest. 3) Flip image flips the vertical orientation of the image. Its default is unchecked, to ensure that positive Y is up. 4) Rotate 180 deg does that. Its default is unchaecked. 5) Gain. G = X.X Most useful when working with pulsed lasers where exposure control is ineffective for pulse widths less than several tens of μs, and the user must insert sampling &/or attenuation in a quantized manner, Gain allows the user to set the Peak to a suitable value. With CW lasers, this is only used if the beam is so faint that even at the maximum 1024 ms exposure with the ND filter removed, the Peak is still not reaching >80 %. 6) Offset. The offset is automatically set above the zero of the ADC full-scale range. This ensures that the noise although very low, is properly sampled. [Though optical intensity is by definition always ≥0, voltage noise will have negative components.] This is primarily a diagnostic tool with limited user utility. [Disable this function by clicking the Lock ADC offset [disable auto adjust] box. Set the Offset by setting the Offset slider. The Offset is shown in mV and as ADC Peak = X.X %. … by why would you want to?] 7) Drag capture box to desired location. The slider bar allows you to access the full imager width on some sensor options. The box below shows the location of the top left hand edge of the box. This will be changed to the center of the box in a future software revision. 8) Pixel multiply factor. Allows you to adjust for ancillary optical elements that may change the scale between the object plane and the CCD pixel plane. For TaperCamDs this number is on the label on the back of the camera and on page 114. 9) IR Camera Settings now includes the ability to select the Enable IR Camera option with a default gamma value of γ = 1.41, plus the option to implement the uniformity correction file that ships with the camera. Check Enable IR Camera box to enable this option. If a compensation file was provided, format WCDIRCompDxxxx.wcf, where Dxxx is the serial number on the back of the camera, then browse for this file and select it. The CompLo and CompHi boxes allow you to set alternative defaults to the maximum and minimum correction factors to be used. [To reverse the normal correction order , check the Comp first then gamma box.] The ‘Gamma’ (Greek ‘γ’) of a camera is the power relationship between the output video signal and the input irradiance (intensity): γ Video Signal = (Input irradiance) 3-28 WinCamD Series Quick-Start Tutorial γ values below 1 ‘soften’ the intensity differences in the scene, and are commonly found in consumer and surveillance cameras, rarely in industrial cameras, and frequently in ‘vidicon’ style IR cameras. Gamma correction is not required for WCamD, TCamD cameras, which have = 1. PLS factor. –UCM camera only. The default value is 1%. The software compensates for residual sensor sensitivity during the readout period. For a full description see the IMPORTANT WinCamD-UCM at Short Exposures Application Note at the website. You may ignore the test modes unless directed there by Tech Support. Numeric display modes is discussed in section 3.2.3 Set centroid cliplevel allows you set a default other than the 13.53% (1/e2). The centroid is calculated for all pixels with % level above the centroid clip level. Currently, the level may be set between 5% and 90%. If you try to set higher or lower values, it will default to 13.53% without warning you. Enter Effective Width cliplevel allows precisely that Set geo-centroid cliplevel allows precisely that for the Geometric centroid Setup trigger. See Chapter 4 on Pulsed Lasers. Jitter suppression. Inoperative. Will be grayed out in a future software revision. Enable auto-naming. A name will be suggested in the format: WC_YY_MM_DD_HH_MM_SS … which is a device abbreviation , WC, followed by the date and time (24 hour clock) read off your computer’s clock. [This may change to a shorter BXYYMMDD_HHMMSS] Use ISO 11146-compliant diameters and orientation calculates 4σ diameter and beam orientation based upon analysis of the whole image, rather than simply the line profiles along the crosshairs. See Appendix A for equations. WinCamD Series 3-29 3.3 Quick-Start Tutorial 3.4 TOOL BAR Toolbar (Button bar) functions provide quick access to some items. Grayed Out? Some buttons are grayed out until you press Stop. Some will be grayed out if they are inapplicable to your Device or to your current mode of operation. Clear, Open, Save. These three buttons, in order, Clear the data from the screen, and Open and Save files. Select the centroid mode to determine the X,Y position of the intersection of the crosshairs. Xc - the mathematical centroid for all points above the level set in Section 3.3. Xg - the geometrical centroid for all points above the set centroid level. [Geometric centroid is the center of all the beam above the Clip[a] level, with no intensity weighting.] Xp - sets the crosshairs on the peak in the profile. Xu - allows the user to place the crosshairs Normal and Fast Mode. N & F allow display in Normal or Fast display mode. When the N button is grayed out you are operating in normal mode, and standard and user requested calculations are performed for the beam. This may limit the speed of the screen update. Select F to tell the software to simply update the screen as fast as possible. Go, Stop, Single Shot and Refind camera(s). The G button starts the capture of images by the head, or press F1. The S button stops the capture of images by the head, or press F2. The 1 button initiates single shot capture of images by the head, or press F3. The R button refinds the attached camera(s). Lock Baseline. The padlock style Lock and Unlock buttons allow you to Lock the baseline. This allows the measurement of beams which overfill the screen and are therefore too large to allow the determination of a good zero level while the beam is on the camera. To use this feature, block the beam and click on the Lock button. Then allow the (CW or pulsed) beam to illuminate the screen. The zero level from which clip levels are determined will be based on the level determined while the beam was blocked. Obviously (?), because the beam wings and true zero level are not imaged, second moment (4σ) widths calculated for such a beam are invalid. To disable this feature, click on the Unlock button. 3-30 WinCamD Series Quick-Start Tutorial To normalize the 2D and 3D displays, click the left hand button. X, Y, B & L allow display of the X profile only, the Y profile only, Both X & Y profiles, or Large in which the profiles are not shown. The Large option allows the viewing of a screen from across the lab. 3.4 Select B to return to the default screen. Background subtraction. Pressing the left hand [-] button to initiate background subtraction. The box shown right will appear. Block the beam and then click OK. The captured background will be subtracted from subsequent images. Press the right hand [ ] icon to disengage this feature. [Hardly ever used: To auto-subtract the minimum level in the image, press Alt S and check the Enable auto baseline subtraction box in the WinCamD Capture Setup dialog box.] Select Beam Set Dialog The matrix button opens a dialog that allows you to select an image beam from the stored set. Move the cursor over the array to view a beam. The left-right keyboard arrows allow you to scroll through the beams without first opening the dialog. The caption line at the top tells you which beam you are looking at. Page Up, Page Down has the same effect. Live versus Saved. These buttons allow you to toggle between live mode and saved data. Reset Averaging. This button clears and restarts the averaging. Print & Print with Notes. This pair of buttons allows you to print just the screen or the screen with additional notes. In either case the header includes the software version number, and the day and date of printing. The file name will be added to this default header in the near future. WinCamD Series 3-31 Quick-Start Tutorial This button accesses the M2 measured feature used in conjunction with the M2DU stage. This is described in a separate Data Sheet and User Guide available at the website. Log Data opens the Data Logging Control & Status dialog box. This allows you to log data to the hard drive, save the results as a *.log file, export the results as text or to Excel, and recall the results as required. Click on Setup Log… to enter sample intervals and periods for up to three different sample intervals, saving up to three files. Press Show example 1 and Show example 2 to see how these boxes should be filled in. If you enter two or three different sample rates, but use the same file name in each AS box, the program will log the two or three sample sets sequentially into the single *.log file. Selective logging. As a default, all displayed results are logged. To log only data that is Enabled in the Pass/Fail parameters box, (accessed by clicking the individual results boxes, see right), select Log enabled data only Click OK to return to Data Logging Control & Status. 3-32 WinCamD Series Quick-Start Tutorial The rest of the buttons in the Data log dialog are self-explanatory. Logged data is saved as *.log text files which may be exported into Microsoft Notepad using Show log file as text, and into Microsoft Excel using Convert to Excel. See examples below: 3.4 Graphing in Excel. If you are unfamiliar with graphing in Excel, please see the Graphing in Excel application note at the website which will take you through the basics. WinCamD Series 3-33 Quick-Start Tutorial Results log to Text File. Logs results data in real-time to a file called RTDATA.txt, (example shown), where it is available for access by other software. By monitoring the Update_key#, you can determine when updated data is available for readout. Image Log. Logs up to 64 images at intervals of 1 to 5,000 s. An example is shown below: In the future, the number of images will be increased and the interval will be reduced to as fast as possible. Because this function fills up your hard drive at ~2.1 MB per full resolution image, the software will assess available space and deliberately not fill it. 3-34 WinCamD Series Quick-Start Tutorial Beam Wander Use the button or press Ctrl W. The display auto-scales as points are added. The number in brackets after the RMS value is the Standard deviation value : 3.4 RMS = [∑[Xr2+Yr2]/n]0.5 where Xr,Yr are relative values σ = [∑[Xr2+Yr2]/(n-1)]0.5 Time interval allows you to set the time interval between samples. Samples to be recorded allows you to set the number of samples, up to 8192. Clear restarts the plot, after a warning. Normalize recenters the plot. Replay or Replay Fast replays the beam position history. Sequence off Press this button and use the + and – buttons on the numeric keypad to scroll through the data for the deviation data for the individual points. To Clipboard puts Beam Wander to the Windows Clipboard. To Excel opens the data in Excel Export to Paint opens the image in Paint Save as bitmap does precisely that. WinCamD Series 3-35 Quick-Start Tutorial Fluence Click this button to see: If it says: !! No relative Power setting !! you need to enter a value before the Fluence can work. Click anywhere on the Power Bar to open the dialog box shown below. Enter the power as measured by a calibrated power meter, and the unit of measurement. The power bar will then display relative to the measurement entered. If you enter dB or dBm, it will recognize these terms and work in logarithmic mode. You may also enter 100 as the number and % as a label to give answers in %. 3-36 WinCamD Series Quick-Start Tutorial 3.4 Press the Setup Fluence button to open the second screen shown above. Choose: Round or Square Defined Fluence Area; enter the Fluence Diameter and Area units that you require. Check the Show Fluence Area box to show the fluence area on the main 2D screen as a white circle or square. The default area for the Peak Fluence Aperture is shown on the red grid screen. Click on the grid to add pixels to the defined four pixel square shown. To save and use what you define, press Save. To return to the four pixel square, press Clean. To restore the area that you previously created, press Restore. You may also enter values and Enable Pass/Fail testing of Fluence Test Limits. Finally, click OK. WinCamD Series 3-37 Quick-Start Tutorial This button allows you to replay the 64 image buffer at a user-defined update rate. Leave it at 0.0 seconds for PC limited replay speed. Press it again to stop the replay. Power Bar The auto-scaling Power bar function gives an indication of relative power as a scrolling ten sample histogram. The power is calculated as the integral of the energy in the image. It is not a calibrated power meter. Click on the bar to open the dialog box shown. Enter the power as measured by a calibrated power meter, and the unit of measurement. The power bar will then display relative to the measurement entered. If you enter dB or dBm, it recognizes these terms and works in logarithmic mode. You may also enter 100 as the number and % as a label to give answers in %. Trigger Delay The slide bar is located below the 3D image area. 3-38 WinCamD Series Quick-Start Tutorial CCD/CMOS Gain The slide bar is located below the 3D image area. It is a qualitative, not a quantitative illustration of gain. i.e. Gain =1 is greater than Gain =1 but is not necessarily exactly twice as large. It offers 5:1 Gain control 3.4 Exposure control may be accessed by rightclicking on the Exposure time area. Defaults are shown. For faint beams, you may uncheck Enable limits to allow longer exposure up to 1024 ms. With –UCM cameras the dark current from ‘hot’ pixels may dominate at long exposures. To manually set the exposure, uncheck Enable auto exposure adjustment WinCamD Series 3-39 Quick-Start Tutorial 3.5 SHORT CUTS Keyboard Short Cut keys are tabulated below. Some require hardware to be present. Grayed out items are not available at the time of writing, but may become available later. F1 Starts active image acquisition Page Up Access previous image F2 Stops active image acquisition Page Down Access the next image F3 Single frame capture Alt F4 Exits the program a Selects absolute position display Alt S Opens Camera Setup b Selects both profiles Ctrl Alt S c Centers the profile in the grid Opens input box Sigma power percent g Go (Start); starts data collection i - Zooms in -UCM offset correction is off when this key is depressed. o Zooms out + -UCM offset correction image is shown when this key is depressed. p Pan the profile r Resets Profile scale Zoom to 1X s Stop; stops data collection x Selects x profile y Selects y profile Ctrl E Opens Exposure Control dialog Ctrl F Opens Fluence dialog Ctrl O Opens a file Ctrl P Prints the results Ctrl S Opens Save dialog Ctrl T Opens Trigger dialog Ctrl U UCM Raw and fine Adjustment. Ctrl W Opens Beam Wander 3-40 for the inclusion WinCamD Series Quick-Start Tutorial 3.6 HARDWARE QUICK-START TUTORIAL 3.6.1 Precautions and Safety Warnings Do not skip this. If you do not take these precautions, you may damage the equipment or your eyes. Always look-up or measure the beam power and try to estimate the beam diameter before analyzing a laser beam for the first time. Ensure that it meets the maximum irradiance and maximum power limits in the specifications. Follow the guidance in Chapter 5 Be aware of the laser beam path and its reflections. Where appropriate use beam blocks and Wear Proper Eye Protection for the wavelength being analyzed. To avoid fragmented files, always close the program properly. Never turn off the computer while the program is active. Image spots and diffraction rings. See Section 3.6.3 3.6.2 Starting Up a) If you have not already done so install the PC Card and software – Chapter 2. b) Eye Safety: If the beam power is high, put on your laser safety goggles before you turn on the laser. It is your responsibility to determine eye safety issues. Use a viewer or phosphor card for beams invisible to the naked eye. c) Disconnect the cable before moving the camera head a large distance. You may hot-plug and un-plug the camera head while the software is on. If you continually move the head around with the cable attached, drag on the cable may cause the spring clip connector retention shell to bend and weaken. Mount the head in a rigid manner such that the head will intercept the laser beam in a plane perpendicular to the beam axis. It often helps to install the head or the assembly to be measured on an XYZ stage. d) If you have not already done so, read this manual. e) If it is the first time you are using the software, but have been experimenting with the settings, go File, Load defaults, to reset the software to its defaults. To start taking data, press ‘g’ on the keyboard or click on the Go or Ready button. The defaults include auto-exposure. The exposure will be set to ~1 ms initially and then automatically adjust for your beam in the range 40 μs to 1024 ms. The defaults set the Inclusion Region image size to 1024 x 1024 and fast mode. Enter Alt S to enter the setup screen and change the values in accordance with Section 3.3. WinCamD Series 3-41 3.6 Quick-Start Tutorial Once the beam is set within the image area, the readings will be accurate and the profiles may be analyzed as discussed throughout the earlier in the chapter. f) When you close the software, it will automatically save the settings that you were using when you exited. To save an alternative and consistent set of settings, use the *.ojf file approach outlined in section 3.2.8. When you next open the software, you may carry on with the settings saved on the last exit, load the defaults, or load a saved *.ojf file. g) If you are working with pulsed lasers, read and understand Chapter 4. h) The standard cable supplied is a 3 meter (10 ft) cable. If you need a longer or shorter WinCamD-UXXX cable, then you may purchase one at your local electronic store. It is a standard Male A to Mini B 5 male USB 2.0 cable; beware - there are other terminations for USB 2.0 cables. 2 m extension and 5 m booster cables (both Male A to Female A) are readily available. Warning. Some very thin USB 2.0 cables may not work. i) Background image subtraction … see Section 3.4 j) Large images … if the beam is larger than the image area, you may still measure it at a clip level that lies within the image area, even though the edges are outside. Set up the beam to a reasonable Peak % level and then disable the auto-exposure. Then block the beam, press Alt S, and Lock ADC offset. Click OK, unblock the beam and then measure it in the normal way. See the Application Note on measuring large beams at the website. 3-42 WinCamD Series Quick-Start Tutorial 3.6.3 Artifacts and Cleaning of the ND filter & Imager chip. The first advice is “Do not”, but sometimes it becomes necessary. ND Filter Dust & Marks. If you see what looks like circular diffraction patterns on the screen that do not move with the source image, then these are dust specs on the ND filter. Sometimes, simply moving the image or rotating the filter will move the spots off the image. 3.6 These spots are most easily cleaned with an oil free air-duster. Some air duster fluid can leave a film so keep the can upright, do a test spray to one side first and bend the nozzle if the angle is awkward. If the problem is finger marks, rub with a small quantity of laboratory grade ethanol or methanol on a lint-free cloth (paper towels are quite good, paper handkerchiefs are appalling). Sometimes you have to do an alcohol wash with a cotton bud first, followed by an edge to edge blow-dry. Some marks can be water-soluble but not alcohol-soluble. Rub with a damp lint-free cloth. Imager Chip Dust. If you see very small black spots on the image that do not move with the source image, then this is dust on the chip. Some level of dust is inevitable, so try to avoid the pursuit of perfection. However, if the dust is interfering with the measurements, at your own risk, remove the ND filter, put the camera under a low power microscope and use an oil-free air jet* to blow the surface of the chip. *Some air duster fluid can leave a film so keep the can upright, do a test spray to one side first and bend the nozzle if the angle is awkward. Damaged chips can be replaced but at your expense. (~$600 for standard chips, higher for -IR chips.). Do not touch the surface of the chip. Do not blow directly on the fragile bond wires WinCamD Series 3-43 Quick-Start Tutorial 3.6.4 TaperCamD Artifacts The following are inevitable consequences of the use of fiber optic tapers. If you, the customer, find these artifacts to be unacceptable in your application, you may return the unit for a full refund, but not replacement, within 30 days of receipt. Image distortion. Schott quotes barrel or pincushion distortion up to ±3% from the nominal magnification. This distortion tends to be towards the taper edges. We do not measure or compensate this distortion. Diamond pattern. Due to the fiber bundles used in taper manufacture, TaperCamD series may show a slight superimposed diamond or chicken-wire pattern shadow. Edge misalignment. Early assembly techniques led to a soft edge of up to ~5 % of the image area, where the taper edge is misaligned with the identically sized CCD edge. This assembly tolerance is improved to better than ~3% on current versions. Response Non-uniformity Compensation. See Appendix E 3-44 WinCamD Series Capturing Pulsed Lasers CHAPTER FOUR 4. CAPTURING PULSED LASERS 4.1 4.2 4.3 4.4 TERMS AND FEATURES ..................................................................4-1 PULSED BEAM CAPTURE INITIAL SETUP ...............................................4-2 AUTO TRIGGER MODE...................................................................4-4 EXTERNAL TRIGGER MODE .............................................................4-6 WinCamD Series makes pulsed beam capture as simple as possible. That said, learn to operate the software with a simple CW beam before you try to operate with a pulsed beam. Trust us on this … your time will be well spent. WinCamD Series: … has comprehensive Auto Trigger capability and a input/output trigger via BNC. … can synchronize to a +1.0 to +12V amplitude (preferably TTL) input pulse. There is ~200 ns delay between a trigger pulse and the shutter opening. … can output a 5 V TTL sync pulse to trigger a laser. … can advance/delay the electronic shutter with respect to the input/output trigger. … can ‘dissect’ pulse widths >40 μs, and do so with synchronous triggering. The pulse may be ‘dissected’ by using an exposure time less than the pulse width and temporally scanning it across the pulsewidth. … can vary the shutter exposure time from 50 μs to 1024 ms, allowing beam ‘attenuation’ on pulsed beams with pulse widths greater than 40 μs. can vary the CCD gain up to 5:1 (7/14 dB, optical/electrical). Use of gains >1 lead to lower SNR (Signal-to-Noise Ratio). 4.1 TERMS AND FEATURES Synchronous Camera Trigger. The camera is triggered by a TTL pulse from the laser. Synchronous Laser Trigger. The laser is triggered by a pulse from the camera. Exposure/Electronic Shutter. The light falling on the array leads to a proportional integrated signal while the electronic shutter is open. Be aware that the terms Trigger, Gating and Capture can sometimes be used interchangeably, and sometimes imply different things. Trigger strictly implies that something happens as a result of some input. Gating implies that the presence of something allows something else to happen. Capture is the act of capturing a pulse. PRR is the Pulse Repetition Rate of the laser. WinCamD Series 4-1 4.1 Capturing Pulsed Lasers SNR is Signal to (rms) Noise Ratio Progressive scan. WinCamD Series uses ‘Progressive Scan’ where the imager is read out as a continuous sequence over the range of interest. The frame rate is frame size and resolution dependent. The electronic shutter opens once per frame. The Exposure time (integration time) can be changed in small steps from 0.050 to 1024 ms. Imagers perform “energy in a bucket” integration. All photo-electrons [pulse(s) plus background] incident within the electronic shutter period is integrated. An ideal situation is that a single laser pulse falls within the period when the shutter is open, and that the background is zero. It is therefore important to use a logical procedure to systematically adjust settings to correctly capture beams. Consider a laser pulse train. A pulse will only be captured when it falls within an open shutter period. The pulse train and the imager exposure period must coincide. The frame transfer timing pulse reads out all charge accumulated on the pixels, essentially clearing the imaging area. For pulse duration <50 μs, the electronic shutter can only ‘gate’ pulse capture. For pulse durations >50 μs, the electronic shutter may be used to attenuate the background and the beam intensity. In some capture modes, the electronic shutter is left open continuously. The charge in each pixel is read out upon request (by movement it into the transfer register) without closing the shutter. The pixel charges are emptied by the readout. Imager gain may be increased in order to increase signal closer to saturation (85% of Peak on the ADC is ideal) at the expense of slightly degraded signal to noise ratio. 4.2 PULSED BEAM CAPTURE INITIAL SETUP Capturing pulsed beams may require some trial and error to obtain the best results. WinCamD covers most conceivable triggering options, pulse durations and PRRs. If you ignore the advice that follows, you may damage the camera head and/or your eyes. a) Read and apply Section 3.6 and Chapter 5 for your personal safety and to set the power falling on the camera head to acceptable levels. If you are unsure, move the beam in slowly from the edge to first pick-up the edge of the beam. b) Press File, Load defaults. It is highly recommended that you start in CW mode with the camera shutter on auto, watching and centering the occasional captured pulses on the screen. If you see nothing in CW, you will see nothing in any of the triggered modes. At this stage you are concerned with ensure that the beam is not too faint to observe and on centering the beam on the imager. 4-2 WinCamD Series Capturing Pulsed Lasers c) Note that the Gain may be increased using the on-screen slider located just below the 3D display areas. Higher gains assist in setting the signal level (Peak = xx.x %) to its optimum value of ~90% (% of ADC saturation) but at the expense of somewhat degraded SNR. d) Next, minimize the ‘dead’ space around the beam by redefining the Capture Region (Section 3.6.3) to be as small as possible while still fully capturing the beam. If this is not done, residual unsubtracted integrated image background may be a significant percentage of the GOOD NOT GOOD pulsed signal, and may compromise correct capture and analysis. [The software automatically subtracts overall background, based upon the lowest signal level in the capture region.] There are two triggered modes of operation. Auto Trigger, where no ‘formal’ laser synchronization occurs. Synchronized mode, useful if the laser provides a trigger output or input. The sections which follow explain these modes. Right-click on the trigger delay box located below the 3D area in order to access the Trigger Setup dialog. WinCamD Series 4-3 4.2 Capturing Pulsed Lasers 4.3 AUTO TRIGGER MODE In Auto Trigger mode, WinCamD will automatically capture and display pulses that lie within the intensity limits set by the user. Auto Trigger is attractive to many users of a WinCamD Series. It works well in many circumstances. Auto Trigger may require some trial and error experimentation to get consistent results. It may require a level of knowledge of what is “good data”, based upon a level of experience with the WinCamD and the laser being tested. Even if your laser driver provides a TTL trigger output or accepts a trigger input, try Auto Trigger before going to Section 4.4. a) Auto-trigger is totally ungated and untriggered, with a simple upper and lower intensity level criteria to Accept or Reject images each time a frame is captured. b) Capture status messages are displayed in the box on the left hand side immediately below the button bar. Auto-Trigger Mode Operation. a) As previously advised, first set up approximately in CW mode. b) Press Ctrl T, or right-click on the non-slider area of the Trigger Control box, to open the dialog box shown, and select Auto Trigger On (Exposure settable). c) Unless you have a reason to select otherwise, start with the defaults of 10% and 100% for the Minimum & Maximum level in percent respectively. The % is expressed as a proportion of the saturation level of the ADC, as shown on the screeen Beams with intensity above 100% will also be captured. Setting to any value below 100% (e.g. 99%) excludes such beams. The Minimum may not be set below 10%. d) Pulse Repetition Rate dependencies. PRR <25 kHz. Choose Exposure settable mode below. PRR ≥25 kHz. Treat as a CW beam, and ignore pulsed laser operation. The number of pulses captured per exposure = Exposure period x PRR. e) 4-4 Constant Exposure mode on WinCamD only. (To be renamed Open Shutter mode.) In this setting the shutter is open continuously. The camera will repeatedly capture images as fast as the software, the PC and the Capture Block setting will allow. As soon as one frame has been processed and displayed, the next image is read out. As requested by the software the accumulated image is moved to the interline transfer register for readout. WinCamD Series Capturing Pulsed Lasers Pulses with an ADC % within the set levels will be captured and displayed. Pulses which do not meet the criteria will not be displayed. The Exposure time depends upon the number of lines in the chosen image size and whether Full or Fast mode has been selected in WinCam Setup. For the fastest update rate choose Fast and a Capture Block area which is just sufficient to fully capture the pulse. Neither Auto-exposure nor Manual exposure will change the exposure time. The software will totally ignore these settings. In a future software release, the actual exposure being used in this mode will be shown in the Shutter Control box. f) Exposure settable mode. Choose this mode if you wish to use the Exposure time to help control the beam saturation. ‘Control’ can mean attenuating a single wide pulse beam by capturing only a part of that beam (e.g. a pulsed LED) or sampling a string of high PRR laser pulses by capturing a larger or smaller number of pulses during each exposure. Normally, set Exposure = 0.95/PRR, to capture single pulses. Any longer exposure time will capture 1 or more pulses. E.g. If the PRR is 200 Hz, set the exposure time to just below 5 ms (1/200) in order to capture nearly every pulse. If background illumination levels are a problem, set the exposure time to a lower value, but at the expense of probability of pulse capture. The camera will repeatedly capture beam images, as fast as the set Exposure, the software & the PC will allow. Pulses with an ADC % within the set levels will be captured and displayed. Pulses which do not meet the criteria will not be displayed. g) Intensity Variations. Because the Auto-Trigger mode is asynchronous with the pulsing laser, the intensity can fluctuate to a greater or lesser extent as one or more pulses fully or partially overlaps the exposure period, and one or more pulses gets included. To restrict the captured images to unsaturated images of reasonable intensity, set the Maximum level in percent to 90%, and increase the Minimum level in percent. Then adjust the external attenuators and/or the CCD gain until pulses are being captured. A narrow ratio between the Maximum and Minimum levels ensures that only single pulses will be captured. Important: If … you use an Exposure below the laser pulsewidth; And … the pulse spatial distribution changes during the pulse; Then … a single pulse image will not fully represent the pulse. Instead … use External Trigger mode, below. WinCamD Series 4-5 4.3 Capturing Pulsed Lasers h) Capture but too low! If this message appears in the Ready area, it is telling you that a frame was taken, but the peak level was below the set Minimum level in percent. Capture but too high! If this message appears in the Ready area, it is telling you that a frame was taken, but the peak level was above the set Maximum level in percent. 4.4 EXTERNAL TRIGGER MODE In this mode, WinCamD captures and display pulses by laser synchronization. Caution should be exercised once a triggerable laser is connected to the WinCamD. The laser could trigger from the shutter signal immediately the camera is turned on. a) Ctrl T opens the dialog box. Select either External Trigger Enabled (Exposure settable) b) Isolated Pulse Triggering. For some users (e.g. doing fusion experiments) single pulse triggering on the first incident pulse is required. For these applications, the trigger pulse must arrive Δt = 40 μs to 20 ms before the laser pulse. The exposure must be set >Δt. In such cases with WinCamD use Direct Trigger Input (no locking) The camera will trigger on the single TTL input pulse and will also indicate on-screen how many pulses have been received. Set Trigger is input. c) Pulse Train Triggering. Set up the dialog box in accordance with the trigger characteristics. [Source Repetition Frequency (optional) currently does nothing and maybe deleted in a future release.] d) The BNC on the WinCamD head can be configured as an input or output socket. The expected input pulse is a TTL pulse. The pulse goes high in synchronization with the exposure signal start on the imager chip and the pulse-width equals the exposure length. Attach a 50 Ω or 75 Ω BNC cable to the BNC connector on the camera head. In most scenarios, the laser will provide the trigger to the camera. The WinCamD BNC I/O 4-6 WinCamD Series Capturing Pulsed Lasers impedance may be set at 75 Ω or 1 kΩ. for output, normally set it to 1 kΩ. To accept a trigger, set it to 75 Ω. If it dos not work, verify the electrical pulse shape on an oscilloscope. e) The camera will repeatedly capture images as fast as the software, the PC and the Capture Block setting will allow. In this setting the shutter is open continuously. As requested by the software the accumulated image is moved to the interline transfer register for readout. Pulses with an ADC % within the set levels will be captured and displayed. Pulses which do not meet the criteria will not be displayed. [The camera card has a peak level detector for every image captured by the ADC. If the peak does not lie within the criteria, the image is not displayed and no further processing occurs.] Set an appropriate Exposure time as discussed earlier. f) There are two counters on-screen in this mode. In the blue line at the top of the screen, the image counter of captured images continually cycles from 1 to 64. In the Ready button area, a counter counts the number of times since go was pressed, that the software sampled the camera to determine whether an image meeting the Minimum and Maximum % criteria has been captured. If every image is good, then these two numbers will be equal. If, as is frequently the case, not all images are good, the count in the Ready button area will increase at a greater rate than the captured image count. In addition, if there is a difference between the numbers, the Ready button will also frequently display the message Waiting. [For processing speed reasons, the update priority on the Ready button is not as high as some other areas of the screen. When no image is captured, there is more time available for the button to be updated, so the message tends to stay at Waiting.] i) Capture but too low! If this message appears in the Ready area, it is telling you that a frame was taken, but the peak level was below the set Minimum level in percent. Capture but too high! If this message appears in the Ready area, it is telling you that a frame was taken, but the peak level was above the set Maximum level in percent. Waiting. Is not receiving a trigger pulse. g) Advance or delay the Trigger Control slider to change the timing of the capture in relation to the trigger pulse, until the whole pulse is captured. WinCamD Series 4-7 4.4 Capturing Pulsed Lasers This page intentionally left blank. 4-8 WinCamD Series Laser Attenuation CHAPTER FIVE 5. LASER ATTENUATION 5.1 5.2 5.3 5.4 5.5 IMPORTANT TERMS ......................................................................5-2 ATTENUATION OF YOUR BEAM ..........................................................5-3 ADDITIONAL BEAM SAMPLING/ATTENUATION .........................................5-3 UV LASERS. .............................................................................5-6 WORKING WITH BEAMS LARGER THAN THE CAMERA ................................5-7 5.5.1 5.5.2 5.5.3 Imaging of the laser beam scattered off a diffusing surface. ............... 5-7 Use of a long focal length mirror ..................................................... 5-7 Use of a long focal length lens......................................................... 5-8 5 ** It is very important to understand this section** This chapter addresses appropriate attenuation/beam sampling techniques and the measurement of large diameter beams. ‘Catalog Optics’ companies can supply suitable instruments, optics and optical mounting hardware to meet most measurement, attenuation, and beam sampling requirements outlined here. Links to Accessories are at the website. The notes in this chapter are provided for guidance only. DataRay Inc. and its Distributors and Representatives accept no liability for errors or omissions in these notes. Where a recommendation not covered by this chapter is required, please fax or email a description of your problem, together with a diagram and full laser beam details. Cameras are designed to be sensitive to low light levels. Lasers are high intensity sources. 2 If the beam Irradiance (W/cm or J/cm2) exceeds the Damage Threshold (Minimum signal/unit area which causes damage) of the camera, irreparable damage may result. If the laser beam Irradiance (W/cm2 or J/cm2) exceeds the Saturation Irradiance (Saturation signal/unit area) of the camera, a saturated image results. If the beam overfills the active area, inaccurate measurement of the beam will result. Typical attenuation factors required between laser beam and camera are factors of 103 to 1010 or more [ND5.0 to >ND10.0]. WinCamD Series cameras feature as standard: ND4.0 attenuating filter (LDFP Low Distortion FacePlate) set at 3o to the optical axis in order to avoid interference fringes. See page 1-7 for ND4.0 transmission. WinCamD Series 5-1 Laser Attenuation Electronic shutter giving effectively ND4.5 (45 dB or 32,000:1) for CW beams. Imager gain variation for Pulsed beams This makes achievement of the required levels of beam attenuation as simple as possible, but it is still important to understand what the considerations are, and how to address beam attenuation and large diameter beam measurement. Ambient Background Attenuation. Although the WinCamD software offers background subtraction, for best dynamic range and SNR, it is better to reduce the ambient background to black level on the camera. Measurements under typical lab conditions require a reduction of the ambient level of around 10,000. The ND4 filter provided with WinCamD cameras provide suitable levels of ambient attenuation. 5.1 IMPORTANT TERMS Irradiance (Power Density). For a Gaussian beam of 1/e2 [13.5% of peak intensity] width of ‘2w’ cm, and total beam power ‘P’ Watts, the peak Irradiance in W/cm2 in the beam, ‘I0’ may be calculated as: I0 = (2 x P) / (π x w2) = 2.55.P/(2w)2 Signal-to-Noise Ratio [abbreviated as SNR] SNR = Peak Signal/RMS noise. Pulse Repetition Rate ND or Neutral Density is a commonly used logarithmic approach to defining the Attenuation Factor provided by a neutral (approximately wavelength independent) filter. It has the advantage that logarithmic numbers may be added and subtracted, whereas attenuation factors must be multiplied and divided. ND is defined as: Pulses per second for a pulsed laser, abbreviated as prr. ND = log10(Attenuation Factor) E.g. Attenuation Factor 1 2 3 10 1,000 10,000 ND Value 0.0 0.3 0.5 1.0 3.0 5.0 e.g. ND 2.6 is a ratio of 400:1 Electronic shutter. Most CCD cameras offer a manual, pull-down menu or software controlled ‘electronic shutter’ mode in which the exposure (integration) time per frame may be set, effectively acting as an attenuator for CW inputs. For WinCamD Series cameras, the software interacts directly with the electronic shutter controls on the CCD chip, allowing on-screen shutter control in small steps from 40 μs to 1 s. For CW beams, the exposure automatically adjusts to the beam intensity. Obviously, use of an electronic shutter: 5-2 WinCamD Series Laser Attenuation 5.2 Does not change the Damage Threshold in W/cm2 for either CW or Pulsed lasers. Does change the Saturation Level in W/cm2 for CW lasers. Does not change the Saturation Level in J/cm2 for Pulsed lasers, unless the pulsewidth is greater than the minimum electronic shutter period of 32 μs. ATTENUATION OF YOUR BEAM a) Using a suitable calibrated Power or Energy meter, measure the laser beam total power ‘P’ Watts or energy per pulse ‘E’ Joules, preferably at the point at which you wish to measure the beam profile. b) By viewing the beam on a diffuse screen, or by using an IR Display Card or IR viewer for IR lasers, or by calculation, or by some other means, estimate the laser Beam Diameter. This dimension will be assumed to be the ‘1/e2’ diameter estimate, denoted as ‘2w’. If you are using a lens or a microscope objective to magnify or demagnify the beam onto the WinCamD, then the beam diameter will vary as magnification ‘M’, and the irradiance will vary as 1/M2. This dimension should be less than the dimensions shown in Section 1.7. If not, go to Section 5.4 c) Go the graphs in Section 1.6. If your beam is less than the saturation limits, then no further attenuation is required. If it is above the limits, carry on reading. d) Calculate any Additional Attenuation required. Pay attention to units. 5.3 ADDITIONAL BEAM SAMPLING/ATTENUATION Choose between the beam sampling/attenuation approaches given below. Note that since wavefront aberration, diffraction and interference results from the inclusion of any optical component in a coherent beam. Schemes that introduce the minimum number of reflections, optical surfaces, optical media (and dust & fibers on surfaces!) are clearly preferred. The catalog optics companies list a range of suitable accessories. Techniques for beam attenuation/sampling may fall into the following categories: Absorbing Neutral Density (ND) filters. Attenuation factors up to ND5.0 (1/105) are available with single absorbing ND filters. As standard we offer stackable ND filters, each in a circular housing with male and female C-mount threads. Filters are tilted by a few degrees to avoid interference fringes. Standard values are ND 0.5, 1.0, 2.0, 3.0, 4.0. Each filter assembly adds an additional 5.7 mm (0.225”) in depth in front of the CCD chip. Neutral density filters are not truly neutral. ND values are normally quoted at 546 nm. See section 1.7 for details. WinCamD Series 5-3 5.2 5.3 Laser Attenuation We also offer the EAM-2 C-mount 4-wheel variable attenuator assembly, offering >90 dB of attenuation. The EAM-2 may be used in connection with a microscope objective to magnify smaller beams onto the WinCamD camera. Do not attempt to attenuate high powers or power densities (irradiance) with absorbing ND filters. Absorbed power can cause the filters to shatter, presenting danger of injury and camera damage. Note that 3.5” diskette material is uniform and has ND ~2.0 and is sometimes a quick fix, but beware the fire risk if used too near to the focus. 5.25” disks are ~ND 3.0. High Power Dielectric Attenuators Attenuation factors up to ND4.0 (1/10,000) are available with reflective narrow bandwidth dielectric reflectors. Damage limits are very high, at 1 MW/cm2 at the wavelength of interest. Angle of incidence is limited to ±10o. www.cvilaser.com. Avoid reflecting the beam back into the laser. Care must also be taken to direct the reflected beam to a beam dump. Metallic Neutral Density filters Attenuation factors up to ND4.0 (1/10,000) are available with single metallic ND filters. Avoid reflecting the beam back into the laser. Care must also be taken to direct the reflected beam to a beam dump. Above ND2.0, metallic ND filters are highly wavelength dependent. For these reasons, metallic ND filters are normally not recommended. ‘Electronic shutter’. See the discussion earlier in Section 5.1. This is why the WinCamD Series cameras exploit this feature with direct software addressing of the electronic shutter. Reflection off a window, prism or wedge front surface. Sampling factors from 4% for an uncoated window to <1% for an AR coated window. (ND1.4 to >ND2.0). An issue with any such reflection is the degree of polarization sensitivity as a function of angle of incidence. Catalog optics companies also offer suitable wedged windows. Note that fused silica damage thresholds can be as high as 1 kW/cm2, so this can be a very effective way of dumping power. The CUB and CUB-UV are C-mount accessories which take a 3 to 10% sample using a optical wedge. Note that the wedge gives two reflections of similar intensity, but at different angles. Use a spacer tube to separate these before both reach the sensor. 5-4 WinCamD Series Laser Attenuation Multiple reflections in a wedge beamsplitter. Sampling factors of 1/1,000,000 are attainable, but multiple internal reflections may lead to interference if the beam divergence is comparable to the beam deviations in the wedge prism. Since the angular separation of the beams is 2ϕ, if the beam is large and ϕ is small, it can be hard to determine which beam is being sampled. If the reflection coefficient per surface is x, [around 0.04 (4%) for material with a refractive index ‘n’ of 1.5] then for angle of incidence θ, and wedge angle ϕ, then samples come off at the following intensities and angles: Surface Top Bottom Top Bottom Top Bottom Intensity x (1-x)2 x (1-x)2 x2(1-x)2 3 x (1-x)2 x4(1-x)2 @x=4%Angle 4.0.10-2 - θ 0.92 (θ+nϕ) 3.7.10-2 -(θ+2nϕ) 1.5.10-3 (θ+3nϕ) 5.9.10-5 -(θ+4nϕ) 2.4.10-6 (θ+5nϕ) 3 2 x (1-x) x(1-x) 2 x 5.3 Eventually the remaining energy is totally 4 2 2 2 2 x (1-x) x (1-x) (1-x) internally reflected. As angles approach the critical angle for total internal reflection, the sampled intensity becomes extremely sensitive to the polarization of the beam. Holographic Beam Sampler (HBS). A holographic (diffractive) beam sampler transmits the main part of the beam and diffracts a percentage of the light into multiple orders off to one side. The hologram is a surface structure in the fused silica (used for silicon wavelength HBSs), giving substrate damage thresholds are as high as the 1kW/cm2 of the starting material, just like wedges and windows. For pulsed beams, keep the level below 1J/cm2, especially at <400 nm. A major advantage of HBSs over angled wedges and windows is their polarization insensitivity, <1% at 100 and ~5% at 200. WCamD sampling diffracted beam HBS Incident beam Main Transmitted Beam Diffracted beams at ±θ , ±2θ , o o Sampling ratios range from 1/50 to 1/2,000 in first order. A ‘typical’ HBS is designed for a sampling fraction ‘s0‘, at ‘λ0’, at ±θo in first order. For two typical sampling fractions, the calculated sample intensities may be calculated as follows: 1st Order 2nd Order 3rd Order* WinCamD Series θ0 ±10o ±20o ±30o s0 = 1% (1/100) s0 = 1/100 ND2.0 s02/2!2 = 1/4.104 ND4.6 s03/3!2 = 1/3.6.107 ND7.6 s0 = 0.05% (1/2,000) 1/2,000 ND3.3 1/1.6.107 ND7.0 1/2.88.1011 ND11.5 5-5 Laser Attenuation *Due to manufacturing tolerances, the exact value of the sampling factor and angle in third order will vary and the beam may suffer some (unspecified) level of distortion. At wavelengths λ other than the design wavelength, replace s0 by sλ and θ0 by θλ . i.e. sλ decreases as λ increases. Sampling fraction ‘sλ’ ≅ s0.(λ0/λ)2 Sampling angle ‘θλ‘ ≅ arcsin[(sinθ0).(λ/λ0)] i.e. θλ increases as λ increases. E.g. Consider a first order HBS designed for 1064 nm: s0 = 1%, θ0 = ±10o Used at 800nm the values change to: sλ = 2.1%, θλ = ±6.9o Standard HBSs are wedged by (e.g.) 30 arcmin, perpendicular to the sampling angle plane, in order to avoid interference effects. Sources of diffractive sampling optics include Gentec [www.gentec-eo.ca]. Note that binary gratings are not holographic gratings and though less expensive, may not perform as well in terms of ghost images etc. 5.4 UV LASERS. Various manufacturers make conversion screens that convert UV to visible. Further information will be found at the website. We sell StarTech UV beam imaging accessories. 5-6 WinCamD Series Laser Attenuation 5.5 WORKING WITH BEAMS LARGER THAN THE CAMERA This section assumes that you have already considered use of a TaperCamD, a TaperCamD20-15 or a Beam Expander. Unsure? Contact [email protected] . 5.5.1 Imaging of the laser beam scattered off a diffusing surface. Incident Focusing lens Scattering from a Diffuse Scattering Surface 5.5 WinCamD This has been found to be a very effective technique. Not only is the beam image optically reduced to fit the CCD area, but also the scattering reduces the beam intensity. If a standard camera lens assembly with integral focusing and iris aperture is employed, then focusing is simple and the beam intensity can be further attenuated by closing the iris. If the incident and scattered angle employed are small and similar, the cosine distortion of the beam on the diffuser is compensated with the camera and lens aligned as shown, orthogonal to the axis of the scattered light. A perfect diffuser backscatters 31.8% per sr. (sr. = steradian of solid angle). For beams up to 24 mm total diameter, the Melles Griot SpeckleEater™ is a rotating diffuser that employs a rotating diffusing disk to eliminate speckle for CW beams. A 10mm lens aperture at 100mm distance samples 7.86.10-3 sr. and therefore would pick up ~0.25% (1/400) of the beam reflected off a perfect diffuser. More generally, if the beam image on the diffuser is focused through a lens iris aperture diameter ‘D’ at distance ‘L’ from the diffuser, (where D⊥L), then the effective Collection Factor may be calculated as ~0.25.(D/L)2. On top of this must be added the increase in irradiance of 1/m2 due to lens magnification ‘m’, (m is <1). Hence the total effective beam attenuation factor is: λ 0.25(D/mL)2 Since m = f/L the factor becomes: λ 0.25(D/f)2 λ 0.25(1/Lens f-number)2 5.5.2 Use of a long focal length mirror Use a long focal length spherical concave mirror, worked slightly off-axis, to reduce the beam diameter to a size which will fit on the camera. Sample the beam along its converging path at a point where it is small enough for the CCD. This will inevitably WinCamD Series 5-7 Laser Attenuation result in some limited aberration of the laser beam due to both the off-axis operation of the spherical mirror and its residual surface imperfections. 5.5.3 Use of a long focal length lens Use a high quality long focal length lens to reduce the beam dimension. As with the mirror, the introduction of any optic can change the characteristics of a coherent beam. 5-8 WinCamD Series Appendices APPENDIX A: Beamwidth definition & Measurement Beamwidth Definition 1. Gaussian Beams True Gaussian beams have no ‘edges’; that is, the intensity of a perfect Gaussian never actually falls to zero at large distances from the center. This arises from the nature of the (circularly symmetric) Gaussian intensity profile: Normalized Gaussian Intensity Profile I(r ) = I0 .e Where: − 2r 2 / w 2 = 2P πw 2 .e − 2r 2 / w 2 r is the radius w is the radius at the point at which the intensity has fallen to 13.5% (1/e2) of the peak value. P is the total power in the beam The ISO standard specifies that a 4σ beam diameter measurement should use at least 99% of the power in the beam. For a circularly symmetric Gaussian this 99% of total power integrates out to a diameter of 3.03w, the point at which I(r) has fallen to 1%. 1 0.8 0.6 0.4 App. 0.2 (1/e2) 0.135 0 -2.0 -1.0 A 0.0 r/w 1.0 2.0 For a Gaussian: I(r) = 50% @ Diameter = 1.2w I(r) = 13.5% @ Diameter = 2w I(r) = 1% @ Diameter = 3.03w I(r) = 0.5% @ Diameter = 3.4w I(r) = 0.1% @ Diameter = 3.7w WinCamD A-1 Appendices 2. Beam Irradiance In order to assess whether the irradiance (W/mm2) from a given laser might overload a beam profiler, it is useful to be able to calculate the peak irradiance. From equation 11), the on-axis irradiance at r = 0 is given by: I(0) = (2P/πw2) = 2.6P/(2w)2 W/mm2 for 1/e2 (13.5%) diameter 2w in mm. For example: • The peak irradiance from a 1 mm diameter, 10 mW HeNe is 26 mW/mm2. • The peak irradiance from a 5 mm diameter, 5 W Nd:Yag is 520 mW/mm2. 3. Second Moment Beam Diameter Conventionally beam diameters have been measured at the 1/e2 intensity point; i.e. at 13.5% of the maximum intensity. For the reason outlined in section 2.2a), ISO 11146 mandates the use of a ‘Second Moment’ definition of beam diameter: 2Wσ ( z ) = 2 2 .σ( z ) ….12) where the variance, σ2(z), is calculated as: σ2 (z ) = ∫∫ r .I(r, φ, z).r.dr.dφ ∫∫ I(r, φ, z).r.dr.dφ 2 ….13) Where I(r,φ,z) is the radial intensity distribution versus angular position φ, along propagation axis z. In more useful x and y terms, (since these are what actually get measured): σ x 2 (z ) = ∫∫ ( x − x ) .I( x, y, z).dx.dy ∫∫ I( x, y, z)..dx.dy σ y 2 (z ) = ∫∫ ( y − y ) .I( x, y, z).dx.dy ∫∫ I( x, y, z)..dx.dy 2 2 2Wσx ( z ) = 4.σ x ( z ) 2Wσy ( z ) = 4.σ y ( z ) The rotation angle φ is given by: φ = 2σx’y’ /(σx’ - σy’ ) 2 2 2 ….14) denotes the centroid of the I(x,y,z) intensity distribution (The ISO 11146 standard actually terms the quantities E(x,y,z) rather than I(x,y,z) , and dσx(z) & dσy(z) rather than 2Wσx(z) & 2Wσy(z). Here we have used the more familiar terminology rather than the less common terminology used in the ISO standard.) x,y A-2 WinCamD Appendices For a pure Gaussian intensity distribution, the second moment width is identical to the more familiar 1/e2 (13.5% of peak intensity) width. There are a number of potential disadvantages to the use of second moment as a beam diameter definition, none of which are insurmountable in a well-designed system. a) Unless the results are gathered and processed automatically, the second moment diameter is non-trivial to calculate. It is not possible to simply ‘measure’ it directly from a graphical plot of the data. b) Any unsubtracted background in the wings, either purely analog noise or quantization noise due to inadequate dynamic range in the sensor or the ADC (analog to digital converter) leads to errors in the second moment. In general it leads to an over-estimation of the second moment width. c) If the I(x,y,z) intensity profile has wings which fall at a rate slower than 1/x2 or 1/y2, then the double integral actually increases as x and y increase. For reasons b) and c) most commercial second moment beam diameter software first automatically determines and subtracts the background, and then truncates I(x,y,z) to the zeroed background level at a predetermined distance from the 1/e2 diameter. Some software allows the user to override this distance. 4. Acknowledgements. Parts of this Application Note draw on Reference 2, and we have used the same notation wherever possible. 5. References 1. ISO 11146. “Optics and optical instruments. Lasers and laser related equipment. Test methods for Beam widths, divergence angle and beam propagation factor.” Published by the International Organization for Standardization. Available from your national standards organization, www.ansi.org in the US. 2. T. F. Johnston Jr., “Beam propagation (M2) measurement made as easy as it gets: the four-cuts method”, Applied Optics, Vol. 37, No. 21, 20 July 1998, pp. 48404850. WinCamD A-3 App. A Appendices Appendix B: Accuracy, Precision & Resolution At Issue: Customers and Reps/Distributors ponder, and sometimes ask, the following apparently reasonable questions: i) What is the beam measurement accuracy/error of WinCamD Series? ii) How can you justify listing accuracy values smaller than the pixel size? iii) How does the accuracy depend on the beam size? They may feel frustration when the answers are not always totally clear-cut and unambiguous. Why the uncertainty? Why is every answer qualified by: “… depending, of course, on the actual beam.” ? 1. Definitions - Accuracy versus Precision versus Resolution The Accuracy of a reading describes how close the reading is to the Absolute value of the parameter being measured. The Absolute value is the value that would be read by a perfect measurement system in perfect calibration with zero errors. The Precision of an instrument refers to the Repeatability of the value obtained. An otherwise perfect measurement instrument that was incorrectly calibrated could be described as Inaccurate but Precise. The Resolution of an instrument refers to the smallest increment (i.e. above the noise level) that the instrument can measure. Readout Resolution is the smallest increment that may be read on the screen or via the software interface. DataRay software offers several Numeric Display Modes. The default is XXX.Y μm. The user may choose other options, but, simply choosing a higher Numeric Display Mode resolution option does not make Accuracy higher. 2. Pixel size/pitch quantization? The pixel dimension (actually the pixel pitch, since the fill factor is never 100%) is 4.65 μm for WinCamD, 6.7 μm for WinCamD-UCM. With TaperCamDs the effective pixel size is even larger. [In fast mode the pixel dimensions are twice as large] The casual observer might conclude that all measurements must be ‘quantized’ in terms of the pixel dimension. As shown below, this is not the case. A-4 WinCamD Appendices 3. Beam Diameter based on clip level WinCamD measures the outer diameter at the clip level. It must achieve this whether or not a pixel is at the specified clip level intensity. To do this it relies upon inter-pixel linear intensity interpolation. The magnified orange profile portion, shown against the light green grid, shows the profile intensity (y-axis) versus position (x-axis) for the left hand edge of a profile. There are pixels above and below, but not on, the blue line indicating the requested clip level. Rather than simply taking the outer pixel as a diameter basis, WinCamD determines the position of the two (adjacent) pixels above and below the requested clip level, and performs a linear interpolation between these two values. I.E., the software determines the position where the profile would have crossed the clip level if the imager pixel size were infinitely small. It then makes the same determination for the right hand side of the full profile. The difference between these two interpolated position values determines the diameter for the specified clip level. Since these interpolated values are not quantized by the pixel location, the measured beam diameter is not quantized by the pixel size. Smallest beam size. Understanding this inter-pixel intensity interpolation leads to an understanding that accuracy will degrade as we move to smaller beams. The profile of a 100 μm Gaussian beam shows well that even with 4.65 μm pixels, the validity of linear interpolation starts to break down as we go to smaller beams. This is because the two adjacent pixels start to lie on a curve rather than a straight line segment. It is for this reason that the normal advice is to use a smallest beam diameter limit of about 10 times the pixel size. DataRay errs on the conservative side and suggests limits of 50 μm for WinCamD, and 70 μm for WinCamD-UCM. WinCamD A-5 App. B Appendices A user may choose to measure smaller beam diameters, but should be aware of these accuracy limitations. 4. Second Moment Diameter The Second Moment Diameter of an image is based upon an area integral weighted by the square of the distance from the beam centroid. As such it does not include a specific clip level. See Appendix A for a full description and the formulae. Since Second moment diameter is a total image based calculation, then, at least to a first order, it is not subject to pixel dimension quantization limits. In accordance with the ISO 11146 standard, DataRay cuts off the calculation at 99% of the included energy. For a pure Gaussian beam 99% of the energy corresponds to curtailing the calculation at a clip level of 1.45%, corresponding to a beam diameter 1.29 times greater than the 13.5 % clip level diameter. For typical beams that are not pure Gaussians these numbers would be different. 5. Centroid The Centroid (Xc,Yc) of an image is the intensity weighted arithmetic mean position of all pixel intensities above the centroid clip level (default value 13.5%). It is the ‘Center of Gravity’ of the beam. As noise moves pixels above and below the centroid clip level, and hence in or out of the centroid calculation, the centroid value may change by an amount lower than the pixel size. For large beams the ‘quantization’ is barely visible. For smaller beams, it may become significant. A-6 WinCamD Appendices APPENDIX C: Support, Returns, Distributors, Reps DataRay maintains a network of knowledgeable Distributors and Representatives, and also offer direct product support. Contact details vary with time, and therefore have not been included here. Visit the website for a complete listing. Service, Returns/RMAs, Repairs, Equipment Problems, Recalibration If you did not receive the product directly from DataRay, contact the vendor directly. If you did receive the product directly from DataRay, see the current procedure for returning product for repair posted at the website, under Returns/Repairs in the Sales & Support menu. The simple steps below are designed to minimize the number of calls that you need to make, minimize time to handle the issue, minimize your costs and our costs, and get you back to a working system as soon as possible. Current support contacts are at the website. Remember: There is a three-year product warranty on all standard DataRay manufactured product (excluding customer damage). Third party manufactured items normally carry a one-year warranty. Outside the warranty period, there is a reasonable minimum repair charge that covers many issues other than customer damage. C Repair turnaround time target is 5-15 working days. If you purchased this product via a distributor, if you obtain their agreement, you may be able to ship the product directly to DataRay for repair. 1) Clearly identify the problem and write it down. Have the name, contact number & email address of the person with direct experience of the problem at hand when you call. Save relevant *.wcf etc. files, including reference files, so that you can show us the problem. [If a third party is going to call us to arrange the return, all this is even more essential.] Tip 1: Do check that everything is correctly plugged in. Never unplug a head (except WinCamD heads) while the software is on. Where possible, check hardware and cables by substitution. Use static safe procedures when working with PC cards or disconnected heads. Tip 2: If 'The software is not working like it used to', remember that you can flush the software to its default configuration by going to File, Load Defaults. You may also download software upgrades for free from Software Upgrades at the website. 2) If you have a production line down due to equipment failure, or some other time crisis, call Technical Support. 3) If you are sure that the equipment must be returned, e.g. it is physically damaged or it was an evaluation item, go to step 5). 4) If it is not working, but you are not sure why, contact Technical Support. We can frequently solve problems over the phone, or identify the problem well enough to minimize turnaround time on returned equipment and/or the number of items that need to be returned. 5) Generate the paperwork. [Not providing the paperwork inevitably leads to delays]: WinCamD App. A-7 Appendices a) Contact [email protected] with a description of the reason for return to obtain an RMA number and a copy of the current RMA form, also found at the website. b) Print it out the RMA form, found at the website, fill it out, keep a copy for your records and include a good copy with the shipment. c) Mark the number on the RMA form, the outside of the shipping box and on the packing list attached to the outside of the shipping box: 6) Pack it properly. Where possible use the original packaging. Always ensure that all boards and hardware with electrical connections is first wrapped in static dissipative foam [pink or mauve] or bag [metallic silver/gray]. If an improperly wrapped item is found to be zapped by static, unlikely but possible, then we must charge you for the replacement. Include the cables. 7) Return the equipment to the address on the RMA form. Different products are dealt with at different facilities. 8) If an International return, carefully follow the instruction on the RMA form concerning Harmonized code, product description and Value. If this information is incorrect, then you will be responsible for an excess duties/taxes. A-8 WinCamD Appendices APPENDIX D: WinCamD-UCM Offset Calibration Why is Offset Calibration required? CMOS imagers have individual readout amplifiers on each pixel. These individual amplifiers have a range of DC offsets leading to ‘Fixed Pattern Noise’. This noise should be subtracted in order to ensure that the CMOS image baseline is correctly and consistently set. How often is Offset Calibration required? The short procedure should be performed once at ambient temperature upon initial receipt of the camera. Thereafter, unless the camera is used in circumstances where the ambient temperature differs by more than ±3 C (5 °F) from the temperature at which it was calibrated, then no recalibration should be necessary. Where is Calibration data held? The procedure generates a 3 MB Serial#.cal file which is automatically saved in the same directory as the DataRay.exe executable file, normally c:/Program files/DataRay . How do I perform Calibration? a) Install the camera in accordance with the instructions in Chapter 2 of this manual. b) Set the camera vertically on its lower edge. In the Setup pull-down menu, select Capture Setup Dialog. Let it run for 10 minutes - to warm up. c) Press OK. In the Setup pulldown menu, select Calibrate current UCM camera to bring up this screen: d) Look on the back of the camera for the DXXXX Serial number at middle right of the rear label. Type it into the box in the dialog. WinCamD A-9 App. D Appendices e) Press Start Calibration and this box will appear: If the cap was taken off, put it back on. Press OK. f) The Calibration will proceed. When it is complete press Save and Exit. Calibration is now complete. Problems? Reread the procedure & repeat it. Still having problems? Please contact Technical Support. A-10 WinCamD Appendices APPENDIX E: Spatial Response Variation Compensation. Applies to: TaperCamD, TaperCamD20/15, and -UXX series cameras. You may use this approach to compensate for any spatial non-uniformity in the response of the array. 1) Go File, Load defaults. This sets Fast mode and a 1024 x 1024 Capture Block in the position shown. [If you will be working in Full resolution mode, select that option.] 2) In the Setup pull-down menu choose Capture setup dialog [ALT S]. Set the Pixel multiply factors if it should not be 1.0. E.g. = 2.25 for the TaperCamD. See page 1-14 for values. Click OK. 3) Right-click on the 2D image and choose Force crosshairs to zero degrees & Crosshairs user placed. Place the crosshairs in the approximate center of the image (not critical). 4) Remove the ND filter and attach a tube at least 100 mm long to the front of the camera. 5) Point the camera plus tube at an approximately Lambertian source. E.g. a ceiling or a wall with a non–glossy finish. Press the Go button. The illumination level must be such enough that the Exposure time lies between 1.000 ms and 50.00 ms. App. E In the Average pull-down menu set Average 20. You may see an image something like that shown right. There may some ‘shading’, plus individual bad pixels or (TaperCams) small groups of bad pixels, corresponding to the (inevitable) broken and cracked fibers in the fiber optic taper. After Background subtraction, you will save this as the compensation file. WinCamD A-11 Appendices 6) Press the button. background subtraction The prompt shown will appear. Block the open end of the tube (e,g, screw on the ND4.0 filter if you have a C-mount tube), and press OK. Unblock the tube, press the Go button, and let the Average grow to 20. Press the Stop button and Save this file as DXXXX_Default_Comp.wcf, where DXXXX is the SN: on the label on the back of the camera. As a default it will save in the DataRay directory, by default c:\Program Files\DataRay. It is good practice to back it up elsewhere. Press the button to the right of the background subtraction button in order to turn it off. 7) In the Setup pull-down menu choose Capture setup dialog [ALT S]. Click the Enable box and Browse to the file that you just saved. Click OK. 8) Press the Go button. The screen should appear flat if you are viewing the same scene that was used to take the compensation file. 9) If you view a different scene, the image will be compensated for array variations as long as you look at the same part of the array with the same resolution. Currently, if your change the Capture block you will need a correction file for that specific Capture Block. This is complex, but may be addressed in a future release. A-12 WinCamD Appendices 10) On an actual beam variations between 20% and 500% of the mean will be compensated. Uncompensated App. E Compensated WinCamD A-13 Appendices Index Note: ‘A-_’ refers to pages in the Appendices A Absolute position, 3-5 Accuracy, A-4 ADC, 1-2 Angular Divergence, 3-9 Attenuation, 5-1, 5-2 Auto-inclusion region, 3-7 Auto Trigger, 4-4 Averaging, 3-24 Profiles, 3-24 Results, 3-24 Reset button, 3-24 Chip height, CCD, 1-5 Cleaning CCD, ND filter, 3-43 Clear, 3-30 Clipboard, 2D, 3D, Profile, Screen dump to, 3-23 Clip Level, 3-10 Clock source, 3-27 Colors, 3-14, 3-24 Computer Minimum Requirements, 2-3 Compensation Files, App. E Configuration, system, 1-2 Crosshair, 3-4, 3-30 B Background subtraction, 3-31 Baseline lock, unlock, 3-31 BNC, 2-1, 4-1 Beam Acquisition/Measurement area, 1-11 Angular Divergence, 3-11 Attenuation, 5-1 Fit algorithms, 3-16 Power Limits, 1-6, 1-7, 1-11 Sampling, 5-4, 5-5 Select from stored data, 3-31 Wander, 3-36 Width Definition, 3-10 Binary, save as, 3-22 Button Bar, 3-30 D Damage Threshold, 1-11 Data Buffer, 3-31 Examine Previously Saved, 3-3 Log, 3-32 Save to File, Select, 3-22, 3-30 Defaults, Load, 3-23 Deviation, Max. & Std., 3-17 Device Selection, 3-2, 3-23 Diameter Display mode, 3-10 Diffractive Beam Sampler, 5-5 Diffusing Surface, 5-6 Dimensions, 1-3, 1-5 Display Modes, 3-10 Distance, 3-20 Distributors, A-7 Divergence, angular, 3-11 C C++, 2-6 Calibration, 1-3, App. D Camera select, 3-26 Caption Bar, 3-4 Capture block, 3-28 pulsed lasers, 4-1 resolution, 3-28 CCD Chip height, 1-5, 2Cleaning, 3-43 Center profile, 3-20 Centroid Averaging, reset on drift, 3-24 Beam, 3-5 Clip level, 3-29 Mode, 3-30 A-14 E EAM-2, 5-4 Ellipticity, 3-5 Electronic shutter, 3-41, 4-1, 4-5 Exposure control, 3-39 for pulsed lasers, 4-4 Eye Safety, 3-41 F Fast mode, 3-28 File Auto-name, 3-29 Open, Save, 3-22, 3-30 Filter, profile smoothing, 3-26 Firmware, upgrade, 2-6 Flip image, 3-27 WinCamD Appendices Fluence, 3-36 Frame Rate, 1-3 Full mode, 3-28 Functional Description, 1-3 G G, Go, 3-30 Gain CCD, CMOS, 3-39 Gamma correction, 3-28 Gaussian Angular Divergence, 3-11 Beam Definition, A-1 Fit, 3-17 *.gif files, 3-23 Global Selection, 3-15 Grids, 3-16 H Hardware Mounting, 1-5, 2-5 Pull-down Menu, 3-21 Quick-Start Tutorial, 3-41 HBS, 5-5 Help, Tech Support, A-7 Holographic Beam Sampler, 5-5 I Image Artifacts, 3-43 Average, Filter, 3-25 Inclusion Region, 3-8, 4-3 Ink Saver, 3-31 Installation, 2-1 Driver, 2-4 Software, 2-3 Intensity multiplier, 3-16 Invalid data, 3-14 IR camera settings, 3-28 Irradiance, Beam, A-1 Damage, 1-11 Definition, 5-1 Peak, 5-1 Saturation, 1-6, 1-7 ISO 11146, 3-9, A-2 J *.jpg files, 3-24 K WinCamD L LabVIEW, 2-6 Line Type, 3-15 Linear, 3-15 Live versus saved, 3-31 Log data, 3-32 Logarithmic, 3-15 M Magnification, see Pixel multiply Factor Main Screen, 3-2 Major axis, 3-5 Manual Conventions, 1-12 Maximum Power Graph, 1-6, 1-7, 1-11 Mean axis, 3-5 Measuring distance, 3-21 Menus, Pull-down, 3-21 Minimum computer requirements, 2-3 Minor axis, 3-5 Mirrors, use of long focal length, 5-7 Mode, Normal, Fast, 3-28 Mounting the head, 1-5 N Neutral Density Definition, 5-2 Filters, 5-2 Filter cleaning, 3-43 Filter transmission, 1-9 Normal mode, 3-28 Normalize Profile, 3-15 O Offset, adjust, 3-28 *.ojf files, 3-3, 3-24 Open, 3-23 Orientation, 3-5 Outline & Mounting, 1-5 P Palette, 3-24 Pan, Image, Profile, 3-21 Pass/Fail Criteria Colors, 3-14 Setup, 3-13 Password, 3-13 PC minimum requirements, 2-3 Peak Irradiance, 5-1 A-15 Index Appendices % of ADC, Image, 3-6 % of ADC, Profile, 3-6 Percentage Fit, Gaussian, 3-16 PMF, Pixel multiply factor, 3-28 Power Bar, 3-38 Limits, 1-6, 1-7, 1-11 Maximum, 1-7, 1-8, 1-15 Relative, 3-38 Precautions, 3-41 Precision, A-4 Print, 3-23 Print Setup, 3-23 Profile Averaging, 3-24 Center, 3-21 Clipboard, to, 3-23 Colors, 3-14 Filter, 3-25 Gain, 3-6 Gaussian fit, 3-16 Grids, 3-16 Linear, 3-15 Measure distance, 3-21 Logarithmic, 3-15 Normalized, linear, 3-15 Pan, 3-21 Scaling, 3-6, 3-19 Smoothing, 3.25 Widths, 3-6 Zoom, 3-3 Pull-down Menu Bar, 3-4 Pull-down Menus, 3-21 Pulse/Pulsed/Pulses Chapter 4 Lasers, capturing, 4-1 Repetition Rate, Definition, 4-1 Saturation limits, 1-7, 1-11 Q Quick-Start Tutorials, 3-1 Hardware, 3-41 Software, 3-2 R Representatives, A-7 Resolution, A-4 Results averaging, 3-24 Returns, A-7 Rotate Image 180 degrees, 3-27 A-16 S S, Stop, 3-30 Safety, 3-41 Sample Data, 3-3 Saturation, Power Limits, 1-6, 1-7, 111 Save As, 3-22 Scale Profile, 3-5 Screen Dump to Clipboard, 3-9 Second Moment Beam Width, 3-10, A-2 Setup, 3-27 Short Cut Keys, 3-40 Single shot, 3-30 SNR, 1-3 Software Installation, 2-3 Quick-Start Tutorial, 3-1 Specifications, 1-4 Starting Up Hardware, 3-43 Software, 3-2 Support, A-7 Synchronous Trigger Definition, 4-1 T TaperCamD Artifacts, 3-45 Compensation Files, App. E Outline & mounting, 1-5 + 1-10 Pixel multiply factor, 2-12, 3-27 Technical Support, A-7 Threshold, Damage, 1-11 *.tiff files, 3-22 Toolbar, Button bar, 3-4, 3-30 Top-hat fit, 3-18 Trigger, 3-40, 4-1 Auto, 4-4 External, 4-6 U U profiles, 3-6 UV Lasers, working with, 5-6 V V-profiles, 3-6 Variance (Second Moment), 3-10, A-2 Visual Basic, 2-6 Visual C++, 2-6 WinCamD Appendices W Wander, beam, 3-37 Wedge Prisms, 5-5 Wireframe, 3-9 X, Y Z Zero Centroid, 3-6 Zero level, 3-6 Zoom Image, 3-3 Profile, 3-3 Numeric 2D Image, 3-3, 3-7 3D View, 3-9 4σ ‘Second Moment’ Beam Diameter, 3-10, A-2 Index WinCamD A-17