1
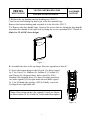
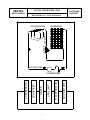
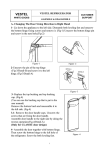
VESTEL
WHITE GOODS
VESTEL REFRIGERATOR
ASSEMBLE & DISASSEMBLE
CUSTOMER
SUPPORT
A- Changing The Door Swing Direction to Right Hand
1- Lie down the appliance to the left side. (FIG-1)
Figure - 1
2- Loosen two screws,which are fixing the bottom hinge. (FIG-2)
Figure - 2
3- Dismantle the bottom hinge. (FIG-3.1) and unscrew the leveling foot (FIG-3.2)
Figure - 3.1
Figure - 3.2
1
VESTEL REFRIGERATOR
VESTEL
WHITE GOODS
CUSTOMER
SUPPORT
ASSEMBLE & DISASSAMBLE
4- Remove the door. (FIG-4)
Figure - 4
5- Unscrew the right pin of the top hinge.
(FIG-5)
Figure - 5
6- Screw the pin on the left hole of the
top hinge. (FIG-6)
Figure - 6
2
VESTEL
WHITE GOODS
VESTEL REFRIGERATOR
ASSEMBLE & DISASSAMBLE
CUSTOMER
SUPPORT
7- Replace the top bushing and top bushing cap. (FIG-7)
(You can use the bushing cap that is put in the user manuel bag)
Remove the bottom bushing and assemble it to the left side. (FIG-7)
7.1- Remove the door handle caps. Unscrew the screws that are fixing the door handle.
Assemble door handle to the right side by doing the reverse operation.(FIG-7/Detail-A)
(Only for CLASSIC door design)
DETAIL-A
Figure - 7
8- Assemble the door to the top hinge. (Reverse operation of item 4)
9- Screw the bottom hinge to the left side. Use holes signed
by V for Vestel (V), Slimline (S), Softline (F), Coolline (C)
and Classic (K) designed doors, holes signed by B for
Bonfanti (B) designed doors. For door reversing operation,
use holes signed by R for right hand side and holes signed
by L for left hand side opening. (FIG-8) Finally, screw the
leveling foot to right hand side.
Note : Door design names (for example Vestel) are shown
as abbreviations (V for Vestel) in Vestel model description.
Figure - 8
3
VESTEL
WHITE GOODS
VESTEL REFRIGERATOR
ASSEMBLE & DISASSAMBLE
CUSTOMER
SUPPORT
B - Changing The Thermostat :
1)
2)
3)
4)
5)
6)
Remove the lamp cover and unscrew the fixing screw.
Remove the screw cap and unscrew the fixing screw.
Remove the thermostat box by pulling it and disconnecting the wire connector.
Remove the thermostat knob by pulling forward. Loosen the nut fixing the thermostat.
Pull out the thermostat bulb from the housing.
Replace the thermostat with a new one and assemble the thermostat box following the steps
backwards.
C - Thermostat Knob
? This knob is used to control the temperature of the freezer and refrigerator parts automatically. It can
be set to any value between “0“ and “5“positions.
? “ 0 ” position indicates that the thermostat is “off ”.The refrigerator is “off ” on this setting.
? By turning the knob between “1” and “5”, you can increase or decrease the cooling degree.
? The refrigerator is designed to get optimum performance when the thermostat knob is set between
position “2” to “4”.
4
VESTEL REFRIGERATOR
VESTEL
WHITE GOODS
CUSTOMER
SUPPORT
REFRIGERANT CYCLE DIAGRAM
CONDENSER
DRYER CAPILLARY
R.EVAPORATOR
SUCTION TUBE
5
SUCTION TUBE
R.EVAPORATOR
CAPILLARY
DRYER
CONDENSER
COMPRESSOR
COMPRESSOR