1
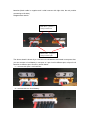
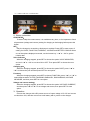
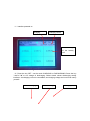
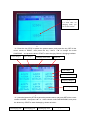
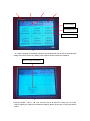
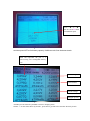
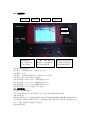
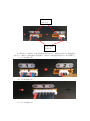
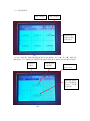
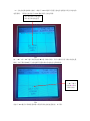
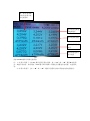
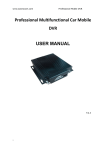
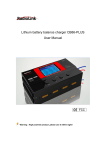
Lithium battery balance charger CB86-PLUS
User Manual
FCC
Radiolink Electronic Co., Ltd
Web Site:http://www.radiolink.com.cn
Warning : High powered product ,please use it within sight !
INTRODUCTION
Thank you for purchasing Radiolink high precision independent balance charger
CB86-PLUS .
CB86-PLUS, open the era of high precision independent balance charge, integrate 6
ways for charge current and equipped exclusive charging circuit for every single battery
cell, which realize batteries don’t affect each other in independent balance charge system.
Support max 6A charge current for 8 battery packs charging with capacity analyzed and
inner resistance assessed, compatible with 1S-6S battery packs. 0.001V balance
precision, better than the average 0.01V. Unique USB flash drive upgrade. Charging
diaries, including initial voltage, complete voltage and charge-discharge voltage, etc.
Analyses of every battery cell’s capacity in each group and assess of internal resistance.
Precision voltage and trickle repairing restore the high-power of over-discharged battery.
Suggestion :when you read this manual,please connect the charger and other related
equipment ,operating while reading. Any questions when using CB86-PLUS, please refer
to the manual or call our after_service +86-755-88361717 or login BBS (such as
www.rcgroups.com, www.5imx.com, www.rcfans.com ) to check the issues related
answer to questions.
Due to unforeseen changes in production procedures , the information contained in this
manual in subject to change without notice.
more information please check our website as below:
http://www.radiolink.com.cn
CUSTOMER SERVICE
Contact Us
Tel: +86-755-88361717
Fax: +86-755-88360925
Email: [email protected]
Programming and User questions
Tel: +86-755-88361717
Fax: +86-755-88360925
Email: [email protected]
一、Function:
Input
Voltage
Charging
Mode
Voice
Indicator
Charging
Time
Charging Current
Final Voltage
START/STOP:
“+/▲”
,“-/▼”: Add or reduce
To start or stop
present data (on charging or
present status
discharging mode)
SET:Set data of the charger
(Forbidden on charging
and discharging status)
CB86S Technical data:
Input Voltage:Voltage range 10.5-15V(The charge will not work with wrong input power
polarity, warning when input power voltage over 15V and less than 10.5V, temperature
over 48C°will auto-start fans)
Voice Indicator:ON/OFF
Time setting: Charging or discharging time from 0 to 99 minutes and 59 second
Charging Mode: Cycle charging, parallel charging, discharging, voltage measure
Charging voltage: 0.00V-4.23V,setting precision 0.01V;
Discharging voltage: 2.00-4.23V,setting precision 0.01V;
Charging current:0.0-6.0A,setting precision 0.1A;
Discharging current: 1.05A
二、Operation:
1、Connection
Connect the charger with a DC power source of output voltage 10.0-5V and current not
less than15A.
Balance plug:
CB86S contains 8 balance ports, it can charge 8pcs 6-cell Lithium battery at the same
time connecting 1S-6S batteries freely by the following sketch. Mind the polarity of
batteries (black cable is negative and it shall connect with right side, the red positive
connecting to left side.)
Diagrammatic sketch:
Red cable(positive)
always on the left
Black cable(negative)
always on the right
The above sketch is shown by a 4-cell and a 2-cell batteries connected in two ports. Also
you can connect a 6-cell battery in one port, or 3 pcs 2-cell in different port, or 2pcs 3-cell
batteries to different port. Shown by sketch below:
(1)connect with 3pcs 2-cell batteries:
(2)connect with one 6-cell battery:
(3)connect with two 3-cell batteries:
2、Button instruction:
START/STOP:
To start or stop the current status, it is available at any time, so it’s important to finish
all parameter (voltage and current) setting for charging or discharging before press this
button.
SET:
Only the charger is not working, this button is enabled. Press SET to enter menu of
setting for VOICE, FUNCTION, CURRENT, VOLTAGE and BETTERY GROUP. When
one of the options displayed reversed, use the button key “+/▲” or “-/▼” to get the
relative data.
Voice indicator:
When the charging stopped, press SET to choose the option VOICE INDICATOR,
and use“+/▲” or “-/▼” to set voice ON or OFF. Then press SET to choose the next
option.
Charging port:
When the charging stopped, press SET to choose the option PORT, press “+/▲”or
“-/▼” to choose the port and then press SET for next option.
Function:
When the charging stopped, press SET to choose FUNCTION, press “+/▲” or“-/▼” to
select different status: CYCLE CHARGING, PARALLEL, DISCHARGING, VOLTAGE
MEASURE, and then press SET for next option.
Voltage and current setting:
When the charging stopped, press SET to choose the option VOLTAGE/ CURRENT,
and then press“+/▲”or“-/▼” to set voltage and current, then press SET for next
option.
3、Operation
Connect the charger with a DC power source of output voltage 10.5-15V and current
not less than 15A, and then connect a 6-cell battery with it, power on the charger.
(1)Interface powered on
Charging
voltage
Charging current
Present voltage
of the battery
cell
1
(2)Press the key SET,set the mode CHARGING or DISCHARGING. Press the key
“+/▲”or“-/▼” to set voltage of discharging. Below sketch shows discharging setting
interface:(discharging current is not settable, and charging voltage and current can set by
yourself)
Mode: discharging
External voltage
Discharging time
Discharging current
is a fixed value(in
charging mode, you
can set the current)
2
(3)Press the key STOP to pause the present status, and press the key SET till the
cursor comes to MODE , then press the key “+/▲”or “-/▼” to change the mode
CHARGING, and press the button START to start charging. Below is charging interface:
Time charged
Port charged
Charging status mark
Time left
Cell voltage
Cell charging current
Capacity charged
Cell charging status
3
(4)press the button key STOP to pause the present status, and press SET till the cursor
comes to MODE,then press“+/▲” or “-/▼”to choose mode DISCHARGING, and press
the button key START to start discharging, shown as below:
Discharging time
Discharging port
Discharging mark
Discharging time left
Current voltage
Discharging current
Capacity discharged
4
(5)When charging or discharging finished, press the button key STOP to check present
voltage and current and every battery cells capacity. Below shows the interface:
Battery voltage and capacity
5
Press the button “+/▲”or “-/▼” and now the cursor ▼ shift from every port. All of the
checks display the relative port batteries capacity. Below shows the current port battery
status:
press“+/▲”or“-/▼”
and the cursor▼ shifts
from different ports
6
And then press SET to find battery capacity of different cells. See the below sketch:
Each cell represents the port is a
power-saving core rechargeable battery
case
Initial voltage
Cell resistance
Current voltage
Charged capacity
7
And then pres the button key START to return to charging status.
NOTE:1)on the status shown by sketch 7, press SET to go back to the interface shown by sketch
6, and press “+/▲” or “-/▼”till the cursor▼ disappeared, or the voice indicator enabled,
now press the key SET to go back to the sketch 2 to set voltage and current and charging
mode etc.
2)On the interface shown by sketch 7,press“+/▲” or “-/▼” to find other port batteries
capacity.
模型专用锂电池充电管家 CB86-PLUS
产品说明书
深圳市乐迪电子有限公司
网址:http://www.radiolink.com.cn
警示:此类产品属于高功率输出产品,请在视野范围内使用!
简
介
感谢您选择深圳市乐迪电子有限公司(RadioLink)生产的专业航模设备及周边产品。
为了您更好地使用我们的充电器产品,请您仔细阅读使用说明书。如果您在使用过程中遇到
任何问题可查阅说明书或致电我们的售后 0755-88361717,也可登录航模类论坛,如:
htpp://www.5imx.com
htpp://www.moz8.com
htpp://www.rcfans.com
www.rcgroups.com
更多的产品信息及最新程序下载,请登录:http://www.radiolink.com.cn
售后服务条款
1,本条款仅适用于深圳市乐迪电子有限公司所生产的产品,乐迪通过其授权经销商销售的
产品亦适用本条款。
2,乐迪产品自购买之日起,一周内经我司核实为质量问题,由乐迪承担返修产品的往返快
递费,购买乐迪产品超过一周到一年内经我司核实为质量问题,用户和乐迪各自承担寄出返
修产品的快递费。
3,返修时需提供购买凭证和保修卡或网络平台交易记录。
4,乐迪产品自购买之日起七天内,在正常使用情况下出现质量问题,外观无损坏,凭保修
卡及购机凭证在经销商处协商可以免费更换同型号产品;经销商在收到更换产品时必须第一
时间通知乐迪公司予以备案更换。
5,乐迪产品将由深圳市乐迪电子有限公司提供终身售后服务, 属于质量问题一年内免费保
修;对于自购买之日起人为损坏、改装、拆机及超过一年免费保修期的,用户必须支付往返
邮费及维修成本费用。
6,为确保您的权益受到保护,并能及时有效的为您服务,请在购买乐迪产品时完整填写好
保修卡及索要购机凭证。
用户享受本售后服务条款必须提供保修卡及购机凭证。
7,返修产品将于乐迪公司收到后 15 个工作日内寄回给顾客,并附上维修报告.
8,以上售后服务条款仅限于中国大陆销售的乐迪产品。
9,港澳台及海外客户的售后问题发至邮箱 [email protected],具体售后细
则视情况而定。
本方案最终解释权归乐迪电子所有
深圳市乐迪电子有限公司
售后服务电话:
(86)0755-88361717
售后服务邮箱:[email protected]
地址:深圳市福田区上梅林凯丰路北 28 号富国工业区 2 栋 3 楼
一、功能菜单:
输入电压
功能模式
音效状态
设定时间
设定电流
设定电压
START/STOP
键:开始/停止运
行选中的功能
“+/▲”
,
“-/▼”键:增
减数据。(在充电/放电
状态时按此键无效)
SET 键:设置充电器
的功能(在充电/放电
状态时按此键无效)
CB86S 的参数指标说明:
输入电压:充电器输入电压,范围为 10.5-15V;
音效设置:开/关;
时间设定:可以设置充放电时间,范围为 0-99 分 59 秒;
工作模式:轮充/并充/放电/电压检测;
充电电压设置:0.00V-4.23V,可设置精度为 0.01V;
放电电压设置:2.00-4.23V,可设置精度为 0.01V;
充电电流设置:0.0-6.0A,可设置最小精度为 0.1A;
放电电流设置:1.05A,固定值,不可自定义。
二、操作说明:
2、电池与充电器的连接
用一个输出电压为 10.5-15V 和电流不小于 15A 的直流电源连接到充电器。
平衡头的连接:
CB86S 充电器包含了八个集成的平衡头,
最多可以连接 8 组 6S 锂电池或锂聚合物电池,1S-6S
可以任意接。连接方式参见以下图片,注意电池正负极,通常负极(黑色线)总是接在右边
接口,正极(红色线)总是接在左边接口。
建议接法如下图:
红线(正极)
总在左边
黑线(负极)
总在右边
以上图片是 1 个 4S 和 1 个 2S 分别连接在两个串口上。同样也可以用 1 个 6S 连接在一
个串口上,或者 3 个 2S 连接在不同的串口,或者 2 个 3S 连接在两个串口,如下图所示。
(1)3 个 2S 连接方式:
(2)1 个 6S 连接方式:
(3)2 个 3S 连接方式:
3、按键功能说明:
START/STOP 键:
开始或停止当前的工作状态这个键在任何时候都有效,所以当您设置功能模式和充/放
电电流和电压时,一定要确认所有的参数设置正确才能按下此键。
SET 键:
当充电器只有在停止状态下,按 SET 键才能进入功能选择和状态设,否则按此键无效。
按 SET 键切换音效、功能、电流、电压、电池组,当其中一个功能处在反显状态时,使用“+/▲”
或“-/▼”键才能调整该功能状态。
音效设置:
当充电器在停止状态下,按 SET 键切换到音效模式,然后按“+/▲”或“-/▼”键选择
打开或关闭音效,选择好后按 SET 键进入下一个状态设置。
充电端口选择:
当充电器只有在停止状态下,按 SET 键切换到平衡充编号下,然后按“+/▲”或“-/▼”
键选择要首先工作的端口,选择好后按 SET 键进入下一个状态设置。
功能模式选择:
当充电器在停止状态下,按 SET 键调到功能模式处,按“+/▲”或“-/▼”键切换不同
的功能:轮充/并充/放电/电压检测,选择好后按 SET 键进入下一个状态设置。
如何设置充电电压和电流:
当充电器在停止状态下,按 SET 键调到电池电压/电流处,按“+/▲”或“-/▼”键增
或减到想要的电压/电流,调整好后按 SET 键进入下一个状态设置。
4、操作指引
用一个输出电压为 10.5-15V 和电流不小于 15A 的直流电源连接到充电器,然后将一个
6S 的电池按照以上说明连接充电器,电源上电。
(1)开机界面说明
设定工作电压
设定工作电流
对应端口接入
电池的当前各
节电芯电压
图1
(4)按下 SET 键,根据需要设置功能模式为充电或放电,按“+/▲”或“-/▼”键可以设
置放电电压。以下为放电电压设置界面(放电电流为固定值,充电模式电压电流都可以设置)
。
功能模式
为放电
放 电 电压 截
止值设置
设置充放电时间
00 时:00 分
放电电流为固定
值(若功能模式
为充电,可设置
充电电流)
图2
(5)按 STOP 暂停当前工作状态,按 SET 键至光标移动到 MODE,按“+/▲”或“-/▼”
键设置功能模式为充电,按 START 键开始充电,充电界面说明如下:
充电已用时间
电池使用端口
电池充电图标
充电预计剩余时间
各节电池电压
各节电池
充电电流
已充入电池的电量
每一方格代表对
应端口的某节电
芯的充电情况
图3
(4)按 STOP 暂停当前工作状态,按 SET 键至光标移动到 MODE,按“+/▲”或“-/▼”
键设置功能模式为放电,按 START 键开始放电放电界面说明如下:
放电已用时间
当前电池所占
用串口通道
电池放电图标
放电预计剩余时间
当前电池电压
放电电流
电池放电电量
图4
(6)当电池充满电或放完电时,或按下 STOP 键可以查看当前电压电流值以及各节电池的
电量情况,下图为充电时按下 STOP 键时的停止充电界面。
显示对应端口所接电池
的总电压和充电电量
图5
按“+/▲”或“-/▼”键可以看到光标▼在各个端口移动,每个方格显示各个端口的总电量
情况。如下图中的▼表示当前选择所查看该端口的电池充电详细情况。
按“+/▲”或
“ -/▼ ” 键可
以看到▼在各
个端口移动。
图6
再按下 SET 键可以详细查看该端口所接每节电池的电量情况。如下图。
每一格代表该端
口的电池某节电
芯充电情况
各节电芯充放电
的起始电压
各节电芯的内阻
各节电芯的当前
电压
对应该节电芯已
充入电量
图7
再按 START 键即可回到充电状态。
注:1)在图 7 界面下,按 SET 键可返回至图 6 界面,按“+/▲”或“-/▼”键至▼光标消
失,或提示语出现。此时再按下 SET 键可以回到图 2 界面进行设置电压电流值,充电模式
等。
2)在图 7 界面下,按“+/▲”或“-/▼”键可以查看其它端口所接电池的电量情况。