1
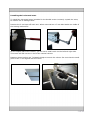
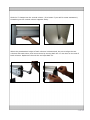
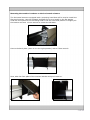
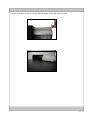
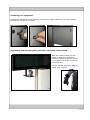
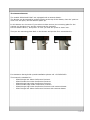
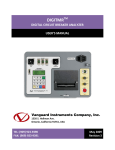
Installation manual for the Audipack®
“Communicate” Video Conference Furniture
An Audipack ® Video Conference (VC) Furniture can be shipped in parts or as an
assembled model. The manual is covers both version.
Mounting the vertical column on the body of the VC-furniture.
In the package 3 aluminum columns are included (depending on the model).
One of them is the vertical column on which the monitor arms will be mounted. This is
the column with the straight ends.
First mount the vertical column by fastening it through the inside of the unit.
Use all mounting holes provided.
Secure this column with the hexagon bolts, rings and washers that are packed with this
column.
Installing the horizontal arms.
To install the horizontal arms (suitable for the double screen versions) unpack the arms;
be careful not to damage them.
Remove the 2 end caps off each arm. When removed two 17 mm bolt heads are visible of
the locking mechanism.
On the sloped side of the column, you will see a small notch on the left and right side.
This notch will fall into the Y-slot of the vertical column.
Between these notches are T-shaped clamps to secure the column. Be sure that the small
parts of the T are aligned with the notch.
Slide the T-clamps into the vertical column. (It is better if you ask for some assistance).
Scratching on the vertical column happens easily.
When the presentation height of both columns is determined, be sure to align the two
columns with each other, and secure them by turning both the 17 mm nuts on the end of
both columns. Replace at the end the end caps back on.
Mounting the monitor brackets on the horizontal columns.
The horizontal arms are equipped with a mounting head that will be used to install the
flat panel monitor. Use the Audipack Uniflatfix Pro to pre-install on the flat panels.
Undo the front panel of the mounting head to set the horizontal position or slightly tilt
the bracket ad use a 13 mm wrench to unlock the M8 bolts.
Secure the back plate (when it is in the right position) with a 13mm wrench
Now, take the front plate of the monitor bracket and put it back on.
Use the 4 smaller screws to set the desired angle of the flat panel monitor.
Installing your equipment.
Install your equipment in the base of the furniture. Power cables etc. can be installed
through the cut out in the back.
Assembling and mounting the (optional) conference camera stand.
With the camera stand you can
install a camera on 5 different
positions. Simply clamp the mount
on the back-side of the vertical or
horizontal arm.
Use the flexible mounting plate to
install your camera.
Set the position by fastening the knobs on the back.
The height of the plateau can be adjusted with the big knob on the back of the stand.
With this knob you can also release the complete plateau, and put it in a horizontal or
vertical way.
The Camera Drawer.
The models P3916 and P3917 are equipped with a camera drawer.
The drawer can be opened by pushing gently at the top of the drawer, then the ‘push-toclose’ lock will open, and the drawer opens up.
In this drawer are 4 screws. If you take out these screws, the mounting plate for the
camera can be taken out, and the camera can be mounted.
Put the drawer back in, and push it in until you hear the ‘push-to-close’ lock.
Then put the mounting plate back in the drawer and put the four screws back in.
For assistance during build-up and installation please call +31795931671.
This manual is suitable for:
- P3912 Single low Video Conference furniture
- P3913 Double low Video Conference furniture
- P3914 Single high Video Conference furniture
- P3915 Double high Video Conference furniture
- P3916 Single high Video Conference furniture with camera drawer
- P3917 Single low Video Conference furniture with camera drawer