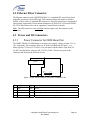
1
User's Manual The iPORT™ FB1000-CL IP Engine February 6, 2006 Rev 060206 These products are not intended for use in life support appliances, devices, or systems where malfunction of these products can reasonably be expected to result in personal injury. Pleora Technologies Inc. (Pleora) customers using or selling these products for use in such applications do so at their own risk and agree to fully indemnify Pleora for any damages resulting from such improper use or sale. © 2003-2006 Pleora Technologies Inc. All information provided in this manual is believed to be accurate and reliable. No responsibility is assumed by Pleora for its use. Pleora reserves the right to make changes to this information without notice. Redistribution of this manual in whole or in part, by any means, is prohibited without obtaining prior permission from Pleora. Copyright © 2006 Pleora Technologies Inc. Rev 060206 Page 2 Table of Contents 1.0 1.1 1.2 2.0 2.1 2.2 Introduction ........................................................................................ 5 The Scope of this User’s Manual........................................................................ 5 Related Documents ............................................................................................. 5 Overview of the iPORT FB1000-CL................................................. 6 Highlights............................................................................................................ 6 Characteristics and Features ............................................................................... 7 3.0 Camera Configuration and Control ................................................. 8 4.0 Connectors........................................................................................... 9 4.1 Camera Link Connector...................................................................................... 9 4.2 Ethernet Fiber Connector.................................................................................. 10 4.3 Power and IO Connectors ................................................................................. 10 4.3.1 Power Connector for OEM Board Set .......................................................... 10 4.3.2 IO Connector for OEM Board Set ................................................................ 11 4.3.3 Power Connector for Boxed Unit ................................................................. 12 4.3.4 IO Connector for Boxed Unit ....................................................................... 13 5.0 Signal Handling ................................................................................ 14 5.1 GPIO Control Blocks........................................................................................ 14 5.2 GPIO Programming Signals ............................................................................. 16 5.3 Camera Interface............................................................................................... 17 5.3.1 Camera Inputs ............................................................................................... 17 5.3.2 Camera Controls ........................................................................................... 17 5.3.3 Camera Link Serial API................................................................................ 17 5.3.4 CL Serial API Usage..................................................................................... 18 6.0 6.1 6.2 7.0 7.1 Mechanical Dimensions.................................................................... 19 Mechanical Drawings of OEM Board Set ........................................................ 19 Mechanical Drawings of Boxed Unit ............................................................... 21 Additional Support ........................................................................... 23 Revision History ............................................................................................... 23 Copyright © 2006 Pleora Technologies Inc. Rev 060206 Page 3 List of Figures Figure 1: Power and IO Connector Locations for OEM Board Set.................................. 10 Figure 2: Power Connector for Boxed Unit...................................................................... 12 Figure 3: IO Connector for Boxed Unit............................................................................ 13 Figure 4: iPORT FB1000-CL GPIO Control Block ......................................................... 15 Figure 5: Isometric View of OEM Board Set ................................................................... 19 Figure 6: Side View of OEM Board Set ........................................................................... 20 Figure 7: Top View of OEM Board Set............................................................................ 20 Figure 8: Front View of Boxed Unit................................................................................. 21 Figure 9: Rear View of Boxed Unit.................................................................................. 21 Figure 10: Side View of Boxed Unit ............................................................................... 22 Figure 11: Top View of Boxed Unit ................................................................................. 22 List of Tables Table 1: Characteristics and Features of the FB1000-CL................................................... 7 Table 2: Camera Link Connector Pin-Out .......................................................................... 9 Table 3: Power Connector Pin-Out for the OEM Board Set ............................................ 10 Table 4: IO Connector Pin-Out for OEM Board Set ........................................................ 11 Table 5: Power Connector Pin-Out for Boxed Unit.......................................................... 12 Table 6: IO Connector Pin-Out for Boxed Unit................................................................ 13 Table 7: iPORT FB1000-CL GPIO Input Signals ............................................................ 16 Table 8: iPORT FB1000-CL GPIO Output Signals ......................................................... 16 Copyright © 2006 Pleora Technologies Inc. Rev 060206 Page 4 1.0 Introduction 1.1 The Scope of this User’s Manual This User’s Manual describes how to access and use features specific to Pleora’s iPORT FB1000-CL IP Engine. The engine is available as both an OEM board set and a boxed unit. Therefore, some sections in the manual, particularly those dealing with physical aspects, have two sections, one for each form factor of the engine. 1.2 Related Documents The iPORT FB1000-CL IP Engine is one member of Pleora’s growing family of iPORT IP Engines. For information about other available engine models, visit www.pleora.com. All the engines share one set of core features, described in a document entitled “User’s Manual, Shared Features of iPORT IP Engines.” iPORT FB1000-CL IP Engine is an element of the iPORT Connectivity Solution. As such, it is shipped with two PC applications: the iPORT IP Device Driver; and the iPORT Software Development Kit (SDK – available in C++ or Visual Basic). These software applications have their own documentation. The iPORT Connectivity Solution also includes the iPORT High Memory Manager, which is described in the iPORT IP Device Drivers manual. As an option, the solution can also include iPORT Hydra™ PC Communications Software, described in the SDK C++ manual. In summary, this User’s Manual complements, and should be used in conjunction with, up to four other documents: • • • • User’s Manual, Shared Features of iPORT IP Engines; User’s Manual, iPORT IP Device Drivers; Reference Manual, The iPORT C++ Software Development Kit; and Reference Manual, The iPORT Visual Basic Software Development Kit. Copyright © 2006 Pleora Technologies Inc. Rev 060206 Page 5 2.0 Overview of the iPORT FB1000-CL 2.1 Highlights Pleora’s iPORT FB1000-CL IP Engine is a fast, economical way to build real-time optical GigE connections between Camera Link® cameras and PCs. It is ideal for vision systems where GigE connectivity is desirable, but optical links are needed to meet regulatory requirements and/or achieve very long-distance reach and superior noise immunity. Applications for the engine include performance-oriented systems for medical imaging, industrial inspection, high-end security/surveillance, and traffic imaging. The iPORT FB1000-CL IP Engine delivers the core set of features offered in all iPORT IP Engines, plus a camera connector and extended functions tailored specifically for Camera Link cameras. It interfaces to all cameras that comply with the Camera Link base configuration standard. The engine grabs data from a Camera Link camera, converts it to IP quickly and efficiently, and sends it to PCs or switches over fiber-based GigE links or LANs. An onboard SFP (small form-factor pluggable) fiber connector allows it to connect directly to fiber cables via standard SFP transceivers. Data is streamed continuously and with low latency (delay) at the full, 1-Gb/s line rate over the GigE connection. In point-to-point configurations, the fiber cable plugs into a fiber-based GigE NIC (network interface card/chip), eliminating the need for a frame grabber. In switched configurations, the cable can terminate at a fiber-based GigE switch and the image data can be streamed to a PC over copper, again without requiring a frame grabber. The FB1000-CL also handles control signals from the PC and other system elements. These signals are routed through a PLC (programmable logic controller) that allows users to precisely measure and control the operation of conveyors, encoders, cameras, and other components – either independently from or in conjunction with the host PC on the network. As one element of Pleora’s end-to-end iPORT Connectivity Solution, the FB1000-CL is shipped with two powerful PC applications. The iPORT IP Device Driver streams data to PC memory using minimal CPU capacity. Users can choose from two versions: the iPORT High-Performance IP Device Driver or the iPORT Universal IP Filter Driver. The iPORT SDK gives users the building blocks needed to quickly and easily enable thirdparty or custom video applications. For more information about the iPORT Connectivity Solution, see the “User’s Manual, Shared Features of iPORT IP Engines.” Copyright © 2006 Pleora Technologies Inc. Rev 060206 Page 6 2.2 Characteristics and Features Table 1 is a list of key characteristics and features of the iPORT FB1000-CL. Hardware Frame Grabber Available as OEM Yes Ethernet Bandwidth Available as Boxed Yes Unicast Yes Multicast Yes Static Configuration Yes BOOTP Yes DHCP Yes 16 MB (Std) 64 MB (Opt) Onboard Memory Inputs/Outputs TTL Inputs 2 TTL Outputs 2 LVDS Inputs 1 Optically Isolated Inputs 1 Optically Isolated Outputs 1 Camera Control Outputs 4 x LVDS Number of Data Channels Video Sources per Data Channel Video Input Interlaced 1 Gb/s 1 Up to 3 Base Camera Link Yes (SPARE must be used as FID) Progressive Scan Yes Programmable Logic Control Area Scan Yes Pulse Generators (timers) 4 Line Scan Rescaler (16-bit) 1 Delayers 1 Yes RGB Bayer Color Monochrome 1 General Purpose Counters Input Debouncing Yes Timestamp Generator Yes Timestamp Trigger Yes FB1000-CL Data Output Formats Pixel Depth (bits) 4 Software Controlled IO Pixel Clock Yes GPIO Interrupts FIFO Other 1 x LVDS (CL) 1 x TTL (GPIO) (3.66) Serial Ports (UART) FB1000-CL Supply Voltage Power Consumption (measured at 10V) Operating Temperature Storage Temperature Min: 4.5 V Typ: 5 V Max: 16 V Typ: 2.6 W (prelim) Max: 2.6 W (prelim) Min: 0 °C Max: 70 °C Min: -40 °C Max: 125 °C Notes: (x.xx) - Available since firmware version x.xx NA - Not applicable Yes Grayscale Bayer RGB 8, 10, 12, 14, 16, 24 Min: 20 MHz Max: 66 MHz Taps per Data Channel 2 (Note 1) Image Width (pixels) (must be multiple of 4) Min: 4 Default: 640 Max: 16,380 Image Height (pixels) Min: 1 Default: 480 Max: 16,383 Windowing Yes Decimation Yes Decimation by Block Yes Tap Reconstruction Optional (Note 4) Data Port Mapping Yes Pixel Shifting Yes Pixel Inversion Yes Recording Yes * All features supported by iPORT S/W 2.2.0 1 - RGB supported as single-tap, 24 bits 4 - NRE or other charges may apply. Contact Pleora. Table 1: Characteristics and Features of the FB1000-CL Copyright © 2006 Pleora Technologies Inc. Rev 060206 Page 7 3.0 Camera Configuration and Control To simplify set-up tasks, both the iPORT FB1000-CL and the camera to which it is attached are configured at the same time by the Camera Configuration Dialog of the iPORT SDK. The FB1000-CL panels in the dialog are auto-generated by the SDK based on the engine’s firmware version and model. This is explained in more detail in the Camera Configuration Dialog section of the “User’s Manual, Shared Features of iPORT IP Engines.” The iPORT application is equipped with camera modules for a range of different Camera Link models. Check the list in the Select Camera Dialog of the Camera Library Controls. If a camera module is available for your Camera Link model, then the Camera Configuration Dialog will auto-generate a panel to control your camera. Internally, the camera module converts the controls of that panel to the actual serial port command of the camera. If no camera-specific module exists for your Camera Link model, then you must select the standard Camera Link camera module instead. In this case, you have to find the camera’s serial port command information in the camera documentation and type it in the Port Communication Panel. For more information, read the “User’s Manual, Shared Features of iPORT IP Engines,” and the CyDeviceExtensionConstants.h file in the “Reference Guide, iPORT C++ Software Development Kit.” Copyright © 2006 Pleora Technologies Inc. Rev 060206 Page 8 4.0 Connectors 4.1 Camera Link Connector The iPORT FB1000-CL features a high-density, 26-pin MDR26 standard female Camera Link connector. The mating part number is the 3M 224-31 series. The connector uses the 3M 14X26-SZLB-XXX-0LC cable, or equivalent. Table 2 maps the pins in the Camera Link connector to signals. Pin Camera Link Signal 1 Inner Shield 14 Inner Shield 2 X0- 15 X0+ 3 X1- 16 X1+ 4 X2- 17 X2+ 5 Xclk- 18 Xclk+ 6 X3- 19 X3+ 7 SerTC+ 20 SerTC- 8 SerTFG- 21 SerTFG+ 9 CC1- 22 CC1+ 10 CC2+ 23 CC2- 11 CC3+ 24 CC3- 12 CC4+ 25 CC4- 13 Inner Shield 26 Inner Shield Table 2: Camera Link Connector Pin-Out Copyright © 2006 Pleora Technologies Inc. Rev 060206 Page 9 4.2 Ethernet Fiber Connector The Ethernet connector on the iPORT FB1000-CL is a standard SFP (small form-factor pluggable) connector with an EMI cage. This connector allows the engine to interface directly to fiber cables via standard SFP transceivers. The SFP transceivers recommended and currently supported by Pleora include Sumitomo's SCP6584-GL-CTH and SCP6486GL-CTH. Other transceivers can be supported. Contact Pleora for details. Note: The SFP transceiver is not included with the engine, only the connector to the transceiver. 4.3 Power and IO Connectors 4.3.1 Power Connector for OEM Board Set The iPORT FB1000-CL OEM board set accepts power supply voltages of from 4.5 V to 16 V (regulated). The connector, shown as J2 on the left-hand side of Figure 1, is a Molex 4-pin 6373 Series (22-23-2041). The part mates with the Molex 4-pin shell (2201-3047) and the Molex crimp pin (08-55-0102). Table 3 lists the four pins in this connector and describes the function of each. Ethernet 15 1 16 2 J2 J12 Figure 1: Power and IO Connector Locations for OEM Board Set Pin Signal Name Type Description 1 GND PWR Ground 2 VIN PWR Power supply voltage in (4.5 V to 16 V regulated) 3 VIN PWR Power supply voltage in (4.5 V to 16 V regulated) 4 GND PWR Ground Table 3: Power Connector Pin-Out for the OEM Board Set Copyright © 2006 Pleora Technologies Inc. Rev 060206 Page 10 4.3.2 IO Connector for OEM Board Set The IO connector for the iPORT FB1000-CL OEM board set is a 16-pin, Samtec 2-mm male header (TMM-108-01-G-D-SM). The mating connectors are in the Samtec MMS108-02-xx-xx series. The mating flat cables are in the Samtec TCSD series (TCSD-08xxxxxxx). The connector is shown as J12 on the right-hand side of Figure 1. Table 4 lists the 16 pins in the connector and describes the function of each. Pin Signal Name Description 1 GND Ground 2 VCC 3.3 V at 250 mA max 3 OPT0_OUT- Optically isolated negative output 4 OPT0_OUT+ Optically isolated positive output 5 TTL_IN[0] TTL input 0 6 TTL_OUT[0] TTL output 0 7 TTL_OUT[1] TTL output 1 8 TTL_IN[1] TTL input 1 9 N/C No connect (leave unconnected) 10 N/C No connect (leave unconnected) 12 OPT0_IN- Optically isolated negative input 12 OPT0_IN+ Optically isolated positive input 13 LVDS_IN- Low-voltage differential signal negative input 14 LVDS_IN+ Low-voltage differential signal positive input 15 GND Ground 16 VCC 3.3 V at 250 mA max Table 4: IO Connector Pin-Out for OEM Board Set These VCC supplies are not recommended for analog circuitry. Analog circuitry should be driven from a separate 3.3 V supply. Copyright © 2006 Pleora Technologies Inc. Rev 060206 Page 11 4.3.3 Power Connector for Boxed Unit The boxed version of the iPORT FB1000-CL uses a Hirose 6-pin power connector, as shown in Figure 2. The part number is HR10A-7R-6P. The mating part number is HR10A-7P-6S. Table 5 lists the six pins in the connector and describes the function of each. Figure 2: Power Connector for Boxed Unit Pin Description 1 VIN 4.5 V to 16 V regulated 2 VIN 4.5 V to 16 V regulated 3 VIN 4.5 V to 16 V regulated 4 Ground 5 Ground 6 Ground Table 5: Power Connector Pin-Out for Boxed Unit Copyright © 2006 Pleora Technologies Inc. Rev 060206 Page 12 4.3.4 IO Connector for Boxed Unit The boxed unit of the iPORT FB1000-CL uses the Hirose 12-pin IO connector shown in Figure 3. The part number for this connector is HR10A-10R-12S; the mating part number is HR10A-10P-12P. Table 6 lists the 12 pins in the connector and describes the function of each. Figure 3: IO Connector for Boxed Unit Pin Signal Name Description 1 OPT0_OUT- Optically isolated negative output 2 OPT0_OUT+ Optically isolated positive output 3 TTL_IN[0] TTL input 0 4 TTL_OUT[0] TTL output 0 5 TTL_OUT[1] TTL output 1 6 TTL_IN[1] TTL input 1 7 OPT0_IN- Optically isolated negative input 8 OPT0_IN+ Optically isolated positive input 9 LVDS_IN- Low-voltage differential signal negative input 10 LVDS_IN+ Low-voltage differential signal positive input 11 GND Ground 12 VCC 3.3 V at 100 mA max Table 6: IO Connector Pin-Out for Boxed Unit Copyright © 2006 Pleora Technologies Inc. Rev 060206 Page 13 5.0 Signal Handling The iPORT FB1000-CL handles the signals in much the same way as other iPORT IP engine models. There are a few minor differences, which are described in this section. 5.1 GPIO Control Blocks The Programmable Logic Controller (PLC) in the iPORT FB1000-CL routes signals through a sophisticated GPIO Control Block. Figure 4 shows the GPIO Control Block signals for the iPORT FB1000-CL. For further details on how the engines handle IO signals, see the “User’s Manual, Shared Features of iPORT IP Engines.” Copyright © 2006 Pleora Technologies Inc. Rev 060206 Page 14 Feedback Inputs trigger trigger trigger trigger Input Signal Routing Matrix Figure 4: iPORT FB1000-CL GPIO Control Block Copyright © 2006 Pleora Technologies Inc. Rev 060206 Page 15 5.2 GPIO Programming Signals Table 7 and Table 8 list the GPIO input and output programming signals that are specific to the iPORT FB1000-CL IP engine. The labels used for inputs to the GPIO Look-Up Table depend on the input configured in the GPIO Look-Up Table dialog. Refer to the “User’s Manual, Shared Features of iPORT IP Engines” for details about other GPIO programming signals used by the engine. Input Signal Description TTL_IN[0] TTL input 0 TTL_IN[1] TTL input 1 LVDS_IN LVDS input OPTO_IN Optically isolated input CL_FVAL Camera Link Frame Valid signal. Refer to camera documentation to find out how specific cameras handle this signal. CL_LVAL Camera Link Line Valid signal. Refer to camera documentation to find out how specific cameras handle this signal. CL_DVAL Camera Link Data Valid signal. Refer to camera documentation to find out how specific cameras handle this signal. CL_SPR Camera Link spare signal. Refer to camera documentation to find out how specific cameras handle this signal Table 7: iPORT FB1000-CL GPIO Input Signals Output Signal Label Description TTL_OUT[0] Q0 TTL output 0 TTL_OUT[1] Q1 TTL output 1 OPT_OUT Q3 Optically isolated output LUT_Q[2] Q2 Feedback signal into GPIO Look-Up Table CL_CC1 Q4 Camera Link control 1. Refer to camera documentation to find out how specific cameras handle this signal. CL_CC2 Q5 Camera Link control 2. Refer to camera documentation to find out how specific cameras handle this signal. CL_CC3 Q6 Camera Link control 3. Refer to camera documentation to find out how specific cameras handle this signal. CL_CC4 Q7 Camera Link control 4. Refer to camera documentation to find out how specific cameras handle this signal. Table 8: iPORT FB1000-CL GPIO Output Signals Copyright © 2006 Pleora Technologies Inc. Rev 060206 Page 16 5.3 Camera Interface 5.3.1 Camera Inputs All Camera Link cameras have four standard signals: Camera Link Frame Valid (FVAL), Camera Link Line Valid (LVAL), Camera Link Data Valid (DVAL) and Camera Link Spare (SPARE). FVAL and LVAL can be activated by positive or negative signal edges, or by high or low levels. DVAL can be activated by high or low levels. For information on the polarity and type of the signals required to support specific camera models, refer to camera documentation. The labels for these signals in the GPIO Control Block programming language depend on the inputs configured in the GPIO Look-Up Table dialog. Refer to “User’s Manual, Shared Features of iPORT IP Engines” for more details about the GPIO Look-Up Table. 5.3.2 Camera Controls The iPORT FB1000-CL can send commands to cameras through the Camera Link Camera Control signals. The Camera Link specification provides four camera control signals, which can be used in a variety of ways. For information on how your camera uses them, refer to its documentation. The labels of the control outputs to the camera in the GPIO Control Block programming language are: o o o o 5.3.3 Q4, for Camera Link CC1 Q5, for Camera Link CC2 Q6, for Camera Link CC3 Q7, for Camera Link CC4 Camera Link Serial API This serial API is an implementation of the standard Camera Link API for serial communications. Refer to Annex B of the Camera Link specification for more information about this API. The API dynamic-linked library (DLL) is named as dictated by the Camera Link standard: (format: clser*.dll): clserptk.dll. The file is installed in the C:\WINNT\system32 directory1. The functions in the DLL are: • clSerialInit: Initialize the serial communication for a specific board. • clSerialRead: Read bytes from the camera. • clSerialWrite: Write bytes to the camera. 1 Some applications may try to search for the clser*.dll files elsewhere than from C:\WINNT\System32. Please refer to that application’s documentation to find where to copy the clserptk.dll file. Copyright © 2006 Pleora Technologies Inc. Rev 060206 Page 17 • • • • • • • • Close the serial communication. clFlushPort: Flush all the data available on a port. clGetErrorText: Return a human readable version of an error code. clGetManufacturerInfo: Return the name of the manufacturer. clGetNumBytesAvail: Return the number of bytes available for reading. clGetNumSerialPorts: Return the number of serial ports available on the system. clGetSupportedBaudRates: Return the supported baud rates. clSetBaudRate: Change the baud rate when opening the next port. 5.3.4 clSerialClose: CL Serial API Usage When an application loads the Camera Link DLL, the DLL will search for and list all IP engines currently on the network. The list is compiled from a zero-based index in the order that the IP engines are found. Note that the order may change, depending on the available engines. IP engines that are dynamically discovered on the network will be named using the following format: MODE #INDEX IP_ADDRESS MODE: either Driver or UDP. INDEX: the index of the adapter. (if there are more that one adapter) IP_ADDRESS: The IP address of the device, or “Direct” ( if the device is directly connected to a High Performance Driver card). When loading, the Camera Link DLL will also attempt to load a file named Config.xml from the current directory of the application using the DLL. If the file is present, the IP engine information it contains will be added before the IP engines that are discovered on the network. The Config.xml file can be created using Pleora’s Coyote application and must be saved in the directory of the application using the DLL. For more information about the Coyote application, see the document entitled “User’s Manual, Shared Features of iPORT IP Engines.” Each configuration is then accessible with a zero-based index corresponding to the available IP engine configurations of the Configuration file. Copyright © 2006 Pleora Technologies Inc. Rev 060206 Page 18 6.0 Mechanical Dimensions This section provides mechanical drawings and measurements of the OEM and boxed versions of the iPORT FB1000-CL IP Engine. The measurements are in inches unless otherwise specified. The measurements have the following tolerances, depending on the number of significant digits provided: .X .XX .XXX ±0.1 ±0.01 ±0.005 6.1 Mechanical Drawings of OEM Board Set Figure 5 to Figure 7 are mechanical drawings of the iPORT FB1000-CL OEM boards. The main board and daughter board are both 0.063 inches thick. The maximum secondary component height on both boards is 0.08 inches unless otherwise specified in the drawings. Figure 5: Isometric View of OEM Board Set Copyright © 2006 Pleora Technologies Inc. Rev 060206 Page 19 Figure 6: Side View of OEM Board Set Figure 7: Top View of OEM Board Set Copyright © 2006 Pleora Technologies Inc. Rev 060206 Page 20 6.2 Mechanical Drawings of Boxed Unit The drawings in Figure 8 to Figure 11 show views for the boxed version of the iPORT FB1000-CL. The enclosure is made from anodized aluminum and provides four mounting holes. The mounting hole diameter and slot width are both 0.17 +/- 0.01 inches. Figure 8: Front View of Boxed Unit Figure 9: Rear View of Boxed Unit Copyright © 2006 Pleora Technologies Inc. Rev 060206 Page 21 Figure 10: Side View of Boxed Unit Figure 11: Top View of Boxed Unit Copyright © 2006 Pleora Technologies Inc. Rev 060206 Page 22 7.0 Additional Support Additional support can be obtained from Applications Support at Pleora Technologies Inc. by calling +(613) 270-0625 or via an email to [email protected]. 7.1 Revision History Revision Date 060206 February 2006 Description - Creation Copyright © 2006 Pleora Technologies Inc. Rev 060206 Page 23 Copyright © 2006 Pleora Technologies Inc. Rev 060206 Page 24