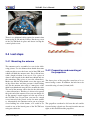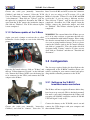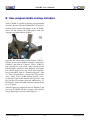
1
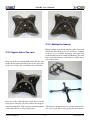
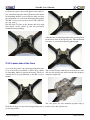
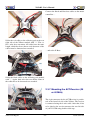
X-3D-BL User’s Manual
X-3D-BL User’s Manual
Inhaltsverzeichnis
1 Introduction
1.1 System overview . . . . . . . . . . . . . .
1.1.1 X-CSM . . . . . . . . . . . . . . .
1.1.2 X-Base . . . . . . . . . . . . . . .
1.1.3 X-3D . . . . . . . . . . . . . . . .
1.1.4 Motors . . . . . . . . . . . . . . .
1.1.5 X-BLDC brushless motor controller
1.2 Components required for the X-3D-BL . . .
1.2.1 Part list . . . . . . . . . . . . . . .
1.2.2 Additionally required . . . . . . . .
.
.
.
.
.
.
.
.
.
.
.
.
.
.
.
.
.
.
.
.
.
.
.
.
.
.
.
.
.
.
.
.
.
.
.
.
.
.
.
.
.
.
.
.
.
2 Assembly
2.1 Before you start . . . . . . . . . . . . . . . . . . . .
2.2 Assembly of the X-CSM frame . . . . . . . . . . . .
2.2.1 Preparing the base of the X-CSM Core . . .
2.2.2 Lateral frame parts of the X-CSM Core . . .
2.2.3 Upper side of the core . . . . . . . . . . . .
2.2.4 Adding the booms . . . . . . . . . . . . . .
2.2.5 Lower side of the Core . . . . . . . . . . . .
2.2.6 Mounting a battery . . . . . . . . . . . . . .
2.3 Mounting the Electronics . . . . . . . . . . . . . . .
2.3.1 Preparing the X-Base . . . . . . . . . . . . .
2.3.2 Preparing the X-BLDC motor controllers . .
2.3.3 Positioning of the X-Base . . . . . . . . . .
2.3.4 Mounting the X-BLDC motor controllers . .
2.3.5 Mounting the motors . . . . . . . . . . . . .
2.3.6 Wiring . . . . . . . . . . . . . . . . . . . .
2.3.7 Mounting the ACT-Receiver (35 or 40 MHz)
2.3.8 Mounting a different receiver . . . . . . . . .
2.3.9 Mounting the X-3D . . . . . . . . . . . . . .
2.4 Last steps . . . . . . . . . . . . . . . . . . . . . . .
2.4.1 Mounting the antenna . . . . . . . . . . . .
2.4.2 Preparation and mounting of the propellers .
2.4.3 Marking the front . . . . . . . . . . . . . . .
3 Setup and configuration of the X-3D-BL
3.1 Updating the Onboard-Software . . . . .
3.1.1 Software update of the X-3D . . .
3.1.2 Software update of the X-Base . .
3.2 Configuration . . . . . . . . . . . . . . .
www.x3d-shop.de
.
.
.
.
.
.
.
.
-2-
.
.
.
.
.
.
.
.
.
.
.
.
.
.
.
.
.
.
.
.
.
.
.
.
.
.
.
.
.
.
.
.
.
.
.
.
.
.
.
.
.
.
.
.
.
.
.
.
.
.
.
.
.
.
.
.
.
.
.
.
.
.
.
.
.
.
.
.
.
.
.
.
.
.
.
.
.
.
.
.
.
.
.
.
.
.
.
.
.
.
.
.
.
.
.
.
.
.
.
.
.
.
.
.
.
.
.
.
.
.
.
.
.
.
.
.
.
.
.
.
.
.
.
.
.
.
.
.
.
.
.
.
.
.
.
.
.
.
.
.
.
.
.
.
.
.
.
.
.
.
.
.
.
.
.
.
.
.
.
.
.
.
.
.
.
.
.
.
.
.
.
.
.
.
.
.
.
.
.
.
.
.
.
.
.
.
.
.
.
.
.
.
.
.
.
.
.
.
.
.
.
.
.
.
.
.
.
.
.
.
.
.
.
.
.
.
.
.
.
.
.
.
.
.
.
.
.
.
.
.
.
.
.
.
.
.
.
.
.
.
.
.
.
.
.
.
.
.
.
.
.
.
.
.
.
.
.
.
.
.
.
.
.
.
.
.
.
.
.
.
.
.
.
.
.
.
.
.
.
.
.
.
.
.
.
.
.
.
.
.
.
.
.
.
.
.
.
.
.
.
.
.
.
.
.
.
.
.
.
.
.
.
.
.
.
.
.
.
.
.
.
.
.
.
.
.
.
.
.
.
.
.
.
.
.
.
.
.
.
.
.
.
.
.
.
.
.
.
.
.
.
.
.
.
.
.
.
.
.
.
.
.
.
.
.
.
.
.
.
.
.
.
.
.
.
.
.
.
.
.
.
.
.
.
.
.
.
.
.
.
.
.
.
.
.
.
.
.
.
.
.
.
.
.
.
.
.
.
.
.
.
.
.
.
.
.
.
.
.
.
.
.
.
.
.
.
.
.
.
.
.
.
.
.
.
.
.
.
.
.
.
.
.
.
.
.
.
.
.
.
.
.
.
.
.
.
.
.
.
.
.
.
.
.
.
.
.
.
.
.
.
.
.
.
.
.
.
.
.
.
.
.
.
.
.
.
.
.
.
.
.
.
.
.
.
.
.
.
.
.
.
.
.
.
.
.
.
.
.
.
.
.
.
.
.
.
.
.
.
.
.
.
.
.
.
.
.
.
.
.
.
.
.
.
.
.
.
.
.
.
.
.
.
.
.
.
.
.
.
.
.
.
.
.
.
.
.
.
.
.
.
.
.
.
.
.
.
.
.
.
.
.
.
.
.
.
.
.
.
.
.
.
.
.
.
.
.
.
.
.
.
.
.
.
.
.
.
.
.
.
.
.
.
.
.
.
.
.
.
.
.
.
.
.
.
.
.
.
.
.
.
.
.
.
.
.
.
.
.
.
.
.
.
.
.
.
.
.
.
.
.
.
.
.
.
.
.
.
.
.
.
.
.
.
.
.
.
.
.
.
.
.
.
.
.
.
.
.
.
.
.
.
.
.
.
.
.
.
.
.
.
.
.
.
.
.
.
.
.
.
.
.
.
.
.
.
.
.
.
.
.
.
.
.
.
.
.
.
.
.
.
.
.
.
.
.
.
.
.
.
.
.
.
.
.
4
4
4
5
6
6
6
7
7
7
.
.
.
.
.
.
.
.
.
.
.
.
.
.
.
.
.
.
.
.
.
.
8
8
8
8
8
9
9
10
11
11
11
12
12
12
13
13
14
15
15
16
16
16
17
.
.
.
.
18
18
18
19
19
www.asctec.de
X-3D-BL User’s Manual
3.2.1
3.2.2
3.2.3
Setting up the X-BLDC brushless motor controllers . . . . . . . . . . . . . . . . . .
Teach-in of your remote control . . . . . . . . . . . . . . . . . . . . . . . . . . . .
X-3D Parameters . . . . . . . . . . . . . . . . . . . . . . . . . . . . . . . . . . . .
19
20
20
4 Operation of the X-3D-BL
4.1 Important things to keep in mind . . . . . . . . . . . . . . . . . . . . . . . . . . . . . . . .
4.2 First flight . . . . . . . . . . . . . . . . . . . . . . . . . . . . . . . . . . . . . . . . . . . .
22
22
22
5 Contact Information
24
A Troubleshooting
A.1 The vehicle drifts significantly into a certain direction . . .
A.2 Bad reception during flight . . . . . . . . . . . . . . . . .
A.3 No reaction on pitch and roll commands during a loop . . .
A.4 The red LED on the X-3D keeps blinking after the startup .
A.5 The X-3D-BL turns itself off during flight . . . . . . . . .
B User-programmable startup melodies
www.x3d-shop.de
.
.
.
.
.
.
.
.
.
.
.
.
.
.
.
.
.
.
.
.
.
.
.
.
.
.
.
.
.
.
.
.
.
.
.
.
.
.
.
.
.
.
.
.
.
.
.
.
.
.
.
.
.
.
.
.
.
.
.
.
.
.
.
.
.
.
.
.
.
.
.
.
.
.
.
.
.
.
.
.
.
.
.
.
.
.
.
.
.
.
25
25
25
25
26
26
27
-3-
www.asctec.de
X-3D-BL User’s Manual
1 Introduction
Congratulations! You have just bought a powerful approved.
high-end model aircraft kit!
Our products are hobby-products and solely meant for
Please read this manual thoroughly until the end befo- usage in non-commercial ways. It is not allowed to
re you start assembling your X-3D-BL and stick with use them for any commercial or military purposes.
the proposed chronological order. Warranty is void if Using any of our components for larger scale flying
objects is explicitly forbidden.
this manual is not strictly followed.
SUBJECT TO CHANGE WITHOUT NOTICE.
WARNING!
Assembling the X-3D-BL requires some experience
1.1 System overview
with building R/C models and soldering. If you do
not feel like you could do this on your own, please
make sure you get some help from a person with the 1.1.1 X-CSM
experience required. If cables are connected falsely
hardware can be destroyed. WARNING! Such cases
The X-CSM is the mechanical frame of the X-3Dare not covered by warranty!
BL UFO. The booms, which are made of a rigid
carbon fiber-balsa wood sandwich material, can be
A motorized model aircraft is not a toy! It should only replaced individually. The central unit of the frame
be flown by adults. Improper assembly or operating called the ”X-CSM Core” is made of light weight
can lead to severe injuries and / or damages. Trouble laser-cut magnesium parts. Being built out of these
with your remote control due to interferences can state-of-the-art materials the X-CSM is a very robust
occur any time without prior notice. Sometimes, a high-tech basis for your quadrotor aircraft.
model aircraft can suddenly become uncontrollable due to a failure of any component, including
mechanical parts and electronics. In this case, the
model can rapidly move towards any direction. Make
sure you always keep a safe distance to people,
animals, obstacles or things of any kind, traffic roads,
etc.. There are country-specific laws regulating the
operation of model aircrafts that definitely have to
be obeyed. Furthermore, we strongly recommend to
effect a liability insurance for model aircrafts. The
manufacturer and your dealer of the X-3D-BL do
not have any influence on, nor can they monitor the
correct assembly and proper operation of your model
aircraft. Always be aware of the dangers mentioned
above and act accordingly. There is no liability of the
manufacturer nor the retailer at all, as far as legally
www.x3d-shop.de
-4-
www.asctec.de
X-3D-BL User’s Manual
1.1.2 X-Base
as the X-3D-BL is turned on. Such an LED can be
mounted to the very front of your vehicle to make it
The X-Base is the central control unit which is easier for the pilot to know where the front side is.
connected to and communicates with all active
elements of the X-3D-BL. Next to the battery, the
motor controllers, the X-3D gyro and the receiver
you can also connect several LEDs to the X-Base to
give your X-3D-BL a unique fancy look.
1 BL-controllers / brushed motors (+)
2 BL-controllers (-)
3 Brushed motors (-) Left/Right/Back/Front
4 PPM-Receiver Input (-) (+) Signal
(from lower to upper connector)
5 LEDs (-) Left/Right/Rear/Front
6 LEDs (+) 5V
7 Power connector, (+) and (-) marked on the
upper side of the board
The key below the power connector (7) turns the
X-3D-BL on and off. A short press is enough to turn
the vehicle on. To turn it off the key has to be pressed
for at least 200ms.
The ”brushed motors” connectors of the X-Base (3)
are not required as the brushless motors are driven by
independent controllers, and thus the connectors can
be used to drive peripherals like for instance a nightflight kit. Connector ”L” is switched on and off by
R/C channel 5, connector ”R” by R/C channel 6. The
connectors can sink currents up to 5A if they’re enabled. That means that the (-)-input of a peripheral has
to be connected to the ”L” or ”R” pad and the (+)input has to be connected to (+) (connector (1)). Be
aware that in this configuration your peripheral will
be supplied the whole battery voltage. If this not what
An LED connected to the ”Front-LED” Pads on the you need make sure you use a suitable voltage regubottom side of the X-Base will always be on as long lator.
www.x3d-shop.de
-5-
www.asctec.de
X-3D-BL User’s Manual
1.1.3 X-3D
The X-3D is the sensor unit of the X-3D-BL. With
three piezo-gyros and highly optimized control
loops it does the actual flight/attitude control. All
parameters influencing the in-flight behavior can be
tuned by connecting the X-3D to a PC using the USB
adapter that came with your X-3D-BL. Once you are
on the field for flying you can select four different
parameter sets using two jumpers.
1.1.5 X-BLDC brushless motor
controller
Every motor is controlled by an independent XBLDC brushless motor controller. The controllers are
highly optimized for the X-BL-52s motors and thus
ensure the highest efficiency possible. Please note that
for this reason the controllers might not work with a
different motor type.
LED patterns shown by the X-3D
• red blinking: Initializing or at least one motor
not detected
• yellow+green: No reception or playing startupmelody
• green: Ready to fly
1.1.4 Motors
The X-BL-52s motors by HACKER Motors Germany are custom-built for the X-3D-BL. The motors are
perfectly suited for the application in this vehicle.
www.x3d-shop.de
-6-
www.asctec.de
X-3D-BL User’s Manual
1.2 Components required for
the X-3D-BL
* 16 plastic screws (short)
1.2.1 Part list
1.2.2 Additionally required
X-CSM
Material
* 1 sheet of magnesium with pre-cut parts
to quarry out
* 4 CF/balsa wood sandwich material booms
* 4 CF panels (1 big, 3 small ones)
* 10 plastic screws incl. nuts
* 1 GFK antenna stick
* 4 O-rings
* 4 rubber bushings
* 1 silicon tube
* foam to protect the battery
* optionally 4 cable ties 2,5 x 100 mm
Adhesion
* Super Glue
* double sided tape
Tools
X-Base
* 1 X-Base
* 1 ACT receiver incl. cable
* 4 spacers (6 mm)
* 4 tapping screws
* screwdrivers (+ and -)
* soldering iron
* lighter or hot-air-gun
X-3D
* 1 X-3D
* 3 spacers
* 6 M2-screws
* 2 jumpers
BL-Kit
* 4 X-BLDC motor controllers
* 4 X-BL-52s motors
* 4 I2C cables
* 8 spacers
* 8 tapping screws
* 2 propellers (clockwise rotation)
* 2 propellers (counter clockwise rotation)
* 4 nuts
www.x3d-shop.de
-7-
www.asctec.de
X-3D-BL User’s Manual
2 Assembly
2.1 Before you start
2.2.2 Lateral frame parts of the
X-CSM Core
Familiarize yourself with the kit and check if all parts
are included. All parts are subject to quality assurance
during production and packaging. We hope that you
are contented with the quality of all components. If a
part should not be totally o.k. we are willing to amend
or exchange the affected part.
2.2 Assembly of the X-CSM
frame
The whole assembly process of the X-CSM is described below. Every important step is depicted in a
photograph. Please read the whole section before you
start assembling your frame in the recommended order.
2.2.1 Preparing the base of the
X-CSM Core
Plug the lateral magnesium parts into the planned
Press the rubber bushings in the respective holes and slots. Turn them until they engage.
glue in the brazen bushings using for example Super
Glue.
.
www.x3d-shop.de
-8-
www.asctec.de
X-3D-BL User’s Manual
2.2.4 Adding the booms
Plug the booms onto the lateral parts of the Core from
below and slide them up. If a lot of force is required
to do so, it is very likely that upper and lower side
of the booms have been confused. Marking: The drill
holes to attach the motor controllers are on the lower
side of the booms.
2.2.3 Upper side of the core
Plug one of the two magnesium plates into the slots
inside the lateral magnesium parts on the upper side
of the core. In this case, orientation does not matter.
Press one of the small CF plates from above over the
lateral parts, until the CF plate touches the magnesium plate completely. Slide a plastic screw through the After that, the booms have to be secured with two plastic screws each. The screws go into the outer two hocentral hole and fix it using a plastic nut.
www.x3d-shop.de
-9-
www.asctec.de
X-3D-BL User’s Manual
les from top and are fixed with plastic nuts from below. Attention! One side of the CF baseboard is meant
for mounting the R/C receiver. Please make sure that
the orientation is as seen in the following photograph.
The R/C receiver goes on the rear left side of the frame (top view!).
Put the solid CF plate on the booms and fix it with
four plastic screws which go into the previously
mounted brazen bushings.
After that, the second magnesium plate is to be placed
in the lower slots of the lateral parts. The orientation
has to be as seen in the following photograph.
2.2.5 Lower side of the Core
As seen in the picture, the two magnesium bars have
to be covered by heat-shrink, a silicon hose, rubber The second CF plate with slots in its corners has to be
or something similar to protect the battery. Their ori- slid over the lateral parts until it touches the magnesientation has to be perpendicular to the R/C receiver um plate completely.
mount.
The two plates are now mounted together using a
Slide the O-rings over the lateral magnesium parts as plastic screw and a plastic nut.
seen in the picture.
www.x3d-shop.de
- 10 -
www.asctec.de
X-3D-BL User’s Manual
Congratulations! You have just finished your X-CSM Your X-CSM frame is now assembled completely!
Core!
Good luck with adding the electronics! :-)
2.2.6 Mounting a battery
2.3 Mounting the Electronics
The X-CSM Core offers a good protection for your
battery. However, the protection only works if the
battery is attached correctly. If this is not the case,
the battery can be damaged or even destroyed during 2.3.1 Preparing the X-Base
a hard crash. The battery can be mounted correctly
using for example a small wooden plate with a hole in
its center. Such a plate can be attached to the battery The X-3D spacers have to be screwed to the X-Base.
using hook-and-loop tape. The hole will engage with
the plastic screw in the center of the Core’s bottom.
Make sure you add some material (e.g. rubber-tape)
to push the battery against the bottom of the Core. It
is important, that the wooden plate touches the lateral
parts of the core, such that the battery can not move
sideways.
After that, the spacers for mounting the X-Base itself
have to be fastened using four tapping screws. The
spacers will stick to the screws, even though they can
easily be moved up and down.
In addition, the battery cables have to be soldered to
the appropriate soldering pads. Make sure that the polarity is correct!
www.x3d-shop.de
- 11 -
www.asctec.de
X-3D-BL User’s Manual
2.3.4 Mounting the X-BLDC motor
controllers
Screw the motor controllers to the respective holes in
the booms. Do this by turning the screws alternately
turn by turn, until the spacers touch the boom. Thus
you will not bend the controller boards too much.
2.3.2 Preparing the X-BLDC motor
controllers
Put two tapping screws into the holes and fasten them
using the 4 mm plastic spacers. Make sure the screwheads are at the controller’s side with the red cable
attached. Repeat this procedure with all four controllers.
The power cables of the controllers are still unconnected at this point.
2.3.3 Positioning of the X-Base
Put the battery cables through the rubber bushing next
to the receiver-mount. This will be the rear left side of
your X-3D-BL.
www.x3d-shop.de
- 12 -
www.asctec.de
X-3D-BL User’s Manual
2.3.5 Mounting the motors
Place the motors on top of the booms as seen in the
following picture, and fasten them using 4 plastic
screws for each motor. Make sure you use the 8 mm
screws which came with the motors, and not the longer ones used for the X-CSM.
2.3.6 Wiring
The black and blue data cables (I2C) have to be put
through the rubber bushings on the front left and the
rear right side of the X-CSM core.
Slide a piece of heat-shrink (about 1 cm) over each
motor cable. Therefore you have to cut the heatshrink which came with your motors and controllers
into 12 pieces with about the same length. Solder the
motor- and controller cables together and isolate them
using the heat-shrink and a hot-air-gun. It does not
matter which controller cable you connect to which
motor wire, as the turning direction of each motor can
be adjusted using the PC-Software later on.
www.x3d-shop.de
After that, the controller power cables have to be put
through the bushings. Two sets of cables go through
the so far unused rubber bushing, and one set of cables goes through each of the bushings with the data
cables already inside (see photograph).
- 13 -
www.asctec.de
X-3D-BL User’s Manual
Connect the black and blue data cables to the motor
controllers ...
Solder the red cables to the soldering pads at the rear
right side of the X-Base marked with ”+”. The cables’ order does not matter. All cables have the same
length, which has been chosen such that non of the
cables must be shortened nor extended.
... and to the X-Base.
Solder the black cables to the soldering pads marked
with ”-”. Again, their order does not matter. None of
the cables has to be shortened nor extended.
2.3.7 Mounting the ACT-Receiver (35
or 40 MHz)
The 4-pin connector for the ACT-Receiver is positioned at the front left side of the X-Base. The receiver
is connected using the 4-wire cable. After that, it has
to be glued to the receiver mount at the rear left side
of your X-CSM using double-sided tape.
www.x3d-shop.de
- 14 -
www.asctec.de
X-3D-BL User’s Manual
Then connect the GND and VCC wires to any of the
four GND and VCC connectors:
2.3.8 Mounting a different receiver
The X-3D-BL was designed for the European market.
Unfortunately, ACT-Europe does not offer any 72
MHz receivers with the convenient digital interface Finally, connect the cables to connector no. 4 of the
used in the X-3D-BL. To enable people in countries, X-Base exactly as seen in the next picture.
where 35 and 40 MHz R/C models are not allowed,
to fly the X-3D-BL as well, we implemented an
interface for a standard PPM-receiver (cf. 1.1.2,
connector no. 4). However, as a normal receiver
has an output multiplexer to distribute the incoming
signal to the independent servo control channels, you
have to modify the receiver to make it compatible
to the X-3D-BL. Be aware that you do such a
modification at your own risk! By trying to modify a
receiver its warranty will be void!
Almost any receiver can be used, as long as you are
able to find and to access the combined PPM-Signal
before it is split up into several channels by the output Please make sure you upload the ”X-Base Vx.x for
multiplexer. A digital storage oscilloscope is a handy X-BL and PPM receiver.xbs” firmware as described
in 3.1.2.
tool to find the signal.
Here is an example of how to modify the ”BERG Microstamp 4” full range receiver. This receiver is cast
in some soft plastics. The combined PPM signal can
be found at the outer most pin of the PIC processor.
To reach it you have to use a cutting knife to carefully
cut away a little part of the molding material. Carefully solder a wire to the outer most pin of the processor
as shown in the following photograph.
www.x3d-shop.de
2.3.9 Mounting the X-3D
The X-3D is simply plugged to the X-Base and fastened using three screws. To do so, you have to remove
the top cover of the X-CSM Core.
- 15 -
www.asctec.de
X-3D-BL User’s Manual
There is no additional cable required to transfer data
between the X-3D and the X-Base. Put the top cover
of the X-CSM back in place and fasten it using the
central plastic screw.
2.4 Last steps
2.4.1 Mounting the antenna
The antenna can be assembled as seen in the following picture. Use the thinnest heat-shrink that came
with your kit to cover the lower end of the GFK stick
which will hold the antenna wire. Put a silicon hose
with a length of about 2 cm over it. Cut a piece of
about 3 mm length of the thick heat-shrink and use
the remaining (long) piece to cover the silicon hose.
Make sure that the heat-shrink covers the upper end
of the silicon hose and thus prevents it from sliding
off. Fix the antenna wire using a 3 mm piece of the
thick heat-shrink and wrap the wire around the stick.
The end of the antenna can be fixed to the stick using
a short silicon hose. This hose is also used to protect
the peak end of the antenna. Now you can simply slide the antenna’s stand support over the top-screw of
the X-CSM Core. If you want, you can use a metal
screw instead of the plastic screw for more stability. Alternatively, the antenna can be put on a longer
screw holding one of the booms, or it could be fastened to one of the lateral parts of the X-CSM core
using two cable ties.
www.x3d-shop.de
2.4.2 Preparation and mounting of
the propellers
The lower piece of the propeller center has to be removed using a cutter. In addition, the hole has to be
extended using a 3 mm (1/9 inch) drill.
The propellers can then be slid over the axle and be
fastened using a plastic nut. Do not fasten the nut too
tight, as this would bend the propellers.
- 16 -
www.asctec.de
X-3D-BL User’s Manual
Please note that there are two types of propellers: One
pair of propellers is spinning clockwise, the other pair
is spinning counterclockwise. The Propellers spinning clockwise must be mounted to the front and
the rear motor, whereas the counterclockwise rotating
propellers must be mounted to the left and to the right
motor.
2.4.3 Marking the front
As a pilot you always must know where the front of
your X-3D-BL is. To make this easily visible we recommend to attach some colorful tape to the front
boom. A little flag as seen in the following photograph makes it much easier to identify the UFOs front
in any situation.
To improve the durability of the propellers during a
crash you can optionally add a cable tie (e.g. 2.5 x
100 mm) as seen in the following picture.
www.x3d-shop.de
- 17 -
www.asctec.de
X-3D-BL User’s Manual
3 Setup and configuration of the X-3D-BL
Your X-3D-BL UFO is now completely assembled.
stance you have owned your X-3D or X-Base already before you bought the brushless components, you
need to update the on-board software of both, the X3D and the X-Base as follows.
3.1.1 Software update of the X-3D
Disconnect the battery from the X-3D-BL. You need
a jumper to activate the so called bootloader. Set the
jumper to the following position:
Now, it has to be configured using the X-Control PC
software.
Please download the X-Control PC software from the
download area of www.x3d-shop.de. The software
package (.zip-file) contains the most recent X-Control
software, the on-board-software for all components
of the X-3D-BL and optimized parameter sets for the
X-3D. Please unzip the archive to a local folder on
your hard disk. Double click the .exe-file to install the
X-Control software and follow the instructions given
by the install wizard. Then open the application (XControl) and click on the American flag to change the
language to English.
Connect the USB-adapter to your computer. Open
the X-Control software, click on ”X-3D” and on the
left hand side on ” X3D firmware upgrade”. Then,
connect the X-3D to the USB adapter as seen in the
following picture.
3.1 Updating the
Onboard-Software
If you bought your X-3D-BL completely in one kit
you do not have to update any on-board software. In
this case, please continue with chapter 3.2. If for in-
www.x3d-shop.de
- 18 -
www.asctec.de
X-3D-BL User’s Manual
Choose the serial port (normally ”Autoselect:
COMxx”) and click on ”connect”. Select the ”X-3D
Vx.x for X-Base.ufc” firmware file after clicking on
”select firmware”. Then click on ”Upload”, wait for
the upload to be completed, disconnect the USB adapter from the X-3D, remove the bootloader jumper
and click on ”Finished”. The X-3D software update
is now completed.
Base Vx.x for X-BL and ACT receiver.xbs” firmware
file if you are using an ACT receiver (35 or 40
MHz) or select the ”X-Base Vx.x for X-BL and PPM
receiver.xbs” if you are using a different receiver.
Then click on ”Upload”, wait for the upload to be
completed, disconnect the USB adapter from the
X-Base, remove the bootloader jumper and click
on ”Finished”. The X-Base software update is now
completed.
3.1.2 Software update of the X-Base
WARNING! The current limit of the X-Base was set
to 11 A in early revisions, to guarantee the full safeAgain, you need a jumper to activate the so called
ty in combination with brushed motors. Please make
bootloader. Set the jumper as seen in the following
sure that the current limit of your X-Base is set to 35
picture.
A as you are using brushless motors. To do so, please
connect the X-Base again to the X-Control software
and click on ”parameters”. The value of the edit-field
designated with ”Current:” must be 35. Once you are
done click on ”Finished” and then on ”Transmit and
disconnect”.
3.2 Configuration
The last steps required before the first flight are the
Open the X-Control software, click on ”X-Base” and configuration of the X-BLDC brushless motor conthen on ”X-Base firmware Upgrade” on the left hand trollers, teaching in your remote control and uploaside. Turn on the X-Base (In this case the battery has ding suitable controller parameters to the X-3D.
to be connected to the UFO!) and connect the USB
adapter to the X-Base.
3.2.1 Setting up the X-BLDC
brushless motor controllers
The X-Base will not recognize all motors before they
have been set up correctly. This is absolutely normal!
Not until a successful configuration the X-Base will
recognize all X-BLDC controllers and the X-3D-BL
UFO will signal ”ready to fly”.
Connect the battery to the X-3D-BL, turn it on and
Choose the serial port (normally ”Autoselect: connect the USB adapter with your computer and
COMxx”) and click on ”connect”. Select the ”X- then with the X-Base.
www.x3d-shop.de
- 19 -
www.asctec.de
X-3D-BL User’s Manual
Open the X-Control software and click on ”X-Base”.
Choose the correct COM-Port (normally ”Autoselect:
COMxx”) and click on ”Connect”. Chose ”X-BL
Setup” and click on ”start search”. After several
seconds four brushless controllers with different
serial numbers should appear in the list. If less than
four controllers appear, turn of your X-3D-BL, check
all solderings and connectors and repeat the previous
steps.
If all four controllers have been found, click on
”config” and follow the instructions given by the
software in order to tell each controller its own
position and the appropriate turning direction. After
that, click on ”Disconnect” to complete the controller
setup.
The X-3D-BL works with any R/C with at least four
channels. Make sure that all channels work independently and that no mixers are active in your remote.
3.2.3 X-3D Parameters
The X-3D offers four preprogrammable parameter
sets which can be selected by jumpers. You can find
four recommended parameter sets in the software
package (.zip-file) you downloaded before in the sub
folder ”X-3D Settings”.
To upload the parameters you have to connect the XOptionally a startup melody can be installed using the 3D with the USB adapter:
X-BL update function. A detailed description of how
to do this can be found in appendix B.
3.2.2 Teach-in of your remote control
Connect the USB adapter to your PC and to the XBase, turn on your UFO and click on ”X-Base” and
then on ”Connect” in the X-Control software. Then
choose ”Receiver setup” and ”Automatic calibration”and follow the instructions given by the software.
You can freely choose a stick on your R/C for every function. If you are used to a certain configuration
you should definitely continue using this one. If you
haven’t flown other model aircrafts before we recommend the following configuration (”Mode 2”):
www.x3d-shop.de
In this case it does not matter if the X-3D-BL is
turned on or off. Click on ”X-3D” in the X-Control
software, choose the correct COM-Port (normally
”Autoselect: COMxx”) and click on ”Connect”. Then
- 20 -
www.asctec.de
X-3D-BL User’s Manual
click on ”Parameters”.
You can select a parameter set in the upper left
corner. The image on the lower left shows the jumper
setting which enables the selected setting. Select all
four settings (one after another) and for each of them
load one of the four recommended parameter sets
(e.g. ”X-3D for X-Base - Beginner Setting Vx.x.ini”)
by clicking on ”Load”.
Click on ”Finished” and then on ”Transmit and Disconnect” to complete the software configuration of
your X-3D-BL.
www.x3d-shop.de
- 21 -
www.asctec.de
X-3D-BL User’s Manual
4 Operation of the X-3D-BL
4.1 Important things to keep in
mind
• Directly after turning the X-3D-BL on the
motors produce a short beep. It is perfectly
normal that the propellers move slightly during
that tone.
• Keep the X-3D-BL totally still after turning it
on until the X-3D shows the yellow+green (no
reception) or green (ready to fly) light pattern.
Otherwise the sensors can not be calibrated
correctly and the vehicle might go crazy after
turning on the motors. If you accidentally moved
the system during startup simply turn it off and
on again.
you should turn off the motors immediately if
one of the propellers touches the ground or any
other obstacle and hence the X-3D-BL is not
able to take off.
• There is a battery warning implemented in your
X-3D-BL. A low battery is signalized by a periodic, simultaneous tremor of all motors. This
is hard to see but it can be heard. Depending on
the battery you use there is about a minute of
flight time left after the low-battery warning is
activated. Lithium Polymer (LiPo) batteries are
very vulnerable to deep discharge. That is why
the X-3D-BL turns off completely if the voltage drops under a programmable threshold. You
can adjust the thresholds for the low-battery warning and the low-battery shut down using the XControl software. Therefor you have to connect
the X-Base to your PC using the USB adapter
and click on ”X-Base”, ”Connect” and then on
”Parameters”.
• If only the green LED at the X-3D board is on
the vehicle is ready to fly. A yellow+green light
pattern means ”no reception”, which is also
signalized by a periodic beep of all motors. In
this case please check that your remote control is
turned on and fully functional, that the receiver 4.2 First flight
crystal is installed in the receiver and that the
receiver is connected correctly.
We recommend to wait for a dry and calm day to do
the first flight. The best training area is a big field
with grass. On the soft ground your X-3D-BL will
• After the startup phase the motors are still turned
survive crashes much more likely than if you crash
off and secured. To turn them on you have to
on tar or concrete. Do not fly above tar, concrete or
move the yaw stick to the very left or to the
other hard grounds unless you are an experienced
very right while your throttle stick is in zero
X-3D-BL pilot!
position. The motors will then start and keep
running at their minimum speed. Now you can
fly as usually. To turn the motors off you have Check the functionality of your X-3D-BL before
to do the same procedure again: Move the yaw your take off! To do so, you can hold your vehicle
stick to the very left or to the very right while by holding the lower part of the X-CSM Core. Make
your throttle stick is in zero position. There is no sure you do not touch the blades. Start the motors,
flight maneuver where one would use this con- move the pitch and roll sticks and see if the vehicle
trol input and thus you will not accidentally turn turns into the desired direction. Turn the motors off
off your motors during flight. For safety reasons again after the test was completed successfully.
www.x3d-shop.de
- 22 -
www.asctec.de
X-3D-BL User’s Manual
Now, place the X-3D-BL on a flat ground. Turn on
the motors and lift off by pushing the throttle stick up
a bit. Attention! the X-3D-BL is extremely powerful!
If you give to much throttle it will rise up into the
air very fast. However, make sure that the vehicle
does not touch the ground any more after you started
to push the stick up, because the controllers can
only work as intended once the vehicle is airborne.
Try to keep the X-3D-BL hovering in a height of
about one meter. Make sure that the front marking
is always facing away from you and correct the
orientation accordingly using your yaw stick. Only
if the front is facing away from you the vehicle will
fly in the direction you push the pitch and roll stick.
In any other case you have to rotate the helicopter
mentally to know where to push the stick for a
desired reaction, which requires some practice. If
the vehicle continues to yaw in a certain direction
without any command you can use the yaw trimmer
on your R/C to compensate for that.
Once you know how to hover in a constant height you
can start flying a few meters away from you and come
back again. After that, you can try to fly to the right
and to the left hand side and thereby turn the heading
in the direction of travel using the yaw stick. Of course, this requires some practice. With some more practice you’re even able to do 3D-maneuvers like loops
and flips. Good luck!
Enjoy flying your X-3D-BL UFO!
www.x3d-shop.de
- 23 -
www.asctec.de
X-3D-BL User’s Manual
5 Contact Information
This manual is copyrighted. Any kind of changes or copying, completely or in part, have to be
approved by the Ascending Technologies GmbH.
This document may only be linked to by the Ascending Technologies GmbH and the x3d-shop.
www.x3d-shop.de
PC-Quadrat GmbH
¨
Aussere
Bayreuther Str. 57
DE - 90409 Nuremberg
GERMANY
Phone: +49 911 995140
Fax: +49 911 99514-66
E-Mail : [email protected]
Software/manual downloads: www.x3d-shop.de
Support forum: www.xufo.de
Venue: Nuremberg
Register no.: HRB 15803
www.x3d-shop.de
- 24 -
www.asctec.de
X-3D-BL User’s Manual
A Troubleshooting
This chapter holds solutions to problems which might Make sure your TX battery is fully charged and that
occur during the operation of your X-3D-BL UFO.
the antenna is fully extended. If you are still having
trouble you can to the following test to check the
range of your R/C system:
A.1 The vehicle drifts
significantly into a certain
direction
Turn the system off and on again and make sure
that it is held totally still until the X-3D shows the
yellow+green or the green light. If the problem still
exists hold the vehicle in your hand (hold the lower
part of the X-CSM Core), turn on the motors carefully, give some throttle and figure out in which direction
it tilts. Move the corresponding trimmer on your R/C
in the opposite direction. Repeat this until the drift is
very small, that means until the vehicle stays kind of
leveled for a few seconds after startup. Now also the
take-off should work without any problems.
The vehicle always turns into the same
direction, even though the relevant trimmer
is at maximum and the vehicle was definitely
held still during startup
Is your remote control taught-in correctly? Connect
the X-Base to your PC using the USB adapter and
open the X-Control software to check if all channels
are detected as centered if the sticks on the R/C are
centered. If this is not the case repeat the teach-in of
your R/C following the instructions given by the software.
During the range check all other transmitters should
be switched off. The best location to do the test is a
big open field, as metallic objects like cars or wire
fences could influence the result. You need a helper
who holds your transmitter with the antenna as close
to vertical as possible. Turn the X-3D-BL on and wait
until only the green LED on the X-3D is on signalizing ”ready to fly”. Then walk away from the transmitter until the yellow LED starts flickering. At this
point you should be at least 100 m away from your
TX. Repeat the whole procedure with the motors running at minimum throttle. If at a distance of about 100
m the signal is still o.k. (i.e. only the green is LED
on), your reception is totally fine. Due to the size of
the aircraft and the associated visibility you will never fly any further away than that. If the yellow LED
comes up randomly at shorter distances your TX/RX
combination is to weak. In this case you can try extending the antenna of the X-3D-BL by using a longer
plastic tube or stick which holds the antenna. A fully extended antenna works definitely better than one
which is wound around a stick as described in this manual. If you use a stub antenna at your TX this could
also be the reason for a bad reception, as such antennas do not transmit the full power. In this case try
using a standard telescopic antenna instead.
A.3 No reaction on pitch and
roll commands during a
loop
A.2 Bad reception during flight
If the X-3D-BL does not react while it is airborne, During your first attempts to fly 3D maneuvers it can
please check if someone else uses the same channel. happen that your X-3D-BL suddenly stops turning
www.x3d-shop.de
- 25 -
www.asctec.de
X-3D-BL User’s Manual
in pitch and roll even though you push the pitch/roll and then on ”Transmit and disconnect”.
stick to maximum. In this case throttle is too low (almost zero). The so called heading lock controllers
used to stabilize all axes of the X-3D-BL resets the
computed angles to zero if throttle is at minimum.
This is the only way to get the vehicle to lift off
straight after it was standing on the ground or held
in your hand. To avoid the problem during the loops
simply do not take throttle totally back but always leave a few percent of throttle. After a few tries you will
get used to that behavior.
A.4 The red LED on the X-3D
keeps blinking after the
startup
If you have not configured your X-3D-BL using the
X-Control software as described above this behavior
is normal. In this case please follow the instructions
given in 3.2. If the configuration of your vehicle was
completed successfully the blinking red LED means
that one of the motor controllers or motors was not
detected. Please check if all four cables in black and
blue color between the X-Base and the motor controllers are connected correctly. If all connections are o.k.
please verify that all motors produce a short beep directly after you turn the X-3D-BL on. If one of them
does not play the sound check the power connection
of the affected motor controller. Are all wires o.k.?
Are all soldering points clean and correct? If you
connect the X-Base to the X-Control software it will
show you which of the motors is not working correctly.
A.5 The X-3D-BL turns itself
off during flight
Please make sure that the current limit of your X-Base
is set to 35 A. To do so, please connect the X-Base
to the X-Control software and click on ”parameters”.
The value of the edit-field designated with ”Current:”
must be 35. Once you are done click on ”Finished”
www.x3d-shop.de
- 26 -
www.asctec.de
X-3D-BL User’s Manual
B User-programmable startup melodies
Your X-3D-BL is capable of playing preprogrammed
melodies directly after the initialization. To upload a
melody please connect the battery to the X-3D-BL,
turn it on and connect the USB adapter with your
computer and then with the X-Base.
Open the X-Control software and click on ”X-Base”.
Choose the correct COM-Port (normally ”Autoselect:
COMxx”) and click on ”Connect”. Chose ”X-BL Setup” and click on ”start search”. After several seconds
four brushless controllers with different serial numbers should appear in the list. If all four controllers
have been found, click on ”Firmware upgrade”, then
on ”Select all controllers” and open the ”Select firmware” dialog. Select ”X-BL Startup melody (.snd)”
on the lower right of the window and open any *.snd
file you like, for instance from the subdirectory ”XBL Sounds” in the X-3D-BL software package. Then
press ”Upload”.
After the upload is completed click on ”Finished” and
turn your X-3D-BL off and on again. After initializing it should play the new sound. Enjoy it! :-)
www.x3d-shop.de
- 27 -
www.asctec.de