1
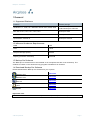
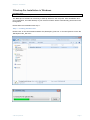
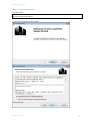
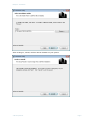
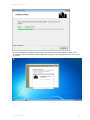
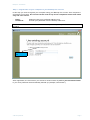
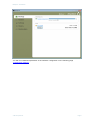
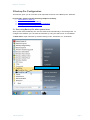
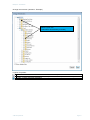
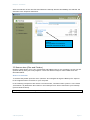
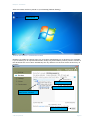
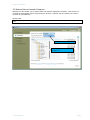
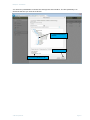
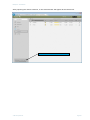
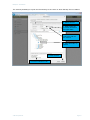
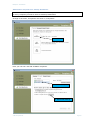
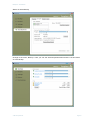
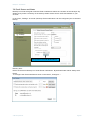
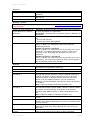
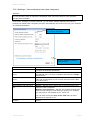
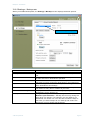
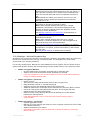
Backup Pro – User Manual Language English Version Date 3.2 May 21, 2014 Created by Company Arcplace AG Wiesenstrasse 14 8008 Zürich Email [email protected] Telephone +41 44 260 80 00 +41 44 260 80 01 www.arcplace.ch Fax Internet Backup Pro – User Manual Index of contents 1 General ..................................................................................................................................... 2 1.1 Supported Platforms ........................................................................................................... 2 1.2 Minimum Hardware Requirements ...................................................................................... 2 1.3 Backup Pro Software .......................................................................................................... 2 1.4 Download Backup Pro Software.......................................................................................... 2 2 Backup Pro Installation in Windows .......................................................................................... 3 3 Backup Pro Configuration ......................................................................................................... 9 3.1 Start using Backup Pro after system boot ........................................................................... 9 3.2 Select Data to Back Up ..................................................................................................... 11 3.3 Restore data (Files and Folders) ...................................................................................... 13 3.4 Restore data from another backup destination .................................................................. 16 3.5 Restore Data of another Computer ................................................................................... 17 3.6 Web Restore (Restore data through the web interface) .................................................... 18 3.7 Add new backup destination ............................................................................................. 22 3.8 Email Status and Alerts .................................................................................................... 28 3.9 Free up storage space in the Arcplace Datacenters .......................................................... 29 3.10 Settings – Overview ........................................................................................................ 30 3.10.1 Settings – Inbound backup from other computers ..................................................... 33 3.10.2 Settings – Backup Frequency and Versioning .......................................................... 34 3.10.3 Settings – Filename patterns to exclude ................................................................... 35 3.10.4 Settings – Advanced settings ................................................................................... 36 3.10.5 Settings – Backup sets ............................................................................................. 37 3.10.6 Settings – Archive Encryption Key ............................................................................ 38 4 Backup Pro migration .............................................................................................................. 40 © 2014 Arcplace AG Page 1 Backup Pro – User Manual 1 General 1.1 Supported Platforms Platforms Software package Windows 8, 7, Vista, XP / Windows Server 2012, 2008, 2003 32 Bit: Backup Pro Win 64 Bit: Backup Pro Win x64 Mac OS X 10.9, 10.8, 10.7, 10.6, 10.5 Backup Pro Mac Linux 2.6 Series Kernel or newer Backup Pro Linux OpenSolaris, Solaris 10 Backup Pro Solaris 1.2 Minimum Hardware Requirements RAM 1 GB CPU 1 GHZ HD (free storage space) 250 MB Display (minimum resolution) 1024x768 1.3 Backup Pro Software The Backup Pro Software has to be installed on all computers that are to be backed up. The software is based on the award-winning program CrashPlan from Code42. 1.4 Download Backup Pro Software Please download the Backup Pro Software for your system: Windows x64 Windows x32 Mac OS Linux Solaris Download Download Download Download Download Important note: Please download the correct version for your windows platform (32bit or 64bit). © 2014 Arcplace AG Page 2 Backup Pro – User Manual 2 Backup Pro Installation in Windows Important note: The installation of Backup Pro needs administrator rights! The Backup Pro software is necessary to backup data from the computer. After installation and user registration, the initial backup of your document folder will be automatically performed in the background. Please start the installation with step 1. Step 1 – Loading installer files Double-click on the downloaded installer file „BackupPro_Win.exe“ or for x64 -Systems on the file „BackupPro-x64_Win.exe“. © 2014 Arcplace AG Page 3 Backup Pro – User Manual Step 2 – Start the installation Important note: The installation of Backup Pro is not anymore Arcplace branded. This is absolutely correct and will be the case in the future. Follow the instructions on the screen: © 2014 Arcplace AG Page 4 Backup Pro – User Manual After clicking on „Install“, the files will be installed on your system. © 2014 Arcplace AG Page 5 Backup Pro – User Manual Now you should see a window, which shows you the success of the installation. After a few seconds a window will appear in the background. Change to the registration screen with a click on „Finish“. © 2014 Arcplace AG Page 6 Backup Pro – User Manual Step 3 – Registration of your computer to your Backup Pro account In this step you need to register your computer using your Backup Pro account. One computer is equivalent to one client. An account can be used for up to four computers/clients and needs only one user license. - Email: Password: Please provide your full Email address here. Provide your password from the backup order here. The Email and Password should have been sent to you directly from your IT -Partner or from Arcplace. Change to this tab After registration, the first screen you will see is shown below. By default your document folder in your user profile will be automatically backed up (example „Documents“). © 2014 Arcplace AG Page 7 Backup Pro – User Manual You will find a detailed explanation of the software configuration on the following page „Configuration Manual“. © 2014 Arcplace AG Page 8 Backup Pro – User Manual 3 Backup Pro Configuration This section gives you an overview of all important functions of the Backup Pro Software. In particular, please read the following chapters carefully: 1. Select Data to Back Up 2. Restore data (Files and Folders) 3. Settings – Backup Frequency and Versioning 4. Settings – Archive Encryption Key 3.1 Start using Backup Pro after system boot After system boot the Backup Pro service starts itself automatically in the background. To configure the software you can start the interface by using the start menu or the taskbar. 1. Start menu: Open interface by double-clicking under „CrashPlan“ on „CrashPlan“ Click here to open the interface. © 2014 Arcplace AG Page 9 Backup Pro – User Manual 2. Taskbar: Open interface by double-clicking on the house symbol in the taskbar Doubleclick to open the interface You can find more options in the context menu of right-mouse click. Show Application... Backup Pro Data Arcplace Datacenters Sleep... Exit © 2014 Arcplace AG . The context menu can be opened by a Open interface (same function as double-clicking on the icon) Optional backup destination (see Add new backup destination) Arcplace backup destination (Online Storage) Stop scheduled backup jobs for a certain time Close the taskbar program Not recommended because Backup Pro won’t detected whether or not the user is away Page 10 Backup Pro – User Manual 3.2 Select Data to Back Up Which data should I backup? This question is important and according to the requirements the appropriate files and folders should be selected in order to be included in your backup set. ATTENTION: What is not selected, will not be backed up! Please review your selection carefully. To change the selection click on the button „Change“ as shown on the screenshot below. Click here to change or add new files and folder to your selection. © 2014 Arcplace AG Page 11 Backup Pro – User Manual Change the selection (Attention: Example) Select by left click (Subfolders automatically included) Legend of symbols: Not selected These files and folders won’t be backed up! Selected with subfolders Files and folder (with all subfolders) will be backed up! Folder contains selected subfolders © 2014 Arcplace AG Page 12 Backup Pro – User Manual After the selection of the new files and folders the backup will start immediately and transfer the selection to the Arcplace datacenter. Overview of selected files and folders. It’s important to review this selection from time to time! 3.3 Restore data (Files and Folders) Restoring data allows you to copy certain files and folders back to your computer, so they can be opened directly with your local programs. There are different ways to restore data which are described below. Restore a file/folder To restore files please open the menu „Restore“ and navigate through the Backup Pro explorer to the original location of the file on your computer. In the following example we will restore a lost document „Customer letter xyz.docx“ in the folder „Documents“. By default the last version in the backup archive wi ll be restored to your Desktop (see screenshot below). Excepting the selection, restoring a folder is equivalent. © 2014 Arcplace AG Page 13 Backup Pro – User Manual 1. Select file to restore 2. Change destination folder on your computer 3. Start the restore On the bottom you see the status of the restore operation . 4. Status of the restore © 2014 Arcplace AG Page 14 Backup Pro – User Manual After the restore the file is placed on your Desktop (Default Setting). Restored file Search and restore a certain file version Restoring a certain file version helps you to reverse maloperations on a document. For example, if you’re working on an important document all day long and suddenly need a previous version of the document this can be done with Backup Pro. By default new versions will be saved every 15 minutes. 1. Search document 3. Select a certain version 2. Expand here to list the different file versions 4. Start the restore © 2014 Arcplace AG Page 15 Backup Pro – User Manual 3.4 Restore data from another backup destination Data can be restored from different backup destinations. By default data will be restored from Arcplace Datacenters, but you can change it (if you have configured different backup destinations) as shown on the screenshot below. In this example: Arcplace Datacenters W7-MGMT local backup Default backup destination at Arcplace (over Internet) Backup destination on another Computer (over LAN/Internet) Backup destination on a local storage (Hard disk) 1. Select backup destination 2. Continue as shown in chapter 3.3 © 2014 Arcplace AG Page 16 Backup Pro – User Manual 3.5 Restore Data of another Computer Backup Pro also allows you to restore data from another registered computer. That means it’s possible to restore data, which originated from another computer which is linked to the same account (e-mail address). Please note: The destination folder of the restore operation is always on the computer you’re working on right now. 1. Select other computer 2. Continue as shown in the chapter 3.3 © 2014 Arcplace AG Page 17 Backup Pro – User Manual 3.6 Web Restore (Restore data through the web interface) Backup Pro gives you the option to restore data through a web interface. Th is means that you do not need the Backup Pro software for a restore. To restore data through the web interface use the following link https://backuppro.arcplace.ch with your Internet Browser (Internet Explorer, Firefox etc.) and login with your Backup Pro credentials (see screenshot below). Click on “Devices” on the left side and then on the Restore button from the device you want to perform a restore from. 2. Click on the Restore button 1. Open Devices © 2014 Arcplace AG Page 18 Backup Pro – User Manual You have two possibilities to restore files through the web interface. The first possibility is to download the files you need as a ZIP file: 3. Selet file/folder to restore 5. Start restore 4. Check if selection is ok © 2014 Arcplace AG Page 19 Backup Pro – User Manual After preparing the restore selection, a new download link will appear at the bottom left. 6. Click here to download the ZIP-File © 2014 Arcplace AG Page 20 Backup Pro – User Manual The second possibility is to push the files directly to the client on which Backup Pro is installed: 3. Select Device 4. Start typing the pc name and select the right client. 5. Click here and select the path for the restore 6. Selet file/folder to restore 8. Start restore 7. Check if selection is ok © 2014 Arcplace AG Page 21 Backup Pro – User Manual After clicking on restore, you will see that the push restore has started on the bottom left. Please check the folder you selected during the restore process on the client and you should find the selected file. 6. Push Restore started 3.7 Add new backup destination Where do you want to back up your data? In addition to the Arcplace Datacenters, Backup Pro allows you to back up your data to a local storage or another computer. Advantage of a local storage as a backup destination? Having a local storage as an additional backup destination brings the ability to restore data without being online. Local storage furthermore makes it easier to restore large amounts of data, even with a poor internet connection. Advantage of another computer as a backup destination? To have a backup on another computer brings additional security. © 2014 Arcplace AG Page 22 Backup Pro – User Manual Add Local Storage Change to the menu „Destinations“ and click on „Folders“. 1. Click here Click on „Select...“ and select an empty folder on your hard disk. 2. Select folder © 2014 Arcplace AG Page 23 Backup Pro – User Manual Please note: The folder needs to exist, you can’t create new folder using this dialog. 3. Select existing empty folder 4. Confirm selection After selection you can see the listed „Backup Pro Data“ as a local backup destination. The initial backup can be started now. 5. Start initial backup © 2014 Arcplace AG Page 24 Backup Pro – User Manual Status of Initial Backup Change to the menu „Backup“. Here you can see all backup destinations and the current status of each backup. The local backup will now backup the same data as the Arcplace Datacenters. © 2014 Arcplace AG Page 25 Backup Pro – User Manual Add another computer as a backup destination Please be aware that you must have installed the Backup Pro Software with the same account on every computer you want to have as a backup destination! Change to the menu „Computers“ and click on „Computers“. 1. Click here Here you can see a list with available computers. 2. Select a computer 3. Start initial backup © 2014 Arcplace AG Page 26 Backup Pro – User Manual Status of Initial Backup Change to the menu „Backup“. Here you can see all backup destinations and the current status of each backup. © 2014 Arcplace AG Page 27 Backup Pro – User Manual 3.8 Email Status and Alerts Backup Pro sends at regular intervals Email notifications about the condition of the backups. By default every week a summary of the backup status will be sent to the Email address of your account. In the menu „Settings“ in the tab „Backup“ Email notifications can be configured (see screenshot below). Configuration of Email Notifications Delivery time: Define at what time Backup Pro sends Email notifications. By default Emails will be always sent. Email: To configure the Email notifications click on the button „Configure...“. © 2014 Arcplace AG Page 28 Backup Pro – User Manual Please note: Your SPAM filters should allow to receive Emails with the following sender address [email protected]. Email Settings: Send backup status report every: Warn me when not backed up for: Alert me when not backed up for: Send Email summary of backups every 7 days. Send Warning Email if computer is not backed up for x days Send Alert Email if computer is not backed up for y days 3.9 Free up storage space in the Arcplace Datacenters Every week Backup Pro maintains your backup archives and frees up storage space. The backup maintenance process deletes backup data, which are not selected to backup. Please review your selection carefully Chapter Select Data to Back Up Example: Accidently you have chosen to backup all your data in your profile folder including your music and video files. The problem is now that your music and video files need much more storage space than you actually have. To free up storage space you have to deselect the music and video folders first. After deselecting the music and video files still remain in the backup archive. If you don’t want to wait for the next maintenance interval you can manually activate the maintenance process. In the menu „Destinations“ in the tab „Cloud“ the maintenance can be started by clicking on the button „Compact“ (see screenshot below). Click here to start the maintenance © 2014 Arcplace AG Page 29 Backup Pro – User Manual 3.10 Settings – Overview In this chapter you will find an explanation of the Backup Pro Software settings . In the menu „Settings“ you will find the listed tabs below. General: Item Name for this computer: Inbound backup from other computers: User is away when not active for: When user is away, use up to: When user is present, use up to: Stop when battery reaches: Launch system tray on startup: Show full paths on Backup tab: Language: Backup: Backup will run: Verify selection every: Frequency and versions: Filename exclusions: Advanced settings: Backup sets: © 2014 Arcplace AG Description Name of the computer you are currently using (name can be changed). Settings for disabling/enabling inbound backups. See Inbound backup from other computers for detailed list of settings. Number of minutes of inactivity after which the user is considered „away“. Percent of CPU to use when user is not at computer (away) . Percent of CPU to use when user is at computer (present) . Pause backup when remaining battery power is below this level. Displays CrashPlan icon in notification area. Show full path (sequence of drives and folders to navigate to files) wherever filenames appear on the Backup tab. Automatic means that Backup Pro will display in the default language specified by the OS. Note: Changing the language creates a new history file. Your old history file will no longer be available, even if you switch back to the original language. You need to exit and restart the Backup Pro application before your new selection takes effect. Always – Backup Pro is always running Between specified times – Backup Pro runs only during the time range you specify. For example, you may want to run only between 6 a.m. and 9 a.m. You can also choose the days of the week you want backups to run. Backup and restore are allowed to run only during this timeframe. Scan system for file changes and deleted files within your backup selection at the interval and time of day you specify. If the computer is powered off or asleep at the scheduled scan time, the scan will wait until the next scheduled scan time to run. Display window in which you can specify how often Backup Pro backs up and which versions shall be retained. See Backup Frequency and Versioning for detailed list of settings. Display window in which you can enter file extensions to be excluded from your backup. See Filename patterns to exclude for detailed list of settings. Settings for disabling/enabling data de-duplication, compression, encryption, real-time file watching, and backing up open files. See Advanced settings for detailed list of settings. Create backup sets; view and edit backup set options. Once backup sets are enabled, the Backup tab displays additional options. See Backup sets for detailed list of settings. Page 30 Backup Pro – User Manual Account: Personal information Change Password… Manage account License Do not change the username without asking your IT -Partner! Display the Security page on which you can change your password. This hyperlink brings you directly to the web administration of Backup Pro. Information helpful for technical support calls. Security - Access: Before changing anything here, please read the chapter Settings – Archive Encryption Key very carefully! Require account password to access Backup Pro desktop application Account Password Archive Encryption Network: Internal address: External address: Discover: Network interfaces: [Configure...] Wireless networks: [Configure...] Proxy enabled: Proxy PAC URL: Limit sending rate when away: Limit sending rate when present: © 2014 Arcplace AG Checked - Requires that the user enters the correct password to open the Backup Pro application. Unchecked - No password is required to open the Backup Pro application. Your Backup Pro account password. This password is required for: - Access Web Restore - Access Web Admin Management 448-bit encryption (default) Users or admins can restore files without providing an additional password. 448-bit encryption + password Users or admins can restore files only by providing the correct password. This additional password cannot be reset if it is forgotten or lost. By default this password is the account password. 448-bit encryption + custom key Users or admins can restore files only by providing the correct 448-bit key. The custom key cannot be reset if it is forgotten or lost and backup data is unrecoverable. IP address the computer/device's operating system reports to the Backup Pro application. Read-only. Address Backup Pro sees for this computer. Read-only. Click to force Backup Pro to test and update connection status. Backup is disabled when the computer/device is connected via de-selected network interfaces. Unless a network interface is explicitly excluded, backup is allowed over any connected network interface. A network interface must be connected before it can be disabled; however, once an interface is disabled, it remains disabled in Backup Pro unless specifically re-enabled. Note: Feature available on Windows and Mac only. Backup is disabled when the computer/device is connected via de-selected wireless network SSIDs. Unless a network's SSID is explicitly excluded, backup is allowed over all wireless networks. Click Add to specify an SSID not displayed in the list. Note: Feature available on Windows and Mac only. Enable proxy settings to connect to the Internet via a proxy server. The URL required to connect to the Internet via a proxy. Contact your network administrator if you do not know the URL for your network. Bandwidth setting when you are not using your computer. Selecting a larger value allows Backup Pro to back up your files faster. Bandwidth setting when you are working at your computer. Keep in mind backup will be slower at lower bandwidth Page 31 Backup Pro – User Manual Sending message buffer size: Receiving message buffer size: TCP Packet TOS: © 2014 Arcplace AG settings. For expert users only! Size of outbound buffer for WAN and LAN (i.e. the amount of data that's allowed to be "in flight" at one time over the network between the source and the destination). For expert users only! Size of inbound buffer for WAN and LAN (i.e. the amount of data that's allowed to be "in flight" at one time over the network between the source and the destination). For expert users only! Must have QoS capable router configured. Choose the TCP Packet quality or custom DSCP value from the list: Low, Normal, Reliability, Throughput or DSCP… Page 32 Backup Pro – User Manual 3.10.1 Settings – Inbound backup from other computers Attention: Please be aware that using a computer as a backup destination needs additional storage space, you may therefore have to change the destination path (other hard disk) to have sufficient storage space available. In the menu „Settings“ in the tab „General“ you can define settings regarding the inbound backups. By default other computers using the same Backup Pro account can use your computer as a backup destination. Disable offering this computer as a backup destination Change destination path for other backups Item Accept inbound backups: Perform shallow maintenance every: Perform deep maintenance every: Listen bind address: Listen port: Allow backup and restores to run: Default backup archive location: © 2014 Arcplace AG Description Indicates whether or not other computers can use this computer as a backup destination. Checks the overall health of the archive and prunes versions and deleted files. This scan completes faster than the deeper maintenance. Uses checksum of all data blocks to verify health of archive. This scan automatically occurs on each block silo that is able to reclaim space. IP address of the interface that listens for connections. Port the interface listens to for backup connections. Always – Backup Pro is always able to receive backups and restore to other computers. Between specified times – Backup Pro accepts backups and restores only during the time range you specify. For example, you may want to run between 6 a.m. and 9 a.m. You can also choose the days of the week that you want backups and restores to run. Shows location on file system where backup archives are stored. Page 33 Backup Pro – User Manual 3.10.2 Settings – Backup Frequency and Versioning The window below shows how you can specify how often Backup Pro backs up and which versions shall be retained. Change to the menu „Settings“ and to the tab „Backup“. Here click on the button „Configure...“ on the point “Backup frequency and versioning:” Item Backup frequency – New version Versions to keep from last week Versions to keep from last 90 days Versions to keep from last year Versions to keep from previous years Remove deleted files after Defaults © 2014 Arcplace AG Description Indicates how often Backup Pro backs up a file. Indicates which versions to keep from last week (not including today). Indicates which versions to keep from last 90 days (not including last week). Indicates which versions to keep from last year (not including the last 90 days). Indicates which versions to keep from previous years (not including last year). Period after which deleted files are removed from the archive. Return settings to original default. Page 34 Backup Pro – User Manual 3.10.3 Settings – Filename patterns to exclude In the menu „Settings“ in the tab „Backup“ you can define filename patterns to exclude files and folders from the backup set. It can be used to exclude some file extensions or certain file paths. Exclude certain file extension: 1. Type the file extension here Existing filters 2. Click here to add 3. Confirm with Ok To exclude certain file extensions from certain paths follow the instructions in the screenshot below („Regular Expression“ has to be enabled). 2. Type filter here Existing filters 3. Add filter 1. Enable option Delete existing filters 4. Confirm with OK In the example above all files with the extension *.exe in the folder Downloads in your user profile will be excluded from backup. Considerations Excluding files previously selected for backup marks the excluded files for deletion from the backup archive. Newly excluded files are purged from the backup archive during the next scheduled Archive Maintenance. Once excluded files are purged, they are gone forever and cannot be restored. © 2014 Arcplace AG Page 35 Backup Pro – User Manual 3.10.4 Settings – Advanced settings Item Data de-duplication: Compression: Encryption enabled: Watch file system in real-time Back up open files: © 2014 Arcplace AG Description Automatic - Full compression is used when going over a slow Internet connection. Minimal is used when going direct to disk or over LAN. Full - Every effort is made to identify duplicate data. While being 100% effective, it requires a great deal of CPU power. With this setting you're sacrificing CPU and speed to save bandwidth and disk at destination. Minimal - Several methods are used to identify duplicate data. While about 90% effective, this setting requires far less CPU power and will speed up initial backup significantly, typically 400% on a single processor system. Controls how Backup Pro compresses your backup. Compressed backups use less bandwidth and less disk space. Compression does consume some CPU, but not enough to offset overhead due to maxing out your bandwidth or I / O. Because you generally have more CPU available than bandwidth or disk I / O, we do not recommend turning off compression. Automatic - Files that do not compress well or are already compressed are not compressed by Backup Pro. On - All files are compressed. Off - No files are compressed. Indicates whether encryption is turned on. Indicates whether Backup Pro is constantly monitoring for file changes. When enabled, this setting allows Backup Pro to avoid scanning your system for changes. Turning off this setting means that changes will be detected only during a nightly scan or when users press Scan. Indicates whether files that are open (in use) at the time of back up will be backed up. Page 36 Backup Pro – User Manual 3.10.5 Settings – Backup sets When you enable Backup Sets, the Settings > Backup screen displays the below options. List of existing backup sets Item Name: Priority: Add Remove Duplicate Files Destinations – Change Backup will run: © 2014 Arcplace AG Description Name for this backup set. Indicates the sequence in which the selected backup set will run. Creates a new backup set. By default, new backup sets have no files selected or destinations specified. Deletes the selected backup set. Backed up files will be removed from their respective destinations in the backup set. Makes a copy of the selected backup set, including selected files, destinations and settings. Specifies the file/folders to be included in your backup. You can select as many files or folders as you want. Displays Destinations window where you specify the destinations for the backup set. Always – Backup Pro is always running. Between specified times – Backup Pro runs only during the time range you specify. For example, you may want to run between 6 a.m. and 9 a.m. You can also choose the days of the week you want backups to run. Backup and restore are allowed to run only during this timeframe. Page 37 Backup Pro – User Manual Verify selection every: Frequency and versions: Filename exclusions: Advanced settings: Scan system for file changes and deleted files within your backup selection at the interval and time of day you specify. If the computer is powered off or asleep at the scheduled scan time, the scan will wait until the next scheduled scan time to run. Note: Backup Pro alerts you if the time you set to run the verification scan is outside the timeframe you've allowed Backup Pro to run. Display window in which you can specify how often Backup Pro backs up and which versions to retain. Note: When multiple backup sets back up to a single destination, the frequency and version settings from the backup set with the highest priority are applied to all sets backing up to that destination. See Backup Frequency and Versioning for detailed list of settings. Display window in which you can enter file extensions to be excluded from backup. Note: When multiple backup sets back up to a single destination, exclusions applied to one set are applied to all sets that back up to the same destination. See Filename patterns to exclude for detailed list of settings. Settings for disabling/enabling data de-duplication, compression, encryption, real-time file watching, and backing up open files. See Advanced settings for detailed list of settings. 3.10.6 Settings – Archive Encryption Key By default your account and archive is secured with a randomly-generated 448-bit encryption key that all your computers use to encrypt your backup data. The encryption key itself is also secured with your account password. For security minded users, Backup Pro offers additional security options. Each of these security options offer greater security and correspondingly require greater effort to use. Options include: 448-bit encryption (Default): o No extra password to remember and least risk for restoring data o Admins can access backup data stored at Backup Pro Central o If the user forgets his or her account password, it can be reset without affecting backup or existing backup data 448-bit encryption + password: o Higher security o The user sets a data password that secures the encryption key o Data password must be 8 - 56 characters long o Admins must have the additional password to restore files o Additional password to remember and increased risk of not being able to restore o Users can change the data password at any time, and changing the data password does not affect backup data o Admins cannot access backup data stored at Backup Pro Central without knowing the data password o If the data password is lost, it cannot be reset and any backup data is unrecoverable 448-bit encryption + custom key: o Highest upgraded security o Manage your own data key per machine. Each computer under this account could use a different data key o Admins need data key to restore o Impossible to remember, with increased risk of losing the data key (not being able to restore) © 2014 Arcplace AG Page 38 Backup Pro – User Manual Because you don't want someone getting at your data by simply downgrading your security, we have made it so Backup Pro does not allow you to downgrade your security option. Considerations Once you have upgraded your security settings, you can never downgrade. Arcplace Support has no way to recover your private data password or private encryption key because Arcplace never has access to this information. Administrators need to enter the user's private password or private key to restore files for users. Passwords cannot be viewed in the admin console, so a user must give this information directly to the administrator. Important: You cannot recover your files if you forget your private password or lose the custom encryption key you created. You must reinstall Backup Pro on all computers in your account with a new username and start backing up again. © 2014 Arcplace AG Page 39 Backup Pro – User Manual 4 Backup Pro migration This procedure describes how to migrate (adopt) the Backup Pro with all configuration settings from one computer to another computer. It is exactly the same procedure for a planned hardware replacement or for disaster recovery (old computer is not anymore available due to i.e. hardware issue, lost, stolen etc.). ATTENTION: For migrations: The file and folder structure must be identical on the new computer as on the old computer. If not, Backup Pro will perform the initial backup again which could lead to an increased storage quota. Step 1 – Installation of Backup Pro Install the same Backup Pro client version as it was installed on the previous computer. Step 2 – Login Login with the same username and password as you did on the old computer. This will temporary create a new computer object for the user you logged-in. © 2014 Arcplace AG Page 40 Backup Pro – User Manual Step 3 – Start the adopting wizard After successful login with your account you’ll have the option to adopt this computer. This will avoid restarting the initial backup and will apply your previous configuration settings. Click on this link Step 4 – Adopt the previous computer Please select the computer you want to adopt. 1. Choose the previous computer 2. Click on „ok“ © 2014 Arcplace AG Page 41 Backup Pro – User Manual Step 5 – Log in again After successful adopting of the previous computer you will be signed out automatically and you have to type in your password again. Step 6 – Adoption completed After successful login the migration process is completed. The temporary created computer object will be removed automatically and the display name of the previous computer will be renamed to the new one. © 2014 Arcplace AG Page 42


![SS400G MLSS Converter [Style:S2.2]](http://vs1.manualzilla.com/store/data/005726371_1-b873ef07ceb169a0226d293b313a67fd-150x150.png)