1
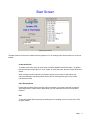
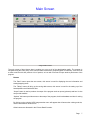
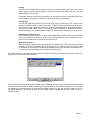
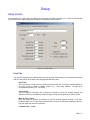
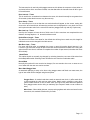
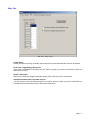
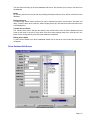
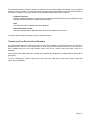
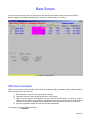
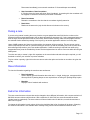
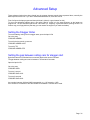
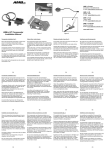
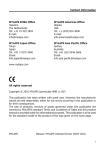
LAPS FREE
Radio Control Model Timing Software
USER GUIDE
th
User Guide Version 0.03 17 Jan 2004
th
For Program Version 0.03 17 Jan 2004
Copyrights and Trademarks
Copyright© 2003,2004 by rctiming.com. All rights reserved.
All trademarks mentioned are registered trademarks of their respective holders.
Disclaimer
rctiming.com takes no responsibility for any incidental or consequential damages resulting from use of products
manufactured or distributed by rctiming.com
Software produced by rctiming.com is not considered to be ‘perfect’ and may contain faults.
Contact Details
Email: [email protected]
Web: http://www.rctiming.com
Support
Please view the rctiming.com web site for support/help (especially the FAQ), if the information you require is not
on the web site or you would like to make a suggestion/report a problem please e-mail.
Updates
Improvements in the software are made at regular intervals, when a new version is released the details will be
posted on the web site. When new functions are added updates will also be done to the manual and this is also
downloadable from the web site.
Page
2
Contents
Introduction …………...… 4
Installation ………………. 5
Start Screen …………….. 6
Main Screen …………..… 7
Tables ……………..…….. 11
Setup ………….…………. 14
Driver Database .……….. 21
Race Screen ……………. 24
EOR Screen ..….………... 27
Output …………….……... 29
Running an Event ……... 30
Misc ……………..……….. 31
Advanced Setup ..…..….. 31
Page
3
Introduction
Welcome to Laps Free, we hope that you enjoy using the software, it was created over several years to make it
easy to use and functional. The software is not designed to be the “greatest” or to have every function imaginable,
only the options that are needed have been included to make the software easier to use.
What is Laps Free ?
Laps is software designed for a PC running Windows 95,98, NT, 2000, ME & XP. The software is designed
primarily for the timing Radio Controlled Model cars but might have other uses such as timing model boats,
hovercrafts or slot cars. Laps enables a racing event to be managed easily, functions have been added to
automate processes and make life easier on the user.
For the purpose of timing, several different methods can be used. The program is able to use AMB timing
equipment or take manual input via the keyboard.
This Manual
This manual will continually be updated/improved, the latest version will be downloadable from the rctiming.com.
To find the version of this manual please look at the 1st page.
Please make sure that the version of this manual corresponds to the version of the software that you are using,
otherwise you may find that additional functions are available (either in the manual or the software).
Computer System Requirements
The computer specification required depends on many attributes, however as a general rule:
Component
Minimum Spec
Recommended
Processor Mhz
75
200
Memory
16
64
Screen Resolution
800*600
800*600
Sound Card
Required
Required
To set your computer for timing purposes (for any timing program not just Laps):
•
•
•
Turn off screensavers, power management should be set to “Always on”
Turn off Windows sounds (in the control panel “Sounds” change sound scheme to “No Sounds”)
Reduce the amount of programs that are running, on less powerful systems disable anti-virus.
Page
4
Installation
Program Installation
Run the install program provided, if upgrading from a previous version the settings file(s) will not be overwritten. A
restart may be required, the install program will request a restart if it is required.
Once the program is installed, place the licence file (‘licence.lap’) into the Laps Free directory/folder, this is the
same directory as the LapsW.exe file is located. If the licence file is not found a message will be shown when the
laps program is run. If using the default settings then LapsW.exe will be located in ‘c:\program
files\rctimingDOTcom\laps free\’.
Page
5
Start Screen
Image of Start Screen
The start screen is the first to be shown when the program is run, an existing event can be opened or a new one
created.
Create New Event
To create a new event, enter an event name in the box labelled “New Event Name:”, by default
this box will have today’s date in it. Click “create” to create the event, the main screen will then be
shown.
When creating an event a directory is created using the event name, for this reason only
characters allowed in a directory name can be used. A warning will be given if any invalid
characters are used.
Open Existing Event
Events that have been setup previously can be reopened, click on the event that you want to
open and press the “Open” button, alternatively you can just double click on the event that’s
required.
Exit
To exit the program without opening an existing event or creating a new one, click on the “Exit
Program” button.
Page
6
Main Screen
Image of Main Screen
The main screen of laps (shown above) enables you to get to all of the administration easily. The program is
navigated using the icons, many of the common tasks have also be grouped together for efficiency. If the icon has
a down arrow then this will produce a list of options, an icon with no arrow will open another part/screen of the
program.
Buttons
The “Race” button opens the race screen, this screen is used for displaying the race information and
starting/stopping races.
The “Tables” button will bring up the racing table screen, this screen is used for the setting up of the
heats/qualifiers and finals/mains lists.
“Output” button is used to produce the output of the program such as reports (printouts) and html. It also
can provide statistics.
“Options” this button provides access to the setup of the program, the driver database and also for exiting
the program.
By clicking on the rctiming LAPS image another menu will appear that will access the rctiming web site,
version information & about screen.
Other buttons are discussed in the “Drivers Details” section.
Page
7
Drivers Details
Each driver that is racing in an event needs to be entered into the program, the program allows you to
easily add/remove and edit driver information at any time.
To add a new driver
The main screen provides access to add a new driver, there are two ways to do this.
Click the “Drivers” button and then click on “new”. The other way to add a new driver is to double
click the blank driver at the bottom of the list on the main screen (as shown by the large oval
below)
Options for entering a new driver
Driver Details Screen
When a new driver is added or an existing driver is edited, the Driver Details screen will appear.
The screen is used to add or edit data about a driver, there are two tabs near the top of the
screen, the first is the Details (driver name, crystals etc) the other tab shows the drivers
scores/results and allows these to be modified if required.
Driver Details Screen
Name
Enter the drivers name here, if enter is pressed after the drivers name has been put in
the first letter in each name will be changed to capital letters (only if the option is set in
the setup)
Page
8
Class
The class that this driver will be racing in can be set here e.g. Touring cars, 2wd Buggy
etc. (the class names can be set in the program setup)
Freq
By pressing this button another screen will appear where a drivers crystals can be
entered. A crystal for heats or finals does not have to be set, as the computer will select a
driver’s crystal when sorting the races.
Ability
This isn’t a required field, the ability level can be set from 0 to 100 (best drivers being
100). This figure is used when sorting races by ability level.
Mem #
Not a required field, used to store a track/clubs membership number.
AMB DP
If using an AMBrc system and the driver has a personal (DP) transponder enter the
transponder number in here. (Do not enter the tracks own transponders here)
Driver Enabled
This is an optional feature that might prove useful. By default all drivers are enabled, by
un-ticking “enabled”, a driver will no longer be placed into results or sorted into races.
This is useful if an event is pre booked and a driver does not turn up or is not going in the
mains/finals.
Picture File
By clicking this, another screen will appear with a list of driver’s pictures, select a picture
and it will appear while the driver is racing.
Remove Picture
Removes the picture that is associated with the driver (doesn’t delete the actual picture
file)
Each driver is given an id number (shown in the box at the top right of the screen), to move between id
numbers press the arrows on screen. This feature is useful when adding more than one driver, just press
the right arrow to go to the next id, which should be free if working with a new event.
Once finished editing/adding a new driver click the X at the top right to go to the previous screen.
To edit a driver
All of the drivers are listed on the main page, to edit a driver just find the driver that needs editing and
double click on that driver. There is another way to do exactly the same thing, single click on the driver
required and then click the “Drivers” button and then “edit”.
To delete a driver
Select (click on) the driver to be deleted from the list on the main page, click the “Drivers” button and
select delete.
To find a driver
With large events it is very difficult to find drivers in qualifier/heat & finals/mains tables, this option will find
the drivers location and take you to it. Select (click on) the driver to be found from the list on the main
page, click the “Drivers” button and select find. Another screen will appear, if the driver has been found
you can select one of the buttons shown and the racing table screen will appear with the driver selected.
Enable all drivers
To enable all the drivers in the event, click on the “Drivers button” and select “Enable All Drivers”.
Disable all drivers
Page
9
To disable all the drivers in the event, click on the “Drivers button” and select “Disable All Drivers”. If no
drivers are enabled in an event then no driver will be sorted into races and overall results won’t include
any drivers.
Display drivers by
When running large events it is difficult to find drivers in the driver list, to find drivers faster the driver list
can be sorted by either first name, second name or id number. Press the down arrow under the words
”Display drivers by” and select the method the names are to be displayed by.
Page 10
Tables
To open the “Racing Tables” screen click the “Tables” button from the main screen. The table screen is used for
the setting up of the races, it allows drivers to be sorted, added to races, checking of frequencies and other
problems.
There are two tabs on this screen, one is used for the qualifiers/heats the other is for the mains/finals (both are of
exactly the same design). The table part of the screen contains the races, under each race number a list of driver
id numbers is shown.
To add a driver to a heat find a free cell in the table and add that drivers id number, the drivers name will appear
on the left hand side panel. To see the drivers frequency click the “View” button on the side panel and click it
again to go back to the drivers name. To remove a driver from a race, delete the number from the cell and leave it
blank (this does not remove the driver from the event).
Laps can sort races itself by a drivers race results or ability levels, it also puts drivers into races according to their
class. Frequency clashes can also be automatically resolved or allocated if a current crystal is not set. The
automatic sorting removes the need to manually put cars into races however fine-tuning of races can still be done
even after a sort.
The Racing Table Screen
Up
The “up” button in the side panel will place all the cars in a race (the current race highlighted in the table)
into the lower car numbers.
Down
This does the same as the “up” button but the cars in the race are given the high car numbers. This is
useful for even distribution of transponders and race numbers.
Page 11
View
The ”View” button alternates between seeing the drivers name and their frequency, this is useful as it
shows the frequencies that are being used in the race without looking at each individual drivers details.
Check
Clicking the “Check” button will check the races for any problems, frequencies (clashes and none
existing), drivers in the table more than once and id numbers that have no driver name. All the problems
that have been found will be listed in the problems part of the screen. To correct crystal clash/none
existence, double click on the problem and that driver’s crystal screen will appear. Once the problems
have been fixed click the “Check” button again to confirm the entire list of problem are gone.
Freq Changes (Crystal Changes)
Clicking on “Freq Changes” will bring up another screen that lists the frequencies that have changed
between heats and finals. If you click this before the finals have been sorted you will find that the
frequencies will all be different because final crystals have not been allocated yet.
Delete
By clicking the “Delete” button a whole race will be deleted (the race that will be deleted is the currently
highlighted race).
Print
The print button will bring up a screen asking which table to print, the option to include frequencies is
useful when drivers should not be told the frequencies that other people are on.
Sort
The sort button will bring up the options for automatically placing drivers that are in the event into races,
races can be sorted by the ability levels that have been entered or the race results.
The sort table screen
To sort the table several options have to be filled in:
Sort Table
Select the table that you would like to be sorted, heat or finals.
Page 12
Sort By
This will be the method used to sort the drivers, by selecting “Ability Level” the races will be
sorted using the ability levels entered for each driver. The lowest ability level going first the
highest will be in the last race.
If selecting “Results” then the drivers are sorted on the results that they have had by racing, the
rounds used for collecting the results can be selected by using the input boxes.
Sorting Type
This box only appears if the sort is to be done using results, by selecting “FTD” a drivers best
laps and time will be used for sorting in the races. If “RbyR / Points” is selected then the driver is
given points for each round and a number of points will be added to give the qualifying position.
The input box under “RbyR / Points” can be set to select the amount of rounds will be used to
add up the points. For information about multiple FTD button see the Misc Section of the manual.
Include drivers with no scores
When ticked all drivers that are in an event and enabled will be put into a race, when un-ticked
only drivers that have completed at least one lap will be sorted into a race. This option is very
useful for drivers that have not turned up or not raced at all.
Allocate frequencies
When selected the computer will check each driver for frequencies, if the driver does not have a
frequency set then it will allocate one from their frequency list (if a driver does not have any it will
be left blank). If any frequency conflicts occur between two or more drivers then the program will
try to resolve these by changing the lowest drivers frequency first.
By clicking the “Next” button the next screen to do the sort will be shown, by clicking on cancel at the X at the top
right of the screen the sort will be cancelled.
Race Numbers Screen
Once the “Next” button has been pressed another screen will apear, this new screen allows you to set the amount
of people in each race and can be done according to class. By defaut 10 drivers will be in each race, by changing
the numbers per race the amount of races and the number of drivers in the last race will change. Once you
change the number of drivers per race click on the “Update” button to update the information. Click on “OK” to
perform the sort.
Page 13
Setup
Setup Screen
The setup screen is used to alter the settings of the program and each event that is run. There are several tabs
on this screen, more tabs may appear according to the options that are selected.
Event Tab – Setup Screen
Event Tab
The event tab contains all the settings which relate to the event that is being run, these settings are saved
with an event and so do not have to be changed after different events.
Event Title
The event title is used on the top of prints and also on html files, by using a good description of
an event it will be easier to identify results. E.g. “ King Kong Hobbies, Summer Nitro
Championship Round 2 (19th July 2003)”
Track Length
This isn’t required information but it allows the computer to work out average speeds and
distance travelled (in the statistics). Select the type of units used by pressing on feet or meters.
Min Lap Time - Times
Enter the minimium laptime, its important to set the minimum laptime correctly, if too short
problems might occur if cars crash while around the loop (or cut the track). Setting the time too
high will mean that drivers will miss laps.
Last Start Time – Times
Page 14
The last start time is used only with stagger start races, this allows the computer to know when to
end races before all the cars have finished, cars that start after the last start time will fail to get a
full race distance.
Race Interval – Times
This is used for the countdown timer between the races, this should normally be set greater than
60 seconds (unless the drivers are very fast runners).
Race Setup – Times
The race setup time is set so that the next race’s details will appear on the screen, setting this
close to the race interval time will mean the previous race is displayed for a very short time. Also
at this point the start order for the race will be read out (stagger start only and only if option set).
Max Last Lap - Times
Used by the computer to know when to finish a race if all the cars have not completed the race
distance. Average laptime + 10 seconds is about normal.
Default Race Length – Times
The amount of minutes a race lasts for, the default time will be given to each race, this length for
individual races can be changed in the table screen.
Max Race Laps – Times
For races that finish after a completed time (most rc races) this option should stay as 0, for
Formula 1 type races the number of laps for the race can be entered here. Make sure if using this
option that the race time is sufficent to complete the number of laps entered, otherwise the races
will end early.
Heats/Finals
This option should not normally be changed, by selecting heats the next race will be taken from
the heats/qualifier table. Selecting Finals will take the race from the finals/mains table.
Round/Heat
Normally this option will never need to be changed, if a race needs to be re-run or races are run
out of order then the next race can be set here.
Mass Start/Stagger Start
As standard qualifying is setup to be done using stagger starts and finals use mass starts, the
type of start used can be changed using these options.
Stagger Start – A method used where each car starts its own clock, in effect each driver
is racing against the clock and not other drivers. Mainly used in qualifying, every driver
gets the same amount of time as each other (as long as they start within the specified
time) stagger starts can be rolling or stationary (the computer reads out car numbers to
start).
Mass Start – Often called grid start, cars are racing against each other and are all on the
same clock, this method is used mainly for finals.
Page 15
Sound Tab
Sound Tab – Setup Screen
The sound tab shows all the settings for the sounds made by the computer.
Read Running order every * minutes
The computer can read the running order at intervals during the race, e.g. to read out the order every 2
minutes enter 2, to never read the running order enter 0
Countdown warnings between races
The time before the next race will be announced every minute before the race starts and also at 30
seconds if this option is selected.
Read race number at half way into race
If selected the race number will be read out when halfway into the race.
Read Finishing Order after race
When selected the computer will read out the finishing order at the end of the race.
Read out improved drivers after race
If selected the drivers that improved their time will be read out at the end of the race, this will only happen
after round 1 (because the drivers don’t have a score to improve in round 1).
Sound Test (Numbers)
Select a number and then press ”Play Number”, the computer will then read out the number chosen
through the sound car.
Page 16
Misc Tab
Misc Tab – Setup Screen
Crystal Setup
Clicking this button will bring up another screen where the crystal names that are used can be entered.
Scroll Lock Toggle/Change during race
If this option is enabled then during the race the Scroll Lock light (if you have one) will blink to show you
that a race is running.
Round 1 Start Order
When using a stationary staggered start the starting order of the cars can be entered here.
Auto Start unstarted cars from leader first lap
It is very unwise to use this option because it can lead to incorrect timing, so leave it unchecked. It is
included because some tracks require it due to their racing rules.
Page 17
Device/Hardware Tab
Devices/Hardware Tab – Setup Screen
Count Method - Count Device
Select the option that suits your method of counting, note that an AMBrc can also be run in system 20
mode (but it uses the last number on the transponder only).
Count Method - Port
If using an AMB System 20 or AMBrc the serial port for the connection must be selected.
Count Method - Speed Trap
AMBrc users can enable the speed trap function of the AMBrc by selecting this option and setting the
distance between the two loops. (AMB recommend a 10 meter gap, however you can try a smaller gap).
Page 18
Track Transponders Tab (AMBrc users only)
Track Transponders – Setup Screen
This tab will only be shown when an AMBrc has been selected as the counting method.
Transponder Set Color
The colors of the transponder sets can be entered here, up to four sets can be added.
AMBrc Transponder Numbers
AMBrc rechargeable transponders have a seven-digit number, the computer needs to know this number
to associate it with a car number. Select the transponder set and then enter the numbers, any number
can be associated with a car number, this means that one spare transponder can be used to cover all the
car numbers, unlike system 20 where you have to have all ten.
Page 19
Classes Tab
Track Transponders – Setup Screen
This tab is where you can edit the names of the classes, the most commonly used classes that you use should be
at the top.
Race Duration
Each class can have the duration of the races edited here, qualifying and the finals can all be set to
different times. The duration is then placed into the heat/qualifier or finals/mains table when the races are
sorted, if there is a last minute duration change then the change should be made in the tables screen.
10 Second Countdown beeps
Selecting this option will make the computer beep for the 10 seconds before the race starts, also when
the start button is pressed the computer will countdown from 10 seconds and will not start the race
immediately.
Read start order
Reads the start order for the cars at race setup time if the option is selected (stagger start only). If using a
rolling stagger start this option should not be enabled.
Page 20
Driver Database
The driver database isn’t required to run an event, think of the drivers database as an extra program that can be
used to save you time. The database is designed for storing driver’s details so that every time you have a new
event all the details don’t have to be typed in again. The database can store an unlimited amount of drivers
however a database with a large amount of drivers (hundreds or thousands) will be difficult to manage and so you
may want to create several databases.
If you have drivers that race regularly then entering them in the drivers database will save a lot of time, if you run
events where most drivers are new or only race once every year then using the driver database might not be
useful. Remember that drivers do change their details such as frequencies and class and so the database will
have to be maintained.
Main Screen – Options
Create a new driver database
To start a new driver database click the “File” button in the main screen and select “New Driver
Database”. A screen will appear requesting a file name and also where you would like to put the file,
create a new file by entering the name you would like to give the database.
Open an existing driver database
To open a database click the “File” button in the main screen and select “Open Driver Database”. A
screen will appear requesting the file that you would like to use.
Driver Database Screen
Driver Database Screen
Once a driver database have been created or opened the driver database screen will appear, just like the
program main screen a list of drivers will be shown. To close the drivers database click on the X at the top right of
the screen, the database will be saved automatically when the screen is closed.
New
Page 21
The new button will bring up the driver database edit screen, this will allow you to enter a new driver into
the database.
Delete
By selecting a driver from the list and then pressing the delete button the driver will be removed from the
database.
Display drivers by
To make finding a driver easier the driver list can be sorted by first name, second name, id number and
ability. Press the down arrow under the words ”Display drivers by” and select the method the names are
to be displayed by.
Transfer Driver to Event
The Transfer Driver button will take the details of the selected driver from the driver database and will
create a new driver in the event. If the driver of the same name already exists in the event and is in the
same class a warning will be given before the details are transferred.
Editing driver details
To edit a driver’s details in the driver’s database double click on the driver in the list and the edit window
will appear.
Driver Database Edit Screen
Driver Database Edit Screen
Page 22
The edit screen allows for driver’s details to be edited (or a new drivers details to be added), the only required
fields are “Name” & “Class”. For information about the fields see the Driver Details Screen section from earlier in
the manual. In addition to the fields used in the main program address details can be entered.
Preferred Frequency
Entering a preferred frequency is optional (but recommened), the preferred frequency will always be used
first when allocating frequencies (when sorting the heats).
Save
The information will be updated in the driver database.
Save and Transfer to event
The driver database will be updated and the driver will be transferred to the event.
If you don’t want to keep the changes you have made click cancel.
Transferring From Event to Driver Database
It is recommended that if you want to have drivers in the driver database you should enter them from the driver
database screen. However if you already have an event with the drivers entered and wish to put them into a
driver database then go to the main program screen, click on the “drivers” button and select “Copy all to
database”.
All the drivers will be transferred to the currently open database (if a database is not loaded then the option will be
greyed out).
To move a single driver, select the driver on the driver list in the main screen, click on the “drivers” button and
select “Copy to database”
Page 23
Race Screen
The race screen is what you will look at during the races and the time between them, the screen could look
different (slightly more details), depending upon the screen resolution that you are using.
Race Screen – During a Race
PRE Race Countdown
When the race screen is first opened it will be shown in countdown mode, countdown mode is what will happen
while counting down for the next race.
1) Race will finish or race screen is opened for the first time
2) Countdown will start, time is shown top left corner of the screen
3) When the race setup time is reached the new race information will be shown on screen. If using an
AMB system the system will be enabled, if transponders pass the loop the hits will be shown and car
number will turn white. If staggered start is enabled then the start order will be read out at this time.
4) Once the countdown reaches zero the race will start automatically.
In countdown mode four buttons are shown:
• Start Race
Page 24
Race starts immediately (or ten second countdown if 10 second beeps are enabled)
•
Stop Countdown / Start Countdown
If counting down the button will show ‘Stop Countdown’, by pressing this the countdown will
be stopped, to restart the countdown press ‘Start Countdown’.
•
Reset Countdown
Resets the countdown to the time that the countdown originally started at.
•
Read Order
Reads out the start order (only do this after race is shown on the screen).
During a race
If you are using manual counting then every time the car goes passed the start finish line the number on the
keyboard must be pressed associated to the car that has passed (0 represents 10). If using a staggered start race
then the keys must be pressed to start the cars timers. While manual counting make sure the program remains
the selected window otherwise pressing of the key will go to another application and won’t count any laps.
Users of AMB systems don’t have to touch anything, the computer will do everything. The race screen can be
closed if required (the race will run just like normal) you can then go and do something else, such as enter other
drivers/change frequencies or even use another application. If manual counting is required even while using
transponders then press the ‘Enable Keys’ button and the keyboard can be used to count cars while still using the
AMB system.
To end a race early or restart it, right click anywhere on the race window and select the option required, you will
be asked to confirm your selection to prevent mistakes.
To give a driver a penalty, right click on the race screen select the option and set the car number to be given the
penalty.
Race Information
To view the information regarding the race there are two buttons:
•
Race Information
Used to display general information about the race i.e. length, timing type, race type and the
drivers pictures. If passing beeps are not required then un-ticking the ‘passing beeps’ option.
•
Marshals
Displays a list of marshals with numbers.
Extra Car Information
The race screen has extra columns that can be changed to show different information, with a screen resolution of
800*600, two extra columns will be shown. With a resolution of 1024*768, four extra columns will be shown
(window must be maximised). The extra columns will have a label colour of dark blue, normal columns have a
label colour of green.
To change the information in each column click on the dark blue label, a list of options will be shown. Changing
the extra car information is not available while manually timing cars but will be enabled in-between races.
Page 25
The colours
The race screen uses many different colours, each colour represents something that a drivers has done.
Color
RED
Description
Car has finished the race, or had been ended by the computer because of no laps scored.
GREEN
The drivers has improved his/her result
YELLOW
The driver is currently set to improve on their previous result
BLACK
Driver is set to beat FTD time (or has beaten if finished)
PINK
Driver is set to beat the best result in this round (or has beaten if finished)
White
Car has passed the loop/been counted within the last three-four seconds
BROWN
GREY
Car has passed within minimum lap time (not counted), with speed trap it shows that it’s working
Car has not passed loop for a while and might be out of race
The bar at the bottom of the screen shows the time into the race, at the start of the race it will be blue, after half
distance it will go green and with one minute to go yellow. Once the race is over the bar will change to red and will
disappear when the next race is setup.
Page 26
End of Round (EOR) Screen
The End of Round screen will appear at the end of a round (all the heats for a round have been completed).
End of Round Screen
Positions Print
EOR Positions
This will produce a list of drivers sorted by their results.
FTD
By selecting this drivers will be sorted using there best laps and time. For information about the Multiple
FTD button see the Misc Section
RbyR / Points
Selecting this option will sort drivers by allocating them points for each round and then using a selected
number of rounds to work out points.
Rounds to be used
Either all rounds can be selected or a selected number of rounds can be used.
Print Drivers with no scores
Page 27
By selecting this option all drivers will be printed, if unselected then only drivers that have counted at least
one lap will be printed.
Next Round
By clicking on this the next round will be started, before going to the next round there will be an option to
print the start order for the next round, the start order for the next round will be the order that the cars in
each heat will start. This will only be useful that use a statistic stagger start where the computer reads out
the car numbers to start.
Enter Finals
Using the “Enter Finals” button will bring up the screens to sort the finals, and should only be used once
all the qualifying rounds are finished. This procedure is identical to the sort method for the tables.
Main Screen
By pressing this button the EOR screen will disappear and the main screen will be shown, this is useful
when changes have to be made to results and other details before the finals or the next round. To return
to the EOR screen click on the “Race” button in the main screen.
Page 28
Output
Output Options
The “Output” button on the main screen will bring up several options, these options will either print or show
information on screen.
Final Results
This bring up a screen where the round and finals can be selected and a printout of the results will then
be produced, this feature is useful for printing the results at the end of the day for trophy presentations
etc.
Position Print (EOR)
This produces the positions of the drivers just as the EOR screen does, the rounds used can be set and
so the results can be printed at any time.
Statistics
A screen will be opened showing some of the statistics of the current event, laps completed by each class
and miles completed etc.
Frequency Numbers
Lists the number of people that have each frequency.
Start Order
After the first round a list of start orders for each race can be produced, this is only for those that use
stationary staggered starts where the computer reads out the starting order. This produces the same
output as the EOR screen.
Labels
Using this feature can produce labels that might be useful for booking in an event or sticking to
transmitters, several options are available including a print then feed method that allows the use of direct
printing of envelopes.
Page 29
Running an Event
Here is a list of steps required to run an event, some of the steps may be missed once you get used to running
the program. This isn’t intended to be a step-by-step guide but a general guide to follow, so read the other
sections to get an insight into each feature.
1)
2)
3)
4)
5)
6)
7)
8)
9)
10)
11)
12)
13)
14)
Make sure that any devices that you will be using are connected i.e. AMB system & printer
Start the LapsW.exe program
The First screen will be shown, create a new event entering any name you like.
Click on the ‘Options’ button then ‘Program Setup’
Enter a title for the event, set all the times and check other settings. Once finished close window.
Enter all the drivers in the event by selecting ‘New’ from the ‘drivers’ menu on the main screen. At the
same time you could add drivers from the ‘Driver Database’, read the specific section about the driver
database for more information.
Once all drivers are entered go to the ‘Tables’ screen and click on sort.
Select the number of drivers in each race and continue.
Make sure the races are how you want them, move drivers around if required.
Click on the ‘Check’ button, if any errors occur then solve them and press ‘Check’ if no errors occur
then continue to next step, otherwise start step 10 again.
Close the ‘Tables’ screen, at the main screen click on ‘Race’, the race screen will appear and start
countdown.
Once the race has been setup try passing a transponder across the loop (if using AMB system), the
car number should go white, this will ensure the counting system is working.
Once the countdown has finished the race will start, continue to run races until the end of the round.
At the end of round the ‘EOR’ window will be shown, print off a Position Print if required. Then ‘Enter
finals’ or continue with another round of qualifying.
After ‘Enter Finals’ has been selected
15) Sort the finals using the method required then use the ‘Check’ button to make sure that there are no
problems. Solve any problems that exist and continue to the next stage.
16) To show the drivers that need to change frequency click on the ‘Freq Changes’ button
17) Close the ‘Races’ window and Click the ‘Race’ button in the main screen.
18) The countdown for the finals will now start.
19) Once all the finals are complete the ‘EOR’ window will appear click on ‘Main Menu’.
20) Once in the main menu click on ‘Options’ then ‘Exit’
Page 30
Misc
HTML
HTML is created automatically after each round is complete and after each race.
The HTML pages are located in a specific HTML directory that is made once an event has been created. In the
directory that LapsW.exe is in there will be another directory called ‘event files’ open this.
In the ‘event files’ directory open the event directory that you want the files from, open the ‘HTML’ folder in that
directory and the files are in there.
Pictures
Drivers can have a picture associated with them, this will show up on the race screen if they are in the top three.
There is a directory called “driverpics” located in the same directory as lapsw.exe, place drivers pictures in here.
Pictures should be of type .jpg, the frame for showing pictures is 95 * 125 larger images will be reduced to fit into
the space. Picture files should be no larger than 50k in size (most of ours are 7k) because the computer has to
load the picture each time it is used.
Removing Old Events / Database
After several events you might want to delete old data that you no longer need, each event is created in its own
directory, to remove the event just delete the directory.
The events are located in the ‘event files’ directory that is located in the same place as lapsW.exe (standard
installations with have this at c:\program files\rctimingDOTcom\laps free\)
Each database has its own file, database files are located in the directory ’database’ (located in the same place
as lapsw.exe), just delete the file to remove it.
Multiple FTD
Multiple FTD
The multiple FTD button appears on the EOR Positions & Sort Table Screens, by pressing it the above screen is
shown.
FTD is normally the best single result a driver has achieved, by using this option a numbers of the drivers best
results can be added together to give a new totalled result.
Enter the number of best rounds you want to count into ‘Number of rounds to score’ (must be 2 or higher).
Then select all the rounds or a selection of rounds between 1 and 19. Once OK is pressed the totalled result will
be placed into round 20, the heats/finals or EOR results can then be printed (making sure you select round 20 as
the only round to count as this I the only one with the totalled result).
Page 31
Advanced Setup
These advanced option have been placed into the program because people have requested them, normally the
default options will be fine. If you don’t understand what these do, then don’t touch!
First of all open the laps program and then exit/close it (there is a good reason for this).
To get to the advanced options open a file called “laps.ini” which is in the same directory as the lapsw.exe
program file. The file should be opened into a text editor (i.e. notepad). A good idea before opening the file is to
make a copy to a floppy disk etc (that way you can restore the original if you make a mistake).
Setting the Stagger Order
To set the starting order given for stagger starts, open the laps.ini file
Go to the entry
STAGGER ORDER=
To set for the last round, re-enter as
STAGGER ORDER=LAST
To set for FTD
STAGGER ORDER=FTD
Setting the gap between calling cars for stagger start
By default cars will be called with a one second gap but this can be increased.
The gap between calling cars can be between 1 second and 3 seconds.
Open the laps.ini file
Go to the entry
STAGGER GAP=
To set to 1 second
STAGGER GAP=1000
To set to 3 seconds
STAGGER GAP=3000
Any number between 1000 and 3000 is acceptable. e.g 1.25 seconds = 1250
If the number is not between 1000 and 3000 then the default 1 second will be used.
Page 32