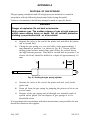
1
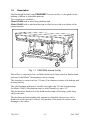
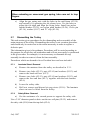
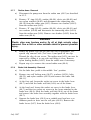
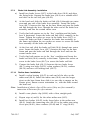
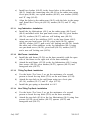
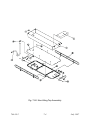
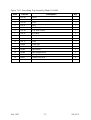
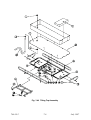
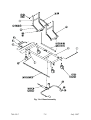
AKRON®
CASCADETM SHOWER TROLLEY
Models
156000 & 156010
SERVICE MANUAL
746-38
PRELIMINARIES
Revision record
All revisions incorporated into this copy of the manual must be recorded
below.
Revision
No.
July 1997
Issue
Date
Date
By (Signature)
Inserted
(i)
Remarks
746-38-2
Configuration Control
The Assembly/Spares Manual Modification Record (ASMR) is the Huntleigh
Nesbit Evans Ltd configuration control document for the equipment model
number(s) covered by this manual. The ASMR issue record for this manual is
given below.
Manual
Revision
Model 156000
Date
Model 156010
ASMR Introduced ASMR
Issue at Serial No. Issue
Introduced
at Serial No.
Issue 1
Feb.
1997
0
105638
0
100592
Issue 2
July
1997
1
116030
1
116030
Remarks
Sections 5 & 7
to issue 2
Note: From May 1998 previous production updated to current specification.
Refer to new Service Manual 746-156.
July 1997
(iii)
746-38-2
Preface
Read and understand this manual before attempting to service or repair the
equipment.
This manual is intended to be used by Huntleigh Nesbit Evans approved service
technicians. In the event that the manual is provided to a customer in response to
customer requirements, the customer is advised not to attempt any repairs and to
direct any required service to qualified Huntleigh Nesbit Evans Ltd technicians.
In no event will Huntleigh Nesbit Evans Ltd be responsible for any service
performed by customers or third parties.
Warnings, Cautions and Notes
WARNINGS given in this manual identify possible hazards in procedures or
conditions which, if not correctly followed, could result in death, injury or other
serious adverse reactions.
Cautions given in this manual identify procedures or conditions which, if not
correctly followed, could result in equipment damage.
Notes given in this manual are used to explain or amplify a procedure or
condition.
General Warnings
WARNING
Before starting any service or maintenance procedures, ensure
that the equipment has been adequately decontaminated.
July 1997
(v)
746-38-2
Contents
INTRODUCTION . . . . . . . . . . . . . . . . . . . . . . . . . . . . . . . . . 1-1
About This Manual. . . . . . . . . . . . . . . . . . . . . . . . . . . . . . . 1-1
Description . . . . . . . . . . . . . . . . . . . . . . . . . . . . . . . . . . 1-2
Brakes and Steering. . . . . . . . . . . . . . . . . . . . . . . . . . . . . . 1-3
Height Variation . . . . . . . . . . . . . . . . . . . . . . . . . . . . . . . . 1-4
Lateral Tilt (Model 156010 only). . . . . . . . . . . . . . . . . . . . . . . . 1-4
Safety Sides . . . . . . . . . . . . . . . . . . . . . . . . . . . . . . . . . . 1-5
OPERATIONAL MAINTENANCE . . . . . . . . . . . . . . . . . . . . . . . . 2-1
General . . . . . . . . . . . . . . . . . . . . . . . . . . . . . . . . . . . . 2-1
Cleaning . . . . . . . . . . . . . . . . . . . . . . . . . . . . . . . . . . . . 2-1
PREVENTIVE MAINTENANCE. . . . . . . . . . . . . . . . . . . . . . . . . . 3-1
General . . . . . . . . . . . . . . . . . . . . . . . . . . . . . . . . . . . . 3-1
Castors . . . . . . . . . . . . . . . . . . . . . . . . . . . . . . . . . . . . 3-1
Gas Spring (Model 156010 only) . . . . . . . . . . . . . . . . . . . . . . . 3-1
TESTING . . . . . . . . . . . . . . . . . . . . . . . . . . . . . . . . . . . . . 4-1
General . . . . . . . . . . . . . . . . . . . . . . . . . . . . . . . . . . . . 4-1
Height Variation . . . . . . . . . . . . . . . . . . . . . . . . . . . . . . . . 4-1
Castors and brakes . . . . . . . . . . . . . . . . . . . . . . . . . . . . . . 4-1
Lateral Tilt . . . . . . . . . . . . . . . . . . . . . . . . . . . . . . . . . . . 4-1
Safety Sides . . . . . . . . . . . . . . . . . . . . . . . . . . . . . . . . . . 4-2
SERVICING INSTRUCTIONS . . . . . . . . . . . . . . . . . . . . . . . . . . 5-1
General . . . . . . . . . . . . . . . . . . . . . . . . . . . . . . . . . . . . 5-1
Special Tools and Equipment . . . . . . . . . . . . . . . . . . . . . . . . . 5-1
Shower Tray Components - Replacement . . . . . . . . . . . . . . . . . . 5-2
Castors - Replacement . . . . . . . . . . . . . . . . . . . . . . . . . . . . 5-2
Hydraulic Pump - Replacement . . . . . . . . . . . . . . . . . . . . . . . . 5-3
Gas Spring - Replacement . . . . . . . . . . . . . . . . . . . . . . . . . . 5-4
Dismantling the Trolley . . . . . . . . . . . . . . . . . . . . . . . . . . . . 5-5
Restoration of Paintwork . . . . . . . . . . . . . . . . . . . . . . . . . . . 5-11
TECHNICAL DATA . . . . . . . . . . . . . . . . . . . . . . . . . . . . . . . . 6-1
(continued)
July 1997
(vii)
746-38-2
Contents (continued)
ILLUSTRATED PARTS LIST . . . . . . . . . . . . . . . . . . . . . . . . . . . 7-1
General . . . . . . . . . . . . . . . . . . . . . . . . . . . . . . . . . . . . 7-1
Numerical Index (when applicable) . . . . . . . . . . . . . . . . . . . . . . 7-1
Detailed Parts List . . . . . . . . . . . . . . . . . . . . . . . . . . . . . . . 7-1
How to Use the Illustrated Parts List . . . . . . . . . . . . . . . . . . . . . 7-1
Illustrated Parts List . . . . . . . . . . . . . . . . . . . . . . . . . . . . . . 7-2
746-38-2
(viii)
July 1997
1
1.1
INTRODUCTION
About This Manual
This manual contains information on servicing and maintenance of the
CASCADE™ shower trolley Model 156000 and 156010.
The manual comprises the following sections:
Section 1 - Introduction : (this section) Includes a general description of the
equipment with an explanation of the function and operation of the controls.
Section 2 - Operational Maintenance : Describes routine procedures and checks
to ensure correct operation during the service life of the equipment.
Section 3 - Preventive Maintenance : Gives details of regular, periodic
maintenance actions to ensure correct operation of the equipment.
Section 4 - Testing : Defines a serviceability test to verify correct operation of
the equipment if function is suspect or following any maintenance or servicing
procedure.
Section 5 - Servicing Instructions : Contains illustrated procedures for removal
and installation of replaceable parts and sub-assemblies.
Section 6 - Technical Data : Contains a list of technical data for the equipment
and components.
Section 7 - Parts List : Contains illustrations and detailed lists for the
identification of replaceable parts.
July 1997
1-1
746-38-2
1.2
Description
The Huntleigh Nesbit Evans CASCADE™ shower trolley is designed for the
bathing of infirm or bedridden patients.
Two versions are available :Model 156000 with a non-tilting platform and
Model 156010 with a platform that can be tilted to one side as a further aid to
patient transfer.
Fig. 1-1 CASCADE shower trolley
The trolley is constructed on a welded tubular steel frame which is finished and
protected with Rilsan® thermoplastic nylon coating.
The structure is carried on four 125 mm (5 in) diameter castors with braking and
steering facility.
The solid laminate platform is variable in height with 370 mm of adjustment.
On Model 156010, the platform may be tilted laterally by up to 12°.
The platform has fixed rails at the head and foot and self locking, quick drop,
safety side rails.
The platform and surrounding rails support a collapsible shower tray with a
drain hose at the foot end. A fixed, low gradient, foot down tilt ensures water
drainage to the outlet.
746-38-2
1-2
July 1997
The shower tray is made from ‘soft feel’ PVC fabric, padded with high density
foam and includes a PVC covered foam pillow.
1.3
Brakes and Steering
At the head of the trolley is a bow pedal, which will operate all linked castors
simultaneously.
When the pedal is in the horizontal position, the brakes are free and all the
castors are able to rotate and swivel.
When the pedal is pressed down, it applies the brakes on all four castors.
When the pedal is lifted up, it engages one foot end castor (in line) so that it
cannot swivel. The trolley can then be pushed and steered from the head end, by
one person.
Fig. 1-2 Castors, brakes and steering
July 1997
1-3
746-38-2
1.4
Height Variation
The height of the trolley platform can be adjusted from either side of the trolley
by the use of a foot pedal.
To raise the platform, operate the pedal with a pumping action. Utilise the full
stroke by allowing the pedal to rise to its full extent and pushing it down to the
bottom of the stroke.
To lower the platform, lift the pedal. The platform will descend under its own
weight. Release the pedal when the platform reaches the desired height or has
descended to the lower limit.
Fig. 1-3 Height adjustment
1.5
Lateral Tilt
Model 156010 only
The platform can be tilted to the right by up to 12° using the bow shaped handle
and release lever which are located beneath the platform, on the left side. This
facility is used to aid transfer of the patient from trolley to bed after the shower.
To tilt the platform, grasp the handle firmly and pull the release lever. The left
side of the platform will rise with the assistance of a gas spring. Let go of the
release lever to lock the platform at the desired angle.
To level the platform, grasp the handle firmly, pull the release lever and push
the platform down against the action of the gas spring. Let go of the release
lever to lock the platform in the level position.
746-38-2
1-4
July 1997
Fig. 4 Tilt release lever
1.6
Safety Sides
To lower the safety side, lift the side vertically to release the slotted pivots and
swing the side out and down.
To raise the safety side, first lift the side of the shower tray, folding the corners
on the outside against the head and foot. Swing the safety side out and up until
it is vertical then allow it to drop and engage the slotted pivots. Make sure that
both pivots are fully engaged.
July 1997
1-5
746-38-2
2
2.1
OPERATIONAL MAINTENANCE
General
The equipment has been designed to be virtually maintenance free between
service intervals. The periodic cleaning and maintenance necessary will be
determined by use and condition.
Examine the equipment for obvious signs of damage. If found take appropriate
remedial action.
Examine the shower tray and pillow for cuts or other damage. If the outer skin
is penetrated, discard and replace with a new part.
2.2
Cleaning
WARNING
Gloves and protective clothing should always be worn when
carrying out cleaning procedures.
The shower tray and all parts of the trolley can be cleaned using the following
procedures. For complete cleaning, the tray should be removed from the trolley.
Ensure that all surfaces are thoroughly dry before the tray is replaced on the
trolley.
2.2.1
Normal Cleaning
Using a soft cloth, wash the tray with hot water and a mild detergent to remove
all deposits. Rinse with clean water and allow to dry or dry with paper towels.
Use a soft disposable cloth and wipe down all areas with a chlorine solution i.e.
NaDCC or sodium hypochlorite solution, 1,000 ppm and allow to dry.
Take extra care with any areas that may harbour dirt and dust.
The hose should be flushed through with hot water and a mild detergent, rinsed
with clean water, then flushed through with a chlorine solution i.e. NaDCC or
sodium hypochlorite solution 1,000 ppm.
Caution
Do not use Phenol based cleaning solutions.
Do not use abrasive compounds or pads.
July 1997
2-1
746-38-2
3
PREVENTIVE MAINTENANCE
WARNING
Before starting any service or maintenance procedures, ensure
that the equipment has been adequately decontaminated.
The following checks should be made at regular six monthly intervals to ensure
that the equipment is in proper functional order and to determine any servicing
or repair action that is necessary.
3.1
General
Examine the trolley for obvious signs of damage.
Check that all fastenings are secure, especially at pivoting joints.
Examine the shower tray and pillow for cuts or other damage. If the outer skin
is penetrated, discard and replace with a new part.
Examine the paintwork for cuts, chips, abrasions or other damage. If bare metal
is exposed, the damaged area can be repainted using two part polyurethane
paint. Refer to Section 5 - Servicing Instructions.
Examine the hydraulic system for signs of leaks. If found, investigate and take
the necessary corrective action. Refer to Section 5 - Servicing Instructions.
3.2
Castors
Set the brake pedal to each position in turn and check that the brakes and
steering lock are working efficiently. In the ‘free’ position, make sure that all
four castors turn and swivel easily when the trolley is moved.
Brakes that fail to lock indicate that the castor is past its working life and should
be replaced. Refer to Section 5 - Servicing Instructions.
3.3
Gas Spring (Model 156010 only)
Operate the tilt adjustment. If the mechanism does not release or fails to lock
securely, the release lever may be at fault. If the movement is too easy (lacks
power and is not well damped), it is possible that the gas spring is faulty.
Investigate and take the appropriate corrective action. Refer to Section 5,
Servicing Instructions.
July 1997
3-1
746-38-2
746-38-2
3-2
July 1997
4
4.1
TESTING
General
The following serviceability tests should be performed before returning the
trolley to use after service or repair, or if any function is suspect.
Investigate any failure and take appropriate corrective action.
These instructions should be read in conjunction with Section 1 - Introduction,
sub-section 1.3.
Note: References to the left or right side of the trolley are when looking from
the head end.
4.2
Height Variation
Operate the height control foot pedal and verify that the trolley platform rises
and descends in a smooth and controlled manner over the full range of
adjustment from 630 mm to 1000 mm. Repeat this procedure with a load of
approximately 76 kg (12 stone person) on the platform.
Apply a load of 180 kg to the platfom and raise the platform to approximately
mid position. Measure and record the platform height after 1 hour and again
after 2 hours. The difference between the two measurements should be no more
than 5 mm.
Examine the underside of the trolley for any sign of an oil leak.
4.3
Castors and brakes
Set the brake pedal to the horizontal ‘free’ position, push the trolley and verify
that all four castors rotate and swivel easily.
Push the trolley from the head end until all four castors are in line and trailing.
Raise the brake pedals to the ‘steer’ position and verify that the left castor at the
foot end is locked in line while the other three castors still swivel freely.
Press the brake pedal down to the ‘brake’ position. Push the trolley and verify
that all four castors are locked. Any castor that rotates should be replaced.
4.4
Lateral Tilt
Operate the tilt adjustment and verify that the angle of the platform can be
varied smoothly over the full range from horizontal to 12°.. If the movement is
too easy (lacks power and is not well damped), it is possible that the gas spring
is faulty.
July 1997
4-1
746-38-2
4.5
Safety Sides
Raise and lower the safety sides several times. Verify that the latching pivots
operate freely and that, when raised, the sides are firmly locked in the vertical
position.
746-38-2
4-2
July 1997
5
SERVICING INSTRUCTIONS
WARNING
Before starting any service or maintenance procedures, ensure
that the equipment has been adequately decontaminated.
5.1
General
The servicing procedures given in this section include instructions for:
!
!
!
Replacement of specific components and sub-assemblies
Dismantling and assembly of the main structure
Restoration of paint finish
Do not disassemble more than is necessary to replace a defective item.
Throughout this section, numbers given in parenthesis thus (02-14) refer to the
illustrated parts list figure and item number for the part.
All references to left or right of the trolley are when viewed from the head end.
Before the trolley is returned to use following any service or repair procedure:
!
Carry out a visual inspection for signs of damage, particularly to the
shower tray
!
!
Perform a seviceability test as given in Section 4
Clean the equipment using the method described in Section 2
5.2
Special Tools and Equipment
In addition to normal workshop tools, the special tools and equipment listed
below are recommended for servicing the trolley.
Item
Description
Part No.
Use
1
Hoist SWL 170 kg
745.07
General
2
Sling strap (2)
745.08
General
3
Brake cam rotating tool (hexagonal)
745.10
Fitting castors
4
Clip rotating tool
745-03
Removing radius arms
5
Clip removal tool
745.01
Removing radius arms
July 1997
5-1
746-38-2
5.3
Shower Tray Components - Replacement
5.3.1
Removal
a)
Raise the trolley to maximum height and level the platform.
b)
Loosen the worm drive clip (01-4) and pull the hose (01-5) off the
liner (01-3).
c)
Unscrew the waste cap (01-2) and remove the cap, sealing washer
and waste liner (01-3).
d)
Remove the mattress (01-1) and pillow (01-6) from the trolley.
5.3.2
Installation
a)
Raise the trolley to maximum height, level the platform and lower
both safety sides.
b)
Lay the mattress (01-1) in position on the trolley, with the
threaded portion of the waste fitting through the hole in the
laminate sheet.
c)
Assemble the liner (01-3), sealing washer and cap (01-2) to the
waste fitting on the underside of the platform and tighten the cap
firmly by hand.
d)
Fit the worm drive clip (01-4) over the hose (01-5), push the hose
onto the waste liner (01-3) and tighten the worm drive clip to
secure the hose.
e)
Loop the hose (01-5) onto the storage hook beneath the trolley.
f)
Lift the sides of the mattress to the vertical position, folding the
corners on the outside and against the head and foot. Raise the
safety sides of the trolley to support the sides of the tray.
5.4
Castors - Replacement
Note: The left castor at the foot end is a tracking castor (04-12). The other
three castors are braking castors (04-15).
5.4.1
Removal
a)
Use the hoist (Tool item 1) to raise one end of the base frame
(04-5) by about 150mm and support the base frame on wooden
blocks.
Note: Do not raise the base frame by lifting the top frame. Do not put the sling
around the brake link rod.
746-38-2
5-2
July 1997
b)
Set the brake bow pedal to the middle ‘free’ position. Release the
socket set screw in the brake lever (04-7) and slide the brake rod
link (04-6) out of the frame just far enough to clear the castor
stem.
c)
Bend the shakeproof pressing (04-29) away from the two hexagon
headed screws (04-30) and remove the screws and the pressing.
d)
Remove the castor (04-12) or (04-15). The castor bush (04-32)
should remain in the frame.
5.4.2
Installation
a)
Using the cam rotating tool (Tool item 3), ensure that the castor is
in the ‘free’ condition. Make sure that the brake bow pedal is in
the ‘free’ position.
b)
Install the castor stem in the castor bush (04-32) and align the
fixing holes. Assemble a new or serviceable shakeproof pressing
(04-29) and two hexagon headed screws (04-30). Tighten the
screws firmly and bend up the pressing to secure them.
c)
Push the brake rod link (04-6) through the castor stem and
centralise it in the frame. Tighten the socket set screw in the brake
lever (04-7) to secure the brake link rod.
d)
Remove the wooden blocks and lower the trolley to the floor.
5.5
Hydraulic Pump - Replacement
5.5.1
Removal
a)
Raise the platform to maximum height and use the hoist
(Tool item 1) to support the top frame assembly.
b)
Remove the ‘E’ ring (04-33), washer (04-35) and clevis pin
(04-34) to release the hydraulic pump (04-13) from the radius arm
(04-2).
c)
Remove four pan head screws (04-19), washers (04-20) and the
two sadddle clamps which secure the pump to the base frame.
Remove the hydraulic pump (04-13), together with the pedal arms
(04-14).
d)
Support the pedal arm with a suitable anvil and use a xx diameter
punch to drive out the roll pin (04-17). Remove the pedal arm
(04-14) from the hydraulic pump (04-13). Repeat for the second
pedal arm.
July 1997
5-3
746-38-2
5.5.2
Installation
a)
Install the pedal arm (04-14) on the spindle of the hydraulic pump
(04-13) and align the fixing holes.
b)
Support the pedal arm (04-14) on a suitable anvil and drive in the
roll pin (04-170. Repeat for the second pedal arm.
c)
Install the hydraulic pump assembly on the base frame (04-5) and
attach with two saddle clamps, four pan head screws (04-19) and
washers (04-20).
d)
Operate the pump to align the holes in the radius arm (04-2) with
the hole in the pump ram. Install the clevis pin (04-34), washer
(04-35) and ‘E’ ring (04-33). Remove the hoist.
5.6
Gas Spring - Replacement
5.6.1
Removal
a)
Apply maximum tilt angle to the the top deck and support it with
the hoist (Tool item 1).
b)
Remove ‘E’ clip (03-18), washer (03-17) and clevis pin (03-16) to
release the lower end of the gas spring (03-19). Remove two nylon
headed bushes (03-25) and two nylon plain bushes (03-26).
c)
Remove M10 nut (03-20) and unscrew the gas spring (03-19) from
the gas spring mount (03-23).
d)
If necessary, remove two retaining pins (03-21), the gas spring
mount (03-23) and four nylon headed bushes (03-22).
WARNING
The gas spring is a high pressure device. Do not attempt to open.
Disposal must be carried out in accordance with manufacturer’s
instructions. Do not incinerate.
e)
5.6.2
Dispose of unserviceable gas springs safely, see Appendix A.
Installation
a)
If removed, install the gas spring mount (03-23) with four nylon
headed bushes (03-22) and two retaining pins (03-21).
b)
Screw the gas spring (03-19) into the gas spring mount (03-23)
until the screw thread protrudes by the thickness of the M10 nut
(03-20). Install the M10 nut (03-20) and tighten to secure.
746-38-2
5-4
July 1997
WARNING
When extending an unsecured gas spring, take care not to trap
fingers.
c)
5.7
Align the gas spring axis with the holes in the mid frame (03-24)
and extend it by operating the tilt release lever. Use the hoist to
adjust the tilt angle and align the fixing holes. Install two nylon
headed bushes (03-25), two nylon plain bushes (03-26), Clevis pin
(03-16), washer (03-17) and ‘E’ clip (03-18).
Dismantling the Trolley
This sub-section gives procedures for the dismantling and re-assembly of the
main structure of the trolley. Dismantling the trolley is not a routine procedure
and should only be carried out to the extent necessary in order to replace a
defective part.
The information given is for guidance. Procedures will be varied according to
the purpose for which they are undertaken and will not necessarily be performed
in the given order. For example; it is not necessary to dismantle the top
assembly in order to remove it from the base assembly.
Procedures which are deemed to be self evident have not been included.
5.7.1
Laminate Sheet - Removal
a)
Remove the mattress from the trolley as described in 5.3.1.
b)
Remove two bolts (02-12), nuts (02-14) and washers (02-13) and
remove the head end bow (02-7).
c)
Remove two bolts (02-12), nuts (02-14) and washers (02-13) and
remove the foot end bow (02-7), together with the hose bracket
(02-9).
d)
Lower the safety sides.
e)
Drill out, remove and discard six pop rivets (02-16). The laminate
sheet can now be lifted from the trolley.
5.7.2
Safety Sides - Removal
a)
Get the assistance of a second person to support the safety side.
Use a 3/16" diameter punch to drive out the two roll pins (02-15) and remove
the safey side (02-8) from the top deck (02-6).
July 1997
5-5
746-38-2
5.7.3
Non-Tilting Top Deck - Removal
a)
Get the assistance of a second person, or use the hoist
(Tool item 1) to support the top deck (02-6).
b)
Remove four hexagonal nuts (04-23), screws (04-24), pivot bushes
(04-21) and spacers (04-22).
c)
The top deck (02-6) can now be lifted off the base assembly.
5.7.4
Tilting Top Deck - Removal
a)
Get the assistance of a second person, or use the hoist
(Tool item 1) to support the top deck (03-6).
b)
Remove the gas spring (03-19) as described in 6.6.1.
c)
Remove two ‘E’ clips (03-18), washers (03-17) and clevis pins
(03-16).
d)
The top deck (03-6) can now be lifted off the mid frame (03-24).
5.7.5
Mid Frame - Removal
a)
Remove four hexagonal nuts (04-23), screws (04-24), pivot bushes
(04-21) and spacers (04-22).
b)
The mid frame (03-24) can now be lifted off the base assembly.
c)
Remove and discard bump-on (03-29) if unservicable.
5.7.6
Leg Fabrication - Removal
a)
Remove one self locking nut (04-36), pan head screw (04-38),
pivot bush (04-39) and washer (04-37) to disconnect the stabiliser
from the leg fabrication. Remove one self locking nut (04-36), pan
head screw (04-38), pivot bush (04-39), spacer (04-49) and washer
(04-37) and remove the stabiliser (04-3) from the base frame
(04-5).
b)
Remove four self locking nuts (04-36), pan head screws (04-38),
pivot bushes (04-39) and washers (04-37) and remove the leg
fabrications (04-1) from the radius arms (04-2) and (04-4).
746-38-2
5-6
July 1997
5.7.7
Radius Arms - Removal
a)
Disconnect the pump ram from the radius arm (04-2) as described
in 6.5.2.
b)
Remove ‘E’ ring (04-45), washer (04-44), clevis pin (04-40) and
two nylon washers (04-43) and disconnect the connecting tube
(04-10) from the radius arm (04-2). Remove two bushes (04-42)
from the radius arm (04-2).
c)
Remove ‘E’ ring (04-45), washer (04-44), clevis pin (04-41) and
two washers (04-44) and disconnect the connecting tube (04-10)
from the radius arm (04-4). Remove two bushes (04-42) from the
radius arm (04-4).
WARNING
Plastic clips may fracture and/or fly off at high velocity when
removed. Use a cloth or other suitable shield to prevent possible
injury.
d)
Rotate the plastic clip (04-48) until the slot is uppermost. Use
special clip removal tool (Tool item 4) and push off the clip.
Discard the clip, do not re-use. The radius arm (04-2) can now be
removed by sliding it to one side and lifting it clear. Remove
nylon bearing bushes (04-47) from the radius arm if necessary.
e)
Repeat step c) to remove the second radius arm (04-4).
5.7.8
Brake Link Assembly - Removal
a)
Set the bake bow pedal to the middle ‘free’ position.
b)
Remove two self locking nuts (04-27), washers (04-26), bolts
(04-25), and nylon washers (04-28) and remove the brake link
(04-11).
c)
At the foot end, loosen the socket set screw in the brake lever
(04-7) and slide the brake rod link (04-6) out of the frame.
d)
At the head end, loosen the socket set screw in the brake lever
(04-7) and the two socket set screws in the levers attached to the
brake bow (04-8). Slide the brake rod link (04-6) out of the frame
and remove the brake bow assembly together with the brake lever
(04-7).
e)
Support the brake bow (04-8) on a suitable anvil and use a xx
diameter punch to drive out the roll pins (04-50). Remove the
brake levers (04-7) from the brake bow (04-8).
July 1997
5-7
746-38-2
5.7.9
Brake Link Assembly - Installation
a)
Install two brake levers (04-7) in the brake bow (04-8) and align
the fixing holes. Support the brake bow (04-8) on a suitable anvil
and drive in the two roll pins (04-50).
b)
At the head end, slide the brake rod link (04-6) through one castor
stem and one end of the brake bow assembly. Locate the brake
lever (04-7) between the lugs on the base frame and pass the brake
rod link through the lever, through the other end of the brake bow
assembly and into the second castor stem.
c)
Verify that both castors are in the ‘free’ condition and the brake
bow is horizontal. Locate the brake rod link (04-6) centrally in the
frame. Tighten the socket set screw in the brake lever (04-7) to
secure the brake rod link. Centralise the brake bow assembly in
the frame and tighten the two socket set screws to secure the brake
bow assembly on the brake rod link.
d)
At the foot end, slide the brake rod link (04-6) through one castor
stem. Locate the brake lever (04-7) between the lugs on the base
frame and pass the brake rod link through the lever and into the
second castor stem.
e)
Verify that both castors are in the ‘free’ condition and locate the
brake rod link (04-6) centrally in the frame. Tighten the socket set
screw in the brake lever (04-7) to secure the brake rod link.
f)
Connect the brake link (04-11) between the two brake levers
(04-7) using two bolts (04-25), nylon washers (04-28), washers
(04-26) and new self locking nuts (04-27).
5.7.10
Radius Arms - Installation
a)
Install a nylon bearing (04-47) in each end of the tube on the
radius arm (04-4). Install the radius arm (04-4) onto the longer
pivot on the base frame then slide it to one side to engage on the
shorter pivot. Ensure correct orientation i.e., with the arms toward
the head end.
Note: Installation of plastic clips will be easier if they are first warmed by
immersion in hot water for a few minutes.
b)
Install a new plastic clip (04-48) with a firm, straight push.
c)
Repeat steps a) and b) for the other radius arm (04-2).
d)
Install two bushes (04-42) in the lower holes in the radius arm
(04-4). Attach the connecting tube (04-10) to the radius arm using
clevis pin (04-41), three washers (04-44) and ‘E’ ring (04-45).
746-38-2
5-8
July 1997
e)
Install two bushes (04-42) in the lower holes in the radius arm
(04-2). Attach the connecting tube (04-10) to the radius arm using
clevis pin (04-40), two nylon washers (04-43), one washer (04-44)
and ‘E’ ring (04-45).
f)
Align the holes in the radius arm (04-2) with the hole in the pump
ram. Install the Clevis pin (04-34), washer (04-35) and ‘E’ ring
(04-33).
5.7.11
Leg Fabrication - Installation
a)
Install the leg fabrications (04-1) on the radius arms (04-2) and
(04-4) and attach with four pan head screws (04-38), pivot bushes
(04-39), washers (04-37) and new self locking nuts (04-36).
b)
Attach one end of the stabiliser (04-3) to the base frame (04-5)
using one pan head screw (04-38), pivot bush (04-39), spacer
(04-49), washer (04-37) and a new self locking nut (04-36). Attach
the other end of the stabiliser to the leg fabrication (04-1) using
one pan head screw (04-38), pivot bush (04-39), washer (04-37)
and a new self locking nut (04-36).
5.7.12
Mid Frame - Installation
a)
Install the mid frame (03-24) on the base assembly with the open
side of the frame to the right side of the base assembly.
b)
Attach the mid frame (03-24) to the leg fabrications (04-1) using
four screws (04-24), pivot bushes (04-21), spacers (04-22) and
hexagonal nuts (04-23).
5.7.13
Tilting Top Deck - Installation
a)
Use the hoist (Tool item 1) or get the assistance of a second
person to locate the top deck (03-6) on the mid frame (03-24).
b)
Attach the top deck to the mid frame using two clevis pins
(03-16), washers (03-17) and ‘E’ clips (03-18).
c)
Install the gas spring as described in 6.6.2.
5.7.14
Non-Tilting Top Deck - Installation
a)
Use the hoist (Tool item 1) or get the assistance of a second
person to locate the top deck (02-6) on the base assembly.
b)
Attach the top deck (02-6) to the leg fabrications (04-1) using four
screws (04-24), pivot bushes (04-21), spacers (04-22) and
hexagonal nuts (04-23).
July 1997
5-9
746-38-2
5.7.15
Safety Sides - Installation
a)
5.7.16
Get the assistance of a second person to locate the safety side on
the top deck (02-6) or (03-6). Align the fixing holes and drive in
the two roll pins (02-15) or (03-15).
Laminate Sheet - Installatiion
a)
Carefully lay the laminate sheet (02-5) on the top deck (02-6),
ensuring that it is correctly positioned with the hole for the waste
outlet at the foot end of the trolley.
b)
Align the fixing holes and attach the laminate sheet (02-5) with six
pop rivets (02-16).
c)
At the head end, attach the end bow (02-7) to the top deck (02-6)
with two bolts (02-12), washers (02-13) and nuts (02-14).
d)
At the foot end, attach the end bow (02-7) and the hose bracket
(02-9) to the top deck (02-6) with two bolts (02-12), washers
(02-13) and nuts (02-14).
e)
Install the mattress on the trolley as described in 6.3.2.
746-38-2
5-10
July 1997
5.8
Restoration of Paintwork
Any damage to the protective finish of the trolley must be repaired promptly to
avoid corrosion and general deterioration.
Use only the genuine Huntleigh Nesbit Evans paint touch-up kit, part No.
745.06. To ensure correct colour, quote serial number of the trolley when
ordering.
5.8.1
Health and Safety
The material supplied for restoration of paintwork is a polyurethane paint
containing isocyanates. It is a category H.S.4 product and is classified as
“dangerous” and “flammable” under the Classification, Packaging and
Labelling of Dangerous Substances Regulations 1984.
Proper precautions must be taken in the handling, storage and use of this
material. There is a potential hazard from the isocyanates because they are
respiratory sensitisers. Persons with a history of asthma should not be engaged
in any process which involves their use.
Accidental spillages should be absorbed onto sand or other inert material and
disposed of in accordance with the Deposit of Poisonous Waste Act 1972 or
local authority regulations. Do not allow materials to enter drains.
If kept in a workroom, the product should be stored in a fireproof cupboard or
bin.
WARNING
Painting materials are dangerous. Read, understand and follow the
manufacturer’s instructions. Use only in a well ventilated area and
avoid breathing the vapours especially during mixing. Do not
smoke. Do not use near flame or other sources of heat. Put on
appropriate protective clothing to avoid skin contact. Wear eye
protection and a type CC canister respirator to BS2091. If it
contacts the skin, wash immediately with soap and warm water. If
ingested by mouth or if it contact the eyes, flush with large
quantities of water and seek immediate medical help.
5.8.2
Procedure
The material must be mixed and applied in a clean. dry atmosphere. Thinning
will not normally be necessary for brush application but, if required, thinners
must be added only after thorough blending of the base and hardener.
July 1997
5-11
746-38-2
The paint cures by chemical action and cured coating becomes resistant to
solvents and difficult to remove. It is therefore necessary to clean equipment
and utensils with Superthane thinners directly after use.
It is essential to avoid the introduction of moisture to the painting materials so
all equipment must be thoroughly clean and free from traces of oil or water.
a)
Clean and degrease the damaged area by wiping with a lint free
cloth moistened with a suitable volatile solvent e.g., methylated
spirits. Make sure there are no loose chips of paint and use fine
silicon carbide abrasive paper to abrade the area where paint is to
be applied and blend into a smooth surface. Clean and degrease
the area again.
b)
Mix a suitable (minimum) quantity of material in the ratio of 2.25
parts base to 1.0 part hardener e.g., put 35 ml of base material into
the measuring beaker and add hardener up to the 50 ml mark. Stir
the mixture until the two components are thoroughly blended. The
prepared mixture will have a pot life of 4-6 hours at 20°C.
c)
Apply the mixture to the damaged area using a soft bristle brush
to give a smooth and even coat. A second coat may be applied if
necessary but flat down the surface if left for more than 24 hours
between coats.
d)
Allow to cure in a clean, dry atmosphere. The coating will be firm
dry in 24 hours, fully cured in 5 days at 20°C. It can be subject to
normal exposure to atmosphere after reaching the firm dry
condition but should be allowed to cure for at least 5 days before
being subjected to washing.
746-38-2
5-12
July 1997
6
TECHNICAL DATA
CASCADE shower trolley Model 156000 & 156010
Overall dimensions
Length
Width
Height (max)
206 cm
85 cm
121 cm
Platform height (centre)
Minimum
Maximum
63 cm
99 cm
Adjustable
12° (max)
Lateral tilt
(Model 156010 only)
Castors
12.5 cm dia.
(3 brake and 1 brake/track, antistatic)
Product weight
(including shower tray)
Model 156000
Model 156010
Safe working load
July 1997
91 kg
94 kg
180 kg
6-1
746-38-2
7
7.1
ILLUSTRATED PARTS LIST
General
The illustrated parts list is for the identification and requisition of replaceable
parts.
7.2
Numerical Index (when applicable)
The Numerical Index gives, in alpha-numerical sequence, all part numbers
given in the Detailed Parts List. The ‘Total Required’ column gives the total
quantity required for each part number at the figure and item entry.
7.3
Detailed Parts List
The detailed parts list includes parts lists and related illustrations. The
illustrations are exploded views of different areas of the platform. Each
illustration is accompanied by a list of all the parts appearing in that view.
7.4
How to Use the Illustrated Parts List
Identify the applicable illustration, find the part on the illustration and note the
item number which is given in a balloon. Refer to the Parts List opposite the
illustration for information regarding the part.
Sometimes a number of identical parts may appear in different locations but
only one will be identified with a balloon. The number in the “Qty” column of
the parts list indicates the total number of times that the part appears in the
illustration.
July 1997
7-1
746-38-2
7.5
Illustrated Parts List
Fig. 7-01 Shower Tray Assembly
746-38-2
7-2
July 1997
Figure 7-01 Shower Tray Assembly
Item
Part No.
Description
Qty
1
757.02
Mattress (Shower Tray)
1
2
757.08
Waste Cap and Sealing Washer
1
3
757.00
Waste Liner (Fig. 2 Item 3)
Ref
4
S4739
Worm Drive Hose Clip (Fig. 2 Item 11)
Ref
5
757.17
Waste Hose (Fig. 2 Item 10)
Ref
6
757.03
Pillow (Fig. 2 Item 1)
Ref
July 1997
7-3
746-38-2
Fig. 7-02 Non-tilting Top Assembly
746-38-2
7-4
July 1997
Figure 7-02 Non-tilting Top Assembly (Model 156000)
Item
Part No.
Description
Qty
1
757.03
Pillow
1
2
757.02
Mattress Assembly (Fig.8-01)
1
3
757.00
Liner
1
4
757.01
Plug
1
5
757.06
Laminate Sheet
1
6
757.44
Top Deck Frame
1
7
757.07
End Bow
2
8
757.08
Safety side
2
9
757.18
Hose Bracket
1
10
757.17
Hose
1
11
S4739
Hose Clip
1
12
S1521
M8 Bolt Hex Head
4
13
S1804
M8 Washer
4
14
S1904
M8 Hexagonal Nut
4
15
S1017
Spring Pin
4
16
S4517
S/Steel Pop Rivet
6
July 1997
7-5
746-38-2
Fig. 7-03 Tilting Top Assembly
746-38-2
7-6
July 1997
Figure 7-03 Tilting Top Assembly (Model 156010)
Item
Part No.
Description
Qty
1
757.03
Pillow
1
2
757.02
Mattress Assembly (Fig. 8-01)
1
3
757.00
Liner
1
4
757-01
Plug
1
5
757.06
Laminate Sheet
1
6
757.05
Top Deck Frame
1
7
757.07
End Bow
2
8
757.08
Safety Side
2
9
757.18
Hose Bracket
1
10
757.17
Hose
1
11
S4739
Hose Clip
1
12
S1521
M8 Bolt Hex Head
4
13
S1804
M8 Washer
4
14
S1904
M8 Hexagonal Nut
4
15
S1017
Spring Pin
4
16
718.84
Clevis Pin
17
S1829
Washer
4
18
S4734
‘E’ Clip
4
19
712.91
Gas Spring
1
20
S1902
M10 Hexagonal Nut
1
21
712-16
Retaining Pin
2
22
S4905
Headed Bush - Nylon
4
23
712.17
Gas Spring Mount
1
24
757.04
Mid Frame Fabrication
1
25
718.82
Headed Bush - Nylon
2
26
S4906
Plain Bush - Nylon
2
27
757.13
Release Handle
1
28
S4517
S/Steel Pop Rivet
6
29
S5108
Bump On
2
30
4K214
Moulded Handle Grip
1
31
S5049
End Cap
1
July 1997
7-7
746-38-2
50
Fig. 7-04 Base Assembly
746-38-2
7-8
July 1997
Figure 7-04 Base Assembly (Model 156000 and 156010)
Item
Part No.
Description
Qty
1
757.12
Leg Fabrication
2
2
717.33
Radius Arm
1
3
713.54
Stabiliser
1
4
712.39
Radius Arm
1
5
729.17
Base Frame
1
6
729.33
Brake Rod Link
2
7
717.128
Brake Lever
4
8
717.26
Brake Bow
1
9
717.29
Brake Bow Grip Tube
1
10
713.24
Connecting Tube
1
11
718.87
Brake Link
1
12
S5993
Castor - Tracking
1
13
717.165
Hydraulic Pump
1
14
741.59
Pedal Arm Fabrication
2
15
S5994
Castor - Locking
3
16
S5133
Pedal Rubber
2
17
S1037
Roll Pin
2
18
S4506
Pop Rivet
2
19
S3433
Pan Head Screw
4
20
S1822
Washer
4
21
718.150
Pivot Bush
4
22
S1829
Spacer
4
23
S1921
Hexagonal Nut
4
24
S3612
Screw
4
25
S1504
Bolt
2
26
S1804
Washer
4
27
S1403
Nut - Self Locking
2
28
718.85
Washer - Nylon
2
29
718.39
Shakeproof Pressing
4
30
S1141
Screw - Hexagonal Head
8
(Continued)
July 1997
7-9
746-38-2
Figure 7-04 Base Assembly (Continued)
Item
Part No.
Description
Qty
31
S5038
End Cap
4
32
712.01
Castor Bush
4
33
S4733
‘E’ Ring
1
34
713.92
Clevis Pin
1
35
S1825
Washer
1
36
S4300
Nut - Self Locking
6
37
S1819
Washer
6
38
S3401
Screw - Pan Head
6
39
713.94
Pivot Bush
6
40
718.83
Clevis Pin
1
41
718.84
Clevis Pin
1
42
718.82
Bush
4
43
S5135
Washer - Nylon
2
44
S1819
Washer
4
45
S4734
‘E’ Ring
2
46
S5047
End Cap
2
47
712.02
Bearing - Nylon
4
48
712.04
Clip - Plastic
2
49
713.105
Spacer
1
50
S1017
Roll Pin
2
746-38-2
7-10
July 1997
APPENDIX A
DISPOSAL OF GAS SPRINGS
The gas spring contains air and oil at high pressure and must be vented in
accordance with the following instructions before being discarded.
Under no circumstances should any attempt be made to open the device.
WARNING
Danger of explosion. Do not heat or incinerate.
High pressure gas. The sudden release of gas at high pressure
could cause serious injury or death. Put on suitable protective
clothing, eye protection and / or a face shield.
a)
Operate the valve at the end of the piston rod and allow the piston
rod to extend fully.
b)
Clamp the gas spring in a vice and drill a hole approximately 3
mm diameter at position 1 as shown in Fig. B-1. Screen off the
drilling point because metal chips and oil may be ejected due to
the high internal pressure. Then drill a second hole at position 2 as
shown. the holes should be drilled to a depth of approxomately 10
mm.
Fig. A-1 Venting the gas spring cylinder
c)
Operate the valve at the end of the piston rod and push in the
piston rod.
d)
Drain oil from the gas spring by pumping the piston rod in an out
several times.
e)
Dispose of the gas spring and oil through raw materials trade or
special refuse points. Do not dispose of gas springs or oil in
household refuse.
If correct disposal in accordance with these instructions is not possible, the unit
should be returned to the supplier.
July 1997
A-1
746-38-2