1
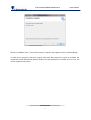
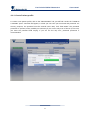
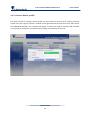
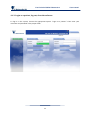
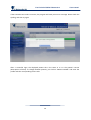
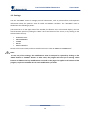
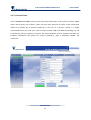
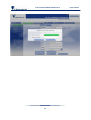
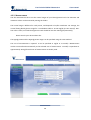
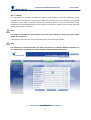
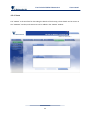
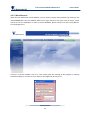
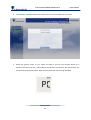
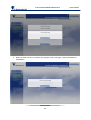
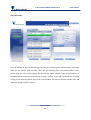
THE ART OF MEDICAL DIAGNOSTICS
LiteLink mini USB
Wireless Data Download Device
Diatransfer 2
Diabetes Data Management Software
User manual
Lite Link mini USB & Diatransfer 2
User manual
Table of Contents
1 Introduction .................................................................................................................................................................................................... 3
2 Overview of operating elements of Diatransfer 2 ........................................................................................................................................... 3
3 Installation ...................................................................................................................................................................................................... 4
3.1. Minimum requirements and recommended conditions for Diatransfer 2 Software: .................................................................................. 4
3.2 Installation of Diatransfer 2 Software .......................................................................................................................................................... 4
4 Using Diatransfer 2 software .......................................................................................................................................................................... 8
4.1 Create user profiles, Log in .......................................................................................................................................................................... 8
4.1.1. Create Patient profile ............................................................................................................................................................................... 9
4.1.2. Create Doctor profile ............................................................................................................................................................................. 10
4.1.3. Login as a patient, log out, close the software ....................................................................................................................................... 11
4.1.4. Login as a doctor .................................................................................................................................................................................... 13
4.2. Settings ..................................................................................................................................................................................................... 15
4.2.1. Personal Data ......................................................................................................................................................................................... 17
4.2.2. Measurement ........................................................................................................................................................................................ 20
4.2.3. Timing .................................................................................................................................................................................................... 21
4.2.4. Notes...................................................................................................................................................................................................... 22
4.2.5. Miscellaneous ........................................................................................................................................................................................ 23
4.3 Read device ................................................................................................................................................................................................ 24
4.4 Data entry .................................................................................................................................................................................................. 29
4.5 Statistics ..................................................................................................................................................................................................... 31
4.5.1. Blood Glucose Diary ............................................................................................................................................................................... 32
4.5.2. Timeline ................................................................................................................................................................................................. 34
4.5.3. Daily averages ........................................................................................................................................................................................ 35
4.5.4. Statistics ................................................................................................................................................................................................. 36
2
Lite Link mini USB & Diatransfer 2
User manual
1 Introduction
Diatransfer 2 is diabetes data management software for the blood glucose monitoring systems of 77
Elektronika. This software helps doctors obtain up-to-date information on the health status of their
patients, and makes it possible for them to interact in time during critical circumstances. The results
of the patient’s measurements may be transferred from the patient’s location to the doctors via the
Internet. Data can be uploaded to the Diatransfer 2 program, which operates on the patients’ own
PC, as well with a special infrared (IR) coupler, Lite Link, which is manufactured for the blood glucose
meters of 77 Elektronika. Diatransfer 2 displays the measurement results as diagrams, calculates
various statistics, and helps patients contact their healthcare professionals more easily via the
Internet.
2 Overview of operating elements of Diatransfer 2
The entire blood glucose monitoring system consists of three parts:
•
77 Elektronika glucometer with built-in IR port.
•
Lite Link mini USB—a wireless data download device.
•
Diatransfer 2—diabetes data management software.
77 Elektronika blood glucose meters are designed to provide easy, accurate, and rapid testing of
blood glucose levels. The test results stored in their memory can be downloaded through the IR
interface of the meters. The following products are compatible with Lite Link and Diatransfer 2:
SensoCard and SensoCard Plus; SensoLite Nova and SensoLite Nova Plus; and AutoSense and
AutoSense Voice.
The Lite Link is an optical interface that transfers test results from the blood glucose meter. It is a
wireless data download device that must be plugged into a USB port of a PC.
The Diatransfer 2 is diabetes data management software that is supplied together with the Lite Link
device. After test results are downloaded from the glucometer, they can be reviewed and evaluated
by the program using different statistics, diagrams, and charts. Diatransfer was developed for
diabetic patients as well as for doctors using the blood glucose meters of 77 Elektronika.
3
Lite Link mini USB & Diatransfer 2
User manual
3 Installation
3.1. Minimum requirements and recommended conditions for Diatransfer 2
Software:
The minimum requirements of Diatransfer 2 are the same as those for the Microsoft Windows XP
Professional Operating System.
•
•
•
•
•
A 233 MHz or faster processor; 300 MHz is recommended
64 MB RAM; 128 MB is recommended
1.5 GB available hard disk space
Keyboard, Microsoft mouse, or a compatible pointing device
Super VGA (1024 x 720) or higher resolution video adapter and monitor
The recommended conditions for the operation of Diatransfer 2 are similar to those for the Microsoft
Windows 7 Operation System.
• A 1 GHz or faster 32-bit (x86) or 64-bit (x64) processor
• 1 GB RAM (32-bit) or 2 GB RAM (64-bit)
• 16 GB available hard disk space (32-bit) or 20 GB (64-bit)
• DirectX 9 graphics device with a WDDM 1.0 or higher driver
PDF document reader software is highly recommended, because this software exports the statistical
results of measurements in PDF format. While internet access is required in order to communicate
with the doctor (for both consultation and supervision), Diatransfer can also be used without this
function.
3.2 Installation of Diatransfer 2 Software
The program can be easily installed using the Diatransfer 2 Setup Wizard. The installation will start
automatically when the CD is inserted. If the installation does not start automatically, double click
the “setup.exe” file to start the process.
The following screenshots guide you step-by-step through the setup process.
4
Lite Link mini USB & Diatransfer 2
User manual
Use the Select Installation Folder page to specify the file system folder in which the program will be
installed. Browse the target folder using the “Browse” button Go to the “Next” page to continue the
process.
5
Lite Link mini USB & Diatransfer 2
User manual
Please read the license agreement carefully. After the terms and conditions are accepted, the
necessary files will be copied to the computer.
6
Lite Link mini USB & Diatransfer 2
User manual
After the installation, there is no need to restart the computer; the program can be used immediately.
In order for the program to function properly, Microsoft .NET Framework 4 must be installed. The
installation wizard automatically detects whether the .NET Framework is installed, and if it is not, the
wizard completes the process.
7
Lite Link mini USB & Diatransfer 2
User manual
4 Using Diatransfer 2 software
4.1 Create user profiles, Log in
There are two types of user accounts: a patient account and a doctor account. There is no significant
difference between these accounts, except that in patient mode, only one user profile can be
accessed, while in doctor mode, a patient list can be created and multiple user profiles can be
managed.
At the first launch of the program, these two types of users will appear on the home screen.
To use the program further, a user profile must be created.
8
Lite Link mini USB & Diatransfer 2
User manual
4.1.1. Create Patient profile
To create a new patient profile, click on the “NEW PATIENT” tab; you will find it under the “LOGIN AS
A PATIENT” panel. A window will appear, in which you can enter your username and password. For
security purposes, the password must be entered twice. Next, click “ADD USER.” The password
protection is optional, and is probably not necessary if you are the only user of the PC (in this case,
just leave the password field empty). If you are not the only user, password protection is
recommended.
9
Lite Link mini USB & Diatransfer 2
User manual
4.1.2. Create a Doctor profile
The steps involved in creating a doctor profile are quite similar to those used in creating a patient
record. Go to the “Login as a doctor” window on the right-hand side of the home screen, then choose
the “ADD NEW DOCTOR” tab. A window will appear, in which you assign a username and password
to the profile. A password is not required, but is highly recommended in this case.
10
Lite Link mini USB & Diatransfer 2
User manual
4.1.3. Login as a patient, log out, close the software
To log in to the system, choose the appropriate option: “Login as a patient.” Then enter your
username and password in the proper fields.
11
Lite Link mini USB & Diatransfer 2
User manual
To log out of the system, click on the “LOG OUT” panel. It is at the top of the menu bar on the lefthand side of the screen. The program will ask you for confirmation. To log out, click “YES.” To remain
at this record, click “NO.”
Before closing the program, it is recommended that you log out first, then click “EXIT” (at the top
right-hand side of the window). The program will then shut down.
12
Lite Link mini USB & Diatransfer 2
User manual
4.1.4. Login as a doctor
To log in to the doctor’s records, enter the username and password in the appropriate fields, then
press the login button. First, a user heading panel appears, under which the patients are listed. The
doctor may also have blood glucose monitoring profiles, which are listed along with the patients.
To open the patients’ files, an access code is needed, which gives doctors access to their patients’
data. The patient sets his/her doctor’s personal access code (which your doctor will give you). The
patient sets the access code at the Settings/Personal data/ menu (see also Section 4.2.1).
To choose one, just click on the selected patient and enter the correct code in the proper field. Then
click “SELECT.”
13
Lite Link mini USB & Diatransfer 2
User manual
If the entered access code is incorrect, the program will send you an error message. Please check the
spelling, and then try again.
After a successful login, the displayed patient tab is the same as it is in the patient’s version
(Description to follow). To change between patients, just click on “SELECT PATIENT” and enter the
profile with the corresponding access code.
14
Lite Link mini USB & Diatransfer 2
User manual
4.2. Settings
Use the “SETTINGS” menu to manage personal information, such as personal data, and important
information about the patient’s state of health and diabetic condition. The “SETTINGS” menu is
divided into the following 5 panels.
(The menu bar is on the upper side of the window; the buttons are in a horizontal display.) You can
switch between panels by clicking the “NEXT” tab at the bottom of the screen, or by clicking on the
selected tab at the top.
•
•
•
•
•
PERSONAL DATA
MEASUREMENTS
TIMING
NOTES
MISCELLANEOUS
Switch to full screen mode, and then double click on the “ART OF MEDICAL DIAGNOSTICS.”
Note:
To save any of the settings, the modifications must be accepted or rejected by clicking on the
“SAVE” button or “CANCEL” button. In other cases, the program will send you a warning. These
buttons are hidden until any modifications are made on the page. This applies to all sections of the
program, so please remember this for each modification you make.
15
Lite Link mini USB & Diatransfer 2
16
User manual
Lite Link mini USB & Diatransfer 2
User manual
4.2.1. Personal Data
In the “PERSONAL SETTINGS” panel, you can enter basic information, such as your first name, middle
name, and surname, your mother’s name, and your birth date and sex. None of this information
needs to be added, but it becomes important in the case of a doctor’s revision. It is highly
recommended that you enter your social insurance number (SIN) and address (including city and
street details), also for purposes of revision. The type of diabetes must be entered to facilitate the
program’s calculations. The options are: “Type 1” (Diabetes), “Type 2” (Diabetes), “NONE,” and
“Unknown.”
17
Lite Link mini USB & Diatransfer 2
User manual
If you would like to change your login password, click on the button at the bottom of the screen:
“CHANGE PASSWORD.” A window will appear in which you first enter your old password, and then
enter your new password twice, for confirmation.
If you would like to be supervised by your chosen doctor (such as your GP), an access code will be
needed. This code allows your doctor to access your data after you send it to him/her. To allow this
access, click the “CHANGE ACCESS CODE” button. You need to enter the code given by the doctor in
the pop-up window twice, for confirmation. You can revise the code in the same way. Just type the
new code twice; the old one is no longer needed.
18
Lite Link mini USB & Diatransfer 2
19
User manual
Lite Link mini USB & Diatransfer 2
User manual
4.2.2. Measurement
Use the measurement tab to set the normal ranges of your blood glucose level. The minimum and
maximum values can be entered by moving the sliders.
The normal range is different for each person, and depends on his/her mealtimes. On average, the
normal fasting blood glucose range for a non-diabetic adult is 70-110 mg/dL (3.9-6.1 mmol/l). Onehour after a meal, a normal blood glucose result should be less than 160 mg/dl (8.9 mmol/l).
Please consult your doctor about this.
The Hypoglycemia and the Hyperglycemia ranges can be specified using the same method.
The unit of measurement is optional. It can be specified as mg/dL or as mmol/L. Measurement
results are transferred automatically to the selected unit of measurement. 1 mmol/l is equivalent to
approximately 18 mg/dl. Both units of measurement are widely used.
20
Lite Link mini USB & Diatransfer 2
User manual
4.2.3. Timing
Five mealtimes are normally prescribed for patients with diabetes. These five mealtimes can be
specified in the Timing panel. The program assigns the measurement results’ timing to the specified
mealtime intervals. (This is important, because the measured values for one and a half hours before
a mealtime are calculated differently in the statistics.) This helps to create a more accurate statistical
record of the patient’s condition.
Note:
The program calculates the results before and after meals differently. Please be precise about
setting the mealtimes.
The beginning and end of these five mealtimes can be set by moving the sliders.
Note:
The mealtimes are ordered one after the other and cannot be combined. Mealtime durations are
at least 5 minutes, and at least 5 minutes must have elapsed between two meals.
21
Lite Link mini USB & Diatransfer 2
User manual
4.2.4. Notes
The "NOTES” is the interface for describing the details of the therapy. These details can be written in
the “THERAPY” window, and comments can be added in the “NOTES” window.
22
Lite Link mini USB & Diatransfer 2
User manual
4.2.5. Miscellaneous
When there is malfunction of the software, you can create a report of the problem. By clicking on the
“SAVE ERROR LOG” tab, the software offers you a log in which to save your notes on errors, which
can be sent to our developers. In order to receive feedback, please contact us at this e-mail address:
[email protected]
If there is a serious problem, such as a crash, which stops the running of the program, a warning
window will appear, in which an error report or the logfile can be sent to us.
23
Lite Link mini USB & Diatransfer 2
User manual
4.3 Read device
Use this menu function to upload data from the blood glucose meter through the infrared device
(Lite Link).
1. The Lite Link must be plugged into a USB port on your PC to establish communication
between them. Connect the Lite Link device.
2. Click on the “DOWNLOAD DATA” button in the “READ DEVICE” window.
24
Lite Link mini USB & Diatransfer 2
3.
User manual
The software automatically detects the presence of the connected Lite Link device.
4. Switch the glucose meter to “PC” mode and place it close to the infrared device (at a
maximum distance of 20 cm), as described at the device’s user manual. The data transfer can
be initiated at the glucose meter. Wait patiently while the data is being uploaded.
25
Lite Link mini USB & Diatransfer 2
User manual
5. When the data transfer is complete, the program sends a message: “DATA SUCCESSFULLY
UPLOADED.”
26
Lite Link mini USB & Diatransfer 2
User manual
6. If the PC does not detect the Lite Link, a warning pop-up window appears. If this happens,
remove the device and place it close again, then click on the “DOWNLOAD DATA” button
again. When the PC detects the Lite Link device, the data transfer can begin.
7. If the data transfer is unsuccessful, the program displays an error message.
•
Error messages
o Unknown device. Do you want to send an error report to the manufacturer?
This warning may appear if the PC does not recognize the device.
Please carefully review the list of compatible devices. (See more in
Section 2: Overview of the operating elements, 77 Elektronika blood
glucose meters)
o Corrupt data received. Please try again.
This message appears if there is come communication problem
between your PC and the measuring device, or if there is an
uploading problem. Please check your meter and try again.
27
Lite Link mini USB & Diatransfer 2
8. After a successful data transfer, the glucose meter switches off automatically.
9. The Lite Link can then be removed safely.
28
User manual
Lite Link mini USB & Diatransfer 2
User manual
4.4 Data entry
This tab displays all the recorded data for checking and correcting false measurements. The upper
table lists the devices, and the lower table, the corresponding data. The measurements can be
chosen from this menu, which displays the details in the “DATA VALUES.” Here, the parameters can
be edited. Please make sure that the time setting is correct. If you had a problem with the time
setting on the measuring device, this can be corrected here. Just click on the little calendar icon, and
adjust the timing to make it correct.
29
Lite Link mini USB & Diatransfer 2
User manual
There are seven types of marks to specify the data characteristics:
“MARKER”
If the measurement does not seem right, or may not be correct; for example, control
measurements
“PLAZMA”
Measurement from plasma
“HYPO”
Measurement in the hypo section
“IGNORED”
Unwanted results; the statistics will not include these.
“PREMEAL”
Before-meal mark
“POSTMEAL”
After-meal mark
“SPORT”
Measurement after sports activity
Brief comments, such as notes on measurement modifications or symptoms that accompany a given
measurement can be tagged to each measurement. This is done in the “DESCRIPTION” window.
There is an option in which once can export all data. This is one of the most important features of the
program, as the exported database can be sent to your doctor, who imports and reviews it, and can
also leave comments or therapy tips. (The “THERAPY” and “NOTES” interfaces in the SETTINGS
section are especially designed for this.)
Choose “EXPORT” and save the .d2e file, then send it in an e-mail. The import database is quite
similar; just click “IMPORT” and choose the right file (.d2e format).
30
Lite Link mini USB & Diatransfer 2
User manual
4.5 Statistics
Diatransfer 2 consists of four parts:
•
Blood glucose diary
•
Timeline
•
Daily averages
•
Statistics
These sections can be found side-by-side in a horizontal display at the top of the window. Use the
two sliders above this menu bar for setting the time and the period. With the top slider, you can set
the last day of the review period. With the bottom one, you can adjust the length of the period,
which can vary from 7 to 180 days.
The second table lists the measuring device(s). Here, when you choose a device, the Blood
glucose diary, Timeline, and Statistics underneath show the corresponding values. To display all
the measurement values (from all devices), please do not select any of them. Hold the CTRL
button and click on the marked measurement in order to unmark it.
Note!
It is recommended that one device be used by only one person. If a measuring device is used
by more than one person, the program will not be able to separate the data, which can lead to
incorrect diagnosis.
Note!
The Statistics menu is hidden until the measurements are uploaded.
31
Lite Link mini USB & Diatransfer 2
User manual
4.5.1. Blood Glucose Diary
The blood glucose diary displays the measurement data in a tabular format, similar to typical blood
glucose diaries in a paper format; it displays the times with the measurement results. These values
are already checked, and if necessary, they can be corrected or marked in the “DATA ENTRY” section.
(The program shows the marks added to the results along with the comments.)
The values are color-coded to denote the following ranges:
•
red – hyper,
•
pink – high
•
black – normal
•
yellow - low
•
blue – hypo
These color codes are applied to all sections with statistics. (Daily averages, Statistics)
32
Lite Link mini USB & Diatransfer 2
User manual
If “LO” is displayed as a result after testing, this means that the measured value is too low, and is out
of the measurement range!
If “HI” is displayed as a result after testing, this means that the measured values is too high, and is
out of the measurement range!
In either HI or LO appears, contact your healthcare professional immediately.
Also, if the program displays HI or LO, the measurement is out of the glucose meter’s normal range
and the exact value cannot be displayed, either on the meter or on the computer.
Incorrect high or low results may have serious medical consequences. If your blood glucose is
unusually high (higher than 16 mmol/l) or low (lower than 3 mmol/l), or if you question your results,
repeat the test more carefully using a new strip. Consult your healthcare professional before making
significant changes to your diabetes medication program. Do not ignore physical symptoms.
33
Lite Link mini USB & Diatransfer 2
User manual
4.5.2. Timeline
The results are displayed here in a graphical format. The blood glucose values are located on the
vertical axis. The values can be displayed in units of mmol/L or mg/dL, depending on the unit
settings. (To find the setting, go to: Settings, Measurement, and Glucose Unit). The horizontal axis
represents the time values. The chart can be controlled with the mouse. When you point on a
measurement (rep point on the curve), the parameters are displayed. You will see the actual
measured value, the time, when the measurement was made, and any flags that may be connected
to that value.
The two green horizontal lines define the normal range (as was set in the Settings menu, under
Measurement values). This range includes the values that represent healthy results for the person.
The two horizontal red lines define the adjusted acceptable zone. If a value is outside of this range,
contact your healthcare professional immediately.
The diagram can be enlarged by scrolling with the mouse. It can also be zoomed out in the same way,
by moving backwards. To move the chart to the left or the right just click, hold the button, and drag
the diagram.
34
Lite Link mini USB & Diatransfer 2
User manual
4.5.3. Daily averages
This tab displays the averages, the extreme values, and the deviation of the measurements in a daily
unit, like a logbook.
The measurement results are assigned to the timing settings (Settings/ Timing/ Time blocks). The
program automatically pairs results with the corresponding mealtimes (based on the time setting on
both the measuring device and on the program) Marks can specify these values. For example, the
“PREMEAL” mark automatically assigns it to the appropriate pre-mealtime interval.
35
Lite Link mini USB & Diatransfer 2
User manual
4.5.4. Statistics
On this tab, Diatransfer 2 summarizes the measurement results (including the edited results and
ignoring the marked ones) and calculates the statistics for the specified period. (The period can be
set with the sliders at the top.) These calculations show how many results were evaluated, as well as
the minimum and maximum values, including the mean blood glucose results.
The hypo, hyper, low, high, and normal ranges are displayed in pie chart format with different colors.
The color scheme is the same as was shown earlier, in the “Blood gl. diary” or the “Daily averages”
tabs.
From this information, the software can create report, which can be downloaded and saved in PDF
format. On this report, the heading gives the patient’s name, birthdate, and the time the report was
created. The document itself displays the averages, the deviation, the range limits, and the pie chart
format of the results with a timeline diagram. This report is a great help for your doctor when you
have a medical examination, as it gives him/her a more complete picture of your health status.
First press the “MAKE REPORT” button; then you can download the report as a PDF document. The
PDF report can be easily printed; just click on “Print” or push the “CTRL”+ P” buttons.
36