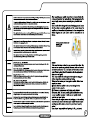
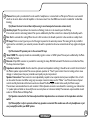
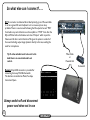
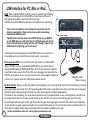
1
STUDIO LIVE
Welcome
Dear Player,
Thank you very much for purchasing your new Laney product and becoming part of the worldwide Laney
family. Each and every Laney unit is designed and built with the utmost attention to care and detail, so I
trust yours will give you many years of enjoyment.
Laney products have a heritage which stretches back to 1967 when I first began building valve amplifiers in
my parent’s garage.
Since then we have moved on from strength to strength developing an extensive range of guitar, bass,
public address, multi instrument and keyboard amplification products along with a list of Laney endorsees
that includes some of the world’s most famous and respected musicians.
At the same time we believe we have not lost sight of the reason Laney was founded in the first place - a
dedication to building great sounding amplification for working musicians.
Warm Regards,
Lyndon Laney Chairman & Founder
2
Important Safety Instructions
WARNING: When using electrical products, basic cautions should always be followed, including the following:
1. Read these instructions.
2. Keep these instructions safe.
3. Heed all warnings.
4. Follow all instructions.
5. Do not use this apparatus near water.
6. Clean only with a dry cloth.
7. Do not block any of the ventilation openings. Install in accordance with manufacturer’s instructions.
8. Do not install near any heat sources such as radiators, heat registers, stoves or other apparatus (including amplifiers) that produce heat.
9. An apparatus with Class I construction shall be connected to a mains socket outlet with a protective connection. Do not defeat the safety purpose of the polarized or
grounding-type plug. A polarized plug has two blades with one wider than the other. A grounding type plug has two blades and a third grounding prong. The wide blade or
third prong is provided for your safety. If the provided plug does not fit into your outlet, consult an electrician for replacement of the obsolete outlet.
10. Protect the power cord from being walked on or pinched, particularly at plugs, convenience receptacles, and the point they exit from the apparatus.
11. Only use attachments/accessories provided by the manufacturer.
12. Use only with a cart, stand, tripod, bracket, or table specified by the manufacturer, or sold with the apparatus. When a cart is used, use caution when moving the
cart/apparatus combination to avoid injury from tip-over.
13. The mains plug or appliance coupler is used as the disconnect device and shall remain readily operable. The user should allow easy access to any mains plug, mains
coupler and mains switch used in conjunction with this unit thus making it readily operable. Unplug this apparatus during lightning storms or when unused for long periods
of time.
14. Refer all servicing to qualified service personnel. Servicing is required when the apparatus has been damaged in any way, such as when power-supply cord or plug is
damaged, liquid has been spilled or objects have fallen into the apparatus, the apparatus has been exposed to rain or moisture, does not operate normally, or has been
dropped.
15. Never break off the ground pin. Connect only to a power supply of the type marked on the unit adjacent to the power supply cord.
16. If this product is to be mounted in an equipment rack, rear support should be provided.
17. Note for UK only: If the colours of the wires in the mains lead of this unit do not correspond with the terminals in your plug‚ proceed as follows:
a) The wire that is coloured green and yellow must be connected to the terminal that is marked by the letter E‚ the earth symbol‚ coloured green or
coloured green and yellow.
b) The wire that is coloured blue must be connected to the terminal that is marked with the letter N or the colour black.
c) The wire that is coloured brown must be connected to the terminal that is marked with the letter L or the colour red.
18.This electrical apparatus should not be exposed to dripping or splashing and care should be taken not to place objects
containing liquids, such as vases, upon the apparatus.
19. Exposure to extremely high noise levels may cause a permanent hearing loss. Individuals vary considerably in susceptibility to
noise-induced hearing loss, but nearly everyone will lose some hearing if exposed to sufficiently intense noise for a sufficient time.
The U.S. Government’s Occupational Safety and Health Administration (OSHA) has specified the following permissible noise
level exposures: According to OSHA, any exposure in excess of the above permissible limits could result in some hearing loss.
Earplugs or protectors to the ear canals or over the ears must be worn when operating this amplification system in order to
prevent a permanent hearing loss, if exposure is in excess of the limits as set forth above. To ensure against potentially dangerous
exposure to high sound pressure levels, it is recommended that all persons exposed to equipment capable of producing high
sound pressure levels such as this amplification system be protected by hearing protectors while this unit is in operation.
3
4
Introduction
+
+
+
+
+
+
+
+
+
+
+
+
+
+
+
5
Design Features:
Hybrid Tube Bass Amplifier, "Loaded with a high voltage ECC83 tube for natural tube warmth and
compression, along with a wide dynamic range, forming the source of the Nexus-SL’s tone”.
Up to a 1000Watts of controllable sound dynamics from twin power amplifiers & tube stage, with
individual speaker outputs allowing a wide range of cabinets to be used without fear of overload.
Ease of use with simple ergonomic fascia layout.
Built in, Laney designed, high quality digital bass effects for sound enhancement.
USB-DAW connection facility with Re-Amp for all your recording requirements.
Effects loop facility for outboard processors.
DSP, Compressor, Tilt, Touch functions.
Professional balanced DI facilities to connect to any PA desk.
Headphone facility for silent practice.
Auxiliary input for backing tracks.
Full protection against any load errors or over temperature with fast auto re-set.
Built in automatic fan cooling in high ambient temperatures.
Universal mains input for worldwide usage without the need to change anything except your power
cord.
Small, rugged, all steel, light weight, rack mountable construction with carry bag, remote 4way
footswitch control and rack adaptor wings included.
STUDIO LIVE
Professional Hybrid Tube Bass Amplification
6
Up & running......
WITH TWO (8 Ohm)
EXTENSION CABINETS
Guitar
N410
www.laney.co.uk
HORN
-COM
N
FULL
ON
"J
ACK
B
O
HALF
OFF
1/4
POWER RATING:
600 WATTS RMS
8 OHMS
N
N410
"J
ACK
S P
O
E AK
LINK
-COM
B
O
N410
INPUT
S P
O
E AK
N115
1/4
SERIAL NUMBER
MODEL
N410
L Z B1 2 3 4
DESIGNED AND ENGINEERED IN THE UK BY LANEY
MADE IN CHINA
www.laney.co.uk
HORN
FULL
ON
HALF
OFF
1/4
POWER RATING:
400 WATTS RMS
8 OHMS
N115
"J
ACK
N
-COM
B
O
LINK
S P
O
E AK
N115
-COM
N
"J
ACK
B
O
S P
O
E AK
INPUT
1/4
SERIAL NUMBER
MODEL
N115
L Z B1 2 3 4
MADE IN CHINA
7
DESIGNED AND ENGINEERED IN THE UK BY LANEY
WITH A SINGLE EXTENSION CABINET
Before connecting a cabinet, check your settings are correct.
Impedance selector switch: Used to select the optimum load impedance matching. It
should be set to match the total load of the Master speaker output socket. This ensures
optimum operation of “Touch” panel control. Incorrect setting will not cause damage or
reduced power but your potential sound quality may be compromised.
TIP: Speakers connected to the Slave output and their impedance have no
relevance to this switch.
Guitar
www.laney.co.uk
HORN
N
-COM
INPUT
FULL
"J
ACK
B
O
N210
S P
O
E AK
HALF
ON
OFF
1/4
POWER RATING:
300 WATTS RMS
8 OHMS
N210
"J
ACK
N
-COM
B
O
LINK
S P
O
E AK
1/4
SERIAL NUMBER
MODEL
N210
L Z B1 2 3 4
DESIGNED AND ENGINEERED IN THE UK BY LANEY
MADE IN CHINA
www.laney.co.uk
HORN
N
-COM
INPUT
FULL
"J
ACK
B
O
or N115
S P
O
E AK
HALF
ON
OFF
1/4
POWER RATING:
400 WATTS RMS
8 OHMS
N115
"J
ACK
N
-COM
B
O
LINK
S P
O
E AK
1/4
SERIAL NUMBER
MODEL
N115
L Z B1 2 3 4
DESIGNED AND ENGINEERED IN THE UK BY LANEY
MADE IN CHINA
www.laney.co.uk
B
HORN
-COM
N
FULL
ON
"J
ACK
INPUT
S P
O
E AK
HALF
OFF
1/4
POWER RATING:
600 WATTS RMS
8 OHMS
N
N410
"J
ACK
S P
O
E AK
LINK
-COM
B
O
or N410
O
Speaker Connectors: These connectors are independently coupled to two separate
internal power amplifiers. One or both can be used at the same time. When using only
one output connector always use the
“Master” one. This will ensure all panel
controls are fully functional and the best
sounds are achieved. The Slave output
socket tracks exactly the Master output.
The minimum recommended load on
each socket is 4 Ohms. Speakon
connectors are advised for connecting
your cabinets but ¼” speaker jacks
and cable can be used. (Do not use
microphone or instrument cables).
1/4
SERIAL NUMBER
MODEL
N410
L Z B1 2 3 4
MADE IN CHINA
DESIGNED AND ENGINEERED IN THE UK BY LANEY
8
WITH MULTIPLE (8 Ohm)
EXTENSION CABINETS
Guitar
N410
N410
N210
N115
www.laney.co.uk
www.laney.co.uk
"J
ACK
OFF
INPUT
N
B
B
LINK
N
N410
L Z B1 2 3 4
DESIGNED AND ENGINEERED IN THE UK BY LANEY
N410
www.laney.co.uk
N410
L Z B1 2 3 4
DESIGNED AND ENGINEERED IN THE UK BY LANEY
www.laney.co.uk
N
FULL
ON
HALF
OFF
1/4
B
N
N210
L Z B1 2 3 4
DESIGNED AND ENGINEERED IN THE UK BY LANEY
N115
-COM
-COM
"J
ACK
N210
SERIAL NUMBER
N115
"J
ACK
O
B
O
1/4
LINK
S P
O
E AK
S P
O
E AK
9
HORN
B
INPUT
-COM
OFF
"J
ACK
-COM
"J
ACK
B
O
ON
MODEL
MADE IN CHINA
O
HORN
FULL
HALF
POWER RATING:
400 WATTS RMS
8 OHMS
N
N210
SERIAL NUMBER
MODEL
1/4
POWER RATING:
300 WATTS RMS
8 OHMS
LINK
1/4
MADE IN CHINA
S P
O
E AK
S P
O
E AK
N
N410
"J
ACK
-COM
"J
ACK
N410
SERIAL NUMBER
MADE IN CHINA
INPUT
OFF
-COM
O
1/4
MODEL
N410
ON
O
N
S P
O
E AK
LINK
FULL
HALF
1/4
POWER RATING:
600 WATTS RMS
8 OHMS
S P
O
E AK
Tip:This amplifier is safe to operate without any
speakers connected.This enables use with only
headphones or just as a preamplifier within your DAW
system.
HORN
B
ON
-COM
-COM
FULL
HALF
1/4
"J
ACK
O
B
HORN
O
N
S P
O
E AK
S P
O
E AK
INPUT
POWER RATING:
600 WATTS RMS
8 OHMS
1/4
SERIAL NUMBER
MODEL
N115
L Z B1 2 3 4
MADE IN CHINA
DESIGNED AND ENGINEERED IN THE UK BY LANEY
Front Panel Controls
Power Switch: This fully disconnects the mains power to the amplifier. On switching on, the standby light will flash until the standby
switch is also operated, then the light will glow continuously to show that the amplifier is ready to use. From cold the amplifier may take
up to 60 seconds to fully operate whilst the tubes are heating up to full running temperature.
Standby Switch: This switch puts the amplifier into a standby mode where the tube circuits remain on and ready to operate instantly.
In standby mode the power amplifier is shut and some other functions like DI (when Output Sourced), USB (Right Channel Record),
Phones (Amp Mode) are also closed. When this function is activated an adjacent light flashes continuously. Useful during breaks in
sessions where instant re-start is required.
Hi and Lo input Jacks: These are only useable individually. They are high impedance (1Meg) inputs. The Hi socket is for high output
type guitars. (Will include most active types). The Lo socket is for low signal output type guitars. (Most passive types with standard
pickups). Either socket may be used for the best sound and drive level from your guitar.
Gain Control: This is used to adjust the level of clean or drive sound you require, in conjunction with the Peak Indicator.
Peak Indicator: This shows when tube compression/distortion is occurring. If you want a clean undistorted sound adjust the gain
control to only just illuminate the peak light when playing the very loudest notes. If you want more tube compression and warmth adjust
the gain so that the light stays on for more of your playing. As the gain is increased it may be necessary to reduce the Volume control for
your desired sound level. At high levels of gain tube clipping compression will occur, which can be desirable for some types of playing. Try
the gain at various positions to get your optimum sound. Backing off the volume on your guitar will reduce the compression and
distortion characteristics.
Comp Indicator: Shows when the on board compressor is actively compressing your sound. (Gain Control must be pulled out to
operate). At low settings the light will only flash on peaks showing that the amount of compression is only slight. At higher Gain settings
the light will illuminate for longer showing more compression is taking place. The amount of compression can also be adjusted via your
guitar volume control or playing weight.
10
Shape Switch: This is a four position rotary switch; position one is a bypass or off condition, position two, three and four apply 3
different pre-shaped EQ sounds. When selected they may be turned on and off remotely via the FS4-NSL footswitch. A light adjacent to
the switch shows when it is active.
Bass Control: This control has a centre off position (12 o'clock) where it has no effect on your sound. Turning the control clockwise
increases the level of low frequency bass notes. Turning the control anti-clockwise decreases the level of low frequency bass notes
Sweep Control: This adjusts the frequency at which the Middle control operates. It ranges from 100Hz to 5kHz and is “low Q” to
remain musical at all settings.
Middle Control: This control has a centre off position (12 o'clock) where it has no effect on your sound. Turning it clockwise increases
the mid frequencies selected by the Sweep control. This can add punch to your sound or extra clarity in on stage environments. Turning
anticlockwise decreases the mid frequencies selected by the Sweep control. This can be used to adjust the tonal quality of your guitar
sound.
Treble Control: This control has a centre off position (12 o'clock) where it has no effect on your sound. Turning the control clockwise
will increase the amount of high frequencies in your sound. Turning anti-clockwise will reduce the amount of high frequencies in your
sound.
General EQ Notes: Start with everything flat then adjust the EQ for your desired sound. Use the controls sparingly and
avoid excessive amounts of lift or cut which invariably give poor overall sound.
RETURN/LEFT
RETURN
MONO/RIGHT
Volume Control: Adjusts the maximum output power of the amplifier. At zero the amplifier is silent. As the control is turned clockwise
the maximum power available is increased to its maximum at 9-10. This control should be used in conjunction with the Gain control
when distorted or compressed sounds are required. (Hi Volume settings with low Gain settings will give loud clean sounds. Lo Volume
settings with Hi Gain settings will give compressed/distorted sounds). Distortion created is generated from the ECC83 tube for natural
musical sounds under all conditions. Pulling out the Volume control will mute all the guitar signal paths with the exception of the
Tuner/Raw output socket on the rear panel and the Raw signal to the USB left channel. When the Mute is operated the adjacent light will
flash continuously. This function may also be controlled via the FS4-NSL footswitch. Aux In will continue to operate.
Tip: to operate via the remote FS4-NSL the Volume control must be in the pulled out Mute position.
Tilt: This control has a centre neutral position. Turning the control clockwise increases the overall mid to high frequencies and decreases
the lows thereby giving your sound more presence, which can be useful for cutting through in live band situations.
Turning the control anticlockwise reduces the overall mid to high frequencies and increases the lows making your overall sound rounder.
(This control operates within the power section so has no effect on the DI output unless “Source” switch is set to Output but will be
11
present on the amplifier signal sent to the USB right channel record, the headphones and the connected speakers).
Touch: This control has a centre neutral position. Turning the control clockwise makes your sound more open with rounded resonant
bass and extended highs. It also gives the amplifier more touch sensitivity. Turning the control anticlockwise makes the sound tighter and
faster. This control has only a subtle effect on tonal balance and in general is only something the player can feel as he plays. There are
many factors including the speakers/venue and playing style which can determine where this control should be set.
This control has no effect on the DI output unless “Source” switch is set to Output but will appear on the USB right channel record, the
headphones and the speakers.
Note: (For operation of this control at least one speaker must be attached to the Master output socket and the impedance
switch set to match it).
Pull Tight: Pull out the touch control to speed up the tube touch response of your sound making it more percussive and a little less
warm. A light shows adjacent to this control when operated.
Tip: spend a little time experimenting with these controls to find the best results.
Interval: This control has a centre off position where it has no effect on your sound and the adjacent light will be extinguished. Turning
the control clockwise the light will illuminate and increasing amounts of 5ths are added to your sound. Turning the control anticlockwise
will illuminate the light and increasing amounts of Octave down signal will be added to your sound. These features are fully polyphonic
with perfect tracking retained at all times.
Tip:This function can be remotely switched via the FS4-NSL footswitch.
Focus: This control is used in conjunction with the Interval control. It has a centre position where it has a nominal effect on your sound.
Turning the control clockwise will increase the added high frequency harmonics of your sound giving a wide range synth sound. Turning
the control anti-clockwise will reduce the higher harmonics subjectively increasing the low end.
Tip:This control is most noticeable on 5ths operation on Octave down it is more subtle
Space: This control has a centre off position where it has no effect on your sound and the adjacent light will be extinguished.
Turning the control anticlockwise will illuminate the light adjacent to the control and add increasing amounts of large hall reverb sound.
Turning the control clockwise will illuminate the light adjacent to the control and add increasing amounts of chorus to your sound.
Tip:This function may be turned on and off via the FS4-NSL footswitch.
12
Rear Panel Controls
SPEAKO
N
SPEAKO
N
1/4
” JACK-CO
BO
M
1/4
BO
M
L Z B1 2 3 4
” JACK-CO
10
13
Universal Power Inlet: This socket accepts a standard IEC grounded connector supplied with the product.
The unit must be earthed under all circumstances. Input voltages from ~100V to ~240V 50-60Hz can be used around the
world without need for any fuse or voltage changes to the product.
DI:This connector is a balanced direct feed primarily go to a PA sound desk. It carries a ground lift switch adjacent to it to
remove any hum loop problems. There is a source switch allowing the DI output to be sent “PRE” from before any control
functions on the amplifier or “POST” from after the EQ and FX but before the Volume control and “Output” which is post the
Volume and all other control functions. This gives the option to send all of the sound including output stage dynamics directly
to the mix, avoiding the need for microphones. To allow suitable levels to be sent to the desk there is an associated send Level
control.
USB:There is standard USB 2.0 audio in/out connector which supports the following:
1) Ability to simultaneously record the RAW untreated sound to the left channel and the full amplifier sound to the right
channel.
2) Ability to play back USB stereo information to headphones for monitoring.
Tip: Can then be linked from the headphone output back into the Auxiliary input (5) with a 3.5mm to 6.5mm
stereo jack lead allowing simultaneous USB play back.
Tip:This feature will also allow external DSP effects on your DAW to use the RAW signal as a left input then the
effected signal sent directly back to the Aux input for mixing with the amp through signal all via US and without
affecting your direct sound.
3) Re-Amp Send socket allowing the recorded RAW channel to be sent back to the amplifier input via a standard instrument
jack lead for re-processing. (See Page 17 for further explanation).
Phones: Stereo jack is provided which can be used for headphones or a stereo feed to a PA system. There is a source switch
which can be set to listen to the full amplifier or the stereo return from the USB. A level control is included for comfortable
listening.
Tip:(Ensure the level is turned down before using to avoid unexpected excessive volume levels)
Auxiliary Input: This input allows the connection of backing tracks etc. to be mixed in post the FX loop.
It has a level control to aid mixing balance. This input is unaffected by the Mute control but is silenced by the Standby switch.
Fan: Built in automatic fan cooling. When the unit is first turned on, the fan will operate for a few seconds as a safety check.
FX Loop: This is an insert type loop so all of the signal is passed to the external processor. The mixing of the dry and effect
signal must be controlled in your external processor. A switch is provided to allow two nominal levels of loop signal and a bypass
option.
Tip:The internal FX operate prior to the external FX loop.
Tuner/ RAW: The output jack sends an untreated/dry signal to a tuner or DAW system. This output is unaffected by the Mute
or Standby functions.
Remote: A 5pin DIN connector is provided for connecting the Laney FS4-NSL footswitch. The functions controlled are Mute,
Pre-shape, Interval and Space.
10 Impedance selector switch: Used to select the optimum load impedance matching. It should be set to match the total load of
the Master speaker output socket. This ensures optimum operation of “Touch” panel control. Incorrect setting will not cause
damage or reduced power but your potential sound quality may be compromised.
Speaker Connectors: These connectors are independently coupled to two separate internal power amplifiers. One or both
can be used at the same time. When using only one output connector always use the “Master” one. This will ensure all panel
controls are fully functional and the best sounds are achieved. The Slave output socket tracks exactly the Master output.
The minimum recommended load on each socket is 4 Ohms. Speakon connectors are advised for connecting your cabinets but
¼” speaker jacks and cable can be used. (Do not use microphone or instrument cables). The maximum output available at each
socket is ~70Volts Peak and 30Amps Peak.
Tip: Speakers connected to the Slave output and their impedance have no relevance to the impedance selection
switch.
Tip:This amplifier is safe to operate without any speakers connected.This enables use with only headphones or just
as a preamplifier within your DAW system.
14
So what else can I connect?......
DI: This connector is a balanced direct feed primarily go to a PA sound desk.
It carries a ground lift switch adjacent to it to remove any hum loop
problems. There is a source switch allowing the DI output to be sent “PRE”
from before any control functions on the amplifier or “POST” from after the
EQ and FX but before the Volume control and “Output” which is post the
Volume and all other control functions. This gives the option to send all of
the sound including output stage dynamics directly to the mix, avoiding the
need for microphones.
Tip:To allow suitable levels to be sent to the
desk there is an associated send Level
control.
Mixer Desk
or
Powered Cab
Footswitch
Remote: A 5pin DIN connector is provided for
connecting the Laney FS4-NSL footswitch.
The functions controlled are Mute, Pre-shape,
Interval and Space.
Always switch off and disconnect
power cord when not in use
15
Phones, FX procesor or Tuner....
Phones: Stereo jack is provided which can be used for headphones
or a stereo feed to a PA system. There is a source switch which can
be set to listen to the full amplifier or the stereo return from the
USB. A level control is included for comfortable listening.
Tip: Ensure the level is turned down before using to avoid
unexpected excessive volume levels.
FX Loop: This is an insert type loop so all of the signal is
passed to the external processor. The mixing of the dry and
effect signal must be controlled in your external processor.
A switch is provided to allow two nominal levels of loop
signal and a bypass option.
Tip:The internal FX operate prior to the external
FX loop.
Tuner/ RAW: The output jack sends an
untreated/dry signal to a tuner or DAW system.
This output is unaffected by the Mute or Standby
functions.
FX Unit
Tuner
Headphones
16
USB interface for PC, Mac or iPad...
USB: There is standard USB 2.0 audio I/O connector supporting the following:
1. Ability to simultaneously record the RAW untreated sound to Channel 1
(left) and the full amplifier sound to the channel 2 (right).
2. Ability to play back USB stereo information to headphones for monitoring.
Tip: Can then be linked from the headphone output back into the
Auxiliary input with a 3.5mm to 6.5mm stereo jack lead allowing
simultaneous USB play back.
Tip:This feature will also allow external DSP effects on your DAW to
use the RAW signal as a left input then the effected signal sent directly
back to the Aux input for mixing with the amp “through” signal all via
USB and without affecting your direct sound.
3. Re-Amp Send socket allowing the recorded RAW channel to be sent back to
the amplifier input via a standard instrument jack lead for re-processing.
Record out via USB: To run into iPad or iPad mini connect via a Camera USB
adaptor, PC/MAC connects via standard A-B USB cable, for use with the likes of
Garage Band ®, Audacity ®, MixPad Audio Mixer ®, Pro Tools and similar. It should be
noted that the audio output of an iPad or iPad mini is disengaged and returned via the
USB. This can be picked up via a rear panel monitor switch on the amplifier headphones
in stereo, or if required, routed into a PA system/powered cabinets.
iPad, iPad mini®,
Tablet or Laptop
Re-Amp Facility: During recording the amplifier processed signal is sent to the right hand channel. The left hand channel carries the
guitar signal totally unprocessed. On an iPad using Garage Band if the track is recorded in stereo then copied with one track panned
left and the other track panned right, then both raw and processed signals are available independently.
This allows for the re-amplifying of a sound that may have been over processed initially. To re-amp via Garage Band on the iPad, solo
the original channel and record a new one with the link in place from the rear re-amp socket and the guitar input. The newly
processed signal will now appear on the right channel with the guitar direct signal again on the left. Other effects may be added into
the link cable but the guitar original sound will not be recorded. It will instead record to the left channel the sound directly after the
effects with no amplifier and the fully processed signal after the amplifier and effects on the right.
Further explanation, videos, etc can be found at www.laney.co.uk
17
Block Diagram
RAW / TUNER
HI INPUT
MUTE
GAIN
SUBSONIC
FILTERS
COMP
SHAPE
EQ
DSP
LOW INPUT
MAIN OUTPUT
N
BO
M
SPEAKO
1/4
500W
SEND
” JACK-CO
FX
LOOP
N
BO
M
SPEAKO
500W
TUBE STAGE
RETURN
1/4
BYPASS
0DB
-10DB
” JACK-CO
SLAVE OUTPUT
LEVEL
AUX
INPUT
AUX LEVEL
RIGHT
SEND
LEFT
SEND
RIGHT
RETURN
USB
PHONES
LEFT
RETURN
SOURCE
REAMP SEND
GROUND LIFT
PRE
POST
LEVEL
DIRECT
OUT
OUTPUT
EXTERNAL REAMP LINK CABLE
18
Tube Amp Tips
Tube amplifiers generally sound much warmer/sweeter than solid state transistor amplifiers but they also need a little more
respect due to the fragile glass tubes. The Nexus-SL uses a specially selected ECC83/12AX7 High Voltage preamp tube
which should give you years of trouble free service, however like all tube amps; it is important to treat it with a certain amount
of care. Use the following steps as a guide for how to take care of your amplifier:
■ Take care when moving the amplifier. Tubes are fragile glass components, they can easily be damaged if thrown in and
out of vans.
■ Allow the amplifier to warm up to room temperature before switching it on: the sudden thermal shock can crack a cold
glass tube enclosure, plus any moisture is bad news around high voltage electronics.
■ After playing, allow the amplifier to cool down before moving. Hot tubes are more fragile than cool ones.
■ Always use good quality loudspeaker cables: instrument cables are not capable of handling the load requirements of the
loudspeaker and can short out.
A tubes life expectancy is based upon a number of factors which include operating temperature, how hard and how often it is
played, vibration due to travel, etc. Tubes should be changed in your amplifier if you notice any deterioration in your
amplifiers sound or performance. Otherwise, they need not be changed at any regular interval.
Typical problems with preamp tubes can be crackly noise, hiss, hum, and microphony. If they fail or exhibit reduced
performance, preamp tubes can simply be swapped out with no further action required.
The user should not attempt to service this product.
Method of replacing tubes for Qualified Service Engineers
To change a tube, firstly switch off and unplug the amplifier from the mains supply. Wait for the tubes to cool down. Remove
the top cover. The Preamp tube is protected with a screen can; to remove, push down and twist the can anti clockwise and
then pull up. The tube can now be gently pulled out. Take care when inserting the new tube to make sure all pins are
correctly aligned. Replace the top cover before connecting to the mains supply.
19
Rack Mounting
Ventilation:
Ensure the amplifier is well ventilated and that the ventilation slots in the top, bottom & sides are not obstructed in any way.
Avoid dropping anything in through the vents especially liquids of any kind. If this should happen turn off the product and disconnect from
the power supply immediately and leave to dry out for at least 24hrs. Seek help from a qualified service engineer.
Rack Wing 008496
M4 x 10mm Screw 008497
1U
Choice of
mounting positions
1U
Rack Mounting:
Using the included Rack Wings, the chassis may be fitted into a standard 2U sized slot in a 19” rack unit.The wings are provided with a
choice of mounting holes to allow the fascia to be flush with or recessed into the rack mounts. Only use the supplied mounting screws to
attach the wings to the amplifier, as longer items could cause internal damage.
Ventilation must also be considered when rack mounting and adequate provisions made.We recommend that a gap no less than a 1U slot
is provided on top and underneath the amplifier to provide adequate air flow for cooling.
20
Specifications
Operating Voltage Range:
Average power consumption:
Power Output:
Load Impedance:
Output Voltage:
Input Impedance:
Input Overload:
Input Sensitivity:
FX Loop Sensitivity:
USB:
Unit Dimensions:
Weight:
Carton Contents:
Nexus-SL
Mains Lead
Carry Bag
Rack Wing & Fasteners
User Manual
FS4-NSL Footswitch & Cable
21
~100V to ~240V 50-60Hz.
200W(Measured at 1/8th continuous output power)
2x500W into 4 Ohms. 2x250W into 8 Ohms.
1x4-16 Ohms, 2x4-16 Ohms.
2x~70V Peak.
1MegOhm & 100pF.
Hi Input =>~6V Lo Input >~3V.
Lo Input/ EQ Flat/Gain Max/Volume Max =~15mV
0dBu/-10dBu (Nominal dependant on control settings)
44.1kHz Standard Slave CODEC (PC/MAC/iPad compatible)
H88,W428,D285
5.5Kg (Unit) 11Kg (Packed)
STUDIO LIVE
Legal
FCC Compliancy Statement
This device complies with Part 15 of the FCC rules.
Operation is subject to the following two conditions:
1)
This device may not cause harmful interference
2)
This device must accept any interference received, that may cause undesired operation.
Warning: Changes or modification to the equipment not approved by Laney can void the user's authority to use the equipment.
Note: This equipment has been tested and found to comply with the limits for Class B digital device, pursuant to Part 15 of the FCC
Rules. These limits are designed to provide reasonable protection against harmful interference in a residential installation. This
equipment generates, uses and can radiate radio frequency energy and if not installed and used in accordance with the instructions,
may cause harmful interference to radio communications. However, there is no guarantee that interference will not occur in a
particular installation. If this equipment does cause harmful interference to radio or television reception, which can be determined by
turning the equipment off and on, the user is encouraged to try and correct the interference by one or more of the following
measures.
!Reorient or relocate the receiving antenna.
!Increase the separation between the equipment and receiver.
!Connect the equipment into an outlet on a circuit different from that to which the receiver is connected.
!Consult the dealer or an experienced radio/TV technician for help
-------------------------------------------------------------------------------This product conforms to the requirements of the following European Regulations, Directives & Rules:
CE Mark (93/68/EEC), Low Voltage 2006/95/EC, EMC (2004/108/EEC),
RoHS (EU2002/95/EC), WEEE (EU2002/96/EC)
--------------------------------------------------------------------------------In order to reduce environmental damage, at the end of its useful life, this product must not be disposed of along with normal
household waste to landfill sites. It must be taken to an approved recycling centre according to the recommendations of the WEEE
(Waste Electrical and Electronic Equipment) directive applicable in your country.
--------------------------------------------------------------------------------Windows is a registered trademark of Microsoft Corporation in the United States and other countries.
Mac, Mac OS & iPad are trademarks of Apple Inc., registered in the U.S. and other countries.
Audacity is a trademark of Dominic Mazzoni
MixPad Audio Mixer is a trademark of NCH Software, Inc
Pro Tools is a trademark registered in the United States by Avid Technology, Inc.
Speakon is a trademark of Neutrik®AG.
--------------------------------------------------------------------------------(USB2.0 is compatible with Windows XP ® operating system, Windows 7 ® operating system & Windows 8 ® operating system. Also
compatible with Mac ® & iPad ® 1-3 via camera USB adaptor, iPad ® 4 & iPad Mini ® via Lightning-USB camera adaptor cable.)
22