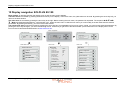
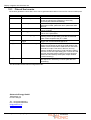
1
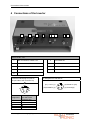
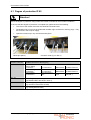
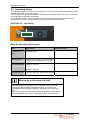
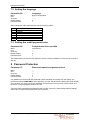
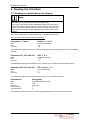
Solutronic Energy GmbH Küferstrasse 18 D-73257 Köngen Fon +49 (0) 70 24-9 61 28-0 Fax +49 (0) 24-9 61 28-50 www.solutronic.de SOLPLUS 80 – 120 User Manual SOLPLUS 80 – SP120 User Manual Firmware: 1.45 RS / 2014-04 Version: A1, Subject to change without prior notice Contents SOLPLUS 80 – 120 User Manual ........................................................................................................... 1 1 Notes About The User Manual......................................................................................................... 4 1.1 Scope ......................................................................................................................................... 4 1.2 More information......................................................................................................................... 4 1.3 Abbreviations.............................................................................................................................. 4 1.4 Symbols used in this document.................................................................................................. 5 2 Safety ............................................................................................................................................... 6 2.1 Safety in general......................................................................................................................... 6 2.2 Intended use............................................................................................................................... 6 2.3 Safety instructions ...................................................................................................................... 6 2.4 Non-observance of this User Manual ......................................................................................... 7 2.5 Nameplate .................................................................................................................................. 8 2.5.1 Explanation of the symbols used on the nameplate .......................................................... 9 3 Introduction..................................................................................................................................... 10 4 Connections of the Inverter ............................................................................................................ 11 4.1 Degree of protection IP 65 ....................................................................................................... 12 5 Operating the Inverter .................................................................................................................... 13 5.1 Switching the inverter on and off .............................................................................................. 13 5.2 Operating states ....................................................................................................................... 14 6 Using The Display .......................................................................................................................... 15 6.1 Functions of the controls .......................................................................................................... 15 6.2 Using the display controls ........................................................................................................ 16 7 Checking The Default Settings....................................................................................................... 16 7.1 Setting the date and time ......................................................................................................... 16 7.2 Setting the language................................................................................................................. 17 7.3 Setting the credit payment value .............................................................................................. 17 8 Password Protection ...................................................................................................................... 17 8.1 Customised protection of the inverter settings ......................................................................... 18 9 Reading Out Yield Data.................................................................................................................. 19 9.1 Reading out yield data on the display ...................................................................................... 19 9.2 Submenus: ............................................................................................................................... 21 9.2.1 Slave data ........................................................................................................................ 21 9.2.2 Installation data................................................................................................................ 21 9.2.3 Annual energy logger....................................................................................................... 22 10 Main Menu................................................................................................................................ 22 10.1 Setting parameters.............................................................................................................. 22 11 Communication Ports ............................................................................................................... 23 11.1 Communicating with several inverters by means of the master-slave network ................... 23 11.2 Ethernet and web server ...................................................................................................... 24 11.3 SOLPLUS+ communication software................................................................................... 24 12 Data Logger.............................................................................................................................. 25 12.1 Resetting to default settings................................................................................................. 26 13 Other Parameters ..................................................................................................................... 26 14 Maintenance and Cleaning....................................................................................................... 27 14.1 Cleaning the cooling fins ...................................................................................................... 27 14.2 Cleaning the display............................................................................................................. 27 15 Display navigation SOLPLUS 80-120 ...................................................................................... 28 15.1 Files of the inverter............................................................................................................... 29 SP80-120_User Manual_A1_EN_2014-04-24.doc 3/29 Notes about The User Manual 1 Notes about The User Manual Thank you for deciding to buy a SOLPLUS inverter from Solutronic Energy. This manual describes how to user your SOLPLUS inverter. Please keep it somewhere where you have ready access to it whenever you need to. Please comply at all times with the safety precautions we refer to in this manual. In order to keep the description short, the section on communication deals mainly with the details of display communication. For all other means of communication, reference is made to the relevant manuals. You can carry out all parameter settings described here using the respective means of communication available. Note: The password level of the safety-relevant parameters has changed from FW 2.65. Please refer to the current parameter list, which is available on the website SOLUTRONIC. 1.1 Scope This User Manual applies to the following Solutronic inverters: SOLPLUS 80, SOLPLUS 100 and SOLPLUS 120 1.2 More Information More information on how to operate your new inverter can be found on the accompanying CD and on our download page at www.solutronic.de The CD contains the following documents and software: SP100 – SP120 Installation Instructions DimenSOL+ dimensioning tool (program for designing SOLPLUS installations) SOLPLUS+ communication software (for the PC) and user manual Instructions for master-slave network/yield monitoring Instructions for Ethernet browser SOLPLUS inverters have been developed, manufactured and tested with great care and incorporate the very latest technology. Our manufacturing procedures are in accordance with the stipulations of ISO 9001. If you encounter any problems or have any questions, please do not hesitate to get in touch with us. 1.3 Abbreviations The following abbreviations are used in this manual: SOLPLUS+ DC AC IGBT EMV Read-out and monitoring software for use with all Solutronic inverters Direct current (direct voltage): electrical value on the input side of the inverter Alternating current (alternating voltage): electrical value on the output side of the inverter Photovoltaic Generator: interconnection of several solar modules to form a string or a number of parallel strings. Insulated-gate bipolar transistor Electromagnetic compatibility Password level -1 Password level 1 Password level 2 Passwort Level 3 Passwort Level 4 measured value, cannot be changed client installer Safety Master PV Generator SP80-120_User Manual_A1_EN_2014-04-24.doc 4/29 Notes about The User Manual Solutronic Energy GmbH Küferstrasse 18 D-73257 Köngen Tel.: 07024/96128-0 Fax: 07024/96128-50 [email protected] www.solutronic.de 1.4 Symbols used in this document Please read and observe the following safety instructions in this manual. The danger classes describe the risks of non-observance of the safety instructions. (The safety instructions describe the following danger classes per ANSI.) Attention! "Attention!" denotes a warning that, if not observed, can result in property damage! Caution! "Caution!" denotes a warning that, if not observed, can result in personal injury! Warning! "Warning!" denotes a warning that, if not observed, can result in death or serious injury! Danger! "Danger!" denotes a warning that, if not observed, will result in death or serious injury! Note Useful information and tips to help you operate the SOLPLUS inverter to best effect. SP80-120_User Manual_A1_EN_2014-04-24.doc 5/29 Safety 2 Safety 2.1 Safety in general Please read the following safety information and instructions before you put the SOLPLUS inverter into operation for the first time, in order to avoid personal injuries and/or property damage. These instructions must be complied with at all times. Do to attempt to install or put the SOLPLUS inverter into service until you have read through all the documentation supplied thoroughly. Read through these safety instructions and all other user instructions and tips before you begin work with this device. If you sell on, hire out or pass on this device to someone else in some other way, make sure that you give the new user these safety instructions, too. 2.2 Intended use This device must be used only for the purpose described in this User Manual. The inverter is designed for use in grid-connected photovoltaic installations. All safety regulations must be complied with. All installation work must be carried out precisely as described in this manual. No modification of any kind to or in this device or to its external wiring is permitted. Any such modification could lead to serious safety problems and danger to life and limb. 2.3 Safety instructions Warning! Improper use of these devices, non-observance of the warnings given in this manual and improper tampering with the safety functions can lead to property damage, personal injury, electric shock and, in extreme cases, death. Caution! The surface of the inverter housing can become hot when the inverter is in operation. Very hot! Do not touch! Danger! High voltage due to incorrect connection! Risk of fatal or bodily injury from electric shock. SP80-120_User Manual_A1_EN_2014-04-24.doc 6/29 Safety Notice Solutronic Energy is not liable for the consequences arising from faulty installation of the inverter! Among these consequences are: Damage to the display and keyboard foil, deterioration of readability Fading of the print on the housing, the look of the housing deteriorates Therefore, chose the place of installation for the inverter so that the device is not directly or indirectly exposed to UV radiation: The device must not be exposed to direct sunlight The device must be protected from reflections by glass facades or PV modules 2.4 Non-observance of this User Manual Solutronic Energy shall accept no liability for damages resulting from non-observance of the warnings given in this User Manual. Read the operating, maintenance and safety instructions before you put the device into operation for the first time. If you are not able to understand the language used in this documentation sufficiently, please contact and inform the supplier of the situation. Trouble-free and safe operation of this inverter presumes proper, professional and workmanlike transportation, storage, mounting and installation as well as careful operation and thorough maintenance. SP80-120_User Manual_A1_EN_2014-04-24.doc 7/29 Safety 2.5 Nameplate You can identify the model of your inverter by looking at the nameplate. The nameplate, which carries the precise type designation of the inverter, is located on the right-hand side of the housing. The example below shows the nameplate of a SOLPLUS 120. The nameplate of the SOLPLUS 80/100 has exactly the same layout. Nameplate of a SP 120 S/N 0938-0001 SP120 IP 65 MC4 MAC: 0021EC050001 SP80-120_User Manual_A1_EN_2014-04-24.doc 8/29 Safety 2.5.1 Explanation of the symbols used on the nameplate The nameplate provides the following information: Attention! Hot surfaces! Attention and danger! Observe the operating instructions!! Waste Electrical and Electronic Equipment (WEEE) Solar inverters must not be disposed of with household waste. Please return the device to Solutronic after it has reached the end of its useful life. Attention! The inverter may still carry voltage even after it has been disconnected from the PV installation and grid. Please be sure to wait until the capacitors have fully discharged (discharge period). S/N 0938-0001 Menu SP120 IP 65 MC4 MAC: 0021EC050001 SP80-120_User Manual_A1_EN_2014-04-24.doc SOLPLUS 35 PAC : 3416 W grid-feed mode Menu 9/29 Introduction 3 Introduction Each SOLPLUS inverter features a number of interfaces and communication ports via which the data of the inverter can be read out. A total of approximately 300 inverter parameters can be read out. The data provided by the inverter are divided into the following categories: 1. Yield and display values: These values represent the instantaneous values of the inverter. They are actual values and display values that cannot be altered. 2. Setting values: These are values that can be set and altered individually. Depending on the importance and meaning of the parameters, these values can be set by the end customer, the fitter or the utility company. For security purposes, different password levels are incorporated. SP80-120_User Manual_A1_EN_2014-04-24.doc 10/29 Connections of the Inverter 4 Connections of the Inverter ion uni 9 y pl omm cat SOLPLUS 80 - 120 1 DC connections, Tracker 1 X1 6 M12 RS485 X6 2 DC connections, Tracker 2 X2 7 M12 RS485 X7 3 DC connections, Tracker 3 X3 8 Additional PE connection 4 AC grid connection X4 9 DC isolator 5 Ethernet X5 Connection label plug X4 (view on Pin assignment of X6 and X7 the port side of the connector X4) (br) + 12 V= (1) N 1 Pin assignment L1 L2 L3 N PE PE L 2 (bk) RS485 B- (4) (2) RS485 A+ (wh) (3) Ground (bl) Labelling (on the port side of the connector X4) 1 2 L N PE SP80-120_User Manual_A1_EN_2014-04-24.doc 11/29 Connections of the Inverter 4.1 Degree of protection IP 65 Attention! The IP 65 degree of protection rating means the inverter is suitable for semi-outdoor installation. To ensure that this degree of protection is complied with, please observe the following: The cover of the inverter must ever be closed and its seals intact. Penetrations not in use must be sealed with suitable, tight connectors or dummy plugs. They are enclose in the scope of supply. Open the inverter only in dry environment take place. Blind caps (MC 4) Inverter connector Connector seals (Tyco / MC 4) Suitable connector or dummy plug DC: X1, X2, X3 DC-PV String connectors DC-PV String connectors DC-PVString connectors n for connectors + Multicontact PV-BVK4 32.0716 for connectors f for connectors + and - Multicontact PV-SVK4 32.0717 Tyco AC: X4 The mating connector is supplied with the inverter (type Wieland RST 25i5 96.051.4554.3) M12: X6, X7 The dummy plug is supplied with the inverter (e.g. Phoenix Contact SAC-4P-MS) The dummy plug is supplied with the inverter (e.g. Harting Han 3A RJ45) RJ45: X5 SP80-120_User Manual_A1_EN_2014-04-24.doc 1394739-1 12/29 Operating the Inverter 5 Operating the Inverter 5.1 Switching the inverter on and off Only ever switch the inverter one or off by means of the DC isolator (9). Disconnect the AC side before turning off the inverter on the DC switch (9). The DC isolator can remain switched on during normal operation. Warning! Never disconnect the DC plug connectors (1 – 3) while the inverter is operating. The electric arc that would arise if you did could kill you or result in you suffering serious injury! In the event of an emergency, the inverter may also be disconnected from the DC voltage of the PV modules by means of the DC isolator (9) while the installation is up and running. SP80-120_User Manual_A1_EN_2014-04-24.doc 13/29 Operating the Inverter 5.2 Operating states The operating states of the SOLPLUS 80 - SOLPLUS 120 inverters are indicated by means of a lightemitting diode (LED) and on the display. The LED has two colours and indicates the instantaneous operating state of the inverter. The actual operating state is indicated on the display. For the operating state to be identified, the DC side of the inverter must be connected to the PV modules and a minimum voltage of approx. 280 V must be input into the inverter. SOLPLUS 80 – 120 display e menu LED What the operating states means: LED Explanation Constantly lit green Grid-feed mode Flashing green Initialisation or standby, e.g. because the voltage of the solar generator is too low Flashing red/green Fault has occurred Display content or Restart in progress Constantly lit red Fault in at least one phase of the inverter What to do in the case of a fault If the LED on the inverter lights up red or red/green, read up the fault description in the Installation Instructions manual or note down the warning/alarm/fault message indicated on the display and contact your fitter. It is best if you read out all the data supplied by the SOLPLUS inverter: the last fault displayed, fault memory, data logger and list of all parameters. SP80-120_User Manual_A1_EN_2014-04-24.doc 14/29 Using The Display 6 Using The Display 6.1 Functions of the controls The inverter has an LCD display that is used to monitor and set the main values. This enables the operator to display important values and control the inverter even without a PC. the AC side LED Display Button navigation field The operator uses the 5-button control element to navigate through the menu. Specific values can be displayed, changed and stored with the aid of these 5 buttons (see table below). OK ▲ Up ▼ Down ◄ Left ► Right OK Note Individually settable values are protected by a password to prevent them from being changed accidentally. The display itself has 4 lines, each consisting of 20 characters. During normal operation, the display is inactive. It switches itself on for 10 minutes if one of the following situations occurs: The inverter switches itself on because the voltage across the solar generator has increased to the extent that the electronics are being supplied with power. One of the buttons is pressed. The backlight of the LCD display switches on for 2 minutes when a button is pressed. 10 minutes after the last time a button has been pressed, the display is deactivated. SP80-120_User Manual_A1_EN_2014-04-24.doc 15/29 Checking The Default Settings 6.2 Using the display controls The basic (start) screen is displayed when the display is switched on. Pressing one of the menu control buttons will call up the menu assigned to it: Displays the yield data of the inverter in kWh and €. You can also call up the data of the slaves and of the installation as a whole via this menu control button. Press ◄ to return to the basic (start) screen. ◄ Displays the 3 AC phases of the inverter in detail. Press OK to return to the basic (start) screen. ◄◄ Displays the 3 DC trackers of the inverter in detail. Press OK to return to the basic (start) screen. Open the password entry box that gives you access to the main menu. ► OK Enter the customer password and confirm by pressing OK . Press ◄ to return to the basic (start) screen. In the main menu, mark the submenu items you want using the and buttons and select by pressing OK . In the submenu, mark the parameters you want using the and buttons and select by pressing OK . Mark the individual digits in the parameter. Use the and ◄ buttons to select the digits and the and buttons to change the value of the digits. After entering the desired value, press OK to confirm it. You will find the entire menu navigation tree in the Appendix. 7 Checking The Default Settings After switching on the inverter the first time, please check that the date, day of the week, time, language and credit payment settings are correctly set. 7.1 Setting the date and time Parameter 97: Date Menu: Unit: Accuracy: Device Configuration --TT.MM.JJJJ Set today's date under parameter 97. Parameter 98: Time Menu: Unit: Accuracy: Device Configuration --hh.mm.ss Set the instantaneous time under parameter 98. SP80-120_User Manual_A1_EN_2014-04-24.doc 16/29 Password Protection 7.2 Setting the language Parameter 99: Language Menu: Unit: Accuracy: Default setting: Password level: Device Configuration ----0 1 Set the language under parameter 65. Use the following values: 0 1 2 3 4 5 6 German English Spanish Italian French Czech Turkish 7.3 Setting the credit payment value Parameter 29: Compensation Euro per kWh Menu: Unit: Accuracy: Default setting: Password level: Yield Control ----0 1 The default setting ex-works is the credit sum valid for rooftop installations in Germany at the time of delivery. 8 Password Protection Parameter 37: Password request and password level Menu: Unit: Accuracy: Default setting: Password level: ----1 0 1 You password is saved under this parameter. When operating the inverter from the display, the password is always ; when operating via a PC, the password is always the serial number of the inverter. You have to enter the password in order to open the main menu of the inverter or to be able to change parameter values on the PC. There are other passwords that enable the fitter or utility company to make safety-relevant settings. Fitters have to request these passwords from Solutronic. SP80-120_User Manual_A1_EN_2014-04-24.doc 17/29 8.1 Customised protection of the inverter settings To protect the inverter and its parameter settings against unauthorised changes, it is possible to assign an access code to the inverter. This is especially important if your inverter is accessible via a modem or the internet. Since the password for parameters of password level 1 is the serial number of the inverter, anyone could change your parameter settings. You can prevent this from happening by setting the following parameter accordingly: Parameter 267: Access code 1 Menu: Unit: Accuracy: Default setting: Password level: Device Configuration --1 0 1 As long as parameter 267 is set to 1, values can be changed. If you enter a number between 1 and 65535 for parameter 267, access to the inverter will in future be blocked and no changes will be able to be made without first entering this number under parameter 267 again. This parameter acts like a combination lock. If you now want to change parameter settings of the inverter, proceed as follows: Enter the customer password to open the main menu Enter your access code under parameter 267 Change the parameters you want to change Deliberately enter an incorrect access code under parameter 267 As long as parameter 267 is set to 0, values can not be changed. Note It is not possible to read out the numbers entered as access code 1! You must therefore make a note of these numbers and keep them safe! If, however, you do happen to forget or lose these numbers, the inverter can only be re-enabled again by the manufacturer. In this case, Solutronic will provide you with a special code that will enable you to reset the access code. SP80-120_User Manual_A1_EN_2014-04-24.doc 18/29 Reading Out Yield Data 9 Reading Out Yield Data 9.1 Reading out yield data on the display Note The inverter is equipped with an integrated energy meter that calculates and adds up the energy fed into the mains power supply. The energy meter of the inverter deliberately indicates a value approx 1.5% lower than that actually fed into the grid. The purpose of this is to ensure the inverter does not indicate to you, the owner, a value that is higher than that recorded by the calibrated export meter of your power supplier. In the basic (start) screen, press the button to display the basic menu. The basic menu displays the following parameters: Parameter 1, 2 and 3: Power L1, L2, L3 Menu: Unit: Accuracy: Actual values/Output W 1W This parameter displays the amount of power instantaneously being fed into the grid by the individual trackers. Parameter 231, 232 and 233: UDC 1, 2, 3 Menu: Unit: Accuracy: Actual values/Input Volt 1V This parameter displays the instantaneous DC voltage of the modules of the individual trackers. Parameter 234, 235 and 236: DC current 1, 2, 3 Menu: Unit: Accuracy: Actual values/Input A 1A This parameter displays the instantaneous DC current of the individual trackers. Parameter 8: Energy/day Menu: Unit: Accuracy: Default setting: Password level: Actual values/Yield monitor kWh 0,001 kWh 0 2 This parameter displays the amount of energy generated by the inverter on a particular day. SP80-120_User Manual_A1_EN_2014-04-24.doc 19/29 Reading Out Yield Data Parameter 12: Energy total Menu: Unit: Accuracy: Actual values/Yield monitor kWh 1 kWh This parameter displays the total amount of energy generated by the inverter. Parameter 27: Euros today Menu: Unit: Accuracy: Default setting: Password level: Actual values/Yield monitor Euro 0,01 Euro 0 2 This parameter displays the yield, i.e. the amount of money, generated by the inverter today. Parameter 28: Euros in total Menu: Unit: Accuracy: Default setting: Password level: Actual values/Yield monitor Euro 0,01 Euro 0 2 This parameter displays the total yield, i.e. the total amount of money, generated by the inverter since it was installed. Parameter 122: Maximum power level today Menu: Unit: Accuracy: Actual values/output W 1W This parameter displays the maximum power level fed into the grid today. Parameter 123: Operating hours today Menu: Unit: Accuracy: Actual values/Inverter h 0,1 h This parameter displays the length of time the inverter has already been switched on today. The meter starts running as soon as the solar generator delivers an adequate voltage. Parameter 124: Operating hours total Menu: Unit: Accuracy: Default setting: Password level: Actual values/Inverter h 0,1 h --4 This parameter records and stores the total length of time the inverter has been switched on since it was first started up. SP80-120_User Manual_A1_EN_2014-04-24.doc 20/29 Reading Out Yield Data Parameter 7: Efficiency Menu: Unit: Accuracy: Actual values/Inverter % 0,1 % This parameter displays the current level of efficiency of the inverter. This value is calculated from the DC voltage and DC current. A value calculated manually on the basis of the AC and DC data may differ from this value due to measurement tolerances. Repeated measurements have confirmed that the value displayed under this parameter is very accurate. Parameter 70, 71, 72: Temperature inverter L1, L2, L3 Menu: Unit: Accuracy: Actual values/Inverter °C 1 °C This parameter represents the current inverter temperature in the respective module Parameter 13, 14 and 15: Mains voltage L1, L2, L3 Menu: Unit: Accuracy: Istwerte/Ausgang V 1V This parameter displays the instantaneous grid voltage of the phases connected. Parameter 148: Serial number Menu: Unit: Accuracy: Default setting: Password level: Configuration --1 --4 This parameter displays the serial number of this inverter. You require this serial number to set up a master-slave network and configure SOLPLUS+. In the event of a fault message/alarm, you need to tell the fitter this serial number. 9.2 Submenus: You open the various submenus by marking the relevant entry in the basic menu and pressing . 9.2.1 Slave data In a master-slave network, you can display the most important data of the slaves on the master. Scroll through the slaves using the and ◄ buttons. Prerequisite for this is that you have defined this inverter as the master and entered the addresses (serial numbers) of the slaves. See section 11.1, "Communicating with several inverters by means of the master-slave network". 9.2.2 Installation data In a master-slave network, you can display the most important data of the entire installation on the master. The same prerequisites apply as for 9.2.1. SP80-120_User Manual_A1_EN_2014-04-24.doc 21/29 Main Menu 9.2.3 Annual energy logger The inverter records the daily yield for every day of the year. The inverter is equipped with a memory that stores the yield for 365 days. This memory is cyclical, i.e. after a year, it overwrites the old values stored. Use the and ◄ buttons to scroll through the months and the and buttons to scroll through the days. 10 Main Menu You can change the parameters of the inverter in the main menu. In the basic (start) screen, press the ► button and then OK . The values that can be changed are protected by a password. The password for end customers is always the following button combination: ▲►▼▲►▼. Then confirm by pressing OK . In the main menu, mark the submenu items you want using the or button and select by pressing OK . Input/Output Menu Inverter Menu Safety Menu Grid Monitoring Menu Communication Menu Options Menu Data Logger Menu RS485 Addresses Menu Monitoring Menu 10.1 Setting parameters In the submenu, mark the parameters you want using the or button and select by pressing OK . Mark the individual digits in the parameter using the or ◄ button. Use the or button to change the value of the digits. After entering the desired value, press OK to confirm it. SP80-120_User Manual_A1_EN_2014-04-24.doc 22/29 Communication Ports 11 Communication Ports 5 5 Ethernet X5 6 M12 RS485 X6 7 M12 RS485 X7 6 7 Pin assignment of X6 and X7 (br) + 12 V= (1) (bk) RS485 B- (4) (2) RS485 A+ (wh) (3) Ground (bl) 11.1 Communicating with several inverters by means of the master-slave network The master-slave network is used to network several inverters in an installation. For this purpose, all inverters are connected in parallel by means of ports X6 (6) and X7 (7). X6 and X7 interconnected, so use 1:1 cables with M12 plug-in connectors (which you can purchase from Solutronic through your fitter). If you make up the cables yourself, all you need to connect up are terminals 2 (RS485-A), 3 (Ground) and 4 (RS485-B). One of the inverters in the installation is defined as the master. The display of this master inverter then shows the most important data of the slave inverters. The master also records and displays the current power levels and the yields of the slaves. Parameter 164: RS485 master Menu: Unit: Accuracy: Default setting: Password level: Communication/RS485 --1 0 1 Parameter 164 defines whether this inverter is assigned at the master. Wert Bedeutung 0 Inverter is not defined as master 1 The unit is RS485 master and sends every 10 seconds, the parameter 84 (Power reduction) 2 The unit is 485 Master and evaluates the phase error bit (supply imbalance) of the various slaves. If grid imbalance detected this bit is sent to the slaves. 4 It is sent P387 (Voltage extern) and P388 (Cosinus Phi extern) every 10 seconds via broadcast to the slaves SP80-120_User Manual_A1_EN_2014-04-24.doc 23/29 Communication Ports If you want to use several of these functions at the same time, one simply adds the value. E.g. Value = 5 transmits P84, P387 and P388 via broadcast. Parameter 165 – 196: RS485 addresses 1 – 32 Menu: Unit: Accuracy: Default setting: Password level: Communication/RS485 --1 0 1 Parameters 165 – 196 define the serial numbers of the slave inverters connected. If the parameter is set to zero (0), it defines the end of the list of slave inverters. If you are interested in setting up this form of communication, please load the instructions for the Ethernet browser from the CD supplied or download them from www.solutronic.de. 11.2 Ethernet and web server With the help of a PC, you can use the Ethernet link (5) to control the inverter via a web browser or SOLPLUS+. If you connect your inverter to a network and configure it, you can call up and read out data from your inverter via any PC connected to the network. Parameter 110 - 113: IP-Adress of the inverter Menu: Unit: Accuracy: Default setting: Password level: Comunication --1 192 1 Parameter 110 - 113 define die IP-Adress of the inverter. Parameter 114 - 117: Subnet mask of the inverter Menu: Unit: Accuracy: Default setting: Password level: Device Configuration --1 255 1 Parameter 114 - 117 define the subnet-mask of the inverter. If you are interested in setting up this communication, so you can find the instructions on the enclosed CD or at www.solutronic.de. 11.3 SOLPLUS+ communication software SOLPLUS+ is Solutronic's evaluation program for SOLPLUS inverters. Connection to the inverter via Ethernet, analogue modem, GSM modem and RS485. Configuration of the inverter Reading-out of the various files that the inverter supplies: list of all parameters, fault memory, annual energy logger etc. Display of the yields in clearly laid-out graphics Display of the data logger in clearly laid-out graphics All parameters can be read out. Simple operator control and a Help function make it possible to monitor how your PV installation is functioning and its yield. SP80-120_User Manual_A1_EN_2014-04-24.doc 24/29 Data Logger If you are interested in using SOLPLUS+ to scan your inverter, please load the program and the instructions for installation and use of SOLPLUS+ from the CD supplied or download them from www.solutronic.de. 12 Data Logger You can record up to 8 parameters in the data logger. You can chose which recording interval you want. We recommend that you use SOLPLUS+ to display the parameters recorded. Parameter 130: Data logger cycle Menu: Unit: Accuracy: Default setting: Password level: Data Logger min 1 5 min 1 The longer the data logger clock pulse you set, the longer the recording time of the data logger and the less precise the temporal resolution of the data. Parameter 133–140: Data logger parameter 1 to data logger parameter 8 Menu: Unit: Accuracy: Default setting: Password level: Data Logger Parameter numbers 1 1 1 Default setting ex works: 133 Parameter 1 DL (Power output L1) 134 Parameter 2 DL (Power output L2) 135 Parameter 3 DL (Power output L3) 136 Parameter 4 DL (Power output L) 137 138 139 140 Parameter 5 DL (Power output L5) Parameter 6 DL (Power output L6) Parameter 7 DL (Power output L7) Parameter 8 DL (Power output L8) In the default setting, 3 parameters are stored per clock pulse. This means that around 5,000 data entries can be recorded in the ring memory in a 5-minute cycle (clock pulse) before the memory is overwritten by the new data. In the case of a 5-minute clock pulse and 14 hours of sunshine (per day), the data logger is full after roughly 89 hours and begins overwriting the first data entries stored: these entries should therefore be read out before they are overwritten. Possible settings: The 8 parameters available can be used to configure the content of a data logger line as desired. The minimum parameter number in each case is 0, the maximum number 254. Please refer to the Appendix for the parameter numbers. Note that the list of parameters from 133 to 140 begins with values that are not zero. The first entry that is 0 means the end of the logger list. The data logger of the inverter now creates "files" every day, which the inverter saves to guard against loss in the event of a power failure. Note After you have changed the configuration of the data logger, you have to delete the entire data logger memory. You do this by setting parameter 66 "Set default values" to the value 70 = Delete data logger. SP80-120_User Manual_A1_EN_2014-04-24.doc 25/29 Other Parameters 12.1 Resetting to default settings Parameter 66: Set standard value Menu: Unit: Accuracy: Default setting: Password level: Configuration --1 0 1 Possible settings: 10 If you set parameter 66 to the value 10, all parameters covered by password level 1 (Customer) are reset to their default settings (delivery status). To enable this function, you have to set password level 1 (Customer) beforehand. 70 If you set parameter 66 to the value 70, the values recorded in the data logger will be deleted. To enable this function, you have to set at least password level 1 (Customer) beforehand. 13 Other Parameters Parameter 45: Function signaller Menu: Unit: Accuracy: Default setting: Password level: Maintenance --1 0 1 0 1 2 3 The inverter generates an intermittent tone when an alarm is given. The inverter generates an intermittent tone as long as the inverter is suffering from a fault and is deactivated. If the cause of the fault is no longer present, the intermittent tone stops being emitted. The inverter generates an intermittent tone when an alarm is given. The inverter generates a continuous tone as long as the inverter is suffering from a fault and is deactivated. If the cause of the fault is no longer present, the continuous tone stops being emitted. The inverter generates an intermittent tone when an alarm is given. The signal generator is always Off. Parameter 147: Device class Menu: Unit: Accuracy: Default setting: Password level: Development --1 120 4 Parameter 147 displays the inverter model. Class 80 100 120 Model designation SOLPLUS 80 SOLPLUS 100 SOLPLUS 120 SP80-120_User Manual_A1_EN_2014-04-24.doc 26/29 Maintenance and Cleaning Parameter 148: Serial number Menu: Unit: Accuracy: Default setting: Password level: Configuration --1 0 4 Parameter 147 displays the serial number of the inverter. At the same time, this parameter serves as the address of the inverter in the network. This value must be set accordingly in the SOLPLUS+ program. Parameter 271: Display parameter Menu: Unit: Accuracy: Default setting: 0 Password level: Configuration --1 1 If you set parameter 271 to a value that is not 0, the parameter with this parameter number will be constantly displayed on the third line in the basic (start) screen of the display. Example: You want to see the value of parameter 8 = Energy today displayed constantly on the display without having to press a button. To do this, set parameter 271 to the value 8. 14 Maintenance and Cleaning Check at regular intervals that your SOLPLUS inverter is functioning properly. If the heat sinks become soiled, e.g. through dirt or dust, we can no longer guarantee that the heat that arises inside the SOLPLUS inverter is properly dissipated. Such soiling and inadequate heat dissipation has a very negative effect on the performance (output), service life and safety of the inverter. Note Do not open the inverter! There are no components inside the inverter that can be maintained or cleaned by the end user. 14.1 Cleaning the cooling fins Caution! The surface of the inverter housing can become hot when the inverter is in operation. Very hot! Do not touch! Switch the inverter off before you clean the cooling fins. (Caution: the inverter requires at least 5 min. to discharge.) Clean the cooling fins using a suitable brush. 14.2 Cleaning the display Note Never use a caustic, abrasive or solvent-based cleaning agent. If the display is difficult to read due to dust or dirt, use a damp cloth to wipe it. SP80-120_User Manual_A1_EN_2014-04-24.doc 27/29 Display navigation SOLPLUS 80-120 15 Display navigation SOLPLUS 80-120 Base window: by pressing a button the display turns on and the main screen appears. The basic menu is accessed by pressing the down arrow key on the display. In the basic menu, the yield values can be read. By pressing the arrow key left, you return to the base window. The main menu is accessed by pressing the arrow key to the right. Before entering the main menu, the password is requested. The sequence (up/right/down/up/right/down), confirmed with “OK”, enters the main menu. Inside the main menu you could modify in several submenus the desired parameters. By pressing the left key, you return to the base window. The actual value menu could be accessed by pressing the arrow key left. It is separated into four menu groups. Inside, you could access several parameters. By pushing the arrow key left again, you reach the following menus. At the end you get back to the base window. (more information on the display menu can be found on the CD and the download section at www.solutronic.de). Basic configuration Password request Actual value menu INPUT DC voltage DC current power DC 231 V 7,6 A 1794W Actual value menu Actual value menu SOLPLUS 35 PAC : 3416 W grid-feed mode Menu Basic menu INPUT INVERTER YIELD MONITOR Main menu Basic menu energy today OUTPUT Enter password Press key combination and Confirm with OK Main menu 0,0kWh energy total 0,0kWh amount euro today 0,0€ amount euro total 0,0€ firmware version 1,29 SPP Address 2 IP: 192.168.0.99 - 11:56:17 (time) - 15.12.2011 (data) - Device Configuration Safety Power Reduction Reactive Power Communication slave data Datalogger installation data Maintenance annual energy logger Yield Control SP80-120_User Manual_A1_EN_2014-04-24.doc 28/29 Display navigation SOLPLUS 80-120 15.1 Files of the inverter The inverter generates various files, which can be generated and read out via one of its communication ports. File number 0 1 Name No file Fault memory 2 List of all parameters 5 List of actual values 6 Data logger 7 Annual energy logger 10 (A) 13 (D) Configuration of data logger Installation monitoring 14 (E) Alarms Description Contains the fault memory – a list of the last 100 faults. These are stored in the sequence in which they occurred (with date and timestamp). A table showing all the parameters of the inverter, with parameter number, parameter name, parameter value and unit A table showing all parameters that contain values that can be changed Contains the data logger: entries with a time stamp and values of the parameters A table in the form of a ring memory (endless loop memory) about the preceding year with the achieved yield of each respective day in 0.1 kWh. A description of the configuration (contents) of the data logger with the estimated storage times A list with the yield values of the master, irradiation sensor and all slaves as well as the yield values of the master, sensor and all slaves relative to the connected nominal DC output. This list is in the form of a ring memory (endless loop memory) and has been created over the course of the preceding year. It cannot be read until the integrated yield monitoring function has been started and successfully ended (see chapter entitled "Yield monitoring"). Contains a list of the last 6 alarms. These are stored in the sequence in which they occurred (with date and timestamp). The above files can be read out using SOLPLUS+. Solutronic Energy GmbH Küferstrasse 18 D-73257 Köngen Tel.: +49 (0)7024/96128-0 Fax: +49 (0)7024/96128-50 [email protected] www.solutronic.de SP80-120_User Manual_A1_EN_2014-04-24.doc 29/29