1
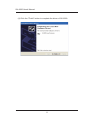
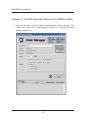
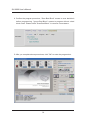
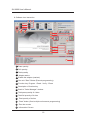
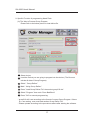
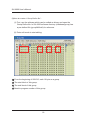
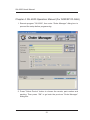
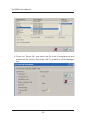
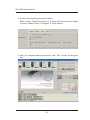
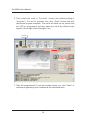
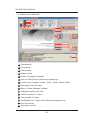
SU-6000 User's Manual SU-6000 User's Manual Contents Chapter 1 SU-6000 Hardware Installation............................3 Chapter 2 SU-6000 Software Installation...............................8 Chapter 3 SU-6000 Operation Manual (For NAND FLASH).............................................................12 Chapter 4 SU-6000 Operation Manual (For NOR/SPI FLASH).........................................................21 Chapter 5 Problems solution:...............................................26 2 SU-6000 User's Manual Chapter 1: SU-6000 Hardware Installation 1. Surface (1) SU-6000's front: Please check reed. If reed is a serious distortion and deformation, it should be adjusted. (2) SU-6000's side 3 SU-6000 User's Manual (3) How to connect cables to SU-6000? (1) Ground wire:Use the wire for the ground. (2) ID knob:It should be set a different ID number when connect multiple SU-6000 in the same PC. If so, the PC software will be able to correctly identify the different SU-6000. (3) USB: A USB cable (A to B connector) for access to PC. (4) AC power cord:110V AC~240V AC power (5) Power: "—": turn on/ "O": turn off 5 2 1 3 2. Setup Adaptors (1) Align the adaptors on the fixed-points of the connectors. fixed-points 4 4 SU-6000 User's Manual (2) Put the the adaptors gently and slight move the them. Make sure the PCB and the fixed-points have been wedged. Then, screw them. fixed-points (3) Four screws should be locked in a clockwise direction slightly first, then, lock them tight. These actions can avoid the dis-average pressure between the PCB and the reed which will cause the damage on the reeds. 5 SU-6000 User's Manual (4) Just screw by hand will be fine. It not necessary to use tools such as screwdriver. Screw too tight will cause damage to the connector. (5) After all of the adaptors locked, the SU-6000 hardware setting has completed. 6 SU-6000 User's Manual 3. Power SU-6000 on (1) Power on the power switch. (2) After power on, the LED will keep bright state. (3)Then, run the PC software and start programming. 7 SU-6000 User's Manual Chapter 2: SU-6000 Software Installation 1. SU-6000 System Requirement (1) Operating system: Windows XP SP2 (Recommend) (2) Processor: Pentium 4 and above (3) Memory: 1GB~2GB and above (4) Hard Disk: over 200M free space(Depend on IC Size) (5) Interface: USB 2.0 High Speed interface 2. SU-6000 Driver Installation (1) Connect the power cord and USB cable with SU-6000. At the first time you turn the power on, a message as below picture should appear on the right bottom of your screen. 8 SU-6000 User's Manual (2) Await ''add new hardware'' dialog box to appear then choose the option ''No, not this time'' to start installation. (3) Then click the option of ''Install from a list or specific location(Advanced)''. 9 SU-6000 User's Manual (4) Choose the file route of driver. Choose the installation route Remember to click this option (5) When the below dialog box appears, please click ''Continue Anyway''. 10 SU-6000 User's Manual (6) Click the ''Finish'' button to complete the driver of SU-6000. 11 SU-6000 User's Manual Chapter 3: SU-6000 Operation Manual (For NAND FLASH) 1. Open the file folder where SU-6000 software located, execute program ''SU6000 nand'', then enter ''Order Manager'' dialog box to proceed the setup before programming. 12 SU-6000 User's Manual 2. Press ''Select Device'' button to choose the vendor and part number. Then press ''OK'' to go back the previous ''Order Manager'' dialog box. 3. Press ''Select File'' and select the file route of programming and beware the file content. You have to click ''File Include Spare Area Data'' option if the file contains spare area data. Make confirmation again then press ''OK'' to go back to ''Order Manager'' box. 13 SU-6000 User's Manual 4. Confirm the program procedure; ''Scan Bad Block'' means to scan bad block before programming, ''Ignore Bad Block'' means to program without a bad block check. Please select ''Scan Bad Block'' in common circumstance. 5. After you complete above procedures, click ''OK'' to enter the program box. 14 SU-6000 User's Manual 6. Then select the order in ''Function'' column (the default setting is ''program''). Put the IC properly then click ''Start'' button and wait the ''BEE~~'' sound which represents program complete. The result will show on the screen and the LED on programmer will also show the result by different light signals. (Green light: Pass; Red light: Fail.) Result (Pass) Function start 7. Take the programmed IC and put another blank one, click ''Start'' to continue programming until complete all the scheduled work. 15 SU-6000 User's Manual 8. Software Icon Instruction 1 6 5 2 3 4 7 8 9 13 10 11 12 14 15 1 Pass quantity 2 Fail quantity 3 Total quantity 4 Adaptor status 5 Enable the adaptor (marked) 6 One unit ''Start'' Button (Execute programming) 7 Function key: Program、Read、Verify、Erase 8 Description of function key 9 Back to ''Order Manager'' window 10 Total pass quantity of 4 sites 11 Total fail quantity of 4 sites 12 Total quantity of 4 sites 13 ''Start'' button (One/ multiple unit execute programming) 14 Zero the counter 15 Information Column 16 SU-6000 User's Manual 9. Specific Function of programming Nand Flash (A) The Way to Process Group Program Please refer to the below picture to load define file. 1 2 3 6 4 5 7 1 Select device 2 Load the file that you are going to program into the device. (The file must include all data of Group Program) 3 Select '' Group Define '' 4 Mark '' Using Group Define '' 5 Press ''Load Group Define File'' then select group512.def 6 Select ''Program'' then mark ''Scan Bad Block'' 7 Press ''OK'' to execute programming. * group512.def is set according to the format of current Group Program. If there is a new setting, user must load another Group Define File. * Please operate according to the procedures above after starting the software. 17 SU-6000 User's Manual (B)How do create a ''Group Define file'' : (1) First, use the software which can be edited as binary and open the Group Define file. In SU-6000 software directory (database\group) has a pre-defined file (group64M.def) for reference. (2) Enter edit mode to start editing: 1 2 3 4 1 From the beginning of 000010, each 16 byte as a group. 2 The start block of this group. 3 The end block of this group. 4 Need to program number of this group. 18 SU-6000 User's Manual (3) As below picture, define 3 groups: 1 2 3 1 group from the block 0 till the block 0x0DBF, the total number of programming block for 0x03F5. 2 group from the block 0x0DC0 till the block 0x0FBF, the total number of programming block for 0x0171. 3 group from the block 0x0FC0 till the block 0x0FFF, the total number of programming block for 0x0002. (4) Notes: Group definition of the size can not exceed the number of IC block, and each group can not overlap each other. Need to have a corresponding programming image file (includes spare area data and blank block). 19 SU-6000 User's Manual (C) MLC Nand Flash Error Bit check function (1) After programming is completed, if the software shows a‘! PASS !’ message, it means there is the corresponding adaptor of the IC have a page does not exceed 4 bit error-bit data. (2) Press click right button of mouse and select 'view error bit count'. (3)The software shows error bit record, as the following picture: TX1 : There are 3 error pages; each page has an error bit. TX2 : No data TX3 : No data TX4 : No error bit 20 SU-6000 User's Manual Chapter 4: SU-6000 Operation Manual (For NOR/SPI FLASH) 1. Execute program ''SU-6000'', then enter ''Order Manager'' dialog box to proceed the setup before programming. 2. Press ''Select Device'' button to choose the vendor, part number and packing. Then press ''OK'' to go back the previous ''Order Manager'' dialog box. 21 SU-6000 User's Manual 3. Press the ''Select file'' and select the file route of programming and beware the file content, then press ''OK'' to go back to ''Order Manager'' box. 22 SU-6000 User's Manual 4. Confirm the program procedure as follow: Blank Check + Erase(if the device is in blank will not process the Erase function) Blank Check Program Verify Normal 5. After you complete above procedures, click ''OK'' to enter the program box. 23 SU-6000 User's Manual 6. Then select the order in ''Function'' column (the default setting is ''program''). Put the IC properly then click ''Start'' button and wait represents program complete. The result will show on the screen and the LED on programmer will also show the result by different light signals. (Green light: Pass; Red light: Fail.) PASS Function Start 7. Take the programmed IC and put another blank one, click ''Start'' to continue programming until complete all the scheduled work. 24 SU-6000 User's Manual 8. Software Icon Instruction 1 6 5 2 3 7 4 8 9 13 10 11 12 14 15 1 Pass quantity 2 Fail quantity 3 Total quantity 4 Adaptor status 5 Enable the adaptor (marked) 6 One unit ''Start'' button (Execute programming) 7 Function key: Program、Read、Verify、Erase、Blank Check 8 Description of function key 9 Back to ''Order Manager'' window 10 Total pass quantity of 4 sites 11 Total fail quantity of 4 sites 12 Total quantity of 4 sites 13 One/Multiple unit '' Start'' button (Execute programming) 14 Zero the counter 15 Information column 25 SU-6000 User's Manual Chapter 5: Problems solution: 1. Unable to find the programmer. •Please make sure the power is on. •Does USB cable connect properly? •Dose the driver install correctly? •Confirm that if the USB port is 2.0 High Speed interface. 2. Unable to detect IC and proceed programming: •Please check: Does the IC put properly? Is it in right insertion way? Are the connected pins clean and ordered? (Please use brand new IC for programming, do not use the used ones in case shorten the adapter's life.) •Is the adapter's part number correct? Is the socket out of usable period? Exceed limited using frequency? (Adapters are expendables, please purchase a new one if the original adapter is unable to use.) 3. Appear abnormal operation situations: Shut down the programmer and software. To try again by re-execute the software and turn on the power of programmer. 4. Microsoft operation system after Win 2000/XP and later needs to have administrator privilege to install driver or other application. 26