1
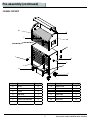
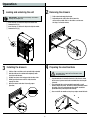
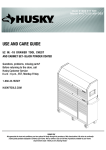
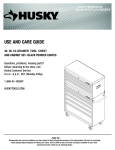
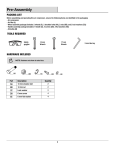
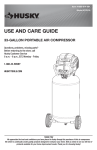
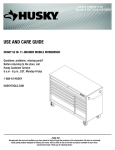
Item #1000 017 600
Model #HOTC4018J9QES
USE AND CARE GUIDE
40 IN. -18 DRAWER STAINLESS STEEL
TOOL CHEST AND CABINET SET
Questions, problems, missing parts?
Before returning to the store, call
Husky Customer Service
8 a.m - 6 p.m., EST, Monday-Friday
1-888-43-HUSKY
HUSKYTOOLS.COM
Table of Contents
Table of Contents...................................................................2
Assembly.................................................................6
Safety Information.................................................................2
Operation.................................................................8
Warranty.....................................................................................3
Maintenance..........................................................9
Pre-Assembly..........................................................................4
Care and Cleaning...............................................9
Service Parts..........................................................10
Tools Required........................................................................4
Hardware Included.................................................................4
Specifications.........................................................................4
Package Contents...................................................................5
Safety Information
1. Do not open more than one drawer at a time.
DANGER: Do not stand on this product. You
may fall or cause the product to tip.
2. Do not let children approach the tool chest / cabinet.
3. To help prevent the product from tipping, load the product
starting with the bottom drawers.
DANGER: Do not move the product prior to
closing and locking all the drawers. The
drawers could come open and make the
product unstable and tip.
4. Keep the locking casters brake set unless you are
moving the cabinet. This will help to prevent the product
from rolling.
5. Lock both the lid and all drawers before moving
the cabinet / chest.
DANGER: Do not mount this product on a
truck bed or any other moving object.
6. Do not step in any drawer / drawers.
7. Do not pull the units, push them when moving.
WARNING: Keep the product on a level
surface. The product may become unstable and
tip if stored or moved on an uneven surface.
8. Do not alter this product in any manner.
WARNING: Be careful when closing the cover.
Remove hands before closing the cover.
CAUTION: Do not lift this product directly
with a forklift or tow with any mechanical
devices.
CAUTION: Do not exceed the maximum
product weight, including contents. Do not
exceed the maximum weight for each drawer.
See Specifications on page 4.
CAUTION: Only transport this product when
empty. Properly secure when transporting.
2
Warranty
The manufacturer warrants the product to be free from defects in materials and workmanship for a period of three (3) years from date of
purchase. This warranty applies only to the original consumer and only to products used in normal use and service. If this product is
found to be defective, the manufacturer’s only obligation, and your exclusive remedy, is the repair or replacement of the product at the
manufacturer’s discretion, provided that the product has not been damaged through misuse, abuse, accident, modifications, alteration
neglect or mishandling. This warranty shall not apply to any product that is found to have been improperly installed, set-up, or used in
any way not in accordance with the instructions supplied with the product. This warranty shall not apply to a failure of the product
as a result of an accident, misuse, abuse, negligence, alteration, faulty installation, or any other failure not relating to faulty material or
workmanship. This warranty shall not apply to the finish on any portion of the products such as surface and/or weathering, as this is
considered normal wear and tear.
The manufacturer does not warrant and specifically disclaims any warranty, whether express or implied, of fitness for a particular purpose,
other than the warranty contained herein. The manufacturer specifically disclaims any liability and shall not be liable for any consequential
or incidental loss or damage, including but not limited to any labor/expense costs involved in the replacement or repair of said product.
Contact the Customer Service Team at 1-888-43-HUSKY or visit www.huskytools.com.
3
HUSKYTOOLS.COM
Please contact 1-888-43- HUSKY for further assistance.
Pre-assembly
TOOLS REQUIRED
Phillips
screwdriver
Safety
goggles
10 mm
Wrench
13 mm
Wrench
HARDWARE INCLUDED
NOTE: Hardware not shown to actual size.
AA
BB
CC
Part
Description
AA
Bolt M6x15L
6
BB
Washer M8
16
CC
Bolt M8x20L
Screw M4x8L
16
DD
Quantity
8
SPECIFICATIONS
Maximum capacity (chest drawer)
320 lbs.
Maximum capacity (cabinet drawer)
680 lbs.
Empty weight (chest)
107.8 lbs.
Empty weight (cabinet)
198 lbs.
NOTE: The maximum product weight is limited by the
maximum loading capacity of the casters.
NOTE: Begin product assembly close to the final
intended location of your chest/cabinet. This
product is heavy and may be difficult to move
after assembly.
4
DDd
Pre-assembly (continued)
PACKAGE CONTENTS
M
A
L
B
K
C
J
D
E
I
G
H
F
Part
Description
Quantity
Part
Description
Quantity
A
Gas lift
2
H
Regular caster
2
B
Top chest
1
I
Drawer
18
C
Bracket
2
J
Key (set)
2
D
Side handle
1
K
Husky badge
2
E
Rolling cabinet
1
L
Lock
2
F
Swivel caster with brake
2
M
Drawer liner
19
G
Drawer slide (pair)
20
5
HUSKYTOOLS.COM
Please contact 1-888-43-HUSKY for further assistance.
Assembly
1 Attaching the side handle
2
Installing the casters
□ Attach the side handle (D) to the rolling cabinet (E)
using six bolts (AA).
CAUTION: Do not over tighten the screws.
NOTE: The holes in the cabinet are tapped and do not
require nuts.
□ Ensure all cabinet drawers are securely locked into
place using the key lock on the rolling cabinet (E).
□ Lay the rolling cabinet (E) on its back. Use the
packaging material to protect the finish.
□ Mount the two swivel casters with brake (F) to the
rolling cabinet (E) using four bolts (CC) and washers
(BB) per caster. The swivel casters with brake (F)
should be installed on the same side as the side handle.
□ Mount the two regular casters (H) to the the rolling
cabinet (E) using four bolts (CC) and washers (BB) per
caster.
□ Tighten all bolts with a wrench.
□ Return the rolling cabinet (E) to its upright position.
□
D
BB
CC
E
E
AA
F
3
4
Placing the chest
NOTE: Two people may be required to complete
this step.
Installing the brackets
NOTE: The holes in the cabinet are tapped and do not
require nuts.
□
□ Place the top chest (B) on top of the rolling cabinet (E)
□ Attach the brackets (C) to the back of the
product to secure the top chest (B) to the rolling
cabinet (E). Place the brackets over the holes and
secure with four screws (DD) per bracket.
□ Tighten all screws securely with a screwdriver.
B
B
DD
E
E
C
6
Assembly (continued)
5 Installing the drawer liner
□ Place the drawer liners (M) in the appropriately sized drawers
and the chest lid area to protect the surface.
M
7
HUSKYTOOLS.COM
Please contact 1-888-43-HUSKY for further assistance.
Operation
1 Locking and unlocking the unit
2 Removing the drawers
□ Fully extend and empty the drawer.
□ Depending on the slide, either lift or lower the
release lever on both sides so the slides can ride over
the stops. Pull out to remove.
IMPORTANT : The drawers must be fully closed before
locking / unlocking the unit.
□
□
□
□
Insert the key (J) and turn it fully to the left to lock.
Remove the key (J).
Insert the key (J) and turn it fully to the right to unlock.
Remove the key (J).
J
4 Preparing the electrical hole
3 Installing the drawers
□ Pull the slides and slide carrier out until fully extended.
□ Hold the slide on the cabinet while aligning it with
the slide on the drawer.
□ Slightly insert one side and repeat for the other side.
□ Slowly push the drawer until it is fully closed to
engage the slide.
□ Open the drawer and close it to verify proper
operation.
WARNING: Be careful to put the power cord
through the hole, as their may be sharp edges around
the punched hole.
□ A perforated hole is located in the back of the chest to allow
for the use of a power cord to be used while the chest top lid
is closed.
□ The perforated hole can be punched through with a small
hammer, mallet, or punch. The hole has been perforated around
the edges. Take care not to damage the cabinet around the
perforation when punching the hole through.
□ Use a metal file to smooth out any sharp edges around the hole.
8
Maintenance
1
2
Maintaining the casters
□ Grease the casters annually using high quality
bearing grease.
Care and Cleaning
□ This stainless steel product has been coated with industrial clear
coating for a durable finish.
□ To help protect the clear coated finish, do not allow harsh chemicals
(oil, grease, or other chemical) to remain on the clear coating.
surface.
□ Use a glass cleaner (Windex R or equivalent product) to clean and
maintain all surfaces of coating.
9
Maintaining the drawers
□ Periodically clean the drawer trim, and
inside the drawers with a mild detergent and water.
□ Remove grease and oil with a standard,
nonflammable cleaning fluid.
□ The use of drawer liners is recommended to protect
the finish inside the drawers and make the drawers
easier to clean. Drawer liners can be purchased at
The Home Depot and can be cleaned with soap
.
and water.
□ Lubricate the slides semi-annually with grease or
equivalent.
Service Parts
M
A
L
K
C
J
D
G
H
F
Part
Description
Quantity
A
Gas lift
2
C
Bracket
2
D
Side handle
1
F
Swivel caster with brake
2
G
Drawer slide (pair)
20
H
Regular caster
2
J
Key (set)
2
K
Husky badge
2
L
Lock
2
M
Drawer liner
19
10
HUSKYTOOLS.COM
Please contact1-888-43-HUSKY for further assistance.
Questions, problems, missingparts? Before returning to the store, call
Husky Customer Service
8 a.m. - 6 p.m., EST, Monday-Friday
1-888-43-HUS KY
HUSKYTOOLS.COM
Retain this manual for future use.