1
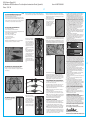
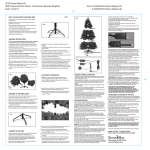
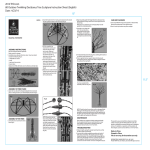
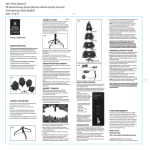
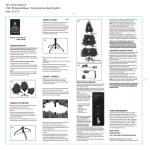
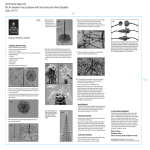
2014 Home Depot US
6ft Outdoor RGB Deciduous Tree Sculpture Instruction Sheet (English)
Date: 5/23/14
OUTDOOR RGB DECIDUOUS TREE SCULPTURE LED14
Please follow the instructions below in order to effectively
assemble and disassemble your tree.
In the event that you should encounter any issues during the assembly
of your tree; please refer to the “Troubleshooting” portion of this
manual or call our toll free customer service number at 1-877-527-0313,
and a trained representative will assist you.
2. Insert the hooks from the 4 swing arms (located on the trunk)
into the eyelets located on the tree’s base (Fig 4).
Item # 2407018UHO
15”
6. Begin to gently guide the hinged branches downward to a
desired position, being careful not to cause injury from the
branch tips.
NOTE: The top 3 branches are not hinged; they must be
guided into a desired position.
7. Proceed to now shape the
tree. The main branches,
along with the branch tips,
are flexible, and should be
spread open to mirror that of
a real bare branched tree (Fig
8).
Fig 4
Fig 8
ASSEMBLY INSTRUCTIONS:
No tools required (Hammer optional).
Retain carton for storage.
1. Carefully remove all parts from the carton. Your tree should
include the following (Fig 1):
1 collapsible tree stand
1 trunk with control box and plug
1 top branch tree section
1 49 function remote control
4 Lawn stakes
Replacement RGB LED bulbs, branch safety tips, light clips and
5 amp 125 volt fuse
Fig 1
49 function
remote control
Collapsible
tree stand
Lawn stakes
Trunk with control box
and plug
Top branch tree section
Replacement LED bulbs,
branch safety tips, light clips and
5 amp 125 volt fuse
Fig 11
3. Lift the complete top
branched tree section and
insert into the top of the
tree’s trunk. Align and
position the base of the tree’s
top section into the “V”
opening on the top of the
tree’s trunk (Fig 5).
4. Insert the hooks from the 2
swing arms (located at the
base of the top branched tree
section) into the eyelets
located on the tree’s trunk
(Fig 6).
5. Make the lone male to female
coaxial connection of the top
branched tree section to the
tree’s trunk (Fig 7a).
Fig 5
8. To illuminate fully insert the plug into a working GFCI outlet or
an outdoor rated extension cord.
9. Push or gently hammer support stakes into the ground
securing the tree base. Angle each stake 45 degrees toward
the center of the tree (Fig 9).
Fig 9
Fig 6
You have completed the
assembly of the tree (Fig 10).
Fig 10
ASSEMBLY OF TREE STAND:
1. Open the two sides of the hinged collapsible tree stand and
place on level ground in your desired display location (Fig 2).
Fig 2
NOTE: Check the item for any loose, unlit or damaged bulbs.
Although it will still operate, the bulbs must be replaced
promptly to ensure the performance and life expectancy of
the item. Also check that the support chains are not tangles
and the lights are hooked onto the frame.
Fig 7a
REMOTE CONTROL OPERATION
ASSEMBLY OF THE TREE:
1. Insert the tree’s trunk into the tree’s
base (Fig 3).
Fig 3
2. If failure to light persists the fuse may need to be replaced.
This product employs an overload protection fuse. A blown
fuse indicates an overload or short-circuit situation. If the
fuse blows, unplug the product from the outlet. Also
unplug any additional strings or products that may be
attached to the product. Replace the fuse as per the
following instructions (follow product marketing for proper
fuse rating). If the replacement fuse blows, a short-circuit
may be present and the product should be discarded.
(a) Before changing fuse, make sure set is unplugged.
(b) Grasp plug and remove from the receptacle or other
outlet device. Do not unplug by pulling on cord.
(c) Slide open the fuse access cover of the plug towards the blades.
(d) Remove fuse carefully.
(e) Risk of fire. Replace fuse only with 5 amp, 125 volt fuse
(provided with product).
(f) Close fuse cover. Make sure door is fully closed and the
fuse is completely covered.
(g) Risk of Fire. Do not replace attachment plug. Contains a
safety device (fuse) that should not be removed. Discard
product if the attachment plug is damaged.
NOTE: Proceed to take the
loose string of lights, located
at the top of the tree’s trunk,
and begin wrapping and
clipping the light string to the
open unlit area where the top
branched tree section and
the tree’s trunk were joined
(Fig 7b).
Fig 7b
Included is your remote control that operates the color and
function of your deciduous tree.
Before operation; a standard 9 volt type battery (6F22, 6LR61 or
23F6-220) must be installed into the remote control; by simply
removing the slide plate located on the back of the remote control.
NOTE: For additional remote control range extend the remote
control antenna.
The tree’s 49 function lighting capability is controlled solely by
the use of the remote control provided.
NOTE: When the tree is turned off by the use of the remote
control; and is then turned back on by the use of the remote
control; the tree will resume the memory of the last lighting
function which was selected on the remote control.
TROUBLESHOOTING
1. If the tree does not illuminate press the on/off button on your
remote control. If failure to light persists the battery may need to
be replaced. Insert a standard 9 volt type battery (6F22, 6LR61 or
23F6-220); aligning the appropriate ( +/- ) markings accordingly.
NOTE: By extending the remote antenna, pressing the
remote function button and changing the remote angle
slightly you may achieve better remote control reception.
If the tree fails to light due to a damaged or defective
remote control; a new remote control can be provided
through our customer service center.
3. A delayed response, while switching between color
selections on the remote control, is in no way a
malfunction of the light set, but is a normal operating
response due to the complexity of the technology.
All bulbs must independently receive their signal to alter
to the correct color selected. Some bulbs receive their
signals quicker than others, hence a delayed receiver
response may occur. Again, this is a normal response
based on the technology.
4. Bulb(s) fail to receive it’s signal and therefore does not
follow the color sequence selected on the remote control:
(a) Identify and mark the bulb(s) and then push the “test”
button which is located on the remote control.
(b) Once the test button has been depressed, the entire
tree’s lights will then switch from its current color
selection and convert to a 6 color multi light set.
(c) Remove the marked bulb(s) and insert a new
replacement bulb with the color it is now indicating when
the test button was pushed.
(d) Once the bulb(s) have been replaced as indicated; proceed
to turn the tree to the off position by the remote control.
(e) Proceed to now turn the tree back to the on position.
(f) The color sequence signal to the bulb(s) has now been
corrected and is now in sync.
5. When turning the tree off, by the use of the remote
control, the tree may remain in a stand-by mode; causing
a bulb(s) to remain actively lit.
6. This RGB LED voltage technology allows for no
overheating to occur when the bulb(s) remains lit and
therefore, this will have no ill effect on the longevity or
safety of the light set and tree.
STORAGE INSTRUCTIONS
1. Leave assembled if storage room permits or disassemble,
placing all components in the original carton.
2. Store in cool, dry location away from sunlight.
NOTE: Store your remote control in a SAFE & DRY location
and remove the battery from remote control before storage.
2 YEAR LIMITED WARRANTY
This product was pre-tested before shipment and date coded.
In keeping with the National Electric Code, this product is
intended for seasonal (90 days max.) installation and use. The
2 year limited warranty covers repair or replacement of this
product if it fails to light. This product is covered under
warranty only if it is used as intended for 2 holiday seasons (90
days max. per season). If product fails to light, call Home Depot
customer service toll-free at 1-877-527-0313. This warranty is
void if the product is misused or damaged in any way.
Made in China Printed in China
This is not a toy, for decorative use only.
Distributed by Santa’s Best®
Riverwoods, IL 60015 USA
www.santasbest.com
13”
2014 Home Depot US
6ft Outdoor RGB Deciduous Tree Sculpture Instruction Sheet (Spanish)
Date: 5/23/14
ESCULTURA EXTERIOR ÁRBOL DE HOJA CADUCA RGB LED14
Por favor siga las siguientes instrucciones para montar y
desmontar su árbol de manera eficiente.
En caso de que tenga problemas durante el montaje de su árbol;
por favor consulte la sección de “Troubleshooting” de este manual
o llame al número gratis de nuestro centro de servicio al cliente al
1-877-527-0313, y un representante entrenado le asistirá.
Fig 1
Control
remoto de
49 funciones
Soporte para
el árbol plegable
Estacas
para césped
Tronco con caja de control y
enchufe
Sección superior de ramas
Bombillas de recambio RGB LED,
consejos de seguridad para las
ramas, clips para las luces y
5 amperios / 125 voltios
15”
2. Inserte los ganchos de los 4 brazos orientables (ubicados en el
tronco) dentro de los ojales ubicados en la base del árbol (Fig 4).
Fig 4
INSTRUCCIONES PARA ENSAMBLAJE:
No se requieren herramientas.
Conserve el embalaje para el almacenamiento.
1. Quite cuidadosamente todas las piezas del embalaje. El árbol debe
incluir los siguientes componentes (Fig 1):
1 soporte para el árbol plegable
1 tronco con caja de control y enchufe
1 sección superior de ramas
1 control remoto de 49 funciones
4 Estacas para césped
Bombillas de recambio RGB LED, consejos de seguridad para las
ramas, clips para las luces y 5 amperios / 125 voltios
Item # 2407018UHO
3. Levante la sección superior
de ramas entera e insértela
dentro de la parte superior
del tronco del árbol. Alinee y
coloque la base de la sección
superior del árbol dentro de
la abertura “V” de la parte
superior del tronco del árbol
(Fig 5).
4. Inserte los ganchos de los 2
brazos orientables (ubicados
en la base de la sección
superior de ramas) dentro de
los ojales ubicados en el
tronco del árbol (Fig 6).
5. Establezca la única conexión
coaxial macho y hembra
desde la sección superior de
ramas al tronco del árbol (Fig
7a).
Fig 5
6. Empiece a dirigir las ramas con bisagras hacia abajo al lugar
deseado, con cuidado de no sufrir lesiones a causa de las ramas.
NOTA: Las 3 ramas superiores no tienen bisagras; es necesario
dirigirlas al lugar deseado.
7. Proceda a dar forma al árbol.
Fig 8
Las ramas principales, junto
con las puntas de las ramas,
son flexibles, y se deben
separar para dar la apariencia
de un árbol sin hojas
verdadero (Fig 8).
8. Para iluminar, introduzca completamente el enchufe en un
tomacorriente operativo de tipo GFCI (interruptor de circuito por falla
de conexión a tierra) o en una extensión clasificada para los exteriores.
9. Empuje o golpee suavemente con un martillo las estacas en el suelo,
para asegurar la base del árbol. Introduzca cada una de las estacas en
un ángulo de 45 grados, dirigiéndolas hacia el centro del árbol (Fig 9).
Ha completado el montaje
del árbol (Fig 10).
Fig 10
Fig 6
ENSAMBLAJE DEL SOPORTE PARA EL ÁRBOL:
NOTA: Verifique el artículo para detectar las bombillas que
puedan estar flojas, apagadas o dañinas. Aunque todavía
funcionara, debe reemplazar las bombillas rápidamente para
asegurar el rendimiento y la duración de vida útil del artículo.
También asegúrese de que las cadenas de soporte y las luces
estén bien fijadas con los ganchos sobre la estructura.
Fig 2
Fig 7a
ENSAMBLAJE DEL ÁRBOL:
1. Inserte el tronco del árbol dentro de
la base del árbol (Fig 3).
Fig 3
Fig 11
Fig 9
1. Abra los dos lados del soporte para el árbol plegable con
bisagras y colóquelo en terreno llano en el lugar de exhibición
deseado (Fig 2).
NOTA: Proceda a tomar el
cable de luces suelto, ubicado
en la parte superior del
tronco del árbol, y empiece a
envolver y sujetar el cable de
luces a la área abierta y no
iluminada donde la sección
superior de ramas y el tronco
de árbol se unieron (Fig 7b).
2. Si todavía no enciende, es posible que se necesite reemplazar el
fusible. Este producto utiliza un fusible de protección contra la
sobrecarga. Este producto tiene una protección contra la
sobrecarga (fusible).Un fusible fundido indica una sobrecarga o
un cortocircuito. Si el fusible se funde, desenchufe el producto
del tomacorriente. Además, desenchufe todos los ensambles de
luces adicionales o los productos conectados con el producto.
Reemplace el fusible según las instrucciones de mantenimiento
efectuadas por el usuario (siga las indicaciones sobre el producto
para determiner la clasificación apropiada del fusible) y después
verifique el producto. Si el fusible de reemplazo se funde, hay
posiblemente un cortocircuito; en este caso debe desechar el
producto. Reemplazo del fusible: Cuando una cantidad
demasiada grande de ensambles de luces han sido conectados
extremo con extremo, muy a menudo se funden los fusibles.
(a) Antes de cambiar los fusibles, asegúrese de que el
ensamble deluces esté desenchufado.
(b) Agarre el enchufe y quítelo del receptáculo o de otro tipo de
tomacorriente. No lo desenchufe, halándolo por la extensión.
(c) deslice y abra la tapa de acceso del fusible, deslizándola
hacia las hojas.
(d) Quite los fusibles cuidadosamente.
(e) Riesgo de incendio – Reemplace el fusible solamente con
uno de 5 amperios / 125 voltios (proveído con el producto).
(f) Cierre la tapa para fusibles. Asegúrese de que el acceso
esté completamente cerrado y que los fusibles estén
completamente recubiertos.
(g) Riesgo de incendio – No reemplace el enchufe. Incluye un
dispositivo de seguridad (fusible) que no pueda ser quitado.
Deseche el producto si el enchufe está dañado.
FUNCIONAMIENTO DEL CONTROL REMOTO
Fig 7b
Se incluye un control remoto que hace funcionar el color y la
función de su árbol de hoja caduca.
Antes del funcionamiento; una batería estándar de 9 voltios
(6F22, 6LR61 o 23F6-220) tiene que estar colocado en el
control remoto; simplemente retire la placa lateral ubicada en
la parte posterior del control remoto.
NOTA: Para mayor alcance del control remoto, extienda la
antena del control remoto.
La capacidad de 49 funciones de iluminación del control
remoto se control solamente con el control remoto provisto.
NOTA: Cuando el árbol se apaga utilizando el control remoto;
y luego se vuelve a encender utilizando el control remoto; el
árbol se reanuda la memoria de la última función de
iluminación seleccionada por el control remoto.
PROBLEMAS / SOLUCIONES
1. Si el árbol no se enciende, oprima el botón on/off en el control
remoto. Si la luz todavía no se enciende, es posible que se
necesite reemplazar la batería. Introduzca una batería estándar
de 9 voltios (6F22, 6LR61 o 23F6-220), haciendo coincidir
correctamente las marcas de polaridad (+ / -) correspondientes.
NOTA: Cuando extiende la antena del control remoto, oprime
un botón de función en el control remoto y cambia el ángulo
del control remoto ligeramente, puede lograr mejor recepción.
Si el árbol no se ilumina debido a un control remoto dañado
o defectuoso; un control remoto nuevo se puede conseguir
a través de nuestro centro de servicio al cliente.
3. Una respuesta retardada, mientras seleccionando entre las
opciones de colores del control remoto, no significa de ninguna
manera un mal funcionamiento, sino que es una respuesta de
funcionamiento normal debido a la complejidad de la tecnología.
Cada bombilla necesita recibir la señal independientemente
para cambiar al color correcto que se ha seleccionado. Algunas
bombillas reciben las señales más rápidamente que otras y, por
lo tanto, una respuesta retardada del receptor se puede ocurrir.
Otra vez, es una respuesta normal debido a la tecnología.
4. La(s) bombilla(s) no recibe la señal y, por consiguiente, no sigue
la secuencia de colores seleccionada a través del control remoto:
(a) Identifique y marque la bombilla(s) y pulse el botón “test”
que se ubica en el control remoto.
b) Una vez pulsado el botón “test”, todas las luces del árbol
cambiarán del color actual a un juego de luces multi de 6 colores.
(c) Retire la bombilla(s) marcada e inserte una bombilla de
recambio nuevo del color que se indica ahora que el botón
“test” se ha pulsado.
(d) Después de sustituir la bombilla(s) como se ha indicado;
proceda a poner el árbol en la posición de apagado
mediante el control remoto.
(e) Ahora proceda a volver a poner el árbol en la posición de
encendido.
(f) La secuencia de colores de la bombilla(s) ahora se ha
corregido y está sincronizada.
5. Mientras apagando el árbol, mediante el uso del control
remoto, es posible que el árbol permanezca en modo de
espera; causando que una bombilla(s) permanezca encendida.
6. Esta tecnología de tensión RBG LED permite que no se produzca
sobrecalentamiento cuando la bombilla(s) permanezca
encendida y por consiguiente, no tendrá efectos negativos
sobre la longevidad ni la seguridad del juego de luces y árbol.
INSTRUCCIONES PARA ALMACENAMIENTO
1. Mantenga la estructura montada si hay espacio suficiente
para guardarla, o desmóntela. Coloque todos los
componentes en el embalaje original.
2. Guárdelo en un lugar fresco y seco, lejos de la luz del sol.
NOTA: Guarde su control remoto en un lugar seguro y seco y
retire la batería antes de guardarlo.
GARANTÍA LIMITADA DE 2 AÑOS
Este producto ha sido previamente probado antes del envío y
también se ha dado una codificación de fecha. De acuerdo con el
Código Eléctrico Nacional de Estados Unidos (NEC), este
producto está diseñado para una instalación estacional (máx. 90
días) y uso. La garantía limitada de 2 años cubre la reparación o el
reemplazo de este producto, si no se enciende. La garantía cubre
este producto solamente si está utilizado para su objetivo
original, durante 2 estaciones vocacionales (máx. 90 días por
estación). Si el producto no se enciende llame sin costo al servicio
de Home Depot al 1-877-527-0313. Si el producto ha sido mal
utilizado o dañado de cualquier manera, la garantía será anulada.
Hecho en China Impreso en China
No es un juguete – solamente para uso decorativo.
Distribuido por Santa’s Best®
Riverwoods, IL 60015 USA www.santasbest.com
13”