1
Model No.:RPW160
Notes
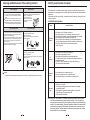
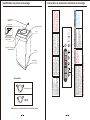
UNPACKING YOUR WASHING MACHINE
1.Inspect and remove all packing material.
2.Inspect and remove any remains of packing, tape or printed
materials before powering on the Washer.
Contents
Important safety instructions ................................................................... 2
Safety and precautions........................................................................ 4
DANGER
Risk of child entrapment .Before throwing away
your old appliance ,remove the door so that children
may not easily become trapped inside.
Installation of the washer..................................................................... 7
Installing Quick Sink Adapter ................................................................. 8
Preparation before washing................................................................. 9
Parts identification of the washer.......................................................... 10
Instruction of the washer operation panel.............................................. 11
Quick start.......................................................................................... 12
The main wash.................................................................................... 13
Special features.................................................................................. 14
About the procedure of full automatic wash program.................................. 15
Cleaning and Maintenance of the washing machine.............................................. 16
Identify usual trouble of washer............................................................................. 17
Malfunction display and solutions......................................................... 18
Technical specifications............................................................................... 18
1
Important safety instructions
IMPORTANT SAFETY INSTRUCTIONS
WARNING-To reduce the risk of fire, electric shock, or injury to persons when using your
appliance, follow basic precautions, including the following :
1. Read all instructions before using the appliance .
2. Use this appliance only for its intended purpose as described in this use and care guide.
3. Use only detergents or softeners as recommended for use in this manual and keep them
out of the reach of children.
4. This appliance must be properly installed in accordance with the installation instructions
before it is used.
5. Never unplug your appliance by pulling on the power cord. Always grasp the plug firmly
and pull straight out from the outlet.
6. Replace immediately any worn power cord, loose plugs and power outlets.
7. Unplug your appliance before cleaning or before making any repairs.
8. If your old appliance is not being used, we recommend that you remove the door.
This will reduce the possibility of danger to children.
9. Do not operate your appliance in the presence of explosive fumes.
10. Do not wash or dry articles that have been previously cleaned in, washed in,
soaked in or spotted with gasoline, dry-cleaning solvents, other flammable or explosive
substances as they give off vapors that could ignite or explode.
11.Clothes or rags used to clean flammable or explosive materials should not be washed
in this appliance until all traces of this material have been removed.
12.Do not add or mix any flammable or explosive substances to the wash.
13.Do not try to remove clothes while the tub is moving. Allow it to come to a complete stop
before reaching in.
14.The appliance’s loading door must be closed when the tub is spinning.
15.Do not operate your appliance when parts are missing or broken.
16.Do not use this appliance for commercial uses.
17..Do not operate this appliance unless all enclosure panels are properly in place.
18.Do not tamper with controls.
19.Do not allow children to play on or in the appliance. Close supervision of children is
necessary when the appliance is used near children.
20.This appliance must be connected to a proper electrical outlet with the correct electrical
supply.
21.Proper grounding must be ensured to reduce the risk of shock and fire. DO NOT CUT OR
REMOVE THE GROUNDING PLUG. If you do not have a three-prong electric receptacle
outlet in the wall, have a certified electrician install the proper receptacle. The wall
receptacle MUST be properly grounded.
22.Under certain condition , hydrogen gas may be produced in a hot water system that
has not been used for 2 weeks or more . HYDROGEN GAS IS EXPLOSIVE .If the
hot water system has not been used for such a period , before using a washing
machine or combination washer-dryer ,turn on all hot water faucets and let the water
2
Important safety instructions
flow each for several minutes . This will release any accumulated hydrogen gas .As the
gas is flammable ,do not smoke or use an open flame during this time.
23.Do not repair or replace any part of the appliance or attempt any servicing unless
specifically recommended in the user-repair instructions, which you understand and have
the skill to carry out.
Note:If for any reason this product requires service, we strongly recommend that a
certified technician perform the service.
24.To reduce the risk of electric shock or fire, do not use extension cords or adapters to
connect the unit to an electrical power source.
SAVE THESE INSTRUCTIONS
GROUNDING INSTRUCTION
This appliance must be grounded. In the event of malfunction or
breakdown, grounding will reduce the risk of electric shock by
providing a path of least resistance for electric current.
This appliance is equipped with a cord having an equipmentgrunding conductor plug. The plug must be plugged into an appropriate
outlet that is properly installed and grounded in accordance with all
local codes and ordinances.
WARNING - Improper connection of the equipment-grounding
conductor can result in a risk of electric shock. Check with a qualified
electrician or serviceman if you are in doubt as to doubt as to whether
the appliance is properly grounded.Do not modify the plug provided
with the appliance - if it will not fit the outlet, have a proper outlet
installed by a qualified electrician.
WARNING – To reduce the risk of electric shock disconnect this
appliance from the power supply before attempting any user
maintenance. Turning the controls to the OFF position does not
disconnect this appliance from the power supply.
3
Safety and precautions
!
Observe the following items in order to prevent from injuring yourself, others
and the damage of property:
! !
Warning
Caution
This indicates serious injury or death to human
being may be caused.
This will remind you that injury to people and
damage to property may occur.
Warning
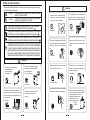
It is prohibited to wash the clothes
touching with kerosene, gasoline,
alcohol and other flammable materials.
Please do not let children climb the
machine or peer into the rotating
spin barrel to avoid accidents.
Please observe following contents of graphics.
!
!
This graphics represents(cause attention),and detailed
cautions will be displayed inside the graphics.
This graphics represents (operation prohibited), and detailed
prohibitive items will be displayed inside the graphics.
This graphic represents (forcible execution), and detailed
forcible execution items will be displayed inside the graphics.
This appliance is not intended for use by persons (including
children) with reduced physical, sensory or mental capabilities,
or lack of experience and knowledge, unless they have been
given supervision or instruction concerning use of the appliance
by a person responsible for their safety. Children should be
supervised to ensure that they do not play with the appliance.
Prohibited
Prohibited
Regularly clean the power plug to
remove dust and dirt to avoid contact
failure.
Please do not damage power flexible
cord and power plug to avoid electric
shocking, short circuit and catching
fire.
!
Prohibited
!
Warning
Please do not insert your hand
and take out clothes inside the
spin barrel before
it is fully stopped.
Please do not disassembly
and assembly the
machine without
authorization.
Please pull out plug from the socket
if the machine is not in use.
Please well connect the earth line of
socket to avoid electric shocking by
accidental leakage.
(earthing)
Earthing
Pull out the plug
No dismantling
No touching
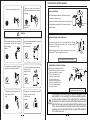
Please do not install the machine in
damp and raining environment to avoid
electric shocking, catching fire, faults
and distortion
accidents.
Please do not directly rinse the
machine with water when
cleaning.
Please do not place on the washer
burning candle, mosquito-repellent
incense, cigarette and other
flammable things, as well
as electric stove, air
heating fan and other
heating
sources.
Please insert the power plug tightly.
鹅天小
小天鹅
No rinsing
No dampness
4
!
Smoke and fire prohibited
5
Installation of the washer
Please do not pull out or insert the
plug with wet hands to avoid electric
shocking.
Please use correct power source.
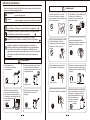
Remove package
! Remove package and take out the bottom board of
the cabinet on the foam cover.
!
! Open the lid of washer's door and take out accessories.
Base foamed cushion
! A trial operation or washing on the foamed cushion is
Wet hands are
prohibited
strictly forbidden.
!
Caution
Placement of upper water drain hose
The water temperature shall not exceed
55℃ when washing
with warm water.
Please ensure that the water inlet pipe
is connected and the tap is opened
before washing
clothes.
C
5
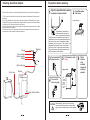
>5
86~100 cm
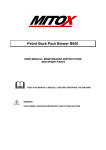
Before washing machine starts, user should hang up the
drain pipe 86-100cm height from the floor.
+
!
The height of drain hose (“a”)should between 86-100 cm.
Diameter of “b”shuld not less than 3 cm, and flow capacity
not less than 40 L/Min.
+
Prohibited
Customers are not allowed to change
the power line without permission.
It is strictly prohibited to place and sit
children or lay
weights on the
washer.
Prohibited
Prohibited
Please do not pull the electric cord
when pulling out the
plug.
!
Prohibited
6
Installation of water inlet pipe
Clamping nut
Put the water inlet pipe(which has
metallic filtering bag) screw on to the tap.
Tightly screw another end of water
inlet hose on water inlet valve .
(with rubber seal ring inside).
Note: When tightening the
clamping nut, evenly apply the
force and do not twist the water
inlet valve to avoid breaking of
water inlet valve joint.
Water inlet hose
Only for model with double
screw thread water inlet pipe
!
Please do not wash down raincoat,
fishing coat and similar
clothes in the
washer.
FOR UPPER DRAIN SYSTEM ONLY
If the supply cord is damaged, it must be replaced by the
manufacturer, its service agent or similarly qualified persons
in order to avoid a hazard. The instructions for appliances
connected to the water mains by detachable hose-sets shall
state that the new hose-sets supplied with the appliance are
to be used and that old hose-sets should not be reused.The
openings must not be obstructed by a carpet.This appliance
is for indoor use only.
7
Installing Quick Sink Adapter
Preparation before washing
When installing the quick sink faucet adapter to the faucet, follow the steps below:
1.First,remove the aerator from your faucet nozzle and determine the size/type of
the faucet.
2.Once you determine the size/type of the faucet(Outside Threaded End or Inside
Threaded End),place the proper sized rubber washer into the silver faucet adapter.
3.Attach the silver faucet connector to the faucet.
4.Attach the faucet connector to the water inlet hose and make sure that the rubber
washer is placed in between.
5.Attach the other end of the water inlet hose to the washer water inlet and make
sure that the rubber washer is placed in between.
Faucet
Washers
Faucet Adapter
Quick Connector
Washer
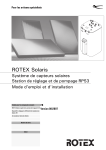
Adjust the adjustable foot to make
1 the
washer be placed stable.
2
Install the water
inlet hose.
For two inlet hoses
+
3
Connect with to
power source.
5
Put down the drain
hose.
Upper drain
4
Turn on the
water supply.
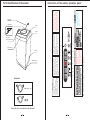
>860mm
Washer
Rear View of Washer
Note:
The water
will overflow
when the
height of
the drain
hose under
860mm.
+
+
NOTICE Before washing, please do take out coins,
!
8
+
Adjustable foot (extend when
clockwise rotating and shorten
when counterclockwise rotating)
(Slightly incline the washer first and loosen the
adjustable foot knob. Adjust the adjustable foot so
as to ensure four corners of washer be steadily
contacted with the ground. Then tighten the
adjustable foot knob and lock it. If the ground is
obviously not flat, correction should be made on
the ground surface, otherwise the washer barrel
will incline and knock the cabinet)
Water inlet hose
Drain hose
+
+
keys and other hard goods, and zip up clothes
tightly to prevent them and barrel from damage.
9
6
Put in
clothes
and
suitable
amount of
washing
powder.
Adjustable leg
Accessories
Inlet hose
10
1pc
Please refer to the real material as the attachment
11
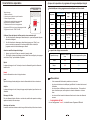
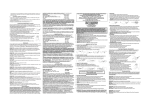
8 7 6
Load Size
Small
Medium
Large
3
3.Temperature
5
press the button to select
different temperature water
for washing.
when the "hot" is on ,it does
not means washing machine
will use water supplied by
the water inlet
4
Remain(min)
If the drawing is changed, no information anymore.
4.Delay
Heavy(light) Quick(flash)
Jeans(light) Anti-wrinkle(flash)
Normal(light) Air dry(flash)
Cabinet
2
ON/OFF
1
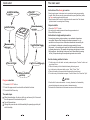
2.Start/Pause
Heavy
8.Function
Press the ON/OFF
button once to turn ON
the power to the washer.
press it again to turn the
power OFF
1.ON/OFF
1.The function display light Indicate
that a selected feature is ON or
what the cycle is about to begin.
2.During the wash cycle ,the light
indicates the current STATUS of
wash/ rinse /spin cycle.
Top lid
Press the “load size” and “Function”
at the same time to lock buttons on
control panel.
Press the “load size” and “function”
at the same time again to unlock
buttons.
7.Child lock
Control panel
6.Load Size
Drain hose
(For upper drain only)
Press the button, by washing
quantity select water level
position in reason. The indicator
lights move at each press on
the button, and light and flash
in turn.
Water inlet
5.Program
Power line
Can select fully automatic
program like:
Parts identification of the washer
Instruction of the washer operation panel
frame
Quick start
The main wash
9 Press the
[start/pause] key
1 Install the washing
machine
8 Select the desired
program
2 Load the laundry
Instruction of the Heavy procedure
! [Heavy] wash program is the easiest, most convenient and most common washing
program. When the user press the power switch and then press [Start/Pause] button,
the Heavy washing program will start to work.
! When the washer start to work, the digital tube show the remain time. The indicator
light which stand for remaining time is flickering.
Steps in details
1.Press the ON/OFF button.
2.According to the washing amount choose the proper water level.
3.Press Start/Pause button.
Instruction to single wash procedure
3 Measure out the
detergent
7 Plug the power supply
! User can freely select any single procedure, or any combination of procedures
among Wash, Rinse and Spin according to the actual requirements. It is only
required to turn off any one or two of these three indicators that not needed by the
user. And keep the indicator be on showing the process needed by the user.
! Single wash -- after switching on the power, turn off Rinse and Spin two indicators
by pressing these two keys. The operation for single rinse and single spin is similar.
! Single wash-spin – after switching on the power, turn off Rinse indicator by pressing
that key. The operation for single rinse-spin and single wash-rinse is similar.
Use the cleaning solution for twice
4 Close the top lid
6 Turn on the water supply
5 Hang up the drain
pipe firmly
1. Put the laundry in the first batch and wash powder and press “Function” button to set
single “wash” to run.
2. Take out the laundry in the first batch after hearing the buzzing sound.
3. put in the laundry in the second batch, and run “ Wash”, “Rinse”, “Spin”.
4. Take out the laundry in the second batch after hearing the buzzing sound.
5. Put in the laundry in the first batch and press “ Function” button to run “Rinse” and “Spin”.
! NOTICE
Program selection
1 Press the ON/OFF button.
2 Select the proper water level and other attached functions.
3 Press the Start/Pause key.
! Close the lid of the door when machine is running, otherwise, it will automatically
stop working during spin process and send out abnormal warning.
!The washer will not work when the filled water does not reach the set water level.
The wash stops
When the wash stops, the buzzer will buzz continuously for 6 times and
then the power will be automatically cut off.
Turn off the water tap.
Although the power can be cut off automatically, the power plug must be pull
out for the safety.
12
13
Special features
About the procedure of full automatic wash program
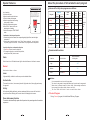
Features of five fully auto program are as follows:
Press the “ DELAY” button each time,
the n umber on the digital indication
adds by “1” ; After the number
reaches “24”,press the “ DELAY”button
each time ,the number adds by “6” ;
After the number reaches 48, the light
of delay time is turned off , and the
delay program return to original status.
time of washing.
1.Switch on the power .
2.Open the tap and lay the drain hose.
3.Put in the laundry and detergent.
4.Select the proper load size according
to the quantity of clothes.
5.Select the functions and programs.
6.Press “DELAY” button to select the
beginning time of washing.
7.close the lid and press “START/PAUSE”
button.
load size
Program
Heavy
Default
wash
time
Scope
rinse
times
Cancel the delay time, or alternate the delay time
1. Press Power button to cancel the delay time.
2. To change the delay time , cancel the delay time first ,
and then press “Delay” button to reset.
Quick
total
time
Notes
Large
Small-Large 12 minutes
2
Quick
Large
Small-Large 2minutes
30seconds
1
Normal
Large
Small-Large Wash 4minutes
1
wash time
include
30seconds 10minutes
soak
time
7minutes 39minutes
Jeans
Large
Small-Large 40seconds+Soak
2
1 minutes
42minutes
10seconds
+Soak 13 minutes
Wash3 minutes
Confirmation of the delay and inspection
1. After the delay function is started, the corresponding delay light will flash, and other lights
are turned off.
2. After the delay function is started , press “ Delay” button continuously , you may inspect
the preset program and function . Loose the button , the program return to delay status.
spin
time
13 minutes
Anti-wrinkle
Large
Air dry
Large
Small-Large 12 minutes
-
-
2
5minutes 42minutes
-
34minutes
- 57minutes 60minutes
Recommended Load size:
Approximate Water
used in gallon
Load size
Load size in lbs
Large
6.79
10.57
Medium
4.89
7.93
Small
Less than4.89
4.23
Wash time is short. Suitable to wash light stained clothes and clothes in summer.
Normal
Wash cotton clothes or linens.
Jeans
High wash ability, suitable to wash heavy or serious stained clothes.
Notes:
Anti-wrinkle
The wash time is short ,rinses many time with high water level, thoroughly wash away
the garment.
Air dry
As for not easily fading ,deforming , and non-waterproof clothes,can use the function to
dry clothes without heating,and to reach the result of being dried in a room.
It is recommended to use low or mid foam powder.
The volume of wash powder is changed with different type .You need to read its usage manual.
Water volume is different because of clothes variety. When washing machine doe
not run properly, please adjust clothes volume or water level.
The water volume above listed is based on normal clothes volume.
The test Program
During “Normal” program, it is identified as Efficiency Program .
Power lost memory function
The machine will automatically operate from the previous lost power stage when the machine
re-power on.
14
15
Cleaning and Maintenance of the washing machine
Maintenance
End of program
The washing machine will send off the sound
of "dou-dou" at the end of any program operation
to remind you to take out the laundry or operate
it again.
After the sound ,the washing machine returns
to its power-off state with no display and all lights off.
Please shut off the tap, pull out the plug when not
in use to avoid water leakage or the fire accidents.
Use gentle clothing to wipe off the water and dirt on
the surface each time after using the washing machine.
Detergent , propellant and
other chemicals are not
allowed to use so as to avoid
any damage to the plastic
accessories.
Identify usual trouble of washer
When the washer is in trouble, please contact local service office or the sales service
department of our company and the customer should not dismantle the machine without
permission.
If the washer can not work normally, or appear abnormity or alarms, please check and
correct as follows.
List of faults and inspection
Faults
Clean the water inlet
Inspection Items
Clean Of the filter
After using the washing machine for a period,please clean
After long time use,the water inlet mesh bag may
it according to the following steps:
be blocked with smudginess,and should be cleaned
1.Take out the lint filter.
according to the following steps:
2.
Open the filter and wash it clean in the water.
1.Switch on the power,followed by shutting off the tap .
3.Restore it and fix it.
2.Let the washer works for 5 seconds so that water
flows into the tub through the water inlet hose.then
turn off the power.
3.Unload the water inlet hose and clean the mesh bag,
then restore the water inlet assembly.
No water
flows in
! If the power is off or the fuse is burned out.
! If the water supply is cut off or the water pressure is too low.
! If the inlet hose is properly connected and the water tap is opened.
! If the filtering screen of inlet valve is blocked by dirt.
! If the coil of inlet valve is damaged. (The slight electromagnetic
sound is normal phenomenon when the inlet valve is switched on)
! If the "Start / Pause" button is pressed after the power
switch is pressed.
(only for magic filter)
After using the washing machine for a period, clean it
according to the following steps:
1. Take off the lint filter.
2. Turn over the mesh bag and wash it clean in the water.
3. Restore and fix it.
No
washing
! If the power is off or the fuse is burned out.
! If the power supply voltage is too low.
! If the water amount reaches to the required water level.
(The washer will not work if the water amount does not reach the
required water level)
! If it is set to "Delay" washing mode. (It will only start to work
until the reservation time reached)
(only for normal filter)
Notes:
If the drain filter is not cleaned at proper time (every 10 times of use),Drain problem could be caused.
Abnormal
draining
! If the water drain hose is placed very high.
! If the end of water drain hose is sealed in pond.
! If the internal rubber ring of drain valve is blocked by dirt.
Abnormal
spin
! If the door lid is closed.
! If all clothing piled largely at one side of barrel or the clothing
is excessively placed.
! If the washer is not placed in stable condition or it is placed in
inclination state. (The ground is not flat).
! If the motor belt is loosened.
Note: During the spin process, if washing are piled at one side of the spin barrel,
it will cause unbalance of spin barrel resulting in striking. At this moment, the
computer inside the washer will feel this unbalance phenomenon and will automatically
correct it ( fill in water Washing ). However, if unbalance situation is not removed after
continuous three corrections, which means the computer auto-correction can not
resolve the problem. Then the user has to manually and evenly place the clothing
inside the barrel to solve the problem.
16
17
Malfunction display and solutions
When the washer is in trouble, please contact local service office or the sales service
department of our company and the customer should not dismantle the machine
without permission.
If the washer can not work normally, and the abnormal indication is shown in the digital
display window or the machine alarms, please check and correct as follows.
Fault
Alarm for
water inlet
Alarm for
opening lid
Cause of fault
Indication
Water injection for about
16 minutes, but do not
reach preset water level
“E1” flares, and
other lights are
turned off.
Open the lid after starting
the delay time. Open the lid
when the washer is spinning.
Open the lid when entering
into the child lock state.
“E2” flares, and
other lights are
turned off.
Alarm of the
buzzing sound
Stopping alarm
“E3” flares, and
other lights are
turned off.
Imbalance
alarm
Drain alarm
After draining for 4
minutes, does not finish
draining.
“E4” flares, and
other lights are
turned off.
overflow alarm
Water level is higher than
rated overflow level
“E5” flares, and
All water lever
lights flash.
Power off,
repair
Note: 1: alarm removed, the return to the status before the alarm; E3 failures appear in the same trip.
2: overflow alarm, automatic water drain valve open until the manual intervention contact failure.
Technical specifications
31kg
515X525X938
Current
value
Drum Size
3.0A
120
60
18
1.6Cu.ft
1.68Cu.ft
RPW160
Remarques
DÉBALLER VOTRE LAVE-LINGE
1.
Vérifiez et retirez tous les éléments d'emballage.
2.
Vérifiez et retirez tous les restes d'emballage, de ruban ou de
documents avant de mettre en marche le lave-linge.
Table des matières
Consignes de sécurité importantes................................................................................... 2
Sécurité et précautions ...................................................................................................4
Installation du lave-linge .................................................................................................7
Installer l'adaptateur rapide d'évier ...............................................................................8
Préparation avant le lavage ............................................................................................9
Identification des pièces du lave-linge .......................................................................10
Instructions du panneau de commande du lave-linge ...............................................11
DANGER
Démarrage rapide ..........................................................................................................12
Le lavage principal .........................................................................................................13
Características especiales ...........................................................................................14
Risque d'enfermement des enfants .Avant de jeter votre
ancien appareil, veuillez enlever la porte pour que les
enfants ne peuvent pas facilement être piégés à
l'intérieur.
À propos de la procédure du programme de lavage automatique intégral .............15
Nettoyage et entretien du lave-linge ...........................................................................16
Identifier les problèmes courants du lave-linge .........................................................17
Affichage des pannes et solutions ...............................................................................18
Spécifications techniques.............................................................................................18
1
Consignes de sécurité importantes
Consignes de sécurité importantes
AVERTISSEMENT : Pour réduire le risque d'incendie, de décharge électrique ou de
blessures aux personnes lors de l'utilisation de votre appareil, suivez les précautions de
base, dont les suivantes :
1. Lisez toutes les consignes avant d'utiliser l'appareil.
2. Utilisez uniquement cet appareil pour son usage prévu comme décrit dans ce guide
d'utilisation et d'entretien.
3. Utilisez uniquement des détergents ou des assouplissants recommandés dans ce
manuel et conservez-les hors de portée des enfants.
4. Cet appareil doit être installé correctement conformément aux instructions d'installation
avant d'être utilisé.
5. Ne débranchez jamais votre appareil en tirant sur le cordon électrique. Saisissez
toujours fermement la fiche et retirez-la franchement de la prise.
6. Remplacez immédiatement tout cordon électrique usé, fiche et prise électriques
desserrés.
7. Débranchez votre appareil avant de le nettoyer ou d'effectuer des réparations.
8. Si vous n'utilisez pas votre ancien appareil, nous vous recommandons de retirer la
porte.
Cela réduit la possibilité de danger vis-à-vis des enfants.
9. N'utilisez pas votre appareil en présence de vapeurs explosives.
10. Ne lavez pas ou ne séchez pas d'articles ayant précédemment été nettoyés, lavés,
trempés ou tachés avec de l'essence, des solvants pour nettoyage à sec ou toute
autre substance inflammable ou explosive car elles émettent des vapeurs pouvant
s'enflammer ou exploser.
11. Les vêtements ou les chiffons utilisés pour nettoyer des produits inflammables ou
explosifs ne doivent pas être lavés dans cet appareil jusqu'à ce que toutes les traces
de ces substances aient été enlevées.
12. N'ajoutez pas ou ne mélangez pas de substances inflammables ou explosives au
lavage.
13. Ne pas essayer de retirer les vêtements tandis que le tambour est mobilisée. Laissezle s'arrêter complètement avant d'y accéder.
14. La porte de chargement de l'appareil doit être fermé lorsque le tambour est en train
d'essorer.
15. Ne pas manipuler votre appareil lorsque les éléments sont perdus ou brisés.
16. Ne pas utiliser cet appareil à des usages commerciales.
17. Do pas utiliser cet appareil à moins que tous les panneaux sont bien en place.
18. Ne modifiez pas les commandes.
19. Ne laissez pas les enfants jouer sur ou dans l'appareil. Une surveillance étroite des
enfants est nécessaire quand l'appareil est utilisé à proximité des enfants.
20. Cet appareil doit être branché à une prise électrique appropriée à l'alimentation
électrique correcte.
21. Vous devez vous assurer de la mise à la terre correcte afin de réduire le risque de
décharge et d'incendie. NE COUPEZ PAS OU NE RETIREZ PAS LA PRISE DE
TERRE. Si vous n'avez pas de prise électrique murale à trois bornes, faites installer la
prise appropriée par un électricien certifié. La prise murale DOIT être correctement
raccordée à la terre.
2
Consignes de sécurité importantes
22. Sous certaines conditions, de l'hydrogène peut être produit dans un système d'eau
chaude qui n'a pas été utilisé pendant 2 semaines ou plus. L'HYDROGÈNE EST
EXPLOSIF. Si le système d'eau chaude n'a pas été utilisé pendant une telle durée,
avant d'utiliser un lave-linge ou une combinaison lave-linge/sèche-linge, ouvrez tous
les robinets d'eau chaude et laissez l'eau couler pendant plusieurs minutes. 21.Cela
libérera de l'hydrogène accumulé .Car ce gaz est inflammable, ne pas fumer ou
utiliser une flamme nue pendant ce temps.
23. Ne réparez pas ou ne remplacez pas les pièces de l'appareil ou n'essayez pas
d'effectuer d'entretien sauf si recommandé spécifiquement dans les consignes de
réparation pour l'utilisateur, que vous comprenez et pour lesquelles vous avez les
compétences.
Remarque : Si, pour une raison quelconque, ce produit nécessite une réparation , nous
vous recommandons fortement de contacter un technicien agrée.
24. Pour réduire le risque de choc électrique ou d'incendie, ne pas utiliser de rallonges
ou des adaptateurs pour connecter l'appareil à une source d'alimentation électrique.
CONSERVEZ CES INSTRUCTIONS
INSTRUCTIONS DE MISE À LA TERRE
Cet appareil doit être raccordé à la terre. En cas de dysfonctionnement
ou de panne, la mise à la terre réduit le risque de décharge électrique en
fournissant un chemin de moindre résistance pour le courant électrique.
Cet appareil est doté d'un cordon muni d'un bouchon-conducteur . La
fiche doit être branchée à une prise appropriée, correctement installée et
raccordée à la terre conformément à tous les codes et décrets locaux.
AVERTISSEMENT : Un raccordement incorrect du conducteur de terre
peut entraîner un risque de décharge électrique. Vérifiez avec un
électricien ou un agent de service qualifiés si vous doutez de la mise à la
terre correcte de l'appareil. Ne modifiez pas la fiche fournie avec
l'appareil : si elle ne convient pas à la prise, faites installer une prise
appropriée par un électricien qualifié.
AVERTISSEMENT : Afin de réduire le risque de décharge électrique,
débranchez cet appareil de l'alimentation électrique avant de procéder à
une opération d'entretien. Passer les commandes sur la position ARRÊT
ne débranche pas l'appareil de l'alimentation électrique.
3
Sécurité et précautions
Observez les points suivants afin d'éviter de vous blesser, de blesser d'autres
personnes et d'endommager les biens :
Ceci indique que des blessures graves ou la mort
Avertissement
peuvent être causées.
Ceci vous rappelle que des blessures aux personnes
Attention
et des dommages aux biens peuvent être occasionnés.
Veuillez observer le contenu suivant des graphiques.
Ce graphique représente (nécessite attention) et les
précautions sont affichées en détail à l'intérieur du graphique.
Ce graphique représente (opération interdite) et les points interdits
sont affichés en détail à l'intérieur du graphique.
Ce graphique représente (exécution forcée) et les points à
exécution forcée sont affichés en détail à l'intérieur du graphique.
Cet appareil n'est pas conçu pour être utilisé par des personnes (y
compris les enfants) aux capacités physiques, sensorielles ou
mentales réduites ou manquant d'expérience et de connaissances,
sauf si elles sont surveillées ou formées pour l'utilisation de cet
appareil par une personne responsable de leur sécurité. Les enfants
doivent être surveillés afin de s'assurer qu'ils ne jouent pas avec
l'appareil.
Avertissement
Veuillez ne pas laisser les enfants
monter sur la machine ou regarder
dans le tambour d'essorage rotatif afin
d'éviter des accidents.
Il est interdit de laver les vêtements en
contact avec du kérosène, de
l'essence, de l'alcool et tout autre
produit inflammable.
Interdit
Interdit
Veuillez ne pas endommager le cordon
flexible d'alimentation et la fiche
électrique pour éviter une décharge
électrique, un court-circuit ou un
incendie.
Nettoyez régulièrement la fiche
électrique pour retirer la poussière et la
saleté afin d'empêcher tout faux
contact.
!
Interdit
Avertissement
Ne démontez pas et
n'assemblez pas l'appareil
sans autorisation.
Veuillez ne pas insérer votre main ni
retirer les vêtements à l'intérieur du
tambour d'essorage avant qu'il ne soit
complètement arrêté.
Pas de désassemblage
Ne pas toucher
N'installez pas l'appareil dans un
environnement humide et pluvieux
afin d'éviter une décharge électrique,
un incendie ou des accidents causés
par des défaillances et des
déformations.
Veuillez ne pas rincer directement
l'appareil avec de l'eau lors du
nettoyage.
Veuillez bien raccorder la ligne de terre
de la prise pour éviter une décharge
électrique par fuite accidentelle. (Mise
à la terre)
Veuillez débranchez l'appareil de la
prise électrique s'il n'est pas utilisé.
Mise à la terre
Retirez la fiche
Veuillez ne pas poser sur le lave-linge
une bougie allumée, de l'encens antimoustique, une cigarette et d'autres
produits inflammables ainsi qu'une
cuisinière électrique, un
ventilateur chauffant et
d'autres sources de
chauffage.
Veuillez bien insérer la fiche électrique.
鹅天小
小天鹅
Pas de rinçage
Aucune humidité
4
!
La fumée et le feu interdit
5
Installation du lave-linge
Veuillez utiliser la source électrique
correcte.
Veuillez ne pas retirer ou insérer la
fiche avec les mains mouillées afin
d'éviter une décharge électrique.
Défaites l'emballage.
Boîte
d'emballage
! Défaites l'emballage et extrayez le carton du
polistyrène par le bas.
! Ouvrez le carton et retire les accessoires.
!
Les mains mouillées sont interdites
! Toute opération de test ou le lavage de la mousse sont
strictement interdits.
Coussin de base en mousse
Attention
Psitionnement de l'embout de drainage supérieur.
La hauteur du tuyau de vidange ("a") doit être comprise entre
86 et 100 cm. Le diamètre de "b" ne doit pas être inférieur à
3 cm, et la capacité de flux ne doit pas être inférieure à
40L/Min.
La température de l'eau ne doit pas
dépasser 55 ℃ lorsque vous lavez à
l'eau tiède.
Veuillez vous assurer que le tuyau
d'arrivée d'eau est raccordé et que le
robinet est ouvert avant de laver les
vêtements.
C
5
>5
86~100 cm
Avant de lancer la machine, l'utilisateur doit raccorder le
tuyau de vidange et le positionner à 86/100 cm du sol.
+
!
+
Interdit
Il est strictement interdit de placer et
d'asseoir des enfants ou de poser
des poids sur le lave-linge.
Les clients ne sont pas autorisés à
modifier la ligne électrique sans
permission.
POIUR SYSTÈME D'EVACUATION UNIQUEMENT
Installation du conduit d'alimentation en eau intérieur.
Interdit
Interdit
Veuillez ne pas laver d'imperméables
en duvet, de manteaux de pêche et
de vêtements similaires dans le lavelinge.
Veuillez ne pas tirer sur le cordon
électrique quand vous retirez la fiche.
!
Interdit
6
Placz le conduit d'alimentation en eau
intérieur (doté d'un sac de filtration en
métal) au moyen d'une vis.
Vissez l'autre extrémité du tuyau
d'entrée d'eau sur le robinet d'entrée
d'eau. (avec une bague en caoutchouc
à l'intérieur)
Ecrou de serrage
Tuyau d'entrée d'eau
Remarque : Lorsque vous serrez l'écrou de
vissage, appliquez une force régulière et ne
faites pas pivoter la vanne intérieure afin de
ne pas la fissurer ni de fissurer son joint.
Uniquement pour les modèles doté d'un
conduit d'alimentation en eau à double vissage
Si le cordon est endommagé, il doit être réparé par le fabricant ou
par l'un de ses techniciens agréés. Seules les personnes
qualifiées sont autorisées à intervenir. Les consignes concernant
la connexion des conduits d'alimentation sont fournies avec
l'appareil et doivent être respectées avec précaution. Le nonrespect de ces consignes pourrait entraîner une panne de
l'appareil ou blesser l'utilisateur. Cet appareil est réservé à un
usage en intérieur.
7
Installer l'adaptateur rapide d'évier
Préparation avant le lavage
Lorsque vous installez l'adaptateur au robitnet, suivez les étapes suivantes:
1. Premièrement, retirez l'aérateur de votre robinet puis définissez le type/la taille de
votre robinet.
2. Une fois cela déterminé (extrémité filetée intérieure ou extérieure), positionnez une
bague en caoutchou de taille adaptée sur l'adaptateur.
3. Reliez le raccord de robinet argenté au robinet.
4. Fixez l'adaptateur au conduit d'alimentation en eau intérieur et vérifiez que la bague en
caoutchouc a été correctement placée.
5. Reliez l'autre extrémité du conduit d'alimentation intérieur et vérifiez que la bague en
caoutchouc est bien positionnée.
Robinet
Machines à laver
Ajustez le pied réglable pour placer
1 la machine à laver stablement.
2
Installez le tuyau
d'entrée d'eau.
Pour deux tuyaux d'entrée
+
+
+
+
Pied réglable (étendu lors de tourner
dans le sens des aiguilles d'une montre
et raccourci lors de tourner contre le sens des aiguilles
d'une montre ) ( incliner légèrement la machine à laver
tout d'abord et desserrez le bouton du pied réglable.
Ajuster le pied réglable de façon à assurer que les quatre
coins de la machine à laver soient solidement en contact
avec le sol. Ensuite, serrez le bouton du pied réglable et
le verrouiller. Si le sol n'est évidemment pas plat, la
correction doit être apportée sur la surface du sol, sinon
le tambour de la machine à laver se penche et frappe le
cabinet)
Adaptateur du robinet
Connecteur rapide
Lavage
3
Connectez-vous
avec une source
d'alimentation.
le tuyau de
5 Déposez
vidange.
de lavage à
une quantité
appropriée
Tuyau d'entrée d'eau
Tuyau de vidange
supérieur
Lavage
le robinet
4 Tourner
d'alimentation
d'eau.
>860mm
Tuyau d'évacuation
Remarque :
L'eau va
déborder
lorsque la
hauteur du
tuyau de
vidange est
inférieure.
860mm.
+
Vue arrière de
la machine à laver
+
AVIS
!
8
Avant le lavage, veuillez retirer les monnaies, les clés
et d'autres matériaux dures, et fermer bien la zip des
vêtements afin d'éviter l'endommagement des
vêtements et du tambour.
9
les
6 Mettre
vêtements
Pied réglable
Accessoires
Embout intérieur 1 pc
10
Référez-vous aux documents réels comme pièces jointes
11
4. Retard
3
3.Température
5
Température
Appuyez sur le bouton
pour sélectionner La
température différente
pour le lavage
4
Programme
Si se cambia el dibujo, no hay información más.
Appuyez sur le bouton pour prédéterminer le temps de
retard. Chaque pression sur la touche à moins de 24
heures , le temps de retard est ajouté une heure.
Chaque pression sur la touche à moins de 24 heures, le
temps de retard est ajouté 6 heures, après 48 heures,
l'indicateur de préréglage revient à l'état originaire. Si
vous appuyez sur le bouton en permanence, le temps
de retard change automatiquement.
8 7 6
Capacité de charge Retard
Petit
Essorer
Fonction
Froid
Moyen
Rinçage
Retard (hr.)
Chaud
Température
modérée
Grand
Lavage
Lumière/Flash
Cabinet
8.Fonction
Rapide
Anti-plis.
Essorage à l'air libre
Lourd
jeans
Normal
Après la sélection du programme,
appuyez sur le bouton pour
démarrer.
Appuyez sur le bouton pour rompre
l'opération, appuyez de nouveau
sur la touche, le programme se
poursuit jusqu'à la fin du
programme.
Appuyez sur le bouton ON /
OFF une fois pour brancher
la machine à laver.
Appuyez de nouveau pour
débrancher la machine.
1.ON/OFF (Démarrage/Arrêt)
1.L'indicateur de la fonction indique
qu'une fonction sélectionnée est
Activée ou que le cycle est amorcé.
2.Pendant le cycle de lavage, la
lumière indique l'état actuel du cycle
de lavage / rinçage / essorage.
2.Start/Pause (Mise à marche / Pause)
2
Start/Pause
ON/OFF
1
Appuyez sur "capacité de charge" et
"Fonction" en même temps pour
verrouiller les boutons sur le panneau
de commande.
Appuyer de nouveau sur "capacité de
charge" et "Fonction" en même temps
pour déverrouiller les boutons.
Cadre
Temps restant (min)
Panneau de commande
7.Verrou enfant
Tuyau de vidange (
seulement pour le tuyau de
vidange supérieur)
6.Capacité de charge
Couvercle supérieur
Appuyez sur le bouton,
sélectionner le niveau d'eau
conformément à la quantité de
lavage. Les lumières
d'indicateur se mobilisent à
chaque pression sur le bouton,
la lumière et le flash s'alternent.
Entrée d'eau
5. Programme
Ligne électrique
Peut sélectionner le
programme entièrement
automatique comme:
Lourd (lumière) Rapide (flash)
Jeans (lumière) Antirides
(flash) Normal (Lumière) Sec
à l'air (flash)
Identification des pièces du lave-linge
Instructions du panneau de commande du lave-linge
Características especiales
À propos de la procédure du programme de lavage automatique intégral
Méthode de l'utilisation du
bouton "retard"
Temps de lavage.
1. Mettre sous tension.
2. Ouvrez la porte et placez le tuyau d'évacuation.
3. Placez le linge et la lessive.
4. Sélectionner la capacité de charge appropriée
conformément à la quantité de vêtements.
5. Sélectionnez les fonctions et les programmes.
6. Appuyez sur DELAY pour lancer le démarrage en décalé.
7. Appuyez sur le bouton " START / PAUSE".
Appuyez sur le bouton "DELAY" à chaque fois, le
nombre sur l'indicateur numérique est ajouté "1";
Après que le nombre atteint "24", appuyez sur le
bouton "DELAY" à chaque fois, le nombre est ajouté
"6"; Après le nombre atteint 48, la lumière du temps de
retard s'éteint, et le programme de retard retourne à
l'état d'origine.
Caractéristiques de cinq programmes automatiques sont les suivants:
Capacité de charge
Lavage
Remarques
MODE
Temps
Temps
Temps
Temps
Lourd
Grand
Petit-Large
12 minutes
2
5 minutes
42 minutes
Rapide
Grand
Petit-Large
1
30 minutes 10 minutes
Normal
Grand
Petit-Large
Laver 4 minutes +
tremper 13 minutes
1
7 minutes
2
(Minutes)
2 minutes
30 minutes
Retard ( heures)
Confirmez l'heure de départ et vérifiez que tout est correctement réglé
1. Une fois la fonction de démarrage en décalé lancée, le voyant correspondant clignote,
etles autres s'éteignent.
2. Une fois la fonction de démarrage en décalé lancée appuyez sur "Delay"; vous
pouvez consulter le programme et la fonction prédéfinie. Lâche le bouton, le
programme revient en mode déémarrage en décalé.
Annuler ou modifier le temps de décalage.
1. Appuyez sur le bouton Power pour annuler le temps de retard.
2. Pour modifier le temps de décalage, annulez d'abord l'heure configurée, puis appuyez
sur le bouton "Delay" pour réinitialiser le système.
Total
Par défaut
Temps restant
Retard
Rinçage Essorage
Programme
jeans
Grand
Petit-Large
Laver 3 minutes 40
secondes + tremper
13 minutes
Anti-plis.
Grand
Petit-Large
12 minutes
2
essorage à l'air
libre
Grand
_____
_____
_____
39 minutes
1 minute 10
42 minutes
secondes
_____
Temps de
lavage
Inclure
trempée
Temps
34 minutes
57 minutes 60 minutes
La capacité de charge recommandée:
Capacité de charge
Capacité de charge en
livres
L'eau utilisée approximatif en gallon
Grand
6,79
10,57
Moyen
4,89
7,93
Petit
A moins de 4.89
4,23
Rapide
Le temps de lavage est court. Convient pour laver les vêtements légers et les vêtements
tachés en été.
Normal
Laver les vêtements de coton ou le linge de maison.
jeans
Capacité de lavage élevée, adapté pour laver les vêtementstrès tachés ou volumineux.
Observations:
Anti-plis.
Le temps de lavage est court, le temps de inçage est plus important, pour bien rincer les
vêtements.
Essorage à l'air libre
Pour les vêtements fragiles, délicats ou non étanches, cette fonction permet un séchage
rapide mais naturel, donc sans risque.
Il est recommandé d'utiliser de la poudre bas ou mi mousse.
Le volume de la lessive est modifiée par type différent. Vous devez lire le manuel
d'utilisation.
Le volume d'eau est différente en raison de vêtements divers. · Si la machine à
laver ne fonctionne pas, veuillez ajuster le volume de vêtements ou le niveau
d'eau.
Le volume de l'eau énumérés ci-dessus est basée sur le volume des vêtements
normaux.
Le programme de test
Au cours de programme “Normal”, il est identifié comme Programme d'Efficacité.
Historique des fonctions
Le machine revient aux derniers mode de lavage utilisés une fois qu'elle est sous tension.
14
15
Nettoyage et entretien du lave-linge
Entretien
Fin du programme
Identifier les problèmes courants du lave-linge
Utiliser des tissus doux pour essuyer l'eau et la saleté sur la
surface de la macine, après chaque utilisation. N'utilisez ni
détergents, ni produits abrasifs, afin de ne pas risquer
d'endommager les accessoires en plastique .
La machine à laver enverra le son de" "dou-dou" "à la fin
de toute opération de programme pour vous rappeler de
prendre le linge ou de faire fonctionner à nouveau.
Après le bip sonore , la machine à laver revient à son
état hors tension, sans écran et sans voyants lumineux.
Veuillez: · fermer le robinet , débrancher la prise lorsque
la machine n'est pas utilisée afin d' éviter les fuites d'eau
ou les risques d'incendie .
Lorsque la machine montre des signes de faiblesse, contacte votre revendeur le plus
proche ou votre technicien habituel afin de la faire contrôler.
Si la machine semble ne pas fonctionner normalement ou émet des bruits anormaux ,
suivez les consignes suivantes:
Vérifiez l'état général de la machine
Pannes
Nettoyer l'entrée d'eau
! L'alimentation est peut-être coupée ou le fusible est grillé.
Nettoyer le filtre
Après une utilisation continue , le tambour et le
filtres peuvebt être encombrés et doivent donc être
nettoyés selon les étapes suivantes :
1. Mettez sous tension , puis fermez le robinet .
2. Faites tourner la machine à vide pendant 5
secondes afin que l'eau s'écoule dans la cuve
par le tuyau d'arrivée d'eau .Puis éteignez
l'alimentation.
3. Démontez le tuyau d'entrée d'eau et nettoyez le
sac en filet, puis remontez le dispositif d'entrée
d'eau.
Une fois la machine utilisée, veuillez suivre les consignes de
nettoyage suivantes:
1. Sortez le filtre intérieur.
2. Ouvrez-le et mettez-le à tremper dans le d'eau.
3. Restaurer ^ et le fixer.
Éléments d'inspection
! L'alimentation en eau est peut-être coupée ou la pression d'eau est trop faible .
! Le tuyau d'alimentation est-il correctement branché et le robinet d'eau est-il ouvert? ! Le
L'eau ne coule
filtre et la vanne sont-ils propres et non pas encrassés?
pas
! La bobine de la vanne n'est-elle pas endommagée? ( Un bruit léger est normal lorsque la
vanne intérieure est activée)
! Si le bouton "Start / Pause" est enclenché après que l'interrupteur a été activé.
! L'alimentation est peut-être coupée ou le fusible est grillé.
(uniquement pour filtre magique)
Après chaque utilisation, nettoyer la machine en
respectant les étapes suivantes:
1. Retirez le filtre.
2. Retournez le sac et faite-sle tremper dans l'eau .
3. Repositionnez-le après l'avoir légèrement séché.
! La tension d'alimentation est trop faible.
Pas de lavage
! La quantité d'eau atteint le niveau d'eau requis .
(La machine ne fonctionnera pas si la quantité d'eau nécessaire n'est pas respectée)
! La machine est en mode Démarrage en décalé. (Elle ne se lancera qu'à l'heure configurée)
! L'embout d'évacuation est mal positionnée, ou positionné trop haut.
Evacuation
anormale
! La bague en caoutchouc est encrassée.
(uniquement pour filtre normal)
Observations:
Si le filtre n'est pas nettoyé au bon moment ( toutes les 10 heures d'utilisation ) , un
problème de vidange pourrait résulter .
! L'embout du tuyau d'évacuation est mal vissé.
! La porte est mal fermée.
Rinçage
inefficace
! Si tous les vêtements empilés sur un même côté de la machine ou s'ils sont trop
volumineux.
! Si la machine n'est pas stable ou est inclinée. (Le sol n'est pas lisse)
! Si la courroie du moteur est desserrée.
Remarque : Pendant le processus d'essorage le linge est empilé sur un seul côté du
cylindre d'essorage, cela peut provoquer le déséquilibre du tambour. Dans
ce cas, la machine tentera de réajuster automatiquement l'équilibre (une fois
le lavage terminé). Toutefois, si ce déséquilibre n'est pas rectifié, cela
signifie que la fonction d'auto-correction ne peut pas résoudre le problème.
Dans ce cas, arrêtez la machine et repositionnez de manière équilibrée le
linge dans le tambour.
16
17
Affichage des pannes et solutions
Lorsque la machine montre des signes de faiblesse, contacte votre revendeur le plus
proche ou votre technicien habituel afin de la faire contrôler.
Si la machine à laver ne peut pas fonctionner normalement, et l'indication anormale est
affichée dans le panneau d'affichage numérique ou les alarmes de la machine, vérifier et
corriger s'il vous plaît comme suit.
Panne
Cause de la panne
Signal
Alarme de la
courroie
Injection d'eau pendant
environ 16 minutes, mais le
niveau de l'eau préconfiguré
n'est pas respecté
Alarme pour
ouvrir le
couvercle
Ouvrir le couvercle après le
démarrage de la
temporisation . Ouvrir le
couvercle lorsque la machine
est en train de essorer.
Ouvrez le couvercle lors
d'accéder dans l'état de verrou
enfant.
Alarme de
déséquilibre
Vérifié déséquilibre pour la
troisième fois .
Fusées "E3" , et
d'autres lumières
sont éteintes .
Égoutter alarme
Après la vidange pendant 4
minutes , ne finit pas de
vidange .
Fusées "E4" , et
d'autres lumières
sont éteintes .
alarme de
trop-plein
Tenue Inlet
Fusées " E5 " , et
toutes les lumières
de levier de l'eau
Flash .
Alarme sonore
Fusées " E1 " , et
d'autres lumières
sont éteintes .
La sonnerie
retentit sur
bourdonnement
pendant 10
secondes . Si la
" E2" , ou que les
faute n'est pas
autres voyants sont
Résolu, sonner
allumés.
10 secondes une
fois par toutes
les 16 minutes.
Signal de fin
Ouvrez le
couvercle pour
faire face à des
défauts , puis
fermez le
couvercle pour
arrêter l'alarme .
Alarme.
Remarque : 1 : alarme enlevé , le retour à l'état avant l'alarme ; échecs E3 apparaissent dans le
même voyage .
2 : alarme de trop-plein , vanne automatique de vidange d' eau libre jusqu'à l'échec manuel de
contacts intervention .
Spécifications techniques
Dimensions
(mm)
515X525X938
Poids du produit
31kg
Valeur actuelle
3,0A
Taille du tambour
1.6Cu.ft
Tension
nominale
120V-
Fréquence
nominale
60Hz
Pression d'eau maximale autorisée dans l'entrée d'eau 0.5Mpa
La pression minimale de l'eau est autorisée pour
l'entrée d'eau
18
0.1 Mpa