1
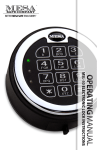
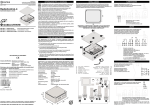
CATEGORY
PAGE
QUICK START
2
TROUBLE SHOOTING
3
BASIC FEATURES & FUNCTIONS
3
SAFE OPERATION & PROGRAMMING
4
HOW TO OPEN YOUR SAFE
4
CHANGING THE MASTER CODE
4
ACTIVATE USER CODES
5
CHANGE USER CODES
5
DELETE USER CODES
5
SETTING SINGLE USER & DUAL USER MODE
6
SETTING TIME DELAY
6
HOW TO OPEN IN TIME DELAY MODE
6
LOW BATTERY WARNING
7
CHANGING YOUR BATTERIES
7
MSL-500 ELECTRONIC LOCK INSTRUCTIONS | PG.2
DEAR VALUED CUSTOMER:
Congratulations on choosing your new Mesa Safe to secure and protect your
valuables! You have made an excellent choice in your security measures. M ESA
S AFE C OMPANY has built a solid reputation on integrity and quality craftmanship.
We pride ourselves on delivering the best products in the industry and
consistently exceed customer expectations.
Your Mesa Safe product comes with a Support Team and Warranty in place
that is second-to-none. We have the qualified Safe Technicians throughout the
country, ready to assist you, should you have any issues regarding your unit.
Please visit us at M ESA S AFE .com and scour our vastly diverse selection of
products to meet your security needs. Thank you for choosing M ESA S AFE
C OMPANY .
Before using your unit, thoroughly read and understand the Operating Instructions
of the unit. This will ensure maximum efficiency and usability.
!
"
#
$
%
&
(
"
#
$
%
&
1
2
'
4
)
*
!
$
"
#
$
%
&
,
-
.
*
ĂƩĞƌLJ
&
-
!
6
8
9
+
3
5
7
*
0
#
&
QUICK START
1 Install the 9-V Battery that is included with your safe
2 Enter 1-2-3-4-5-6-7-8-#
3 Turn handle before the green light turns off
4 To lock your safe, close door & turn handle back to the locked position
IMPORTANT : Always make sure your safe is locked before walking away!
If your code is correct a green light will turn on for approximately 5 seconds
& you will also hear a ‘Click’
If the code is incorrect, a red light will turn on, following with 5 ‘Beeps’
NOTE : Be sure to press firmly & ONLY use your finger tips to press the
keys on the keypad. DO NOT USE your finger nail, a pen, etc. This will
damage the keys.
PG.3 | MSL-500 ELECTRONIC LOCK INSTRUCTIONS
TROUBLE SHOOTING
The Lock Has No Response [No Beeps]
/
Make sure the battery wires in the keypad housing are not pinched & are
securely connected
Lock may possibly be in the Lockout Penalty mode. Wait 5 minutes & check
if the lock responds [See Wrong Try Penalty; pg. 3]
Replace the existing batteries with new ones
/
/
[See Changing Your Batteries; pg. 3]
The Lock Is Responding but Does Not Unlock
/
Make sure you are getting a valid response
Make sure you get a signal with every key stroke
Make sure you are not in Time Delay mode
/
/
[See How To Open In Time Delay; pg. 3]
/
Replace the existing batteries with new ones
[See Changing Your Batteries; pg. 3]
0
If the lock still does not open, contact M ESA S AFE C OMPANY Technical Support :
800.490.5624 [Monday thru Friday 7AM - 4PM/PST ]
! IMPORTANT : DO NOT RETURN SAFE TO STORE
If you are missing parts, have difficulty programming the lock or opening your
safe, or any additional questions regarding the use and care of your safe, DO
NOT RETURN your safe to the store. Please contact M ESA S AFE C OMPANY Technical
Support : 800.490.5624 [Monday thru Friday 7AM - 4PM/PST ] for assistance.
BASIC FEATURES & FUNCTIONS
/
6 Personal Codes available
[Users : Master, User 1, User 2, User 3, User 4, & User 5]
1
NOTE : Avoid confusion - keep notes on which code belongs to which user.
The M ESA MSL-500 Electronic Lock is shipped from the factory with a factory
set Master Code.
/
2
IMPORTANT : Because the codes are factory set, we highly recommened
changing the codes to your own unique codes immediately!
/
/
/
If 4 incorrect codes are entered consistently, the keypad will shut down for a
period of 5 minutes. During this shut down period the keypad will not accept
any codes
Programmable time delay function can be set from 01 minutes to 59
minutes
Optional dual user mode, in this mode two seperate codes will need to be
entered to unlock the safe
MSL-500 ELECTRONIC LOCK INSTRUCTIONS | PG.4
SAFE OPERATION & PROGRAMMING
Your Master Code is factory set to : 1-2-3-4-5-6-7-8
3
4
NOTE : The Master Code should always be held by the owner of the safe.
You will not be able to activate/delete users, set up single/dual entry and
set up time delay without the Master Code.
HOW TO OPEN YOUR SAFE
Single User Mode [Default Setting]
1 Input : Code - # [light stays green for 5 seconds]
2 Turn the handle clockwise before the green light disappears
3
3
Example : 1-2-3-4-5-6-7-8-#
Invalid Code: Red light along with 5 ‘Beeps’
Dual User Mode
[Please refer to Setting Single User & Dual User Mode; pg. 4]
1 Input : 1 st Code - # [lock will ‘Beep’ 2 times]
2 Input : 2 nd Code - # [light stays green for 5 seconds]
3 Turn the handle clockwise before the green light disappears
3
3
Example : 1 st Code - # - 2 nd Code - #
Invalid Code: Red light along with 5 ‘Beeps’
Wrong Try Penalty
If 4 wrong codes are entered, the keypad will not accept any codes for 5
minutes. If you press any key during this penalty, the orange light will turn on
for approximately 2 seconds and you will hear a ‘Beep’.
CHANGING THE MASTER CODE [Code length : 3 - 8 digit code]
4
NOTE : Always perform this operation with the door opened! Test the
new code several times before closing the door.
1 Input : * - * [lock will ‘Beep’ 2 times]
2 Input : 8-8-8-# [lock will ‘Beep’ 2 times]
3 Input : Current Master Code-# [lock will ‘Beep’ 2 times]
4 Input : New Master Code-# [lock will ‘Beep’ 2 times]
5 Re-Input : New Master Code-# [light stays green for 3 seconds]
3
3
Example :
- -8-8-8-# - Master Code - # - New Master Code - # - New Master Code - #
*Unsuccessful
*
Code Change: 5 ‘Beeps’ [the old code is still valid];
repeat steps 1 - 5
PG.5 | MSL-500 ELECTRONIC LOCK INSTRUCTIONS
ACTIVATE USER CODES [Code length : 3 - 8 digit code]
1 Input : * - * [lock will ‘Beep’ 2 times]
2 Input : 3-3-3-# [lock will ‘Beep’ 2 times]
3 Input : Current Master Code-# [lock will ‘Beep’ 2 times]
4 Input : [User#] - # [User#: Specify which user you would like to activate: 1,
2, 3, or 4]
Input : New User Code - # [lock will ‘Beep’ 2 times]
Re-Input : New User Code - # [light stays green for 3 seconds]
5
6
5
Example :
- -3-3-3-# - Master Code - #-4-# - New User Code - # - New User Code - #
*Unsuccessful
*
Code Activation : 5 ‘Beeps’ [repeat steps 1 - 6]
5
CHANGE USER CODES [Code length : 3 - 8 digit code]
1 Input : * - * [lock will ‘Beep’ 2 times]
2 Input : 4-4-4-# [lock will ‘Beep’ 2 times]
3 Input : Current User Code-# [lock will ‘Beep’ 2 times]
4 Input : [User#] - # [User#: Enter the User # that identifies the Current User
Code on Step 3]
Input : New User Code - # [lock will ‘Beep’ 2 times]
Re-Input : New User Code - # [light stays green for 3 seconds]
5
6
5
Example :
- -4-4-4-# - User 2 Code - #-2-# - New User Code - # - New User Code - #
*Unsuccessful
*
Code Activation : 5 ‘Beeps’ [repeat steps 1 - 6]
5
DELETE USER CODES [Code length : 3 - 8 digit code]
1 Input : * - * [lock will ‘Beep’ 2 times]
2 Input : 6-6-6-# [lock will ‘Beep’ 2 times]
3 Input : Current Master Code-# [lock will ‘Beep’ 2 times]
4 Input : [User#] - # [lock will ‘Beep’ 2 times]
[User#: Specify which user you would like to delete: 1, 2, 3, or 4]
Re-Input : [User#] - # [light stays green for 3 seconds]
5
5
Example :
- -6-6-6-#-Master Code-#-1-#-1-#-New User Code- #-New User Code-#
[ This will delete User 1]
**
5
Unsuccessful Code Change : 5 ‘Beeps’ [repeat steps 1 - 5]
MSL-500 ELECTRONIC LOCK INSTRUCTIONS | PG.6
SETTING SINGLE USER & DUAL USER MODE
Single User Mode [Only 1 code needed to open safe]
1 Input : - [lock will ‘Beep’ 2 times]
2 Input : 1-5-8-# [lock will ‘Beep’ 2 times]
3 Input : Current Master Code-# [lock will ‘Beep’ 2 times]
4 Input : 1-# [light stays green for 3 seconds]
* *
6
Example :
- -1-5-8-#-Master Code-#-1-#
[ This will delete User 1]
**
6
Unsuccessful Code Change : 5 ‘Beeps’ [repeat steps 1 - 4]
Dual User Mode [2 seperate codes needed to open safe]
1 Input : - [lock will ‘Beep’ 2 times]
2 Input : 1-5-8-# [lock will ‘Beep’ 2 times]
3 Input : Current Master Code-# [lock will ‘Beep’ 2 times]
4 Input : 2-# [light stays green for 3 seconds]
* *
6
Example :
- -1-5-8-#-Master Code-#-2-#
*Unsuccessful
*
Code Change : 5 ‘Beeps’ [repeat steps 1 - 4]
6
[ To use this mode, refer to How To Open Your Safe on pg. 2]
SETTING TIME DELAY [0 - 59 minute time delay]
1 Input :
2 Input : * - * -1-5-9-# [lock will ‘Beep’ 2 times]
3 Input : Current Master Code-# [lock will ‘Beep’ 2 times]
4 Input : 2-# [light stays green for 3 seconds]
01 = 1 minute Time Delay
59 = 59 minute Time Delay
00 = Will turn Time Delay mode off
6
6
6
**
Example : - -1-5-9-#-Master Code-#-3-#
[ This will set the Time Delay period to 3 minutes]
Unsuccessful Code Change : 5 ‘Beeps’ [repeat steps 1 - 4]
The Master Code will override the Time Delay
HOW TO OPEN IN TIME DELAY MODE
1 Enter any valid code other than the Master Code
2 Once the code is entered the Time Delay will activate
3 During the Time Delay, codes will not be accepted. When you press any
PG.7 | MSL-500 ELECTRONIC LOCK INSTRUCTIONS
4
5
6
key, the light will stay orange for 3 seconds
The lock will ‘Beep’ continuously & the green light will flash for the last 30
seconds of the Time Delay period
Once the continuous ‘Beeps’ stop, the lock will unlock for 5 seconds
Turn the handle to open safe
LOW BATTERY WARNING [ Time to change your batter y]
7
When you enter your code, a green light & a red light will turn on for
approximately 5 seconds; you will also hear 10 ‘Beeps’. The safe will probably
not unlock when you get this response
When you enter your code, a green light will turn on for approximately 1
seconds. The safe will not unlock when you get this response
If your keypad has no response [no beeps; no lights]
7
2
1
9
:
;
4
A
B
=
>
7
N
6
5
C
M
3
<
O
*
?
D
@
K
F
9
8
J
E
G
H
I
ĂƩĞƌLJ
ŽŵƉĂƌƚŵĞŶƚ
L
0
P
Q
R
#
7
S
T
U
ĂƩĞƌLJ
ŽŶŶĞĐƚŽƌ
9V
ϵsĂƩĞƌLJ
CHANGING YOUR BATTERIES
1 Locate the battery cover on the bottom edge of the keypad & remove the
2
cover by pulling on the tab
Carefully & gently remove the 9-V battery from the compartment
8
CAUTION : Hold onto battery connector to avoid pulling
wires out of housing.
3 Carefully re-insert the new 9V battery, do not force the battery into the
compartment
4 The lock will retain all current codes & settings
© 2013 MESA SAFE COMPANY