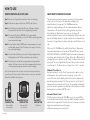
1
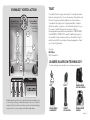
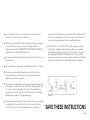
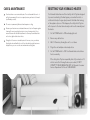
Vornado Air, LLC
415 East 13th Street, Andover, Kansas 67002
800.234.0604 | www.vornado.com
Speak your mind www.vornado.com/reviews
CL3-0150 RA
CL3-0150 rA, V00
Read and SAVE these important instructions
Whole Room Heater Owner’s Guide
www.vornado.com
MODEL TVH600
Designed, engineered and supported in Andover, Kansas.
www.vornado.com
Questions or comments?
¿Prequntas o comentarios?
[email protected]
800.234.0604
Vornado® Vortex Action
Ordinary Heater
Without Adequate
Heat Circulation
Vornado Whole
Room Heater
With Signature
Vortex Heat
Circulation
82º
72º
82º
72º
82º
72º
TRUST
It is said that trust isn’t given, but earned. For decades Vornado
has been earning the trust of our customers by offering them only
the best. Vornado provides the highest level of performance,
coupled with the highest level of support available. Complete
satisfaction with no exceptions – this is Vornado’s promise to you.
If you are not satisfied for any reason, please contact us.
Knowledgeable representatives are available at 1-800-234-0604
from 8:00 AM to 5:00 PM CST. A wealth of additional support is
also available online at www.vornado.com. On behalf of myself
and the entire staff at our Andover, Kansas headquarters – thank
you for selecting Vornado.
Sincerely,
Bill Phillips
CEO, Vornado Air
Leaders in Airflow Technology ™
Products and support are available online at www.vornado.com
62º
TVH600
OFF
OFF
ON
OFF
Zippi™
Flippi™
Whole Room
Air Circulators
Whole Room
Humidifiers
TOWER
CIRCULATORS
whole room
heaters
ON
Ordinary heaters provide only localized heat. Heat immediately rises
to the ceiling, resulting in cold and hot spots in the room. Vornado’s
OFF
OFF
OFF
unique Vortex Action delivers continuous, uniform heat surrounding
everyone in the room in a warm, comfortable temperature.
ON
ON
English 3
IMPORTANT INSTRUCTIONS
READ ALL INSTRUCTIONS BEFORE USING THIS HEATER.
Please visually inspect all internal and external components before connecting to electric current. If any damage is found,
DO NOT USE THIS UNIT and contact Vornado Air LLC at 1-800-234-0604.
When using electrical appliances, basic precautions should always be followed to reduce the risk of fire, electric shock, and
injury to persons, including the following:
Read all instructions before using this heater.
This heater is hot when in use. To avoid burns, do not let bare skin touch
hot surfaces. Use handles when moving this heater. Keep combustible
materials, such as furniture, pillows, bedding, papers, clothes, and
curtains at least 3 feet (0.9 m) from the front of the heater and keep
them away from the sides and rear.
Extreme caution is necessary when any heater is used by or near children
or invalids and whenever the heater is left operating and unattended.
Always unplug heater when not in use.
Do not operate any heater with a damaged cord or plug or after the
heater malfunctions, has been dropped or damaged in any manner.
Discard heater, or return to authorized service facility for examination
and/or repair.
Do not use outdoors.
This heater is not intended for use in bathrooms, laundry areas and
similar indoor locations. Never locate heater where it may fall into a
bathtub or other water container.
4 English
Do not run cord under carpeting. Do not cover cord with throw rugs,
runners, or similar coverings. Do not route cord under furniture or
appliances. Arrange cord away from traffic area and where it will not be
tripped over.
To disconnect heater, turn controls to off, then remove plug from outlet.
Do not insert or allow foreign objects to enter any ventilation or
exhaust opening as this may cause an electric shock or fire, or damage
the heater.
To prevent a possible fire, do not block air intakes or exhaust in any
manner. Do not use on soft surfaces, like a bed, where openings may
become blocked.
A heater has hot and arcing or sparking parts inside. Do not use it in
areas where gasoline, paint, or flammable liquids are used or stored.
Use this heater only as described in this manual. Any other use not
recommended by the manufacturer may cause fire, electric shock, or
injury to persons.
Always plug heaters directly into a wall outlet/receptacle. Never use with
an extension cord or relocatable power tap (outlet/power strip). Operate
this heater only in its upright position.
Do not operate this heater on an elevated surface such as a shelf or
desktop. Use only while placed on the floor.
This heater is equipped with a thermal safety shut-off system, designed
to turn off the heater when an internal overheating condition is
detected (see How To Use “RESETTING YOUR VORNADO HEATER,” to
determine how to check and reset the heater).
Do not operate this product with any electronic speed-control device on
the same circuit.
grounded outlet that has been properly installed in accordance with all
electric codes and ordinances. If you are in doubt as to whether or not
an outlet is properly grounded, contact a qualified electrician.
This heater is for use on 120 volts. The cord has a plug as shown at A
in Figure 65.1. An adapter as shown at C is available for connecting
three-blade grounding-type plugs to two-slot receptacles. The green
grounding lug extending from the adapter must be connected to a
permanent ground such as a properly grounded outlet box. The adapter
should not be used if a three-slot grounded receptacle is available.
Do not use heater to dry human or animal hair/fur or articles of clothing.
This heater operates with an infrared remote control. Interference
between this remote and other remote-control-operated electrical
appliances in your home is possible.
This product is equipped with a 3-prong plug, with a grounding pin as a
safety feature. To reduce the risk of electric shock, this plug is intended
to connect to properly grounded outlets only. This plug will fit into a
grounded outlet only one way. Do not alter the plug. Do not attempt to
defeat this safety purpose of the grounding plug.
This product must be grounded. If the product malfunctions, grounding
provides a path of least resistance for the electric current to reduce
the risk of electric shock. The 3-prong plug must be inserted into a
Figure 65.1
SAVE THESE INSTRUCTIONS
English 5
HOW TO USE
Remote Control Quick Start Guide
Smart Remote Temperature Sensor
Step 1 Remove static cling decal from the Heater Touch Screen Display.
This innovation incorporates continuous monitoring of the temperature
at the location of the remote. This temperature reading is then
transmitted back to the base unit. The TVH600 automatically
adjusts heat output and fan speed to meet and maintain the desired
temperature set. The benefit of this technology is when you position
the Smart Remote Temperature Sensor near you, the heater will
automatically adjust to meet your desired temperature at that location.The
base unit will always attempt to operate using the sensor information from
the remote, if a signal cannot be obtained, the base unit will function on its
own.
Step 2 Plug Heater into approved wall outlet. DO NOT turn Heater on.
Step 3 Place 2 AA batteries (included) into Remote. Aim Remote at Heater. Recommended to be within 3 feet for programming the Heater.
Step 4 Press and hold the Remote POWER button for approximately 3 seconds, until display flashes one time. The Remote now has generated a new communication signal.
Step 5 Press and hold the Heater POWER button for approximately 3 seconds, until the display begins to flash. The Heater is now ready to recieve the new communication signal.
Step 6 Press the Remote Mode button one time. The Heater display will stop flashing and glow solid. The Remote and Heater are now linked.
Step 7 Set the Heater to desired heat setting, temperature setting and timer duration. The Remote does not need to be programmed for the Heater to function properly using only the main touch-screen display.
Note: You should only need to set up the connection one time upon first use
of your Heater. If for some reason the Remote loses its connection – repeat the
Remote Control Quick Start Instructions.
REMOTE
POWER BUTTON
Press and hold
for 3 seconds
6 English
HEATER DISPLAY
POWER BUTTON
Press and hold
for 3 seconds
REMOTE
MODE BUTTON
Press Once
Fully control the TVH 600 remotely with the Smart Remote Temperature
Sensor with illuminated screen. Turn the unit ON and OFF, select mode FAN ONLY, LOW HEAT or HIGH HEAT, adjust the desired set temperature
up or down, and set the automatic-off timer, all from up to 30 feet away. As
you adjust the remote, the base unit will “beep” to indicate it has received
your signal. The screen-light will dim after just a few seconds, to minimize
room illumination. The Remote does not require “line-of-site” to operate.
Illuminated Touch Screen
Innovative and easy to use, the Touch Screen provides complete control
at the base unit. Just touch the screen to “wake-up” or turn on the
screen. Follow the intuitive display and touch the screen to adjust mode,
desired temperature, and timer. The Timer can be set to turn the unit off
automatically in hour intervals up to 9 hours. The screen-light will dim after
just a few seconds to minimize room illumination. Both the remote and the
base unit feature one-button ON/OFF control.
Automatic Climate Control
With this unique technology, the TVH 600 does not cycle on and off like
most ordinary heaters, but uses continuous variable heat and air output to
maintain the set temperature. This allows the unit to often run on less than
high power, minimizing noise and energy use,
all while maintaining your set comfort level.
TVH600 OPERATING CONTROLS
Plug into a standard grounded wall outlet.
Press the POWER button to turn on the Heater.
Position the TVH 600 so the vortex beam of warm air is directed across
the room unobstructed.
Using the touch screen, select the mode you wish to use, LOW heat,
HIGH heat, or FAN ONLY.
Turn off after use.
TVH 600 TOUCH SCREEN CONTROLS
SMART REMOTE
TEMPERATURE
SENSOR
TVH 600 TOUCH SCREEN CONTROLS
POWER BUTTON
Press to turn unit ON or OFF, red light illuminates when power is ON.
HEAT MODE
To select the heat level you desire, press HIGH HEAT for up to 1500 watts,
or LOW HEAT for up to 750 watts of maximum power.
FAN ONLY MODE
Select FAN ONLY mode to operate the heater with no heat.
SET TEMPERATURE
To select the desired room temperature, press the [+] or [–] to raise or
lower the temperature by one degree at a time.
ROOM TEMPERATURE
The Touch Screen also indicates room temperature. The temperature displayed
is the approximate temperature at the location of the Smart Remote. The
base unit will always attempt to operate using the sensor information from the
Remote, if a signal cannot be obtained, the base unit will function on its own.
(See Smart Remote Temperature Sensor below.)
TIMER
The timer function allows you to set the unit to automatically turn off in one-hour
intervals up to 9 hours. Press the [+] to add hours of operation, or the [–] to
remove hours of operation. The unit will completely shut off when the set time
has expired.
SOUND
When a setting is changed you will hear a “beep” to indicate that a setting has
been changed.
LCD DISPLAY
Display window will be illuminated when adjustments are being made, and the
illumination will dim after adjustments are complete.
SMART REMOTE TEMPERATURE SENSOR
Fully control the TVH 600 with the Smart Remote. All adjustments made with
the Remote will be indicated with a “beep” from the unit to notify you that the
change has been received.
POWER
Press the ON/OFF button to turn the unit ON or OFF.
HEAT MODE
Press the HEAT UP or HEAT DOWN arrows to adjust heat settings one degree at
a time.
TIMER
Press the TIMER UP or TIMER DOWN arrows to adjust timer by one hour at a
time.
MODE
Press the center MODE button to select HIGH HEAT, LOW HEAT or FAN ONLY.
BATTERY REPLACEMENT
Screen will indicate when the batteries need to be replaced. The Remote
requires 2 AA batteries. To replace the batteries remove the cover located on
the bottom side of the remote. Note: The SMART REMOTE SENSOR sends
frequent signals to the base unit; this uses more power than ordinary remotes so
more frequent battery replacement will be required.
English 7
CARE & MAINTENANCE
Your heater has no user serviceable parts. Do not disassemble the unit – it
will void your warranty. If service is required, return your heater to Vornado
(see Warranty section).
The motor is permanently lubricated and requires no oiling.
Because your heater moves a substantial amount of air, it will require regular
cleaning. Be sure to unplug the unit prior to any cleaning activity. Use a
vacuum cleaner with the brush attachment to clean any accumulated dust
on the front grill and the side air inlets.
During the off-season or extended periods of non-use, store your heater.
Unplug the unit and bundle the cord. Save the plastic bag the heater was
shipped in so you can cover the unit and minimize settling dust.
RESETTING YOUR VORNADO HEATER
Your Vornado Heater has a multi-level safety shut-off system designed
to prevent overheating. Overheating may occur when the inlets or
outlet are blocked, a foreign object prevents the blade from turning,
or the appliance tips over. If this happens, the safety shut-off system
will cut power to the heat element and you will need to manually reset
the heater.
1.
Set the POWER switch to OFF and unplug the unit.
2.
Remove any obstructions.
3.
Wait 5 –10 minutes, allowing the unit to cool down.
4.
Plug in the unit and place in desired position.
5.
Set the POWER switch to ON. Your Vornado Heater should now
function normally.
If the safety shut-off system repeatedly shuts off your heater or if it
will not reset after following the above procedure, DO NOT
ATTEMPT TO DISASSEMBLE THE UNIT. Call Vornado Consumer
Services Department toll-free at 1-800-234-0604.
OPERATING TIPS
The SMART REMOTE SENSOR can be turned off to save battery life or to stop the
remote from sending information to the base unit. Slide switch on the back of the
remote to the OFF position to turn the remote off, slide the switch to ON position to
allow the remote to send signals.
The SMART REMOTE SENSOR uses RF (radio frequency) to send the signals, so lineof-sight is not required for the unit to function. However, to obtain the best remote
temperature sensing, position the remote where it can sense an accurate temperature.
Setting the remote too close to other heat sources, even under a warm lamp or in your
lap, will cause the remote to sense the temperature as warmer than the air. Inversely,
setting the remote too close to cold drafty areas, like a cold window or door, will
cause the remote to sense the temperature in the room as cooler. Placing the remote
in a drawer or other similar locations will not allow the unit to sense the true typical
temperature. Be sure to place the remote out in the open.
Note: Even though the remote sensor may send a signal for additional heat, the
Remote Temperature Sensor cannot put the Heater into an unsafe heat mode.
Performance is always limited by maximum power settings and multi-level safety shutoff systems. The remote is not a toy and should only be used in the prescribed manor
intended for the use of this heater.
Note: If a room is very large or has too much heat loss, the heater may not be able
to obtain the desired set temperature at the remote, even with the unit running
continuously. To properly carry the heater, place one hand in the back handle opening
and use your other hand to hold from the front.
In smaller areas, you might prefer to set the unit in LOW HEAT mode. In larger spaces
you might prefer to set the unit on HIGH HEAT mode. A vortex beam of air will gently
keep the air circulating in the room for even, uniform heating.
To use the TVH 600 as a personal fan, press the “FAN ONLY” mode on the touch
screen. The TVH 600, like any other 1500-watt electric heater, draws up to 12.5 amps of
electric current. If using your TVH 600 on HIGH heat setting causes your home circuit
breaker or fuse to trip, we offer the following suggestions:
ADVANCED SAFETY FEATURES
TIGHT GRILL SPIRALS
Resists curious fingers.
COOL TOUCH CASE
Safe to touch, even on high heat setting.
AUTOMATIC SAFETY SHUT OFF SYSTEM
If airflow becomes blocked and overheating occurs,
power to the heating element and fan is shut off.
TIP-OVER PROTECTION
If tipped over, power to the heating element and fan
motor is reduced to prevent overheating.
IDEAL 120°F EXIT AIR TEMPERATURE
Warm enough to heat an entire room.
GROUNDED HEAVY-DUTY POWER CORD
Adds durability and a more secure wall connection.
1. Try turning off other electrical appliances that run on the same electrical circuit
as your TVH 600.
2. Run the TVH 600 on LOW HEAT mode.
3. Have your electrician add an additional circuit to your homes electrical system.
ALWAYS USE COMMON SENSE WHEN USING THIS AND/OR ANY
ELECTRICAL APPLIANCE.
English 9
VORNADO AIR LLC
5-YEAR LIMITED WARRANTY
Vornado Air LLC (“Vornado”) warrants to the original consumer or
purchaser that this TVH600 heater (“Product”) is free from defects in
material or workmanship for a period of five (5) years from the date of
purchase. If any such defect is discovered within the warranty period,
Vornado, at its discretion, will repair or replace the Product at no cost if the
Product is returned to Vornado postage-paid. Repairs not covered by the
warranty or outside the warranty period will require a fee to cover the cost of
materials, handling and shipping.
This warranty does not apply to defects resulting from abuse of the
Product, modification, alteration, repair or service of the Product by
anyone other than Vornado, mishandling, improper maintenance,
commercial use of the Product, damages which occur in shipment or are
attributed to acts of God.
REPAIR OR REPLACEMENT AS PROVIDED UNDER THIS WARRANTY IS
THE EXCLUSIVE REMEDY OF THE CONSUMER. VORNADO SHALL
NOT BE LIABLE FOR ANY INCIDENTAL OR CONSEQUENTIAL
DAMAGES FOR BREACH OF ANY EXPRESS OR IMPLIED WARRANTY
ON THIS PRODUCT. EXCEPT TO THE EXTENT PROHIBITED BY
APPLICABLE LAW, ANY IMPLIED WARRANTY OF MERCHANTABILITY
OR FITNESS FOR A PARTICULAR PURPOSE ON THIS PRODUCT IS
LIMITED IN DURATION TO THE DURATION OF THIS WARRANTY.
Some states do not allow the exclusion or limitation of incidental or
consequential damages, or allow limitations on how long an implied
warranty lasts, so the above limitations or exclusions may not apply to
you. This warranty gives you specific legal rights, and you may have
other rights that vary from state to state.
For warranty or repair service, call 1-800-234-0604 or email
[email protected] to obtain a Return Authorization
(“RA”) form. Please have or include your Product’s model number and
serial number, as well as your name, address, city, state, zip code and
phone number when contacting Vornado for warranty service. You may
be required to provide the original sales receipt. For your records:
10 English
Staple or attach your original sales receipt to this Owner’s Guide. Please also
write your Product’s serial number below (located on product specs decal).
Serial No.______________________________________
After receiving the RA form, ship your Product to:
Vornado Air LLC
Attn: Warranty & Repair
415 E. 13th Street
Andover, KS 67002
To assure proper handling, packages must be clearly marked with the RA
number. Packages not clearly marked with the RA number may be refused at the
receiving dock.
Please allow 1-2 weeks for repair and return of your Product after the
Product is received.
Product registration available online at www.vornado.com.
© 2011 Vornado Air LLC Andover, KS 67002
Specifications subject to change without notice. Vornado® is a trademark owned
by Vornado Air LLC. Designed, engineered and assembled in the U.S.A.
Vornado Consumer Services
www.vornado.com
[email protected]
800.234.0604
Español 11