Transcript
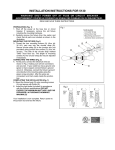
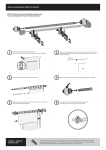
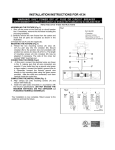
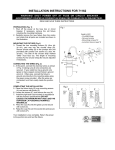
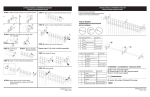
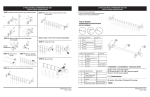
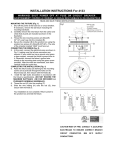
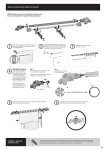
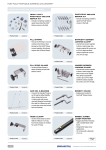
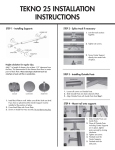
TRAVERSING DRAPERY ROD INSTALLATION INSTRUCTION
1
Using bracket (B), mark screw hole
at the desired bracket height locations.
Repeat for each bracket using level if needed.
2
Drill pilot holes into screw marked locations.
Use 1/8” drill bit if drilling into wood
and 3/16” drill bit if drilling into dry wall.
3
Insert the wall anchors (F) into the dry wall and
attach bracket (B) using mounting screws (E).
If mounting to wood attach the bracket
with the screws without the wall anchors.
(F)
(E)
(B)
4
Untighten and turn bottom latch.
Turn top screw until flush with bracket to allow for rod installation.
5
Attach finials onto each end of rod.
Put screw-on finial into white inserts and begin to turn until flush
and tight. .
7
8
9
Pull the two telescoping rods apart from the center until separate. Add desired amount
of carriage slides onto the track from the middle, then put rods back together.
*For three piece rod (packaged as one rod inside the other and another stand alone rod), just
add slides by sliding from the open end of rod. Connect all rods together when finished.
(B)
6
(B)
Extend rod to desired length and slide telescopic rod
through all brackets. Turn bottom latch on center bracket inward
and tighten with screw driver. Repeat on remaining brackets.
Tighten all set screws on the top of each bracket.
Clip drapery to carriage slide clips.
AB