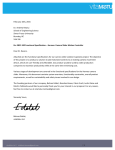
1
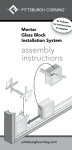
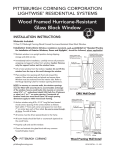
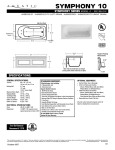
Pittsburgh Corning Glass Block Shower System Mortar Installation Instructions
See “END WALL DETAIL”
on other side of this sheet
72"
See “END WALL DETAIL”
on other side of this sheet
477/8"
1
1 /4"
36"
11/4"
221/2"
9 1/2"
R
221/2"
403/8"
R
6" x 8" Premiere Series
R
6" x 8" EndBlock™
Finishing Unit
443/4"
51"
6" x 8" EndBlock™
Finishing Unit
40 /8"
R
See “WALK-IN SILL
DETAIL” on other
side of this sheet
48"
5 3/4"
6" x 8" ARQUE® Block
24" Approx.
Opening
6" x 8" Premiere Series
R
3
18 5/16"
R
R
R
R
25"
PLAN VIEW
6" x 8" EndBlock™
Finishing Unit
PLAN VIEW
477/8"
45°
R
11/4"
8" x 8"
Premiere
Series
17"
HEDRON®
Corner Block
271/2"
CLASSIC SHOWER FLOOR PLAN
(WALK-IN “LEFT ENTRY”SHOWER also available.)
(Base can be installed with entry on either side. Left side entry shown above.)
See “END WALL DETAIL”
on other side of this sheet
R
52 3/8"
11/4"
18 1/2"
18 1/2"
PANEL ANCHOR SILL LOCATIONS
R
WALK-IN “RIGHT ENTRY” SHOWER FLOOR PLAN
SILL DETAIL*
18 1/4"
R
Panel Anchor
12" Length
7"
52 1/2"
Glass Block
4" Length
R
28" max.
8" x 8" Premiere Series
PLAN VIEW
6" x 8" EndBlock™
Finishing Unit
TRIDRON® 45° Block
DETAIL A
NEO ANGLE SHOWER FLOOR PLAN
Mortar or Plaster Mix
Support Grid
12" x 12" x 2" Thick
Full Length and Width of Base
Shower Base
*NOTE: Jamb Detail Similar
MATERIALS REQUIRED TO COMPLETE PROJECT
Shower System Kits include the items listed below (unless otherwise indicated).
The Walk-In Shower System (Left or Right Entry)
1
110
30
20
17
10
10
2
7
2
1
7
30
30
1
1
1
1
Walk-In Shower Base, 72" x 51"
6" x 8" x 4" Glass Blocks
6" x 8" x 4" ARQUE® Glass Blocks
6" x 8" x 4" EndBlock™ Finishing Units
Panel Anchors, 16" long
Panel Reinforcing, 48" long
Expansion Strips, 16" long
Tubes Glass Block Sealant, 10 oz.
Bags VeriTru® Spacers
Bags ARQUE® Spacers
Set of Detailed Installation Instructions
50# bags of premix glass block
mortar (purchased separately)
#12 x 2" Sheet Metal Screws
#12 Flat Washers
Piece No. 80 Grit Sandpaper
2 oz. Bottle of Weldbond® Primer
8 oz. Bottle of TGR® Grout Sealer
Chrome Shower Drain
800 Presque Isle Drive
Pittsburgh Pa 15239-2799
TEL: 800-624-2120
FAX: 724-325-9704
www.pittsburghcorning.com
The Classic Shower System
1
60
10
10
8
6
5
2
5
1
1
1
4
14
14
1
1
1
1
Classic Shower Base, 48" x 48"
8" x 8" x 4" Glass Blocks
6" x 8" x 4" EndBlock™ Finishing Units
8" HEDRON® Corner Blocks
Panel Anchors, 16" long
Panel Reinforcing, 48" long
Expansion Strip, 16" long
Tubes Glass Block Sealant, 10 oz.
Bags VeriTru® Spacers
Pivot Shower Door
Shower Door Installation Kit
Set of Detailed Installation Instructions
50# bags of premix glass block
mortar (purchased separately)
#12 x 2" Sheet Metal Screws
#12 Flat Washers
Piece No. 80 Grit Sandpaper
2 oz. Bottle of Weldbond® Primer
8 oz. Bottle of TGR® Grout Sealer
Chrome Shower Drain
The Neo Angle Shower System
1
40
20
20
12
8
10
2
5
1
1
1
4
20
20
1
1
1
1
Neo Angle Shower Base, 52" x 52"
8" x 8" x 4" Glass Blocks
6" x 8" x 4" EndBlock™ Finishing Units
8" TRIDRON 45° Block®
Panel Anchors, 16" long
Panel Reinforcing, 48" long
Expansion Strip, 16" long
Tubes Glass Block Sealant, 10 oz.
Bags VeriTru® Spacers
Pivot Shower Door
Shower Door Installation Kit
Set of Detailed Installation Instructions
50# bags of premix glass block
mortar (purchased separately)
#12 x 2" Sheet Metal Screws
#12 Flat Washers
Piece No. 80 Grit Sandpaper
2 oz. Bottle of Weldbond® Primer
8 oz. Bottle of TGR® Grout Sealer
Chrome Shower Drain
The information contained herein is accurate and reliable to the best of our knowledge. But, because Pittsburgh Corning Corporation has no control
over installation workmanship, accessory materials or conditions of application, NO EXPRESS OR IMPLIED WARRANTY OF ANY KIND, INCLUDING
THOSE OF MERCHANTABILITY OR FITNESS FOR A PARTICULAR PURPOSE, IS MADE as to the performance of an installation containing
Pittsburgh Corning products. In no event shall Pittsburgh Corning be liable for any damages arising because of product failure, whether incidental,
special, consequential or punitive, regardless of the theory of liability upon which any such damages are claimed. Pittsburgh Corning Corporation
provides written warranties for many of its products, and such warranties take precedence over the statements contained herein.
Warranty is valid in Canada.
© 2007 Pittsburgh Corning Corporation
All trademarks used in this publication are the property
of Pittsburgh Corning Corporation.
GB-230
Rev. 5/07
Pittsburgh Corning Glass Block Shower System Mortar Installation Instructions
Special Notes to the Installer
*All drawings provided with these instructions are typical, and may appear different
than the actual items being installed.
*The installer is solely responsible for determining the requirements necessary for
compliance with all codes involving installation of this shower.
*All published unit dimensions are for reference only. Any critical dimensions
required for installation should be taken directly from the shower base being installed.
*Carefully check the shower base upon receipt. Notify your supplier immediately if
any questions or problems are encountered during this process. Do not install the base
without first addressing questions which arise during inspection. Check for:
• unit drain match to the bathroom drain location. • surface damage.
• color coordination to other bathroom fixtures.
*If other than 1/4" thick ceramic tile will be installed on the walls of the shower, adjust
the installation of the shower base so the tile does not interfere with the installation of
the glass block.
*Pre-drill holes in the shower base before fastening to framing or fastening panel anchors.
*General instructions for assembly and installation
of the Pivot Shower Door are located with the shower door kit. Caution: carefully read
section 3, Shower Door Installation, below. Steps 6, 12, and 14 of the Pivot Shower
Door instructions must be modified to accommodate the door installation for a glass
block application.
*If pre-fabricated panels are used, panel anchors and reinforcing must still comply
with the recommended spacing.
1. Shower Base Installation
1.1 Mortar or plaster mix is mandatory to provide bottom support under the
shower base. Apply mortar on the sub floor 2 inches thick in a 12" x 12", grid pattern
the full length and width of the shower base (DETAIL A). Level the shower base around
the perimeter.
1.2 When installing the unit, care must be taken to avoid flattening the mortar
beyond the point where the shower base will rest after installation is complete. Avoid
standing in or loading the base until the mortar has set. The use of plaster mix in lieu of
mortar will result in the mixture hardening more quickly.
1.3 After installation of the shower base, but before beginning to install the glass
block, prepare the curb area of the shower base to provide a better bond with the
mortar. With the No. 80 grit sandpaper, sand a 4" wide area over the textured surface of
the curb enough to remove the gloss of the acrylic and provide a rough feeling surface.
1.4 After you have mixed and prepared your mortar, prepare a solution of 3 parts of
Weldbond® adhesive and 1 part clean water. Using a brush, apply a prime coat to the
sandpapered curb area. Allow to become tacky to the touch (3 to 5 minutes). Work on
one glass block wall at a time. Make sure the surface is still tacky before applying the
mortar and panel anchors, otherwise, you may have
to do a little at a time.
2. Glass Block Installation
2.1 Mortar Mix—Use an approved glass block
pre-mix mortar. Follow mixing instructions on the bag. Use a drier consistency mix
than for brick work. No antifreeze compounds or accelerators allowed. Freshly mixed
mortar can cause skin irritation. Avoid direct contact and wash exposed skin areas
promptly with water. If any gets into the eyes, rinse immediately
with water and seek prompt medical attention.
2.2 Glass Block
A. Install the panel anchors on the curb (sill) at the locations indicated for each
shower plan shown. Use a 3/16" drill to predrill holes on the curbs for the screws and
washers. Do not screw directly onto the acrylic curb without having predrilled the holes.
Secure each panel anchor with two #12 x 2" screws (with the #12 flat washers) into the
shower base. Cover each screw head/washer with a daub of sealant. (SEE SILL DETAIL).
Install wall panel anchors 16 inches vertically on center where required. Secure
each wall panel anchor with two, #12 x 2" screws (with the #12 flat washers).
B. Place expansion strips only between the horizontal panel anchors. Make certain
the expansion strips extend the full height of the panel. (Do not mortar).
C. Remove protective film from the shower base curb area only.
D. Apply a full mortar bed on the curb area.
E. Set the first course of block. Maintain a uniform joint width of 1/4 inch. The use of
VeriTru® Spacers will help align and speed installation. For installation using
the ARQUE® glass block spacers, maintain a uniform joint width no greater than 3/8 inch.
F. Install horizontal panel reinforcing 16 inches on center, in the same horizontal
mortar joints to coincide with the wall panel anchors. Run reinforcing continuously
from end to end as follows:
• Place lower half of mortar in bed joint. Do not furrow.
• Press panel reinforcing into place.
• Cover panel reinforcing with upper half of mortar bed.
Glass Block Unit
Fastener
Plastic
Anchor
IMPORTANT NOTE:
For the Walk-In Shower only, install reinforcing in the last vertical mortar joint
(immediately before column of EndBlock™ Finishing Units) of the straight wall. Install
two pieces of panel reinforcing with a minimum 6" splice.
G. Place full mortar bed for joints not requiring panel reinforcing. Maintain uniform
joint width.
H. Set succeeding courses of block. Apply a skim-coat of mortar to the top edges of
the final course of glass block and trowel smooth.
I. To finish the joints, use one of the following methods:
• Strike joints smooth while mortar is still plastic and before final set.
• While mortar is still plastic and before final set, tool out mortar to a depth of 1/4
inch and fill with tile grout.
After either method used, apply the TGR® grout sealer to the mortar joints or
grout joints (on both sides of the walls) at least 7 days or more after the mortar
sets. Follow the sealer application instructions on the bottle.
J. After final mortar set, apply sealant to the full depth of all recesses at the glass
block panel perimeter and shower base/glass block or tile interface and where shown
on the details.
2.3 Cleaning Glass Block
A. Clean excess mortar from the face of the glass blocks before it has set.
B. Do not use abrasive cleaners, acids or steel wool.
C. Rinse, sponge or use wet cloth frequently to remove abrasive particles that may
scratch blocks.
3. Shower Door Installation
(for the Classic and Neo Angle Showers).
A. Make certain the additional screws and plastic anchors listed in the Shower Base
Bill of Materials for installation of the door are on hand.
B. Locate the Pivot Shower Door Owner’s Manual assembly and installation
instructions in the showerdoor kit.
C. Follow the Owner’s Manual instructions until Step 6.
Measure up from the threshold to the center of the first mortar joint. Mark this
location on the center of the pivot jamb. Repeat for the third, sixth and eighth mortar
joints. Drill a 3/16" diameter hole through the pivot jamb at each mark, making certain
they line up with the mortar joints.
Continue with the instructions stated in Step 6 of the Owner’s Manual. In Step 7,
make certain the holes are drilled into the mortar joint, using a masonry bit. Use #8 x
1
1 /2" pan head screws to mount the pivot jamb. Continue with the instructions until
Step 12.
D. Drill holes in the adjustment rail to line up with the mortar joints (as done
previously in Step 6 for the pivot jamb).
Continue with the instructions in Step 12.
E. In Step 13 (if needed), use the adjustment screws to adjust the size of the door opening.
F. In Step 14 use #8 x 11/4" flat head screws to mount the magnetic jamb to the
adjustment rail.
IMPORTANT NOTE:
After completing the installation, mask off the area around the pivot jamb and
magnetic jamb 1/4" away. Apply heavy bead of glass block sealant to both jambs. Strike
the joints and remove the masking tape.
4. Acrylic Shower Base Care & Cleaning Instructions
The Lucite® cast acrylic surface of all Pittsburgh Corning Shower Bases is among the
glossiest, highest quality surfaces available. Its hard, non-porous surface prevents dirt
from accumulating and resists stains better than other materials. With normal use, Lucite
cast acrylic will retain its beauty with only a minimal amount of care. To maintain the
high gloss, elegant look of the Lucite cast acrylic surface, follow these simple steps:
1). Use common household, non-abrasive cleaners for most cleaning jobs (For
example: Lysol Basin, Tub & Tile Cleaner®; Glass Plus®; Simple Green®; Mr. Clean; and
Top Job, or a mild dishwashing detergent such as Ivory® Liquid.) Follow manufacturers'
directions and precautions. Rinse well and dry with a clean cloth.
2). Never use abrasive cleaners.
3). Do not allow your Lucite® cast acrylic surface to come into contact with products
such as acetone (nail polish remover), nail polish, dry cleaning solution, lacquer thinners,
gasoline, pine oil, winter green, etc.
4). Remove dust and dry dirt with a soft, damp cloth.
5). Clean grease, oil, paint or ink stains with isopropyl (rubbing) alcohol. Dry with a
clean, soft cloth.
6). Avoid using razor blades or other sharp objects that might scratch the surface.
Small scartches can be removed by applying a thin coat of automotive paste wax and
buffing lightly with a clean cloth. For deeper scratches, sand the surface lightly with a 400
grit "wet or dry" paper and buff with a fine-grit buffing compound.
Panel Anchor
SHOWER DOOR FASTENER DETAIL
WALK-IN SILL DETAIL
TRIDRON 45° Block®
Glass Block Unit
Glass Block Unit
Reinforcing
TRIDRON 45° Block® CORNER DETAIL
Reinforcing
Shim
Water-Resistant Wall Board
Tile
Sealant
ARQUE®
Block
Expansion Strip
ARQUE® DETAIL
Reinforcing
HEDRON®
CORNER DETAIL
Reinforcing
Stud
HEDRON® 90° Block
EndBlock™ Unit
Panel Anchor
END WALL DETAIL
www.pittsburghcorning.com
GB-230
Rev. 5/07