1
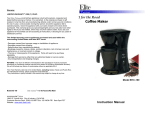
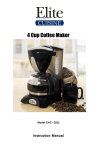
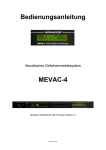
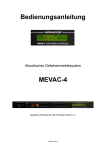
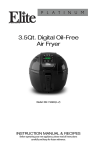
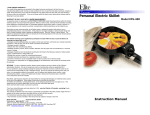
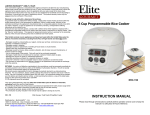
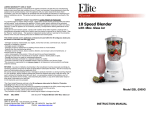
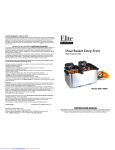
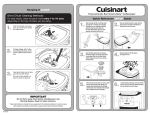
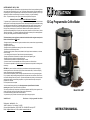
LIMITED WARRANTY* ONE (1) YEAR:
Your small kitchen appliance is warranted to the original purchaser to be free from any manufacturing defects
under normal use and conditions for one (1) year, cord excluded. During that period, should the appliance fail
to operate properly, return the appliance with your sales receipt to the store where purchased. If you use your
appliance for household use and according to instructions, it should give you years of satisfactory
service. This product warranty covers only the original consumer purchaser of the product.
WARRANTY IS ONLY VALID WITH A DATED PROOF OF PURCHASE.
To guarantee repair or replacement without charge, a dated sales receipt showing purchase within the limited
warranty period* must accompany the appliance. Without a sales receipt, warranty will be estimated according
to the appliance's manufactured date. A comparable appliance should arrive within 2-3 weeks. However, in
case an appliance is not covered by warranty, correspondence offering alternatives will be mailed to you.
During the one-year warranty period, a product with a defect will be either repaired or replaced with a
reconditioned comparable model (at our option) when the product is returned to our Service Center. (See the
“Returns” section below). The repaired or replacement product will be in warranty for the remaining balance
of the one-year warranty period and an additional one-month period.
12 Cup Programmable Coffee Maker
This limited warranty covers appliances purchased and used within the 48 contiguous states plus the
District of Columbia and does NOT cover:
- Damages caused by unreasonable use, neglect, normal wear and tear, commercial use, improper assembly
or installation of product.
- Damages caused in shipping.
- Damages caused by replacement or resetting of house fuses or circuit breakers.
- Defects other than manufacturing defects.
- Breakage caused by misuse, abuse, accident, alteration, lack of proper care and maintenance, or incorrect
current or voltage.
- Lost or missing parts of the product. Parts will need to be purchased separately.
- Damages of parts that are not electrical; for example: cracked or broken plastic or glass.
- Damage from service or repair by unauthorized personnel.
- Extended warranties purchased via a separate company or reseller.
- Consumer’s remorse is not an acceptable reason to return a product to our Service Center.
*The consumer is responsible for any delivery charges for all replacement units provided for exchange under
the warranty.
RETURNS: Any return of defective merchandise to the manufacturer must be processed accordingly by
contacting customer service first to obtain an RA # (Return Authorization Number). We will not accept any
returns of merchandise without an applicable RA #.
We cannot assume responsibility for loss or damages to products returned to us during incoming shipment.
For your protection, always carefully package the product for shipment and insure it with the carrier. Be sure
to enclose the following items with your return: any accessories related to the problem, your full address and
daytime phone number, a note describing the problem, a copy of the dated sales receipt or other proof of
purchase and a valid RA#.
C.O.D shipments cannot be accepted.
*One Year Limited Warranty valid only in the 48 contiguous states plus the District of Columbia,
excluding Alaska, Hawaii, Puerto Rico and the Virgin Islands.
This warranty is effective only if the product is purchased and operated in the USA; product usage which is in
violation of the written instructions provided with the unit will void this warranty.
For international warranty, please contact the local distributor.
**Any instruction or policy included in this manual may be subject to change at any time.
Model EHC-646T
Model EHC-646T
Elite Platinum 12-Cup Programmable Coffee Maker
Distributed by: MAXI-MATIC® , USA
18401 E. Arenth Ave. City of Industry, CA 91748
Customer Service Department: (626) 912-9877 Ext. 120 MON-FRI 10am-5pm PST
Email: [email protected] Or visit our website: www.maxi-matic.com
INSTRUCTION MANUAL
IMPORTANT SAFEGUARDS
WARNING: To avoid the risk of electrical shock, always make sure the coffee maker is unplugged from
the electrical outlet before assembling, disassembling, relocating, servicing, or cleaning it.
•
•
•
•
•
•
•
•
•
•
•
•
•
•
•
•
•
•
•
•
•
•
•
READ ALL INSTRUCTIONS BEFORE USE.
This coffee maker is intended for indoor, household, non-commercial use in brewing coffee. Do
not use the coffee maker for any other purpose.
Keep the coffee maker out of the reach of children and pets. This coffee maker is not intended for
use by children. Extra caution is necessary when using this product near children.
Never leave the coffee maker unattended while it is in use. Always unplug the coffee maker from
the electrical outlet when storing.
Always operate the coffee maker on a flat, level, and stable surface.
Do not place the coffee maker in areas or on surfaces (for example: carpets) that may be
damaged by water, heat, or moisture. We will not be liable for any water-related damage that
occurs during the use of this product.
Do not set the hot carafe on a wet or cold surface as the temperature difference between the hot
carafe and the colder surface may cause the carafe to break or crack.
Do not place the coffee maker or the carafe on or near gas or electric burners. Do not place the
coffee maker or the carafe inside of, or on top of, a microwave oven or heated conventional oven.
Do not operate this product or any other electrical product in the presence of explosives and/or
flammable fumes.
Use only product manufacturer’s attachments with this product; otherwise a risk of fire, electrical
shock, or personal injury may result.
Do not touch hot surfaces of this product. Always touch the product using the handle and knobs.
Never move the coffee maker when it is in use or while it contains hot liquid. Allow the unit to cool
completely before handling. Do not touch the glass portion of the carafe or other hot surfaces of
the coffee maker.
Do not operate the coffee maker if it has a damaged power cord or plug. Do not operate the
coffee maker if it shows signs of damage. This product has no user-serviceable parts. Do not
attempt to repair this product yourself. Only qualified service personnel should perform any
servicing.
Do not remove the bottom cover of the coffee maker, as there may be a risk of fire or electrical
shock.
Do not immerse the power cord or plug in, or otherwise expose them to, water or other liquids, as
an electrocution hazard may result.
Do not allow the power cord to hang over the edge of a table or counter where it may get tripped
over or pulled.
Keep the power cord and product away from heated surfaces.
To disconnect product from an electrical outlet, pull directly on the plug; do not pull on the power
cord.
Keep the carafe lid on the carafe while brewing and serving coffee. Never operate the coffee
maker without the carafe in place on the warming plate and the carafe lid closed.
Do not open the lid to the water reservoir or the filter basket while the coffee maker is brewing.
Allow the filter basket to cool completely before removing it from the coffee maker.
The carafe is designed solely for use with this coffee maker. Do not use the carafe on a stovetop
heating element or with other products.
Do not use the carafe if it has a loose, weakened handle or if it is cracked, chipped, or otherwise
damaged.
Do not clean the carafe with steel wool pads or other abrasive cleaners and materials.
This product is for indoor use only. Do not use this product outdoors, as an electrocution hazard
exists.
NOTE: A short power cord is provided to reduce the risk of personal injury resulting from becoming
entangled in or tripping over a longer cord. If a longer cord is required, extension cords are available
from local hardware stores and may be used if proper care is exercised in their use. If an extension
cord is used: (1) the marked electrical rating of the extension cord should be at least as great as the
electrical rating of the appliance; (2) the extension cord should be arranged so that it will not drape over
the countertop or tabletop where it can accidentally be pulled on by children or pets.
SPECIAL INSTRUCTIONS:
•
To avoid a circuit overload when using this product, do not operate another high-wattage product
on the same electrical circuit.
•
Avoid the use of an extension cord because the extension cord may overheat and cause a risk of
fire.
SAVE THESE INSTRUCTIONS FOR FUTURE REFERENCE
WARNING: This coffee maker is equipped with a polarized plug (one blade is wider than the other
blade) as a safety feature to reduce the risk of electrical shock. This plug will fit into a polarized outlet
only one way. This is a safety feature. If you are unable to insert the plug into the electrical outlet, try
reversing the plug. If the plug still does not fit, contact a qualified electrician. Never use the plug with
an extension cord unless you can fully insert the plug into the extension cord. Do not alter the plug. Do
not attempt to defeat the safety purpose of the polarized plug.
A short power-supply cord is provided to reduce risks of injuring yourself from becoming entangled in
or tripping over a longer cord.
Longer extension cords are available and may be used if you exercise caution during use.
If a longer cord is used please note the following:
The marked electrical rating of the extension cord should be at least as great as the electrical rating of
the appliance.
KNOW YOUR COFFEE MAKER ….
BEFORE FIRST USE….
Check that all accessories are complete and the unit is not damaged. Add clean water up to
MAX level to brew several times without coffee according to the steps below, then discard
the water. Wash the detachable parts thoroughly with warm water and dry thoroughly.
Filter
Tank cover
Strength controller
Funnel
Tank
Funnel support
Carafe lid
USING YOUR COFFEE MAKER FOR THE FIRST TIME:
SETTING THE CLOCK DISPLAY
When first using your coffeemaker, plug the power cord into an electrical outlet. The digital
display will automatically indicate [12:00].
NOTE: Please note that the clock display will be displayed as a 24-hour clock which means
1:00pm will display as [13:00] or 3:00pm will display as [15:00].
1)
2)
Carafe
Keeping warm plate
Handle
Control panel
(see below)
3)
4)
*Measuring spoon is not shown
5)
CONTROL PANEL
RUN
AUTO
HOUR
MIN
12:00
ON OFF
PROG
Press ON/OFF button two times, the right AUTO indicator light will illuminate.
Press PROG button one time, the word CLOCK is showed at the up-right corner on
display.
Press the HOUR and MIN button continuously to set the
clock’s present time (real clock)
For example: Real time is [8:10] (See fig. 1)
Once the Clock has been set, after a few seconds the word
CLOCK will disappear from the corner.
Your real-time clock has been set.
PROGRAMMING AUTOMATIC START-UP
1) Press PROG button two times and the word TIMER shows on
up-left corner of display.
2) Set the delayed starting time by pressing HOUR button and
Fig.2
MIN button repetitively, that is 13:00 (see Fig. 2). After about
10 seconds, the LCD will display the current clock. You may
see the automatic start time by pressing PROG.
3) When the time is due the AUTO indicator light will shut off, and the RUN indicator light
will illuminate and the unit will begin brewing. The appliance will cut off power
automatically after two hours if it has not been manually disconnected at the
completion of brewing.
Note: You may cancel the automatic start function by pressing ON/OFF. If you want to
change the automatic start time, only following the above steps again.
SETTING UP YOUR COFFEEMAKER TO BREW COFFEE
1) Open the tank cover and fill proper amount water with the carafe. The water level
should not exceed MAX level as indicated on the gauge. Then put the tank cover in
place.
2) Open the funnel support, place the funnel into the funnel support, make sure it is
assembled correctly. Then put the filter correctly.
3) Add coffee powder into filter. Usually a cup of coffee need a level spoon of coffee
powder, but you may adjust according to personal taste. Close the funnel, a click sound
will be heard when the funnel is closed completely.
4) Set strength controller to your desired position: STRONG or LIGHT (see Fig. 1),
depending on your own taste or need.
5) Insert the carafe on keep warm plate horizontally.
6) Plug the power cord into the outlet, the LCD will
display [12:00] (see CONTROL PANEL).
7) Press “ON/OFF” button once, the indicator of RUN
will be illuminated. The appliance will begin working.
8) Caution: To reduce the risk of steam scalding, be careful when opening the lid during
brewing.
9) The brewing process can be interrupted by pressing the ON/OFF button twice at any
time, and the indicator of RUN will be extinguished. The appliance will continue brewing
once ON/OFF is pressed again.
Note: During brewing process you may remove the carafe to serve for duration of not
exceeding 30 seconds, and the coffee maker can stop dripping automatically. If the serve
time exceeds 30 seconds the coffee will overflow the filter basket.
1)
Upon completion of brewing coffee, that is one minute later after the coffee stops
dripping out, you can remove the carafe, pour and serve.
Note: The brewed coffee you get will be slightly less than the water you have added as
some water is absorbed by coffee powder. DO NOT touch cover, keep warm plate and so
on when operating as they are very hot.
2)
3)
When the brewing process is complete, if you do not want to serve immediately, keep
the coffee maker on, the coffee can be kept warm on the keep warm plate for up to twohours. The coffeemaker will be automatically shut off power after two hours if it has not
been manually disconnected at the completion of brewing. For an optimum coffee taste,
serve it just after brewing.
Always turn the coffee maker off when it is not in use.
Note: Be careful when pouring the coffee, freshly brewed coffee tend to be very HOT.
CARE AND CLEANING….
CAUTION: Always unplug the product from electrical outlet when storing and allow the keep
warm plate to cool completely before cleaning it. Never immerse the housing or power cord
into water or any other liquid for cleaning.
1) Clean all detachable parts after each use in hot, sudsy water.
2) Wipe the product’s exterior surface with a soft, damp cloth to remove stains.
3) Water droplets may buildup in the area above the Filter and drip onto the product base
during brewing. To control the dripping, wipe off the area with a clean, dry cloth after each
use of the product.
4) Use a damp cloth to gently wipe the keep warm plate. Never use abrasive cleaner to
clean it.
5) Replace all parts and keep for next use.
REMOVING MINERAL DEPOSITS
1) To keep your coffee maker operating efficiently, you should clean away the mineral
deposits left by the water regularly according to the water quality in your area and
the frequency of use. if the mineral deposit is excessive, the appliance will
represent the following signs:
a. Brewing time gets longer obviously. Generally, brewing a cup of coffee
need 7-9 minutes, but if the mineral deposit is excessive, the rate of
brewing gets slow and time gets longer.
b. The appliance cycles on and off prior to the ending of brewing.
2) De-scaling is required If either case above has occurred. The de-scaling can be
conducted as one of the following method, which depends on your convenience.
a. Use the de-scaler available in the market. Prepare the solution as per the
instructions of de-scaler. Then fill the solution into the water tank and
brew the appliance without coffee powder. Pause for 15 minutes after one
cup of water has flowed out. Then continue brewing until completion.
Repeat this process if necessary.
b. Use the solution of white vinegar and water, the proportion of each by
volume is 1:3. Brew this solution until no yellow liquids flow out.
3) Using the tap water to brew several times until no odor left when finished descaling.
HINTS FOR GREAT-TASTING COFFEE
1. A clean coffee maker is essential for making great-tasting coffee. Regularly clean the
coffee maker as specified in the “CARE AND CLEANING” section. Always use fresh,
cold water in the coffee maker.
2. Store unused coffee powder in a cool, dry place. After opening a package of coffee
powder, reseal it tightly and store it in a refrigerator to maintain its freshness.
3. For an optimum coffee taste, buy whole coffee beans and finely grind them just before
brewing.
4. Do not reuse coffee powder since this will greatly reduce the coffee’ flavor. Reheating
coffee is not recommended as coffee is at its peak flavor immediately after brewing.
5. Clean the coffee maker when over-extraction causes oiliness. Small oil droplets on the
surface of brewed, black coffee are due to the extraction of oil from the coffee powder.
6. Oiliness may occur more frequently if heavily roasted coffees are used.