1
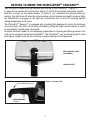
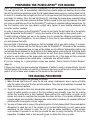
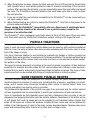
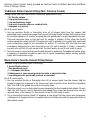
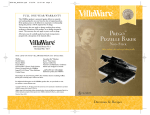
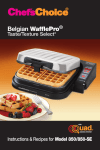
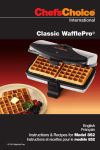
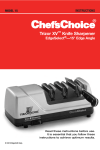
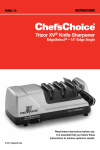
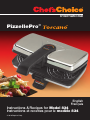
International
PizzellePro®
English
Français
Instructions & Recipes for Model 834
Instructions et recettes pour le modèle 834
© 2010 EdgeCraft Corp.
IMPORTANT SAFEGUARDS
When using electrical appliances, basic safety precautions should always be
followed including the following:
1. Read all instructions before using the PizzellePro® Toscano™.
2. Do not touch hot surfaces. Always use plastic handle on lid and do not touch
stainless cover when hot.
3. To protect against fire, electric shock and injury to persons, do not immerse
cord, plug or pizzelle maker in water or other liquid.
4. Close supervision is necessary when any appliance is used by or near children
or the infirm.
5. Before use, unwind the power cord completely and keep the cord away from
the hot parts of the appliance
6. Do not let power cord hang over edge of table or counter or touch hot surfaces.
7. Do not place on or near hot gas or electric burner, or in a heated oven.
8. Only operate the pizzelle maker on a dry, flat, non-slip surface.
9. Do not use PizzellePro® outdoors.
10. Do not operate the PizzellePro® with a damaged cord or plug. If it malfunctions
or has been damaged in any manner, return PizzellePro® to the EdgeCraft
Corporation Service Department for examination, repair or adjustment.
11. The use of accessory attachments not recommended by the EdgeCraft
Corporation may result in fire, electric shock or injury to persons.
12. Always unplug the pizzelle maker from electrical outlet when not in use
and before cleaning to avoid accidental electrical shock. Allow it to cool
before cleaning.
13. As long as the appliance is hot, even if unplugged, there is the danger of
someone getting burned. Do not touch and do not put it into storage while hot.
14. Extreme caution must be used when moving an appliance containing hot oil or
other hot liquids.
15. Do not use the PizzellePro® for other than intended use.
16. For use only on 120V 60Hz power. Use a socket with a good ground
connection. Do not use a three to two way adapter on the three prong power
cord provided.
17. For household use only.
SAVE THESE INSTRUCTIONS
2
YOU MADE
A GOOD
CHOICE
he PizzellePro® Toscano™ Model 834 comes to you from
Chef’sChoice®, known for the unique electronic WafflePro® Series
of waffle makers and as the supplier of the world’s finest
professional household gourmet products. You will find that the
PizzellePro® produces rapidly and consistently two classic-sized
pizzelles, just right for any occasion.You will appreciate how quickly you
can make pizzelles – a set of 2 in less than 30 seconds. The special
heating system and the added power of the PizzellePro® eliminates the
commonly encountered need with conventional pizzelle makers to wait
for heat-up of the pizzelle plates between each baking cycle.
T
Remember when pizzelles were only for the Holidays? All of that has
changed and now you can enjoy pizzelles anytime, thanks to the ease
and speed of the PizzellePro®. Try rolling freshly baked pizzelles into
cylinders or cone shaped pastries for cannolis and fill with a variety of
tasty fruit or other sweet creamy fillings. Enjoy!
3
GETTING TO KNOW THE PIZZELLEPRO® TOSCANO™
Take a minute to identify the key features and controls of the PizzellePro®, (Figure 1).
To open the lid, release the locking latch (Figure 2) and lift the insulated front plastic handle.
Note the red light on the handle (Figure 1), which is “on” whenever the pizzelle plates are
heating. This light turns off when the pizzelle plates are fully heated and ready for bakng. While
the PizzellePro® is plugged in, the light will continuously turn on and off, ensuring optimal
baking temperature at all times.
The PizzellePro® Toscano™ is equipped with a locking latch designed to control the thickness
of each pizzelle. This latch can be easily unlocked by lifting the finger release (Figure 2), which
is conveniently located under the handle.
Provision has been made for cord wrapping as described in Cleaning and Storage section. The
cord can be wrapped around the PizzellePro®. The PizzellePro® can be stored upright to save
shelf space. Simply close the lid and stand it upright resting on the hinged end.
Heat Indicator Light
(see above)
Handle for lid
Figure 1. PizzellePro® Toscano™.
Figure 2. Locking latch.
Press Handle Down to Lock
Pull Up and Forward
to Release
4
PREPARING THE PIZZELLEPRO® FOR BAKING
Insert the PizzellePro® power cord into a grounded 120 volt, 60 cycle outlet and close the cover.
The red light will turn on immediately, indicating the pizzelle plates are heating. As you close
the lid, the latching mechanism under the lid handle should snap securely, locking down the lid.
In about 3-4 minutes the red light will turn off to let you know that the pizzelle plates are hot
and ready for baking. Once the red light turns off, indicating the plates have reached baking
temperature, you may bake pizzelles without further regard to the light. Periodically, the light
will come on and then go off as the PizzellePro® continues to maintain baking temperature. On
the first heating cycle you may detect a slight odor, typical of new heating elements with
non-stick surface coatings.
In order to avoid injury as the PizzellePro® heats, do not touch the hot metal lid or the pizzelle
plates. Manipulate the PizzellePro® only by the handle of the lid and by other plastic parts.
To start making pizzelles, pull up on the release arm to release the latching mechanism and
open the lid of the PizzellePro®. Do not attempt to force the lid open without unlatching – or
you will damage the latch.
Because both of the baking surfaces are factory finished with a non-stick coating, it is necessary to oil the surfaces only the first time you use the PizzellePro®. It should not be necessary
to oil again on subsequent use so long as the plates are at sufficient temperature before use
and enough time is allowed for the pizzelles to fully bake before opening the lid. If sticking tends
to occur, close the lid, make certain the plates are hot, then open carefully add a teaspoon
of water to each pattern on the lower plate and close the lid. If this does not fully eliminate
sticking, use a commercial non-stick spray – preferably one without lecithin.
If you are looking for a good pizzelle recipe, see section “Some Favorite Pizzelle Recipes”
(page 6).
It takes only about one level measuring tablespoon of batter to make a single pizzelle. You will
find that some of the batter will remain on the spoon and you can either use a small spatula to
push it all off or leave some residue on the spoon for the next batch.
THE BAKING PROCEDURE
Prepare the pizzelle batter and proceed as follows:
1. When the red light turns off, open the lid and, using a tablespoon, drop a spoon of batter
onto the center of each of the two pizzelle patterns. Close the lid immediately to spread the
batter across each pattern.
2. The batter should be thick but should slide easily off the spoon when pushed. Place one
spoon of batter quickly on each of the two patterns and promptly close the lid, making
certain the locking latch is fully fastened. Avoid putting too much batter on grids as an
excess will cause an overflow and increase the clean up time. If you prefer pizzelles with
irregular edges use less batter, otherwise use more batter to produce full rounder patterned
pizzelles with more regular circular edges.
3. You may at times wish to inspect the pizzelle before it is fully baked. Wait 20 seconds before
attempting to open the lid. If the pizzelle is not cooked sufficiently you will sense some
resistance as you attempt to open the lid. If you do sense resistance, let the pizzelle
cook another 5 seconds or so and you should be able to easily and safely lift the lid for
inspection. If needed, bake a few seconds longer to obtain the color you wish.
5
4. When the pizzelles are done, release the latch and open the lid. Lift and remove the pizzelles
with a plastic fork or small plastic spatula in order to minimize scratching of the non-stick
surface. After removing the pizzelles, you can immediately spoon the new batter and repeat
the cycle. The PizzellePro® recovers instantly after each bake cycle and is ready to make
the next pizzelles.
5. If you do not start the next pizzelles immediately, the PizzellePro® can be closed until you
are again ready to bake.
6. When finished baking, be certain to unplug the PizzellePro®. Only then is the power to the
pizzelle maker switched off.
Always unplug the PizzellePro® immediately after use. Never leave it unattended when
plugged in. Children should not be allowed to use a pizzelle maker except in the
presence of an attentive adult.
The PizzellePro®, when unplugged, cools faster when its lid is left fully open. Store only when
cold. Save shelf space by storing the PizzellePro® upright, resting on its hinged flat end.
PIZZELLE TRADITIONS
It is generally believed that pizzelles were originated in the Tuscan region of Italy in ancient
times to mark an annual celebration. Initially baked over an open fire with relatively simple but
effective irons, the early pizzelles often were proudly embossed with the family crest or some
hint of the village of origin.
Over time it became tradition to use pizzelles to celebrate any holiday or festive occasion but
inevitably there were pizzelles for everyone at Christmas and Easter. The modern patterns found
on these delicious waffle cookies most commonly are floral on one side and a woven basketlike pattern on the other.
The recent increased popularity of pizzeles is the result of greater recognition of their delicious
versatility. For example, pizzelles, when still hot, can be formed into cylinders, cones and minibaskets that can hold a wide variety of delicious fillings for festive occasions. The range of taste
experiences that can be created with fillings of formed pizzelles is virtually endless.
SOME FAVORITE PIZZELLE RECIPES
The basic pizzelle recipe has undergone little change through the years. However, there are
variations based on selection of cooking oils, including butter, margarine, vegetable oil or shortening, and of course many flavorings, including anise, vanilla or almond extract. Even rum
extracts and whisky are used by some in pizzelles.
The fundamental ingredients of the pizzelle are eggs, flour, and sugar and the relative amount
of these ingredients can be varied slightly to match your preferences of taste and texture.
Once all ingredients are fully blended, select and test a tablespoon that you plan to use for
dispensing and dropping the batter onto the pizzelle patterns. Consistency of the batter will be
of soft dough that holds its shape but can be adjusted to suit individual tastes. A batter that
slides off the spoon as a ribbon will produce a slightly thinner cookie and can be obtained by
adding a few tablespoons of liquid to the basic recipes described below. Recipes using more
sugar and incorporating butter instead of oil often yield a crisper cookie.
6
You can adjust the amount of baking powder slightly in any recipe. It is necessary to use just
enough to ensure that the two pizzelles fill out completely during the baking cycle. More than
that will do little for the texture and increase the likelihood that the pizzelles will spread beyond
the design borders of the patterns.
Commonly, pizzelle recipes use 3, 6 or 12 eggs. Most recipes start with 6 eggs, which will make
about 70 pizzelles in the Pizzelle Pro®.
We recommend first a family recipe from Caterina Casola of Buffalo, New York. This recipe has
been handed down more generations in Italy than her family can remember. Each year her delicious recipe has been used to produce thousands of pizzelles eagerly awaited by the family and
a host of friends.
Caterina Casola’s Family Recipe
6 eggs
1
⁄2 cup vegetable oil
2 or more teaspoons vanilla or anise extract (pure)
3 cups all purpose flour
2 teaspoons baking powder
1 1⁄2 cups sugar
Makes about 70 pizzelles.
1. Beat the eggs until smooth. Add the oil and vanilla or anise extract. Sift the flour and baking
powder onto the mixture. Add the sugar and vigorously blend all of these dry ingredients into the
egg mixture until smooth. The mixture will be sticky and stiff. Test by dropping the mixture from
a tablespoon. As needed add a few tablespoons of water so that the mix drops conveniently as
a ribbon in two to three seconds. If the mix is too thin add a few tablespoons of flour.
2. Bake for approximately 20 seconds, open the lid briefly to examine the color and bake longer as
desired to create a darker/browner surface. (See Baking Procedure section).
A Sweeter Variation with Butter
For a sweeter pizzelle with the added flavor of butter you will like the following:
6 eggs
1 cup butter
2 or more teaspoons vanilla or anise extract (pure)
4 cups all purpose flour
3 teaspoons baking powder
2 cups sugar
Makes about 72 (6 dozen) pizzelles.
1. Beat the eggs until smooth. Melt the butter in the microwave or in a small saucepan on low heat.
Allow the butter to cool briefly while you blend and mix the sugar and vanilla or anise extract into
the eggs. Then add the melted butter into the mix, sift the flour and baking powder onto the mix
and blend vigorously to ensure uniformity. The batter will be sticky and stiff. As needed, adjust
the mixture with a few tablespoons of water or flour to slightly thin or stiffen the batter so it flows
ribbon-like off of a tablespoon.
2. Bake for approximately 20 seconds, open the lid briefly to examine the color and bake longer as
desired to create a darker/browner surface. (See Baking Procedure section).
7
Chocolate Pizzelles
For a special treat try our chocolate flavored pizzelles.
Using Catarina Casola’s pizzelle recipe above (based on 6 eggs) mix and completely blend all
ingredients as described above. Then melt 6 ounces of semi-sweet chocolate placed in a small
bowl in the microwave or in a small saucepan warmed over a very low heat. Stir the chocolate
periodically as it melts in order to prevent over heating.
Stirring vigorously, blend the melted chocolate slowly into the pizzelle mix. Spoon the batter
onto the Pizzelle Pro®, bake and enjoy! (See Baking Procedure section).
OTHER VARIATIONS
Crisco®, margarine or equivalent shortening can be used as a direct substitute for butter using
the quantity called for in the recipe.
The quantity of sugar can be varied slightly but if the mix becomes too thick add a few
tablespoons of water to adjust the stiffness and flow of the mix.
Other flavorings such as almond extract, nut oil, rum extract, sweet wine or liquors can add
novelty to your party pizzelles.
ENTERTAINING WITH CANNOLIS AND
OTHER PIZZELLE DELICACIES
It is not surprising that Italy, cradle of some of the worlds finest cuisine created the pizzelle and
found almost magical ways to use the pizzelle as the foundation for an even greater range of
taste sensations (Figure 3).
Perhaps the cannoli is the most popular of these pastries. Like the pizzelle itself, the variations
are endless and an opportunity to explore delicacies with your own favorite fillings, fruits
and flavorings.
The cannoli shell (see Figure 3) is formed by wrapping the hot pizzelle immediately as it is
removed from the PizzellePro® around a wooden dowel rod, a metal rod or cylinder or a
cylindrical spoon handle about 1 inch diameter. Because this wrapping can be done only while
the pizzelle is still very hot, you will find it helpful to; (a) quickly roll the pizzelle around the form;
(b) locate the area of overlap (where the pizzelle overlaps itself); (c) then holding onto the form,
press and hold that overlap area down on a flat hard surface for a few seconds while the
pizzelle cools into a rigid cylindrical form. Practice does help. (To help ease the rolling process,
reduce the bake time to 12-15 seconds. If rolling both pizzelles into cannolis, roll the second
pizzelle “inside out” so the darker
surface is on the inside or you may
consider only baking one pizzelle at a
time to roll into the cannoli shape.) If,
as an alternative, the pizzelle is
wrapped around a small wooden or
metal cone, a cone-shaped pizzelle
shell can be created.
The round or cone shaped shells
formed as described above can be
3. Cannolis and pizzelles are ideal
filled with any of the following Figure
for entertaining.
8
delicious cannoli recipes, kindly provided by Caterina Casola of Buffalo, New York and Marie
Doria of Chicago, Illinois.
Traditional Italian Cannoli Filling (Mrs. Caterina Casola)
Another recipe from the Casola family refined over generations in Italy.
1 lb. Ricotta cheese
1
⁄3 cup granulated sugar
1
⁄3 cup confectioners sugar
1
⁄3 cup mini chocolate chips or candied fruits
1 teaspoon rum extract
Fills 6-8 cannoli shells.
1. Use low moisture Ricotta or thoroughly drain off all excess liquid from the cheese. Add
granulated sugar, confectioners sugar and rum extract to the Ricotta and beat with a power mixer
at a medium speed for 10 minutes, scraping the bowl periodically to ensure ingredients mix well.
Then add chocolate chips or fruit and beat for another 3 minutes. At this stage the Ricotta
mixture should be creamy, but stiff. If it appears too stiff to extrude from a pastry bag, slowly add
more confectioners sugar to mix and blend for another 2-3 minutes until you have the right
consistency. Refrigerate for a few hours before use. (It’s safe to hold for 2-3 days). Load pastry
bag with mix and fully fill each cannoli shell. For best results, do not fill until ready to serve.
2. Decorate ends of cannoli with ground toasted almonds or pistachios. For added decoration, place
a raspberry or shredded coconut on each end of cannoli. Immediately before serving, sprinkle
lightly with confectionery sugar.
Marie Doria’s Favorite Cannoli Filling Recipe
This adds a slight cinnamon flavor to the filling.
1 pound Ricotta cheese
1 cup powdered sugar
1
⁄2 - 3⁄4 teaspoon cinnamon
3 tablespoons or semi-sweet grated chocolate or chocolate chips
1
⁄2 cup chopped nuts (preferably walnuts or almonds)
Fills 6-8 cannoli shells.
1. Use low moisture Ricotta or thoroughly drain off all excess liquid from the cheese. Add the
powdered sugar and cinnamon to the cheese and, with an electric mixer, blend the ingredients
fully. Then fold in the grated chocolate or chocolate chips.
2. Place the cannoli mix in a pastry bag for easy dispensing into the formed pizzelle shells. Fill each
shell fully with the mix, and for decoration and added flavor, press the chopped nuts onto the
exposed areas of the cannoli. For best results, do not fill until ready to serve.
3. For an interesting variation, blend 1/2 teaspoon of rum extract into the cannoli mix and prepare
a tablespoon of chopped cherries or candied cherries to further decorate the exposed surface of
the finished cannoli.
9
Maria Doria’s Optional Cannoli Filling Recipe
This is an American variation adding cream for a smoother filling.
1 pound Ricotta cheese
2 tablespoons heavy cream
1
⁄4 cup granulated sugar
3 tablespoons orange liquor
2 ounces finely chopped semisweet chocolate
3 tablespoons chopped mixed candied fruits
Fills 6-8 cannoli shells.
1. Use moisture-free Ricotta cheese or drain off all excess liquid from the cheese. Combine the
cheese, cream, sugar and orange liquor and then blend fully with a hand mixer. The mixture must
be stiff enough so that it will hold its shape when used to fill the pizzelle shells. If needed, add
more cheese to stiffen the mixture. Then fold in the chocolate chips and candied fruits.
2. Load the mix into a pastry bag and fill each shell fully. If you wish to decorate the exposed
cannoli surface, consider using chocolate bits, jimmies, more candied fruits or colored chopped
nuts. For best results, do not fill until ready to serve.
DELICIOUS VARIATIONS OF THE CANNOLIS
AND PIZZELLE PASTRIES
Pizzelle shells can be used in a variety of other ways. Consider alternate fillings such as thick
flavored custards, heavy puddings, whipping cream (plain or with powdered sugar), meringue
or cheese cake.
It is possible also to create attractive pastry baskets by quickly forming the pizzelle while still
hot over the base of a small flat bottom glass or cup. These small baskets can be filled with any
of the foods listed above or used as individualized decorative containers for raspberries,
chopped peaches, cherries, other favorite fruits or candies.
Chocolate covered pizzelles or cannoli shells are another special treat. To melt the chocolate,
place it in a bowl and heat in the microwave or in a saucepan on low heat stirring periodically
as it melts. Simply dip the end or entire pizzelle shell (plain or chocolate) in melted dippingchocolate and allow to cool at room temperature or, to cool faster, place it in the refrigerator.
10
CORD SAFETY
A short power supply cord is provided with this appliance to reduce the risk of someone
becoming entangled in or tripping over a longer cord and causing the PizzellePro® to overturn,
spilling its hot contents.
While EdgeCraft does not recommend it, extension cords are available and may be used if care
is exercised in their use. If an extension cord is used, it must have an integral ground wire,
a three prong plug and the marked electrical rating of the extension cord should be at least
15 amperes.
The longer cord should be arranged so that it will not hang over the counter top or tabletop
where it can be pulled on by children or pets or tripped over.
CLEANING AND STORAGE
Before cleaning the PizzellePro®, always unplug the power cord and wait until the PizzellePro®
cools to room temperature. Never clean the appliance under water. If you find it necessary to
clean the baking surface, use a soft brush, Q-tip® or a flexible moist cloth. Never use sharp or
pointed tools as they will damage the non-stick surfaces. The exterior can be safely cleaned
with a mild detergent on a damp cloth or small soft brush. Then use a dampened cloth followed
by drying with a dry soft cloth.
Wrap the power cord around the PizzellePro® Toscano™ as shown and secure the end of
the cord (see Figure 4). You will find it is easy to store vertically, resting on the top hinged face
as shown.
Figure 4. Cord can be wrapped around a fully closed
PizzellePro®, which can be stored upright as shown.
(Do not store until cool.)
Cord Wrap
11
Limited Warranty: Used with normal care, this EdgeCraft product is guaranteed against
defective material and workmanship for a period of one (1) year from the date of
original purchase (“Warranty Period”). We will repair or replace, at our option, any
product or part that is defective in material or workmanship without charge if the
product is returned to us postage prepaid with dated proof of purchase within the
Warranty Period. This warranty does not apply to commercial use or any product abuse.
ALL IMPLIED WARRANTIES, INCLUDING IMPLIED WARRANTIES OF MERCHANTABILITY
AND FITNESS FOR A PARTICULAR PURPOSE, ARE LIMITED TO THE WARRANTY PERIOD.
EDGECRAFT CORPORATION SHALL NOT BE LIABLE FOR ANY INCIDENTAL OR
CONSEQUENTIAL DAMAGES. Some states do not allow limitations on how long an
implied warranty lasts and some states do not allow exclusions or limitation of
incidental or consequential damages, so the above limitations or exclusions may not
apply to you. This Limited Warranty gives you specific legal rights, and you may also
have other rights which vary from state to state.
SERVICE
This appliance is for household use only. No user-serviceable parts are inside. Refer servicing
to qualified personnel.
In the event service is needed, return your PizzellePro® to EdgeCraft Corporation, where the
cost of repair or electrical or mechanical adjustment can be estimated before the repair is
undertaken. If failure occurs within the warranty period there may be no charge.
Please include your return address and a brief description of the problem or damage to the pizzelle
maker on a separate sheet inside the box. Send your unit insured and postage prepaid to:
EdgeCraft Corporation
825 Southwood Road, Avondale, PA 19311, U.S.A.
Customer Service 1-800-342-3255 or 610-268-0500
www.chefschoice.com
Conforms to UL Std. 1083
Certified to CAN/CSA Std. C22.2 No.64-M91
Chef’sChoice® and EdgeCraft® are registered trademarks of EdgeCraft Corporation, Avondale, PA.
© EdgeCraft Corporation 2010
Rev. 08/09 H09
W8342Z0
12