1
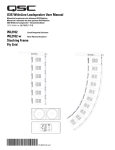
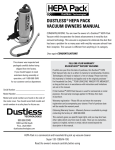
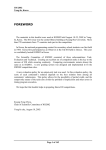
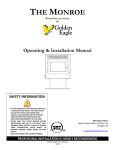
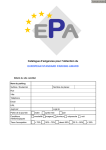
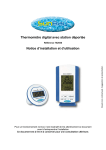
Love-Less Ash Co.
AshVac
TM
CONGRATULATIONS: You
are now the *owner of an
Ash Removal System which
incorporates the latest
advancements in ash removal
technology. This vacuum will fill
a need arising from wide-spread
use of fireplaces and wood/coal/
pellet stoves. Engineered to
eliminate the dust that has been
a problem for so many years
with the conventional method
of cleaning stoves with a bucket
and shovel. If you have any
questions concerning the
operation or assembly of your
Ash Vacuum call customer
service at 1-800-568-3949.
U.S. Patent No.
4,868,949
5,259,087
Ash
Vacuum
System
Owners Manual
Model No. MU405
Cougar “quiet”
3 Gallon Ash Capacity
LIMITED ONE-YEAR HOME USE WARRANTY
Your Ash Vacuum is warranted in normal ash removal use; provided
that use is in accordance with the Owner’s Manual and the safety rules
listed within, against original defects in material and workmanship for
a period of one year from date of purchase. Please note that this
warranty is limited to and applies only to the original purchaser. “For
Household Use Only,” “POUR USAGE MÉNAGER TYPE MENAGER,” so
long as that use is in accordance with instructions and limitations set out
in this manual. Love-Less Ash Company is not responsible and will not
be held liable for statements made by any person(s) as to operation of
this unit that vary from the terms of this limited warranty. Please read
this manual carefully for limitations. This warranty does not apply to
industrial, commercial or rental use. Love-Less Ash Company warrants
placing the Ash Vacuum in correct operating condition, by repair or parts
replacement, during the warranty period, without charge. There are no
warranties, express or implied, written or verbal, which extend beyond
the description in this manual.
Simply return the complete unit or part, (transportation
prepaid), to Love-Less Ash Company, 1285 East 650 South,
Price, Utah 84501. L.L.A. Company assumes no responsibility for damage
or faulty performance caused by misuse or careless handling, or where
repairs have been made or attempted by others. Proof of purchase date
is required. This warranty gives you specific legal rights and you may
also have other rights which may vary from state to state.
Model No. MU305
Cheetah II
3 Gallon Ash Capacity
• Introduction
• Features
• Set Up
• Care
• Repair Parts List
• Warranty
• Serial Number on Lid
ATTENTION:
Read all safety rules carefully before
attempting to operate. Save these
instructions.
1285 East 650 South
Price, Utah 84501
dustlesstechnologies.com
Customer Service: 800.568.3949
www.lovelessash.com
IMPORTANT - SAFETY INSTRUCTIONS
IMPORTANTES MESURES DE SÉCURITÉ
SAVE THESE INSTRUCTIONS
CONSERVER CES INSTRUCTIONS
1. Read the Owner’s Manual completely before attempting to operate this unit.
2. Always check the filter before each use.
3. Run this unit for 30 seconds after you have finished cleaning your stove or fireplace to insure all materials are safely stored in the canister.
“WARNING – To avoid the risk of electrical shock do
not use outdoors or on wet surfaces.”
“AVERTISSEMENT – Pour reduire les risques de
choc electrique, ne pas utiliser a l’exterieur et ne pas aspirer
de matieres humides.”
1. Connect to a properly grounded outlet. See grounding instructions.
2. Don’t change filters, clean the unit, or empty the canister until the plug has been disconnected from the electrical outlet. Always unplug unit when not
in use and before servicing.
WARNING –
To reduce the risk of burns, fire, electric shock, or personal injury:
Do not allow this unit to be used as a toy or to run unattended at anytime.
Keep children away from this unit.
11. Do not abuse cord. Never carry your Ash Vacuum by the cord or pull cord to
disconnect it from the outlet. Grasp the plug, not the cord.
2.
Do not allow this unit to be used for anything other than ash removal.
3.
Do not use accessories except those recommended and provided by Love-Less
Ash Company. Use this unit only for its intended use as described in this
manual. Use of accessories not recommended by the manufacturer may cause
fire, electric shock, or injury. (See parts list)
12. Do not leave the cord lying on the floor once you have finished the cleaning
job. It can become a tripping hazard.
1.
4.
5.
Do not operate this unit in an enclosed space where flammable, explosive or
toxic vapors are given off by oil-base paint, paint thinner, gasoline, etc.
Do not vacuum toxic, carcinogenic, combustible, or other hazardous materials
such as asbestos, arsenic, barium, beryllium, lead, pesticides, or other health
endangering materials.
6.
To avoid the igniting of vapors or dust due to the arcing of the motor brushes,
do not pick up flammable or readily combustible material.
7.
Do not expose your Ash Vacuum to excessive heat as damage to your vacuum
may occur and the 1 year warranty will be null and void.
8.
Do not vacuum materials other than ASHES from your stove or fireplace into
the canister.
9.
Do not store this unit immediately after ash removal, in any enclosed or
confined area.
10. Never operate your Ash Vacuum without filters properly in place.
13. Never handle plug, cord, or cleaner with wet hands.
14. Never drop or insert any object into any openings. Do not use with any opening blocked; keep free of dust, lint, hair, and anything that may reduce air flow.
15. Do not vacuum burning/live materials ie. PELLETS.
16. Keep cord from heat, oil and sharp edges. Do not close doors on the cord or
snag it under furniture or pull around corners with sharp edges.
17. The operation of an Ash Vacuum can result in foreign objects being blown into
your eyes, which can result in eye damage. Always wear safety goggles
when operating vacuum.
18. Use special care when emptying heavily loaded canisters.
19. Do not use outdoors or on wet surfaces. Do not leave appliance when
plugged in. Unplug from outlet when not in use and before servicing. Do not
use with damaged cord or plug if appliance is not working as it should, has
been dropped, damaged, left outdoors, or dropped into water, return it to service center.
20. WARNING - Fire hazard - Intended for vacuuming cold to warm ashes only.
General household or shop-vac use could increase fire risk by induction of combustibles into unit prior to vacuuming ashes. Consult operating manual before use.
21. Hose may become too warm to hold if used incorrectly.
GROUNDING INSTRUCTIONS:
1.
This appliance must be grounded. If it should malfunction or breakdown, grounding provides a path of least resistance for electric current to reduce the risk of electric
shock. This appliance is equipped with a cord having an equipment-grounding conductor and grounding plug. The plug must be inserted into an appropriate outlet that
is properly installed and grounded in accordance with all local codes and ordinances.
WARNING - Improper connection of the equipment-grounding conductor can result in a risk of electric shock. Check with a qualified electrician or service person if you are
in doubt as to whether the outlet is properly grounded. Do not modify the plug provided with the appliance.
NOTE: Static shocks are common in dry areas or when the relative humidity of the air is low. This is only temporary and does not affect the use of the Ash Vacuum. To
reduce the frequency of static shocks in your home, the best remedy is to add moisture to the air with a console or installed humidifier.
SET-UP WITH ONLY 5 EASY STEPS
STEP ONE: Place the lid upside down on a flat surface. Place the small, white secondary filter with the finished side OUT over the spring mounted cage on the underneath
side of the lid. Gently push the filter all the way on and compress the springs, then let off all pressure allowing the cage to push the filter back out into a relaxed
position. Secure filter firmly with the 7” clamp to the lid so particles are not allowed to go through to the motor.
STEP TWO: Take the rod of the filter support basket and slide it through the small hole in the lid. The filter support basket should be between the primary and secondary filters. Take the larger, primary filter with the stamped side IN, and place it over the filter support basket (part #9p23) and fasten it securely with the 10” clamp to
the base of the lid. NOTE: The primary filter’s bottom seam and the filter support basket should line up and cross the center of the lid. Where the filter attaches
to the lid, there should be a minimal amount of wrinkles. The filter and lid should look like Fig. 2 when completed. (NOTE: ALWAYS CHECK FILTER BEFORE
EACH USE TO ENSURE THAT IT FITS SNUGLY IN PLACE AND IS IN GOOD CONDITION.)
STEP THREE: From the top side of the lid, screw in the brass rod cover finger tight only.
STEP FOUR: Place the lid on top of the canister and secure in place with the 3 lid clamps.
STEP FIVE: Slide one end of the hose on to the port connection on the side of the canister. This will be a snug fit. Slide the metal nozzle into the other end of the hose with
the crimped end OUT. See Fig. 3.
NOTE: Never use your Ash Vacuum without the metal nozzle in place.
Your Ash Vacuum is now ready for operation. Congratulations!
FEATURES:
•
A patented double filter system allows ash to be
removed from wood stoves, pellet stoves or fireplaces
without emitting dust. (Fig. 1)
•
The primary and secondary filters may be cleaned
without removing the lid. Agitation of the filter
support basket, located between the primary and
secondary filters allows both filters to be cleaned
without removing the lid. (Fig. 2)
•
The primary filter is fire retardant as a precaution in
the event a hot spark should accidentally hit the filter.
•
A secondary filter traps sub-micron particles that are
allowed through the primary filter. This filter covers a
spring mounted cage which allows the filter to be
cleaned without removing the lid.
•
The hose is metal to give you greater flexibility.
Only vacuum cold to warm ash. A rubber gasket may
be part of the hose so excessive heat may harm the
gasket.
•
The metal nozzle allows ash to be removed quickly
while larger particles are left behind to be burned at a
later date. (Fig. 3)
Fig. 1
HOW TO USE:
Simply place the crimped end of the metal
nozzle directly on the fire brick and rub in circular
motion. This allows the ash to travel through the
hose quickly and without clogging. Move the
larger pieces to the side or break up larger pieces,
when necessary, between nozzle & fire brick.
HOW TO CLEAN YOUR FILTERS:
Temporary Cleaning (Often):
1.
Thorough Cleaning
(after 60-80 Gallons of ash has been removed)
Always turn off your Ash Vacuum before cleaning
the filters.
1.
Unplug the unit from the electrical outlet.
2.
Remove the brass noggle cover from the lid.
2.
3.
PRIMARY FILTER - Lift the filter support basket rod
“noggle” slightly and shake from side to side so the
basket hits the sides of the primary filter to break the
crust of ash and make the particles fall off.
Before removing the primary filter, vacuum along the
hose clamp so the dust that collects there will not fall
inside the filter when it is removed.
3.
Remove the primary filter and vacuum the outside of the
secondary filter and the inside of the primary filter.
4.
Before reattaching the filters, inspect them for possible
holes which may allow ash to penetrate to the motor.
Silicone rubber sealant may be used to repair small holes.
5.
Reattach the filters to the lid making sure the filters and
hose clamps are placed properly and tightly.
SECONDARY FILTER - Lift the filter support basket rod
“noggle” up and down quickly two or three times so
light contact is made with the secondary filter to slightly
compress the snap springs under the cage and make a
snapping effect on the filter as pressure is removed.
4.
Replace the brass noggle cover to the top of the lid.
NOTE:
D O N O T WA S H T H E F I LT E R S
HOW TO ORDER REPAIR PARTS
TROUBLE SHOOTING
TROUBLE
POSSIBLE CAUSE
REMEDY
Clogged Nozzle
Ash is blocking nozzle
end or nozzle is being
held above the ash
and ash is trying to
go through all at
once.
Place nozzle directly
on firebrick and rub
to move large
particles out of the
way and maintain
air flow and to crush
larger particles if
necessary.
Nozzle is backwards
in hose.
Put smooth end
in hose & crimped
end out.
Coated primary filter.
Coated secondary
filter.
Clean primary filter
see instructions on:
“How To Clean Your
Filter.”
Clean both primary
and secondary filters.
Clogged nozzle/hose.
See clogged nozzle.
Cleaning TOO WARM
of ash.
Let ash cool down.
Poor Suction
Hose Becomes Hot
Do not use gloves
to vacuum warmer
than normal ash.
Dust Escaping
Hole in either filter.
Hose clamps are not
tight enough.
Filters may have
wrinkles or out of
correct position.
Pop rivets may start
to leak air.
Repair or replace
filters. Small holes
may be repaired with
Silicone Rubber
Sealant.
Tighten hose clamps.
Inspect filters and
adjust them so they
are smooth around
the hose clamps.
Caulk pop rivets from
the inside of the unit.
NOTE: Inspect filters before each use to insure that they are in good
condition.
NOTE: EXCESSIVE OR ABUSIVE shaking of the filter support may result in
tearing and/or premature wearing of either filter.
}
Crevice Tool – 4P19
Brush Tool – 4P20
Pellet Stove Cleaning Tool
Set
4P22
When ordering repair parts, always give
the following information:
• MODEL NO.
• PART NUMBER
• PART DESCRIPTION
Love-Less Ash Co./Dustless Technologies
1285 East 650 South • Price, UT 84501
(435) 637-5885 • FAX (435) 637-5895
E-Mail: [email protected]
Parts List
BRASS NOGGLE
COVER
04503
2" SCREWS
91574
8’ CORD
01433
SWITCH
91423
MOTOR COVER
01154 (COUGAR)
MOTOR COVER
(CHEETAH II)
11451
3/4" SCREWS
91564
MOTOR
2E54
LID
6P93
CAGE SPRINGS (4)
1P24
Filter Pkg. – 2F22
91161
CAGE
11151
(Includes 1 Primary & 1 Secondary)
Wire Brush Tool – 14112 Round Wire Brush Tool – 14113
CAGE SCREWS (4)
91171
CANISTER
3M82
LID CLAMP
92123
PORT
92113
5’ HOSE
SECONDARY FILTER
6F44
7” CLAMP
93131
FILTER SUPPORT
9P23
1M50
NOZZLE
2M30
PRIMARY FILTER
9F66
10” CLAMP
HANDLE
7M83
Model No. MU405 “COUGAR”
Model No. MU 305 “CHEETAH II”
93121