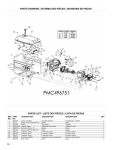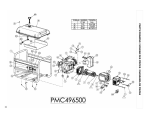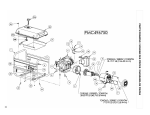
1
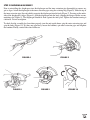
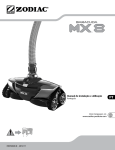
Beta
®
Owner’s Manual
and Quick
Installation
Instructions
Automatic Aboveground Pool Cleaner
THANK YOU FOR PURCHASING THE BARACUDA® BETA®. YOUR BETA® HAS BEEN DESIGNED AND
MANUFACTURED TO BE EASILY INSTALLED AND TO PROVIDE YEARS OF LOW MAINTENANCE OPERATION.
PRIOR TO INSTALLING YOUR NEW BETA®, PLEASE DO THE FOLLOWING:
1) Complete and return the warranty card.
2) Record your purchase information on the spaces provided below.
3) Attach your invoice (or a copy) to this page.
These actions will insure prompt warranty service, should it be required. Simply present your owner’s manual, along with the invoice at any of our authorized warranty
centers nationwide.
RECORD YOUR BARACUDA® BETA® POOL CLEANER DATA HERE:
Date of Purchase
Purchased From
City
State/Province
Zip/Postal Code
Serial No.:
BARACUDA® BETA® LIMITED WARRANTY
This BARACUDA BETA was carefully inspected before shipment from our warehouse. Upon unpacking, if any part proves defective or missing, please notify your dealer
immediately. Please consult owner’s manual for complete instructions on the installation and operation of your BARACUDA® BETA®.
®
®
ZODIAC POOL CARE, INC. WARRANTS THE BARACUDA® BETA® POOL CLEANER AGAINST ALL MANUFACTURING DEFECTS AND ALL WEAR AND TEAR FOR THE
FIRST TWO (2) YEARS INCLUDING THE HOSES. ALL WARRANTIES ARE EFFECTIVE FROM THE DATE OF PURCHASE.
Should this product prove defective in workmanship, materials or wear during the applicable warranty period, the consumer’s sole and exclusive remedy shall be such
repair or replacement of the product as provided below.
THIS LIMITED WARRANTY EXCLUDES THE FOLLOWING:
1. Discoloration of the BARACUDA® BETA® pool cleaner. This is caused by reaction to ultraviolet rays and the chemicals used in the pool water. Discoloration does not affect the operating ability of the BARACUDA® BETA®. Therefore, this Limited Warranty does not cover the replacement of discolored parts.
2. Damage to or malfunction of the unit resulting from excess chlorination or improper water chemistry balance.
3. Replacement of parts which fail or become defective as a result of improper installation, negligence, misuse, abuse or tampering by unauthorized repair personnel.
4. Age, pool water imbalance, and improper installation can cause vinyl pool liners to become brittle or unduly wrinkled. Corrosion of the supporting walls and/or irregularities in the pool base
may also cause liner failure. The use of this product in such an environment is at the pool owner’s risk. Therefore, the pool owner hereby releases the manufacturer from any and all claims for
damage where these conditions exist.
5. The BETA® is designed for use in aboveground pools only. If unit is used in any other application, the pool owner hereby releases the manufacturer from any and all claims. This misuse will
void all warranty on the unit.
THE LIMITED WARRANTY PROVIDED HEREIN IS THE SOLE AND EXCLUSIVE WRITTEN WARRANTY WITH RESPECT TO THE BARACUDA® BETA® POOL
CLEANER. ALL IMPLIED WARRANTIES IMPOSED BY APPLICABLE LAW, INCLUDING ANY IMPLIED WARRANTY OF MERCHANTABILITY OR FITNESS FOR A PARTICULAR PURPOSE, WITH RESPECT TO EACH COMPONENT OF THE BARACUDA® BETA® ARE LIMITED TO THE DURATION OF THE EXPRESS LIMITED WARRANTY WITH RESPECT TO SUCH COMPONENT. SOME STATES DO NOT ALLOW LIMITATIONS ON HOW LONG AN IMPLIED WARRANTY LASTS, SO THE ABOVE
LIMITATION MAY NOT APPLY TO YOU.
In no event shall ZODIAC POOL CARE, INC. be liable in contract or in tort, or under any other legal theory, for lost profits or revenues, loss of use or similar economic loss, or for indirect, special, incidental, consequential or similar damages, even if it has been advised of the possibility of such claim. Some states do not allow the exclusion or limitation of incidental or consequential damages, so the above limitation or exclusion may not apply to you.
No claim under this Limited Warranty will be recognized unless the registration card, included in your box, is completed and returned within fifteen (15) days of the purchase date. Only the
original purchaser may submit a claim under this Limited Warranty. Purchaser’s claims against ZODIAC POOL CARE, INC., shall be limited to those claims which may be asserted under the
Limited Warranty relating to any defect, malfunction or wear of the BETA®.
To obtain warranty replacements or repair, the unit should be returned, freight prepaid, to an authorized warranty center or directly to : ZODIAC POOL CARE, INC., 2028 NW 25th Avenue,
Pompano Beach, FL 33069. Call for authorization at (888) 786-7797. When submitting a claim, always supply serial number, evidence of purchase date, retailer and a brief description of the
problems/defects encountered. ZODIAC POOL CARE, INC. reserves the right to repair or replace all defective or worn parts covered by this Limited Warranty and return same to purchaser,
freight collect.
ZODIAC POOL CARE, INC. assumes no responsibility for any warranties or representations made by other individuals or businesses beyond the express terms
contained in this Limited Warranty.
This warranty gives you specific legal rights, and you may also have other rights which vary from state to state
For sale and use in the United States, Canada, and Mexico only. This pool cleaner is not warranted or guaranteed outside of the United States, Canada, or Mexico.
This pool cleaner is covered by one or more of the following Canadian and U.S. patents and Canadian registered design:
Canadian patent nos. 1,140,708, 1,254,105 and 1,256,262. Canadian rd. no. 64787 U.S. patent nos. 4,351,077, 4,642,833, 4,742,593 and 5,014,382.
2
TABLE OF CONTENTS
Prepare the Pool and Filter System....................................................
Assembly............................................................................................
Installation..........................................................................................
Maintenance and Care........................................................................
Accessories.........................................................................................
Troubleshooting Guide.......................................................................
Easy Access SystemTM ........................................................................
Parts Diagram.....................................................................................
Let Us Help ........................................................................................
4
4
6
9
10
11
12
14
15
Check that the following parts are included:
(1) Cleaner Head
w/Footpad and Apron
(1) FlowKeeperTM
Valve
(1) Wheel Deflector
(2) 45-degree Installation
Adapter Elbows
(11) Hose Lengths
(1) Pool PulseTM
(1) Yellow Disc
(3) Hose Deflectors
(1) Hose Protector
(1) Aboveground
Skimmer Cuff
(1) Hose
Connector
If assistance is required, call 1-888-786-7797
Important: for Vinyl Liner Pool Owners
Vinyl liners are subject to deterioration or damage due to age, the effect of chemicals, corrosion
or failure of the supporting walls; as well as improper installation, maintenance or cleaning of
the supporting walls or base.
Before installing the Baracuda® Beta®, examine the interior of your pool carefully. If your vinyl
liner is brittle or has stones, wrinkles, roots or metal corrosion in contact with the underside of
the liner, or has damage to the base material or supporting walls, do not install the Baracuda
Beta before having a qualified professional perform the necessary repairs.
3
PREPARE THE POOL
AND FILTER SYSTEM
Step 1:
Manually vacuum your pool.
Step 2:
Backwash or clean the filter according to the manufacturer's instructions.
Step 3:
Clean the skimmer basket and the pump strainer basket.
Note: If your pool is equipped with a main drain, turn it off.
ASSEMBLY
4
Step 1:
Slide the yellow disc over the base of the footpad. Be sure it fits properly in the grooves
provided. Be sure to install the disc with “TOP” printed facing up.
Step 2:
Slide the wheel deflector over the extension pipe and secure between the two lowest
pipe ridges.
Step 3:
Connect the hose sections, placing the hose deflectors (Part No. 24209) as indicated in
the illustrations below. Pools larger than 26’ require additional hose sections. For oval
pools use enough hose sections to reach the farthest point from the skimmer plus 2 to 3
sections.
27' - 28' Diameter (requires one extra hose section)
TO SKIMMER
TO BETA®
21' - 24' Diameter
TO SKIMMER
TO BETA®
15' - 18' Diameter
TO SKIMMER
TO BETA®
12' Diameter
TO SKIMMER
TO BETA®
Step 4:
Place the hose connector (Part No. 33205)
on the male end of the hose. The connector end of the hose will attach to the
Flowkeeper valve.
5
INSTALLATION
Step 1:
Turn the filter system off. (Be sure you have turned off the main drain, if your pool has one.)
GENERAL POOL SCHEMATIC
SKIMMER
RETURN
FLOW
INLET
POOL
FILTER
PUMP
Step 2:
Select the FlowKeeperTM fitting combination (A, B or C) best suited to your
skimmer from the figures below.
FIGURE A
Direct Method Remove Skimmer Basket
FIGURE B
With Skimmer Basket and Skim Vac Plate
(supplied with pool)
SKIMMER
HOSE
SKIMMER
ABOVEGROUND SKIMMER CUFF
FLOW
KEEPERTM
VALVE
FLOW
KEEPERTM
VALVE
SKIMMER
BASKET
ABOVEGROUND
SKIMMER CUFF
FIGURE C
Vacuum Line Installation
SKIMMER
VACUUM
PLATE
SKIMMER
FLOW KEEPERTM
VALVE
COVER
PLATE
CAUTION:
The FlowKeeperTM valve MUST
be used on all installations.
NOTE:
The FlowKeeperTM should be
positioned with the spring
loaded by-pass door toward
the pool bottom.
HOSE
ABOVEGROUND SKIMMER CUFF
6
2-45°
FITTINGS
SKIMMER
BASKET
Step 3:
To prevent losing prime to your pool pump, all air must be removed from the hoses and
the BETA® head before connecting them to your system.
Turn the filter system on.
Hold one end of the hose over the return inlet until a full stream of water flows from the
other end.
Step 4:
Keep both hose ends underwater and completely submerge the BETA® head. When the
bubbles have stopped flowing from the head, connect the female end of the hose to the
BETA®.
7
Step 5: Cover the end of the 4 1/2” hose connector
tightly with your hand.
Move to the skimmer and connect the hose end to the FlowKeeperTM valve and fitting combination
selected in Step 2. Now insert the end of the valve assembly into the suction port of the skimmer.
Step 6: To insure proper operation, mesure the flow with the Pool Pulse. Keeping the end of
the hose underwater, remove the Beta head and attach the Pool Pulse. If the flow is in the “Too
Low” range, see “Preparing the pool and filter system” on page 4. If the flow is in the “Too High”
range, remove the Beta cleaner and call our technical services hotline at 1-800- 937-7873 for
assistance. Always use the Pool Pulse to insure your Beta is running within the “Ideal” range”.
POOL PULSE™
IDEAL
8
Your installation is now complete.
TOO
HIGH
TOO
LOW
MAINTENANCE AND CARE
1. Remove the BETA® from the pool before super chlorinating or other chemical balancing and re-install
a minimum of four hours later.
2. Always store the hoses straight (in the original box if possible). Never coil the BETA® hose. (Coiled
hose may be straightened with hot water or by laying the hose in the sun on a warm deck for several
hours.)
CORRECT
X
INCORRECT
3. Always disconnect the hose from the skimmer before backwashing your filter.
4. Off season storage: remove the disk and store it flat. Store the head in a warm dry place. Store the hoses
straight.
9
ACCESSORIES
PART ILLUSTRATION
PART NO.
1. 24100
1
2A. 90153
(for 11/2" return inlet)
2B
2A
2B. 90155
(for 2" return inlet)
3. 26705
3
Return Line Diverter
Use when no other
return inlet directional
fittings exist.
(see page 11).
Retrofit Eyeball Return
Line Diverter
Use to replace standard
directional inlet eyeballs
(see page 11).
The
with 4 1/2"
Hose Connector
Use when heavy debris
or leaf situations exist.
4. 46155
Large Wheel Deflector
Use when extra clearance
needed at steps or other
obstacles.
5. 38031
Hide-A-Hose
Sinks the pool cleaner hose
when the pump is turned off.
4
5
10
DESCRIPTION
TROUBLESHOOTING GUIDE
MECHANICAL (MACHINE STOPS OR MOVES SLUGGISHLY)
1. Turn the filter system off and check all the connections of the BETA® to the skimmer.
2. Remove the BETA® head from the hose, turn it upside down and inspect for debris blocking the
diaphragm. (See page 12)
3. Backwash or clean the filter and clean pump and skimmer baskets of all debris. Turn the filter system on
and check that there is good flow. NOTE: In cold water 60° F or less, water flow through the BETA® must
be increased to compensate for the reduced flexibility of the hose and diaphragm.
4. If the BETA® still does not move, lift the hose out of the water, section by section while the filtration system is running. A cracked hose can be detected by a hissing noise. Replace it.
5. If none of the above steps resolves the problem, the pool circulation system is probably not supplying the
water flow necessary to propel the BETA®. Check it using the Pool PulseTM (Part No. 44805).
6. Have a qualified pool service person inspect your pump impeller, pump motor, filter tank and elements or
plumbing for blockage or leaks.
MACHINE BECOMES NOISY (SPEED INCREASES DRASTICALLY)
Check the FlowKeeperTM valve for obstructions.
BETA GETS CAUGHT UNDER OR AROUND THE POOL LADDER
1. Remove the ladder if possible.
2. Acquire and install a large wheel deflector from your BARACUDA® dealer.
MACHINE NOT COVERING ENTIRE POOL (DUE TO FORCE OF WATER FLOW FROM
RETURN INLET).
1. Turn directional eyeball downward (toward pool bottom).
2. If return flow still effects hose or unit, install a Baracuda return diverter. Follow the directions below.
2a: Remove the existing return
inlet eyeball retaining ring
and remove the
directional
eyeball.
2b: Replace the directional eyeball with the BARACUDA®
return eyeball diverter (Part
No. 90153) and reinstall the
eyeball retaining ring. NOTE:
If your return inlet dimension
is 2,” use return
eyeball diverter
(Part No. 90155)
available
from your
BETA®
dealer.
2c: For pools with no return inlet
directional fitting or with other
types of return line diverters,
use a BARACUDA® universal
return line diverter (Part No.
24100), available from your
BETA® dealer.
Pinch the wires
together and insert
them fully into the
return inlet.
AIM THE FLOW FROM THE DIVERTER TOWARD THE BOTTOM OF THE POOL.
SOLAR BLANKET OPERATION
Remove or do not initially install the hose deflectors.
11
EASY ACCESS SYSTEM™
Unlike other competitive automatic pool cleaners, the BETA® has the patented Easy Access System. This unique
feature allows almost instantaneous access to the one moving part– the diaphragm.
Large foreign objects, such as children’s toys, tree branches and rocks, should be removed manually from your
pool prior to operating an automatic pool cleaner. In the event a foreign object does not get manually removed
and a blockage occurs, the Easy Access System allows you the opportunity to remove the blockage or check the
diaphragm for damage in minutes at poolside.
STEP 1 REMOVAL OF DIAPHRAGM
Remove the wheel deflector (Figure 1). Loosen the handnut by turning it counter clockwise one full turn (Figure
2). (Do not loosen or remove the handnut completely.) Turn the unit over, grasp the diaphragm by the flange
(Figure 3) and pull the diaphragm/ assembly out of the body (Figure 4). Remove the diaphragm from the inner
extension pipe (Figure 5), leaving the retaining ring on the diaphragm.
STEP 2 EXAMINATION
Inspect the diaphragm for the blockage or damage. If damage is evident, i.e., a cut or hole on the sides of the
diaphragm, return it, along with head of the unit (excluding hoses), to your authorized Baracuda warranty station
for replacement.
If a blockage is apparent, grasp it and remove it. If this can’t be done, a garden hose may be used to flush the obstacle through. Do not use any sharp objects to probe or push an obstruction as this may damage the diaphragm.
FIGURE 1
12
FIGURE 4
FIGURE 3
FIGURE 2
FIGURE 5
STEP 3 DIAPHRAGM ASSEMBLY
Prior to reinstalling the diaphragm, rinse the diaphragm and the inner extension pipe thoroughly to remove any
grit or algae. Attach the diaphragm to the inner extension pipe using the retaining ring (Figure 6). Slide the top of
the inner extension pipe (the end which is opposite the diaphragm) into the body (Figure 7). Pressing on the underside of the diaphragm’s ridges (Figure 8), push the diaphragm into the body, aligning the flange with the accommodating slot (Figure 9). The diaphragm should fit flush against the inlet plate. Tighten the handnut turning it
clockwise. Do not overtighten.
To check that the assembly has been done properly, turn the unit upside down, grip the outer extension pipe and
spin the body (Figure 10). If it does not spin freely, loosen the handnut, spin outer extension pipe and retighten
the handnut. Finally, reinstall the wheel deflector.
FIGURE 4
FIGURE 8
FIGURE 5
FIGURE 9
FIGURE 10
13
1
16
18
17
2
3
4
19
22
5
20
23
7
21
8
13
9
10
6
14
15
11
12
14
PART NO.
DESCRIPTION
1.
46055
Beta Wheel Deflector-12” (Turquoise)
1
2.
74055
Beta Outer Ext. Pipe w/Handnut
1
3.
50210
Beta Outer Body Top (White)
1
4.
80200
Beta Float Ball
1
5.
53005
Beta Outer Body Bottom (White)
1
6.
90147
Beta Weight
1
7.
49855
Apron (Turquoise)
1
8.
74000
Compression Ring
1
9.
71605
Beta Inner Body
1
10.
61305
Beta Inner Body + Compression Ring
1
11.
72955
Beta Footpad - Turquoise
1
12.
48140
Beta Slotted Disc (Yellow)
1
13.
73406
Threaded Inner Extension Pipe
1
14.
81600
Diaphragm Retaining Ring
1
15.
81700
Diaphragm
1
16.
60050
FlowKeeper Valve
17.
44805
Pool PulseTM
1
18.
22425
45º Elbow
2
19.
64700
Aboveground Valve Cuff
1
20.
33205
Beta 4 1/2” Connector (White)
1
21.
24209
Beta Hose Deflector (White)
3
22.
33800
Hose Protector
1
23.
21205
Beta Hose Kit - 11x1 Meter (White)
1
TM
QTY.
1
LET US HELP!If you are having a coverage problem you cannot solve, mail or fax us the following information along with a sketch of your pool shape,
including dished out or hopper areas if they exist, and indicating the location of skimmers, inlets, ladders, and the filter system.
Also include a brief description of the problem. (Send a photocopy and retain this page for future use.)
MAIL TO:
ZODIAC POOL CARE, INC.
2028 NW 25th Avenue, Pompano Beach, Florida 33069 or fax to: (954) 977-5065
ZODIAC POOL CARE CANADA, LTD.
2115 South Service Road West, Unit #3, Oakville, Ontario L6L 5W2 or fax to: (905) 825-5780
CUSTOMER NAME: ____________________________________TELEPHONE NO: (_______) ___________________
ADDRESS: ________________________________________________________________________________________
CITY:
STATE/PROVINCE:
ZIP/POSTAL CODE: __________
SERIAL NO.:___________________________________________PURCHASED FROM: _________________________
POOL SIZE: ___________________________________________PUMP SIZE (H.P.):____________________________
FILTER (circle one):
SAND
D.E.
CARTRIDGE
FILTER SIZE (or Model No.)_________________________
Indicate problem:___________________________________________________________________________
_________________________________________________________________________________________
_________________________________________________________________________________________
15
ZODIAC POOL CARE, INC.
2028 NW 25th Avenue, Pompano Beach, Florida 33069
1-888-786-7797
www.baracuda.com
© Copyright 2001
90716