1
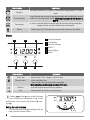
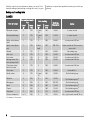
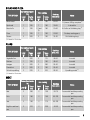
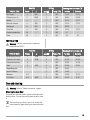
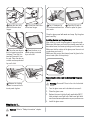
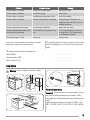
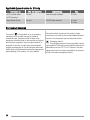
EN
User manual
Oven
ZOB 383
Contents
Safety information _ _ _ _ _ _ _ _ _ _ _ _ _ _ _ _
Product description _ _ _ _ _ _ _ _ _ _ _ _ _ _ _ _
Before first use _ _ _ _ _ _ _ _ _ _ _ _ _ _ _ _ _ _
Daily use _ _ _ _ _ _ _ _ _ _ _ _ _ _ _ _ _ _ _ _ _
Hints, tips and cooking tables _ _ _ _ _ _ _ _ _ _ _
2
4
4
5
7
Care and cleaning _ _ _ _ _ _ _ _ _ _ _ _ _ _ _ _
What to do if… _ _ _ _ _ _ _ _ _ _ _ _ _ _ _ _ _
Installation _ _ _ _ _ _ _ _ _ _ _ _ _ _ _ _ _ _ _
Environment concerns _ _ _ _ _ _ _ _ _ _ _ _ _ _
11
12
13
14
Subject to change without notice
Safety information
Before the installation and use, read this manual carefully:
• For your personal safety and the safety of your property
• For the respect of the environment
• For the correct operation of the appliance.
Always keep these instructions with the appliance also if
you move or sell it.
The manufacturer is not responsible if incorrect installation or use results in damage.
Children and vulnerable people safety
• Do not let persons, children included, with reduced
physical sensory, reduced mental functions or lack of
experience and knowledge to use the appliance. They
must have supervision or instruction for the operation
of the appliance by a person who is responsible for
their safety.
• Keep all packaging away from children. There is the
risk of suffocation or physical injury.
• Keep children and small animals away from the appliance when the door is open or the appliance is in operation. There is the risk of injury or other permanent
disability.
• If the appliance has Switch-on lock or Key lock function, use it. It prevents children and small animals from
accidental use of the appliance.
General safety
• Do not change the specifications of this appliance.
There is the risk of injury and damage to the appliance.
• Do not let the appliance stay unattended during operation.
• Switch off the appliance after each use.
Installation
• Only an approved electrician can install and connect
the appliance. Contact an approved service centre. This
2
•
•
•
•
•
•
•
•
•
•
•
•
is to prevent the risks of structural damage or physical
injury.
Make sure that the appliance is not damaged because
of transport. Do not connect a damaged appliance. If
necessary, contact the supplier.
Remove all packaging, stickers and layers from the
appliance before first use. Do not remove the rating
plate. It can invalidate the guarantee.
Fully obey the laws, ordinances, directives and standards in force in the country where you use the appliance
(safety regulations, recycling regulations, electrical or
gas safety rules etc.).
Make sure that the appliance is disconnected from the
power supply during the installation.
Be careful when you move the appliance. The appliance
is heavy. Always use safety gloves. Do not pull the
appliance by the handle.
The electrical installation must have an isolation device
which lets you disconnect the appliance from the mains
at all poles. The isolation device must have a contact
opening width of minimum 3 mm.
You must have correct isolation devices: line protecting cut-outs, fuses (screw type fuses removed from the
holder), earth leakage trips and contactors.
The shock protection parts must be fixed in such a way
that they cannot be undone without tools.
Some parts of the appliance carry current. Close the
appliance with furniture and make sure that there are
no free spaces. It prevents electrical shock because you
cannot accidentally touch dangerous parts.
Before the installation, make sure that the kitchen cabinet has the recess dimensions applicable.
Make sure that the appliance is installed below and
adjacent safe structures.
Keep the minimum distances to the other appliances
and units.
• Install the appliance with its back and one side close
to the higher appliance. The other side must be close
to appliance with the same height.
• The appliance cannot be positioned on a base.
• Built in ovens and built in cooking surfaces are attached with special connection system. To prevent
damage to the appliance, only use an appliance with
the appliances from the same manufacturer.
Electrical connection
• The appliance must be earthed.
• Make sure that the electrical data on the rating plate
agree with your domestic power supply.
• Information on the voltage is on the rating plate.
• Always use a correctly installed shockproof socket.
• When you connect electrical appliances to mains sockets, do not let cables touch or come near the hot appliance door.
• Do not use multi-way plugs, connectors and extension
cables. There is the risk of fire.
• Do not replace or change the mains cable. Contact the
service centre.
• Make sure not to squash or cause damage to the mains
plug (if applicable) and cable behind the appliance.
• Make sure that the mains connection is accessible after
the installation.
• Do not pull the mains cable to disconnect the appliance. Always pull the mains plug – if applicable.
Use
• The appliance is only for domestic use. Do not use the
appliance for commercial and industrial use.
• Only use the appliance for domestic cooking tasks.
This is to prevent physical injury to persons or prevent
damage to property.
• Do not use the appliance as a work surface or storage
surface.
• Do not put flammable products or items that are wet
with flammable products, and/or fusible objects (made
of plastic or aluminium) in, near or on the appliance.
There is the risk of explosion or fire.
• The interior of the appliance becomes hot during use.
There is the risk of burns. Use gloves when you insert
or remove the accessories or pots.
• Be careful when you remove or install the accessories
to prevent damage to the oven enamel.
• Always stay away from the appliance when you open
the door while the appliance is in operation. Hot steam
can release. There is the risk of skin burns.
• To prevent damage or discoloration to the enamel:
– do not put any objects directly on the appliance floor
and do not cover it with aluminium foil;
– do not put hot water directly into the appliance;
– do not keep moist dishes and food in the appliance
after you finish the cooking.
• Discoloration of the enamel has no effect on the performance of the appliance
• Do not use this appliance if it is in contact with water.
Do not operate the appliance with wet hands.
• Do not apply pressure on the open door.
• Always close the appliance door when you cook, even
while grilling.
Care and cleaning
• Before maintenance, switch off the appliance and disconnect the appliance from the power supply.
• Before maintenance, make sure that the appliance is
cold. There is the risk of burns. There is the risk that
the glass panels can break.
• Keep the appliance clean at all times. A build-up of fats
or other foodstuff can result in a fire.
• Regular cleaning prevents the surface material from
deteriorating
• For your personal safety and the safety of your property, only clean the appliance with water and a soap.
Do not use flammable products or products that can
cause corrosion.
• Do not clean the appliance with steam cleaners, highpressure cleaners, sharp objects, abrasive cleaning
agents, abrasive sponges and stain removers
• If you use an oven spray, follow the instructions from
the manufacturer. Do not spray anything on the heating
elements and the thermostat sensor.
• Do not clean the glass door with abrasive cleaning
agents or metal scraper. Heat resistant surface of the
inner glass can break and shatter.
• When the door glass panels are damaged they become
weak and can break. You must replace them. Contact
the service centre.
• Be careful when you remove the door from the appliance. The door is heavy!
• Do not clean catalytic enamel (if applicable).
3
Oven lamp
Disposal of the appliance
• Disconnect the appliance from the power supply before
the replacement of the oven lamp. There is the risk of
electrical shock!
• To prevent the risk of physical injury or damage
– Disconnect the appliance from the power supply.
– Cut off the mains cable and discard it.
– Discard the door catch. This prevents children or
small animals from being closed inside of the appliance. There is the risk of suffocation.
Service centre
• Only an approved engineer can repair or work on the
appliance. Contact an approved service centre.
• Use only original spare parts.
Product description
General overview
2
3
4
5
1
6
7
8
10
9
Oven accessories
• Oven shelf
For cookware, cake tins, roasts.
• Deep roasting pan
Before first use
Warning! Refer to "Safety information" chapter.
Setting the time
The oven only operates after time set.
4
1
2
3
4
5
6
7
8
9
10
Control panel
Temperature indicator
Temperature control knob
Display
Oven function control knob
Air vents for the cooling fan
Heating element
Oven lamp
Rating plate
Fan
To bake and roast or as pan to collect fat.
• The roasting pan grid
To put in the deep roasting pan.
Preheating
1. Set function
and maximum temperature.
2. Run an empty oven for 45 minutes.
3. Set function
and maximum temperature.
4. Run an empty oven for 15 minutes.
This is to burn off any residue from the cavity surface.
Accessories can become more hot than in normal use.
During this period an odour and smoke can be emitted.
This is normal. Make sure the airflow is sufficient.
Initial Cleaning
When you connect the appliance to the electrical supply
or in case of a power cut, the Time function indicator
flashes automatically.
To set the current time use " + " or " - " button.
After approximately 5 seconds, the flashing stops and the
display shows the time of day set.
• Remove all parts from the appliance.
• Clean the appliance before first use.
Caution! Do not use abrasive cleaning agents! This
can damage the surface. Refer to chapter "Care and
Cleaning".
For time change you must not set an automatic
function (Duration or End ) at the same time.
Daily use
Warning! Refer to "Safety information" chapter.
Switching the Oven On and Off
1. Turn the oven functions control knob to an oven
function.
2. Turn the temperature control knob to a temperature.
The temperature indicator comes on while the oven
temperature increases.
3. To switch off the oven, turn the oven functions control
knob and the temperature control knob to the Off position.
Oven Functions
Oven function
Application
OFF position
The appliance is OFF.
Oven lamp
Lights up without any cooking function.
Conventional cooking
Heats both from the top and bottom element. To bake and roast on one oven level.
Top heating element
Heats only from the top of the oven. To finish cooked dishes.
Bottom heating element Heats only from the bottom of the oven. To bake cakes with crispy or crusty bases.
Grill
To grill flat food items in small quantities in the middle of the shelf. To make toasts
5
Oven function
Application
Dual grill
The full grill element is on. To grill flat food items in large quantities. To make
toasts.
Thermal grilling
The grill element and the oven fan operate alternately and circulate hot air around
the food. To cook large pieces of meat. Maximum temperature for this function is
200 °C .
Fan cooking
To roast or roast and bake the food that requires the same cooking temperature,
using more than one shelf, without flavour transference.
Defrost
Thaws frozen food. The temperature control knob must be on off position.
Display
1
2
6
5
3
Minute minder
Application
Shows the time. To set, change or check the time.
To set a countdown time.
A signal sounds, after the time period is completed.
This function has no effect on the operation of the oven.
Duration
To set how long the oven has to be in operation.
End
To set the switch-off time for an oven function.
Duration
and End
can be used at the same
time, if the oven is to be switched on and off auto, then
matically later. In this case first set Duration
End
.
Setting the clock functions
1. Press the Selection button again and again until necessary function indicator flashes.
6
Function Indicators
Time display
Function Indicators
Button "+"
Selector Button
Button "-"
4
Clock function
Time of day
1
2
3
4
5
6
2. To set the time for Minute minder
, Duration
or End
, press " + " or " - " button.
The related function indicator comes on.
When the time period ends, the function indicator
flashes and an acoustic signal sounds for 2 minutes.
and End
the
With the functions Duration
oven switches off automatically.
3. Press any button to stop the signal.
4. Turn the oven function control knob and the temperature control knob to the Off position.
Cancelling the clock functions
1. Push the Selection button again and again until necessary function indicator flashes.
2. Push and hold button " - ".
After some seconds the clock function goes out.
Other Functions
Cooling fan
When the appliance operates, the cooling fan switches on
automatically to keep the surfaces of the appliance cool.
If you switch off the appliance, the cooling fan continues
to operate until the appliance cools down.
Safety thermostat
To prevent dangerous overheating (due to incorrect use
of the appliance or defective components), the oven has
a safety thermostat, which interrupts the power supply.
The oven switches back on again automatically, when the
temperature drops.
Hints, tips and cooking tables
Warning! Refer to "Safety information" chapter.
Information on acrylamides
Important! According to the newest scientific knowledge,
if you brown food (specially the one which contains
starch), acrylamides can pose a health risk. Thus, we
recommend that you cook at the lowest temperatures and
do not brown food too much.
• The appliance has four shelf levels. Count the shelf
levels from the bottom of the appliance floor.
• You can cook different dishes on two levels at the same
time. Place the shelves on level 1 and 3.
• The appliance has a special system which circulates
the air and constantly recycles the steam. With this
system you can to cook in a steamy environment and
keep the food soft inside and crusty outside. It decreases the cooking time and energy consumption to a
minimum.
• Moisture can condense in the appliance or on the glass
doors. This is normal. Always stand back form the appliance when you open the appliance door while cooking. To decrease the condensation, run the appliance
for 10 minutes before cooking.
• Wipe away moisture after every use of the appliance.
• Do not put the objects directly on the appliance floor
and do not cover the components with aluminium foil
when you cook. This can change the baking results and
damage the enamel coating.
Baking cakes
• The best temperature for baking cakes is between
150°C and 200°C.
• Preheat the oven for approximately 10 minutes before
baking.
• Do not open the oven door before 3/4 of the set cooking
time is up.
• If you use two baking trays at the same time, keep one
level empty between them.
Cooking meat and fish
• Do not cook meat with weight below 1 kg. Cooking too
small quantities makes the meat too dry.
• To keep the red meat well cooked outside and juicy
inside set the temperature between 200°C-250°C.
• For white meat, poultry and fish set the temperature
between 150°C-175°C.
• Use a dripping pan for very fatty food to prevent the
oven from stains that can be permanent.
• Leave the meat for approximately 15 minutes before
carving so that the juice does not seep out.
• To prevent too much smoke in the oven during roasting, add some water into the dripping pan. To prevent
the smoke condensation, add water each time after it
dries up.
Cooking times
Cooking times depend on the type of food, its consistency, and volume.
7
Initially, monitor the performance when you cook. Find
the best settings (heat setting, cooking time, etc.) for your
cookware, recipes and quantities when you use this appliance.
Baking and roasting table
CAKES
Conventional cooking
Fan cooking
Cooking
time [min]
Notes
160
45-60
In cake mould
2 (1 and
3)
160
24-34
In cake mould
170
2
160
60-80
In cake mould 26 cm
1
170
2 left +
right
160
100-120
2 cake moulds of 20 cm on the
oven shelf
Strudel
2
175
2
150
60-80
On baking tray
Jam- tart
2
170
2
160
30-40
In cake mould 26 cm
Fruit cake
2
170
2
155
60-70
In cake mould 26 cm
Sponge cake (Fatless sponge cake)
2
170
2
160
35-45
In cake mould 26 cm
Christmas cake/
Rich fruit cake
2
170
2
160
50-60
In cake mould 20 cm
Plum cake
2
170
2
160
50-60
In bread tin 1)
Small cakes
3
170
3 (1 and
3)
160
20-30
On flat baking tray
Biscuits
3
150
3
150
20-30
On flat baking tray1)
Meringues
3
100
3
100
90-120
On flat baking tray
Buns
3
190
3
180
15-20
On flat baking tray1)
Choux
3
190
3
180
25-35
On flat baking tray1)
Plate tarts
3
180
2
170
45-70
In cake mould 20 cm
1 or 2
180
2
170
40-55
Left + right in cake mould 20 cm
TYPE OF DISH
Level
Temp
[°C]
Level
Temp
[°C]
Whisked recipies
2
170
2 (1 and
3)
Shortbread dough
2
170
Butter-milk cheese
cake
1
Apple cake (Apple
pie)
Victoria sandwich
1) Preheat for 10 minutes.
8
BREAD AND PIZZA
TYPE OF DISH
Conventional cooking
Fan cooking
Cooking
time [min]
Notes
190
60-70
1-2 pieces, 500 gr one piece1)
1
180
30-45
In bread tin
190
2 (1 and
3)
180
25-40
6-8 rolls on flat baking tray 1)
1
190
1
190
20-30
On deep roasting pan1)
3
200
2
190
10~20
On flat baking tray1)
Cooking
time [min]
Notes
Level
Temp
[°C]
Level
Temp
[°C]
White bread
1
190
1
Rye bread
1
190
Bread rolls
2
Pizza
Scones
1) Preheat for 10 minutes.
FLANS
TYPE OF DISH
Conventional cooking
Fan cooking
Level
Temp
[°C]
Level
Temp
[°C]
Vegetable flan
2
200
2
175
45-60
In mould
Quiches
1
190
1
190
40-50
In mould
Lasagne
2
200
2
200
25-40
In mould
Cannelloni
2
200
2
190
25-40
In mould
Yorkshire pudding
2
220
2
210
20-30
6 pudding mould 1)
Cooking
time [min]
Notes
1) Preheat for 10 minutes.
MEAT
TYPE OF DISH
Conventional cooking
Level
Fan cooking
Temp
[°C]
Level
Temp
[°C]
Beef
2
200
2
190
50-70
On oven shelf and deep roasting
pan
Pork
2
180
2
180
90-120
On oven shelf and deep roasting
pan
Veal
2
190
2
175
90-120
On oven shelf and deep roasting
pan
English roast beef
rare
2
210
2
200
44-50
On oven shelf and deep roasting
pan
9
TYPE OF DISH
Conventional cooking
Level
Fan cooking
Temp
[°C]
Level
Temp
[°C]
Cooking
time [min]
Notes
English roast beef
medium
2
210
2
200
51-55
On oven shelf and deep roasting
pan
English roast beef
well done
2
210
2
200
55-60
On oven shelf and deep roasting
pan
Shoulder of pork
2
180
2
170
120-150
On deep roasting pan
Shin of pork
2
180
2
160
100-120
2 pieces on deep roasting pan
Lamb
2
190
2
190
110-130
Leg
Chicken
2
200
2
200
70-85
Whole on deep roasting pan
Turkey
1
180
1
160
210-240
Whole on deep roasting pan
Duck
2
175
2
160
120-150
Whole on deep roasting pan
Goose
1
175
1
160
150-200
Whole on deep roasting pan
Rabbit
2
190
2
175
60-80
Cut in pieces
Hare
2
190
2
175
150-200
Cut in pieces
Pheasant
2
190
2
175
90-120
Whole on deep roasting pan
Cooking
time [min]
Notes
FISH
TYPE OF DISH
Conventional cooking
Fan cooking
Level
Temp
[°C]
Level
Temp
[°C]
Trout/Sea bream
2
190
2 (1 and
3)
175
40-55
3-4 fishes
Tuna fish/Salmon
2
190
2 (1 and
3)
175
35-60
4-6 fillets
Grilling
Preheat the empty oven for 10 minutes, before
cooking.
Quantity
TYPE OF DISH
Grilling
Pieces
g
Fillet steaks
4
800
Beef steaks
4
600
Sausages
8
/
10
Cooking time in minutes
Temp. (°C)
1st side
2nd side
3
250
12-15
12-14
3
250
10-12
6-8
3
250
12-15
10-12
level
Quantity
TYPE OF DISH
Grilling
Pieces
g
level
Cooking time in minutes
Temp. (°C)
1st side
2nd side
Pork chops
4
600
3
250
12-16
12-14
Chicken (cut in 2)
2
1000
3
250
30-35
25-30
Kebabs
4
/
3
250
10-15
10-12
Breast of chicken
4
400
3
250
12-15
12-14
Hamburger
6
600
3
250
20-30
Fish Fillet
4
400
3
250
12-14
Toasted sandwiches
4-6
/
3
250
5-7
/
Toast
4-6
/
3
250
2-4
2-3
10-12
Thermal grilling
Warning! Use this function with a maximum
temperature of 200°C.
Quantity
TYPE OF DISH
Grilling
Pieces
g
Rolled joints (turkey)
1
1000
Chicken (cut in two)
2
Chicken drumsticks
6
Quail
Vegetable gratin
pieces. Scallops
Cooking time in minutes
Temp. (°C)
1st side
2nd side
3
200
30-40
20-30
1000
3
200
25-30
20-30
-
3
200
15-20
15-18
4
500
3
200
25-30
20-25
-
-
3
200
20-25
-
level
-
-
3
200
15-20
-
Mackerel
2-4
-
3
200
15-20
10-15
Fish slices
4-6
800
3
200
12-15
8-10
Care and cleaning
Warning! Refer to "Safety information" chapter.
Cleaning the oven door
The oven door has two panels of glass installed one behind the other. You can remove the glass panel to clean
it.
door.
The oven door can close if you try to remove the
internal panel of glass before you remove the oven
11
90°
1
1 Open the door fully
and hold the two door
hinges.
2 Lift and turn the levers
on the two hinges.
2
6 Turn 2 fasteners by
7 Carefully lift and re90° and remove them from move the panel of glass.
their seats.
Clean the glass panel with water and soap. Dry the glass
panel carefully.
Installing the door and the glass panel
3 Close the oven door to 4 Place the door on a
the first opening position stable surface protected
(halfway). Then pull for- by a soft cloth.
ward and remove it from
its seat. Place the door on
a stable surface protected
by a soft cloth.
After cleaning, install the glass panel in opposite order.
Make sure that when you install the internal panel with a
decorative frame, the screen-printing is on the outer side.
Make sure that the surface of the glass panel frame is not
rough when you touch it.
Make sure that you put the internal panel of glass to the
correct seats (refer to the picture).
Replacing the oven light bulb/cleaning the glass
cover
5 Release the locking
system to remove the internal panel of glass.
What to do if…
Warning! Refer to "Safety information" chapter.
12
Warning! Be careful! There is the risk of electrical
shock!
1. Turn the glass cover anti-clockwise to remove it.
2. Clean the glass cover.
3. Replace the oven light bulb with applicable 300°C
heat-resistant oven light bulb. New oven light bulb
must have the same parameters as your previous one.
4. Install the glass cover.
Problem
Possible cause
Remedy
The oven does not heat up
The oven is not switched on
Switch on the oven
The oven does not heat up
The clock is not set
Set the clock
The oven does not heat up
The necessary settings are not set
Control the settings
The oven does not heat up
The fuse in the fuse box is released
Control the fuse. If the fuse is released more than one time, refer to a
qualified electrician.
The oven lamp does not operate
The oven lamp is defective
Replace the oven lamp
Steam and condensation settle on the You left the dish in the oven for too
food and in the oven cavity
long
Do not leave the dishes in the oven
for longer than 15-20 minutes after
the cooking process ends
The display shows “12.00”
Reset the clock
A power cut
If you cannot find a solution to the problem yourself,
contact your dealer or the service centre.
The necessary data for the service centre is on the rating
plate. The rating plate is on the front frame of the oven
cavity.
We recommend that you write the data here:
Model (MOD.)
.........................................
Product number (PNC)
.........................................
Serial number (S.N.)
.........................................
Installation
Warning! Refer to "Safety information" chapter.
A
540
50
560
2
in
550 m
560
÷57
0
580
B
570
590
20
594
Electrical installation
Important! The manufacturer is not responsible if you do
not obey the safety precautions from chapter "Safety".
560
593
in
550 m
80
-570
0
0
÷1
This appliance is supplied without a main plug and a main
cable.
Applicable types of cables for Europe: H07 RN-F, H05
RN-F, H05 RRF, H05 VV-F, H05 V2V2-F (T90), H05 BBF
13
Applicable types of cables for UK only
Connection via
Min. size Cable/flex
Cable/flex type
Fuse
• 13 A socket outlet
• 13 A spur box
2,5 mm²
Three core butyl insulated
13 A min.
Oven Control Circuit
2,5 mm²
PVC/PVC twin and earth
15 A min.
20 A min.
Environment concerns
The symbol
on the product or on its packaging
indicates that this product may not be treated as
household waste. Instead it should be taken to the
appropriate collection point for the recycling of electrical
and electronic equipment. By ensuring this product is
disposed of correctly, you will help prevent potential
negative consequences for the environment and human
health, which could otherwise be caused by inappropriate
waste handling of this product. For more detailed
14
information about recycling of this product, please
contact your local council, your household waste disposal
service or the shop where you purchased the product.
Packaging material
The packaging material is environmentally-friendly
and recyclable. Plastic parts are marked with international
abbreviations such as PE, PS, etc. Dispose of the packaging material in the containers provided for this purpose
at your local waste management facility.
15
397152801-C-032010
www.zanussi.com/shop