1
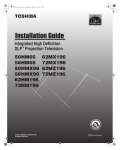
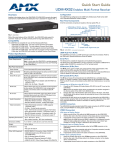
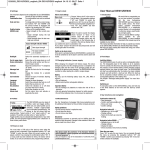
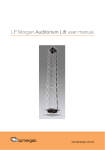
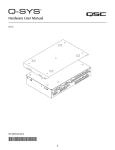
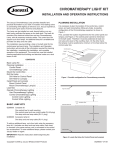
KP 1 In-Wall Keypad
Power for the Digital Revolution™
Introduction
Congratulations! As the owner of a KP 1 in-wall keypad, you own an
accessory that adds convenience and versatility to your home audio system
by providing independent control in each room or zone powered by a
Harman Kardon PA 4000 multichannel power amplifier. The elegant, threebutton design offers power on/off and volume control and is prewired to
accept an optional infrared (IR) sensor to allow remote control of virtually any
device equipped with a remote IR input.
The KP 1 uses an optional Decora®-style cover plate for coordination with
other wall-mounted switches. The KP 1 does not require an external power
supply, as all needed power is provided through the connection to the
PA 4000.
In order to fully enjoy the benefits of remote keypad control, please take a
few minutes to read this owner’s guide. It contains important information that
will guide you step by step through the correct and safe installation of your
keypad. If you do not have experience installing in-wall electrical and
telecommunications components, we recommend that you have the KP 1
installed by a properly trained professional.
If you have any questions about this product, its installation or its operation,
please contact your retailer or custom installer. They are your best source of
product information.
Features
■ Elegant, Three-Button Design
■ Up to Four KP 1 Keypads May Be Attached to the PA 4000 for
Independent Control of Separate Rooms and Zones
■ Accepts Optional IR Sensor That Transmits Commands to Most
Remote-Controllable Products Through a PA 4000
■ Designed for Use With Optional Decora-Style Wall-Plate That
Blends in With Other In-Wall Electrical Components
■ Mounts in Standard Electrical Junction Box or With Plaster Ring
■ RJ-45 Connector Offers Easy Installation With PA 4000 Amplifier
■ 3-Pin Eurostyle Connector for Optional IR Sensor
Typographical Conventions
In order to help you use this guide with the front panel controls and rear panel connections for both the KP 1 and PA 4000, certain conventions have been used.
Example – indicates a specific front panel button or rear panel connection jack
1 – indicates a KP 1 front panel control or feature
¡ – indicates a KP 1 rear panel connection or feature
a – indicates a PA 4000 rear panel connection or switch
250 Crossways Park Drive, Woodbury, New York 11797
1-800/422-8027 (USA only) Fax: 516/682-3523
© 2001 Harman Kardon, Incorporated
Printed 9/01
Part No. YiAK-K1000-01A
Decora is a registered trademark of Leviton Manufacturing Company, Inc.
Micro Link is a trademark and Xantech is a registered trademark of Xantech Corporation.
Harman Kardon is a registered trademark, and Power for the Digital Revolution is a trademark,
of Harman Kardon, Inc.
Important Safety and Installation Information!
What Is Included
Wire Separations
Low-voltage control wiring systems must always be installed to minimize the possibility
of accidental contact with wiring carrying hazardous voltage. Never place any wiring
near bare power wires or lightning rods, antennas, transformers, steam or hot water
pipes, or heating ducts. Never place a wire in a conduit, box, channel, duct or other
enclosure containing power or lighting control circuits of any type. Always provide adequate separation of control or audio/video wiring and other electrical wiring according
to code. When in doubt about separation distances, the “Rule of Sixes” can be used.
This rule requires six feet of separation between low-voltage control wiring and open
high-voltage wiring, lightning grounding wire or grounding rods. It requires six inches
of separation from all other high-voltage wiring unless either the power or control lines
are inside a conduit.
Your KP 1 in-wall keypad includes two mounting screws: 1/8" x 3/4" self-starting,
universal-head machine screws.
Cutting and Drilling
Always observe all applicable safety rules when installing any wires. Be extremely careful not to cut through or drill into concealed wiring or pipes.
Splicing
Common wire-splicing techniques may cause wire to break, resulting in poor circuit
integrity. This can cause interference in the form of static, noise or poor component
performance.
Clean Contacts
Dust or dirt can cause special problems on contacts. Be sure all contacts are clean and
that all parts are installed correctly to protect them from dust and dirt.
• The KP 1 in-wall keypad has been custom-designed for use with the PA 4000
amplifier. Do not connect it to any other device.
• Make sure to follow all instructions when preparing wiring for use with the KP 1
keypad. Failure to do so may result in a potential safety hazard, including possible
danger to persons and/or equipment.
• If you will be running cable through a plenum, remember to use “P”-rated cable to
comply with your local building codes and the NEC. Failure to do so may result in
a potential fire or safety hazard.
• The KP 1 should be installed only by qualified personnel. Always be sure that any
wiring inside walls is installed in compliance with the NEC, or as required by the
applicable state, county and/or municipal building code. Failure to do so may present a potential safety hazard.
• If you have any doubt about your ability to work with electrical and telecommunications wiring, you are advised to hire a qualified professional custom installer to
install this product.
• For additional safety instructions, see the Harman Kardon PA 4000 owner’s
manual.
Installation Location
The KP 1 in-wall keypad can be installed in any location appropriate for standard inwall electrical components. You are responsible for selecting and properly installing an
appropriate electrical junction box or plaster ring. Be sure to check the fit of the box or
ring with the KP 1 before installation into your wall.
If you plan on installing an optional IR sensor, be sure to avoid installing the KP 1 in an
area subject to potential interference with the IR signal. Possible sources of interference
include fluorescent lighting, neon lighting, dimmer-controlled lighting, plasma-panel
video displays, natural light sources, and reflective surfaces such as mirrors or blank
walls. You may wish to temporarily place the component to be controlled using the
sensor in the proposed location prior to starting the installation in order to test the
integrity of IR signals.
Be sure to install the KP 1 keypad with the IR Sensor Cutout 5 at the bottom in
order to avoid potential interference from the buttons when IR signals are transmitted
from a seated position.
What You Must Supply
• You are responsible for providing a Decora-style cover-plate, which will also include
the screws that secure it to the KP 1.
• You are also responsible for providing a sufficient length of 24AWG, 8-conductor,
CM- or CP-rated Category 3 or Category 5 UTP (unshielded twisted pair) wire and
RJ-45 modular plugs. The wiring scheme must be Straight Through (standard T568B)
and not crossed over as is done for telephone or data connections. The maximum
length should not exceed 250 feet in order to avoid degradation of the signal. Further
information on the correct wiring configuration is provided below.
• Should you wish to use an optional IR sensor, Harman Kardon recommends using
the Xantech® model 490-00 Micro Link™ sensor, which measures 1/2" (13mm) in
diameter by 2" (51mm) deep, and includes a 7-foot, 3-conductor cable with pin
assignments for +12 Volts, Signal and Ground. Any similar, compatible sensor may
be used instead.
Front Panel Controls
1
2
Power
3
▲
Volume
4
▼
5
2
1
1 Cover Plate Screwholes — After you have completed installation, these screwholes accept the screws supplied with your Decora-style cover plate to attach it to
the KP 1.
2 Mounting Screw Slots — Use the supplied machine screws to attach the KP 1 to
an electrical junction box or plaster ring using these slots.
3 Power Button – When the KP 1 is connected to a properly configured PA 4000,
gently pressing and releasing this button signals the PA 4000 to turn the channel(s)
controlled by that KP 1 on or off, depending on its last state.
4 Volume ▲/▼ Buttons – Press these buttons to raise or lower the level of the
speakers connected to the channel(s) controlled by the KP 1 in use.
5 IR Sensor Cutout – If you will be installing an optional IR sensor, punch out this
cutout. See the detailed installation instructions in the next section.
Rear Panel Connections
Installation and Connection
¡
™
KP 1
The KP 1 should only be installed by qualified personnel. Before installing this device,
make sure you are aware of all local building codes and NEC standards that may apply
to installing electrical wiring inside the walls of your home. If you have any questions,
consult a custom installer.
Step One – Prepare and Install the Wiring
12V
IR
G
£
¢
∞
™
¡
¡ Cover Plate Screwholes – After you have completed installation, these screwholes accept the screws supplied with your Decora-style cover plate to attach it to
the KP 1.
™ Mounting Screw Slots – Use the supplied machine screws to attach the KP 1 to
an electrical junction box or plaster ring using these slots.
£ RJ-45 Connector – Insert one end of the RJ-45 connector for the cable connecting
the KP 1 to the PA 4000 into this left-facing jack. When the other end of the cable is
plugged into the appropriate jack on the PA 4000, the cable carries control signals generated by the KP 1 and the signals received by the optional IR sensor to the PA 4000,
and a +12 Volt power supply from the PA 4000 that powers the optional IR sensor,
when installed.
¢ 3-Pin IR Sensor Terminal Block – When installing an optional IR sensor, connect
it to the appropriate terminals. Connect the sensor’s three conductors to the Ground, IR
Signal Output and +12V DC terminals by slightly unscrewing each of the set screws
shown, inserting the bare wire end into the downward-facing hole under the set screw,
then tightening the set screw. The terminal block is internally connected to the RJ-45
Connector £.
∞ IR Sensor Cutout – If you will be installing an optional IR sensor, punch out this
cutout. See the detailed installation instructions in the next section.
You will need to prepare an appropriate length of CM- or CP-rated Category 3 or
Category 5 UTP, 8-pin, 8-conductor wiring. For runs over 250 feet, thicker CL2/CL3,
4-pair, 22AWG wire may be required to preserve signal integrity.
Connect the KP 1 to the PA 4000 using standard T568B Straight Through wiring.
Looking at the connector with its clip down and the wires coming out of the connector
toward you, numbered from left to right, the typical pin assignments are as shown in
Wiring Chart 1 and Figure 1.
Pin #
1
2
3
4
5
6
7
8
KP 1 Pin Assignment
On/Off
Volume Down
Volume Up
Key Sense
Ground (GND)
IR GND
IR Signal
+12 Volts
Striped Wire Colors
White with Orange Stripe
Orange with White Stripe
White with Green Stripe
Blue with White Stripe
White with Blue Stripe
Green with White Stripe
White with Brown Stripe
Brown with White Stripe
Solid Wire Colors
White
Brown
Yellow
Green
Red
Black
Orange
Blue
Wiring Chart 1
12345678
Figure 1
Either the striped or solid color standards may be used, depending on the type of cable
being installed. Make certain that the same color wire is connected to the same pin
number at each end of the wire. Make sure that the twisted pairs of wires consist of
those attached to pins 1 and 2, pins 3 and 6, pins 4 and 5, and pins 7 and 8.
When attaching the connectors to each end of the cable, strip the outer insulation
jacket about 1-1/2" to 2" from the end. The cable is constructed of four twisted pairs
of wires. Flatten the wire ends to prepare them for insertion into the connector. Then
trim the wire ends to approximately 1/2" in order to leave as little untwisted wire as
possible. Fully insert the wire into the connector. Carefully crimp the connector in accordance with the connector manufacturer’s instructions, making sure that each wire is
securely fastened in the connector and that no insulation is caught in the connector. If
using stranded conductors, make sure that there are no loose strands.
Before making any connections to the PA 4000, be certain that it has been turned off
and unplugged from the AC outlet.
Home-run the cable from the KP 1 to the PA 4000. Insert the RJ-45 connector on the
cable into the RJ-45 Connector £ on the back of the KP 1 until it clicks into place.
The connection to the PA 4000 and appropriate configuration of the PA 4000 are
described in Step Four.
Step Two – Install an Optional IR Sensor
If you are installing the optional IR sensor, you also need to prepare the sensor’s ribbon
cable. The recommended Xantech 490-00 Micro Link comes with a 7-foot long, 3-conductor ribbon cable. Trim the ribbon cable to 3 or 4 inches. Strip the wire ends 1 to
1-1/2 inches, then fold each bare end over itself twice and twist it. This creates a slightly
thicker wire to connect to the KP 1‘s IR Sensor Terminal Block 4. Break out the
IR Sensor Cutout 5 on the front of the KP 1 by gently pressing out, and insert the
Micro Link sensor through the hole from the front, cable end first. Install the sensor’s
nut on the threaded body of the sensor before connecting the ribbon cable to the
KP 1’s terminal block. Tighten the nut to secure the sensor in its cutout.
490-00
IR Receiver
RJ-45
Connector
(cable
not shown)
Front
Panel
Decorator
Cover
Plate &
2 Screws
(not included)
J-Box
Wallboard
1/8" x 3/4" Machine
Screws (2) (included)
Red (or White)
Stripe
Figure 3
OUT
+12V
GND
Rear of PA 4000
7’ Ribbon Cable
h
Copyright 2000 Xantech Corporation
g
f ed
c
Figure 2
Carefully connect the bare ends of the sensor’s three wires to the KP 1 Terminal
Block ¢ as shown in Figure 2 and Wiring Chart 2. Loosen the set screw for each terminal position, insert the end of the bare wire into the hole directly under the corresponding set screw, and tighten the set screw, making sure that no wires touch each
other or other terminals. If a different compatible IR sensor is used, match the wire
color used to the specific circuit function. Then connect the wires to the KP 1 Terminal
Block ¢ in accordance with Wiring Chart 2.
AMP MODE
POWER CONTROL MODE
CH4
AC/DC
TRIG.
BRIDGE 2 CH3
CH2
AC/DC
ON/
KEYPAD TRIG.
AC/DC
ON/
KEYPAD TRIG.
AC/DC
ON/
KEYPAD TRIG.
ON/
KEYPAD
BRIDGE 2
MUSIC
SENSE
MUSIC
SENSE
MUSIC
SENSE
MUSIC
SENSE
CH3
UP
DN
CH2
UP
DN
ON
NORMAL
CH1/2
OFF
KEYPAD IN
CH4
CH4
CH3
CH2
CH1
UP
DN
MAIN
CH3
SEPARATE
BRIDGE 1
NORMAL
CH3/4
VOLUME
DN
CH 3 IN
3-30V
AC/DC
TRIGGER
INPUT
BRIDGE 1 / CH1
REMOTE IR SENSOR IN
REMOTE MR ON/OFF
CONTROL OUT COMMAND
CH1
CH4
CH3
CH2
CH1
UP
ON
Position on KP 1
Terminal Block
Right
Middle
Left
Position on Micro Link
Ribbon Cable
Middle
Red or White Stripe on
Outside of Ribbon
Opposite to Stripe
Circuit Function
+12 Volts
IR Signal (Output
of Micro Link)
Ground
CH3
CH1
BRIDGE 2
BRIDGE 2
OFF
BRIDGE 1
BRIDGE 1
CH4
CH2
Wiring Chart 2
No other connections are required, as the terminal block is internally connected to the
KP 1’s RJ-45 Connector £ for connections to the PA 4000 and onward to other IRcontrolled devices as applicable.
Step Three – Install the KP 1 In the Wall
Although the KP 1 is designed to fit into a standard single-gang electrical junction box
or plaster ring, always check the fit before cutting into a wall. Follow these guidelines
for optimal placement of the KP 1:
CAUTION: THE ELECTRICAL JUNCTION BOX IN WHICH THE KP 1 IS MOUNTED
MUST BE DEDICATED TO LOW-VOLTAGE CONTROL SYSTEM APPLICATIONS. MAKE
SURE THAT NO AUDIO/VIDEO OR AC MAINS WIRING PASSES THROUGH OR TERMINATES IN THIS BOX!
If you install the optional IR sensor, avoid placing the KP 1 in an area subject to potential interference with the IR signal.
Locate the KP 1 at least 4 inches from a dimmer switch, or install it inside a metal box
rather than plastic, as the dimmer switch may generate electronic noise that might
interfere with the KP 1.
The KP 1 may be installed in a multi-gang junction box with other low-voltage controls.
Please refer to Figure 3 for guidance in installing the KP 1 into a junction box and
attaching a Decora-style cover plate.
Gently place the KP 1 in the junction box or plaster ring and attach it by inserting the
supplied mounting screws through the Mounting Screw Slots ™ of the KP 1
until it is aligned correctly and tighten the screws.
Attach a Decora-style cover plate (not included) by placing the screws provided
with the cover plate through the plate’s holes and into the KP 1’s Cover Plate
Screwholes ¡. Hand-tighten the screws so that the cover plate is secure, taking care
so as not to overtighten and break the cover plate. Although any color or compatible
style of wall plate may be used with the KP 1, the KP 1 itself should not be painted,
in order not to cover the printed button labels.
a
b
a IR Remote Control Output
b MR On/Off Command Switch
c Remote IR Sensor Inputs
d Remote Keypad Inputs
e Bridge 1 Amplifier Mode Switch
f Bridge 2 Amplifier Mode Switch
g Power Control Mode Switches
h Volume/Output Level Controls
Step Four – Connect the KP 1 to the PA 4000
• When the PA 4000 is used in the Normal mode, feeding four pairs of speakers, connect the cable from each KP 1 to the Remote Keypad Input d corresponding to
the proper speaker channel for that room.
• When the PA 4000 is used in one of the Bridged modes, connect the cable from the
KP 1 to the Remote Keypad Input d corresponding to the lower numbered jack
for the pair of channels being bridged. Thus, when Output Channels 1 and 2 are
bridged, connect the KP 1 cable to the Remote Keypad Input d connector for
Channel 1. When Channels 3 and 4 are bridged, connect the KP 1 cable to the
Remote Keypad Input d connector for Channel 3.
• The proper Remote Keypad Input d connections are determined by whether
the amplifier channels are used in their Normal mode or if they are bridged. Use of a
separate input source for Channel 3 does not impact the keypad connections.
• When a KP 1 is connected to any Remote Keypad Input d, the Power Control
Mode Switch g for that channel must be placed in the far right position, under
the words “ON/KEYPAD” to enable the KP 1’s Power Button 3 to turn on the
PA 4000.
When the optional IR sensor is installed, connect the PA 4000’s IR Remote Control
Output a to the IR input jack on the rear panel of the component to be controlled.
IMPORTANT: When a KP 1 is used with any channel on the PA 4000, DO NOT connect
a remote sensor or other device to that channel’s Remote IR Sensor Input c
unless you are using multiple, cascaded PA 4000 amplifiers and KP 1’s with IR sensors,
as explained below.
The PA 4000 will process and forward IR commands received from a Remote IR
Sensor Input c or a Remote Keypad Input d in the order in which they are
received. For example, when four KP 1’s with optional IR sensors are used with four
separate channels and two rooms send an IR command to control the same AVR at the
same time, the second signal received by the PA 4000 will be held until the first
sender’s command has been forwarded to the AVR for processing.
The PA 4000 is also capable of being used with compatible multiroom-equipped
Harman Kardon A/V receivers, using the KP 1 commands to power the AVR’s multiroom
output on or off, while controlling the volume using the PA 4000. To enable this feature, slide the PA 4000’s MR On/Off Command Switch b to the left so that it is
over the word “ON.” You must connect the PA 4000’s IR Remote Control Output
a to the IR remote input of the AVR in order for this function to work.
Notes on Using KP 1 with Cascaded PA 4000’s:
1. When multiple PA 4000 amplifiers are cascaded together, each amplifier may use
separate KP 1’s even though all are fed with the same audio source. Connect the
KP 1’s to each amplifier as described above.
2. When IR sensors are used with multiple amplifiers, daisy-chain the IR Remote
Control Output a of each PA 4000 to one of the Remote IR Sensor Inputs
c of the PA 4000 immediately prior to it in the audio signal chain. However, note
that if an IR command is transmitted simultaneously from any of the downstream
amplifiers and from the KP 1 connected to the channel used for the Remote IR
Sensor Input c, the two commands will be garbled.
3. When multiple, cascaded PA 4000’s are used with a Harman Kardon A/V receiver
that has multiroom-control capability, it is recommended that you slide the
MR On/Off Command Switch b for each PA 4000 in the system to the
“OFF” position. Otherwise, when the last channel of any PA 4000 in the system is
turned off, that PA 4000 will signal the AVR to turn off, regardless of the status of
the other PA 4000’s in the system.
Operation
Turn on the PA 4000 by pressing its power switch. This will cause the Standby indicator
for the channel pairs selected using the Power Control Mode Switches g
to light.
Turn the PA 4000’s channel pairs on or off in response to presses of the corresponding
KP 1’s Power Button 3.
Adjust the initial reference output levels for your system using your receiver or
preamp/processor’s controls. Do not use the Volume/Output Level Controls h
on the back of the PA 4000.
For subsequent listening sessions, you may raise or lower the volume levels in the
remote listening location by pressing the KP 1’s Volume ▲ or ▼ 4 buttons.
When an optional IR sensor has been installed, at any time during the listening session,
point the transmitting end of the previously selected component’s remote control
toward the sensor mounted in the KP 1, and press the remote’s buttons to transmit the
desired command to the PA 4000, which forwards the command to the component.
If your component is equipped with an IR remote output that is connected to one or
more additional components, these may also be controlled using the sensor mounted
in the KP 1.
Setting Turn-On Volume Level Limits
The PA 4000 is equipped with a turn-on volume level limiter in order to prevent
possible disturbances or damage to equipment. Normally, when any channel pair of the
PA 4000 is turned on, it will play at the volume setting in use at the last listening
session. However, the level will automatically be limited to either the factory-preset limit
of –12dB, or to a user-determined limit. The KP 1 allows you to set or reset the volume
level limit from the remote location.
Two people are needed to complete this procedure, as adjustments must be made to
the KP 1 and PA 4000 at the same time.
1. With source material playing, move the Power Control Mode Switch g for the
channel being adjusted to the middle “MUSIC SENSE” position.
2. Use the KP 1 in the remote room to set the volume level to the desired turn-on volume limit – that is, the loudest desired turn-on level – by holding down the Power
Button 3 while simultaneously adjusting the Volume Controls 4.
3. After releasing the keypad buttons, return the Power Control Mode Switch g
for the channel being adjusted to the “ON/KEYPAD” position.
To reset the Turn-On Volume Level Limit to the factory preset of –12dB:
1. With source material playing, move the Power Control Mode Switch g for the
channel being reset to the middle “MUSIC SENSE” position.
2. Simultaneously press the KP 1’s Power and Volume ▲▼ Buttons 34.
3. After the KP 1’s buttons have been released, return the PA 4000’s Power Control
Mode Switch g for the channel being reset to the “ON/KEYPAD” position.
Troubleshooting
If your PA 4000 is not responding to button presses of the KP 1:
• Check the wiring for the cable connecting the KP 1 to the PA 4000. Make sure it is
Straight Through T568B cable, as described in Step One.
• Make sure the PA 4000 has been plugged in and is powered on.
• Make sure that all audio components are properly connected to the PA 4000 and
sending an audio signal to the PA 4000.
• Make sure that a remote control is not simultaneously sending signals to an IR sensor
that has been connected to the PA 4000’s Remote IR Sensor Input c for the
same channel as the KP 1.
If the component intended to receive commands from an optional IR sensor installed in
the KP 1 is not responding:
• Make sure that the component is plugged in and its master power switch is
turned on.
• Check the connections between the IR sensor and the KP 1’s IR Sensor Terminal
Block ¢.
• Check the connection between the PA 4000’s IR Remote Control Output a
and the IR remote control input of the component to be controlled.
• Make sure that another remote control is not simultaneously sending signals to an IR
sensor connected to the PA 4000’s Remote IR Sensor Input c for the same
channel as the KP 1.
Specifications
Wiring protocols:
• RJ-45 modular jack 8P8C per TIA wiring specification for T568B Straight Through
wiring using minimum 24AWG cable
• 3-pin output from optional IR sensor with conductors for Signal, Ground and
+12 Volts
Dimensions (H x W x D): 4" x 1-5/8" x 1-9/16" (103mm x 41.2mm x 40.1mm)
Weight: 0.25 lb (0.11kg)