1
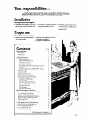
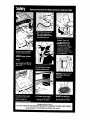
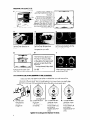
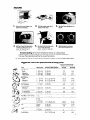
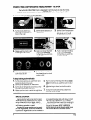
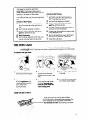
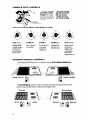
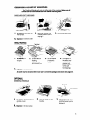
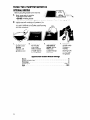
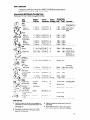
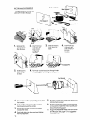
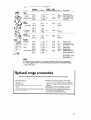
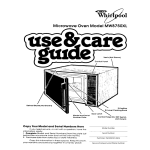
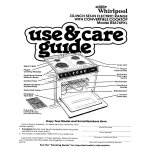
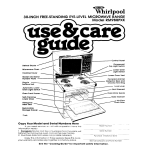
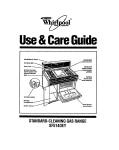
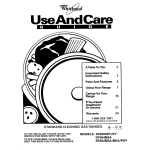
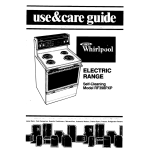
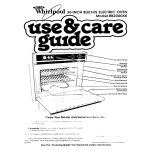
d304NCH
SLIDE-IN ELECTRIC RANGE
WITH CONVERTIBLE COOKTOP
Model
RS576PXP
-Oven
Vent
Y
Surface
Cooktop
Module
Reflector
Bow
Control
/
Heat Deflector
Automatic
Oven Light
Switch
Panel
Broil Element
Model and Serial
Number Plate
Oven
Front Frame
FIberglass
Uen,C.an,
Plug-In
Unlts
\
If you have a questjon,
matlon ready:
Copy
Your Model
or need
service,
and Serial Numbers
have this infor-
1 Complete
Model and Serial Numbers
just behind the oven door)
2. Purchase date from your sales slop.
(from the plate
Copy this informatlon
in these spaces
your warranty and the sales slip together
place
Keep this book,
in a handy
See the “Cooklng
Here
Model
Serlol
Important
Number
Purchase
Service
Gulde”for
Number
safety
Company
Dole
and
Informatlon.
Phone
Number
Your responsibilMzs.
l
l
Proper Installation
and safe use of the range are your personal
responslbilltles.
Read this “Use and Care Guide” and the “Cooking
Gulde”carefully
for important
use and safety information.
Installation
You must be sure your range
is...
installed and leveled in a cabinet and on a floor that will hold
the weight;
l
l
installed in a well-ventilated
area protected
from the
weather;
l
properly
connected
to the
correct electric supply and
grounding.
[See “Installation
Instructions.“)
Proper use
You must be sure your range
used only for jobs expected
of home ranges;
l
Is...
l
l
used only by people
operate it properly;
properlYmaintained.
who can
Contents
Page
2
Responsibilities
2
Installation
2
Proper Use
3
Safety
4
Using Your Range
4
Setting the Clock
Using the Minute Timer
4
5
The Oven Controls
Baking or Roasting
6
6
Adjusting the Oven Temperature
Control
7
Broiling
8
Using the Automatic
MEALTIMER. Clock
9
The Oven Light
9
The Oven Vent
:.
10
Surface Unit Controls
:
10
Cooktop Module Controls
11
Changing
Cooktop Modules
:: ::1
11
Surface Unit Modules
11
Grill Module
: :. 11
Optional Griddle Module
: :.
12
Using the Cooktop Modules.
: : : : : : 12
Optional Griddle
13
Grill Module
14
Optional Rotisserie
15
Optional
Range Accessories
16
Cleaning
and Caring for Your Range
16
Control Panel and Knobs
16
Surface Units and Reflector Bowls
17
Using the Self-Cleaning
Cycle
20
Cleaning
Chart
21
Removing the Storage Drawer
21
If You Need Service or Assistance
21
1 Before Calling for Assistance
22
2. If You Need Assistance
22
3. If You Need Service
4. If You Have a Problem
1: : : 1: : : : : : : 1: 22
c 1983 Whirlpool
Corporation
‘Tmk
I
I
. FOR YOUR SAFETY
l
DO NOT STORE OR USE GASOLINE OR OTHER FLAMMABLE VAPORS AND LIQUIDS
IN THE VICINITY OF THIS OR ANY OTHER APPLIANCE.
I
Using your range
Manual Oven
Light Switch
Oven Selector
/
/
Adjustable
Temperature
Oven
Control
Oven Signal
Light
/
Clean
Light
/
Lock Light
Left Coo l top Module
Signal Light
SETTING THE CLOCK
Push in and turn the Minute Timer Knob to set the Clock.
1.
Push in Minute Timer Knob and turn
clockwise
until clock digits show the right
time of day.
USING THE MINUTE
Let the Minute Timer Knob pop out. Turn
counterclockwise
until the Minute Timer
dial shows OFF. The clock setting will
change if you push in when turning.
TIMER
DO NOT PUSH IN THE KNOB when setting
1.
2.
Without pushing in the Minute Timer
Knob, turn it until the time showing in the
window is longer than you want.
the Minute Timer.
2.
Without pushing in, turn the knob back so
the setting you want shows in the window.
3.
When the time is up, a buzzer will sound
To stop the buzzer,‘turn the dial to OFF
without pushing in the knob.
PUSHING IN AND TURNING THE KNOB CHANGES THE CLOCK SETTING.
Surface Unlt
Control Knob
Right Cooktop
Module
Signal Light
Minute
Timer
I
SurGce UnItI
Cooktop
Module
lndlcator
Stop Time Knob
\
Start Ti&e Knob
THE UVEN CONTROLS
The oven is controlled
by two knobs: the Oven Selector
ture Control. Both must be on a setting foor the oven to heat.
With the Oven Selector on
BROIL, only the top element
heats. (Broiling, pg. 7 ).
Use the Oven Temperature
Control to set baking or roasting temperature
when the
Oven Selector is on BAKE or
TIMED BAKE.
and the Oven Tempera-
With the Oven Selector on
BAKE, the bottom element
does most of the work. The
top element heats, but does
not turn red. (Baking, pg. 6 1.
With the Oven Selector on
TIMED BAKE, the MEALTIMER*
Clock can be used to turn the
oven on and off automatitally. (MEALTIMER Clock, pg.
8 1.
When both the Oven Selector and Temperature
Control
are on BROIL, the broil element heats all the time. The
Oven Temperature
Control
can be set on a temperature
for slower broiling [see Broiling, page 7 ).
BAKING OR ROASTING
Put the rack(s] where you
want them before turning on
the oven.
Rack(s) should be placed
so food can be centered
in
the oven. Always leave at
least 1 12 to 2 inches (4-5 cm)
between the sides of the pan
and the oven walls and pans.
For more information,
see the
“Cooking
Guide.”
Set the Oven Selector
BAKE
on
walls and door
ADJUSTING
Let the oven preheat until the
Signal Light goes off
6
7
During baking, the elements
will turn on and off to help
keep the oven temperature
at the setting. The Signal Light
will turn on and off with the
elements.
The top element helps heat
during baking, but does not
turn red.
Put food in the oven. Oven
rock
Set the Oven Temperature
Control to the baking
temperature
you want
w/l/ be hot.
When baking is done, turn
both knobs to OFF.
THE OVEN TEMPERATURE CONTROL
Does your new oven seem to be hotter or colder than your old oven at the
same settings? The temperature
setting in your old oven may have changed
gradually
overthe years The accurate
setting of your new oven can seem differou thank the oven temperature
needs adjusting.
follow these steps
1.
Pull the Oven
Temperature
Control
straight off
2. Loosen the lock-
3.
ing screw;
NOTICE position
of notches.
Tlghten
the locking
screw.
To lower the temperature, move
black part of
knob closer to LO.
Each notch
equals about 10 F
(5 Cl.
Replace the knob.
4.
To raise the temperature, move
black part of
knob closer to HI.
Each notch
equals about 10 F
(5 Cl
1.
Place the rack where
want it for broiling.
you
2.
Put the broiler pan and
food on the rack.
4.
Set the Oven Temperature
Control on BROIL (or on a
lower temperature
for
slower broiling).
5.
During broiling, the oven
door must be partly
open. A built-in stop will
hold it there.
. Set the Oven Selector
BROIL.
6.
on
When broiling is done,
turn both knobs to OFF.
For slower brolllng, set the Oven Temperature
Control on a temperature
instead of BROIL. The broil element will then turn on and off instead of staying on.
The lower the temperature
setting, the slower the broiling.
The Oven Selector must be on BROIL and the door partly open for all brolllng temperatures.
Suggested
oven-rack
positions
and broiling
inches (cm] from top
Food
Beef Steaks
Rare
Medium
Well done
Beef Steaks
Rare
Medium
Well Done
Hamburgers
iamb Chops
Medium
Ham slice, precooked
or tendered
Canadian
Bacon
Pork Rib or Loin Chop
Well done
Chicken
Fish
i.iver
Frankfurters
Description
of food
1 (2.5 cm]
1 (2.5 cm)
1 (2.5 cm]
Approximate
Temperature
Minutes
-
set to BROIL
1st side
2nd side
3” [ 8 cm]
3”(8 cm]
3” (8 cm]
7-9
9-11
II-13
3-5
P-7
5-7
1 12 (4 cm)
1’2 (4cm)
1 l 2” (4 cm)
‘~‘(1-~ cm]
4”-5
4”-5”
4”-5”
3” (8
13-15
17-19
19-21
6-8
6-8
B-l 0
14-16
4-5
1 ” (2.5 cm)
‘2 -1”
(I-2.5 cm]
‘2 [1 cm)
34 -1
(2-2.5 cm]
2-3 lb
(I-1.5 kg]
cut in half
whole
fillets
‘2 -34
(l-2 cm]
3” (8 cm)
6-8
4-5
3” [ 8 cm)
3” (8 cm)
6-8
6
4-5
4
-
4”-5
to broil Element
times
(lo-13 cm]
(1 O-l 3 cm)
[l O-l 3 cm]
cm]
(10-13 cm)
15
10
7”-9’ [ 18-23 cm)
3” (8 cm)
3” (8 cm]
25-30
11-16
7-8
1 o-1 2
9-14
5-7
3”(8 cm)
4”-5” (1 O-l 3 cm]
3
6-7
3
4-5
7
USING THE AUIOMAnC
MEALTIMER*
CLOCK
The Automatic
MEALTIMER Clock is designed
to turn the oven on and off at times
you set...even when you are not around. IMPORTANT: follow these steps In order.
To start and stop baklng
automatically:
Put the racks where you
want them and place the
food in the oven.
2. Set the Oven Selector
4.
Make sure the clock is set
to the right time of day.
7.
After baking is done, turn
both knobs to OFF.
1.
To stop baklng
1.
2.
3.
4.
on
3.
5.
Push in and turn the Start
Time Knob clockwise
to the time you want baking to start.
6.
8.
To stop the oven before
the preset time, turn both
knobs to OFF.
TIMED BAKE.
Set the Oven Temperature
Control on the baking
temperature
you want.
Push in and turn the Stop
Trme Knob clockwlse
to the time you want the
oven to shut off
automatlcally:
Put the racks where you want them and
place the food in the oven.
Set the Oven Selector on TIMED BAKE
Set the Oven Temperature
Control on the
baking temperature
you want.
Make sure the clock is set to the right time
of day.
5.
Push in and turn the Stop fime Knob clockwise to the time you want the oven to shut
Off
6.
After baking is done, turn both knobs to
OFF.
7. To stop the oven before the preset time,
turn both knobs to OFF.
SPECIAL CAUTION:
Use foods that will not go bad or spoil
while waiting for cooking
to start. Avoid
using dishes with milk or eggs, cream
soups, cooked
meats or fish, or any item
with baking powder or yeast.
Smoked or frozen meats may be used;
so can vegetables,
fruits and casseroletype foods. Vegetables
can be cooked
in
8
a covered
baking dish with about a halfcup (118 mL) of water for 1 to 1% hours.
Any food that has to wait for cooking
to
start should be very cold or frozen before
it is put in the oven. MOST UNFROZEN
FOODS SHOULD NEVER STAND MORE THAN
TWO HOURS BEFORE COOKING STARTS.
-Tmk
If the steps for using the Automatic
MEALTIMER’ Clock are not followed
in
order, the electric oven door lock may be
turned on. The door will then either:
0 not open;
l not close
all the way [the oven light stays
on].
If the Door Won’t Open:
Make sure the Clock and Start and
Stop Times are set to the right time of
day.
2. Turn the Oven Selector to CLEAN.
3. Push in and turn the Stop Time Knob
past the right time of day.
4. Walt 30 seconds.
5. Turn the Oven Selector to OFF; the door
will be unlocked
within 10 seconds.
1.
If the Door Won’t Close:
1. Make sure the Clock and Start and
Stop Times are set to the right time of
day; open the oven door.
2. Turn the Oven Selector to CLEAN.
3. Push in and turn the Stop Ttme Knob
past the right time of day.
4. Push the automatic
oven light switch in
and hold it in for 10 seconds.
5. Let the oven light switch go and turn the
Oven Selector to OFF.
6. Push in the automatic oven light switch
and hold it for another 10 seconds.
7. Close the oven door.
THE OVEN LIGHT
Theovenlightwillcomeonwhenyouopentheovendoororwhenyoupush
the Oven Llght switch. Close the oven door or push the switch again
To replace
1.
to turn off the light
the light bulb:
Turn off the electric
at the main power
power
supply.
4. Replace the bulb with a
40-watt appliance
bulb
available
from most grocery, variety and
hardware stores.
2. Remove the bulb cover by
pulling out on the wire
holder and moving it to the
srde
3. Remove the light bulb from
its socket.
5. Replace the bulb cover
and snap the wire holder
in place. The bulb must
have this cover when the
oven Is being used.
6.
Turn electrical
power back
on at main power supply.
IHEUVENVENT
When the oven is on, hot air and moisture
escape through a vent behind the cooktop. The
vent is needed for air circulation
in the oven.
Do not block the vent. Poor baking can result.
SURFACE UNIT CONTROLS
Control knob
be pushed In b
turnlng them to a setting. They can be set
anvwhere
between HI
an6 OFF.
,\
y-L
t
The slgnal light will
glow when a surface
unlt Is on. Be sure
the light Is off when
you are not cooklng.
PUSH IN.
Turn to setting.
Uni Ill you get used to the settings,
use the followlng
UFO
Use HI to start
foods cooking
or
to bring liquids
to o boil. Surface
unit will not turn
red if good contact is made with
boftom of pun.
Use MED-HI to
hold a rapid boil
or to fry chicken
or pancakes.
as a gulde.
40
Use MED for
gravy, puddings
and icings or to
cook large
amounts of
vegetables.
Use MED-LO to
keep food
cooking
after
starting it on 0
higher setting.
Use LO to keep
food warm until
ready to serve.
Set the heat
higher or lower
within the LO
band to keep
food at the
temperature
you
want.
COOKTOP MODULE CONTROLS
Use Surface Unit Controls to turn on cooktop
surface unit indicators with boxes show which
Grlddle
modules. For the Optlonal
control to use:
on the Left
Grlddle
For the Grill Module,
controls
if you
want
use front or back controls
as you would
both the front and back of the grill to heat.
for surface
Grill on Left
Left Front
10
Griddle
only,
on the Right
units, Use both
Grill on the Rlght
Rlght Rear
CHANGING COOKTOP MODULES
The Cooktop Modules will work on either side of the cooktop. Make
controls are OFF and modules are cool before removlng
them.
sure all
SURFACE UNIT MODULES
1.
To remove,
the handle.
4.
Replace
lift slightly
in reverse
2.
by
With both hands, pull
module toward you to
unplug it.
3.
Lift out and set aside.
order.
GRILL MODULE
. Terminal
.
:I,:
_i
,..
1.
To remove,
off grills.
lift
5.
Replace
in reverse
All parts
must be cleaned
2.
Lift front end of
heating
element and
pull toward you.
3.
4.
Lift out basket
of ceramic
rocks.
Lift slightly at
the back and
remove the
grease well,
being careful
not to spill
fat drippings.
order.
after each
use to avold
fat spoilage
and odors.
See page
20.
OPTIONAL
GRIDDLE MODULE
Terminal
1.
To remove, lift and remove
griddle cover.
4.
Replace
in reverse
2.
Lift front slightly
handle.
by the
3.
With both hands, pull
griddle toward you to
unplug it.
order.
11
USING THE COOKIOP MODULES
OPTIONAL GRIDDLE
,
Before using the griddle for the first time:
1. Wash, rinse and dry griddle.
l
Use warm sudsy water.
l DO NOT immerse
griddle.
l DO NOT use metal
scouring pads or abrasive
cleansers.
2.
1.
Lightly wipe with cooking oil to season. You
don’t have to grease the griddle every time
you use it. However, oil or butter adds flavoring
and aids browning.
Lift and remove
griddle cover.
DO NOT
replace
until
griddle is cool.
2.
Preheat for a
few minutes
[until butter
melts or beads
of water dance
on the griddle).
Approxlmate
3.
griddle.
m
Add food. Use
only nylon or
plastic utensils.
Metal can
scratch the nonstick finish.
Grlddle
Bacon ...................................................
Grllled Sandwiches
......................................
Pancakes
...............................................
Hamburgers
.............................................
Eggs ....................................................
12
They will damage
Module
4.
TURN OFF the
griddle when
cooking
is
finished.
Leaving it ON
will damage
the griddle.
Settlngs
...........
HI
...........
HI
...........
HI
......
MED-HI
.........
MED
GRILL MODULE
A range hood (Whirlpool Model No’sRH8330 or RH8336) should
help get rid of smoke while using the Grill Module.
Approximate
Preheat
Grill Module
grill for five minutes
GRILL
FOOD
Tlmes
at suggested
-
Beet
Steak
Rare
Medium
Well-done
Cooklng
be used to
setting.
Wel htor
Thlc a ness
Internal
Temperature
Control
Setting(r)
Approxlmate
Cooklng
Time
Slde 1 Slde 2 Commenta
I’ (2 5cm]
1 ” (2.5cm)
1 ” (2.5cm)
140 F(60.C)
160 F(71 C)
17O.F(76’C)
Hi
Hi
Hi
To test steak for
8 Min.
9 Min. doneness, cut
11 Min. 12 Min. near center
12 Min. 13 Min. with sharp
knife
Steak
Rare
Medium
Well-Done
tiamburgers
Rare
Medium
Well-Done
1 lz’(3.8cm)
11 2’ (3.8cm)
1 12” (3.8cm)
140 F(60 C)
160 F(71 C)
17O.F(76 C)
Hi
Hi
Hi
10 Min.
7 Min.
13 Min. 13 Min.
16 Min. 16 Min.
1 ” (25cm)
1 ” (2.5cm)
I’ (2.5cm)
140 F(60 C)
160 F(71 C)
170 F(76.C)
Hi
Hi
Hi
8 Min. 10 Min.
9 Min. 12 Min.
10 Min. 13 Min.
Flsh
Whole
Fillets
Lobster Tails
21~‘lbs.(1 kg)120 (44 C)
120 (44 C)
1 lb. (.5 kg)
2 Ibs. (1 kg)
120 (44 C]
Hi
Hi
Hi
15 Min. 15 Min. When fish
4 Min.
4 Min. flakes easily it
5 Min.
5 Min. is done. Cook
all fish on
aluminum foil.
Chicken
Quarters
Pieces
2’~lbs.(l
kg] 190 F(88 C]
Hi
Jq (1.9 cm)
170 F(76 C]
21~lbs.(l kg] 170 F(76 C]
Hi
Hi
1 lb. [ 5 kg)
150 F(59 C]
Hi
6 Min.
1L [I .3cm)
oz. (.3 kg]
- 10 ~-~--
170 F(76 C)
150 F(59 C)
Hi
Med Hi
8 Min. 12 Min.
6 Min. Total
150 (59 C)
Hi
Hi
or
Rib Chops
Sausage
Patties
Links
Other
Frankfurters
Sandwiches,
foil wrapped
Potatoes,
in foil & cut
into pieces
Corn on the
Cob wrapped
in foil
French Bread,
in foil
8 Franks
6 Sandwiches
4 potatoes
55 Min. Total
Turn every
15 Min. 12 Min. few minutes
10 Min. 10 Min.
7 Min.
8 Min. Total
18 Min. Total
Hi
45 Min. Total
4 ears
Turn frequently
150 F(59 C)
Wrap tightly
Hi
30 Min. Total
2 loaves
130 F(54 C)
Hlnts and Tlps:
1. Foods cooked on the grill can spatter. It is
important to clean all parts after each use.
See page 20.
2. The ceramic
rocks will darken with use.
3. The heating element for the grill cleans
itself. Do not immerse
Hi
10 Min. Total
4. Take grill apart to clean and to remove
and store.
5. Most utensils safe for use on an outdoor
grill can be used with your Grill Module
OPTIONAL
Rotlrrerle
ROTISSERIE
Parts
The Rotisserie has 4 parts. It IS
used with the Grill Module.
1.
Remove the
grills from the
Grill Module.
2.
Insert rear support tabs into
slots at rear
of the Grill
Module.
3.
Slide forward to
lock. Tilt top to
level.
4.
Insert front support tabs into
slots at front of
the Grill
Module.
Hanglng
Hlgh Posltlon
6.
Slide back to
lock. Tilt top
to level.
1.
Put one fork on the spit pointing away from
the handle.
Push spit through meat so the weight is
balanced
around the center.
Put the second fork on the spit pointing
toward the meat.
Push both forks into the meat and tighten
the thumbscrews.
3.
4.
14
Low Posltlon
Put motor socket and pins through holes
in Rear Support at the high or low position
5.
2.
Pins
5.
6.
7.
Push the pointed end of the spit all the way
into the motor socket.
Put the handle end of the spit into the high
or low slot [to match the motor socket position) of the Front Support.
Plug in the Rotisserie motor and turn on the
Grill Module. See page 15 for suggested
cooking times.
Approximate
Food
rotlsserle
cooklng
tlmes:
Internal
Temperature
Weight
Control
Setting(s)
Spit
POSItIOn Time
140 F
3121bs
Hi
High
(60 Cl
II.5 kg)
Hi
High
Hi
High
114” Ibs.
1 kg)
2 Ibs.
(1 kg1
Hi
High
Hi
High
1 hr.
10 min.
5 Ibs.
Hi
High
2 hr.
30 min.
Hi
High
High
190 F
(88 Cl
190 F
6141bs
Hi
(2.5 w
3341bs. Hi
(I.5 kg1
Hi
2-l lb.
1 hr.
45 min.
2 hr.
45 min.
2 hrs.
15 min.
2 hrs.
(88 Cl
(1 kg)
Comments
Beet
Rolled rib
(rare)
Rolled rump
140 F
3141bs.
160 Cl
(1.5 kg)
170
(76
170
(76
160
(7’
5 Ibs.
1 hr.
55 min.
2 hr.
Meat with an
outer layer of fat
may take longer
to cook.
Pork
Rolled
loin roast
Spareribs
Canadian
bacon
F
C]
F
Cl
F
Cl
(2 kg)
3 hrs.
15 min.
50 min.
lamb
Rolled
leg
‘175 F
(79 Cl
(2 kg)
Poultry
Chicken
21~ Ibs.
(88 Cl
(1 kg1
190 F
Turkey
(88 Cl
Duck
Cornish
190 F
hen
hens
High
High
Truss poultry
tightly. Run spit in
at the base of the
tail and
diagonally
through the
cavity to the fork
of the wishbone.
If
wing tips brown
too rapidly, cover
them with foil.
NOTE:
l
l
Use the high spit position for anything over two inches (5 cm) in diameter.
Turkeys bigger than 8 to IO pounds should not be put on the rotisserie. Roast
them in the oven.
Optional range accessorfes
Optlonal accessories
provide more ways to cookon and to install your range
See your Whirlpool Appliance
Dealer or Parts Distributor for...
Griddle Module
Rotisserie
* Grtll Module
l
Cooktop Module with two six-inch Surface
Units
l
Cooktop Module with one six-Inch and one
b-inch Surface Unit
l
l
l
l
l
Heavy-duty
8-inch Surface Unit for best
results when using high heat for long cooking times - such as when canning. Part No.
242905.
Backsplash.
Part No. RCK950 (877691).
Sides for end-of-counter
installations
or
for converting
your range to
free-standing.
RCK952 (877692).
15
Cleaning and caring
for your range
CONTROL PANEL AND KNOBS
SURFACE UNITS AND
REFLECTOR BOWLS
REMOVING
1.
2.
3.
Flrst make sure knobs
pull knob stralght otf.
1.
Be sure surface
2.
Lrft the edge of the unit opposite the receptacle just enough to clearthe
reflector bowl.
3.
Pull the surface
receptacle.
4.
Lift out the reflector
are set on OFF then
Use warm soapy water and a soft cloth to
wipe the panel. Rinse and wipe dry
Wash knobs
well and
In warm
soapy
water
Rinse
16
Push the knobs straight
they point to OFF
back
unit straight
away
from the
bowl
REPLACING
1.
4.
units are OFF and COOL.
Be sure surface
-
on. Make sure
2.
unit controls
are OFF.
/
Line up opening
in the reflector
the surface unit receptacle.
bowl
with
Terminal
3.
Hold the surface unit as level as possible
with the terminal
just started
into the
4.
While pushing the surface unit terminal into
the receptacle,
lift a little on the edge of
the unit nearest the receptacle.
5.
When the terminal
is pushed into the receptacle
as far as it will go, the surface unit
will fit into the reflector bowl.
Reflector bowls reflect heat back to the
utensils on the surface units. They also help
catch spills. When they are kept clean, they
reflect heat better and look new longer.
If a reflector bowl gets discolored,
some
of the utensils used may not be flat enough.
Or some may be too large for the surface
unit. In either case, some of the heat that is
meant to go into or around a utensil goes
down and heats the reflector bowl. This extra heat can discolor it.
USING THE SELF-CLEANING
CYCLE
The self-cleaning
cycle uses very hlgh heat to burn away soil. Before
you start, make sure you understand
exactly how to use the cycle
safely.
BEFORE YOU START
1.
Clean areas that may not be cleaned
during the cycle. Use hot water and detergent or a soapy steel-wool pad on...
l the frame
around the oven
l the inside
of the door, especially
the part
outside the oven seal.
DO NOT try to clean the tlberglass
seal. DO
NOT move It or bend It.
Remove any pots or pans you may have
stored in the oven. They can’t stand the
soil or grease. This will
during the cleaning
SPECIAL TIPS
2.
Keep the kitchen well
ventilated
durrng the
cleanrng cycle to help
get rid of normal heat
odcrs and smoke
4.
Clean the oven before
It gets heavrly soiled
Cleonrng a very soiled
oven takes longer and
results In more smoke
than usual
Oven racks lose their shone. drscolor
and become harder to slide on their
guides when they are left in the oven
during the cleaning
cycle To make
them slide easier polish the edges or
the rocks and rack guides with a soapy
steel-wool pad, rinse well and wipe
on a thin coat of salad 01,
5.
3.
If the cleaning
cycle
doesn’t get the oven as
clean as you
expected,
the cycle
may not have been set
long enough. Set the
cleaning
time longer
for heavier so11
To stop the cleaning
cycle after it has
started
l Turn the Stop Ime
Knob clockwise
until the hand points to the right time
of day
l Turn the Oven
Selector and Oven
Temperature
Control to OFF
l
When the oven cools, you can
open the door Wait until the oven IS cool.
SPECIAL CAUTIONS
DO NOT use foil or other
liners in the oven. During
the cleaning
cycle. they
can burn or melt.
DO NOT touch the range
during ‘he cleaning
cycle
it can burn you
DO NOT use commercial
oven cleaners in your oven
Damage to the porcelain
finish may occur.
DO NOT block the vent
during the cleaning
cycle.
Air must move freely for
best results
SElTING THE CONTROLS
1.
18
Make sure the clock
and start and stop
time dials all have the
right time of day
2.
Push in the Stop Trme
Knob and turn the
hand clockwise
about two or three
hours (Two hours for
light soil; three or
more for heavier soil.)
3.
Set the Oven Selector
to CLEAN. The Clean
Light will come on
and the door will lock
automatically.
6.
4.
Set the Oven Temperature Control to
CLEAN.
5.
The Lock Light comes
on when the oven
gets above normal
baking temperatures.
The door can’t be
unlocked when the
Lock Light is on.
7.
Turn the Oven Temperature Control to OFF.
8.
After the oven is cool,
wipe off any residue
or ash with a damp
cloth. If needed,
touch up spots with
cleanser or soapy
steel-wool pad.
When the Lock Light
goes off, turn the Oven
Selector to OFF. This
unlocks the door,
DO NOT TOUCH THE RANGE DURING THE CLEANING CYCLE. IT CAN BURN YOU.
HOW IT WORKS
During the self-cleaning
cycle, the oven gets much hotter than it does
870’ F (466. C). This heat breaks
for baking or broiling...approximately
up grease and soil, and burns it off.
The graph shows approximate
temperatures
cleaning
cycle set for two hours.
SELF-CLEANING
CYCLE -TWO
(Approximate
ART
‘/t hr
1 hr
Temperatures
1% hrs
and times during
a self-
HOUR SETTING
and Times)
2 hrs.
2%
427
C
316
c
204
C
hrs
Notice that the heating stops when the two-hour setting is up, but that it takes a
while longer for the oven to cool down enough to unlock.
CLEANING CHART
PART
Surface
Units
WHAT TO USE
HOW TO CLEAN
Do not clean
l
l
Griddle
Module
and Cover
Warm soapy
water
l
l
l
l
Grill
Warm soapy waler or
soapy steel wool pod
Heotlng Element
Do not clean
Grill Module
Basket with Ceramic
Hot soopy water
l
Wosh, rinse ond dry well
. Use soopy steel wool pads for stubborn
Outslde
Rocks
l
Grease Well and Frame
Worm soopy water and
plostlc scouring pod
Supports ond Splt
Warm soapy water ond
plastic scouring pad
Motor
Soft cloth; warm soopy
water
of range
Chrome reflector
bowls
Porceloln-enamel
broiler pan and grid
Control panel
Oven racks
Oven door
Selt-Cleaning
Oven
Clean often
Sook ond swish in hot, soopy
water
. Wash, rinse and dry well.
l
Clean often.
. Wash, rinse ond dry well
Clean after each use
l
. Do nof Immerse.
l
Unplug before cleaning
. Wlpe clean often.
Soft cloth, warm soopy woter
Nylon or plostlc scouring pad for
stubborn SDO?~
Wlpe otf regularly
when range Is cool.
Do not allow toad contalnlng
acids (such as
vlnegar, tomato, lemon juice or milk) to remain
on surface. Acids will remove the glossy flnlsh.
l
Do not use obraslve
or harsh cleansers.
Automotlc
dlshwosher
or worm,
l
Wash wlth other cooklng
utensils.
soapy water or plastic scrubbing
pad l Do not place In Self-Cleaning
Oven.
Warm, soapy water or soopy steel
l
Wash wlth other cooklng
utensils.
l
Do not oloce In Self-Cleanlna
Oven.
wool pads
Warm, soapy waler
l
Wash, rinse and dry wlth soft cloth.
SelfCleanIng
Oven cycle
l
Leave In oven durlna Self-Cleonlna
cvcle.
Warm, soapy water or soopy steel
* Wash, rinse and dry.lse
soapy ste% 4001 pads
for stubborn areas.
wool pods
Warm, soopy water or plostlc
l
Make certoln oven Is cool. Wash, rinse and dry
well with soft cloth.
scrubbing
pad
Commercial
gloss cleaner
l
Follow dlrectlons
provlded
with cleaner.
For areas outslde Selt-Cleonlng
area
l
Clean before usln Self-Cleaning
cycle to
use worm. soaov water or soaov steel
orevent burn-on o PsolI.
l
hollow dlrectlons
given on page lB,“Uslng the
wool pods
’ ’
Self-Cleonlna
Cvcle.”
l
Do not use c~mrherclal
oven cleaners.
Do not use to11 to line the bottom ot your Self-Cleaning
Oven.
I
20
areas.
l
Sol1 burns off
. Do not immerse
l
Rotisserie
Sol1 burns off.
Do not Immerse
Do not Immerse grlddle.
Wash, rinse and dry well.
Do not use metol scouring pads or harsh
cleansers
Use olastlc scourlna ood If needed.
l
l
STORAGE DRAWER
The storage drawer is for storing
burn or melt in the drawer.
1.
Pull drawer straight
the first stop.
REPLACING
out to
2.
pots and pans. Never
Lift front and pull out to
the second stop.
store anything
that can
3.
Lift back slightly and
slide drawer all the way
out.
3.
Lift drawer front to clear
second stop and slide
drawer closed.
THE STORAGE DRAWER
Drawer Slide Rail
1.
Fit ends of Drawer Slide
Rails into drawer guides
both sides of opening.
2.
on
Lift drawer front and push
in until metal stops [on
drawer slide rails) clear
white stops on drawer
guides.
If you need service or assistance,
we suggest you follow these four steps:
1
l
Before calling for assistance.. .
Performance
problems often result from
little things you can find and fix yourself wrthout tools of any kind
Ii nothlng operates:
Is the range correctly
wired to a live circuit
with proper voltage?
[See lnstallatlon
Instructlons.)
9 Have you checked
the main fuse or circuitbreaker box?
l
If the oven will not operate:
Is the Oven Selector turned to a setting
[BAKE or BROIL, but not TIMED BAKE]?
l
Is the Oven Temperature
Control turned
temperature
setting?
It surface units or cooktop
modules will not
operate:
l
Have you checked
the main fuse or circuitbreaker box?
l Are surface
units or cooktop modules
plugged
in all the way?
l
Do the control knobs turn?
If surface unlt control knob or knobs will not
turn:
l
Did you push in before trying to turn?
If the
Are
the
the
l
l
to a
clock does not keep accurate
time:
you pushing in the knob when setting
Minute Timer? You shouldn’t. Pushing in
knob changes the clock setting.
21
If the Self-Cleanlng
cycle will not operate:
l Are the Oven
Selector and the Oven Temperature Control set to “CLEAN?”
l
Does the Start Time Dial show the correct
time of day?
l
Is the Stop Time Dial set ahead to the time
you want the cleaning
cycle to stop?
If cooklng results aren’t what you expect:
l
Is the range level?
l
Are you using pans recommended
in the
Cooklng Gulde?
l
If baking, have you allowed I’~, to 2 inches
(4-5 cm) on all sides of the pans for arr
circulation7
l
Does the oven temperature
seem too low or
too high? (See page 6, “Resetting the
Oven Temperature
Control.“)
l
Have you preheated
the oven as the recipe
calls for?
l Are the pans
the size called for in the
recipe?
l Are you following
a tested recipe from a
reliable source?
l
Do the cooking utensils have smooth, flat
bottoms?
l Do the cooking
utensils fit the surface unit
being used?
See the Cooktng Gulde for more information
on cooking problems and how to solve them.
2
l
If you need assistance
3
l
If you need service”. . .
Whirlpool
has a
nationwide
network of franchised
TECH-CARE ’ Service
Companies.
TECH-CARE service
technicians
are
trained to fulfill the
FRANCHISED
SERVICE
product
warranty
and provide
afterwarranty
service,
anywhere
In the United
States To locate TECH-CARE service
in your
area call our COOL-LINE service assistance
telephone
number (see Step 2) or look In your
telephone
directory
Yellow Pages under.
APPLIANCES-HOUSEHOLDMAJOR--SERVICE
B REPAIR
,‘,. F,L’N 0, ;iL ,A4 !,
iA'+ .4,-t : ‘1, H CF1[ I i, ,, L
,
-1i.l
',1,
.iiil
i
:c,
:
ELECTRICAL
APPLIANCESMAJOR-REPAIRING
8 PARTS
OR
c i,\,,',,,ii
~"~HlHt~OC~APPLlANCES
:-(AYIHl',EIIitCH
CARFSERWLE
41 i<i'l(‘t
r~;SFa\lf;t
cc
'?! Mn, /
jl/L
c l,lli'\
Lit;.',
25" 59Ytl
OR
WASHING MACHINES,
B IRONERS-SERVICING
DRYERS
...
Call the Whirlpool
COOL-LINE
service assistance telephone
number. Dial free from:
Continental
U.S. . . . . . . (800) 253- 1301
Michigan
. . . . . . . . . . . . . . . . (800) 632-2243
Alaska & Hawaii . . . . . . . . (800) 253- 112 1
and talk with one of our trained Consultants
The Consultant
can instruct you in how to obtain satrsfactory
operatron
from your appleante or. if service is necessary,
recommend
a
qualified
service company
in your arec
4
l
If you have a problem
...
Call our COOL-LINE service assistance
telephone number [see Step 2) and talk with one
of our Consultants, or if you prefer, write to:
Mr Guy Turner. Vice President
Whirlpool Corporation
Administrative
Center
2000 US-33 North
Berton Harbor Ml 49022
If You must call or-write, please provide. model
Tumber, serial number date of purchase, and
a complete
descrrption
of the problem.
This
Information
IS needed
in order to better respond to Your request for assistance
22
THIS PAGE
INTENTIONALLY
LEFT
BLANK
FSP is a registered
trademark
of Whirlpool
Corporation
for
quality parts. Look lor thk
FSP
symbol of quallty whenever
you need a replacement
part
’ for your Whirlpool
appliance.
0
FSP replacement
parts
will fit right and work right. because
they are
made to the same exacting
speclftcatiorw
used to build every new Whirlpool
appliance.
Bentan Harbor, Michigan. Autotnatto Washers, Clotties Drpen.
Freezers. Retrip~rator-fraezsrs,
Ice Makers, Oistwashert.
Built-in Olrans anfl Surtace Units, Rattges. Miorawave OveRc,
C@mptict@rs, Room Air Condttiu@rs, Dehsmidltiers,
CMbal
Heating and Air Ccndltloning S~tsms.
Part No. 5040202 1877862
@I983 Whirlpool
Corporation
Printed
in U.S.A.