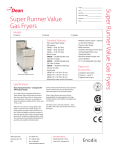
1
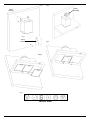
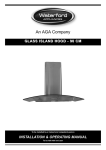
An AGA Company
100cm S tainless S teel Box Hood
To be installed by a trained and competent person
INSTALLATION & OPERATING MANUAL
To be left with end user
WARNING & SAFETY INFORMATION
Please read this manual carefully, it provides important information about the safety, installation, use and maintenance of the appliance. The manufacturer cannot be considered responsible for any damage caused by
improper, incorrect or unreasonable use.
WARNING! Do not connect the appliance to the mains until the installation is fully complete.
ELECTRICAL CONNECTION
The mains power supply must correspond to the rating indicated on the plate situated inside the hood. A
double-pole switch must be fitted in accordance with the relevant standards.
Attention: Replacing the supply cable must be carried out by a Qualified Electrician or an Authorised Service
Agent.
The appliance is only intended for use by competent persons. Children should be supervised to ensure that
they do not play with the appliance. Never use the hood without being securely fixed using the brackets supplied. The hood must never be used as a support surface unless specifically indicated. If the appliance is fitted in a room with one or more appliances that require an air supply, an adequate air supply must be provided
so that these appliances can function simultaneously at maximum operation. If venting outside, the vent pipe
must run direct from the hood to an external wall.
The use of exposed flames beneath the hood is detrimental to the filters and may cause a fire risk, and must
be avoided at all times. Waterford Stanley recommend a distance of 650-750mm between the cooking appliance and the hood, see Installation Section provided in this manual.
The hood must be regularly cleaned on both the inside and outside AT LEAST ONCE A MONTH.
MAINTENANCE
ATTENTION! Before performing any maintenance, isolate the hood from the electrical supply.
Grease Filter
This must be cleaned once a month using a non aggressive detergent, either by hand or in the dishwasher,
which must be set to a low temperature and a short cycle. When washed in a dishwasher, the grease filter may
discolour slightly, but this does not affect its filtering capacity.
REPLACING LAMPS
Warning! Ensure light bulbs are cool before touching. Ensure all lamps are correctly fitted to the hood at all
times to avoid a possible safety hazard.
This appliance is marked according to the European Directive 2002/96/EC on Waste Electrical and Electronic
Equipment (WEEE). By ensuring this product is disposed of correctly, you will help prevent potential negative
consequences for the environment and human health, which could otherwise be caused by inappropriate waste
handling of this product.
The symbol
on the product, or on the documents accompanying the product, indicates that this appliance
may not be treated as household waste. Instead it should be taken to the appropriate collection point for the
recycling of electrical and electronic equipment. Disposal must be carried out in accordance with local environmental regulations for waste disposal.
For more detailed information about treatment, recovery and recycling of this product, please contact your local
council, your household waste disposal service or the shop where you purchased the product.
1
MAINTENANCE
GENERAL GUIDELINES
Before servicing or repairing the hood make sure the
appliance is disconnected from the mains supply
either by removing the plug or switching the power
socket to OFF.
Before installing and /or using the cooker hood,
please read these instructions carefully.
Before installing the cooker hood make sure the voltage (V), frequency (Hz) indicated on the serial number plate and specifications on the rating plate on the
inside of the cooker hood correspond to the voltage
and frequency of the mains supply.
CLEANING
Clean the outer part of the hood with a soft cloth and
liquid detergent, do not use abrasive cleaning products or scouring pads.
INSTALLATION
CHANGING THE LIGHT BULB
The cooker hood must not be installed and connected to flues where other appliances are installed and
which run off other energy supplies other than electricity (water heaters - boilers - cookers, range/gas
etc). The extraction hood requires a 125mm extraction pipe connected directly to the outside with an
opening of a minimum cross section of 150cm2.
Before changing the light bulb, ensure that the appliance is not live (the switch should be in position 0 OFF). Remove the metal anti-grease filters (Fig.5).
Change the halogen light using a 230V halogen light,
with an E14 coupling, max. 50W. Replace the metal
anti-grease filters.
The hood must be installed with a distance of 650750mm between the cooker top/hob and the extraction hood.The cooker hood must not be installed
above cookers with eye-level grills.
WARNINGS
“NOTE: the areas behind the filters are not
intended to be cleaned”
ELECTRICAL CONNECTION
Follow the cleaning instructions given by the manufacturer and in particular take care that there are not
grease deposits on the surface of the hood which
could create a possible fire hazard. Make sure the
electric hob rings or gas rings are always covered
when in use to avoid heating the filter.
This cooker hood is designed for permanent fixture.
Connect to mains supply. Check voltage and frequency given on the rating plate located on the
inside of the hood. Connect the mains cable to a
power socket or to a double pole switch with a contact gap of at least 3mm. The mains cable (type
H05VV- F 2 x 0.75 mm2) is connected to terminals
marked with the letters L (power line) and N (neutral)
mounted on the hood and is secured in position by a
cable gland. The mains cable must be connected to
a suitable and easily accessible fixed power point.
As the electrical installation must comply with the
laws and regulations in force only a qualified and
authorised electrician must install the hood including
connecting it to a double pole switch with a contact
gap of at least 3mm.
When frying never leave pans unattended as there is
the risk of the oil overheating and catching fire. If
reusing frying oil the fire risk is greater. Never prepare flame cooked food dishes under the hood. The
air duct by the hood must not be conveyed into a flue
used for other appliances that run off other energy
supplies other than electricity. If the air is to be ducted, before installing make sure the flue is in good
condition especially if it has been out of use for a
long period of time. Always observe governing laws
and regulations regarding ducting waste gases. All
recommendations given must be scrupulously
observed to avoid any possible fire hazard.
Connect the mains cable if provided with a plug to a
power socket. The user must have access to the
power socket to be able to connect and disconnect
the plug once the hood is mounted and fixed or the
mains cable can be plugged into a socket with a double pole switch with a contact gap of at least 3mm.
CONTROL PANEL
The control panel is situated on the front of the hood
and comprises of a digital display and 6 touch control switches with the following functions:
The manufacturer will not be responsible if the governing health and safety laws are not observed
which permit safe and correct use of the hood and
electrical connections.
Fan ON/OFF Switch
Reduces the speed of the fan (Min speed 1)
2
THE MANUFACTURER WILL NOT BE RESPONSIBLE IF THESE RECOMMENDATIONS AND
INSTRUCTIONS REGARDING INSTALLATION,
MAINTENANCE AND USE ARE NOT OBSERVED
AND RESPECTED WHEN USING THE COOKER
HOOD.
Digital display,displays the speed of the
fan 1-6
Increases the speed of the fan (Max
speed 6)
OFF delay switch, press once display
flashes, fan switches off automatically
after 10 minutes.
DIMENSIONS
Light ON/OFF switch
Fig.1
VENTILATION
Wall Fixing
Bracket
If there is an appliance fitted in the vicinity which
requires air for combustion, additional air vents will
be required to alleviate the possibility of spillage of
products of combustion, from the appliance/flue
while the fan is in operation. Refer to B.S. 5440 Part
2 & I.S. 813.
Where such an installation exists a test for spillage
should be carried out with all appliances requiring air
for combustion and all extraction fans running at
maximum rate, (i.e. tumble dryers, extraction fans)
with all external windows and doors closed.
If spillage occurs following the above operation, an
additional air vent of sufficient size to prevent this
occurrence should be installed.
INSTRUCTIONS FOR ASSEMBLY
The hood is designed to be wall mounted. Take the
fixing brackets from the packaging and attach them
to the fan unit as shown in Fig. 2 & 3. Remove the
filters from the hood section as shown in (Fig. 5). Fix
the hood section to the fan section using four 10mm
screws (See Fig. 6). Insert the plug on the fan unit
to the socket on the hood section. Position the hood
in the desired position against the wall and mark the
four positions for fixing the two fixing brackets. Drill
four holes at the marked positions using a 6mm
masonry drill bit and insert the rawl plugs into the
holes. Screw the two bottom support screws half
way into the rawl plugs and hook the hood assembly
onto the screws. Fix the hood assembly to the wall
by inserting the two top screws and tighten the bottom support screws. Attach the plastic coupling to
the fan section using two 10mm screws (See Fig.4).
The steel ducting for the hood is to be fixed to the
wall using the bracket supplied, the bracket is to be
fixed nearest the ceiling and fixed to the end of the
duct with slots in it.
3
Fig.4
Fig.2
Plastic
Coupling
Fixing
Bracket
Fig.3
Fixing
Bracket
Fig.6
Fig.5
Fig.7
CONTROL PANEL
4
An AGA Company
WARRANTY
We undertake to repair or replace, free of charge to you any part found to be faulty within the
12 month period from the date of purchase provided that:*
The fault is, in our opinion, caused by defective workmanship, or material and not by accident,
misuse, neglect or normal wear and tear.
*
Any manufacturing defect is reported to the stockist from whom you bought the appliance
within 12 months of the date of purchase.
*
The Waterford appliance is installed to the Manufacturer’s recommendations and by a suitably
qualified person.
*
The guarantee registration form is completed fully and returned to us within 30 days of the
purchase date.
IMPORTANT NOTICE: Any alteration to this appliance that is not approved in writing by Waterford Stanley
will render the guarantee void.
5
Waterford Stanley Ltd.,
Unit 210, IDA Industrial Estate, Cork Road,
Waterford, Ireland.
Tel: (051) 302300 Fax (051) 302315
Rev: 001 DP 080212