1
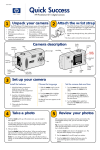
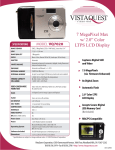
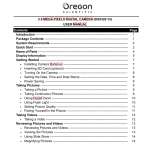
User's Manual
For customers in North and South America
For customers in the USA
This device complies with Part 15 of the FCC rules. Operation is subject to
the following two conditions:
(1) This device may not cause harmful
interference.
(2) This device must accept any interference
received, including interference that may
cause undesired operation.
For customers in Canada
This Class B digital apparatus meets all requirements of the Canadian
Interference-Causing Equipment Regulations.
For customers in Europe
“CE” mark indicates that this product complies with the
European requirements for safety, health, environment and
customer protection. “CE” mark cameras are intended for sales
in Europe.
Contents
Page
1. Warnings and Precautions ---------------------------------------------------------2. System Requirements ---------------------------------------------------------------3. Package Contents --------------------------------------------------------------------4. Name of Parts --------------------------------------------------------------------------5. Operating The VQ1100 --------------------------------------------------------------Power consuming -------------------------------------------------------------------6. Using Camera's Modes -------------------------------------------------------------7. Installing Your VQ1100 Driver and Software -------------------------------8. Checking the Connection of Your VQ1100 ---------------------------------9. Uninstalling Software ----------------------------------------------------------------10. Transfer Images with PhotoImpression 5 -----------------------------------11. Using the camera in PC Camera Mode ---------------------------------------12. ArcSoft PhotoImpression 5 ------------------------------------------------------13. ArcSoft PhotoImpression 2 ------------------------------------------------------14. Internet Video Conferencing -----------------------------------------------------Appendix: Specifications -------------------------------------------------------------
1
2
2
3
4
5
6
11
12
13
14
15
16
17
20
21
020606
1. Warnings
• When the battery icon is blinking, download the pictures to your computer
immediately and change the batteries, otherwise you image will be lost.
• Do not use batteries other than those specified for use with the camera. The
use of unsuitable batteries may result in the batteries splitting or leaking and
causing a fire, injury, or soiling of the battery compartment.
• When placing batteries in the camera, check the polarity of the batteries (and +) to ensure proper orientation. Incorrect polarity may result in the
batteries splitting or leaking and causing a fire, injury, or soiling of the battery
compartment.
• Remove the batteries if the camera will not be used for an extended period
of time. The batteries may leak and cause a fire, injury or soiling of the battery
compartment. If the batteries leak clean and wipe the battery compartment
carefully and install new batteries. Wash your hands carefully if you touch the
battery fluid. Please note that when you remove the batteries your images will
be lost from the camera memory.
• Do not use manganese batteries. Manganese batteries cannot supply
sufficient power to support camera operation. Replace all batteries at the
same time. Never mix old and new batteries.
WARNING: Handling the USB cable on this product may expose you to lead,
a chemical known to the State of California to cause birth defects or other
reproductive harm. Wash your hands after handling.
-1-
2. System's Requirements
. Personal computer, laptop, desktop, or IBM compatible with Pentium 166
MHz minimum, and with an active USB (Universal Serial Bus) port.
. Windows 98 SE / ME / 2000 / XP, CD ROM drive, color monitor, mouse and
keyboard.
. Color printer for printing color pictures.
. For transferring still images, or for videoconference, your computer must
have modem and communication software for Internet connection.
3. Package Includes
• VQ1100
Digital camera
• Wrist strap
• USB cable
• CD installation
disc
• User’s guide
-2-
4. VQ1100 Names of Parts
1. Shutter Button
2. Viewfinder
3. Flash
4. Lens
5. USB Port
6. Indicator Lamp
7. LCD
8. MODE
9. ON/OFF
10. Strap Eyelet
11. Battery Compartment Cover
12. Tripod Socket
-3-
5. Operating The VQ1100
• Open the battery cover and insert batteries.
Step 1: Slide open the battery door by lifting the tab on the door.
Step 2: Insert three AAA batteries with the polarity as shown:
Step 3: Slide close the battery cover.
Warning: Do not open the battery door when the camera is powered ON.
This will cause all images in memory to be lost immediately. Please download
The pictures to your computer if you want to turn on the battery cover.
Notes:
1. Always download your images to your computer soon after you have
captured them. Never assume your images will be retained for more
than three or four days. If the batteries are depleted, your images will
be lost.
2. If you must change the batteries, makes sure the camera is OFF and
then change the batteries in less than thirty (30) seconds.
3. If you will not use the camera for a long time (several days, or more)
remove the batteries. The batteries will discharge slowly if left in the
camera. This may cause complete battery discharge as well as loss
of images. The batteries may corrode if left in the camera for
extended periods of time.
4. Dispose of batteries properly in accordance with local laws and
regulations. Do not place them in fire.
5. The digital camera has an automatic power-saving feature. The
camera will turn off automatically if it has not been used after
approximately thirty (30) seconds.
When the camera is connected to a computer using a USB cable, it is not
necessary to use batteries because the camera uses the power provided by
the computer through the USB interface
-4-
• Press and hold the ON/OFF button for 2 second to start the camera. The
camera will beep once, indicating that it is ready. The LCD screen will display
digits and symbols.
• Aim the camera and compose the scene by looking through the viewfinder (2).
• Press the shutter button to take a picture. Buzzer will sound as the
confirmation of the taken picture. LCD will show number of pictures taken.
• Sleep mode: With the power ON, if you do not take another picture within 60
sec., camera will turn to the "Sleep" mode to save batteries. The blank LCD
screen identifies the "Sleep" mode. (Press the ON/OFF button held 2 second
can manual turn on/off the "Sleep" mode.)
• Re-activating camera from "Sleep" mode. Press the ON/OFF button (9)
held 2 second to re-active the camera for taking next picture.
Please note, that when batteries disconnected or discharged, the
memory, and all taken pictures will be erased.
Power Consumption
• The batteries allow you to take, and store all pictures inside the memory for
approximately two weeks (camera stays in the "Sleep" mode)
• After that, LCD screen starts to blink, informing you that the batteries are low.
You must download the stored pictures into the computer within a day;
otherwise all pictures will be lost.
-5-
6. Using Camera's Modes
Press the mode button to select the function you want to set, and the press
the shutter button to confirm. Then press the mode button again to change the
option, and then press the shutter button to confirm and you will see the result
on the LCD.
VQ1100 has sixteen modes, which can be selected by pressing the Mode
button, Pressing the Mode button to see the features options in the following
sequence:
• Snapshot Mode
• Flash Off
• Auto Flash
• Force Flash
• Low Resolution Mode
• High Resolution Mode
• SXVGA
• XVGA
• Single Mode
• Continuous Capture Mode
• AVI Video Mode
• Self Timer Mode
• 60Hz Mode
• 50Hz Mode
• Delete One Picture Mode
• Delete All Pictures Mode
LCD screen displays flickering symbols related to the selected mode.
-6-
1. Snapshot Mode: The LCD displays the number of pictures
taken. Press the Shutter button to take a picture. The number
will automatically increase.
2. Flash Off Mode: Flash never fires. (Default). Press the mode
button once and then press the shutter button to confirm.
Press the mode button again to select the icon
, and then
press the shutter button to confirm.
3. Auto Flash Mode: Flash fires when the lighting conditions
require it. Press the mode button once and then press the
shutter button to confirm. Press the mode button again to select
the icon
, and then press the shutter button to confirm.
4. Force Flash Mode: Flash fires every time you take a picture,
regardless of the lighting conditions. Press the mode button
once and then press the shutter button to confirm. Press the
mode button again to select the icon
, and then press
the shutter button to confirm.
5. High Resolution Mode: Take few pictures but big picture size.
Press the mode button twice and then press the shutter button
to confirm. Press the mode button again to select the icon
,
and then press the shutter button to confirm.
6. LOW Resolution Mode: Take more pictures but small picture
size. Press the mode button twice and then press the shutter
button to confirm. Press the mode button again to select the
icon
, and then press the shutter button to confirm.
-7-
7. SXVGA Mode: Take pictures about 1.3M pixels. Press the
mode button three times and then press the shutter button to
confirm. Press the mode button again to select the icon SXVGA,
and then press the shutter button to confirm.
8. VGA Mode: Take pictures about 0.3M pixels. Press the mode
button three times and then press the shutter button to confirm.
Press the mode button again to select the icon VGA, and then
press the shutter button to confirm.
9. Single Mode: Press the mode button four times and then press
the shutter button to confirm. Press the mode button again to
select the icon
, and then press the shutter button to confirm.
10. Continuous Capture Mode: Press the mode button four
times and then press the shutter button to confirm. Press the
mode button again to select the icon
, and then press
the shutter button to confirm. Press the shutter button again
and camera will take 3 pictures sequentially.
11. AVI Video Mode: Press the mode button four times and then
press the shutter button to confirm. Press the mode button
again to select the icon
, and then press the shutter
button to confirm. Press the shutter button still to recording
and the camera will beep during recording. The recording is
finished when you release the shutter button. [The video
resolution is QVGA (320x240) default and you cannot change
-8-
the video resolution; The capture mode return to single mode
automatically when finish recording.]
9. Self-Timer Mode: Press the mode button five times and then
press the shutter button to confirm. Press the mode button
again to select the icon on (reactive the Self-Timer mode), and
then press the shutter button to confirm. Press the shutter
button again and camera will take a picture automatically after
10 seconds.
10. 60Hz Mode: Press the mode button six times and then
press the shutter button to confirm. Press the mode button
again to select the icon 60H. You should set up to this mode
if you use 60Hz power.
11. 50Hz Mode: Press the mode button six times and then
press the shutter button to confirm. Press the mode button
again to select the icon 50H. You should set up to this mode
if you use 50Hz power.
12. Delete One Picture Mode: Press the mode button seven times
and then press the shutter button to confirm. Press the mode
button again to select the icon
, press the shutter button
and the icon will blink, press the shutter button again to
confirm and camera will delete (erase) last stored picture from
the memory.
-9-
13. Delete All Pictures Mode: Press the mode button seven times
and then press the shutter button to confirm. Press the mode
button again to select the icon
, press the shutter button
and the icon will blink, press the shutter button again to
confirm and camera will delete (erase) all stored pictures from
the memory.
can
14. PC camera mode: Press the shutter button to turn on the
camera, and then connect the camera and the computer with
the USB cable. You will see the icon PC on the LCD. Then you
download the pictures. (see page 14)
Note: 1.The erased pictures cannot be recovered. Make sure you have
selected the images you want to erase.
2.If the battery low the camera will beep when you turn on the camera;
“
” message appears on the LCD when the memory is full.
Please download the pictures to your computer.
- 10 -
7. Installing Your VQ1100 Driver and Software
• Installing Driver
1. Turn on the computer.
2. Insert installation CD into the CD-ROM drive
and the installation CD menu will appear.
3. When you see the following screen, choose
“Camera Driver”.
4. Follow the on-screen instructions.
5. Restart the computer.
For Windows 2000/XP only:
During installation of the driver or software, computer may display the
message: “The software you are going to install doesn’t contain the
Microsoft signature, and may not work correctly.
Do you want to continue? Y / N”
Please select Y to continue the installation.
• Installing Software
1. Insert installation CD into the CD-ROM drive
and the installation CD menu should appear.
2. When you see the following screen, choose
“Arcsoft Software” to install the software.
3. Follow the instructions on screen.
4. Installed software will automatically create
“VideoImpression 2” or “PhotoImpression 5” logo on your desktop.
- 11 -
8. Checking the Connection of Your VQ1100
Plug the USB cable to your camera then to the computer's USB Port.
WARNING: DON'T using USB cable to connect two computers or two
USB ports in one computer at same time.
NOTE: Windows 98 SE users: If the first time you connect the USB cable to
the computer you see the Insert Disk dialog box “Please insert the disk
labeled 'Windows 98 Second Edition CD-ROM’, and then click OK.” Please
follow the instructions on screen.
For Windows 98/Me only:
• Double click “My Computer” icon
->
Control Panel -> System -> Device Manager
-> Imaging Device; if you see"Mega Pixel
Camera (8101 SXGA)", that means your
camera is installed now.
For Windows 2000/XP only:
• Double click “My Computer” icon
(Windows 2000) or go to Start Button and
select “My Computer” (Windows XP) ->
Control Panel -> System -> Hardware ->
Device Manager -> Imaging Device; if you see
"Mega Pixel Camera (8101 SXGA)", that
means your camera is installed now.
- 12 -
9. Uninstalling Software
For Windows 2000/98 SE/Me:
• Uninstalling Software
1.Click "Start" on the task bar and choose "Settings".
2.Choose "Control Panel" and double click "Add/Remove Programs".
3.Select the program to be uninstalled: "ArcSoft PhotoImpression 5" or "
ArcSoft PhotoImpression 2".
4.Click "Remove Program" and follow the instructions on screen.
• Uninstall the Camera Driver
1.Click "Start" on the task bar and choose "Settings".
2.Choose "Control Panel" and double click "Add/Remove Programs".
3.Select the program to be uninstalled "Mega Pixel Camera (8101 SXGA)".
4.Click "Remove Program" and follow the instructions on screen.
For Windows XP:
• Uninstalling Software
1.Click "Start" on the task bar and choose "Control Panel".
2.Double click "Add or Remove Programs".
3.Select the program to be uninstalled: "ArcSoft PhotoImpression 5" or "
ArcSoft PhotoImpression 2".
4.Click "Remove" and follow the instructions on screen.
• Uninstall the Camera Driver
1.Click "Start" on the task bar and choose "Control Panel".
2.Double click "Add or Remove Programs".
3.Select the program to be uninstalled "Mega Pixel Camera (8101 SXGA)".
4.Click "Remove Program" and follow the instructions on screen.
- 13 -
10. Transfer Images with PhotoImpression 5
Follow the instructions below to transfer the
pictures using PhotoImpression 5.
1. Connect the DIGITAL CAMERA to your
computer.
2. Launch PhotoImpression 5 application: Start →
Programs →Arcsoft software suite →
PhotoImpression 5.
3. Click “folder”.
4. Select “Camera/Scanner” → “Mega Pixel
Camera (8101 SXGA)”.
5. Click on “Get DSC ” to browse the pictures in the camera.
6. Click on “Download” to download the pictures.
7. The Picture Manager allows you to view each individual image saved on
your camera. You can use the arrow keys to scroll to the previous or the
next picture. Click on the “Transfer ALL” button to download the images to
your computer.
- 14 -
11. Using the VQ1100 in PC Camera mode
Note: Please install camera drive before you can use the camera in PC-Cam.
Setting Up PC-Cam
1.Turn the VQ11001100 power on and connect the camera and the computer
use the USB cable.
2. There are many methods to view your image in PC-Cam mode if you have
Video software. For example:
A.
Click “NetMeeting”Æ “Start Video”.
B.
About Arcsoft software:
a. PhotoImpression 5: Click “file” on the
function menuÆ Click “Get photo” Æ
an icon
on the browse pane
as shown on the right Æ“Live” Æ“DONE”.
b. VideoImpression 2: Click “Create a new video”Æ“Get from
Album”Æ“Capture Video”
Æ“DONE”.
- 15 -
12. ArcSoft PhotoImpression 5
ArcSoft PhotoImpression 5 is a
complete digital image editing application
designed with real people in mind.
Easy-to-use “Getting Start” guides,
user-friendly UI, complete image editing
functionality, give users wonderful
experience to organizing, viewing,
enhancing, editing, printing and sharing
photos.
Click “Start”Æ “Program”Æ “ArcSoft Software Suite“Æ “PhotoImpression 5” to
launch PhotoImpression 5 or double click PhotoImpression 5 icon on the
desktop and you will see a window as the screenshot above.
Select the picture source. For example: 1. Click “Folder”
for acquiring
photos from your computer 2. Select the file path. 3. You can start editing
them.
- 16 -
1. Get Photo – Choose how to view or acquire photos.
2. Enhance – Crop, brighten, rotate, resize and modify photos.
3. Create – Add clip art, special effects, frames and more.
4. Project – Make calendars, photo books and greeting cards.
5. Print – Print multiple images per page and multiple pages at one time.
6. Send – Email photos or upload them to online photo sharing accounts.
Note: For more detailed information, please refer to the Help section.
13. ArcSoft VideoImpression 2
ArcSoft VideoImpression 2 creates
home movies and slide shows by
combining existing videos, still images,
exciting scene transitions, and multiple
audio tracks. Though simple to use, the
program provides intense and broad
video editing and export options perfect
for owners of digital still cameras,
desktop and digital video cameras, and
camcorders.
Click “Start”Æ “Program”Æ “ArcSoft Software Suite“Æ “VideoImpression 2”
to launch VideoImpression 2 or double click VideoImpression 2 icon on the
desktop and you will see a window as the screenshot above.
Open a Project – Let you browse the project files in the VideoImpression
system folder. By “project,” we mean to say a file that contains all of the
settings and each individual component on the Storyboard. When you save
your work as a project, you can go back and swap components, add and
- 17 -
remove them, alter audio, etc.
Create a Video – Create a new video project. You can retrieve media
materials from the device connected or choose media files from system
folder. You can choose video materials from your photo album as well.
Create a Slide Show – Create a slide show project. You can retrieve media
materials from the device connected or choose media files from system
folder. You can choose slide show materials from your photo album as well.
If the box “Always show this wizard when VideoImpression starts.” at the
bottom of the wizard is checked, the wizard will appear each time you run
the program. If you'd like to skip the wizard the next time, uncheck the
box.
Select the item you desire and the picture and videos you need then you will
enter the editing interface as below.
You can use the six steps in the Function Menu to create video clips and
slide shows.
- 18 -
1. Media - Select the videos and images that will comprise your final movie or
slide show.
2. Edit - Modify video and image color and adjust the duration of each movie
component. Only available for video projects.
3. Effects - Add neat special effect transitions between each component, or
apply a pre-made theme.
4. Text - Place animated text on any movie component. Only available for
video projects.
5. Narrate - Record audio directly from the program and add it to your movie.
6. Produce - Combine all components to create your final video; save it in a
variety of ways or email it to friends.
The Storyboard - The backbone of the creation process, it's where you
assemble your movie.
The Player - Preview and modify your movies in this area.
Working with Albums - Albums let you organize your media for easy access.
Note: For more detailed information, please refer to the Help section.
- 19 -
14. Internet Video Conferencing
To run a video conference with another person, you and the other person
must have the computer station configured with web camera, microphone,
speakers, and have access to the Internet.
You have to download video conference software, purchased or free, such as
basic software like I-phone or Microsoft NetMeeting.
For example: to download Windows NetMeeting, go to www.microsoft.com
search for NetMeeting and follow the download procedure.
Starting NetMeeting, you have to follow the simple set up procedure on the
computer screen, enter your personal information and adjust the microphone
volume. Here's how video conferencing works:
To receive video:
1.Call someone you want to see/hear.
2.On the Tools menu, point to Video, and then click Receive.
If you have a video camera, you can send video to the person you are calling.
To send video
1.Call someone you want to see/hear.
2.Click the Start Video button.
Note: 1.You can also send video by clicking the Tools menu, pointing to
Video, and then clicking Send. After starting the video, the button
changes to Stop Video. To stop the video, click the Stop Video
button again.
2.Windows XP user should upgrade MSN Messenger 6.0 to work with
the camera.
For software support please contact www.ArcSoft.com
- 20 -
Appendix:
Specifications
Image Sensor
Lens Specification
Operating System
White Balance
Exposure Control
Flash Strobe
Continuous Picture
Max Frame Rate –
PC Mode
Still Image
1.3M pixels CMOS Sensor, 1/3-inch
F 2.8, f =7.3 mm
Microsoft Windows 98SE/ME/2000/XP
Auto
Auto
Yes ( Flash Off ,Flash Auto, FlashOn)
3 Pictures
VGA 12 fps
QVGA 25 fps
Video Capture
SXGA 17 pictures
VGA 68 pictures
AVI frame rate is 7.5 fps and in QVGA mode
Display
Interface
Storage
Power Source
Dimension
Bundled Software
Status LCD
USB 1.1
Built-in 8MB SDRAM
3 x AAA1.5V Alkaline Batteries (not included)
88 x 27 x 54mm
ArcSoft PhotoImpression 5, VideoImpression 2
C 2006 Vistaquest corporation
○
- 21 -
www. vistaquestusa.com