1
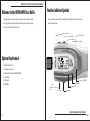
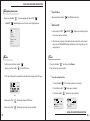
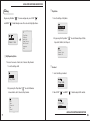
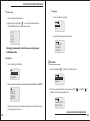
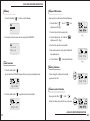
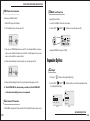
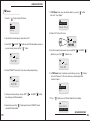
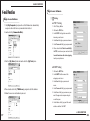
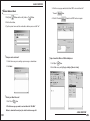
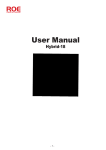
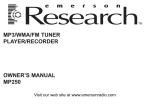
Welcome to the ULTRA-MP3 User Guide
Welcome to the ULTRA-MP3 User Guide
Function Indicator Symbols
Congratulation on your purchase of product. Please read through
These symbols appear on the indicator panel to indicate the current mode .
these operating instruction. After you finish, please put them away
See the chart below.
in a safe place for further reference.
MIC
Volume Up Button
Volume Down Button
Play/Pause Button
Record Button
System Requirement
1. IBM compatible PC
Mode Button
Flash
Memory
Card
2. Pentium II or above
3. Microsoft Windows 98/SE/ME/2K/XP
4. 64 M RAM
Power on/off Button
5. USB port
Forward Button
6. CD-ROM
SD/MMC Card Reader
Eject
Phonejack
1
Backward Button
Hold Button
Function Indicator Symbols
2
Driver Installation
Using the Utility
For windows 98 user
8 Click [ start ] to run the firmware installation.
9. A serires of screens, a wizard will guide you through the software installation.
For windows 98 user, please simply insert the enclosed
CD into CD-ROM drive.
1. Double Click [ My computer ] from desktop
2. Select CD-ROM drive
ULTRA-MP3 functions Description
Power on
3. Click the right button fo mouse andthen select [ Open ]
4. Double click the [ Set up.exe ] to install driver.
1. Press the Power "
5. A series of screens, a wizard will guide you through the software installation.
2. In 2 seconds, LCD show ULTRA-MP3 ( fig.a)
Firmware updating
ULTRA-MP3 provides a useful utility for updating the latest
firmware. To install this utility, simply insert the enclosed CD into
CD-ROM drive.
1 Double Click [ My computer ] from desktop.
2 Select CD-ROM drive.
3 Click the right button for mouse and then select [ Open ].
4 Double click the [Set up.exe] to install driver.
5 A series of screens, a wizard will guide you through
the software installation.
" button
fig.a
3. The current track and the playback time
indicator will be displayed on LCD. ( fig.b)
fig.b
4. If there is no MP3 files on the memory,
it will display NO Files. ( fig.c)
fig.c
Power off
Please press Power "
" button for 5 seconds and LCD shows [ Continue
Holding To Power Off ] and [ Shut Down ].
6 Connect the ULTRA-MP3 to USB port.
7 Please go to [Start]"[Program file]"and find [SigmaTel
MSCNMMC Audio Play]"[Firmware download]
Continue Holding To
Power Off
to load the firmware.
3
ULTRA-MP3 functions Description
4
ULTRA-MP3 functions Description
Navigating the menus
By pressing M button "
and BWD "
I Stop MP3 Music
" , the menu will pop out. Move FWD "
"
" button through menus. Press to select highlighted items.
By pressing Power button "
I BWD and FWD
1. By pressing the FWD "
Music
Voice
Settings
Erase files
Memory
Exit
Voice
please press Play button "
",
" to play MP3 music.
2. The current track and the playback time indicator will be displayed on LCD (fig.e).
" and then select to Voice.
1. Press the M button "
2. You can listen the voice recording.
I Voice Recording Function
1. Press Q button "
2. Press Power button "
3. Press Play button "
fig.e
5
" button, you could play back to
2. When the song is playing, it will skip to the prior section & the next section if
you press the FWD or BWD button continuously. If you let go the keys, the
song will go on.
1. After pressing the Power button "
4. By pressing Play "
" or BWD "
the previous track or next track.
Music
3. By pressing Play "
" the MP3 Music will stop.
" button again to pause MP3 music.
" button again to release the pause function.
V
001/001
V001.Wav
CLASS
01:28
" for 3 seconds to start voice recording.
" to stop voice recording.
" to listen the voice recording.
DVR
V
CLASS
00:01:28
V001.WAV
ULTRA-MP3 functions Description
6
ULTRA-MP3 functions Description
I Play Mode
Setting
By pressing M button "
and BWD "
" , the menu will pop out. press FWD "
"
1. Select to Settings"Play Mode.
" button through menus. Press to select highlighted items.
Setting
Erase files
EQ
Play Mode
Contrast
backlight
Power Saving
Rec Bitrate
Language
Exit
Play Mode
Contrast
2. By pressing the Play button "
" to select Normal, Repeat Track,
Repeat All, Shuffle, Shuf. Repeat
Normal
Repeat Track
Repeat All
I EQ( Equalizer) Mode
There are five modes : Rock, Jazz, Classical, Pop, Normal
I Contrast
1. Select to Settings"EQ
1. Select to Settings"Contrast
EQ
Play Mode
2. By pressing the Play button "
Play Mode
Contrast
" to select EQ modes
between Rock, Jazz, Classical, Pop, Normal.
Rock
Jazz
Classical
Pop
Normal
7
2. Move FWD "
" and BWD "
" button to adjust LCD contrast.
Contrast
ULTRA-MP3 functions Description
8
ULTRA-MP3 functions Description
I Language
I Power Saving
1. Select to Settings"Language
1. Select to Settings"Power Saving
2. By pressing the Play button "
" to select the timeout after which
the ULTRA-MP3 will shut down for power saving.
1 min
2 mins
5 mins
10 mins
Disable
Language
Exit
2. Select the language for the display texts.
Language
English
Chinese
Strongly recommend to set the power saving mode
to Disable mode.
I Rec Bitrate
1. Select to Settings"Rec Bitrate.
Erase files
1. Press the M button "
Rec Bitrate
Language
" and then select to Erase files.
Erase file
Memory
2. You can select the record compress ratio which is between 8000 Hz and 48000 Hz.
8000
16000
32000
48000
Hz
Hz
Hz
Hz
3. The lower compress ratio is for lower record quality, so it's suitable for long
time recording, and vice versa.
9
2. The voice recording file will be erased and press FWD "
button to select the file you want to erase.
" and BWD "
"
Delete? 001
Song Title
ULTRA-MP3 functions Description
10
ULTRA-MP3 functions Description
Memory
Repeat A-B function
1. Press the M button "
" and then select to Memory.
How to repeat a certain part of track continuously.
1. Press Q button "
" , the A-> "
" icon
A-1
CLASS
will show on LCD.(flg.f)
Memory
Exit
2. It will set the start of the repeat part A.
2. It shows the internal memory and free memory of ULTRA-MP3 .
3. Press Q button again , the A->B icon "
fig.f
"
will show on LCD. (flg.g)
4. It will set the end of the repeat part B.
I N T : xxx MB
5. Now, it will repeat the selected part ( A-B) of the
FREE: xxx MB
track continuously.
6. Press Q button "
A-B
V
001/001
" , it will stop A-B function.
CLASS
01:28
Song title
fig.g
Lock Function
Battery Indicator
1. Press the Hold button "
",
you can lock the ULTRA-MP3 to prevent the keys being accidentally pressed.
Please change the battery when indicator
A-B
V
appears on the LCD.
V
001/001
001/001
CLASS
01:28
Song title
CLASS
01:28
Key Locked
Volume control Function
2. Press the Hold button "
V
001/001
" again to release the Lock function.
CLASS
By pressing the VOL+ "
" / VOL- "
"
button, the volume steps will increase or decrease.
01:28
Song title
11
ULTRA-MP3 functions Description
12
ULTRA-MP3 functions Description
USB Pock drive Function
SD/MMC card Function
How to use USB Pock drive?
Support Play and Plug.
1. Attach MP3 player to USB port .
1. Insert the SD/MMC card to the card reader.
2. The illustration (fig.h) will show on LCD.
2. Press FWD "
3. You can see TWO Portable drives on you PC. ( for windows 2000 user, please
make sure to install the Windows Service Pack3 ; For Windows 98 user, please
make sure to install the enclosed driver)
4. When data transmitting, the musical note icon will running on LCD.
" /BWD "
" button, the icon will show on LCD.
« Support SD/MMC card up to 512MB.
Expansion Options
Backlight
1. Press the "
5. When data transmitting finished, the musical note will disappear on LCD.
6. The ULTRA-MP3 do harm when you take out the ULTRA-MP3
" button, Setting"Back light.(fig.h)
2. Press FWD "
" /BWD "
the backlight will off.(fig.i)
" button and then select the timeout after which
while the transmitting have not completed.
5
Auto Power Off Function
ULTRA-MP3 will power off in 60 seconds if the Play or REC button is not pressed.
13
Backlight
Power Saving
fig.h
Secs
10 Secs
Always On
Disable
fig.i
Expansion Options
14
Expansion Options
FM Tunner
7. In "FM Tuner "mode, save your favorite station by pressing "
and select " Save Station " .
1. Press the "
" button
" button, Setting"FM Tunner.
Save Station
Delete Station
FM Tunner
Setting
8. It blinks "SA?" on the LCD screen.
2. You will read the radio frequency shown on the LCD.
3. Press FWD "
" & BWD "
" button to search FM radio stations and set up
as preset memory channel by Play "
FM
" button.
9. Select the memory channel number by pressing FWD "
button then press Play "
V
" and "BWD "
"
" button to save.
01/01
96.3 MHZ
FM
OK
V
01/01
96.3 MHZ
4. It shows "PRESET" icon on LCD screen when setting completed.(fig.h)
FM
10. In "FM Tuner" mode, to start auto-scan function by pressing "
" button
and select "Auto Scan." When the radio is on, searching stops when
a channel is found.
V
PRESET 01/01
96.3 MHZ
Auto-Scan
Exit
5. Under preset memory channel, to press FWD "
" and BWD "
" button
for selecting preset FM radio stations.
6. Remember to press Play "
searching FM radio stations.
15
" button again to release "PRESET" icon for
11. Press "
" button and select "Delete Station" to delete stations.
Save Station
Delete Station
Expansion Options
16
E-mail Function
E-mail Function
Begin to use Software
1. Click[ My Computer ] and you will see that Windows has automatically
assigned a drive letter for every removable disk detected.
2. double-click the [ Removable Disk ].
Begin to use Software
I
Setting :
u
A. POP 3 Setting
1. Click "Setting: Button
2. Click on the POP3 tab
3. Iin the POP3 field, type the name of the
incoming e-mail server.
4. In the User field, type your account name
5. In the Password field, type your password
6. Please check in the Check Leave Mail(s)
in POP3 server box or you can check in the
Launch thmail.exe after device pluging
box for your preference.
3.Find the [ My Tools ] folder and double-click the [ My Tools] icon.
u
B. SMTP Setting
1. Click on the SMTP tab
2. Iin the SMTP field the name of the
outgoing e-mail server
3. In the User field, type your account
name.
4.Please doubled-click the [ THMail.exe ] program to start the software.
5.Follow the on-screen instructions to proceed.
4. In the Password field, type your password
5. In the Name field, type your name as you
want it to appear to everyone who gets
e-mail from you.
6. In the Address field, type your full e-mail
address and then Click "OK"
17
E-mail Function
18
E-mail Function
3. Click the message you want to delete from POP3 server and then click "
Create Address Book
1. Click [New] "
" Button and then click [ Address ] "
"Remove"
" Button.
button.
4. Click the "Recheck"
button to check POP3 mail server again.
2. Click the New button,
3. Type the person's name and the e-mail address with no spaces and click "ok".
ICompose and send email :
1. Click in the message area, and type your message as shown below.
2. Click Send .
IImport email into Microsoft Outlook
1. Click "Open"
Express:
button.
2. On the File menu, point to [Copy to folder] or [Move to folder]
ICheck your Email Account:
1. Click "Check"
Button
2. Click the message you want to read and then click "Get Mail'
Button to download the mail you just select from the message list.
19
E-mail Function
20
E-mail Function
3.Verify the location of your messages, and then click ok. Then you will find your email
message into outlook express.
Operation Notes and trouble shooting
1. Please do not drop the ULTRA-MP3 and keep it in areas free from extreme
temperature changes, moisture and dirty environment.
2. The ULTRA-MP3 do harm when you take out the ULTRA-MP3
while the transmitting have not completed.
3. Please remove the battery to avoid electrical leakage when you do not use ULTRA-MP3.
4. After turning on the MP3 player, there is no signal on LCD.
s Please replace or check battery placement.
s Please check if the battery is inserted.
Back up and restore the email messenger software
When first time installed, Email messenger software will be automatically backup to
your PC. After formatting your ULTRA-MP3 you can still restore the email software by
following the procedures below.
1.Click on [ My documents ] folder
s Battery life may vary with different manufacturer.
5. If the key buttons could not work, please check if the " Hold" button is on.
Please press it again to release the lock function.
s Please check if the volume control turn it to level 0 and please turn it up.
s Please check if the MP3 music file is in the memory
6. For windows 98 user, Please make sure to install the enclosed driver before using ULTRA-MP3.
2.You will find [ ULTRA-MP3-Backup ] folder
3.Find thmail.exe and smail.exe for installation.
4. After executing thmail.exe and smail.exe file, the Email Messenger software will
be restored to your ULTRA-MP3.
Attentions
Windows 2000 Service Pack 3 (SP3) provides the latest updates to the Windows
2000 family of operating systems . Windows 2000 SP3
allows you to install all the latest Windows 2000 updates with a single installation.
21
The 2000 Service Pack 3 (SP3) is protected by copyright of Microsoft corporation.
7. For windows 2000 user, when plugging USB ULTRA-MP3 to PC, you should see two
additional drives on PC .if you only see one additional drive on your PC,
s Please make sure to install Windows 2000 SP3 , which allows you to install all the
latest Windows 2000 updates with a single installation.
s you can visit at http:// v4.windowsupdate.Microsoft.com/zhtw/default.asp to update
Windows 2000 with a single installation.
The 2000 Service Pack 3 (SP3) is protected by copyright of Microsoft corporation.
8. ULTRA-MP3 can be used as USB mass storage.
( Removable disk drive, smart card reader).
Operation Notes and trouble shooting
22