1
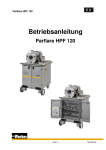
Installation Library Product Section QFNA-IOM-1 Service Literature Air Handling Fans Product Model Literature Type Sequence Date File No. Supersedes Q Fan and Super Q II Fan Installation/Operation/Mainteance QFNA-IOM-1 August 1997 SV-AH-FAN-QFNA-IOM-1-897 FAN-IM-3-975 Model Q Fan and Super Q II Plus ™ X39640481-01 Since the Trane Company has a policy of continuous product improvement, it reserves the right to change specifications ©American Standard Inc. 1997 and design without notice. The installation and servicing of the equipment referred to in this booklet should be done by qualified, experienced technicians. Table of Contents Subject Page Model Number . . . . . . . . . . . . . . . . . . . . . . . . . . . . 3-7 General Information . . . . . . . . . . . . . . . . . . . . . . . . . . 8 Literature Change History . . . . . . . . . . . . . . . . . . . . . . 8 About this Manual . . . . . . . . . . . . . . . . . . . . . . . . . . 8 Warnings and Cautions . . . . . . . . . . . . . . . . . . . . . . . 8 Shipping, Rigging and Handling . . . . . . . . . . . . . . . . . . . 9 Storage . . . . . . . . . . . . . . . . . . . . . . . . . . . . . . . . 9 Installation - Q Fan . . . . . . . . . . . . . . . . . . . . . . 10 Provide a Foundation . . . . . . . . . . . . . . . . . . . . . . . . 10 Isolate the Fan . . . . . . . . . . . . . . . . . . . . . . . . . . . 10 Arrangement 9: For units size 16-44, Class I and II . . . . . . 10 Arrangement 9: For units size 49-60, Class I and II . . . . . . 10 Arrangement 1: For units size 27-44, Class I and II . . . . . . . 10 Arrangements 1 and 9: For units size 16-44 Class III . . . . . . 10 Clearances . . . . . . . . . . . . . . . . . . . . . . . . . . . . . 10 Installation of Motor and Beltguard When NOT Factory Installed. . 12 Arrangement 9 . . . . . . . . . . . . . . . . . . . . . . . . . . 12 Arrangement 1 . . . . . . . . . . . . . . . . . . . . . . . . . . 12 Installation of Drives When Motor NOT Factory Installed . . . . . . 14 Arrangements 1 and 9 . . . . . . . . . . . . . . . . . . . . . . 14 Wheel Alignment . . . . . . . . . . . . . . . . . . . . . . . . . . 15 Arrangements 1 and 9 . . . . . . . . . . . . . . . . . . . . . . 15 Q Fan Duct Connections . . . . . . . . . . . . . . . . . . . . . . 17 Super Q II Duct Connections . . . . . . . . . . . . . . . . . . . . 17 Installation - Super Q II . . . . . . . . . . . . . . . . . . . . 18 Preparation for Mounting . . . . . Ceiling Mounting . . . . . . . . . Floor Mounting . . . . . . . . . . Accessories Installation . . . . . . Inlet Vanes . . . . . . . . . . . . Silencer . . . . . . . . . . . . . . Start-Up Q Fans and Super Q Fans Start-Up Procedures . . . . . . . Determining Fan RPM . . . . . . . . . . . . . . . . . . . . . . . . . . . . . . . . . . . . . . . . . . . . . . . . . . . . . . . . . . . . . . . . . . . . . . . . . . . . . . . . . . . . . . . . . . . . . . . . . . . . . . . . . . . . . . . . . . . . . . . . . . . . . . . . . . . . . . . . . . . . . . . . . . . . . . . . . . . . . . . 18 18 18 19 19 19 20 20 20 Maintenance . . . . . . . . . . . . . . . . . . . . . . . . . . 21 Establishing A Schedule . . . . . . . . . . . . . . . . . . . V-Belt Drive . . . . . . . . . . . . . . . . . . . . . . . . . . Variable Inlet Vanes. . . . . . . . . . . . . . . . . . . . . . Isolation Base . . . . . . . . . . . . . . . . . . . . . . . . . Wheel and Housing . . . . . . . . . . . . . . . . . . . . . . Scheduled Preventive Maintenance Services . . . . . . . . Bearing Service . . . . . . . . . . . . . . . . . . . . . . . . . About Bearings . . . . . . . . . . . . . . . . . . . . . . . . Sealmaster, SFT, MSF, SF and MSFT Bearings . . . . . . . Link-Belt P-300 Bearings . . . . . . . . . . . . . . . . . . . Link Belt Series 6800 Spherical Roller Bearing Pillow Blocks Troubleshooting. . . . . . . . . . . . . . . . . . . . . . . . . Vibration and Noise . . . . . . . . . . . . . . . . . . . . . . Other Noise and Vibration Services. . . . . . . . . . . . . . HP Too High . . . . . . . . . . . . . . . . . . . . . . . . . Overheated Bearing . . . . . . . . . . . . . . . . . . . . . High Temperatures . . . . . . . . . . . . . . . . . . . . . . 2 . . . . . . . . . . . . . . . . . . . . . . . . . . . . . . . . . . . . . . . . . . . . . . . . . . . 21 21 21 21 21 21 25 25 25 26 27 29 30 30 30 30 30 QFNA-IOM-1 Model Number Model Number Description An example of a typical service model number for a Q Fan is shown below. The fan model number is located on the unit nameplate. Table 1 provides model information on both Q Fans and Super Q II Fans. QFCA4092HE0RE11NFFCAN000000000L Service Model Number Table 1 Model Number Information for Q Fans and Super Q II Fans Product Description MODEL QFNA UORT H VOLT 460 IOPT IB BHPF 22.4 TYPE SQ2 DSEQ E0 MOLO R OOPT SH Selection Category SIZE 40 MTRS TT GRSL N STPR 2.5 ARRG 9 MTYP PO18 DTYP C1.5 FCFM 30000 Description of Selection CLAS 2 MSHP 30 WBAL FACT RPMF 1421 Model Digit Number FAN Type Q Fan QF Standard N Super Q II Development Size Arrangement Class C A Sequence 16 16 19 19 21 21 24 24 27 27 30 30 33 33 36 36 40 40 44 44 49 49 54 54 60 60 Arrangement 1 1 Arrangement 9 9 Special S 1 1 2 1-2 2 3 3 Special S 4 5-6 7 8 Continued on next page QFNA-IOM-1 3 Model Number Table 1 Model Number Information for Q Fans and Super Q II Fans (Continued) Selection Category Orientation Description of Selection Upblast Unit Downblast Unit Horizontal Unit Special Design Sequence Motor Location Inlet Option Outlet Option Motor Supplied/Mounted By Bottom Left Right Top Special Inlet Vanes Inlet Screen Inlet Flange Inlet Bell Inlet Bell with Inlet Screen Short Inlet Silencer Long Inlet Silencer Special None Outlet Duct Equalizer Outlet Flange Outlet Screen Outlet Duct Equalizer with Outlet Flange Short Outlet Silencer Long Outlet Silencer Special None Trane Supplied/Trane Mounted Trane Supplied/Field Mounted Field Supplied/Trane Mounted Field Supplied/Field Mounted Special Model Digit Number U D H S EO B L R T S A B D E F 1 2 S 0 A B C D 1 2 S 0 1 2 3 4 S 9 10-11 12 13 14 15 Continued on next page 4 QFNA-IOM-1 Model Number Table 1 Model Number Information for Q Fans and Super Q II Fans (Continued) Description of Selection Selection Category Motor Horsepower Motor Type Voltage 0.5 0.75 1 1.5 2 3 5 7.5 10 15 20 25 30 40 50 60 75 Special ODP Motor 1800 RPM 1 Speed, 1 Winding ODP Motor High Efficiency 1800 RPM 1 1 Winding ODP Motor High Efficiency 1800/1200 RPM 2 Speed, 2 Winding ODP Motor High Efficiency 1800/900 RPM 2 Speed, 1 Winding ODP Motor High Efficiency 1800/900 RPM 2 Speed, 2 Winding ODP Motor Premium High Eff E+ 3 1800 RPM 1 Speed, 1 Winding TEFC Motor 1800 RPM 1 Speed, 1 Winding TEFC Motor High Efficiency 1800 RPM 1 Speed, 1 Winding TEFC Motor Premium High Eff+3 1800 RPM Speed, 1 Winding Special 115 Volt/60 Hertz/1 Phase 230 Volt/60 Hertz/1 Phase 200 Volt/60 Hertz/3 Phase 208 Volt/60 Hertz/3 Phase 230 Volt/60 Hertz/3 Phase 460 Volt/60 Hertz/3 Phase 575 Volt/60 Hertz/3 Phase Special Model Digit Number A B C D E F G H J K L M N P Q R T S A B 16 C D E F 17 G H J S A B C D E F G S 18 Continued on next page QFNA-IOM-1 5 Model Number Table 1 Model Number Information for Q Fans and Super Q II Fans (Continued) Selection Category Drive Type Inverter Balance Grease Lines Thrust Restraints Isolator Duct Special Coating Description of Selection Constant Pitch Drive with 1.2 Service Factor Constant Pitch Drive with 1.4 Service Factor Constant Pitch Drive with 1.5 Service Factor Variable Pitch Drive with 1.2 Service Factor Variable Pitch Drive with 1.4 Service Factor Variable Pitch Drive with 1.5 Service Factor Special Inverter Factory Balanced Inverter Ready Balanced by Customer None Special Nylon (Standard) Copper None Special WB None Special Free Standing Spring Floor Housed Spring Floor Double Deflection Neoprene Floor Double Deflection Neoprene Ceiling Spring Ceiling Spring and Neoprene Ceiling Spring Rails Floor Neoprene Wall Steel Base with Spring Floor Concrete Inertia Base with Spring Floor None Special Duct Canvas None Special Baked Phenolic (Heresite) Inside Coat Baked Phenolic (Heresite) Inside/Outside Coat Epoxy Coating Inside Coat Epoxy Coating Inside/Outside Coat Epoxy Phenolic (2 Component)Inside Coat Epoxy Phenolic (2 Component)Inside/Outside Coat Epoxy Phenolic (Air Dry Heresite)Inside Coat Epoxy Phenolic (Air Dry Heresite)Inside/Outside Coat Polyester (Sanitile) Coat Inside Polyester (Sanitile) Coat Inside/Outside None Special Model Number A B C D E F S A B 0 S N C S 1 0 S B C D E F G H J K L S A 0 S A B C D E F G H Digit 19 20 21 22 23 24 25 J 0 K S Continued on next page 6 QFNA-IOM-1 Model Number Table 1 Model Number Information for Q Fans and Super Q II Fans (Continued) Selection Category Insulation Enhancement Access Door Drain Mounting Leg Motor Frame Size QFNA-IOM-1 Description of Selection Fan Insulation Fan and Accessories Insulation None Special Double Acoustic None Special Access Door Motor Side Access Door Opposite Motor Side Access Door 90° Right of Motor Access Door 90° Left of Motor None Special Drain None Special Inlet Mounting Leg Outlet Mounting Leg None Special 56T 143T 182T 184 213T 215T 254T 256T 284T 286T 324T 326T 364T 365T Special Model Number 1 2 0 S A 0 S 1 2 3 4 0 S A 0 S A B 0 S A B C D E F G H J K L M N P R Digit 26 27 28 29 30 31 7 General Information Literature Change History QFNA-IOM-1 (August 1997) Manual supersedes FAN-IM-3 (975), reflecting ABU support of the Q fans and Super Q fans. General update. About this Manual This manual describes proper installation of Model Q Fans and Super Q II Fans. Note: The installation and servicing of the equipment referred to in this booklet should be done only by qualified, experienced technicians. Model Q fans are shipped assembled except for some motor and drive selections that are not mounted for shipping reasons or are intended for field installation at customer request. Accessories are mounted to the fan at the factory with the following exceptions: A. Inlet Vane Option (Shipped from mfg. to job site) B. Silencer Option (Shipped from mfg. to job site) C. Flex Duct Option (Shipped with fan) D. Vertical Mounting Leg Option (Shipped with fan) E. Isolator Option (Shipped with fan or from mfg.) These accessories have their own installation instructions which are shipped with the accessory. Trane Model Q fans and Super Q II Fans are dynamically balanced, properly aligned, and lubricated before leaving the factory. These Procedures, however, do not guarantee that the fan will be ready to operate on receipt. Damage and misalignment can occur due to rough handling during shipment and installation. Follow all instructions in this manual to assure a successful installation. Failure to follow these instructions may void the warranty. THIS MANUAL SHOULD BE KEPT WITH THE FAN UNIT SINCE IT CONTAINS INFORMATION FOR PROPER MAINTENANCE AND TROUBLESHOOTING. 8 Warnings and Cautions Notice that WARNINGS and CAUTIONS appears at appropriate intervals throughout this manual. WARNINGS are provided to alert installing contractors to potential hazards that could result in injury or death, while CAUTIONS are designed to alert personnel to conditions that could result in equipment damage. Your personal safety and the proper installation of this unit depend upon the strict observance of these precautions. Observe the following warnings, cautions and all warning labels on the unit: WARNING! ROTATING PARTS DISCONNECT ALL ELECTRIC POWER INCLUDING REMOTE DISCONNECTS BEFORE SERVICING. SECURE DRIVE SHEAVES TO ENSURE ROTOR CANNOT FREEWHEEL. Failure to disconnect power before servicing can cause severe personal injury or death. Note: Re-connect all grounding devices. All parts of this product capable of conducting electrical current are grounded. If grounding wires, screws, straps, clips, nuts or washers used to complete a path to ground are removed for service, they must be returned to their original position and properly fastened. QFNA-IOM-1 Shipping, Rigging and Handling All Model Q and Super Q II fans are shipped on skids to minimize possible damage in transit. Caution: NEVER LIFT A UNIT BY THE BEARING BRACKETS, MOTOR BRACKETS, OR OTHER ACCESSORIES. NEVER FORKLIFT THE UNIT BY THE HOUSING. Failure to handle properly will damage the unit. Fan sizes 16-44 can be lifted using the lifting holes in the square outer frame. If a forklift is used, lift only under the skids or frame, being especially careful for units with special protective coatings. Fan sizes 49-60 should be rigged for lifting and handling by securing chains or cables through the front and rearmost mounting supports and under the horizontal stiffening angles as shown in Figure 1. Figure 1—Typical Fan Unit Shipped with Rigging (Sizes 49-60) Storage The following criteria should be met when storing the unit. Note: Protect the unit from the elements. Where outside storage is necessary, several precautions are needed. • First cover the inlet bearing and drive opening, then place unit in an area with good drainage and cover with a tarp if possible. • Do not use plastic to completely cover the unit at the risk of trapping condensation. This type of covering can cause excess moisture, condensation and rusting. • DO NOT STACK FANS. FAN SIZES 49-60 THAT SHIP WITH AN INLET BELL MUST REMAIN ON THE SHIPPING SKID UNTIL READY TO BE INSTALLED ON ISOLATORS. The inlet bell extends below the bottom frame of the fan and can be damaged if set on the floor without skids. For extended storage or storage under severe conditions: • As often as once a month, purge the bearings with fresh grease to prevent moisture or dirt from accumulating in the bearing. • See Maintenance Section of this manual. QFNA-IOM-1 9 Installation —Q Fan Provide a Foundation Most units will be mounted to or hung from a concrete structure. If mounted to a steel structure, the mounting structure should be welded. Table 2 refers to unit weights. Isolate the Fan Isolation should be used to prevent noise and vibration from being transmitted to the building. Arrangement 9: For units size 16-44, Class I and II Mount directly to four flexible isolators for either floor or ceiling mounting. Use rails for wall mounting. For vertically-mounted fans, provide mounting legs to which isolators are mounted. Arrangement 9: For units size 49-60, Class I and II Mount directly to eight isolators when used with a steel or concrete base. Eight bolts are used to mount the fan to the base in holes pre-drilled. These sizes must be mounted horizontally. When ceiling suspension is required, the fan must be set on an integral base which is hung from the ceiling. 10 Arrangement 1: For units size 27-44, Class I and II Use an integral steel or concrete base rather than individual isolators. Mount the fan horizontally as shown in Figure 2. Arrangements 1 and 9: For units size 16-44, Class Ill Provide a rigid integral steel base or, preferably, an inertia pad. Mount these fans horizontally. Note: For some applications involving large fans and high pressures, thrust restraints may be required. When used, mount them on the fans exterior frame members at the horizontal centerline. Clearances Allow sufficient clearance around the equipment to provide ample room for servicing and maintenance. Inlet screen may be used if the fan has an unducted inlet. Recommended minimum clearance is no less than 1/2 the fan wheel diameter away from a wall or obstruction. QFNA-IOM-1 Installation —Q Fan Table 2 - Unit Weight (Less Motor, Drive, Accessories and Shipping Package) Arrangement 9 Unit Size 16 19 21 24 27 30 33 36 40 44 49 54 60 Class I 125 165 190 220 260 325 410 525 690 920 1020 1090 1730 Class II 135 180 210 255 300 375 465 600 775 1010 1075 1140 1830 Arrangement 1 Class I *NA NA NA NA NA NA 425 545 705 920 NA NA NA Class II *NA NA NA NA 315 385 480 615 790 1025 NA NA NA Class III 155 200 230 285 335 415 515 655 830 1070 NA NA NA Note: *NA - This combination of arrangement, class and size is not available. Figure 2—Integral Base for Arrangement 1 Top View QFNA-IOM-1 11 Installation —Q Fan Caution: When the customer is providing drives and/or motor, the Trane Company will not assume any responsibility for damages occurring due to selected drives or motors. Installation of Motor and Beltguard When NOT Factory Installed Arrangement 9 1. Remove the belt guard from the shipping position. Remove the screws on two sides along the edge (the number varies with the fan size). Lift the guard off. 2. If needed, reposition the belt tightener to correspond to the specific belt length and motor frame (drive center line). (See Figure 3). 3. To mount the motor, first turn the adjusting screws for the belt tightener (angles or base plate) down as far as possible. 4. Bolt the motor to the belt tightener. Before final tightening, center the motor on the belt tightener. 5. Check the motor rotation to be sure the fan will rotate in the direction shown in Figure 4 when the drive is installed. 6. Disassemble the belt guard by removing the clips or screws that hold the front and rear panels together. See Figure 5. Slip the rear panel assembly of the belt guard over the shaft so that the shaft protrudes through the rubber block-off to belt guard. On fans sizes 49-60, secure the rubber block-off by putting a crimp in the slots holding block-off to belt guard. See Figure 6. Locate the edge of the rear panel assembly on gasketing approximately 1/4" from the drive hole. Refer to Figure 7. Center the rear panel over the drive hole in the shell and secure with the self-drilling screws provided as shown in Figure 8. 12 Arrangement 1 Remove the motor pedestal support and belt guard from the top of the unit and bolt the “F” shaped pedestal support to the unit as illustrated in Figure 2. Mount slide rail base to pedestal. Bolt the motor to the slide rail base. Disassemble the belt guard by removing the self-tapping screws. Slip the rear side assembly of the belt guard over the motor shaft so that the shaft protrudes through the rubber block-off. See Figure 6. Locate the edge of the rear side assembly of the belt guard on gasketing approximately 1/4" from the edge of the drive hole in the fan shell. The motor should be as close to the fan shaft centerline as the slide rail base will permit. Fasten the front side assembly of the belt guard to the rear side assembly already in place on the unit with the self-tapping screws provided. The polyurethane gasket must remain in position during this operation. Drill pilot holes in the shell using the front side assembly as a template and attach to the shell with screws proved in Figure 8. Attach support leg and angle with screws provided. QFNA-IOM-1 Installation —Q Fan Figure 4—Motor Rotation Inlet End Figure 3—Shows Motor Mount Angle Adjustment Inlet Side View Airflow Figure 5—Belt Guard Disassembled Figure 7—Rear Side Assembly of Belt Guard QFNA-IOM-1 Figure 6—Motor and Sheave Arrangement Figure 8—Fan Discharge 13 Installation —Q Fan Installation of Motor and Beltguard When NOT Factory Installed Arrangements 1 and 9 Remove the discharge cone covering the fan shaft. Check the sheave bore for burrs and lubricate for easier mounting. Do not use excessive force when mounting sheaves, as this may damage the bearings. Be sure the fan and motor shafts are parallel. See Figure 9. Set the motor sheave with a 1/2" space between block-off retainer and back of sheave as shown in Figure 6. Align the sheaves with a straight edge as in Figure 9 and tighten the setscrews. When the sheaves are not the same width, place a string in the center groove of both sheaves and pull tight. The string should go straight through the center of both grooves. Move the motor in as close to the fan shaft centerline as the adjusting angles will permit. Slip the belts over the sheaves without forcing them. Forcing the belts may cause damage. Tighten the belts slightly and manually rotate the drive several times. As a check, on multiple belt drives, determine that the force of deflection is approximately the same by pushing each belt in an equal distance at a point halfway between the sheaves. After realignment, tighten the belts to a reasonable tension. Operate the unit a few minutes to allow belts to seat (See Start-Up). Belts should not slip when running, but a slight squeal at startup is normal. Do not over-tension belts. Belt tension should be rechecked after eight hours of operation and monthly thereafter. When the belt is in operation, the tight side of the belt should form a straight line from sheave to sheave with only a slight bow on the slack side. Attach the front side of the belt guard to the rear panel assembly already in place on the unit using clips or screws provided. Keep the polyurethane gasket in position during this operation. Replace the end cone using the screws and/or clips originally used. Be sure belts do not scrape the edge of the cutout in the end cone when the unit is in operation Figure 9—Aligning Sheaves With A Straight Edge For Sheaves Of The Same 14 FNA-IOM-1 Installation —Q Fan Wheel Alignment Arrangements 1 and 9 Figure 10—Front Bearing Bracket Figure 11—Clearance Fan Wheel Diffuser Manually rotate the fan wheel to be sure that it turns freely. The tip clearances are set in the factory and normally do not require readjustment. to determine if adjustment is required, measure and record the clearances between wheel and housing at six equally spaced intervals around the inside of the fan housing. Clearances should be measured at the leading and lagging edge of the blade tip. If adjustment is necessary loosen the front bearing bolts and readjust bearing location. See Figure 10. On sizes 16 through 44, additional adjustment can be obtained by loosening from bearing bracket and readjusting position. Retighten all fasteners and torque per Tables 4 and 5. Tip clearances are given in Table 3 and bolt torques in Table 4 and 5. Check the spacing between the rear edge of the fan wheel and diffuser cylinder. If this spacing is not as shown in Figure 11, move the fan wheel on the shaft for proper measurement. To achieve this, loosen the setscrew(s) and move the fan wheel out sufficiently to insert two pieces of the correct thickness bar stock, one at each side of the wheel. Move wheel gently against bar stock pieces. Tighten setscrew and remove bar stock pieces. See Figure 11. QFNA-IOM-1 15 Installation —Q Fan Table 3—Tip Clearance Between Wheeland Housing Class 1, 2 and 3 Unit Size 16 19 21 24 27 30 33 46 40 44 Tip Clearance (Inches) .030 to .075 .030 to .075 .030 to .075 .030 to .075 .035 to .080 .040 to .085 .045 to .090 .050 to .095 .055 to .100 .065 to .110 Table 4—Recommended Torques for Wheel Bolts (Wheel Bolts are on Fan Sizes (49-60 Only) Bolt Dia. (Inches) 1/4 5/16 3/8 7/16 1/2 9/16 5/8 Torque Ft/Lb 6 12 24 52 69 99 150 Table 5—Nut and Bolt Torque Requirements for Fan Housing and Bearing Supports Bolt Dia. (Inches) 1/4 5/16 3/8 7/16 1/2 9/16 5/8 3/4 16 Torque Ft/Lb 6 12 20 43 58 76 115 195 FNA-IOM-1 Installation —Q Fan Q Fan Duct Connections To maintain catalog performance there must be a minimum of three fan diameters of straight duct on the fan inlet and minimum of one fan diameter of straight duct on the fan discharge. A 90° elbow at the discharge should be a minimum of two fan diameters from the fan discharge. An open fan inlet should never be closer than one fan diameter from a bulkhead. Use an inlet BELL for open inlet applications to maintain rated performance. Inlet ducts should be the same diameter as the fan inlet. Outlet ducts may be the same diameter as the fan outlet or inlet. If the outlet duct is equal to the inlet, either the duct equalizer accessory or flexible connection should be used to make the transition. The inlet and outlet are the same size on fan sizes 49-60". See Tables 6 and 7 for inlet and outlet diameters. Flexible connections are recommended for quiet operation an and are required for units mounted on vibration isolators. Flexible connections should be fastened to the inlet or outlet so that they do not extend into either opening. Flexible connections should not be stretched tight. If the connections tend to sag or are misaligned at the inlet, a section of duct whose length is equal to one-half the wheel diameter should be attached to the fan inlet ahead of the flexible connection. In a horizontal run in which an Arrangement 9 fan is bolted to a floor, wall, or suspended from a ceiling, ductwork may be flange or slip connected as long as there is no distortion of the fan shell due to the duct weight. The same applies to Arrangement 1 fans which are always floor mounted. Table 6 - Inlet and Outlet Diameters for Q Fan Unit Size 16 19 21 24 27 30 33 36 40 44 49 54 60 QFNA-IOM-1 Inlet Outlet 19-5/16 21-25/32 24-5/8 28-1/32 30-7/8 34-5/16 37-23/32 41-11/16 45-31/32 50-13/16 52-3/8 58-1/32 64-1/16 17-25/32 20-7/16 23-1/8 26-5/16 29 32-3/16 35-13/32 29-5/32 43-5/32 47-11/16 52-3/8 58-1/32 64-1/16 Note: Flanged connections require inlet or outlet flange accessory. Access doors should be provided in the inlet and outlet ducts if the flexible connections do not permit sufficient access to the fan. The access doors should be large enough to make possible visual inspection of the bearing at the fan inlet and removal of the end cone access to the drive and rear bearing. Super Q 11 Duct Connections Connect inlet and outlet ductwork to ! Super Q 11 duct collars. DO NOT SUPPORT EXTERNAL DUCT FROM THE DUCT COLLARS. External ductwork should be supported independently from the floor to the ceiling. To maintain catalog performance, there must be a minimum of three diameters of straight duct on the inlet and minimum of one diameter of straight duct on the discharge. A 90° elbow at the discharge should be a minimum of fan diameters from the fan discharge. An open fan inlet should never be closer than one fan diameter from a bulkhead. Use an inlet BELL for open inlet applications to maintain rated performance for sizes 49 through 60 only. Table 7 - Inlet and Outlet Diameters for Super Q II Fan Unit Size 16 19 21 24 27 30 33 36 40 44 Inlet Outlet 20-5/32 22-5/32 26-5/32 28-5/32 32-5/32 34-5/32 38-5/32 42-5/32 46-5/32 48-5/32 25-7/8 27-7/8 22-7/8 25-7/8 28-7/8 31-7/8 38-5/32 42-5/32 46-5/32 48-5/32 17 Installation —Super Q II Preparation for Mounting Floor Mounting Lift the unit into position with a crane or forklift. Crane lift from the ends of the support rails using a spreader bar. When using a fork, lift from under both support rails. Before unit startup, always remove the shipping hold-down screws from the bottom of the unit to free the isolators. There is one screw at each end of the hat section. Use the plug buttons (provided in the bag attached to the unit) to cover the holes. Ceiling Mounting Hang ceiling supported units with four 3/4-inch steel rods, one connected to each corner of the support rail. Use large heavy gauge washers to insure the unit remains attached to the rods. Figure 11a—Inlet Vane Installation 18 QFNA-IOM-1 Accessories Installation Inlet Vanes Caution: Due to the size of the equipment, reasonable care must be taken when loading, unloading, handling and installing the inlet vane assembly to avoid over stressing and possible permanent damage to the frame and related components by excessive racing, skewing, twisting etc. 1. Bracket angles, isolators, and fasteners are common procurement items to be supplied by the customer. See Figure 11a. 2. Using an inlet vane angle ring as a template drill eight (8) holes of C (two (2) per quadrant in Q Fan frame. Assemble with size D bolts, nuts and lockwashers. 3. Position support bracket under inlet vane assembly as shown. Use bracket to drill six (6) holes in angle ring on flow entering side. Use same drill and fastener size as above. Silencer— Q Fan and Super Q II Fan Plus Duct Silencers, when ordered, are shipped loose from the manufacturer and are field installed. They must be connected to the Q fan using the flexible duct connector but they can be either rigid or flex connected to the Super Q fans. Silencers are sized for Q Fan and Super Q Fan collars. The support structure for silencers and flex connectors are provided by the installer. Inlet silencer— has a fixed center body and should be attached as per above description. The air flow arrow on the silencer should follow the direction of the air flow indicated on the Q Fan. Outlet silencer— has a movable cylinder. The inner cylinder has either sheet metal screws or is spot welded. Remove the sheet metal screws from the silencer center body or break the spot welds with a chisel and hammer. The center body must then be repositioned close to the end cap of the fan (no more than one inch from the end cap). Secure the silencer center body with sheet metal screws and connect with the fan using connectors as per above description. The air flow arrow on the silencer should follow the direction of the air flow indicated on the Q Fan. Figure 11b—Typical Silencer 4. Weld or fasten corners of the bracket together and attach isolator(s). 5. Use two isolators for size 49 through 60 only. Size 16 through 44 uses one isolator mounted in the center. QFNA-IOM-1 19 Start-Up Q Fans and Super Q II Start-Up Procedures • Tighten the belts slightly and manually rotate the drive several times. The following items must be checked before initial start-up of the fan: 1. Check all bolts, setscrews, and locking collars on the fan, bearings, drive, motor mount, and accessories for tightness. See Tables 4, 5, 10, 11 and 13. 2. Turn the fan wheel by hand to be sure it does not strike any portion of the housing. See Table 3 for tip clearance for tip clearance. 3. Recheck bearing alignment and lubrication. • On multiple belt drives, determine that the force of deflection is approximately the same by pushing each belt in an equal distance at a point halfway from each sheave. If this force is not the same for each belt, the motor and fan shaft are not parallel. Realign as required. • After realignment, tighten the belts again to a reasonable tension. • Operate the unit a few minutes to allow belts to seat. Belts should not slip when running,but a slight squeal at start-up is normal. DO NOT OVER-TENSION BELTS. 4. Operate the variable inlet vanes to be sure they move freely and position properly. 5. Repair any coating flaws in units with special protective coatings. 6. Check switches and wiring to motor. 7. Check fan and duct for dirt and debris and close all access doors. Foreign material in the inlet cone can cause wheel imbalance. 8. Check belt alignment and tension as follows: • Belt tension should be rechecked after 8 hours of operation and monthly thereafter. When the belt is in operation, the tight side of the belt should form a straight line from sheave with only a slight bow on the slack side. At initial start-up, check the fan wheel for proper rotation. When facing the inlet, the wheel must rotate clockwise. If the fan has inlet vanes, they can be partially closed to lower power requirements at start-up. On fans with multi-speed motors, run initial checkout at low speed. Pay particular attention to any vibration, noise or overheating of the fan bearings and motor (bearings may run warm during break in). Vibration is the most common problem encountered during start-up. If the vibration is significant, it must be corrected before allowing the fan to operate continuously. See Table 8. The “Trouble Shooting” section of this manual details the common causes for vibration. If the problem is diagnosed as fan wheel imbalance, use a vibration analyzer to rebalance the fan. The addition of any balance weights can be made on the inlet cone. See Figure 11. Determining Fan RPM Q Fans and Super II Fans with factory installed motor and drive are shipped with the correct Fan RPM. However, if the motor and drive are field installed and the Fan RPM needs to be set or checked, the following procedure can be used: Fan RPM can best be determined by using a strobe-type tachometer. If such an instrument is not available, approximate RPM can be derived as follows: 1. Remove belt guard and mark motor sheave. 2. By hand, rotate the fan wheel 10 times while counting revolutions of motor sheave to the nearest quarter turn. 3. Divide the nameplate motor RPM by the number of revolutions of the motor sheave and multiply by 10. This is Fan RPM. Example: If motor sheave revolves 8-1/4 turns - - Motor nameplate states 1750 RPM. 1750 x 10 = 2121 RPM 8-1/4 Table 8 - Maximum Allowable Vibration on Trane Model Q Fans 20 Fan Size Fan RPM 16-44 49-60 49-60 All Speeds Up to 1000 1000 & Up Vert, Horiz, and Axial Fans 5 Mils 4 Mils 3 Mils QFNA-IOM-1 Maintenance Establishing A Schedule Wheel and Housing Establishing a regular schedule for inspecting and performing maintenance procedures. Acceptable schedules will vary depending upon the type of application and local conditions. Consult the “Trouble Shooting” section if problems are encountered. All bolts and setscrews on the entire fan should be checked for tightness. Retighten according to Tables 4, 5, 10, 11 and 13. V-Belt Drive V-Belt Drives should be inspected or periodically for alignment, tension, and belt wear. Belts must be tight enough to avoid squeal and on slippage during operation. Slight squeal at start-up is normal. Overtension of the belts will cause fan and motor bearing wear and shorten the life of the belt. When belts are replaced, a matched set (type and dimension) should be used. Sheaves and belts should be cleaned with a dry cloth. Oil and grease must be kept away from belts and sheaves because they will cause deterioration and slippage of the belts. Use of belt dressing is not recommended. Variable Inlet Vanes Inspect inlet vanes for freedom of operation and wear. Clean with a dry cloth as conditions require. These vanes have sleeve type bearings which do not require lubrication. Isolation Base Inspect the base for freedom of movement and the bolts for tightness. Springs should be inspected for cracks and fatigue and replaced if necessary. Rubber isolation should be checked for deterioration. Keep oil, grease, chemicals and dirt away from isolators. QFNA-IOM-1 Any dirt accumulation on the wheel or in the housing should be removed to prevent imbalance. Especially inspect for any accumulations the inlet cone. The paint on fans and accessories should be touched up occasionally to prevent deterioration of the metal. This is particularly important on units having special coatings. Caution: Whenever the operating conditions of the fan are to be changed, (speed, pressure, temperature, etc.) The Trane Company must be consulted to determine whether or not the unit can be operated safely at the new conditions. Scheduled Preventive Maintenance Services The recommended schedule may vary with climate and equipment use conditions. Inlet vanes, for example, may need to be cleaned more often in a dusty environment. Make schedule adjustments accordingly. An example of a Scheduled Maintenance for Q Fan and Super Q II Fan is shown in Table 9. Note: For any conditions not covered in this table, consult The Trane Company. 21 Maintenance Table 9 - Schedule Maintenance - Q Fan and Super Q II Fan Interval Weekly or Bi-Weekly 22 Task Procedure Apply grease to the inlet and outlet bearing grease zerks while the fan is operating. Stop application when grease is seen being purged through the bearing Grease lubricated bearings seals. Once the purge level is (moderate to dirt, dry conditions*) determined, use the minimum amount of grease that is possible to reach purge (purge = point at which grease is visually seen escaping from the bearing seals). QFNA-IOM-1 Notes For most ambient temperatures (0 to 150° F), use a high quality, all-purpose, Lithium/Lithium complex based, #2 EP grease (Mobilith AW-2, Texaco Starplex 2, Shell Alvania #2, or equivalent). For extreme ambient conditions (less than 0° F and more than 150° F), a synthetic or specialty purpose grease may be considered. For specific recommendations, contact your closest Trane Sales/Service office. Maintenance Table 9 - Schedule Maintenance - Q Fan and Super Q II Fan (Continued) Interval Task Inspect motor Grease motor (severe service*) Monthly* Check belt tension Grease lubricated bearings General unit inspection and cleaning Grease motor (severe/moderate service*) Grease lubricated bearings Every two-three months Grease motor (severe/moderate/ clean service*) QFNA-IOM-1 Procedure Check for excessive vibration and temperature See lubrication instruction on motor nameplate or on tag attached. If motor has grease fitting and relief plugs, remove and clean out any hardened grease. Add fresh grease at the fitting with a low pressure gun. Run the motor a few minutes to expel grease through the relief vent. Replace all plugs, fittings. See General Maintenance procedure Apply grease to the inlet and outlet bearing grease zerks while the fan is operating. Stop application when grease is seen being purged through the bearing seals. Once the purge level is determined, use the minimum amount of grease that is possible to reach purge (purge = point at which grease is visually seen escaping from the bearing seals). Notes *When very dirty and high temperatures exist and for motor with hp over 150 For most ambient temperatures (0 to 150° F), Use a high quality, all-purpose, Lithium/Lithium complex based, #2 EP grease (Mobilith AW-2, Texaco Starplex 2, Shell Alvania #2, or equivalent). For extreme ambient conditions (less than 0° F and more than 150° F), a synthetic or specialty purpose grease may be considered. For specific recommendations, contact your closest Trane Sales/Service office. Look for accumulated dirt, damage to Clean as required coils, fans, motors, piping, and wiring and other obvious problems. See lubrication instruction on motor *When very dirty and high nameplate or on tag attached. If temperatures exist and for motor with motor has grease fitting and relief hp 10-150. Also for 12-24 hr service in plugs, remove and clean out any moderate dirt or moisture conditions. hardened grease. Add fresh grease at the fitting with a low pressure gun. Run the motor a few minutes to expel grease through the relief vent. Replace all plugs, fittings. Apply grease to the inlet and outlet For most ambient temperatures (0 to bearing grease zerks while the fan is 150° F), Use a high quality, all-purpose, operating. Stop application when Lithium/Lithium complex based, #2 EP grease is seen being purged through grease (Mobilith AW-2, Texaco the bearing seals. Once the purge Starplex 2, Shell Alvania #2, or equivalent). For extreme ambient level is determined, use the minimum amount of grease that is conditions (less than 0° F and more possible to reach purge (purge = than 150° F), a synthetic or specialty point at which grease is visually seen purpose grease may be considered. For specific recommendations, contact escaping from the bearing seals). your closest Trane Sales/Service office. See lubrication instruction on motor In severe, very dirty, high temp nameplate or on tag attached. If conditions, grease motors up to 7-1/2 motor has grease fitting and relief hp; In moderately dirty, moist 12-24 hr plugs, remove and clean out any service conditions, grease motors hardened grease. Add fresh grease 50-150 hp. In clean, dry 8-16 hr service at the fitting with a low pressure gun. conditions grease motors over 150 hp. Run the motor a few minutes to expel grease through the relief vent. Replace all plugs, fittings. 23 Maintenance Table 9 - Schedule Maintenance - Q Fan and Super Q II Fan (Continued) Interval Every two-three months Task Check bearing Inspect and clean V-belt drives, sheaves, and belts Inspect and clean inlet vanes Every six months Inspect the isolation base Inspect and clean wheel and housing Grease motor (moderate/clean service*) Every year Grease motor (moderate service*) Every two years Every three years 24 Procedure Be sure all setscrews and bolts are tight. Check for excessive noise, vibration, and temperature. Tighten screws and bolts as needed. Check for proper alignment, tension, and signs of belt wear. Belts must be tight enough to avoid squeal and slippage during operation. Clean sheaves and belts with a dry cloth. Do not apply belt dressing. Replace worn belts as needed. Inspect vanes for freedom of operation and wear Clean with dry cloth as needed. Inspect for freedom of movement and the bolts for tightness. Inspect springs for cracks and fatigue. Check rubber isolation for deterioration. Replace parts as needed. Check all bolts and screws on entire fan for tightness. Retighten to specifications in tables. Remove any dirt accumulation on the wheel or in the housing to prevent imbalance. Inspect for any accumulation of dirt on inlet cone. Clean as needed. See lubrication instruction on motor nameplate or on tag attached. If motor has grease fitting and relief plugs, remove and clean out any hardened grease. Add fresh grease at the fitting with a low pressure gun. Run the motor a few minutes to expel grease through the relief vent. Replace all plugs, fittings. See lubrication instruction on motor nameplate or on tag attached. If motor has grease fitting and relief plugs, remove and clean out any hardened grease. Add fresh grease at the fitting with a low pressure gun. Run the motor a few minutes to expel grease through the relief vent. Replace all plugs, fittings. See lubrication instruction on motor nameplate or on tag attached. If motor has grease fitting and relief plugs, remove and clean out any hardened grease. Add fresh grease at the fitting with a low pressure gun. Run the motor a few minutes to expel grease through the relief vent. Replace all plugs, fittings. Notes Slight squeal by belts at startup is normal. Overtension of belts will cause fan and motor bearing wear and shorten the life of the belt. Oil and grease must be kept away from belts and sheaves since they cause deterioration and belt slippage. The vanes have sleeve-type bearings that do not require lubrication. Keep oil, grease, chemicals and dirt away from isolators. Touching up paint on fans and accessories occasionally will prevent deterioration of metal and maintain fan performance. This is especially important on units having special coatings. In moderately dirty, moist 12-24 hr service conditions grease motors 10-40 hp. In clean, dry 8-16 hr service conditions, grease motors 50-150 hp. In moderately dirty, moist 12-24 hr service conditions grease motors up to 7-1/2 hp. QFNA-IOM-1 Bearing Service About Bearings The bearings for the Model Q Fans are carefully selected to match the maximum load and operating conditions of the fan. Following the instructions in this manual will minimize any bearing problem. All fans shipped with bearings pre- lubricated and installed. The grease lines are also filled at the factory. Since bearings may have to be adjusted or removed, the following general instructions and setscrew torques are provided. See Table 10. Sealmaster SFT, MSF, SF and MSFT Bearings See Figures 12 and 13. 1. Shaft must be clean and free from nicks and burrs. The bearing bore is ground for a sliding fit over the shaft. 2. Lubricate the shaft and make certain the setscrews are clear of the bore. 3. Slide bearing onto shaft - never hammer the ends of the inner race. Setscrews (2) should be toward end of shaft. If necessary to apply force use a brass bar against the inner race only to drift bearing into place. 4. Bolt flanged housing to support and check freedom of rotation. See Table 10 for torques. 5. Tighten self-locking cup point setscrews securely onto the shaft. See Table 10 for torques. Table 10 - Torques for Tightening Setscrews on Sealmaster SFT, MSFT, SF and MSF Bearings Bearing Bore SFT MSFT MSF SF Setscrew Hex Size Diameter Across Flats Recommended Torque Foot Lbs. 15-16 to 1-3/16 1-3/16 to 1-1/2 1-1/4 to 1-3/4 1-3/16 to 1-1/2 1-13/15 to 1-15//16 1-11/16 to 2 1-11/16 to 2 2-7/16 to 3-1/4 3-7/16 to 3-1/2 Figure 12—Sealmaster Bearing, SFT Series QFNA-IOM-1 1/4 1-13/16 to 2-7/16 2-1/2 to 2-15/16 5/16 1/8 5.5 5/32 10.5 3/8 3/16 19.0 7/16 7/32 29.0 1/2 1/4 42.0 Figure 13—Sealmaster Bearing, MSF Series 25 Bearing Service Figure 14—Link-Belt P-300 Bearing Link-Belt P-300 Bearings See Figure 14 1. Shaft must be clean and free of nicks, burrs and rust. If bearing is being replaced, be certain shaft is straight and round. 2. Lubricate the shaft and bearing bore. Be certain setscrews are clear of bore. 3. Slide bearing on shaft with setscrews facing toward drive. If it is necessary to tap or press unit on the shaft, use a hardwood block or soft metal bar against the end of the inner ring. Do not strike or exert pressure on housing or seals. 4. Bolt housing securely to support. See Table 11 for bolt torques. After visually checking alignment, tighten setscrews to the torque values given in Table 11. 5. Rotate shaft by hand to check freedom of rotation. Any condition of strain, irregular rotational torque, abnormal sound or vibration may be due to improper alignment, improper location, bent shaft, etc. Installation should be rechecked and corrections made as required. Note: After installing or readjusting bearings, wheel alignment and tip clearances must always be rechecked. Table 11—Torques for Tightening Setscrews on Link-Belt P300 Bearings Bearing Designation and Bore (Inches) P-327 1-11/16 P-331 1-15/16 P-335 2-3/16 P-349 2-7/16 P-343 2-11/16 P-347 2-15/16 P-355 3-7/16 P-359 3-11/16 26 Setscrew Diameter (Inches) 3/8 3/8 7/16 7/16 1/2 1/2 5/8 5/8 Recommended Torque Inch Lbs. Foot Lbs. 325 27 325 27 460 38 460 38 680 57 680 57 1350 113 1350 113 QFNA-IOM-1 Bearing Service Link-Belt Series 6800 Spherical Roller Bearing Pillow Blocks 1. Use jack screws in the dowel pin 6 holes to disassemble base and cap. Do not use a pry or wedge at the split time. 2. Bolt base to bearing supports, square with the shaft. Draw up base mounting bolts snugly but not to final tightness. 3. Shaft must be clean and free of burrs and nicks. Apply mixture of white lead and oil to shaft, outside of diameter and threads of tapered sleeve and face of lock nut. 4. Slide steel rings, bearing, adapter and accessory parts on the shaft in the correct order. See Figure 15. The bearing is to be set up as a fixed bearing on the drive 5. Set the bearing and sleeve snugly on the shaft at the position of the bearing support. The bearing is to be placed with the bearing face opposite the lock nut against the bearing housing shoulder. The lock nut is on the sheave side bearing. In placing this bearing, take into account that tightening correctly will move the bearing further up the tapered sleeve. Do not tighten lock nut beyond finger tight at this time. 6. The shaft with bearing assembly may be lowered into housing. Lower slowly and position bearings and seals to engage bearing housing base. If bearing outer rings become misaligned, do not force back into position instead, carefully work back by turning and sliding 7. Bearings must be mounted to achieve the required clearance removal. a. Measure the initial built-in bearing clearance across the top rollers and outer ring raceway as shown in Figure 16. A snug feel is recommended. It must be possible to remove the shim by pulling it straight out. b. Tighten the lock nut forcing the bearing up the tapered OD of the sleeve until the bearing measured clearance is reduced by the amount shown in Table 12. 8. The proper method of tightening is shown in Figures 17 and 18. Using a spanner wrench, tighten the lock nut until snug. Hold the adapter sleeve from turning until seated firmly. Using a brass bar and hammer, drive the face of the locknut as shown to relieve the thread pressure. Retighten the lock nut and repeat until the correct adjustment specified in Step 7 is obtained. Bend a tang of the lock washer down into one of the lock nut slots. Use the slot which is most nearly lined up with the tang. Insert “C” spacer in fixed bearing housing, on the lock nut side. 10.Lubricate before operation by packing the bearing full and filling the reservoir on both sides of the bearing up to the bottom of the shaft. Grease should be forced in one side of the bearing until it comes out the other side all the way around. Grease recommendations are given in the “Maintenance” section. See Table 9. 11.Apply non-hardening gasket compound to cap surfaces which contact the base. Tighten cap nuts or bolts securely. 12.With the mounting bolts snug, check alignment and freedom of rotation. The housing or shaft clearance with the seals is small and can be checked visually for uniformity all the way around. Align by shimming or shifting as necessary. Use large area shims to avoid distorting the housing and pinching the bearing. Finally, tighten mounting bolts securely. See Table 13 for torques. Table 12 - Bearing Clearance Reduction on Link-Belt 6800 Series Bearings Pillow Block Range Bore Size (Inches) 6823 - 6828 6829 - 6844 6845 - 6868 6869 - 6892 6893 - 68104 1-7/16 - 1-3/4 1-13/16 - 2-3/4 2-13/16 - 4-1/4 4-5/16 - 5-3/4 5-13/16 - 6-1/2 Reduction of Clearance (Inches) Min. Max. 0.0010 0.0015 0.0010 0.0020 0.0015 0.0025 0.0020 0.0030 0.0025 0.0035 9. QFNA-IOM-1 27 Bearing Service Figure 15—Link-Belt Series 6800 Spherical Roller Bearing Figure 16—Check Bearing Clearance Table 13—Recommended Cap Nut and Cap Bolt Tightening Torques for Link-Belt 6800 Series Bearings (Cast Iron Pillow Blocks) Pillow Block Range P-LB 6823 thru P-LB 6840 P-LB 6841 thru P-LB 6852 P-LB 6853 thru P-LB 6856 P-LB 6857 thru P-LB 6864 P-LB 6865 thru P-LB 6872 P-LB 6873 thru P-LB 68104 Figure 17—Tightening the Lock Nut 28 Bore Size (Inches) Torque Ft/Lb 1-7/16 - 2-1/2 2-9/16 - 3-1/4 3-5/16 - 3-1/2 3-9/16 - 4 4-1/16 - 4-1/2 4-9/16 - 6-1/2 45 - 50 90 -100 160 -180 90 - 100 160 - 180 400 - 440 Figure 18—Using a Brass Bar and Hammer to Relieve Thread Pressure QFNA-IOM-1 Troubleshooting Table 14, as shown below, can be used to diagnose apparent problems or failures in the fan. This table is intended as a diagnostic aid only. For detailed diagnostics and repair, contact your local Trane Service Company. Table 14 —Fan Troubleshooting Symptom Cause Components worn, misaligned, or loose Wheel unbalanced Excessive vibration or noise Over tensioned belts Misaligned drive (See Table in General Isolation system not functioning Maintenance section) properly Foreign material in fan housing Bearing defective, contaminated, or not lubricated properly Bent shaft First start after lubrication; grease Bearing is excessively hot has not fully redistributed Note: Bearings on high-speed Parts over lubricated Belts over tensioned fans can run 75° above Parts not lubricated properly ambient Misaligned bearing Motor is poorly positioned Worn or damaged belt Loose fan belt Worn sheaves Worn sheaves Misaligned belt Short belt life Grease or oil on belts Belts slipping Belts rubbing HP too high Low CFM QFNA-IOM-1 Fan speed above design Static pressure above design Leaks or obstruction in duct system Access door open RPM too low System resistance higher than design Variable inlet vanes partially closed Remedy Replace, re-align, or tighten parts. Align bearing screws, if needed. Loosen and Retighten bearing set screws. Balance Wheel Adjust belt tension Align drive Inspect and adjust isolators Clear housing Replace or lubricate bearing as needed Correct shaft alignment Clean surface of grease and purge Clean surface of grease and purge Adjust belt tension Apply lubricant. Check bearings for damage Correct alignment. Check shaft level Adjust tension Replace belt. Check sheave alignment Replace sheaves Realign drive with MVP sheave set at mean pitch diameter Realign drive with MVP sheave set at mean pitch diameter Check for leaky bearings. Clean belts and sheaves Adjust tension Remove obstruction or re-align drive for clearance Check for leaky bearings. Clean belts and sheaves Fix leaks and remove obstruction Close door Check fan RPM and adjust as needed Open vanes 29 Troubleshooting Vibration and Noise High CFM Most noise and vibration problems are caused by components being worn, misaligned, or loose. These conditions can usually be found by observation. The problem is solved by replacement, realignment or tightening of the parts involved. 1. System resistance below design Other Noise and Vibration Sources 1. Wheel unbalanced 2. Drive components unbalanced 3. Bearing defective, contaminated or not lubricated adequately 4. Set of “unmatched” belts in use 5. Foreign material in fan housing 2. RPM too high Overheated Bearing Bearings on high speed fans can run as high as 75 ° F above ambient. They may feel very warm with no problem being present. This is especially true immediately after lubrication when it is normal for bearings to run somewhat hot while they purge excess grease. High Temperatures Abnormally high temperatures can be caused by the following conditions: 6. Electrical hum from motor 7. Air velocity higher than design 8. Fan operating in surge 9. Isolation system not functioning properly 1. Overgreasing 2. Foreign material in bearing 3. Excessive belt tension 4. Poor alignment 10.Shaft bent 5. Bent shaft HP Too High 6. Damaged or worn bearing 1. Fan speed above design 7. Inadequate lubrication 2. Static pressure above design Low CFM 1. Leaks or obstructions in duct system 2. Access door open 3. RPM too low 4. System resistance higher than design 5. Variable inlet vanes partially closed 30 QFNA-IOM-1