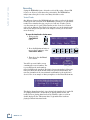
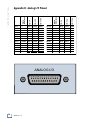
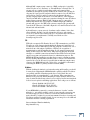
1
MDR24/96 Front Panel
HOURS
K
MINUTES
BARS
SECONDS
FRAMES
BEATS
TICKS
Operation Guide
Time Display
Current Time Display
The Current Time display shows the exact position of the MDR24/96’s
“playback head.” Current Time is displayed in SMPTE time
(HH:MM:SS:FRAMES).
To change the Current Time:
♦
Use the Transport PLAY, REWIND, FAST FWD or LOC buttons.
Locate Points and Looping
Locate points provide fast access to frequently used locations in your Project.
The MDR24/96 has two numbered Locates (two additional numbered Locates
are available when using the Remote 24 or Remote 48). Storing a Locate point
saves the Current Time (Transport position) to the Locate button. Recalling a
Locate causes the Transport to jump to the stored time.
To recall a Locate point:
♦
Press LOC 1 or LOC 2 to jump to that point.
LOC 1
LOC 2
To store numbered Locate points:
Locate points can be stored either on the fly or when stopped.
1. Press STORE. The store light will blink to indicate that the
MDR24/96 is ready to save a Locate point.
2. Press LOC 1 or LOC 2 when the Transport is at the
desired time; the store light will go out, indicating that
the point has been stored.
LOC 1
LOC 2
STORE
Locates 1 and 2 double as start and end points for looped playback. When
looping is enabled, playback cycles between the Loop Start and Loop End
points. The order of the Loop points does not matter. If Current Time is
outside the Loop points when playback starts, the transport jumps to the Loop
Start point; if it is between the Loop points, playback starts from Current Time.
To enable Looping:
1. Press LOOP 1-2 to enable looping.
2. Press PLAY to start loop playback.
LOOP
1–2
Locates 3 and 4 serve as punch-in and punch-out points when PUNCH is
selected from a remote control. Punch is an automatic recording feature that
switches a record-armed track (or tracks) into Record mode at a specified
punch-in point (LOC 3), and takes it out of Record at the specified punch-out
point (LOC 4). See “Auto Punch” on page 42 for more details.
Operation Guide
37
MDR 24/96
Recording
Saying the MDR24/96 is just a 24-track recorder is like saying a Ferrari 550
is just a car. It’s true, but it misses the point entirely. The MDR24/96 has
many features that place it above an ordinary 24-track recorder.
Virtual Tracks
One difference between the MDR24/96 and some other recorders is the virtual
tracks. Each of the 24 tracks on the MDR24/96 is actually one of eight virtual
tracks. These virtual tracks give you places to hold onto old takes, just in
case they turn out to be gems. Virtual tracks can also be used as a scratch
pad to try out different edits. First let’s learn how to access the virtual tracks
and later we will present you with a few examples on how you can use them
most effectively.
To access the virtual tracks selection menu:
1. First press the
TRACK/EDIT
button.
TRACK EDIT MENU
TRACK/
EDIT
P
2. Press the Right Arrow button to
move to the second page of the
TRACK EDIT MENU.
3. Then choose the Set Virtual
select button.
[1]->
UndoCut Copy Paste Redo
SELECT
SELECT
SELECT
SELECT
<- TRACK EDIT MENU
Mute
Set
Virtual
You will be presented with a screen
containing two rows of numbers. The
top row displays the track numbers
from 1-24 without the tens digit. The first 1-9 represents tracks 1-9, the next
0-9 represents tracks 10-19, and the final 0-4 represents tracks 20-24. The
next row of numbers is the current virtual track number for the track listed
above it. Here is an example of what you might see in the Virtual Track menu:
123456789012345678901234
111122222888888888888444
(bottom # = V-track)
<< >>
OK
This display shows that tracks 1-4 are playing back virtual track 1, tracks 5-9
are playing virtual track 2, tracks 10-21 are playing virtual track 8, and
tracks 22-24 are playing virtual track 4. By default the entire second row
should display all ones. This means that to begin with all the tracks are
playing back their first virtual track.
38
MDR 24/96
[2]
DEC
INC
It is often convenient to display the virtual track window while tracking so you are
always aware of which virtual track you are recording onto for any given track.
Track Mutes
The MDR24/96 allows you to mute the playback of any track. This can be useful to
mute certain tracks while editing without having to reach for your mixer board.
Also, if you have an automated mix set up on your digital mixer, you can mute
tracks from the MDR24/96 without disrupting the mixing console. Finally, when
editing instruments spanning multiple tracks such as a drum kit, it may benefit
you to listen to just a particular part of the drum set to fine tune your edit points.
With track mutes, you can easily mute everything but the desired tracks and edit
to your hearts content.
Operation Guide
4. Use the << and >> SELECT buttons to select a track
number from the top line; the selected track number will
appear as an “_” instead of its number. Now press the (–)
DEC / (+) INC buttons to change the virtual track on the
selected channels. This screen allows you to manually set
any track to any of its eight virtual tracks.
To mute a track:
1. First press the TRACK/EDIT
button.
2. Press the Right Arrow button
to move to the second page of
the TRACK EDIT MENU.
<- TRACK EDIT MENU
Mute
[2]
Set
Virtual
3. Press the Mute select button.
The dialog window will tell you to press the track arm buttons to toggle the mute
status on a track. If the Record Ready LED is lit while the mute screen is
displayed, the track will be muted, and if the Record Ready is not lit, the track will
play normally.
4. Use the Record Arm buttons to mute and unmute tracks. Press the OK
select button to leave the Track Mute menu.
The Record Ready LEDs change to their previous state, but any muted tracks will
remain muted until you return to the mute screen to change their status. The meters
continue to show playback on muted tracks, but the outputs will not pass audio.
Record Safe
Record Safe locks out all Record Ready and Master Record switches. Any tracks
that are armed become disarmed when Record Safe is activated. If the transport is
running in Master Record mode (whether actually recording or not), the record
operation is canceled.
You’ll find the REC SAFE button above the floppy disk drive.
Operation Guide
39
MDR 24/96
Auto Take
Sometimes you may want to record multiple passes, each on a different
Virtual Track. Instead of forcing you to manually change virtual takes
after each record pass, we have included the handy AUTO TAKE
button to automate this for you. With the AUTO TAKE button engaged,
the MDR24/96 will step through virtual tracks on each record pass for
all Record Ready tracks. For example, if you are recording vocals on track 12,
your first take may be on virtual track one. With the Auto Take button engaged,
the next time you press record, the virtual track on track 12 will be incremented to
virtual track 2. This will continue all the way through virtual track 8. If you press
record again, it will change back to virtual track 1 and continue the cycle again.
This is very handy with the LOOP button enabled to automatically record a section
of a song, and do eight passes on the eight different virtual tracks.
AUTO
TAKE
Monitoring
The Monitor Mode buttons determine what you hear from the MDR24/96 Tape
Outputs. The MDR24/96 offers several familiar monitoring modes to facilitate
rehearsal, tracking, and overdubbing.
All Input
All Input is used for rehearsal and level setting. When All Input is on, both armed
and unarmed tracks monitor their inputs, and the Auto Input setting has no effect.
To enable All Input:
♦
Press the ALL INPUT button. The LED above
the button lights when All Input is on.
ALL
INPUT
Auto Input
Auto Input is used for recording. Auto Input affects only tracks that are in Record
Ready (“armed”). Tracks that are not armed only monitor the playback of
previously recorded audio. All Input overrides Auto Input. To use Auto Input, All
Input must be turned off.
When Auto Input is On, armed tracks monitor their inputs in Stop, Fast Forward,
Rewind, and Record. In Play, you hear only what’s already recorded on the tracks.
This mode is used primarily for tracking and overdubbing, where you want to hear
what’s been previously recorded on the track before the punch-in and after the
punch-out. During the punch, you hear what is presently being recorded. Auto
Input On is the default mode when you power up the MDR24/96.
When Auto Input is Off, armed tracks always monitor their inputs. This mode is
used primarily for rehearsal and tracking, where you want to always hear what
you’re playing rather than what’s already recorded on that track.
To enable Auto Input:
♦
40
MDR 24/96
Press the AUTO INPUT button. The glowing
LED above the button indicates that it’s ON.
AUTO
INPUT
A professional analog recorder has meters that indicate 0 VU at a +4 dBu nominal
signal level. Generally you can record peaks 10 to 15 dB above that before
distortion becomes objectionable. This 10-15 dB range above the nominal level is
called “headroom”. The overload indicators on the MDR24/96 light when the
signal level reaches –1 dBFS.
On digital recorder meters, zero represents the full-scale digital signal level,
0 dBFS for short. 0 dBFS is the hottest signal that a digital device can handle,
with no headroom to spare. When a digital signal reaches 0 dBFS for more than a
sample or two, the resulting distortion is uglier than scraping your fingernails
across a chalkboard.
24TRACK /24BIT DIGITAL AUDIO HARD DISK RECORDER
1
OL
OL
OL
OL
OL
OL
OL
OL
OL
OL
OL
OL
OL
OL
OL
OL
OL
OL
OL
OL
OL
OL
2
4
2
4
2
4
2
4
2
4
2
4
2
4
2
4
2
4
2
4
2
4
2
4
2
4
2
4
2
4
2
4
2
4
2
4
2
4
2
4
2
4
2
4
7
7
7
7
7
7
7
7
7
7
7
7
7
7
7
7
7
7
7
7
7
7
7
10
15
10
15
10
15
10
15
10
15
10
15
10
15
10
15
10
15
10
15
10
15
10
15
10
15
10
15
10
15
10
15
10
15
10
15
10
15
10
15
10
15
10
15
10
15
20
25
20
25
20
25
20
25
20
25
20
25
20
25
20
25
20
25
20
25
20
25
20
25
20
25
20
25
20
25
20
25
20
25
20
25
20
25
20
25
20
25
20
25
20
25
30
35
40
30
35
40
30
35
40
30
35
40
30
35
40
30
35
40
30
35
40
30
35
40
30
35
40
30
35
40
30
35
40
30
35
40
30
35
40
30
35
40
30
35
40
30
35
40
30
35
40
30
35
40
30
35
40
30
35
40
30
35
40
30
35
40
30
35
40
50
50
50
50
50
50
50
50
50
50
50
50
50
50
50
50
50
50
50
50
50
50
50
2
3
4
5
6
7
8
9
10
11
12
13
14
15
16
17
18
19
20
21
22
Operation Guide
Metering and Setting Record Levels
OL
2
4
23
24
Remember, audio levels must NEVER reach 0 dBFS... never, ever, ever. Digital
clipping is an extremely nasty sound that could only pass for music if you
like what those crazy kids listen to over and over at all hours of the night
including weekdays.
To get the best sound from the MDR24/96:
1. Turn ALL INPUT on.
ALL
INPUT
2. Ask the talent to play or sing as loud as they will be performing during the
session. While watching the MDR24/96 meters, adjust the console’s tape
outputs so that the signal peaks cause the red overload indicators to come
on occasionally. Then, back off the tape output level slightly. This insures
the best fidelity and the widest dynamic range in the recorded signal and
leaves you a little headroom to accommodate the talent’s enthusiasm.
Keep the signal levels as high as possible without overload, because
recording at lower levels reduces resolution and dynamic range.
Nonetheless it is always better to be conservative and avoid the risk of
overload than to try squeezing the last ounce of dynamic range from the
signal.
3. Alternately, if you have a tone generator or a sound source with a constant
volume (you can hold down a key on a synth), turn All Input on and send
the tone to all 24 tracks of the console. Adjust the output levels to read
0 VU on analog consoles, or around –20 dBFS on digital consoles. If the
MDR24/96 meters read –15 to –20, you’re in good shape. This leaves
enough headroom for most popular music, but if you’re recording acoustic
music, jazz, classical, or narration, you may want to leave a little more.
When the talent starts to play you may have to make some final tweaks to
get everything just right.
Operation Guide
41
MDR 24/96
4. After adjusting the tape output levels for each console channel, follow
your console manufacturer’s instructions for setting the console tape
return levels.
With analog I/O, a +22 dBu signal at the
dBu
equivalent
MDR24/96 inputs and outputs corresponds to
+22 dBu
OL
0 dBFS inside the MDR24/96. So, if your
2
+20
4
+18
console has a nominal output level (0 VU) of
7
+15
+4 dBu, there is 18 dB of headroom before
10
+12
15
+7
you hit the maximum record level on the
20
+2
25
–3
MDR24/96. It also means that your console
30
–8
must be capable of putting out at least +22
35
–13
40
–18
dBu without distortion so the console doesn’t
50
–28 dBu
clip while the recorder is still within its
working range. Most professional consoles
can output +22 dBu without breaking a sweat
(like the Mackie Analog and Digital 8•Bus consoles). But beware that
semi-pro consoles often operate at a nominal output level of –10 dBV and
will run out of steam before reaching a level that can take advantage of the
recorder’s full resolution.
Auto Punch
The Auto Punch function automatically starts and stops recording on armed tracks
at preset punch-in and punch-out times, just as if you had pressed the appropriate
buttons. Auto Punch is frequently used in combination with the Loop (page 37)
and Auto Take (page 40) functions. This feature is only accessible from either the
Remote 24 or Remote 48.
Typically this feature is used when you want to re-record a portion of a track. By
setting up auto-punch points, you can be assured of punching in and out at the
same spots on every pass, protecting yourself from accidentally recording over a
good section of the track. By setting Loop points surrounding the Punch points,
you can continuously repeat a punch until you get it right or decide you need to
practice the part some more.
The Punch markers share duties as LOC 3 and LOC 4 points (page 37). While it’s
logical to set LOC 3 to the punch-in time and LOC 4 to the punch-out time,
recording always starts at the earliest of the two times, and stops at the later time.
In order to perform an automatic punch, PUNCH must be enabled from
the remote, the track on which you’re punching must be in record-ready,
and the recorder must be running in the Master Record mode. When in
the Punch mode, the MDR24/96 will actually record only between the
two Punch markers. Pressing the RECORD button when
outside the markers will have no effect other than arming for
PLAY
auto-punching. Within the Punch region, you can stop
recording by pressing either the STOP or PLAY button, and
you can use the RECORD + PLAY buttons to punch in and
out anywhere within the Punch region.
PUNCH
RECORD
Automatic punching can only be set up, enabled, and disabled from the remote
controllers. Once the punch-in and -out points are set, you can use the front panel
or remote controllers to control recording in the Punch mode. Punch must be
disengaged on the remote in order to manually control recording operations
outside of the Punch area.
42
MDR 24/96
Rehearse (only available on the remote control) is a tool that you can use to
determine if a punch-in at your chosen point will work, without committing a
recording pass to disk. In the Rehearse mode, upon entering Record (track
enabled and the Master Record button pressed), monitoring switches from
playback to input, just as in the Auto Input On monitor mode. The difference is
that no audio is recorded. This is a carry-over from the days of destructive punchins, when you might want to check to see if the punch will transition smoothly
before erasing the old track.
Some people may never use this function because it’s always possible to undo a
recording pass if you make a bad punch. After all, why risk losing a take when it
can be undone? But Rehearse is handy for setting auto-punch start and end points
without wearing out the talent or recording blank space.
Operation Guide
Rehearse
Rehearse mode can be accessed from a remote
controller by pressing the REHEARSE button.
REHEARSE
Footswitch Operation
The MDR24/96 can be set up to perform key functions simply by stepping on a
footswitch. Simply connect a normally open footswitch to the FOOT SWITCH
jack on the back of the MDR24/96. You can also connect a second footswitch
with a different function assignment to the Footswitch input of a Remote 24 or
Remote 48 Pro. The footswitch is extremely handy when you want to use your
hands for other tasks, like playing your instrument, working the console, or eating
pizza. Punching in and out is probably the most common use of the footswitch, but
it can do other tricks as well.
Punch: The Punch function is used to punch in and out of record on selected
tracks. Simply press the record arm buttons on the tracks you wish to punch
in on and start the MDR24/96 playing before the punch point. When you
reach the point that you want to begin recording, hit the footswitch. When
you are finished with the punch, hit the footswitch again. Recording stops
but playback continues.
When punching, the input monitoring mode is important. If Auto Input
Monitor is selected, you will hear track playback on the record-armed tracks
until you punch in. At that point you will begin to hear the incoming audio
being recorded. When you hit the footswitch again to punch out, you will
again hear the track playback. If you do not have Auto Input monitoring
selected, you will always hear the incoming audio on the record-ready tracks.
If you have All Input monitoring selected, you will not hear any track
playback at all; this is not normally used when punching.
One final word about punching: it is a good idea to plan ahead with your
punch and find a second or two of silence at which to punch in and out. This
will ensure that you have no audible glitches at the punch points.
Stop/Play: The Stop/Play footswitch function does just what it says—it
allows you to start and stop the transport with your foot. If the transport is
stopped, press the footswitch to start it. If the transport is playing, press the
footswitch to stop it. Rinse and repeat. It’s just that easy!
Cycle Cue: This function is not currently implemented on the MDR24/96.
New Cue: This function is not currently implemented on the MDR24/96.
Operation Guide
43
MDR 24/96
Solo (Remote Only): This choice is available for the Remote Footswitch but not for the
MDR24/96 Footswitch. Although you cannot solo a track on the MDR directly, it can be
soloed with a footswitch attached to a Remote 24. The footswitch solos the channel
displayed in the Track Number window on the Remote 24. The meters on the MDR24/96
will continue to display signal on all of the tracks with audio, but the MDR24/96 will output
audio from only the soloed track. Press the footswitch again with the same track selected
to disengage the solo function and to return the MDR24/96 to regular operation. You can
also select a different channel on the Remote 24 and press the footswitch to solo that
channel instead.
To change footswitch function for the MDR24/96 or a Mackie Remote:
1. Press the front panel SYSTEM button.
<- SYSTEM MENU
2. Press the Right Arrow button to move to
the second page.
[2]
Footswitch
MDR Remote Clock About
3. Now press either the Footswitch MDR or
the Footswitch Remote select button.
4. Use the << and >> select buttons to change the assignment of the selected footswitch.
Press the OK select button to choose a setting. The MDR 24/96 has four functions that
can be assigned to the footswitch; the remote adds a fifth.
Footswitch
OUTPUT
OUTPUT
OUTPUT
ANALOG I/O ANALOG I/O ANALOG I/O
TAPE IN/OUTS
44
MDR 24/96
INPUT
INPUT
INPUT
M
Delete Last
One way to save disk space is to use the DELETE LAST button after a bad
recording pass. One of the benefits of digital recording with the MDR24/96 is that
you can keep every take and decide later which one to use. But sometimes you
know right off that the last take will never see the light of day. In these instances
you can quickly reclaim disk space by deleting the last record pass. Keep in mind
that this command will delete audio from all tracks recorded on the last pass. If
the vocal was great but the guitar was junk, re-record the guitar but do not
perform the Delete Last Command; you don’t want to lose the vocal too.
To delete the last recording pass:
1. Press the
DELETE LAST
button.
DELETE LAST
2. “Purge audio files
created during the last
recording pass?” appears in
the display.
Also purge audio files
created during last
record pass?
Cancel No Yes
Operation Guide
Editing
Choose Yes to delete the pass and the audio files to reclaim disk space. This
is normally what you will choose. The track reverts back to any audio that
was previously recorded onto it.
Choose No to delete the take but to leave the audio file on the hard drive. The
take will no longer play but the audio file will remain on the hard drive. This
is useful if you want to back up every single take, even the bad ones. The
track reverts back to any audio that was previously recorded onto it.
Choose Cancel if you decide that you do not want to delete the last take.
3. If you chose Yes, you will see a readout describing the progress of the
delete function. When it reaches 100%, the Delete Last function is
finished, and the main project returns to the display.
Alternate method:
1. Press the TRACK/
EDIT button and
select Undo-Redo.
2. From the Undo-Redo
menu, select Undo.
TRACK/
EDIT
P
undo:Record Pass
redo:none
#:3 Undo Redo Exit
The History List
Number
Operation Guide
45
MDR 24/96
Track Edit
The TRACK/EDIT button gives you access to the set of non-destructive editing
tools on the MDR24/96. The MDR24/96 allows you to cut or copy a piece of
audio from any track and paste it onto any other track. You can, for example,
move a vocal from the first chorus of a song and paste it over a take in the
second chorus. You are also able to cut or copy from multiple tracks at once and
paste them onto a different group of tracks. If you need to replace the
background vocals from a chorus, you could copy from the multiple backing
tracks from the first chorus and paste them in the second. One final example to
whet your appetite: if you have a few different vocal takes on virtual tracks, you
can easily copy them from one virtual track to another to create a perfect
composite vocal take. Now that we have described the possibilities, let’s explain
how to do all this.
When audio data is cut or copied from a track it is placed on a virtual clipboard
where it is held until you decide to put it somewhere. Data will also be removed
from the clipboard when you replace the contents with something else. This
means that you can copy a guitar line from one track then, record a bass part,
drink some coffee, play your project a few thousand times, and finally decide to
paste the guitar line and everything will be perfect. It also means that if you are
not careful, you can accidentally lose audio. You might cut a bass drum kick, but
if you decide to then copy a vocal and forget to paste the bass drum first, the
bass drum will be replaced by the vocal on the clipboard. Since you cut the bass
drum from its original position, it will no longer be on the track and because you
did not paste it, it will be gone from the project. This is why it is always a good
idea to paste audio right after you cut it. But remember that editing on the
MDR24/96 is non-destructive so you can cut and copy all you like knowing that
your audio is safe and sound. When you perform edits, the MDR24/96 is not
actually moving the audio. Instead you are just reorganizing the order in which
the MDR24/96 plays the audio files. All editing commands are remembered in a
999-level history list so that every edit can be undone and redone until you are
satisfied (see Undo-Redo later in this manual).
To perform an edit you must tell the MDR24/96 three things: what type of an
edit you would like to perform, what tracks to perform the edit on, and the audio
range that you would like the edit to cover.
To perform an edit:
1. First press the
TRACK/EDIT
TRACK EDIT MENU
[1]->
button to enter the
TRACK EDIT
UndoMENU. Press
Cut Copy Paste Redo
either the Cut or
Copy select
buttons to enter a menu for placing audio data from a track onto the
clipboard. Press the Paste select button to enter a menu allowing you to
return clipboard data to an audio track. These buttons do not perform
the operation but take you to a specific menu for that command.
TRACK/
EDIT
P
2. You will now be in a menu for the specific operation
chosen. You may notice that the Record Ready lights
REC
REC
have all gone out, even if you had some tracks in Record
1
2
Ready mode. This is normal; the Record Ready lights
have many duties on the MDR24/96. In an edit menu,
they are used to choose which tracks to perform an edit to. Press the
REC (Record Ready) button on the track you wish to edit. If the red
Record Ready light for a track is lit, the edit will be performed on that
track. As mentioned previously, you can select multiple tracks
simultaneously to edit them all at once. Read on for more detailed
information about each edit type.
46
MDR 24/96
REC
3
SELECT
SELECT
SELECT
SELECT
4. Press the Edit select button to perform the operation.
There are five edit operations on the MDR24/96. Three are different ways to place
audio onto the clipboard, and two are different ways to return audio from the
clipboard to the selected track(s).
Operation Guide
3. Look at the screen and you will see a Start
START:00:02:17:12
time and End time (you will not see an End
END:00:02:20:04
(trackselect = record)
time if you have chosen Paste as the edit
Start End Cut Join
function). These numbers signify the time
range to perform the edit between. The
Start time is where you want the edit to
begin and the End time is where you want
the edit to end. First, enter the end time by
moving the transport to the desired position by using the transport
buttons. When you see the desired End time on the time display, press the
End select button. Now position the transport to the desired Start time
and press the Start select button.
Cut
Access the Cut command by first
START:00:02:17:12
pressing the TRACK/EDIT button,
END:00:02:20:04
then pressing the Cut select button,
(trackselect = record)
and then choosing Cut when you are
ready to perform the operation. Cut
Start End Cut Join
removes the audio between the Start
and End points on the selected
tracks and places it onto the clipboard. In its place on the original track will be
blank space, silence. Use the Cut command if you want to remove a section from a
track because you don’t like it or because you want to move it someplace else. Cut
should be used if you would like everything else on the track to remain in the same
position.
Before Cut Audio B:
Audio B
Source Track
Clipboard
Source Track
Audio A
After Cut Audio B:
Audio C
Audi o A
Clipboard
Audio C
Audio B
Join
Access the Join command by first pressing TRACK/EDIT, then pressing the Cut
select button, and then choosing Join when you are ready to perform the operation.
Join is similar to Cut in that it removes the selected audio from the track and
places it onto the clipboard. The difference is that a blank space is not left behind.
Instead, any data on the selected tracks following the edit selection will be slid
back in time to join with the audio preceding the edit selection. This is analogous
to removing a section of analog tape and splicing the ends back together; the cut
section is thrown out and the remaining tape will now reach the play head earlier
in time. The difference is that this can be done with just the selected tracks as
opposed to all 24 tracks as is the case with analog tape. The Join command is
useful for removing a section of silence from a live set or to fix phasing problems
between two microphones on the same source by removing a very small amount at
the beginning of one of the tracks.
Before Join Audio B:
Source Track
Audio A
Audio B
After Join Audio B:
Source Track
Clipboard
Audio C
Audio A
Audio C
Clipboard
Audio D
Audio B
Operation Guide
47
MDR 24/96
Copy
Access the Copy command by first
START:00:02:17:12
pressing TRACK/EDIT, then pressing
END:00:02:20:04
the Copy select button, and then
(trackselect = record)
choosing Copy when you are ready to
perform the operation. The copy
Start End Cancel Copy
command places the selected audio
onto the clipboard but it does not
remove it from the original tracks; these are unaffected by the copy function.
Copying audio is often used to replace bad sections of audio with a good section
that came before it. For example, if a singer nailed the take for the first chorus but
didn’t have the required energy for the second, you can then easily copy her first
chorus and paste it into the second.
Before Copy Audio B:
Source Track
Audio A
Audio B
After Copy Audio B:
Source Track
Clipboard
Audio C
Audio A
Audio B
Clipboard
Audio C
Audio B
Paste
Access the Paste command by first
START:00:02:17:12
pressing TRACK/EDIT, then pressing
the Paste select button, and then
(trackselect = record)
choosing Paste when you are ready to
Start
Paste Insert
perform the operation. The Paste
command copies the contents of the
Clipboard onto the selected audio track. This replaces any audio on the track with
the audio on the clipboard. In the Paste Menu you only specify the Start point, not
the end point. The length of audio on the clipboard determines the end point. This
means that you must be sure that the audio on the clipboard is not longer than you
think; if it is it may replace something that it shouldn’t. But, if the selection on the
clipboard has a section with no information where nothing was recorded into the
original track, then the section being pasted over will not be replaced.
Before Paste Audio B:
Source Track
Audio D
Audio E
After Paste Audio B:
Source Track
Clipboard
Audio F
Audio B
Audio D
Audio B
Clipboard
Audio F
Audio B
The MDR24/96 pastes multiple tracks based on the lowest track arm light that is
lit when in the Paste Menu. It remembers the arrangement of tracks on the
clipboard and will paste them accordingly. If we copy audio from tracks 12, 15, 16,
and 17 and paste them starting on track 12, the MDR24/96 will paste the tracks
in the same tracks they were copied from. If we instead paste these with the track
1 record ready light lit, the tracks will be pasted onto tracks 1, 4, 5 and 6. If
multiple track arm lights are illuminated when pasting, the tracks will be pasted
starting on the lowest one; the rest of the record ready lights are irrelevant. If a
single track is pasted with multiple lights illuminated, the same will be true. The
track will only be pasted on the lowest track, nothing will happen to the rest of
the armed tracks.
48
MDR 24/96
Access the Paste command by first
START:00:02:17:12
pressing TRACK/EDIT, then pressing
the Paste select button, and then
(trackselect = record)
choosing Insert when you are ready
Start
Paste Insert
to perform the operation. This editing
function is another digital emulation
of analog tape editing. When you perform an Insert, the data on the clipboard is
placed onto the track specified. Instead of replacing existing data as would happen
with the Paste function, audio is moved to make room for the clipboard contents.
This is similar to analog tape editing: you could cut the tape in two pieces, insert
the piece of tape you wish to add between the two ends, and tape all three
together. The previous data will be shifted later in time to make room for the new
audio. Again, with the MDR24/96 you can perform an Insert onto just the selected
tracks instead of all of them. Insert can be useful when you need to increase the
length of a verse by copying the exiting portion and inserting it again to double the
length. It can also be useful to insert some silence at the beginning of a track.
Before Insert Audio B:
Audio D
Operation Guide
Insert
After Insert Audio B:
Source Track
Clipboard
Audio E
Audio B
Source Track
Audi o D
Audio B
Clipboard
Audio E
Audio B
Undo/Redo
The Undo/Redo operation allows you to revert to any stage in your editing process.
You can experiment with different edits and then compare the results with the
original to decide if you want to keep an edit or not. You can also use the UndoRedo to correct a bad recording pass. The MDR24/96 keeps a record of the last
999 commands you performed on the current project since the last time the project
was opened. These are stored in what is called a History List. Think of the History
List as a record of every command executed from the beginning of the session to
the present state of the MDR24/96. This means that you can perform 999 edits,
and undo back to the very beginning of the editing session. Because you can redo
edits as well, you can go back and forth until you are satisfied. The MDR24/96
does not remember the History list forever. If you open a new session you must
either save the current state of the MDR24/96 or choose not to save, thus reverting
the project to the last saved state. When you open the project again, the history list
will be cleared. If you turn off the MDR, the history list will also be forgotten.
To go to the Undo-Redo menu:
1. First press the
TRACK/EDIT
button.
TRACK EDIT MENU
TRACK/
EDIT
2. Press the UndoRedo select button.
P
[1]->
UndoCut Copy Paste Redo
You will now be in the Undo-Redo menu. On the top line of the display, you will see
a listing of the command or function that can be undone listed after the word
Undo. On the second line you will see the command or edit that can be redone
listed after the word Redo. You might see the words Record Pass, Cut, or Paste
listed to name a few. The bottom left corner of the screen shows which History
Operation Guide
49
MDR 24/96
List item number you are
currently on. As you undo or redo
items you will see this number
decrease or increase. Keep note of
this number when you find
something you like or write it
down before you perform a series
of edits so that you can quickly
navigate to this history point
again.
Undo Current
Command
Redo Prior
Command
undo:Paste
redo:Copy
#:32 Undo Redo Exit
The History List
Number
3. Press the Undo select button to undo the command listed. This will reduce
the history list number by one.
-or3. Press the Redo select button to redo the command listed. This will
increase the history list number by one.
If no items can be undone, None will be displayed as the undo command. Pressing
the Undo select button will have no effect. Similarly, if no items can be redone, None
will be displayed as the redo command. Pressing Redo will have no effect as well.
50
MDR 24/96
The following are examples of specific applications of the MDR24/96 editing
commands. These illustrate how the commands can be effectively used. Use these
as jumping off points and apply these techniques to other situations. We will not
describe every button to press; refer to the above sections for details.
Replacing a Multiple Track Chorus
In this example, we would like to move a copy of the first chorus and replace the
second chorus with it. What makes it seem tricky is that we need to move the
Lead Vocal, as well as three tracks of background vocals. The MDR24/96 can
handle this task easily.
Navigate to the Copy Menu by pressing the Copy button on the first page of the
Track/Edit Menu. Press the REC (Record Ready) buttons on the tracks containing
the vocals, in this example press REC on track 12 for the lead vocal, and tracks
15, 16, and 17, which contain the backup singers. Use the transport and the End
and Start buttons to mark the ending and beginning of the chorus you wish to
copy. Be sure that the section is identical in length to the chorus you wish to
replace. If the selection you copy is too long, it may replace the beginning of the
vocals following the chorus, which would be undesirable. When you have identified
the start and end points, press the Copy select button and the contents of the four
selected tracks are placed onto the clipboard. Now use the transport to find the
spot just before the second chorus where you would like to paste the clipboard.
Operation Guide
Editing Examples
Go to the Paste Menu and press the Start select button to mark the current
locator position as the point you would like to start the paste. Be sure that the
track 12 Record Ready light is lit; this tells the MDR24/96 that track 12 is the
first track we wish to paste onto. Since we copied multiple tracks, the MDR24/96
will paste the first copied track onto track 12, and the rest will be in the proper
order on the correct tracks. Press the Paste select button. The contents of the
clipboard will be placed on tracks 12, 15, 16, and 17, replacing the bad take of the
second chorus with the good take from the first. You may need to fine-tune your
placement by undoing this operation and changing the location with the transport
controls slightly to place it at the exact point. If so, press the Undo/Redo select
button from the Track/Edit Menu, and then choose Undo. This will undo the paste.
Adjust the locator position, go to the Paste Menu to mark the Start point, and
choose Paste again. Repeat this until the chorus is placed perfectly.
Deleting a Section of Audio
The MDR24/96 has no edit command to simply delete a section of audio. This is
because this can easily be done by simply cutting the section, and not pasting it
anywhere. It won’t be permanently deleted unless you later Purge Audio and the
MDR24/96 determines that the audio file is not in use anywhere else. At that point
the audio will be permanently removed.
Find the section you wish to delete and Press the TRACK/EDIT button and then
the Cut select button. Press the REC (Record Ready) button on the track
containing the audio you wish to delete. Use the transport and the End and Start
select buttons to mark the ending and beginning of the section you wish to delete.
Choose Cut when you are ready to delete the section. Now, go about the rest of
your editing without pasting the audio. When you cut or copy the next section of
audio, the previous contents of the clipboard will be removed and essentially
deleted.
If you wish to permanently delete this file, press the Purge Audio select button
found on the second page of the Project menu. If no part of this file appears
elsewhere in your project, it will be purged, permanently removing it from your
hard drive (see “Purge Audio” on page 34).
Operation Guide
51
MDR 24/96
Making a Vocal Comp
When recording vocals, it is often necessary to record multiple takes and combine
them into a perfect vocal composite or comp. This can easily be done with the
MDR24/96 virtual tracks. When recording, use the Auto Take function to record
seven good vocal takes on the first seven virtual tracks of your vocal track. Do
this by pressing the AUTO TAKE button. Let’s record the vocal on track 11;
record a take, return to the beginning and record again. The Auto Take function
will increment track 11 to the second virtual track. Repeat this until you have
seven good takes. If along the way you have a take that you know is not a keeper,
press the DELETE LAST button to remove it from the hard drive and press
RECORD and PLAY buttons to record the virtual track again. When you perform
the Delete Last function in Auto Take mode, the MDR24/96 realizes that the last
take was thrown out and will not increment to the next virtual track until the
current virtual track is filled with an acceptable take. When all seven are finished,
press the AUTO TAKE button again to turn the function off.
We must now edit the seven virtual tracks into one master comp. We will place the
comp on Virtual Track 8. We will not cut any data from the first seven virtual
tracks; we will only copy it. This way, our first seven virtual tracks will remain
intact as we recorded them, in case we ever need them again. We must first listen
to all seven virtual tracks to determine which are our keepers. To begin, press the
TRACK/EDIT button, then press the Virtual Track select button. Listen through
all seven takes of track 11 by manually changing the virtual track for the vocal.
For this example, we will do a simple comp, we will use the first verse from virtual
track 2 and the first chorus from virtual track 7. Select virtual track 2 and leave
this menu.
Now choose Copy in the Track/Edit menu. Press the REC (Record Ready) button
on track 11 to tell the MDR24/96 that we wish to edit this track. Find a blank
space after the first verse and mark this as the out point of our edit by selecting
End. Now use the transport to find a blank spot just before the beginning of the
first verse and mark this as the Start point. Now press the Copy select button. We
have now copied the first verse to the clipboard. Return to the Virtual Tracks
menu and change the virtual track for track 11 to virtual track 8, our comp track.
Navigate back to the Paste menu. Be sure the track 11 Record Ready light is still
lit. Because we have not advanced the transport since we last marked the start
point for the copy, the locator will read the exact same point where we want to
perform the paste. Press the Start button to mark this as the paste point and
press Paste. Our first verse has now been copied from the source track and pasted
on the comp track. We can now copy the chorus in the same way. Change the
virtual track to number 7, the source track for our first chorus. Go to the Copy
menu, select track 11, mark the end point and then the start point. Change the
virtual track back to number 8, go to the Paste menu, select track 11, mark the
start point, which again should be exactly where we want it already, and press
Paste select button. We have now successfully created a vocal comp.
The key to this example is that we marked the End point of the copy first, and the
Start point second. After we mark the start point, the transport is already at the
exact position we want to start the paste. So if we simply do not change the
transport, we can perform the paste on whichever track we wish, on whichever
virtual track we wish, without moving in time whatsoever. This is how you can
move a track, or section of a track, from one track to another. This is why in most
situations it is a good idea to mark the end point of a copy or cut first, and the
start point second.
52
MDR 24/96
The MDR24/96 allows you
to transfer a file to your
computer for editing, and
then transfer it back to the
project on the MDR24/96
for final mixdown. Set up
the MDR and your computer
as described in “Appendix F: Networking (FTP) Setup.” Run the FTP server on the
MDR24/96 and use the FTP Client on your computer to locate the files on the
MDR24/96 that you wish to edit. There is a Master projects folder that holds all of
the projects and inside will be a folder for each project. Inside any particular
project folder will be one and possibly more Audio Files folders where the
individual audio files are held. The MDR24/96 names the files based on the track
they were recorded onto and then sequentially adds a take number for each
recording pass made on the track. For example, the second recording pass on
track 24 will be called Track24_tk2.wav. Use the FTP Client to transfer the
desired files to your computer. It is a good idea to backup a copy of these files
before you begin to edit them because you will be doing destructive operations.
Open the files in your audio editor of choice.
MDR 24/96
24TRACK /24BIT DIGITAL AUDIO HARD DISK RECORDER
OL
OL
2
4
OL
2
4
7
OL
2
4
7
OL
2
4
7
OL
2
4
7
OL
2
4
7
OL
2
4
7
OL
2
4
7
OL
2
4
7
OL
2
4
7
OL
2
4
7
OL
2
4
7
OL
2
4
7
OL
2
4
7
OL
2
4
7
OL
2
4
7
OL
2
4
7
OL
2
4
7
OL
2
4
7
OL
2
4
7
OL
2
4
7
HOURS
OL
2
4
7
2
4
7
44.1k
7
10
15
10
15
10
15
10
15
10
15
10
15
10
15
10
15
10
15
10
15
10
15
10
15
10
15
10
15
10
15
10
15
10
15
10
15
10
15
10
15
10
15
10
15
10
15
20
25
20
25
20
25
20
25
20
25
20
25
20
25
20
25
20
25
20
25
20
25
20
25
20
25
20
25
20
25
20
25
20
25
20
25
20
25
20
25
20
25
20
25
20
25
30
35
40
30
35
40
30
35
40
30
35
40
30
35
40
30
35
40
30
35
40
30
35
40
30
35
40
30
35
40
30
35
40
30
35
40
30
35
40
30
35
40
30
35
40
30
35
40
30
35
40
30
35
40
30
35
40
30
35
40
30
35
40
30
35
40
30
35
40
50
50
50
50
50
50
50
50
50
50
50
50
50
50
50
50
50
50
50
50
50
50
50
VARI
ERROR
1
2
3
4
5
6
7
8
9
10
11
12
13
14
15
16
17
18
19
20
21
22
23
24
REC
REC
REC
REC
REC
REC
REC
REC
REC
REC
REC
REC
REC
REC
REC
REC
REC
REC
REC
REC
REC
REC
REC
REC
1
2
3
4
5
6
7
8
9
10
11
12
13
14
15
16
17
18
19
20
21
22
23
24
LOC 1
LOC 2
STORE
LOOP
1–2
REC
SAFE
ALL
INPUT
AUTO
INPUT
AUTO
TAKE
T-CODE
CHASE
48k
TC
CLOCK
ON
SECONDS
FRAMES
BEATS
BARS
TICKS
PROJECT: Little love
PLAYLIST: Playlist 1
DRIVE: C:Internal
AVAIL: 01:35:00
SELECT
POWER
HIGH RESOLUTION AUDIO
44.1/48/96K SAMPLE RATES
MINUTES
96k
16 BIT 24 BIT
DELETE LAST
TRACK/
EDIT
REWIND
SELECT
PROJECT BACKUP DISK UTIL SYSTEM
FAST FWD
SELECT
SELECT
STOP
DIGI-I/O
PLAY
SYNC
DEC
INC
RECORD
Operation Guide
Editing on a Computer
First, let’s say a few words about edits that work and those that don’t. The edited
files will be transferred back to the MDR24/96 and will replace the corresponding
unedited versions. This means that they will start at the exact same point and
must not change length in order for the files to stay in sync. You may be tempted to
delete some noise before a vocal; do not do this. Instead you could replace this
noise with silence or lower the volume of the noise, but you should not change the
length of the file. Feel free to perform any other operations: compress a bass, EQ a
guitar, distort a vocal. All of these will yield great results.
Once the files are edited to your liking, save them under the same name (this is
why we backed them up earlier). Use the FTP Client to transfer them back to the
MDR24/96. Find the audio files folder containing the old versions of the files you
have just edited. Using the FTP Client, delete these versions on the MDR 24/96
and then transfer the edited versions into the folder. When you next open this
project, the new files will have replaced the old ones.
Disk Management
Formatting Drives
Formatting a drive erases the drive contents and prepares the file system for use
with the MDR24/96. All media must be formatted before it can be used with the
MDR24/96. Normally you’ll format media with the MDR24/96, but you can format
backup media on another system. Only media formatted by the MDR24/96 can be
used for recording and playback. Mackie Media PROJECT disks use the FAT16 file
system, and Mackie Media M•90 drives use the FAT32 file system.
The MDR24/96 only allows you to format an External drive. This is for safety,
since the recorder’s operating system resides on the Internal drive, as well as any
Project files you may have created. Should you feel the need to reformat the
Internal drive, please contact Mackie Technical Support first.
Mackie Media M•90 drives come pre-formatted and ready to use, as do Mackie
Media PROJECT disks (be sure to buy IBM formatted ORB disks). However, offthe-shelf UDMA IDE drives from the computer store do not come preformatted. If
you decide to buy your own drives and install them into Mackie Media Trays, then
you will need to format them, either on the MDR24/96 or off line. You can format
PROJECT disks with any PC that has Windows 95, 98, 98 SE, NT 4.0, Millenium,
Operation Guide
53
MDR 24/96
or 2000 on it, or with any Mac that has File Exchange or PC Exchange installed
(Mac OS 7 or later). You can format your own UDMA IDE drives with any PC that
has Windows 98 SE, Millenium, or 2000 on it, or with any Mac that has OS 10
installed.
Mackie Media drives can also be read by any system that can Format them. So, for
example, you can insert a Mackie Media PROJECT disk into your Macintosh SCSI
or IDE ORB drive and copy your Projects’ Recorded (WAV) and Rendered (WAV or
AIFF) files directly onto your Mac’s hard drive.
To format and verify media performance from the MDR24/96:
1. Press the DISK UTIL button.
2. Now select Format. The LCD
displays a message asking
you to verify the drive speed
for recording and playback.
DISK UTILITY MENU
Mount
Format Verify
3. Select OK. When the format operation has completed, another message
appears asking you to verify the drive speed for recording and playback.
4. If a UDMA drive is installed, select OK. After the performance verification
is completed, select Continue. If a Mackie Media PROJECT drive is
installed, select Cancel; they are too slow to be used for recording and
playback.
5. Press DISK UTIL to exit.
Verify Drive Performance
Verify Drive Performance tests the read/write speed and overall transfer rate of
the external drive under simulated worst-case scenarios to determine whether it
can sustain 24 tracks of recording and playback. Although any IDE drive can be
used for backup, only UDMA IDE drives that pass the performance verification
test can be used for recording and playback.
When a drive passes the performance verification test, it is designated as a realtime drive. Formatting erases this designation, so each time you Format a
real-time drive you must re-run the test. If a drive fails the test, that drive can be
used for backup, but not recording. Drives tagged for backup-only service will be
designated as External* (with the asterisk) in the front panel menus.
After a Format operation, the MDR24/96 automatically prompts you to run the
performance verification test. The test should be run only on UDMA IDE drives.
Don’t run the test on Mackie Media PROJECT drives – the cows will come home
before the test finishes.
54
MDR 24/96
1. Press the DISK UTIL button. If the Active Drive is the Internal drive,
then select Set.
2. From the Set Active Drive menu, Select External, then select OK.
3. Select Verify. When the message appears asking you to confirm the
operation, select OK. After a couple of minutes, the result of the test
will be reported in the front panel display.
4. After the performance verification is completed, select Continue.
Mount/Refresh Drives
DISK UTILITY MENU
The Mount/Refresh drives command
updates the MDR24/96 Project file
Mount Format Verify
lists to reflect the current status of
both the internal and external drives.
Use this command to mount a new
Mackie Media PROJECT disk, or to view the size of files in a Project file list.
Operation Guide
To Verify the Performance of external media:
To Mount drives:
1. Press the DISK UTIL button. Select Mount.
2. Press the DISK UTIL button again to exit after the mounting operation
is complete.
Operation Guide
55
MDR 24/96
Appendix A: Troubleshooting and Service
Additional information and troubleshooting tips can be found in the HDR24/96
Technical Reference Guide. Technical support is available by contacting your
Mackie dealer, calling Mackie Designs at (800) 258-6883 (8:00 AM to 5:00 PM
Pacific Time), or visiting Mackie’s website at www.mackie.com.
Please read the included warranty information, then complete and return the
included Warranty Registration card. You can also register online at www.mackie.com.
Appendix B: Specifications
Physical
Dimensions:
Shipping Weight:
Rack Space Height:
7" x 19" x 13.25" (17.8 cm x 48.3 cm x 33.7 cm)
35.1 lb. (15.9 kg)
4 RU (Rack Units)
Electrical
Operating Voltage:
100/120 Vac & 220/240 Vac, 50/60Hz
Power Consumption: 50W, max.
Motherboard/CPU
CPU:
Internal RAM:
CPU I/O
Networking:
MIDI:
Accessory Slots:
Intel Celeron 433 MHz w/ 128k internal L2 cache
128 MB SDRAM
100 Base-T Ethernet, CAT-5 w/ RJ-45
MIDI In/Out, 5-pin DIN through 15-pin D-sub adapter
PCI (x2) for future expansion
Hard Drive
Drive Size:
Recording Capacity:
20.4 MB UDMA IDE Standard
Greater than 90 minutes @ 24 tracks / 24-bit / 48kHz
(Internal & Mackie Media M•90)
Supported Drive Sizes: Up to 32 GB
Analog (with AIO•8 cards)
Frequency Response:
Dynamic Range:
Conversion:
Reference Level:
< ± 0.25 dB, 5 Hz – 22 kHz.
101 dB
24-bit, 128x oversampling
0 dBFS = +22 dBm
I/O Options
AIO•8 Analog
DIO•8 TDIF & ADAT Optical
OPT•8 ADAT optical
OPT•24 ADAT optical
PDI•8 AES/EBU (w/ input sample rate conversion)
Synchronization
56
Time Code Frame Rates: 24, 25, 29.97, 29.97 Drop, 30, 30 Drop
Time Code Formats:
SMPTE In or SMPTE Out on 1/4" TRS jack
MTC In and Out on DB9 MIDI connector
SMPTE Levels:
+4 dBu, –10 dBV (default), software selectable
Sample Rates:
44.1 kHz / 48 kHz / 96 kHz (w/ PDI•8 card)
External Clock Rates:
43.6 kHz to 50.6 kHz @ 48 kHz setting
40.1 kHz to 48.9 kHz @ 44.1 kHz setting
Word Clock Input:
TTL, 2-5 Vp-p, 75 Ohms terminated, 3.3k Ohms (bridging)
Word Clock Output:
CMOS, 0-5 Vp-p, <30 Ohms
MDR 24/96
You may be wondering about the two disks included with the MDR24/96? These
disks are installation disks for the MDR24/96 software. If you ever have a
problem, Mackie Digital Tech Support may advise you to reinstall the operating
system. This will not delete any projects on either drive, but it is always a good
idea to back up any important projects before doing a reinstallation of the
operating system. You should notice that the MDR24/96 OS fits on just two floppy
disks! This small size is an indication of the efficiency of the operating system and
is one reason why the MDR24/96 runs so smoothly.
Mackie may release updated versions of the operating system on our website:
www.mackie.com. The file can easily be downloaded from the MDR24/96 section
of the site. Be sure to follow the instructions listed to correctly make the floppy
disks. We get many calls to our tech support complaining of bad installations that
are caused by the user not making the disks correctly.
Operation Guide
Appendix C: Upgrading the System Software
Once you have the most recent version of the installer disks, you are ready to
reinstall or update the operating system. Be sure everything important is backed
up and power off the MDR24/96.
To upgrade system software:
1. Insert the first disk into the floppy drive and
turn on the MDR24/96.
You will see the display telling you that it is
“Loading, Please Wait…” It then reads from the floppy drive; this is indicated
by the green light on the front of the drive. The display then flashes a screen
that lists the installer and
the version number, and then
quickly changes over to a
screen saying “Loading disk
Loading disk image One,
Image One, Please Wait…”
Please wait...
When disk image one is
loaded, it will ask you to
“Please insert disk 2.”
2. Eject the first disk, insert the second, and press the Continue select
button. It then loads the second disk image. When this is finished, it will
display “This will install MDR ___ Build ___. Are you sure?”
The blanks display the version number and the build number. Each version
may have several builds associated with it. A new build may make some small
changes or add some new features, but it is not a full-fledged new version.
3. Choose OK to install the software or Cancel to quit. If you choose Cancel
you can simply power cycle the MDR24/96 and everything will be as it was
before. After you choose OK, it will quickly expand all the files and tell you
that the installation was successful.
4. Press the OK button, eject the disk, turn off the MDR24/96, and after a
few seconds, turn it back on. It will boot with the new OS successfully
installed.
Operation Guide
57
Pin 14
Pin 15
Pin 16
Pin 17
Pin 18
Pin 19
Pin 20
Pin 21
Pin 22
Pin 23
Pin 24
Pin 25
I/O 17-24
Ch24
Ch24
Ch23
Ch22
Ch22
Ch21
Ch20
Ch20
Ch19
Ch18
Ch18
Ch17
I/O 9-16
Ch16
Ch16
Ch15
Ch14
Ch14
Ch13
Ch12
Ch12
Ch11
Ch10
Ch10
Ch 9
I/O 1-8
Ch 8
Ch 8
Ch 7
Ch 6
Ch 6
Ch 5
Ch 4
Ch 4
Ch 3
Ch 2
Ch 2
Ch 1
Signal
Description
I/O 17-24
+
shield
–
+
shield
–
+
shield
–
+
shield
–
N/C
I/O 9-16
Pin 1
Pin 2
Pin 3
Pin 4
Pin 5
Pin 6
Pin 7
Pin 8
Pin 9
Pin 10
Pin 11
Pin 12
Pin 13
I/O 1-8
Signal
Description
MDR 24/96
Appendix D: Analog I/O Pinout
–
+
shield
–
+
shield
–
+
shield
–
+
shield
Ch 8
Ch 7
Ch 7
Ch 6
Ch 5
Ch 5
Ch 4
Ch 3
Ch 3
Ch 2
Ch 1
Ch 1
Ch16
Ch15
Ch15
Ch14
Ch13
Ch13
Ch12
Ch11
Ch11
Ch10
Ch 9
Ch 9
Ch24
Ch23
Ch23
Ch22
Ch21
Ch21
Ch20
Ch19
Ch19
Ch18
Ch17
Ch17
ANALOG I/O
13 12 11 10 9
8
7 6
5
4
3
2
25 24 23 22 21 20 19 18 17 16 15 14
58
MDR 24/96
1
Analog and Digital Multitrack Cables
The following companies supply analog and digital multitrack cables for use with
the MDR24/96 I/O cards:
Horizon Music, Inc.
P.O. Box 1988, Cape Girardeau MO 63702-1988
Tel: (800) 255-9822; Fax: (800) 455-3460
http://www.horizonmusic.com
AIO•8 Analog Interface Cables
HDA8 Series
DB25 to [specify connector]
Connector options:
8 male XLR, 8 female XLR, or 8 1/4” TRS
Standard lengths:
5, 10, 15, 20, 25 feet
Operation Guide
Appendix E: Compatible Cables
DIO•8 TDIF Interface Cables
TDIF Series
DB25 to DB25
Standard lengths:
5, 10, 15 feet
PDI•8 AES/EBU Interface Cables
HD44 Series
DB25 to [specify connector]
Connector options:
4 male + 4 female XLR, or DB25
Standard lengths:
5, 10, 15, 20, 25 feet
Hosa Technology, Inc.
6920 Hermosa Circle, Buena Park CA 90620
Tel: (714) 736-9270; Fax (714) 522-4540
http://www.hosatech.com
AIO•8 Analog Interface Cables
DTP Series
DB25 to 8 1/4“ TRS
DTF Series
DB25 to 8 female XLR’s
DTM Series
DB25 to 8 male XLR’s
Standard lengths:
3, 4, 5, 7 meters
DIO•8 TDIF Interface Cables
DBK Series
DB25 to DB25
Standard lengths:
3, 15 feet
OPT•8 / DIO•8 ADAT Optical Interface Cables
OPT Series
Standard ADAT Optical cables
OPM Series
Jacketed ADAT Optical cables w/ metal headshell
OPT lengths:
2, 3, 6, 10, 13, 17, 30, 50 feet
OPM lengths:
3, 5, 10, 15, 20, 30, 50 feet
PDI•8 AES/EBU Interface Cables
DBK Series
DB25 to 4 male, 4 female XLR’s
Standard length:
8 meters only
Operation Guide
59
MDR 24/96
Marshall Electronics
PO Box 2027, Culver City, CA 90231
Tel: (800) 800-6608; Fax: (310) 391-8926
http://www.mars-cam.com/cable.html
AIO•8 Analog Interface Cables
DC-DAXM Series
DB25 to 8 male XLR’s
DC-DAXF Series
DB25 to 8 female XLR’s
DC-DAS Series
DB25 to 8 1/4” TRS connectors
Standard lengths:
3, 5, 10, 15, 20, 25 feet
DIO•8 TDIF Interface Cables
DCD-88D Series
DB25 to DB25.
Standard lengths:
1, 3, 6, 12, 15, 20, 25, 33 feet.
PDI•8 AES/EBU Interface Cables
DC-SYX Series
DB25 to 4 male, 4 female XLR’s
DC-DUB Series
DB25 to DB25
Standard lengths:
3, 5, 10, 15, 20, 25 feet
Pro Co Sound, Inc.
135 E. Kalamazoo Ave., Kalamazoo, MI 49007
Tel: (800) 253-7360; Fax: (616) 388-9681
http://ww.procosound.com
AIO•8 Analog Interface Cables
DA-88 XM Series
DB25 to 8 male XLR’s
DA-88 XF Series
DB25 to 8 female XLR’s
DA-88 BQ Series
DB25 to 8 1/4“ TRS connectors
Standard lengths:
5, 10, 15, 20 feet
Other Cables
In addition to the companies listed above, the following companies supply
individual 110Ω AES/EBU and/or 75Ω word clock and video cables:
Apogee Electronics Corporation
3145 Donald Douglas Loop South
Santa Monica, CA 90405-3210
Tel: (310) 915-1000; Fax: (310) 391-6262
http://www.apogeedigital.com
Canare
531 5th Street, Unit A, San Fernando, CA 91340
Tel: (818) 365-2446; Fax: (818) 365-0479
http://www.canare.com
Whirlwind
99 Ling Rd., Rochester, NY 14612
Tel: (888) 733-4396; Fax: (716) 865-8930
http://www.whirlwindusa.com
60
MDR 24/96
The MDR24/96 comes to you with a handy 10/100 Base-T local area network
(LAN) card built in. The main purpose of networking the MDR24/96 using
Ethernet is to share or back up project files to a computer, network server/router,
or other device with an Ethernet connection and common protocol. It can also be
used to transfer files to a computer for editing.
The topic of computer networking can get very complex and we can’t give you a
complete course here. This appendix covers the basics for configuring a small,
directly connected peer-to-peer network consisting only of one MDR24/96 and one
computer, with some side notes about integrating with a small local area network.
If you’re connecting to a larger network, for instance in a corporate workgroup
environment, you probably have a network administrator who can integrate your
MDR24/96 using the information presented here.
Operation Guide
Appendix F: Networking (FTP) Setup
VERY IMPORTANT: You really CAN connect your MDR24/96 to the Internet.
This means that others who discover your recorder’s address can access, add, and
even delete files on your recorder. Hackers have programs that search systems on
The Net for audio files in hopes of finding a pre-release copy of the Next Big Hit.
You may not want that much free publicity. If you want to use the Internet to share
files with a production partner or client, be aware of the risks.
Disclaimer: Sorry, Mackie Designs cannot offer the service or knowledge that you
might personally need on the broad and seemingly complex issue of networking
security. Please seek guidance from professional computer service types.
The two most popular methods of networking in the PC environment are:
♦
Peer To Peer – Usually used when only two computers are connected
together. This configuration is described in detail here.
♦
Server/Router Network – One or more computers connected to a network
server or router with a connection hub. You may need to consult other
references in order to integrate your MDR24/96 in a larger network, using
the information provided here.
Peer-to-Peer Networking
Required Cables and Hardware
♦
A peer-to-peer network consists of two computers. One computer is the
MDR24/96, referred to as System #1.
♦
The other computer, System #2, is the one with which you wish to share
files, most likely an audio workstation in your studio.
♦
The MDR24/96 is equipped with a 100 Base-T Ethernet interface.
System #2 must have a 100 Base-T network card installed.
♦
The two Ethernet interfaces are connected using industry standard CAT-5
Ethernet cable and connectors.
IMPORTANT: A CROSSOVER cable is required. Since we’re connecting two
Ethernet ports together directly with no intervening network interfacing or routing
devices, a standard Ethernet cable will not work!
When cable shopping, look for one marked “Crossover” or “Reversed”. This is a
special cable wired with input and output connections crossed over from one end
to the other, so data sent by one system appears at the receiver input of the other.
Operation Guide
61
MDR 24/96
Hardware Interconnection
For the simple network described here, simply plug one end of the cable into the
Ethernet port on the network card installed in the computer. Connect the other end
of the cable to the Ethernet port on the MDR24/96. Either end of the cable can go
to either device.
Computer Software Required
♦
Windows 95, 98, NT, 2000, ME, XP for the PC or Macintosh 8.6 or higher.
♦
TCP/IP protocol stack (usually included with the operating system)
♦
An FTP (File Transfer Protocol) client program.
At Mackie, we’ve tested the MDR24/96 with two inexpensive FTP client
programs for Windows, CuteFTP from Globalscape and WS_FTP from
Ipswitch Software, as well as Fetch from Dartmouth Software Development
for the Macintosh. There are several others available. Trial versions of these
programs are available for download at:
http://www.globalscape.com/products/cuteftp
http://www.ipswitch.com/
http://www.dartmouth.edu/netsoftware/
Windows 2000, ME, and XP also have an integrated FTP client as part of the
OS. This can be used instead of a dedicated FTP Client program. By creating
a new network place for the MDR24/96 from the My Network Places window,
the hard drive on the MDR can be accessed as if it was just another local
drive. Consult Window’s help for details.
Network Configuration
When computers are connected to one another each must have a unique address.
Because we are connecting peer-to-peer (no server/router and hub), we will
assume there are no direct connections to the internet (WAN-Wide Area Network),
only between two Ethernet devices. This being the case, address assignments can
be somewhat arbitrary. However, if there is a direct connection to the Internet
(WAN), a specific gateway address must be assigned by your network
administrator or Internet service provider. All Ethernet devices on your network
(LAN – Local Area Network) will share this assigned gateway address.
Using typical Class-C peer-to-peer number assignments with no gateway, the
MDR24/96 address could be, for example, 10.10.28.20 (the factory default) and
the system #2 (computer) address could be 10.10.28.10. In this instance, the
MDR24/96 is host number 20 and the computer is host number 10.
In a simple network, the last number in the address of the client (computer) can be
anything, as long as it’s not the same as the MDR24/96’s address. In a larger
network, there are some higher levels of addressing which must be consistent
within the network.
62
MDR 24/96
Most computers with standard (default) operating system installations are
configured to have a dynamically assigned IP address, that is, they do not have a
fixed IP address. If this is the case with your computer, you probably need to
assign the computer a static IP address. You must assure that the computer and
MDR are not set up for the same address so they don’t collide on the network. In a
simple network, the IP addresses should be identical except for the last field. In
general you can change the settings on the computer or the MDR24/96 to match
the other.
If your computer is connected to the Internet through a cable modem or DSL line,
it may have been assigned an IP address and Subnet Mask. In this situation, leave
these computer settings intact and change the MDR’s address.
Configuring the MDR24/96 FTP Server
Operation Guide
System #1 Settings (MDR24/96)
1. Press the SYSTEM button.
SYSTEM MEN
2. Select Setup TCP.
Run FTP Setup
3. Select IP. Note the IP address
FTP Turbo TCP
displayed. The factory default is
10.10.28.20. You need to know
the MDR 24/96 IP address to set up your FTP client software.
[1]->
MDS
Network
4. For a computer set with a fixed IP address, using the << and >> select
and (–)DEC and (+)INC buttons, set the first three fields of the MDR24/96
IP address to match your computer’s address, and set the last field to
something different. Be sure you don’t set it to the address of another
device that you have on your network. When the IP address has been set,
select OK. (You could also change the computer’s address to match the
MDR; see below.)
5. Select Sub in the Setup TCP window. Use the default number
255.255.255.0 unless your network requires a subnet mask setting. Select
OK. Be sure both the MDR24/96 and your computer have the same subnet.
6. Select Gate and input a value if required by your network or client
software. You might be able to leave this blank if no gateway is being used.
Select OK.
7. Select Exit to close the Setup TCP menu.
8. Select FTP Turbo and use the << and >> select buttons or (–)DEC and
(+)INC buttons to choose between Turbo FTP and Normal FTP. If your
computer has a 100 Base-T Ethernet card installed, choose Turbo FTP. If
it only has a 10 Base-T Ethernet card installed, choose Normal FTP.
9. Select Exit to close the Turbo FTP menu.
10. Press the SYSTEM button to exit the Setup TCP menu.
11. To run the MDR FTP server, press the SYSTEM button.
12. Select Run FTP.
A message appears telling you the FTP server is running. It also displays the
IP address for the MDR for your reference. When you are completely finished
with all file transfers, press the Continue button.
Operation Guide
63
MDR 24/96
System #2 Settings (second computer or other Ethernet device)
Windows 95/98
Configuring TCP/IP:
From the Windows Start button, select Settings. From the pop-up menu,
select Control Panel. You can also get to the Control Panel from the My
Computer icon if you have one on your desktop. Work your way down through
the Control Panel menus as follows:
Note: We have only
included specific instructions to set up a
PC computer with
Windows 95 or 98 installed and a
Macintosh with OS
9.2.1. Sorry, we would
end up with a novel if
we covered every platform and operating
system but you should
be able to apply these
instructions most operating systems.
Network | Configuration | TCP/IP | IP Address
If you don’t see TCP/IP as a choice in the Configuration window (unusual for
standard installations), you’ll need to install it from the Windows installation
disk. See “TCP/IP Is Not Listed” below.
You may or may not have to make changes to the TCP/IP settings, depending
on how your computer is set up. If you use the computer in a network
presently, or if you use it to connect to the Internet, providing those are
functioning normally, it is best to record your current settings and set the
MDR24/96 accordingly. Changing network settings may cause problems with
your existing networking.
If the “Specify an IP Address” button is checked and there is an address and
subnet mask displayed, jot those numbers down. You’ll need them to match
up the MDR24/96 with your computer.
If the “Obtain an IP Address Dynamically” button is checked, or if the
“Specify” button is checked but no IP address is displayed, you’ll have to
make a change. If the computer is not on a local area network and you aren’t
planning to use it to connect to the Internet, the simplest thing to do is check
the “Specify” button and enter an IP address and subnet mask. Use the same
subnet mask as the MDR. Enter the same IP address as the MDR except
change the last field to something different than the MDR.
TCP/IP Is Not Listed
If the TCP/IP networking software is not
installed, install it as follows:
1. Click the Add button.
2. Click Protocol and then click Add.
3. In the Manufacturer’s window, click
Microsoft.
4. In the Network Protocols window,
click TCP/IP, and then click OK.
5. Return to the Configuration window.
You should now see TCP/IP listed.
6. Click the TCP/IP entry, then click
Properties.
64
MDR 24/96
1. From the Apple menu choose Control Panels and select TCP/IP.
2. From the File menu choose Configurations… Select the Default
Configuration and click the Duplicate… button.
3. Name the duplicate configuration MDR24/96 and click OK. This allows
you to have a network setting for normal use and one for the MDR
specifically. This way you won’t have to remember your settings, you
can just choose the correct one for the task at hand.
4. Click the Make Active button with the MDR24/96 configuration
highlighted.
5. From the TCP/IP setup for the MDR24/96, make the following settings:
for the Connect Via box, choose Ethernet (it may say Ethernet Built In)
and for the Configure box, choose Manually. If you see an IP address
and subnet listed, leave them as is and change the settings on the
MDR24/96. If the fields are blank, we must assign an IP address and
subnet to the Mac.
Operation Guide
Macintosh OS 9.2.1
7. Set the IP address to be identical to that of the MDR24/96 except for
the last field. For example, the default IP address on the MDR24/96 is
10.10.28.20. Set the IP address on the computer to 10.10.28.10 where
the last 10 is an arbitrary number that is not 20.
8. Set the Subnet mask to match identically that of the MDR24/96. The
default setting on the MDR24/96 is 255.255.0.0, so you should set the
Subnet mask in the Mac to be the same.
9. Leave the Router address, Name server address, and Search domains
blank.
10. From the File menu, choose Quit. It should prompt you to save; do so
now.
12. Your Macintosh should now be configured properly to see the
MDR24/96. Run the FTP server on the MDR24/96 and open the FTP
Client on your computer to transfer files.
Operation Guide
65
MDR 24/96
FTP Client Configuration
There are a number of FTP clients available for both PC and Macintosh platforms.
This generic example may not exactly reflect the settings for your particular FTP
client software, but it should be close enough to get you on the right track if you’re
having difficulty.
1. Create a new account for connecting
to the MDR24/96.
2. If there is a “Profile” or “Account”
name setting, choose a name like
MDR.
Note: A folder named
“System,” and files entitled “mackieos.EXE”
and “PME.SYS”, normally hidden on the
MDR 24/96 file management listings, will
be visible on the FTP
listing of the C: drive.
These are part of the
operating system and
should be left intact.
Do not delete any of
these files from the
MDR 24/96 hard drive!
3. For “Host” (Name/Address), use the
MDR IP address you decided on
earlier. In the default case the MDR
IP address is 10.10.28.20.
4. If you must choose a “Host Type,” select “Anonymous Login”.
5. If there is a “Password” setting, you can leave it blank. The anonymous
setting will automatically send something that the MDR will ignore.
6. If there is a “Directory” setting, set it to “C” for the internal drive, or “E”
for the external.
7. The Subnet setting on your computer should be set the same as the
MDR24/96.
8. You should now be able to engage the “Connect” command and see the
contents of the MDR24/96’s hard drive. The internal hard drive is C: and
the external hard drive is E:.
9. Now you can copy files from the MDR24/96 to your computer, or from your
computer to the MDR24/96. Refer to your FTP client program for details.
Troubleshooting
If you feel your settings are correct, but the computer just won’t see the MDR24/96,
try a different FTP program. There are many available and sometimes one just
won’t work with a particular configuration of computer and Ethernet card. Using a
different program may be the only solution.
Networking Glossary
Here you will find a short description of some of the features (and acronyms, of
course) of the Network setup:
TCP/IP
TCP/IP is the acronym for Transport Control Protocol/Internet Protocol.
These combined protocols provide the language and guidelines for computers
communicating on a network. Transport Control Protocol might be considered
the method by which computers talk and the Internet Protocol is the assigned
number system by which computers are distinguished. An IP address is a
numeric identifier in the format 123.456.789.000. Each computer that is
attached to the Internet (WAN/Wide Area Network) must have a unique IP
address so it may be identified. Likewise, in a closed networking environment
(LAN or Local Area Network), a unique IP address must be assigned to each
computer that communicates on the network.
66
MDR 24/96
A firewall/router or proxy server is a hardware and/or software device that
allows definable filtering of specific information, file types, and network
access. It is often used for security purposes—if your hard drive and console
are networked, you might want to carefully research the need for
firewall/proxy protection.
Operation Guide
Although LAN computers may connect to a WAN, such practice is typically
achieved by the use of a “Gateway” or “Firewall/Router or Proxy Server.” A
gateway acts as a conduit for networking traffic, and computers that
communicate through the gateway assume the IP address of the gateway. In
other words, if your personal computer, which is connected to your LAN, has
an IP address of 10.1.1.1 and it is connected to the Internet through a
gateway computer with an IP address of 123.456.789.123, other computers
outside your LAN will recognize your computer as having the same IP address
as the gateway computer. Multiple LAN computers may be connected to a
WAN by this method and every computer communicating from behind the
gateway will appear to the WAN as the gateway computer. The gateway will
convert the IP addresses of the LAN computers to its own IP address for both
inbound and outbound traffic.
FTP
FTP is the acronym for File Transfer Protocol. FTP communicates over TCP/
IP and is one of the languages/methods that the Transport Control Protocol
accommodates. As its name implies, FTP was designed to transfer files over a
network. Some of the unique capabilities of FTP are the recognition of
transmission loss and file integrity checking. If a file transfer is interrupted
during an FTP session, the FTP “client” will perform an integrity check and
attempt to re-establish connection and transfer. Most FTP servers and clients
employ a user name and password scheme for authorization purposes. The
MDR24/96 FTP implementation sets the client account to anonymous status,
thereby allowing any fully functional FTP client to connect to the internal file
system of the recorder. Because it’s possible that an unknown computer may
connect to the MDR24/96 and add or delete files, care should be taken when
connecting the MDR to a publicly available network (WAN).
IP Address
Without detailing the intricacies of network security and firewalls, you should
be aware that configuring the MDR24/96 with a publicly available IP address
on a publicly available network may make the recorder’s hard drive and
functions visible to network traffic, i.e., the Internet. When connecting two
Ethernet devices directly, without including an outside network, this is a nonissue. Certain IP address ranges have been set aside by key Internet standards
bodies for use in private networking applications. Those ranges are as follows:
Class A 10.0.0.0—10.255.255.255
Class B 172.16.0.0—172.31.255.255
Class C 192.168.0.0—192.168.255.255
If your MDR24/96 is connected to a network that never “touches” another
network, i.e., not publicly available outside of your network, you may use any
IP address range you choose. However, research and consideration in this
matter should be conducted to prevent any unwanted breaches of security and
IP address conflicts. For further details, you are encouraged to seek additional
information from the following organization:
Internet Assigned Numbers Authority
http://www.iana.org
Operation Guide
67
MDR 24/96
Hub
A Hub is an active device that is designed to connect several Ethernet devices
in a “star” network. Each device connects to the hub, and the hub routes
communication among the devices by sorting out destination IP addresses.
If you already have a network, you probably have a hub. If you wish to
connect the MDR24/96 to a computer that is already connected to a network
or that you regularly use to connect to the Internet, a hub would be a
worthwhile addition to your system, allowing you to have all the cables
connected all the time.
Important: When connecting through a hub, do not use a Crossover cable.
Hubs are designed to use standard cables.
10 Base-T vs. 100 Base-T
The recorder’s Ethernet card is hardware configured to operate at 100 Mbps.
If you wish to connect an MDR24/96 to an existing Ethernet network that is
configured for 10 Mbps transmission rates, it is necessary to use a 10/100
autosensing hub and/or a rate converter. Most hubs today are autosensing.
68
MDR 24/96
2
1
ON
POWER
REC
REC
50
50
2
30
35
40
30
35
40
1
20
25
20
25
3
REC
3
50
30
35
40
20
25
10
15
7
7
10
15
7
10
15
2
4
2
4
2
4
OL
OL
OL
4
REC
4
50
30
35
40
20
25
10
15
7
2
4
OL
5
REC
5
50
30
35
40
20
25
10
15
7
2
4
OL
6
REC
6
50
30
35
40
20
25
10
15
7
2
4
OL
7
REC
7
50
30
35
40
20
25
10
15
7
2
4
OL
8
REC
8
50
30
35
40
20
25
10
15
7
2
4
OL
9
REC
9
50
30
35
40
20
25
10
15
7
2
4
OL
10
REC
10
50
30
35
40
20
25
10
15
7
2
4
OL
11
REC
11
50
30
35
40
20
25
10
15
7
2
4
OL
13
REC
REC
12
13
12
50
30
35
40
20
25
10
15
7
2
4
OL
50
30
35
40
20
25
10
15
7
2
4
OL
14
REC
14
50
30
35
40
20
25
10
15
7
2
4
OL
15
REC
15
50
30
35
40
20
25
10
15
7
2
4
OL
24TRACK /24BIT DIGITAL AUDIO HARD DISK RECORDER
17
LOC 2
LOC 1
REC
17
16
REC
16
50
30
35
40
20
25
10
15
7
2
4
OL
50
30
35
40
20
25
10
15
7
2
4
OL
STORE
18
REC
18
50
30
35
40
20
25
10
15
7
2
4
OL
22
AUTO
INPUT
ALL
INPUT
REC
SAFE
LOOP
1–2
REC
22
21
REC
21
50
30
35
40
20
25
10
15
7
2
4
OL
20
REC
20
50
30
35
40
20
25
10
15
7
2
4
OL
19
REC
19
50
30
35
40
20
25
10
15
7
2
4
OL
50
30
35
40
20
25
10
15
7
2
4
OL
AUTO
TAKE
23
REC
23
50
30
35
40
20
25
10
15
7
2
4
OL
T-CODE
CHASE
24
REC
24
96k
CLOCK
HOURS
SELECT
FAST FWD
STOP
PLAY
DIGI-I/O
SELECT
PROJECT BACKUP DISK UTIL SYSTEM
SELECT
TICKS
FRAMES
SYNC
SELECT
RECORD
DEC
Little love
Playlist 1
C:Internal
01:35:00
BEATS
SECONDS
HIGH RESOLUTION AUDIO
44.1/48/96K SAMPLE RATES
MINUTES
BARS
PROJECT:
PLAYLIST:
DRIVE:
AVAIL:
TC
16 BIT 24 BIT
48k
TRACK/
EDIT
REWIND
DELETE LAST
ERROR
VARI
44.1k
MDR 24/96
INC
Operation Guide
Operation Guide
69
OUTPUT
INPUT
TAPE IN/OUTS
OUTPUT
INPUT
ANALOG I/O ANALOG I/O ANALOG I/O
OUTPUT
MDR 24/96
INPUT
70
M
MDR 24/96
Operation Guide text composed by Dana Bourke, Benjamin Olswang and Tony Baird,
based on a ballet by Jeff Gilbert. It was made possible by the teachings and
donations of the MDR24/96 Design Team, most notably Brian McCully and Bob
Tudor. Graphics and layout were performed by Tony Baird with technical support
from Dave Franzwa, Steve Eborall and Frank “Weasel Boy” Heller. Cover art
courtesy of Bryan Tiller. Long-winded explanations, editing, and last minute
updates from Mike Rivers, with proofreading and final blessing by Jeff Gilbert.
Proofreading and additional editing by Linn Compton. Scott Garside was a pain
the whole time.
Demo Music Credits
Ode to Masters
Written by:
Published By:
Electric Guitar:
Classical Guitar:
Bass:
Drums:
Hammond B3:
Trumpet:
Operation Guide
Colophon
Jay Roberts and Rick Reid
Nigel Nose Music
Jay Roberts
Rick Reid
Dan Dean
Brendan Scanlan
Joey DeFrancesco
Joey DeFrancesco
Little Bit of Love
Written by:
Claude Gaudette & Alan Roy Scott BMI #877477
Published by:
KYUSHU BOY MUSIC BMI #231306319
Artist:
Shirley Meyers
Production Company:
Leggett Music Inc. Nashville Tn.
Produced by:
Keith Olsen
Arranged by:
Claude Gaudette and Keith Olsen
Keyboards:
Claude Gaudette, Richard Baker
Guitars:
Tim Pierce
Engineered by:
Keith Olsen and Peter Love
Recorded and Programmed at Goodnight LA Studios, Los Angeles
“Mackie,” the “Running Man” figure, “MDR24/96,” and “Digital 8•Bus” are
trademarks or registered trademarks of Mackie Designs Inc. All other brand
names mentioned are trademarks or registered trademarks of their respective
holders, and are hereby acknowledged.
© 2002 Mackie Designs Inc.
All Rights Reserved.
Printed in the U.S.A.
Operation Guide
71
16220 Wood-Red Rd. NE • Woodinville, WA 98072 • USA
US & Canada: 800/898-3211
Europe, Asia, Central & South America: 425/487-4333
Middle East & Africa: 31-20-654-4000
Fax: 425/487-4337 • www.mackie.com
E-mail: [email protected]