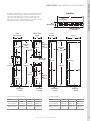
1
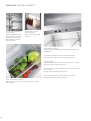
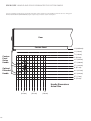
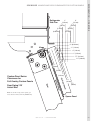
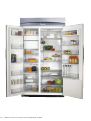
260
MODEL KBUIT4255E SIDE-BY-SIDE REFRIGERATOR SHOWN
SIDE-BY-SIDE
Thermador Side-by-Side Refrigerators offer legendary
Thermador performance and quietness in a configuration that
puts convenience first. They feature adjustable, frameless glass
shelves, which offer impressive capacity while giving easy access
to all contents. Plus, with both Professional and Masterpiece®
Handles available, they can be customized to perfectly
coordinate with all Thermador kitchen appliances.
1.800.735.4328 | THERMADOR.COM
REFRIGERATION — SIDE-BY-SIDE
REFRIGERATION
261
SIDE-BY-SIDE FEATURES & BENEFITS
ADJUSTABLE FRAMELESS
GLASS SHELVES
INTEGRATED GALLON
DOOR STORAGE
Elegant, adjustable frameless
glass shelves offer increased
storage capacity as well as
better visibility of all stored
items at all levels.
Convenient storage for large
containers.
ELECTRONIC CONTROLS
Precision adjustment capability for both the freezer and fresh food
compartments.
ADJUSTABLE-TEMPERATURE MEAT-STORAGE DRAWER
Keeps meats and seafoods fresh and ready for preparation.
HOLIDAY MODE
A special holiday mode acts as an auto-shut-off feature to comply
with certain religious holiday observances.
FULL-FILTERED INTERNAL ICE MAKER WITH EASY-TO-CHANGE
WATER FILTER
Enjoy the pure taste of filtered water and ice.
FULL-FILTERED EXTERNAL WATER AND ICE DISPENSER
Full-filtered external water and ice dispenser.
FRESH FOOD COMPARTMENT
This special drawer keeps all varieties of vegetables and fruits
fresher longer.
262
MODEL OPTIONS
ELECTRICAL SPECIFICATIONS
Select from the 42-inch and 48-inch side-by-side
refrigerator, with a full-filtered internal ice maker or
external ice and water dispenser. Masterpiece® or
Professional Handles are available to match our built-in or
Professional Series product lines, or choose our custom
panel models to integrate beautifully with your cabinetry.
Before you move your refrigerator into its final location, it is important to
make sure you have the proper electrical connection.
INSTALLATION CONSIDERATIONS
The information in this design guide provides key
features, product dimensions, cutouts and installation
specifications. Before installing a Thermador Sideby-Side, be sure to verify the cabinet dimensions and
electrical connections. Also, always consult with the
installation manual packed with the product for complete
details before installing.
The refrigerator can be recessed in an opening between
cabinets or installed at the end of a cabinet run using a
side panel to enclose the refrigerator.
CUSTOM PANELS
The custom panel series features factory-installed,
traditional style trim to provide a “framed” look. This
series requires the installation of custom panels that are
not included. You will need to create the panels yourself
or consult a qualified cabinetmaker or carpenter. See
dimension drawings on the following pages for panel
specifications.
On the custom panel series, you can create a “frameless”
look using full-overlay custom panels. You will need to
order a Trimless Trim Kit (TRIMKITSXS). This accessory
kit contains parts to replace the factory trim. Full-overlay
custom panels and handles are required but not included
in the accessory kit. Create the panels according to the
specifications in the “Full-Overlay Custom Panels” section.
You can order a set of Thermador’s handles or select
handles from another source. For door clearances, see
“Handle and Door Clearances for Custom Panel Series.”
SIDE PANELS
Custom side panels may be needed when not enough
space is available to have cabinets on both sides of the
refrigerator or when the refrigerator is placed at the
end of a cabinet run. For the stainless steel models, you
may choose an Inset, Flush, or Recessed Inset panel
installation. For the custom panel series, you may choose
an Inset or Recessed Inset panel installation.
WARRANTY
Limited two-year warranty—for two years from date of
original purchase, we will provide, free of charge, parts
and service labor in your home to repair or replace
any part of the refrigerator that fails because of a
manufacturing defect.
RECOMMENDED GROUNDING METHOD
A 115 Volt, 60 Hz., AC only, 15- or 20-Amp fused, grounded electrical supply
is required. It is recommended that a separate circuit serving only your
refrigerator be provided. Use an outlet that cannot be turned off by a switch.
Do not use an extension cord.
Important: If this product is connected to a GFCI (Ground Fault Circuit
Interrupter) protected outlet, nuisance tripping of the power supply may
occur, resulting in loss of cooling. Food quality and flavor may be affected.
If nuisance tripping has occurred, and if the condition of the food appears
poor, dispose of it.
REFRIGERATION — SIDE-BY-SIDE
SIDE-BY-SIDE FEATURES & BENEFITS
ELECTRICAL LOCATION
Be sure your appliance is properly installed and grounded
by a qualified technician. Installation, electrical connections
and grounding must comply with all applicable local codes.
4"
(10.2 cm)
A grounded 3 prong electrical outlet should be placed within
4" (10.2 cm) of the right side cabinets or end panel. The water
shutoff should be located in the base cabinet on either side of the refrigerator
or some other easily accessible area. If the water shutoff valve is not in the
cabinets, the plumbing for the water line can come through the floor or the
back wall.
WATER LOCATION
All installations must meet local plumbing code requirements.
The water shutoff should be located in the base cabinet on either side of
the refrigerator or some other easily accessible area. The right-hand side is
recommended. The access hole through the cabinet must be within 1/2"
(12.7 mm) of the rear wall.
Note: If the water shut off valve is in the back wall behind the refrigerator,
it must be at an angle so that the tube is not kinked when the refrigerator is
pushed into its final position.
If the water shutoff valve is not in the cabinets, the plumbing for the water line
can come through the floor. A 1/2" (12.7 mm) hole for plumbing should be
drilled at least 6" (15.2 cm) from the right or left hand side cabinet or panel.
On the floor, the hole should be no more than 1" (2.54 cm) away from the
back wall.
If additional tubing is needed, use copper tubing and check for leaks. Install
the copper tubing only in areas where the household temperatures will remain
above freezing.
Do not use a piercing-type or 3/16" (4.76 mm) saddle valve which reduces
water flow and clogs more easily.
Note: Your refrigerator dealer has a kit available with a 1/4" (6.35 mm)
saddle-type shutoff valve, a union, and copper tubing. Before purchasing,
make sure a saddle-type valve complies with your local plumbing codes.
6"
(15.2 cm)
Limited warranty on sealed refrigeration system**; parts
and labor (3rd–6th year)
Limited warranty on sealed refrigeration system; parts only
(7th–12th year)
6"
(15.2 cm)
1"
(2.54 cm)
6"
(15.2 cm)
24"
(60.96 cm) min.
**Sealed refrigeration system includes compressor,
evaporator, condenser, dryer/strainer and
connecting tubing.
See page 294 for additional warranty details.
1.800.735.4328 | THERMADOR.COM
263
SIDE-BY-SIDE CUSTOM PANELS
If you plan to install custom wood panels, you will need to
create the panels yourself or consult a qualified cabinetmaker
or carpenter. See dimension drawings for panel specifications.
Important: Panels weighing more than recommended may
cause damage to your refrigerator.
Note: Dimensions shown have a (±) 1/16" (1.5 mm) tolerance.
Panels that are more than 1/4" (6 mm) thick must be routed.
If panels are less than 1/4" (6 mm) thick, install a filler panel
between the doors and decorative panels.
TOP GRILLE PANEL
The top panel should not weigh more than 10 lbs. (4.5 kg)
total weight.
DOOR PANELS FOR DISPENSER MODELS
The two freezer panels combined should not weigh more than
30 lbs. (13.5 kg) total weight. The refrigerator panel should not
weigh more than 50 lbs. (23 kg) total weight.
42" = 16 3/4"
48" = 19 1/4"
42" = 22 3/4"
48" = 26 1/4"
23�⁄�� "
(59.5 cm)
42" = 40 1/2"
48" = 46 1/2"
7"
(17.8 cm)
70�⁄�� "
(179 cm)
DOOR PANELS FOR NON-DISPENSER MODELS
The freezer panel should not weigh more than 30 lbs. (13.5 kg
total weight. The refrigerator panel should not weigh more than
50 lbs. (23 kg) total weight.
42" = 16 3/4"
48" = 19 1/4"
42" = 22 3/4"
48" = 26 1/4"
70¹⁄� "
(179.1 cm)
264
34�⁄�� "
(87.4 cm)
TOP GRILLE PANEL – ROUTING REqUIREMENTS
DOOR PANELS – ROUTING REqUIREMENTS
Top and bottom edges of the top panel should be edge routed
1/2" (1.3 cm) and 3/8" (9.5 mm), respectively. Both ends should be
edge routed 7/8" (2.2 cm) as shown.
If an extended handle kit is used (EXTHANDSXS), then routing
the handle side of the panels is not required.
¹⁄� "
Top
Grille
Top
Grille
�⁄� "
(2.2 cm)
STANDARD HANDLE – TOP VIEW
(6.35 mm)
max.
3¹⁄� "
(8.25 cm)
min.
�⁄� "
(2.2 cm)
Handle
¹⁄� "
(6.35 mm)
max.
If the standard handle is used, route the entire handle side of
both panels 3 1/4" (8.25 cm) to allow for finger clearance. Then
route the other sides 1" (2.54 cm).
¹⁄� "
(6.35 mm) max.
¹⁄� "
(1.3 cm)
min.
Hinge Side
Door
Panel
¹⁄� " (6.35 mm) max.
NOTE: When creating a panel with face detail, the offsets will be
hidden and must be accounted for in order to center the detail in
the top grille.
REFRIGERATION — SIDE-BY-SIDE
SIDE-BY-SIDE CUSTOM PANELS
Door
Panel
2" (5 cm)
min.
1"
(2.54 cm)
DOOR PANEL - SIDE VIEW
Top
P anel
¹⁄� "
¹⁄� " (1.3 cm)
min.
Center face
detail between
offsets
³⁄� "
(9.5 mm)
min.
(6.35 mm)
max.
Bottom
¹⁄� "
(6.35 mm) max.
1.800.735.4328 | THERMADOR.COM
265
SIDE-BY-SIDE FULL-OVERLAY CUSTOM PANELS
Custom overlay panels allow you to blend the exterior of your refrigerator into the
overall kitchen décor, and to use custom handles for additional design flexibility.
Note: To use full-overlay custom panels, a Trimless Trim Kit for Side by Sides is
required (TRIMKITSXS). Full-overlay custom panels and handles are required but
not included. Create the panels according to these specifications.
The custom panels must have backer panels attached in order to mount them
to the refrigerator. It is most common to work with three panels, as shown in the
following graphic: a decorative overlay panel, a 1/8" (3.18 mm) spacer panel or
spacer strips and a 1/4" (6.35 mm) backer panel.
Overlay Panel
Spacer Panel
Spacer Panel
1/8"
(3.18 mm)
1" minimum
(2.54 cm)
Backer Panel
5/8" to 3/4"
(15.88 to
19.05 mm)
Door/Grille Trim
Offset Dimension
1/4"
1/8"
(6.35 mm)
(3.18 mm)
In some cases, your cabinet manufacturer may choose to work with one panel routed
for the different dimensions. Follow these panel dimension and placement instructions
to be sure that the custom overlay panels will fit properly.
Important:
– The total weight of the refrigerator door overlay panel cannot exceed 50 lbs. (23 kg).
– The total weight of the freezer door overlay panel cannot exceed 30 lbs. (13.5 kg).
– The total weight of the top grille overlay panel cannot exceed 10 lbs. (4.5 kg).
266
Top Grille
To minimize panel weight, you may use 2" (5.08 cm) spacer strips
around the perimeter in place of full-sheet solid spacer panels.
The spacer strips must be set in at least 1" (2.54 cm) from the
top, bottom and sides edges of the backer panel. If you use
spacer strips, it is also recommended that you use two 2" (5.08
cm) strips horizontally centered for added support.
C
73/8"
(18.73 cm)
F
81/2"
(21.59 cm)
Bottom Offset
1" (2.54 cm)
Freezer
Framed Dispenser
Freezer Frameless
Dispenser
Freezer
Non-Dispenser
Refrigerator
A
A
A
B
Handle-Side
Offset
�⁄� " (3.2 mm)
23 �⁄�� "
(59.53 cm)
24"
(60.96 cm)
D
Handle-Side
Offset
�⁄� " (3.2 mm)
23 �⁄�� "
(59.53 cm)
47�⁄�� "
(119.86 cm)
Handle-Side
Offset
�⁄� " (3.2 mm)
D
Bottom Offset
�⁄� " (3.2 mm)
12
⁄�� "
(31.27 cm)
70�⁄� "
(179.07 cm)
A
71�⁄�� "
(180.50 cm)
D
REFRIGERATION — SIDE-BY-SIDE
SIDE-BY-SIDE FULL-OVERLAY CUSTOM PANELS
70�⁄� "
(179.07 cm)
71�⁄�� "
(180.50 cm)
D
D
E
34 �⁄� "
(88.27 cm)
34 �⁄� "
(87.3 cm)
34 �⁄� "
(87.3 cm)
Bottom Offset
�⁄� " (3.2 mm)
Bottom Offset
�⁄� " (3.2 mm)
DECORATIVE OVERLAY PANELS
Model
Handle-Side
Offset
�⁄� " (3.2 mm)
Bottom Offset
�⁄� " (3.2 mm)
Bottom Offset
�⁄� " (3.2 mm)
BACKER PANELS
A
B
C
1/8"
1/8"
3/8"
Model
D
15/16"
E
F
42-Inch (106 cm)
17
(43.50 cm)
23
(58.74 cm)
41
(105.09 cm)
42-Inch (106 cm)
16
(43.50 cm)
22
(58.26 cm)
40 1/2"
(102.87 cm)
48-Inch (122 cm)
19 5/8"
(49.85 cm)
26 5/8"
(67.63 cm)
47 3/8"
(120.33 cm)
48-Inch (122 cm)
19 7/16"
(49.37 cm)
26 7/16"
(67.15 cm)
46 1/2"
(118.11 cm)
1.800.735.4328 | THERMADOR.COM
15/16"
267
SIDE-BY-SIDE CUSTOM PANEL SERIES SIDE PANELS
Custom side panels may be needed when not enough space is
available to have cabinets on both sides of the refrigerator or
when the refrigerator is placed at the end of a cabinet run. You
may choose an Inset or Recessed Inset panel installation.
REFRIGERATOR AND SIDE TRIM DIMENSIONS
INSET INSTALLATION DIMENSIONS
1. Measure the distance from point A (as shown) to the back
wall. Add 1/32" (0.8 mm) to this measurement to allow the side
panel to fit into the trim.
2. If the panel is more than 3/8" (9.5 mm) thick, route the front
edge to allow the side panel to fit into the trim.
The width and height of a side panel are determined by the type
of installation you are planning.
Notes:
– The dimensions shown are actual product dimensions and may
not reflect the needed installation dimensions.
A
– The side panel should be a minimum of 1/2" (1.27 cm) thick to
avoid warping.
– If the opening depth is 25" (63.5 cm) or more, you may want to
install a support board on rear wall.
RECESSED INSET INSTALLATION DIMENSIONS
Refrigerator
1. Measure the distance from point A (as shown) to back wall.
Overlay
2. Rout the front edge of the support board or attach a 3/8"
(9.5 mm) board to hold the panel in the cabinet side trim.
23�⁄� "
(59.40 cm)
A
Side Trim
�⁄� "
(9.7 mm)
�⁄�� "
(1.5 mm)
�⁄� "
(3.2 mm)
268
�⁄�� "
(4.5 mm)
Custom side panels may be needed when not enough space is
available to have cabinets on both sides of the refrigerator or
when the refrigerator is placed at the end of a cabinet run. You
may choose an Inset, Flush, or Recessed Inset panel installation.
REFRIGERATOR AND SIDE TRIM DIMENSIONS
INSET INSTALLATION DIMENSIONS
1. Measure the distance from point A (as shown) to the back
wall. Add 7/32" (5.6 mm) to this measurement to allow the side
panel to fit into the trim.
2. If the panel is more than 1/4" (6.35 mm) thick, route the front
edge to allow the side panel to fit into the trim.
The width and height of a side panel are determined by the type
of installation you are planning.
Notes:
– The dimensions shown are actual product dimensions and may
not reflect the needed panel installation dimensions.
REFRIGERATION — SIDE-BY-SIDE
SIDE-BY-SIDE STAINLESS STEEL SERIES SIDE PANELS
A
– The side panel should be a minimum of 1/2" (1.27 cm) thick to
avoid warping.
– If the opening depth is 25" (63.5 cm) or more, you may want to
install a support board on rear wall.
FLUSH INSTALLATION DIMENSIONS
1. Measure the distance from point A (as shown) to the back wall.
Refrigerator
2. Attach the support board with a screw or adhesive that is
compatible with aluminum and wood.
24�⁄� "
(61.3 cm)
23��⁄�� "
(60.3 cm)
23�⁄� "
(59.7 cm)
A
RECESSED INSET INSTALLATION DIMENSIONS
1. Measure the distance from point A (as shown) to the back wall.
Side Trim
2. Route the front edge of the support board or attach a 1/4"
(6.35 mm) board to hold the panel in the cabinet side trim.
�⁄� "
(6.35 mm)
��⁄�� "
(4.5 mm)
�⁄�� "
(4.7 mm)
A
�⁄�� "
(5.5 mm)
��⁄�� " (10 mm)
�⁄� "
(15.7 mm)
1.800.735.4328 | THERMADOR.COM
269
SIDE-BY-SIDE HANDLE AND DOOR CLEARANCES FOR CUSTOM PANELS
If you are installing custom panels, the panels must allow certain clearances for the handles and for the doors to swing open.
An Extended Handle Kit (EXTHANDSXS) may be required if you install a custom raised panel.
Door
Custom Panel
1 4
/ " (6.35 mm)
1 2
/ " (1.3 cm)
3 4
/ " (1.9 cm)
Custom
Panel
Series
Handle
1" (2.5 cm)
11/4" (3.2 cm)
11/2" (3.8 cm)
13/4" (4.4 cm)
2" (5.1 cm)
Optional
Extended
Handle
21/4" (5.7 cm)
21/2" (6.4 cm)
23/4" (7 cm)
3" (7.6 cm)
Handle Dimensions
Actual Size
1"
(2.5 cm)
270
2"
(5.1 cm)
3"
(7.6 cm)
Refrigerator
Side Trim
1"
2"
(2.5 cm)
(5.1 cm)
3 4
/"
13/4"
(1.9 cm)
(4.4 cm)
1 2
11/2"
/"
(1.3 cm)
(3.8 cm)
1
/4"
11/4"
(6.35 mm)
(3.2 cm)
REFRIGERATION — SIDE-BY-SIDE
SIDE-BY-SIDE HANDLE AND DOOR CLEARANCES FOR CUSTOM PANELS
1 4
/ " (6.35 mm)
Hinge
1 2
/ " (1.3 cm)
3
/4" (1.9 cm)
1" (2.5 cm)
11/4" (3.2 cm)
11/2" (3.8 cm)
1 /2 "
(1.3 cm)
3/4"
(1.9 cm)
1"
(2.5 cm)
Cus
tom
11/4"
(3.2 cm)
11/2"
(3.8 cm)
l
e
Pan
e
Pan
r
Doo
Door Swing 110˚
Actual Size
ker
Bac
Custom Panel Series
Clearances for
Full-Overlay Custom Panels
l
Note: To use full-overlay custom panels, you
must order the Trimless Trim Kit (TRIMKITSXS).
Spacer Panel
1.800.735.4328 | THERMADOR.COM
271
REFRIGERATION 42-INCH SIDE-BY-SIDE REFRIGERATOR
Models: KBUIT4255E, KBUIT4265E, KBUIT4275E, KBUDT4255E, KBUDT4265E, KBUDT4275E
Stainless steel side-by-side
with internal ice maker.
Stainless steel side-by-side
with full-filtered external
ice and water dispenser.
Custom panel side-by-side
with internal ice maker.
Custom panel side-by-side
with full-filtered external
ice and water dispenser.
KBUIT4255E
Masterpiece® handles
KBUDT4255E
Masterpiece® handles
KBUIT4265E
Professional Series Handles
KBUDT4265E
Professional Series Handles
KBUIT4275E
Masterpiece® and
Professional Series Handles
can be ordered separately.
KBUDT4275E
Masterpiece® and
Professional Series Handles
can be ordered separately.
INSTALLATION OPTIONS
SPECIFICATIONS
Total Capacity (cu. ft.)
25.2
Refrigerator Capacity (cu. ft.) 16
Freezer Capacity (cu. ft.)
9.2 (KBUDT)
9.3 (KBUIT)
Product Width
41"
Product Height
83 1/8"
Product Depth
25"
Cutout Width
41 1/2" – 41 3/4"
Cutout Height (Min–Max)
83 1/2" – 84 3/8"
Cutout Depth
24"
Energy Consumption
611.01 kWh w/Dispenser
561.01 kWh w/o Dispenser
Electrical Supply
115V / 60Hz / 6.9 Amp
Power Cord Included
120V-3 prong
Shipping Weight (lbs.)
573 – 613
Specifications in the planning pages provide dimensions and installation
detail for the stainless steel models as well as installation detail for the
custom panel series.
CUSTOM PANELS
The custom panel series features factory-installed, traditional style
trim to provide a “framed” look. This series requires the installation of
custom panels that are not included. You will need to create the panels
yourself or consult a qualified cabinetmaker or carpenter. See dimension
drawings on pages 264-271 for panel specifications.
On the custom panel series, you can create a “frameless” look using
full-overlay custom panels. You will need to order a Trimless Trim Kit
(TRIMKITSXS). This accessory kit contains parts to replace the factory
trim. Full-overlay custom panels and handles are required but not
included in the accessory kit. Create the panels according to the
specifications in the “Full-Overlay Custom Panels” section. You can
order a set of Thermador’s handles or select handles from another
source. For door clearances, see “Handle and Door Clearances for
Custom Panel Series.”
SIDE PANELS
Custom side panels may be needed when not enough space is
available to have cabinets on both sides of the refrigerator or when
the refrigerator is placed at the end of a cabinet run. For the stainless
steel models, you may choose an Inset, Flush, or Recessed Inset panel
installation. For the custom panel series, you may choose an Inset or
Recessed Inset panel installation.
All refrigerators are UL and CUL approved.
272
Models: KBUIT4255E, KBUIT4265E, KBUIT4275E, KBUDT4255E, KBUDT4265E, KBUDT4275E
Width dimensions were
measured from trim edge
to trim edge.
25 3/8"
(64.5 cm)
23 1/2"
(59.7 cm)
Height dimensions are
shown with leveling legs
extended 1/8" (3 mm)
below the rollers.
3/8"
*83
(211.8 cm)
*When leveling legs are
fully extended to 1 1/4"
(32 mm) below rollers,
add 1 1/8" (29 mm) to
the height dimensions.
The depth from the front of
the top grille to the back of the
refrigerator cabinet is 25 1/8"
(64 mm).
The water line attached to
the back of the refrigerator
is 5 ft (1.5 mm) long. Height
dimensions are shown with
leveling legs extended 1/8"
(3 mm) below rollers.
*83 3/8"
(211.8 cm)
84" (213.4 cm)
Power Cord
*When leveling legs are fully
extended to 1 1/4" (32 mm)
below rollers, add 1 1/8" (29
mm) to the height dimensions.
REFRIGERATION — SIDE-BY-SIDE
REFRIGERATION 42-INCH SIDE-BY-SIDE REFRIGERATOR
*3 1/2" (8.9 cm)
42 1/4" (107 cm)
80" - 90"
(203-229 cm)
12 5/8" (32.1 cm)
4"
(10.2 cm)
41 1/2"
(105.4 cm)
37 1/4"
(94.6 cm)
16 7/8"
(42.9 cm)
83 1/2" (212.1 cm) min.
84 3/4" (215 cm) max.
to bottom of solid soffit
47 7/8"
(121.6 cm)
41 3/8"
(105.1 cm)
90˚
110˚
130˚
77"
(196 cm)
90˚
110˚
130˚
41 1/2" (105.4 cm) to
41 3/4" (106.1 cm)
6"
(15.2 cm)
TOP GRILL CLEARANCE
The location must permit both doors to open to a
minimum of 90°. Allow 4 1/2" (11.4 cm) minimum space
between the side of the refrigerator and a corner wall.
NOTE: More clearance may be required if you are using
overlay panels or custom handles.
1/2"
(1.3 cm)
6"
(15.2 cm)
1"
(2.54 cm)
6"
(15.2 cm)
24"
(60.96 cm) min.
To avoid tipping during use, the solid soffit must be within 1" (2.5 cm)
maximum above the refrigerator. If the solid soffit is higher than 1" (2.5 cm)
or one is not available, then the refrigerator must be braced.
If the anti-tip boards are needed, they must be attached to the rear wall
studs 80" to 90" (203 to 229 cm) above the floor.
41" (104 cm)
25 1/8"
(64 cm)
Note: A clearance of 1/2" (1.3 cm) must be maintained above the top grille
in order for the top grille to be removed.
A grounded 3 prong electrical outlet should be placed within 4" (10.2
cm) of the right side cabinets or end panel. The water shutoff should be
located in the base cabinet on either side of the refrigerator or some other
easily accessible area. If the water shutoff valve is not in the cabinets, the
plumbing for the water line can come through the floor or the back wall.
1.800.735.4328 | THERMADOR.COM
273
REFRIGERATION 48-INCH SIDE-BY-SIDE REFRIGERATOR
Models: KBUIT4855E, KBUIT4865E, KBUDT4855E, KBUDT4865E, KBUIT4875E, KBUDT4875E
Stainless steel side-by-side
with internal ice maker.
Stainless steel side-by-side
with full-filtered external
ice and water dispenser.
Custom panel side-by-side
with internal ice maker.
Custom panel side-by-side
with full-filtered external
ice and water dispenser.
KBUIT4855E
Masterpiece® Handles
KBUDT4855E
Masterpiece® Handles
KBUIT4865E
Professional Series handles
KBUDT4865E
Professional Series handles
KBUIT4875E
Masterpiece® and
Professional Series Handles
can be ordered separately.
KBUDT4875E
Masterpiece® and
Professional Series Handles
can be ordered separately.
INSTALLATION OPTIONS
SPECIFICATIONS
Total Capacity (cu. ft.)
29.6
Refrigerator Capacity (cu. ft.)
18.8
Freezer Capacity (cu. ft.)
10.8
Product Width
47"
Product Height
83 1/8"
Product Depth
25"
Cutout Width
47 1/2" – 47 3/4"
Cutout Height (Min–Max)
83 1/2" – 84 3/8"
Cutout Depth
24"
Energy Consumption
657 kWh with Dispenser
580 kWh without Dispenser
Electrical Supply
115V / 60Hz / 6.9 Amp
Power Cord Included
120V-3 prong
Shipping Weight (lbs.)
573 – 613
Specifications in the planning pages provide dimensions and installation
detail for the stainless steel models as well as installation detail for the
custom panel series.
CUSTOM PANELS
The custom panel series features factory-installed, traditional style
trim to provide a “framed” look. This series requires the installation of
custom panels that are not included. You will need to create the panels
yourself or consult a qualified cabinetmaker or carpenter. See dimension
drawings on pages 264-271 for panel specifications.
On the custom panel series, you can create a “frameless” look using
full-overlay custom panels. You will need to order a Trimless Trim Kit
(TRIMKITSXS). This accessory kit contains parts to replace the factory
trim. Full-overlay custom panels and handles are required but not
included in the accessory kit. Create the panels according to the
specifications in the “Full-Overlay Custom Panels” section. You can
order a set of Thermador’s handles or select handles from another
source. For door clearances, see “Handle and Door Clearances for
Custom Panel Series.”
SIDE PANELS
Custom side panels may be needed when not enough space is
available to have cabinets on both sides of the refrigerator or when
the refrigerator is placed at the end of a cabinet run. For the stainless
steel models, you may choose an Inset, Flush, or Recessed Inset panel
installation. For the custom panel series, you may choose an Inset or
Recessed Inset panel installation.
All refrigerators are UL and CUL approved.
274
Models: KBUIT4855E, KBUIT4865E, KBUDT4855E, KBUDT4865E, KBUIT4875E, KBUDT4875E
25 3/8"
(64.5 cm)
Width dimensions were
measured from trim edge
to trim edge.
23 1/2"
(59.7 cm)
Height dimensions are
shown with leveling legs
extended 1/8" (3 mm)
below the rollers.
*83 3/8"
(211.8 cm)
*When leveling legs are
fully extended to 1 1/4"
(32 mm) below rollers,
add 1 1/8" (29 mm) to the
height dimensions.
The depth from the front of
the top grille to the back of the
refrigerator cabinet is 25 1/8"
(64 mm).
The water line attached to
the back of the refrigerator
is 5 ft (1.5 mm) long. Height
dimensions are shown with
leveling legs extended 1/8"
(3 mm) below rollers.
*83 3/8"
(211.8 cm)
84" (213.4 cm)
Power Cord
*When leveling legs are fully
extended to 1 1/4" (32 mm)
below rollers, add 1 1/8" (29
mm) to the height dimensions.
REFRIGERATION — SIDE-BY-SIDE
REFRIGERATION 48-INCH SIDE-BY-SIDE REFRIGERATOR
*3 1/2" (8.9 cm
48 1/4" (123 cm)
80" - 90"
(203-229 cm)
14 3/8" (36.5 cm)
4"
(10.2 cm)
44"
(111.8 cm)
39"
(99.1 cm)
1/4"
19
(48.9 cm)
83 1/2" (212.1 cm) min.
84 3/4" (215 cm) max.
to bottom of solid soffit
51 3/8"
(130.5 cm)
43 7/8"
(111.4 cm)
90˚
110˚
130˚
77"
(196 cm)
90˚
110˚
130˚
47 1/2" (120.7 cm) to
47 3/4" (121.3 cm)
The location must permit both doors to open to a
minimum of 90°. Allow 4 1/2" (11.4 cm) minimum space
between the side of the refrigerator and a corner wall.
6"
(15.2 cm)
TOP GRILL CLEARANCE
NOTE: More clearance may be required if you are using
overlay panels or custom handles.
1/2"
(1.3 cm)
6"
(15.2 cm)
1"
(2.54 cm)
6"
(15.2 cm)
24"
(60.96 cm) min.
To avoid tipping during use, the solid soffit must be within 1" (2.5 cm)
maximum above the refrigerator. If the solid soffit is higher than 1" (2.5 cm)
or one is not available, then the refrigerator must be braced.
If the anti-tip boards are needed, they must be attached to the rear wall
studs 80" to 90" (203 to 229 cm) above the floor.
47" (119 cm)
25 1/8"
(64 cm)
Note: A clearance of 1/2" (1.3 cm) must be maintained above the top grille
in order for the top grille to be removed.
A grounded 3 prong electrical outlet should be placed within 4" (10.2
cm) of the right side cabinets or end panel. The water shutoff should be
located in the base cabinet on either side of the refrigerator or some other
easily accessible area. If the water shutoff valve is not in the cabinets, the
plumbing for the water line can come through the floor or the back wall.
1.800.735.4328 | THERMADOR.COM
275