1
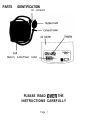
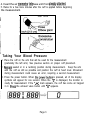
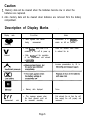
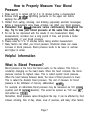
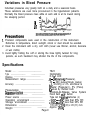
.............................................................
Digital Blood Pressure Monitor
Model 7623 Instruction Manual
Important Notes
Please read this manual carefully before using this device.
This Blood Pressure Monitor is intended for use by adults only.
Children should not use this monitor unless it is under the supervision
of an adult.
Only a physician is qualified to interpret changes in your blood pressure.
This device is not intended to replace regular medical examinations, It is
recommended that your physician review your procedure for using this
monitor. Never make adjustments to your medicaiton unless it is the advice
of a physician.
Please read these instructions carefully for accurate measurements
PARTS
IDENTIFICATION
Air connector
Memory button/Power button
PLEASE READ OVER THE
INSTRUCTIONS CAREFULLY
Page 1
~ ASSEMBLING YOUR UNIT
hxdalling Batteries
1. .To install batteries remove the battery cover and insert the batteries into the
battery compartment as shown. Use only “AA” alkaline batteries.
A. Remove the battery cover from bottom of unit. Insert four “AA” size alkaline
batteries as shown, taking care to observe the proper direction for each battery.
Use of alkaline batteries is recommended.
~B. Replace battery cover.
~2. Push the air connector firmly into the air socket on the back of the unit.
~ Important Notes
~l Replace all four batteries if the low battery symbol appears on the display.
l Remove batteries if storing the unit more than six months without use. Never
~ leave dead batteries in an unit since they may leak and cause damage.
1 Memory data will be cleared when batteries are changed or become exhausted.
Proper Use of the Arm Cuff
,l. Please relax and remain seated or reclined in a quiet location for 5 to 10
~ minutes prior to taking a measurement.
12. Remove any clothing on the upper arm so that the cuff can be placed directly on
the skin. Constriction of the upper arm caused by rolling up a shirt sleeve may
cause an inaccurate reading. Avoid this condition by completely removing the
garment causing the constriction.
,3. Wrap the cuff around the upper arm as shown in the diagram on page 3. The
~ lower edge of the cuff (edge with air hose attached) should be about 1 inch
above the elbow. Position the cuff so that the hose runs along the inside of
the left arm.
Page 2
~4. Insert the air connector.into base unit if not already.attached.
) 5. Relax for a few more minutes after the cuff is applied before beginning
~the measurement.
1
i
Left Arm
~Taking Your Blood Pressure
1. Place the cuff on the arm that will be used for the measurement
(preferably the left arm). See previous section on proper cuff placement.
‘2. Remaih seated or in a reclining position during measurement. Keep the arm
~ with the cuff as still as possible and position the cuff at heart level. Movement
during measurement could cause an error, requiring a second measurement.
3. Press the power button. When the.power’button is pressed, all of the display
symbols will appear for one second. When the “0” is displayed, the monitor is
ready for measurement. If the “A’ mark appears, the cuff has some air trapped
in it. Rress the exhaust valve button until “0” appears.
Page 3
Pressurize the cuff by squeezing the rubber bulb. Squeeze and release the
rubber bulb until the unit indicates a pressure 30 to 40 mmHg greater than your
expected systolic blood pressure.
4. The automatic exhaust mechanism will gradually reducethe pressure in the cuff
and the symbol V will appear.’ Also displayed will be the gradually decreasing I
cuff pressure on the left, and the exhaust rate (mmHg/ set) on the right.
Initially, the exhaust rate may exceed 5 mmHg/sec, but should settle down to a
range between 1 and 5 mmHg/sec. If the exhaust rate is consistently outside of
this range, please call customer service at i-800-621-8854.
Current pressure value Measurement mark
(gradually being reduced)
Remain still during the measurement.
When a pulse is detected, the symbol V will blink in unison with the pulse of the
person being monitored and the pressure display will switch to the right side.
[-I
Flashing
Current pressure value
(gradually being reduced)
When the measurement has been completed, the systolic and diastolic
pressures will be displayed. The display will alternate with the pulse rate
display as shown below.
Page 4
I
Press the exhaust valve to remove. the remaining.air from the cuff.
t
When initial pressurization was insufficient, the symbol I\” wiil appear.
Repressurize the cuff to a value 30 to 4OmmHg greater than the previous time.
n
If an error message is displayed, or you get a reading that you do not believe is
accurate, wait 10 minutes before trying again.
Memory Operation ,
1. When a valid measurement is made, the reading data (systolic, diastolic and
pulse rate) will be stored in the MEMORY as soon as the unit is turned off.
2. The reading in MEMORY can be viewed at any time (except when another ,
measurement is in progress) by pressing the MEMORY button. An “M” appears
in the lower left corner of the display when you are viewing the data in MEMORY.
3. After another valfdmeasurement is performed, the.results of this current
measurement will appear on the display. When the MEMORY button is pressed,
the previous reading will appear once on the display (along with the “M
symbol). Then the display will revert to the current reading.
4. When the unit is shut off (either by manually pressing the ON/OFF button or
when the Auto-off feature operates) the last valid reading taken will be stored
in MEMORY, overwriting the previous data.
Page 5
Caution
1. Memory data will be cleared when the batteries become low or when the
batteries are replaced.
2. Also memory data will be cleared when batteries are removed from the battery
compartment.
Description of Display Marks
Display
mark
,
Condition
l
(r
Measuring
V
l
Exhaust
l
Action
Mark appears and flashes
during
measurement
Measurement is in progressremain as still as possible
Mark Hashes when there is air
remaining in the cuff at power up
Press the exhaust Valve button
to exhaust the air
Mark llashes at the completion
of the measurement until exhaust
is comolete
Increase pressurization by 30 to
l
b-r
Measurement
error
I
l
Memory data displayed
This message appears when
the blood pressure could not
be measured accurately
Page 6
None
First exhaust the air from the cuff,
then reapply the cuff properly and
remeasure
How to Properly Measure Your Blood
Pressure
1. Relax and try to remain still for 5 to 10 minutes before a measurement.
2. Remove shirts or,other tight-fitting garments on the upper arm before
applying the arm cuff,
3. Refrain from eating, smoking, and drinking (especially alcoholic beverages)
before a measurement since these activities can effect your blood pressure.
4. Remember that blo,od pressure varies continuously throughout the
day. Try to take your blood pressure at the same time each day.
5. Do not be too impressed with the results of one measurement. Many
measurements, recorded over a long period of time, will provide a better
understanding of your blood pressure.
6. Please relax for 5 to 10 minutes before taking another measurement.
7. Many factors can affect your blood pressure. Emotional stress can cause
increase in blood pressure. Blood pressure tends to be lower in summer
and higher in winter.
Helpful Informatlon
What is Blood Pressure?
Blood pressure is the force that blood exerts on the arteries. This force is
constantly changing as the heart beats. When the heart contracts, the blood
pressure reaches its highest value. This is called systolic blood pressure.
When the heart relaxes between beats, the value of blood pressure is lower.
This is called the diastolic blood pressure. The unit of measure for blood
pressure is the millimeter of mercury, abbreviated, mmHg.
For example, an individuals blood pressure may be measured as 120 mmHg
(systolic) and 80 mmHg (diastolic). This would be spoken as “120 over 80”,
and written as 120/80.
Remember, blood pressure varies throughout the day. It can be affected by food
intakes, smoking, time of day, stress, level of exercise, and many other factors.
Page 7
What is High Blood Pressure?
Hypertension, or high blood pressure, is a condition where an individual’s
blood pressure remains high over a long period of time. Untreated,
hypertension can cause many serious medical problems including strokes and
heart attacks. To control hypertension, the American Heart Association
recommends that you not smoke, reduce fat and salt intake, maintain proper
weight, exercise, and get regular physical checkups.
Why is it Important to Measure your
Blood Pressure at Home?
Having your blood pressure taken at the doctors office may cause the patient to
become nervous, thus artificially raising the individual’s reading. Taking your
own blood pressure reading at home can eliminate this source of inaccuracy.
Having the capability to measure blood pressure at home provides a good way
to determine one’s fundamental blood pressure. This is defined as the first
blood pressure reading upon waking, before taking any food or drink.
Take your blood pressure every day. Make a log of your daily readings. When
used as a supplement to a doctors readings, this information will help you gain
a greater understanding of your blood pressure and the factors that
affect it.
Blood Pressure Classifications
Standards for assessment of high blood pressure, without regard to age,
have been established by the World Health Organization (WHO), as
shown in this chart
Page 8
Variations in Blood Pressure
Individual pressures vary greatly both on a daily and a seasonal basis.
These variations are even more pronounced in the hypertension patients.
Normally the blood pressure rises while at work and is at its lowest during
the sleeping period.
1
;
11
:
1. Precision components were used in the construction of this instrument.
Extremes in temperature, direct sunlight, shock or dust should be avoided.
2. Clean the instrument with a dry, soft cloth (never use thinner, alcohol, benzene
or wet cloths).
3. Avoid tightly folding the cuff or storing the hose tightly twisted for long
periods, as such treatment may shorten the life of the components.
Specifications
Model ...... .. . ...............................................
. ............................
Type ..............................
Display ......................................................
Measurement range ..................................
7623
Oscillometric
6 di it LCD
.O - h8OmmHg (Pressure),
40 - 200 pulses/minute (pulse)
t/- 3mmHg or 2% whichever is
Accuracy ....................................................
reater (Pressure)+/- 5% (Pulse)
ifanual by Rubber bulb
Pressurization ............................................
Constant-Air-Release Valve System
Depressurization ........................................
Deflation ........................ . ........................... Hand held ush button
alme batteries ( 4 )
Type AA Al R*
Power source .............................................
Operating environment ..............................
t1OC - t4OC, less than 85% RH
t1OC - t6OC, less than 95% RH
Storage environment ..................................
135 (W) x 105 (D) x 45 (H) m m
Dimensions ...............................................
................... Approx 2009
Weight ....................................
Page 9
LIMITED ONE YEAR WARRANTY
This product is warranted for one year from the date of purchase against defects
in material and workmanship. If the product fails to operate during this period,
return it, prepaid, to:
Appliance Service Station,
160 Commerce Drive
P.O. Box 508
Bay Springs, MS 39422
for repair or replacement without charge at the manufacturers option or call
l-800-621-8854. This warranty gives you specific legal rights, and you may
also have other rights which vary from state to state.
01996 Sunbeam Company, Inc. or its affiliated companies.
MODEL 7623
pn. 67778 -2
PLEASE DO NOT ADJUST YOUR MEDICATION
WITHOUT CONSULTING AND APPROVAL BY
YOUR PHYSICIAN.
Page 10
REPLACEMENT PARTS AND ACCESSORIES
1 PART#
1
DESCRIPTION
I PRICE I QUANTITY
ITOTAI.
Order Total: $
Above prices include shipping and handling.
Please print your name and address below.
Send to:
Sunbeam BP Parts, P.O. Box 1964,
Laurel, MS 39441
For Mastercard or VISA: Circle one
Authorization Signature
Page 11
Master Card
VISA