1
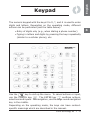
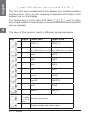
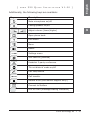
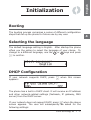
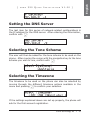
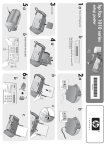
snom 320
VoIP Business Phone
Quick Installation
© 2005 snom technology AG
All rights reserved.
Version 1.00
www.snom.com
snom technology AG
Gradestr. 46
12347 Berlin, Germany
Note to the reader
This is a quick guide to the installation and operation of the snom 320.
The full manual is available on our web page, www.snom.com.
© 2005 snom technology Aktiengesellschaft.
All Rights Reserved. This document is supplied by snom technology AG. No
part of this document may be reproduced, republished or retransmitted
in any form or by any means whatsoever, whether electronically or
mechanically, including, but not limited to, by way of photocopying,
recording, information recording or through retrieval systems, without
the express written permission of snom technology AG.
snom technology AG reserves the right to revise this document and make
changes at any time and without the obligation to notify any person and/
or entity of such revisions and/or changes.
Product specifications contained in this document are subject to change
without notice.
English
Table of Contents
Note to the reader ...................................................................... 2
Installation ................................................................5
Delivery Content ........................................................................ 5
Safety Information ...................................................................... 5
Power supply ............................................................................. 5
Setting up the Phone ................................................................... 6
Wall Mounting ........................................................................... 6
Cleaning .................................................................................. 10
Connecting the phone ..............................................11
Keypad .....................................................................13
Initialization.............................................................17
Booting ................................................................................... 17
Selecting the language ............................................................. 17
DHCP Configuration................................................................... 17
Setting the IP Address ............................................................... 18
Setting the Netmask ................................................................. 18
Setting the IP Gateway .............................................................. 18
Setting the DNS Server ............................................................. 19
Selecting the Tone Scheme ........................................................ 19
Selecting the Timezone ............................................................. 19
Logging on the first account ....................................................... 20
Index .......................................................................23
snom technology AG •
3
4
•
English
English
Installation
1
Delivery Content
Please check whether the delivery contains the following parts:
•
The base unit with display and keypad
•
The handset
•
The handset cable
•
The power supply (optional)
Safety Information
Please read the following safety notices before installing or using
your snom phone. They are crucial for the safe and reliable operation
of the device.
Power supply
You have two options for providing the snom 320 with power:
•
An external power supply (5 V)
•
Power feeding over the network cable (IEEE 802.3af
compatible)
If you want to use an external power supply, use the one that is
included in the package. Other power supplies may cause damage
to the phone, affect its behavior or induce noise.
snom technology AG •
5
English
1
[
S N O M
320 Q
U I C K
INSTALLAT
I O N
V1.00 ]
Setting up the Phone
Your snom 320 is delivered with the footstand attached to the
phone’s bottom shell (shaded gray in Fig. 1). Place the snom 320
on an even, horizontal surface that gives the rubber pads a secure
grip. Do not place it on carpets or other materials containing fibers
that could block the air vents and cause overheating.
After connecting the phone (see chapter Connecting the Phone,
below), clip the cords into the appropriate slots on the footstand or,
in the case of the handset cord, on the bottom shell of the phone
(Fig. 2).
Fig. 1
Fig. 2
Wall Mounting
It is also possible to mount the snom 320 on the wall. In order to
do this, you detach the footstand from the bottom shell and attach
it in the appropriate position for wall mounting, as described in
steps 1 through 6, below.
6
•
Installation
1
Fig. 3
2
S N O M
320 Q
U I C K
INSTALLAT
I O N
V1.00 ]
Turn the phone upside down (Fig. 3). Please, ensure that
you do not damage the display and/or its hinge and that
you do not drop the receiver. You may want to hold the
phone in your lap or have a second person hold it.
Fig. 4
Lightly press the snap-fits of the footstand inwards
(Fig. 3) and, at the same time, tilt the footstand
backwards and lift it from its anchorage in the mounting
holes (Fig. 4).
3
Rotate the footstand 180° around its vertical axis.
4
Make sure that the handset cord has been clipped
correctly into the groove on the bottom shell of the
phone, as shown in Figs. 4 and 6. Failure to clip the
cord into the groove will result in damage to the cord
when the footstand is attached in the position for wall
mounting.
snom technology AG •
7
English
[
1
English
[
S N O M
U I C K
INSTALLAT
I O N
V1.00 ]
Insert the outside, rear snap-fits into the mounting
holes on the bottom shell (Fig. 5, arrow no. 1). Tilt
the footstand forward and downward until the snap-fits
snap into place in the mounting holes. Please, make
sure that the four snap-fits have securely snapped
into the holes before mounting the phone on the
wall.
5
1
Fig. 5
6
320 Q
Fig. 6
The slots on the footstand for the various cords can
also be used when the phone is mounted on a wall.
After connecting the phone (see chapter Setting up the
Phone, above), form the cords into loops and gently
press the long ends into the slots on the footstand. The
loops should not be too big, so that they will not hamper
the secure mounting of the phone on the wall, and not
too small, so that the cords will not be bent or broken
(Fig. 6).
The delivery includes a template to be used for marking the position
of the holes to be drilled in the wall.
(Use wall plugs, if necessary, and screws with half-round head
profiles (diameters of screws dmax= 4.5 mm (0.1755”), diameters
of heads dmax=8.5 mm (0.3315”).
8
•
Installation
S N O M
320 Q
U I C K
INSTALLAT
I O N
V1.00 ]
The screws must protrude approx. 0.5 cm (0.195”) from the wall
for easy wall mounting of the phone.
1
Adjusting the Handset Rest
The speaker of the handset has a small, rectangular indentation
that fits over the rounded end of the plastic tab inserted into a slot
on the top shell of the phone. When the phone is mounted on the
wall, the handset must be placed on this rounded end to ensure
that it will not fall off.
Slide the tab out of the slot, as shown in Fig. 7, rotate it 180°, and
slide it back into the slot, as shown in Fig. 8.
Fig. 7
English
[
Fig. 8
Adjusting the Position of the Display
The position of the snom 320’s display is adjustable up to an angle
of 45° (Figs. 9 and 10).
Hold down the phone with one hand and adjust the display with
your other hand. Do not use too much force and do not pull,
wrench, or twist the display as this might damage or break the
hinges.
snom technology AG •
9
English
[
S N O M
320 Q
U I C K
INSTALLAT
I O N
V1.00 ]
1
Fig. 9
Fig. 10
Cleaning
To clean the snom 320, use an anti-static cloth. Please avoid
cleaning liquids as they might damage the surface or the internal
electronics of the phone.
10 • Installation
English
Connecting the
phone
2
First connect one end of the handset cable to the handset and
then to the jack labeled “
” on the left-hand side of the phone’s
bottom.
Next plug the Ethernet (network) cable into the RJ45 connector
”, and plug the other end into the network side to
labeled “
establish a data link. The second RJ45 connector, labeled “
”, is
for daisy-chaining further Ethernet devices without the need for a
second Ethernet connection line.
If you are using an external power supply, please insert the plug of
” next to the data
the power supply into the connector labeled “
line and hook up the casing into the mains.
If you want to use a headset, it can be connected to the audio jack
” on the bottom side of the snom 320.
labeled “
Clip the cords into the appropriate slots on the footstand or, in the
case of the handset cord, on the bottom shell of the phone (see
Fig. 1 in the chapter Setting up the phone, above).
snom technology AG •
11
English
[
S N O M
320 Q
2
12 • Connecting the phone
U I C K
INSTALLAT
I O N
V1.00 ]
English
Keypad
The numeric keypad with the keys 0 to 9, *, and # is used to enter
digits and letters. Depending on the operating mode, different
actions can be performed (see the table below):
3
• Entry of digits only (e.g., when dialing a phone number)
• Typing in letters and digits by pressing the keys repeatedly
(similar to a cellular phone), etc.
Use the
key to call up the menu. To cancel actions or input,
. The ENTER key
confirms actions,
use the CANCEL key
selections and inputs. For navigation, use the large round navigation
key in the middle.
Depending on the operating mode, the keys can have contextspecific meanings which are described in the manual.
snom technology AG •
13
English
[
S N O M
320 Q
U I C K
INSTALLAT
I O N
V1.00 ]
The four soft keys located below the display are context-sensitive
function keys. Their current mapping is depicted with texts in the
bottom line on the display.
/
next to them
The twelve keys on the right with LEDs
are programmable function keys onto which different functionalities
can be mapped.
3
The keys of the numeric block in different operating modes:
Key
Digits
Lower case
Upper case
0
(SPC)_0
(SPC)_0
1
. @ 1 , ? ! - . @ 1 , ? ! /():;&%*#+<=>$[] /():;&%*#+<=>$[]
2
abc2
ABC2
3
def3
DEF3
4
ghi4
GHI4
5
jkl5
JKL5
6
mno6
MNO6
7
pqrs7$
PQRS7$
8
tuv8
TUV8
9
wxyz9
WXYZ9
“#” or
“.” after
Number guessing
t i m e
out
*
14 • Keypad
Toggles upper and lower case
S N O M
320 Q
U I C K
INSTALLAT
I O N
English
[
V1.00 ]
Additionally, the following keys are available:
Key
Description
Mute microphone on/off
Casing speaker on/off
3
Adjust volume (lower/higher)
Open phone book
Info menu
Menu
Redial
Settings menu
XML add-on (planned)
Establish 3-party conference
‘Do not disturb’ mode on/off
Call hold/unhold
Call transfer
Record a call (with server support only!)
Connect to Mailbox
LED for MWI (message waiting indication)
snom technology AG •
15
English
[
S N O M
3
16 • Keypad
320 Q
U I C K
INSTALLAT
I O N
V1.00 ]
English
Initialization
Booting
The booting process comprises a series of different configuration
steps that set up the phone for future use by any user.
Selecting the language
The default language setting is English. After startup the phone
offers you the option to select the language of your choice. To
change to a different language, use the
or
keys and press
to confirm.
DHCP Configuration
If your network supports DHCP, press
appears:
when this screen
The phone has a built-in DHCP client. It will receive an IP address
and other network-related settings (Netmask, IP gateway, DNS
server) from the DHCP server.
when the above
If your network does not support DHCP, press
screen appears. The user will subsequently be asked for the
following settings:
snom technology AG •
17
4
English
[
S N O M
320 Q
U I C K
INSTALLAT
I O N
V1.00 ]
Setting the IP Address
The user can provide a static IP address for the phone if DHCP is
not used. A valid IP address appropriate to the network in which
the phone is being used can be provided.
4
The following edit functions for IP address editing are available via the
navigation key:
Clear IP address
Move cursor to the right
Backspace and delete sign to the left of the cursor
Move cursor to the left
Confirm input
Setting the Netmask
Similarly, the user will be asked to provide a Netmask.
.
entering the information, confirm with
After
Setting the IP Gateway
If a valid Netmask has been provided, the user will be asked for
the IP address of the IP gateway. After entering the information,
confirm with
.
18
•
Initialization
S N O M
320 Q
U I C K
INSTALLAT
I O N
English
[
V1.00 ]
Setting the DNS Server
The last item for this series of network-related configurations is
the IP address for the DNS server. After entering the information,
.
confirm with
Selecting the Tone Scheme
The user will then be asked for the tone scheme to be used on the
phone. After moving the cursor with the navigation key to the tone
.
scheme you wish to use, confirm with
Selecting the Timezone
The timezone to be used on the phone can also be selected by
moving through the different timezone options available in the
to confirm your selection.
menu and pressing
If the settings explained above are set up properly, the phone will
ask for the first account registration.
snom technology AG •
19
4
English
[
S N O M
320 Q
U I C K
INSTALLAT
I O N
V1.00 ]
Logging on the first account
If no number is assigned to the phone yet, you will be prompted to
key.
type in your account name. Confirm by pressing the
4
The phone will then try to guess the correct registrar. If the registrar
shown on the display is incorrect, please correct the information.
The screen might show something like this:
Confirm by pressing
to use ENUM.
. You will then be asked whether you want
Press
if you wish to use ENUM or
, if you do not. If you
have chosen ENUM, you will be asked for the country code (e.g.,
1 for the US) and the area code (e.g., 802 for Vermont). ENUM
means that a conventional E.164 number (normal phone numbers)
is mapped to a SIP URI so that a pure IP call can be started instead
of an IP/PSTN call. Regarding ENUM see also our white paper
„ENUM on snom phones“.
20
•
Initialization
S N O M
320 Q
U I C K
INSTALLAT
Enter the codes and confirm with
I O N
English
[
V1.00 ]
each time.
The phone tries to register your given account name at the given
registrar. The idle screen appears. Your registration has been
successful if the identity you have just configured is shown in
brackets in the top line. If, however, the letters „NR“ are shown
instead, the registration has not been successful.
4
When the registration has been successful, the time and date are
also shown on the display.
The complete manual is available on our web page,
www.snom.com.
snom technology AG •
21
English
[
S N O M
4
22
•
Initialization
320 Q
U I C K
INSTALLAT
I O N
V1.00 ]
English
Index
A
F
Account 20
Forwarding.
see Call Transfer
Adjust volume 15
B
H
4
Handset rest 9
Booting 17
Help 15
C
I
Call hold/unhold 15
Installation 5
Call transfer 15
IP Address 18
CANCEL key 13
IP Gateway 18
Casing speaker 15
Cleaning 10
Conference 15
K
Connecting the phone 6, 11
Connect to Mailbox 15
D
DHCP 17
Display 9
DNS Server 19
Keypad 13
L
Language 17
LEDs 14
LED for MWI 15
Do not disturb 15
M
E
ENTER key 13
Main menu 15
Manual 21
snom technology AG •
23
English
MENU key 13
Mute microphone 15
S
Safety 5
Safety Information 5
N
Settings menu 15
Netmask 18
Numeric block 14
Setting up the Phone 6
Soft keys 14
numeric keypad 13
T
O
Timezone 19
Open phone book 15
Tone scheme 19
5
W
P
Power supply 5
Wall mounting 6
External power supply 5
Power feeding 5
R
Record a call 15
Redial 15
Copyright © 2005 snom technology AG. All rights reserved. snom® is a registered
trademark of snom technology AG and affiliates in Germany, U.S.A. and certain other
countries. Other trademarks or registered trademarks mentioned in this document
are the property of their respective manufacturers or owners.
24
•
Index