1
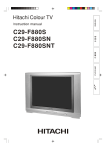
19 LCD TV/MONITOR
MODEL: LCD-19L03
User Guide
LCD-19L03
Description:
Job No.
Ref:
MANUAL(8M30£©
73004H
19L03
Revised:0
Brand Name:
SKYWORTH
P/No.
Scale:
Engineering Dept:
Artwork By:
Date:
Checked By:
Date:
Approved By:
Date:
2007-05-22
1
2
Installing your LCD TV set
The remote control's effective
range is 5 meters from the LCD
screen at an angle of up to +30
degree.Direct light may affect the
remote controls effective range.
Avoid subjecting the remote
control to shocks or vibrations.
Avoid placing the remote
control in humid and hot
environments such as direct
sunlight.
Remove the batteries when not
using the remote control for long
periods.
Insert the mains plug in the wall socket
having a mains voltage of 100¡«240V AC,
50/60Hz.
This TV operates on DC supply, so
through AC-DC adapter to socket at the
back of the TV, The power is +12VDC.
IN THE BOX
You should have:
Television x1set
User Guide x1pc
Warranty Card x1pc
AAA battery x2
Stand x1pc
Wall Mount x1pc
Remote Control x1pc
3
Location of Controls
Front View of TV Set
1.
2.
3.
4.
5.
6.
7.
8.
9.
10.
Remote Sensor
Power Indicator
ON/OFF Button
TV/AV Button
VOL.- Button
VOL.+ Button
PROG.- Button
PROG.+ Button
Menu Button
Speakers
10
9
8
7
6
5
4
3
2
1
10
Rear View of TV Set
1.
2.
3.
4.
5.
6.
7.
PC AUDIO IN
VGA Input
AUDIO input(for YPbPr)
YPbPr Input
AV Input
TUNER IN
12V DC Input
7
1
2
3
AUDIO IN 1
PC AUDIO I N
VGA
R
COMPONENT
L
Y
Pb
4
6
5
4
AUDIO IN 2
VIDEO
Pr
TUNER IN
L
R
Remote Control Functions
Remote Control Unit For TV
POWER BUTTONS
Switch the TV from on to standby or from off to
operate.
MUTE BUTTON
Press once to mute the sound, press again to
return to previously set sound level.
DIGIT BUTTON
This TV allows you to select channels from 0 to
124.
Press this button to select one-digit, two-digit
or three-digit channels input options.
To select a one-digit channel (e.g. Channel 8),
press this --/--- button to change channel
selection to "-" on screen display and press the
"8" button only.
To select a two-digit channel (e.g. Channel 28),
press this --/--- button to change channel
selection to "--" on screen display and press "2"
and "8" buttons.
To select a three-digit channel (e.g. Channel
120), press this --/--- button to change channel
selection to "---" on screen display and press
"1" , "2" and "0" buttons.
AV/TV BOTTON
Press this button to switch among TV broadcast,
AV input program and other source.
With wraparound.
TV
AV
PC
YPBPR
MENU BOTTON
Press this button to enter the menu screens
for various optional adjustable settings.
5
Remote Control Unit For TV
PROGRAM UP P.+ / DOWN P.- BOTTONS
Press these buttons to select channels in
ascending or descending order.
VOLUME UP V.+ / DOWN V.- BOTTONS
Press these buttons to adjust the volume level
up or down.
HOT KEY - inapplicability
Q.VIEW BOTTON
Press this button to return to the previously
viewed program.
S.S. BUTTONS
,
Sound mode set(D/K, B/G, I, L, L)
P.P. BUTTON
TV mode, press this button to adjust the picture
mode.
USER
NATURE
SOFT
BRIGHT
DISPLAY BOTTON
Press this button to display the settings on
the screen. (e.g. Channel number for TV input,
colour system,sound system and sound mode. )
I/II SOUND MODE SELECTION BOTTON
When stereo program is received, press
this button to select STEREO or MONO.
When bilingual program is received, press
this button to select NICAM-I, NICAM-II or
MONO.
6
Remote Control Unit For TV
SLEEP BUTTON
This key is used to set the sleep time .
The choices are 15,30,45,60 and off.
REVEAL
Press the key to reveal/conceal the hidden
information. Such as solutions to riddles and
puzzles.
CANCEL - inapplicability
INDEX - inapplicability
SIZE - inapplicability
SUB.PAGE - inapplicability
MIX - inapplicability
HOLD - inapplicability
TEXT - inapplicability
7
Operation Guide
PICTURE
PICTURE
Enter Picture menu, you can select CONTRAST,
BRIGHTNESS, COLOUR, SHARPNESS, COLOR
TEMP. and PICTURE MODE items by pressing
PROG+/- Buttons.
CONTRAST
C
CONTRAST
BRIGHTNESS
HUE
Press the VOL+/- button to increase/decrease the
contrast of the picture.
COLOUR
MOVE
SELECT
EXIT
BRIGHTNESS
Press the VOL+/- button to lighten/darken the picture.
COLOUR
Press the VOL+/- button to increase/decrease the
colour saturation.
SHARPNESS
Press the button to sharpen or soften the picture.
COLOR TEMP.
Press the button to select a suitable colour
temperature to display.
The choices are" Warm " ," Normal " , " Cool" .
PICTURE MODE
Press the button to change the contrast and
brightness and colour value of picture.
The choices are USER , NATURE , SOFT ,
BRIGHT , with wrap arround.
AUDIO
AUDIO
BASS
C
TREBLE
BASS
BALANCE
SOUND MODE
MOVE
Enter AUDIO menu, you can select BASS, TREBLE,
BALANCE, SOUND MODE, NICAM and AVL items by
pressing PROG+/- Buttons.
STANDARD
SELECT
Press the VOL+ or VOL- button to adjust the bass
boost value.
EXIT
TREBLE
Press the VOL+ or VOL- button to adjust the high
frequency signal value.
8
Operation Guide
BALANCE
Press the VOL+ or VOL- button to adjust to the left to
right sound channel volume.
SOUND MODE
Press the button to obtain special sound effects.
The choices are "USER" , " STANDARD" , " MOVIE " and
" MUSIC " with wrap arround .
NICAM
The choice is MONO , NICAM I and NICAM II.
AVL
Automatic Volume Leveling.
The choices are on and off .
CHANNEL
CHANNEL
Enter CHANNEL menu, you can select AUTO SCAN,
CHANNEL, COLOUR SYS., SOUND SYS.,
SKIP, MANUAL, FINE , COUNTRY and PROGRAMitems
by pressing PROG+/-Buttons.
AUTO SCAN
C
AUTO SCAN
CHANNEL
13
COLOUR.SYS
AUTO
SOUND.SYS
MOVE
B/G
SELECT
EXIT
The auto search action takes care of program tuning,
storing and retrieving program information.
CHANNEL
You can choose program from 1 to 124 you ecpect by pressing
VOL+/- buttons.
COLOUR SYS.
,
Press the button to select a new colour standard value
in TV.
The choices are AUTO , PAL and SECAM .
SOUND SYS.
Press the button to select a new sound standard value
in TV.
,
The choices are " B/G " ," I" , "D/K" ," L" and " L ".
9
Operation Guide
SKIP
Press the skip to enable or disable the selected
program from being tuned to by pressing VOL+/Buttons.
The choices are " on " and " off ".
MANUAL
MANUAL
The manual can get program you expect by PROG+/-,
and can gain frequency accordingly by VOL+/-.
MANUAL SCAN
8
57.75MHz
FINE
Press VOL+/- button to adjust the little change of
frequency.
COUNTRY
The choose are AUSTRIA, GERMANY, SWITZERLAND,
BELGIUM, NETHERLANDS, UK, IRELAND, DENMARK,
FINLAND, ITALY, NORWAY, SPAIN, SWEDEN,
LUXEMBURG, FRANCE, CZECH, POLAND, HUNGARY.
PROGRAM
PROGRAM
PROGRAM
001
002
003
004
005
006
C
NAME
007
008
009
010
011
012
013
DELETE
014
015
016
017
018
019
020
INSERT
It can choose some channel you except by PROG+/- or
VOL+/-, and can name, delete and insert the one.
The red marker is call some channel .When chooseing
some channel and pressing the red mark, it appears
one small white frame and you can start to call the
channel .
Note: moving the positon by VOL+/-;
choosing the letter,number and sign by PROG+/-.
PROGRAM
000
002
003
004
005
006
C
OK
007
008
009
010
011
012
013
CANCEL
014
015
016
017
018
019
020
The green marker is delete some channel.
The yellow marker is insert some channle.
Enter submenu,
Pressing the red marker after call some channel and ok;
Pressing the green marker after call some chanel and
cancel.
10
Operation Guide
FUNCTION
Enter FUNCTION menu, you can select TIMER, PIC
MISE, SCALING, BLUE SCREEN, TXT LANGUAGE and
FACTORY RESET items by pressing CH+/- Buttons.
FUNCTION
TIMER
C
PIC MISC
FULL
SCALING
BLUE SCREEN
MOVE
SELECT
ON
EXIT
TIMER
The user-controlled timers are the CURRENT, TURN
OFF, TURN ON, TURN ON PROGRAM, SWITCH TIME
and SWITCH PROGRAM .
Press VOL+ to enter the submenu.
CURRENT
Set the time for the Real-time Clock .
FUNCTION
CURRENT
00 : 40
TURN OFF
-- : --
TURN ON
-- : --
C
TURN ON PROGRAM
MOVE
SELECT
TURN OFF
Set the off timer value.
1
EXIT
TURN ON
TV set will turn on auto maticallly if you set turn on time
which behind the turn off time.
TURN ON PROGRAM
Set the program you expect which will appears
automatically when TV set on again.
SWITCH TIME
Set the switch timer value.
SWITCH PROGRAM
Set the program to switch to when the switch timer
expires.
11
Operation Guide
PIC MISC
The function is picture adjustment which are LTI, CTI,
BLACK EXTEND and DNR .
FUNCTION
LTI
CTI
C
BLACK EXTEND
DNR
MOVE
ON
LTI
ON
It is the improvement of brightness.
The choices are on and off.
OFF
WEAK
SELECT
EXIT
CTI
It is the improvement of colour.
The choices are on and off.
BLACK EXTEND
It is extendability of black level.
The choices are on and off
DNR
It is reduce noise.
The choices are NORMAL,STRONG,WEAK
SCALING
Choosing the scale of picture you expect.
The choices are normal and full.
BLUE SCREEN
The choices are on and off.
It appears blue screen in TV set when choose on or
appears snowflake dot.
TXT LANGUAGE
The choices are WEST, EAST, RUSSIAN, ARABIC,
FARSI and AUTO.
FACTORY RESET
The function can cancel all current channels.
12
Operation Guide
Enter OSD menu, you can select LANGUAGE,
H-POSITION, V-POSITION,DURATION and HALFTONE.
OSD
OSD
LANGUAGE
C
ENGLISH
LANGUAGE
The choices are ENGLISH, CHINESE.
H-POSITION
H-POSITION
V-POSITION
DURATION
MOVE
SELECT
EXIT
Moving the main menu position in left or right by
pressing VOL+/- buttons.
V-POSITION
Moving the main menu position in up ro down by
pressing VOL+/- buttons.
DURATION
,
Changing the main menu s display time by pressing
VOL+/- buttons.
HALFTONE
,
Chaning the main menu s background color by
pressing VOL+/- buttons.
13
Operation Guide
Other sources
Press the TV/AV Button to select the AV source .
In AV state,There are 5 geneal menu supported
all function s are the same as in TV mode.
AV
In YPBPR state, there are 4 geneal menus(Picture,
Audio,Function,OSD) supported all functions are the
same as inTV mode.
YPBPR
PC
PC
CONTRAST
C
BRIGHTNESS
H-POSITION
H-POSITION
V-POSITION
MOVE
In PC state, there are 4 geneal menus(Picture,
Audio,Function,OSD) as TV.
When entering the PC mode, select the PICTURE menu,
you can select CONTRAST, BRIGHTNESS,
H-POSITION,V-POSITION, CLOCK ,PHASE ,COLOUR
and AUTO ADJUST items by pressing CH+/- buttons.
SELECT
EXIT
The H-Position menu allows control of horizontal
position of the picture on the display.
V-POSITION
The V-Position menu allows control of vertical
positon of the picture on the display.
CLOCK
Changing the clock in pc by pressing VOL+/- buttons.
PHASE
Changing the phase in pc by pressing VOL+/- buttons.
COLOR
COLOR TEMP.
PC
COLOR TEMP.
C
USER
USER - R
USER - G
USER - B
MOVE
SELECT
EXIT
Press VOL+ button to enter the submenu.
COLOR TEMP
Press the button to adjust the best visual effect of
picture.
The choices are USER, NORMAL, WARM, COOL and
SRGB.
When choosing the user, the belowing all item will
adjust by VOL+/-.They are USER-R, USER-G and
USER-B.
AUTO ADJUST
Start the auto-adjust procedure to automatically
determine the values for horizontal position, vertical
position, phase adjust and clock adjust.
Recommend: Don 't changed theses values after auto
adjust at best.
CONTRAST, BRIGHTNESS functions are the same
as functions in TV.
14
Notice of PC connection
1.Power off both computer and display before making any connections.
The monitor comes with a 15-pin PC socket.
Connect the end of signal cable to the
socket of the TV and connect the other end
to the 15-pin connector to the computer.
15 Pin Mini D-Sub Connector
2.PC input typical display mode table:
The following table is an illustration of some of the typical video display modes.
1
2
3
640X480(recommend 60Hz)
800X600(recommend 60Hz)
1024X768(recommend 60Hz)
3.We can set different values in Frequency, phase, H-offset and V-offset. And
we also can select the Auto adjust to adjust different picture modes
automatically.
Component input (YPbPr)
The following table is an illustration of some of the typical video
display modes.
1
2
3
4
5
6
480i
480p
576i
576p
720p(50/60Hz)
1080i(50/60Hz)
15
Tips(TV)
Symptoms
Possibl
e
Remed
ies
Tr y diffe
rent ch
annel,
Check
if OK, p
aerial c
robably
onnecti
Check
station
ons on
aerial fo
trouble
back o
r
broken
f set
Re-orie
w
ires
nt aeria
l (if ind
Probab
o
o
r type)
ly local
interfere
Adjust
nce, su
fine tun
ch as a
ing con
Adjust
n applia
trol
brightn
nce
ess con
Adjust
trol
contrast
control
Check
if statio
n is bro
Adjust
adcast
colour
ing colo
control
ur
Check
if syste
m
is corre
Check
c
tl
if on/o
y set
ff
switch
Check
is "on"
batteri
es in re
mote c
ontrol u
nit
Please make these simple checks as
indicated (
) on the chart for the
respective symptoms and their possible
remedies.
No picture, no sound
Poor sound, picture OK
Poor picture, sound OK
Weak picture
Blurred picture
Double image
Lines in picture
Distorted picture
Weak reception on some channels
Horizontal bars
Picture rolls vertically
Poor colour
No colour
Misoperation of Remote control
Remote control unit no operation
On Screen Display Control outside the screen
16