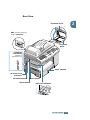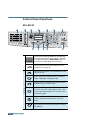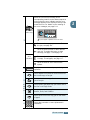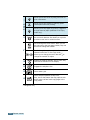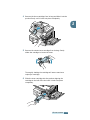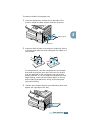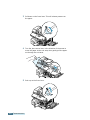
1
SCX-5312F/5112
User’s Guide
Home
Visit us at:
www.samsungelectronics.com/mfp
P/N: JC68-00851A Rev. 2.00
CONTENTS
Chapter 1:
GETTING
STARTED
Unpacking ..........................................................
Component Location ............................................
Front View .....................................................
Rear View ......................................................
1.2
1.4
1.4
1.5
Control Panel Functions ........................................ 1.6
SCX-5312F .................................................... 1.6
SCX-5112 ...................................................... 1.9
Making Connections ............................................
Installing Drum and Toner Cartridges ....................
Turning the Product On .......................................
Loading Paper ....................................................
Setting the Paper Size .........................................
Changing the Display Language ............................
Using Save Mode ................................................
Toner Save ...................................................
Paper Save ...................................................
Power Save ...................................................
Chapter 2:
1.11
1.14
1.17
1.17
1.20
1.20
1.21
1.21
1.21
1.22
INSTALLING SOFTWARE
About Samsung Software .....................................
MFP Driver .....................................................
SmarThru Software .........................................
OCR Software (AnyPage Lite) ...........................
2.2
2.2
2.2
2.2
System Requirements .......................................... 2.3
Installing Samsung Software ................................. 2.4
Configuring Fax and Internet Gates ........................ 2.8
Uninstalling Samsung Software ............................ 2.12
Uninstalling the MFP Driver ............................. 2.12
Uninstalling Samsung SmarThru ...................... 2.14
Using the SmarThru CD-ROM .......................... 2.16
i
Chapter 3:
PAPER HANDLING
Selecting Print Media ............................................
Paper Guidelines ..................................................
Loading Paper in Cassette .....................................
Using the Bypass Tray ..........................................
Setting the Paper Size for Copying .........................
Chapter 4:
3.2
3.3
3.4
3.6
3.9
COPYING
Loading Paper for Copy Output .............................. 4.2
Selecting Paper Tray ............................................ 4.2
Making Copies from the Automatic Document Feeder 4.3
Making Copies on the Document Glass .................... 4.4
Setting Copy Options ........................................... 4.6
Image ........................................................... 4.6
Contrast ........................................................ 4.6
Set ............................................................... 4.7
Zoom ............................................................ 4.7
Auto Fit .............................................................. 4.8
Clone ................................................................. 4.9
Duplex Copy ...................................................... 4.10
Collation Copy .................................................... 4.11
Chapter 5:
PRINTING
Printing a Document ............................................ 5.2
Printer Settings ................................................... 5.3
Accessing Printer Settings ................................ 5.3
Printer Properties Tabs .................................... 5.4
Printer Properties Buttons & Icons .................... 5.12
Chapter 6:
SCANNING
Scanning using the Samsung SmarThru .................. 6.2
Scanning Process with TWAIN-enabled Software ...... 6.4
ii
Chapter 7:
MAINTENANCE
Cleaning the Scan Unit ......................................... 7.2
Expected Cartridge Life ........................................ 7.3
Replacing the Toner Cartridge ............................... 7.3
Setting to Notify Toner Low ................................... 7.7
Cleaning the Drum ............................................... 7.8
Replacing the Drum Cartridge ............................... 7.8
Consumables and Replacement Parts .................... 7.11
Chapter 8:
TROUBLESHOOTING
Document Jams ...................................................
Input Misfeed .................................................
Exit Misfeed ...................................................
Roller Misfeed ................................................
8.2
8.2
8.3
8.3
Paper Jams ......................................................... 8.4
Paper Feed Area ............................................. 8.4
Fuser Area ..................................................... 8.6
Paper Exit Area .............................................. 8.7
Duplex Jam .................................................... 8.9
Bypass Jam .................................................. 8.10
LCD Error Messages ............................................
Solving Problems ................................................
Copier Problem Solution Chart .........................
Printing Problem Solution Chart .......................
Fax Problem Solution Chart .............................
Chapter 9:
8.11
8.13
8.13
8.15
8.18
APPENDIX
General Specifications ..........................................
Scanner and Copy Specifications ............................
Printer Specifications ............................................
Facsimile Specifications ........................................
9.2
9.3
9.4
9.4
INDEX
iii
Important Precautions and Safety Information
When using this product, these basic safety precautions should always be followed to
reduce risk of fire, electric shock, and injury to persons:
1. Read and understand all instructions.
2. Use common sense whenever operating electrical appliances.
3. Follow all warnings and instructions marked on the product and in the literature
accompanying the product.
4. If an operating instruction appears to conflict with safety information, heed the
safety information. You may have misunderstood the operating instruction. If you
cannot resolve the conflict, contact your sales or service representative for
assistance.
5. Unplug the product from the AC wall socket and/or telephone jack before
cleaning. Do not use liquid or aerosol cleaners. Use only a damp cloth for
cleaning.
6. Do not place the product on an unstable cart, stand, or table. It may fall, causing
serious damage.
7. Your product should never be placed on, near, or over a radiator, heater, air
conditioner, or ventilation duct.
8. Do not allow anything to rest on the power. Do not locate your product where the
cords will be abused by persons walking on them.
9. Do not overload wall outlets and extension cords. This can diminish performance,
and may result in the risk of fire or electric shock.
10. Do not allow pets to chew on the AC power, telephone, or PC interface cords.
11. Never push objects of any kind into the product through case or cabinet openings.
They may touch dangerous voltage points, creating a risk of fire or shock. Never
spill liquid of any kind onto or into the product.
12. You product may have a heavy cover for optimal pressure on the document for
the best scanning and/or faxing (usually the flatbed-type product). In this case,
replace the cover after placing document on the scan glass, by holding and
moving it down slowly until it seats on its location.
13. To reduce the risk of electric shock, do not disassemble the product. Take it to a
qualified service technician when repair work is required. Opening or removing
covers may expose you to dangerous voltages or other risks. Incorrect
reassembly could cause electric shock when the unit is subsequently used.
iv
14. Unplug the product from the telephone jack, PC and AC wall outlet, and refer
servicing to qualified service personnel under the following conditions:
• When any part of the power cord, plug, or connecting cable is damaged or
frayed.
• If liquid has been spilled into the product.
• If the product has been exposed to rain or water.
• If the product does not operate properly after instructions have been followed.
• If the product has been dropped, or the cabinet appears damaged.
• If the product exhibits a sudden and distinct change in performance.
15. Adjust only those controls covered by the operating instructions. Improper
adjustment of other controls may result in damage, and may require extensive
work by a qualified service technician to restore the product to normal operation.
16. Avoid using this product during a lightning storm. There may be a remote risk of
electric shock from lightning. If possible, unplug the AC power and telephone cord
for the duration of the lightning storm.
17. SAVE THESE INSTRUCTIONS.
Laser Safety Statement
The printer is certified in the U.S. to conform to the requirements of DHHS 21 CFR,
chapter 1 Subchapter J for Class I(1) laser products, and elsewhere is certified as a
Class I laser product conforming to the requirements of IEC 825.
Class I laser products are not considered to be hazardous. The laser system and
printer are designed so there is never any human access to laser radiation above a
Class I level during normal operation, user maintenance, or prescribed service
condition.
WARNING
Never operate or service the printer with the protective cover removed from Laser/
Scanner assembly. The reflected beam, although invisible, can damage your eyes.
CAUTION - INVISIBLE LASER RADIATION WHEN THIS COVER OPEN.
DO NOT OPEN THIS COVER.
VORSICHT - UNSICHTBARE LASERSTRAHLUNG, WENN ABDECKUNG
GEÖFFNET. NICHT DEM STRAHL AUSSETZEN.
ATTENTION - RAYONNEMENT LASER INVISIBLE EN CAS D’OUVERTURE.EXPOSITION
DAN GEREUSE AU FAISCEAU.
ATTENZIONE -RADIAZIONE LASER INVISIBILE IN CASO DI APERTURA. EVITARE
L’ESPOSIZIONE AL FASCIO.
v
PRECAUCION -RADIACION LASER IVISIBLE CUANDO SE ABRE. EVITAR EXPONERSE
AL RAYO.
ADVARSEL - USYNLIG LASERSTRÅLNING VED ÅBNING NÅR SIKKERHEDSBRYDERE
ER UDE AF FUNKTION. UNDGÅ UDSAETTELSE FOR STRÅLNING.
ADVARSEL - USYNLIG LASERSTRÅLNING NÅR DEKSEL ÅPNES. STIRR IKKE INN I
STRÅLEN. UNNGÅ EKSPONERING FOR STRÅLEN.
VARNING - OSYNLIG LASERSTRÅLNING NÄR DENNA DEL ÄR ÖPPAND OCH SPÄRREN
ÄR URKOPPLAD. BETRAKTA EJ STRÅLEN. STRÅLEN ÄR FARLIG.
VARO! - AVATTAESSA JA SUOJALUKITUS OHITETTAESSA OLET ALTTIINA
NÄKYMÄTTÖMÄLLE LASERSÄTEILYLLE ÄLÄ KATSO SÄTEESEEN.
Ozone Safety
During normal operation, this product produces ozone. The
ozone produced does not present a hazard to the operator.
However, it is advisable that the product be operated in a well
ventilated area.
If you need additional information about ozone, please request
your nearest Samsung dealer.
Power Saver
This product contains advanced energy conservation
technology that reduces power consumption when it is not
in active use.
When the product does not receive data for an extended
period of time, power consumption is automatically
lowered.
The energy star emblem does not represent EPA
endorsement of any product or service.
vi
Radio Frequency Emissions
FCC Information to the User
This equipment has been tested and found to comply with the limits for a Class A
digital device, pursuant to Part 15 of the FCC Rules. These limits are designed to
provide reasonable protection against harmful interference when the equipment is
operated in a commercial environment. This equipment generates, uses and can
radiate radio frequency energy and, if not installed and used in accordance with the
instruction manual, may cause harmful interference to radio communications.
Operation of this equipment in a residential area is likely to cause harmful
interference in which case the user will be required to correct the interference at his
own expense.
Canadian Radio Interference Regulations
This digital apparatus does not exceed the Class A limits for radio noise emissions
from digital apparatus as set out in the interference-causing equipment standard
entitled “Digital Apparatus”, ICES-003 of the Industry and Science Canada.
Cet appareil numérique respecte les limites de bruits radioélectriques applicables aux
appareils numériques de Classe A prescrites dans la norme sur le matériel brouilleur:
“Appareils Numériques”, ICES-003 édictée par l’Industrie et Sciences Canada.
Fax Branding
The Telephone Consumer Protection Act of 1991 makes it unlawful for any person to
use a computer or other electronic device to send any message via a telephone
facsimile machine unless such message clearly contains in a margin at the top or
bottom of each transmitted page or on the first page of the transmission the following
information:
(1) the date and time of transmission
(2) identification of either business, business entity or individual sending the
message; and
(3) telephone number of either the sending machine, business, business entity or
individual.
Refer to the Facsimile User’s Guide for instructions on how to enter this information
into your product’s memory.
vii
The Telephone Company may make changes in its communications facilities,
equipment operations, or procedures where such action is reasonably required in the
operation of its business and is not inconsistent with the rules and regulations in FCC
Part 68. If such changes can be reasonably expected to render any customer terminal
equipment incompatible with telephone company communications facilities, or
require modification or alteration of such terminal equipment, or otherwise materially
affect its use or performance, the customer shall be given adequate notice in writing,
to allow the customer an opportunity to maintain uninterrupted service.
Ringer Equivalence Number
The Ringer Equivalence Number and FCC Registration Number for this product may
be found on the label located on the bottom or rear of the product. In some instances
you may need to provide these numbers to the telephone company.
The Ringer Equivalence Number (REN) is a measure of the electrical load placed on
the telephone line, and is useful for determining whether you have “overloaded” the
line. Installing several types of equipment on the same telephone line may result in
problems making and receiving telephone calls, especially ringing when your line is
called. The sum of all Ringer Equivalence Numbers of the equipment on your
telephone line should be less than five in order to assure proper service from the
telephone company. In some cases, a sum of five may not be usable on your line. If
any of your telephone equipment is not operating properly, you should immediately
remove it from your telephone line, as it may cause harm to the telephone network.
WARNING:
FCC Regulations state that changes or modifications to this equipment not expressly
approved by the manufacturer could void the user’s authority to operate this
equipment. In the event that terminal equipment causes harm to the telephone
network, the telephone company should notify the customer that service may be
stopped. However, where prior notice is impractical, the company may temporarily
cease service, providing that they:
a) Promptly notify the customer.
b) Give the customer an opportunity to correct the equipment problem.
c) Inform the customer of the right to bring a complaint to the Federal
Communication Commission pursuant to procedures set out in FCC Rules and
Regulations Subpart E of Part 68.
viii
You should also know that:
• Your product is not designed to be connected to a digital PBX system.
• If you intend to use a computer modem or fax modem on the same phone line as
your product, you may experience transmission and reception problems with all
the equipment. It is recommended that no other equipment, except for a regular
telephone, share the line with your product.
• If your area experiences a high incidence of lightning or power surges, we
recommend that you install surge protectors for both the power and the telephone
lines. Surge protectors can be purchased from your dealer or telephone and
electronic specialty stores.
• When programming emergency numbers and/or making test calls to emergency
numbers, use a non-emergency number to advise the emergency service
dispatcher of your intentions. The dispatcher will give you further instructions on
how to actually test the emergency number.
• This product may not be used on coin service or party lines.
• This product provides magnetic coupling to hearing aids.
• You may safely connect this equipment to the telephone network by means of a
standard modular jack, USOC RJ-11C.
Declaration of Conformity (European Countries)
Approvals and Certifications
The CE marking applied to this product symbolises Samsung
Electronics Co., Ltd. Declaration of Conformity with the following
applicable 93/68/EEC Directives of the European Union as of the
dates indicated:
January 1, 1995: Council Directive 73/23/EEC Approximation of the laws of the
member states related to low voltage equipment.
January 1, 1996: Council Directive 89/336/EEC (92/31/EEC), approximation of the
laws of the Member States related to electromagnetic compatibility.
March 9, 1999: Council Directive 1999/5/EC on radio equipment and
telecommunications terminal equipment and the mutual recognition of their
conformity.
A full declaration, defining the relevant Directives and referenced standards can be
obtained from your Samsung Electronics Co., Ltd. representative.
ix
EC Certification
Certification to 1999/5/EC Radio Equipment & Telecommunications
Terminal Equipment Directive (FAX)
This Samsung product has been self-certified by Samsung for pan-European single
terminal connection to the analogue public switched telephone network (PSTN) in
accordance with Directive 1999/5/EC. The product has been designed to work with
the national PSTNs and compatible PBXs of the European countries:
In the event of problems, you should contact the Euro QA Lab of Samsung Electronics
Co., Ltd. in the first instance.
The product has been tested against TBR21. To assist in the use and application of
terminal equipment which complies with this standard, the European
Telecommunication Standards Institute (ETSI) has issued an advisory document (EG
201 121) which contains notes and additional requirements to ensure network
compatibility of TBR21 terminals. The product has been designed against, and is fully
compliant with, all of the relevant advisory notes contained in this document.
Replacing the Fitted Plug (for UK Only)
IMPORTANT
The mains lead for this machine is fitted with a standard (BS 1363) 13 amp plug and
has a 13 amp fuse. When you change or examine the fuse, you must re-fit the correct
13 amp fuse. You then need to replace the fuse cover. If you have lost the fuse cover,
do not use the plug until you have another fuse cover.
Please contact the people from you purchased the machine.
The 13 amp plug is the most widely used type in the UK and should be suitable.
However, some buildings (mainly old ones) do not have normal 13 amp plug sockets.
You need to buy a suitable plug adaptor. Do not remove the moulded plug.
WARNING
If you cut off the moulded plug, get rid of it straight away.
You cannot rewire the plug and you may receive an electric shock if you plug
it into a socket.
x
IMPORTANT WARNING: You must earth this machine.
The wires in the mains lead have the following colour code:
• Green and Yellow:
Earth
• Blue:
Neutral
• Brown:
Live
If the wires in the mains lead do not match the colours marked in your plug, do the
following:
You must connect the green and yellow wire to the pin marked by the letter `E', or
by the safety `Earth symbol' or coloured green and yellow or green.
You must connect the blue wire to the pin which is marked with the letter `N' or
coloured black.
You must connect the brown wire to the pin which is marked with the letter `L' or
coloured red.
You must have a 13 amp fuse in the plug, adaptor, or at the distribution board.
xi
xii
1
GETTING STARTED
Thank you for purchasing Samsung multifunctional
product. This product provides printing, copying,
scanning, and faxing (SCX-5312F only) functions!
This chapter provides step-by-step instructions on
setting up the product, and installing the software.
This chapter includes:
• Unpacking
• Component Location
• Control Panel Functions
• Making Connections
• Installing Drum and Toner Cartridges
• Turning the Product On
• Loading Paper
• Setting the Paper Size
• Changing the Display Language
• Using Save Mode
Unpacking
1 Remove the shipping tapes from the front, back, and sides
of the prodcut.
Tape
2 Remove the label completely from the scanner module by
pulling it straight, and the scan unlock switch automatically
moves to the unlock position (
).
Scanner
module
NOTE: To scan or copy a document, the
switch must be on that position. When you
are moving the product or do not use the it
for a long time, pull the switch toward the
Lock mark (
).
3 Pull open the paper cassette and remove the packing
material from the paper cassette.
1.2
GETTING STARTED
4 Ensure that you have the following:
1
USB Cable
AC Power Cord*
Telephone Line Cord*
TAM Lead
(For SCX-5312F only)
(For SCX-5312F UK only)
This User’s Guide,
SmarThru User’s Guide,
Facsimile User’s Guide
(SCX-5312F only),
Quick install Guide
Software CD
Starter Toner Cartridge
Drum Cartridge
*. The appearance of the power cord and the telephone line cord
vary according to countries.
NOTE: You can purchase and install the optional Network Print Server. For
details, refer to the documentation supplied with your Network Print Server.
GETTING STARTED
1.3
Component Location
Take a moment to familiarise yourself with the main components
of your product.
Front View
Automatic
Document Feeder
Document
Guides
Document
Input Tray
Control Panel
(See page 1.6. SCX5312F. See page 1.9 for
SCX-5112.)
Document
Output Tray
Paper Guides
Bypass Tray
Scanner Module
Paper Cassette
Release lever
Front Cover
1.4
GETTING STARTED
Side Cover
Rear View
1
Document Cover
ADF (Automatic Document
Feeder) Connector
Document
Glass
Telephone
Connections
(available in
SCX-5312F only)
Paper Cassette
AC Power Cord
Connector
Parallel Connector
Power Switch
USB Connector
Paper Exit Extension
GETTING STARTED
1.5
Control Panel Functions
SCX-5312F
1
2
4
3
5
6
7
13
8
01
21
03
23
04
24
05
25
System Data
System ID
Date & Time
System Setup
Memory Clear
06
26
07
27
08
28
09
29
10
30
Polling
Add/Cancel
Delay TX
11
31
Memory TX
12
32
Priority TX
13
33
14
34
Tx Confirm
Schedule Job
16
36
17
37
18
38
19
39
20
40
Phone Book
System List
Tx Journal
Rx Journal
Help List
Group Dial
1
02
22
Maintenance
15
35
9
10
11
12
Use to store frequently dialed fax number and
dial them with a touch of the buttons. Also use
in conjunction with the Menu/Exit button to
access the corresponding menu functions.
Allows you to shift one-touch buttons to the
locations 21 through 40.
Adjusts the resolution of the documents for the
current fax job.
Use to choose the receive mode. The selected
mode is displayed in Standby mode.
Use to search for number in memory. Also use
to delete digit in the edit mode.
2
Use to store frequently dialed fax number and
dial them using the 2-digit speed number. Also
use to display alternatively the currently active
and pending jobs.
F
A
X
Redials the last number in Standby mode or
insert a pause into a fax number in the edit
mode.
*
1.6
GETTING STARTED
Use to perform a switch-hook operation such as
call waiting.
When an error occurs, the lamp in the
corresponding location on the Status map turns
on as well as the error indicator, and the error
message appears on the display so that you can
locate the error. For details on the meaning of
the error messages, see page 8.11.
(status map)
ex) The paper is jammed in the exit area.
3
Turns on when a paper jam occurs. To clear
the jam, see page 8.4.
Turns on when the toner or drum almost
runs out. To replace the toner or drum
cartridge, see page 7.3 and page 7.8.
(Error
indicators)
Turns on when the input tray you are using
is empty. To load paper, see page 1.17.
Turns on when an error occurs on the
system.
4
Displays current status and prompts during
operation.
Use to adjust the contrast of the documents for
the current copy or fax job.
5
C
O
P
Y
Use to select the text type for the current copy
job or fax job.
Use to specify the paper tray you want to use in
the Fax or the Copy mode.
Use to set up special copy features such as
AutoFit, Clone, and Collation.
Use to print the current copy job on both sides
of paper.
6
Use to dial a number or enter alphanumeric
characters.
GETTING STARTED
1.7
1
7
S
A
V
E
8
Allows you to save toner by using less toner to
print a document.
Allows you to save power by reducing power
consumption when not printing.
Allows you to save paper by printing 2 pages on
a single sheet of paper (available in the Copy
mode only).
Enters the menu functions in conjunction with
the one-touch buttons. Also backs you up to the
previous menu level or exits the menu.
Scrolls though the menu items. When you set
the copy size or the copy page number, they can
be used to change the number.
9*
Scrolls though the option available for the
selected menu item. In the Copy mode,
allows you to change the zoom rate and to
change the number of copies.
10
Selects the mode to activate: FAX or COPY. Also,
confirms the selection on the display.
11
Engages the telephone line.
12
Use to start a job.
13
Use to stop an operation at any time.
Also, use to clear/cancel the copy options such
as the zoom rate and multi copy pages in the
Copy mode.
* Navigation key
1.8
GETTING STARTED
SCX-5112
2
1
3
4
5
1
10
7
6
8
9
When an error occurs, the lamp in the
corresponding location on the Status map turns on
as well as the error indicator, and the error
message appears on the display so that you can
locate the error. For details on the meaning of the
error messages, see page 8.11.
(status map)
ex) The paper is jammed in the exit area.
1
Turns on when a paper jam occurs. To clear
the jam, see page 8.4.
Turns on when the toner or drum almost runs
out. To replace the toner or drum cartridge,
see page 7.3 and page 7.8.
(Error
indicators)
Turns on when the input tray you are using is
empty. To load paper, see page 1.17.
Turns on when an error occurs on the system.
2
Displays current status and prompts during
operation.
GETTING STARTED
1.9
Use to adjust the contrast of the documents for the
current copy job.
Use to select the text type for the current copy job.
3
C
O
P
Y
Use to specify the paper tray you want to use in
the Copy mode.
Use to collate the copied documents.
Use to print the original image to fit to the page
(Auto Fit) or to print multiple copies on a single
page (Clone).
Use to print the current copy job on both sides of
paper.
4
5
S
A
V
E
6
Use to enter numbers.
Allows you to save toner by using less toner to
print a document.
Allows you to save power by reducing power
consumption when not printing.
Allows you to save paper by printing 2 pages on a
single sheet of paper (available in the Copy mode
only).
Enters menu mode.
Scrolls though the menu items. When you set the
copy size or the copy page number, they can be
used to change the number.
7
Scrolls though the option available for the selected
menu item. The button allows you to change the
zoom rate and the button to change the number
of copies.
8
Confirms the selection on the display.
9
Use to start a job.
10
1.10 GETTING STARTED
Use to stop an operation at any time.
Also, use to clear/cancel the copy options such as the
zoom rate and multi copy pages in the Copy mode.
Making Connections
1 Connect the ADF(Automatic Document Feeder) cord to this
port and fasten the side screws.
NOTE: Without connecting the cord to the port, you cannot use
the ADF.
2 If you have SCX-5112:
Skip this step and proceed to step 3.
If you have SCX-5312F:
Connect the supplied telephone line to the LINE jack and
the other end to the wall jack.
GETTING STARTED
1.11
1
If you want to use your product for receiving both faxes and
voice calls, you will need to connect a telephone and/or
answering machine to your product.
Plug the cord of your extension phone or answering
machine into the EXT jack.
UK users should plug the cord of the extension phone into
the supplied TAM lead and plug the cord of the TAM lead
into the EXT jack on the back of your product.
TAM lead
(For UK users only)
NOTES:
• For UK users, it is strongly recommended to use the TAM lead
and the telephone line cord supplied with your product.
• If you are replacing the line cord with other manufacturer’s, it
should be AWG #26 or lower guage.
1.12 GETTING STARTED
3 Connect the USB cable which came with your product.
1
If you want to use a parallel printer cable, purchase only
IEEE-1284 compliant parallel cable and connect it to the
parallel connector on your product.
NOTE:
• To connect the printer to the parallel port of the computer
requires a certified parallel cable.
You will need to buy the IEEE1284 compliant cable.
• You only need to connect one of the above cables.
• If you are using a USB cable, you must be running Windows 98/
Me/2000/XP.
• When using USB connection, your product provides two USB
modes: Fast and Slow. Fast is the default mode. Some PC user
may experience poor USB implementation in the default mode. If
this occurs, select Slow mode to achieve successful results. For
details on changing USB mode, see page 8.16.
GETTING STARTED
1.13
Installing Drum and Toner
Cartridges
1 Pull the release lever to open the side cover.
CAUTION: Ensure that the side cover is always open before
opening the front cover.
2 Open the front cover.
3 If the cartridge locking lever is on the lower position, turn
the lever upward until it locks into place.
1.14 GETTING STARTED
4 Remove the drum cartridge from its bag and slide it into the
product firmly until it locks into place completely.
1
5 Remove the starter toner cartridge from its bag. Gently
shake the cartridge to loosen the toner.
Thoroughly shaking the cartridge will assure maximum
copies per cartridge.
6 Slide the toner cartridge into the product aligning the
cartridge to the left of the slot until it locks into place
completely.
GETTING STARTED
1.15
7 Turn the cartridge locking lever downwards until it locks into
place.
8 Close the front cover
1
and the side cover
2
.
2
1
NOTE: When the drum or toner cartridge need to be replaced, the
display indicates the corresponding message with the error
indicator. Refer to the list of error messages on page 8.11.
To replace the drum and toner cartridges, see page 7.8 and
page 7.3 repectivly.
1.16 GETTING STARTED
Turning the Product On
1 Plug one end of the supplied three-wire electrical grounding
type cord into the AC socket on the product and the other
end into a properly grounded AC outlet.
2 Turn on the power switch. “WARMING UP PLEASE WAIT”
appears on the display indicating the product is on.
To view your display text in another language, see
page 1.20.
Loading Paper
The paper cassette can hold a maximum of 550 sheets of 20lb
plain paper. For copying or faxing, you can use A4-, letter-, or
legal-size paper only.
1 Pull open the paper cassette.
GETTING STARTED
1.17
1
2 Push down on the pressure plate until it locks in position.
3 Adjust the rear paper guide to the desired paper length. It
is preset to Letter or A4 size depending on country. To load
another size, lift and insert the rear guide into the
corresponding position.
LG
L
FO
LIO
A4
LT
R
Rear guide
4 Fan the paper and insert it into the cassette.
1.18 GETTING STARTED
5 Ensure that the paper corners are under the corner
snubbers.
1
Corner snubber
Do not fill above the max fill line.
Max Fill Line
6 While squeezing the side guide as shown, move it toward
the stack of paper until it lightly touches the side of the
stack. Do not too tightly to press the guide the edge of the
paper; the guide may bend the paper.
7 Close the paper cassette.
GETTING STARTED
1.19
Setting the Paper Size
After loading paper in the paper cassette, you have to set the
paper size using the control panel buttons. These settings will
apply to the Copy mode only. In PC printing mode, you have to
select the paper size in the application program you use.
1 Press Menu/Exit and then System Data from the onetouch dial keypad. SCX-5112 users should press Menu and
then Enter.
The display shows “CASSETTE PAPER” on the top line and
the available options on the bottom line.
2 Use
or to select the paper size you are using, and press
Mode/Enter (Enter for SCX-5112) to save the selection.
You can press the corresponding number shown on the
display to select the paper size.
3 To return to Standby mode, press Stop/Clear.
Changing the Display Language
To change the language that is displayed on the LCD display,
take the following steps:
1 Press Menu/Exit and then System Setup from the onetouch dial keypad. SCX-5112 users should press Menu and
then Enter.
2 Press
or
until “SELECT LANGUAGE” appears on the top
line of the display. The current setting appears on the
bottom line of the display.
3 Press
or
until you see the language you want on the
display.
4 Press Mode/Enter (Enter for SCX-5112) to save the
selection.
5 To return to Standby mode, press Stop/Clear.
1.20 GETTING STARTED
Using Save Mode
1
Toner Save
Toner Save feature allows the printer to use less toner on each
page. Activating this mode will extend the life of the toner
cartridges two times longer than normal mode, but will reduce
the print quality.
To turn the Toner Save mode on, take the following steps:
1 Press SAVE Toner. The display shows the current setting
on the bottom line.
2 Press SAVE Toner or use the navigation buttons to change
the setting.
To enable the Toner Save mode on, select “ON.” The button
backlight is on. To disable the mode, select “OFF.” The
button backlight is off.
3 Press Mode/Enter (Enter for SCX-5112) to save the
selection.
Paper Save
This feature prints 2 pages on a single sheet of paper to save
paper. To turn this feature on, take the following steps:
1 Press SAVE Paper. The display shows the current setting
on the bottom line.
2 Press SAVE Paper or use the navigation buttons to change
the setting. To enable the Paper Save mode, select “ON.” Or
select “OFF” to disable the mode.
3 Press Mode/Enter (Enter for SCX-5112) to save the
selection.
NOTES:
• The Paper Save mode is available only when the document is
loaded in the ADF.
• The Paper Save mode will be disabled when you set the collation
copy or the duplex copy.
GETTING STARTED
1.21
Power Save
The Power Save mode allows the printer to reduce power
consumption when it is not in actual use. To turn the Power Save
mode on, take the following steps:
1 Press SAVE Power. The display shows the current setting
on the bottom line.
2 Press SAVE Power or use the navigation buttons to change
the setting. To enable the Power Save mode, select “ON.” Or
select “OFF” to disable the mode.
3 Press Mode/Enter (Enter for SCX-5112) to save the
selection.
You can further select the length of time the product waits after
a job is printed before it switches to a reduced power state.
1 Press Menu/Exit and then System Data from the onetouch dial keypad. SCX-5112 users should press Menu and
then Enter.
2 Press
or
until “POWER SAVE” appears on the display.
Make sure that “1.ON” blinks on the bottom line.
If necessary, use or to select “1.ON” and press Mode/
Enter (Enter for SCX-5112).
3 The available time settings appear on the display and the
current setting blinks. The available options are 5, 10, 15,
30, and 45 (minutes). Press or until the desired time
blinks.
4 Press Mode/Enter (Enter for SCX-5112) to save the
selection.
5 To return to Standby mode, press Stop/Clear.
1.22 GETTING STARTED
2
INSTALLING SOFTWARE
This chapter provides information on installing the supplied
Samsung software. You must install the Samsung software
to use your product as a printer and scanner.
The topics included in this chapter are:
• About Samsung Software
• System Requirements
• Installing Samsung Software
• Configuring Fax and Internet Gates
• Uninstalling Samsung Software
About Samsung Software
You must install the SmarThru CD-ROM after you have setup
your product and connected it to your computer. The SmarThru
CD-ROM includes the following:
• MFP Driver
• SmarThru Software
• OCR Software (AnyPage Lite)
MFP Driver
To use your product as a printer and scanner, you must install
the MFP driver.
SmarThru Software
SmarThru is the accompanying software for your multifunctional
product. SmarThru contains a powerful image editor that allows
you to edit images in many ways and also includes powerful
Internet mail client software.
With SmarThru, you can save the scanned images in a dedicated
storage area for subsequent editing, sending via e-mail or fax,
printing, and processing by other programs of your choice.
OCR Software
(AnyPage Lite)
OCR (Optical Character Recognition) is software that has the
ability to recognize most character formats, so that a scanned
document can be read and edited with word processing
software.
2.2 INSTALLING SOFTWARE
System Requirements
Before you begin, ensure your system meets the minimum
requirements.
Supported Operating System
Windows 95 OSR2/Windows 98/Windows 98 SE/Windows Me/
Windows NT 4 Workstation or Server with Service Pack 3/
Windows 2000 Professional or Advanced Server/Windows XP
Home edition or Professional.
Minimal Requirements
• Disk space: 120 MB for installation
• Memory: 64 MB
• CPU: Pentium II 233 or higher
• Required software: Internet Explorer 4.01.
Recommended
• Disk space: 220 MB for installation
• Memory: 128 MB
• CPU: Pentium II 400 or higher
• Required software: Internet Explorer 5.5
NOTES:
• Administrative rights should be set for installation on Windows
NT/2000/XP.
• Windows 95 versions prior to OSR2 are not recommended due to
compatibility with OLE/COM libraries.
INSTALLING SOFTWARE
2.3
2
Installing Samsung Software
NOTES:
• For Windows 95/98/Me/NT 4.0/2000/XP users, cancel the “New
Hardware Found” screen when the computer boots up.
• Make sure that your product is plugged in and connected to your
computer’s parallel port or USB port before installing
software from the CD. Windows 95 and Windows NT 4.0 do not
support USB connection.
1 Insert the supplied SmarThru CD-ROM into your CD-ROM
drive.
The SmarThru CD-ROM should automatically run and
opening window appears.
If the opening window does not appear, click Start, and
then Run. Type X:Autorun.exe, replacing “X” with the
letter of your drive, and click OK.
2 If you are asked to select the language, choose the desired
language.
3 Click Install the Samsung Software on your PC.
Installs the
Samsung
Software on
your PC.
Uninstall
the
Samsung
Software.
See
page 2.16.
4 Follow the on-screen instructions and click Next.
2.4 INSTALLING SOFTWARE
5 The SmarThru installation supports three types of setup:
•Typical: Program will be installed with the most common
options and is recommended for most users.
•Compact: Only the MFP driver will be installed.
•Custom: You may choose the options you want to install.
Recommended for advanced users.
2
If you select the Custom installation, you may
choose the options you want to install.
• SmarThru Software: to scan and edit images
and work with electronic documents.
• OCR Software: AnyPage Lite software to enable
OCR.
• MFP Driver: to print and scan.
6 Selecting the type, Click Next.
INSTALLING SOFTWARE
2.5
7 You can choose SmarThru networking option. This
feature allows you to share the modems on your computer
and the product as a scan device via a network or to access
these shared devices located on other computers.
Stand-alone configuration does not allow you to use any
networking features such as Remote Fax or Remote Scan
service.
If you selected SmarThru networking, you can select to
install Server, Client, or both.
Server allows you to share local fax modem and/or scanner
over a LAN. You can control sharing by managing remote
service user. Client allows you to use Remote Fax or
Remote Scan services provided by SmarThru Remote
Services Server over a LAN. You need to have a client
account. These accounts are provided by the server. For
details on Remote Fax/Scan Services, please refer to the
SmarThru User’s Guide.
2.6 INSTALLING SOFTWARE
8 Click Next.
2
9 When the installation is completed, shut down and restart
your computer.
If your computer does not shut down and restart
automatically, you must shut it down manually and restart
it before the changes will be saved.
NOTE: When you install the software, the Digital Signature Not
Found window appears in Windows 2000 and Windows XP. Click
OK in Windows 2000 and click Continue Anyway in Windows XP.
INSTALLING SOFTWARE
2.7
Configuring Fax and Internet Gates
If you select SmarThru networking Server option (see
page 2.6), when your computer restarts after the Samsung
software has installed, you will be prompted to configure the fax
and Internet gates allowing you to send and receive faxes and
e-mails on the SmarThru system.
If you select the Stand-alone or SmarThru networking
Client option (see page 2.6), the following wizards appear only
the first time you try to launch Mailbox in the SmarThru
program. For information on SmarThru, please refer to the
SmarThru User’s Guide.
NOTE: To configure the Internet gate, you must enter your e-mail
address, incoming (POP3 or IMAP4) and outgoing (SMTP) mail
server address, and account name. Ask your Internet service
provider or on-line service provider for the information on your
Internet gate configuration.
1 When the New Modem Wizard appears, choose the system
modem installed in your system and then click Next. This
fax modem will be used by SmarThru Fax Gate for sending
and/or receiving faxes.
2 Click Finish to save the modem setting.
2.8 INSTALLING SOFTWARE
3 Enter your name and e-mail address, then click Next. The
e-mail address has been assigned to you by your Internet
service provider.
2
4 Enter the addresses of your incoming and outgoing mail
servers. Choose the incoming mail server type, then click
Next. Your Internet service provider will be able to provide
you with this information.
INSTALLING SOFTWARE
2.9
5 Enter your account name and password to access your
Internet mail server, then click Next. Your Internet service
provider will be able to provide you with this information.
6 Enter the account record name, then click Next.
2.10 INSTALLING SOFTWARE
7 Click Finish to quit the wizard and enable Internet e-mail
service.
2
NOTE: If you wish, you can reconfigure the Internet gate later by
using SmarThru Configuration. For details, refer to the SmarThru
User’s Guide.
INSTALLING SOFTWARE 2.11
Uninstalling Samsung Software
Uninstall is required if you are upgrading the software or if your
installation fails. You can uninstall all software including
SmarThru and MFP drivers using the SmarThru CD or selectively
uninstall the desired item using the Window unInstallShield.
Note: Before beginning un-installation, ensure all applications are
closed on your PC. A system reboot is required after the software
is uninstalled.
Uninstalling the MFP Driver
1 From the Start menu, select Programs, then select
Samsung SCX-5x12 Series.
2 You can select the component in the MFP driver to uninstall
individually.
If you want to uninstall the scan driver, select TWAIN
Driver Uninstaller.
If you want to uninstall the printer driver, select Samsung
SCX-5x12 Series Driver Uninstall.
If you want to uninstall the Remote Control Panel, select
Uninstall SCX-5x12 Series Remote Control Panel.
2.12 INSTALLING SOFTWARE
3 When your computer confirms your selection, click Yes. The
selected printer driver and all its components are removed
from your computer.
2
4 When the uninstallation is done, click OK.
5 The message box recommends you restart your computer.
Click OK, then restart Windows.
NOTE: If you want to install the printer driver or the scan driver
using the SmarThru CD-ROM, make sure that you select the Setup
Type to Compact. Or select Custom then select MFP Driver. For
details, see page 2.5.
INSTALLING SOFTWARE 2.13
Uninstalling Samsung SmarThru
1 From the Start menu, select Programs.
2 Select Samsung SmarThru, then select SmarThru 3
Uninstall.
3 When your computer asks you to confirm your selection,
click Yes. The Uninstall Options dialogue box appears.
Uninstall options are:
•Backup and delete: Backs up all your data and options to
a safe place. Then removes SmarThru system including
the data.
•Delete: Deletes all the SmarThru data and options. No
backup or copying takes place. Be careful while using this
option as you can easily lose your data.
•Leave intact: Uninstalls SmarThru software leaving data
and option intact. This can be useful, if, for example, you
decide to install Stand Alone configuration over SmarThru
Networking. In this case, uninstall Samsung SmarThru
having Leave intact option set and install SmarThru
Stand Alone configuration.
4 After selecting the uninstall option, click Next.
2.14 INSTALLING SOFTWARE
5 Follow the on-screen instructions to complete the uninstallation. The SmarThru software and all components will
be removed.
2
6 When uninstalling is done, click OK. The message box
recommends restarting your computer.
7 Click OK.
Shut down and restart your computer to complete the uninstallation process and save your changes.
INSTALLING SOFTWARE 2.15
Using the SmarThru CD-ROM
You can un-install both the MFP driver and the SmarThru
software with the CD-ROM you have used to install the software.
1 Insert the SmarThru CD-ROM into your CD-ROM drive.
The SmarThru CD-ROM should automatically run and the
opening window appears. (If the opening window does not
appear, select Run from the Start menu, then type
X:Autorun.exe, replacing “X” with the letter of your drive
and click OK.
2 If you are asked to select the language, choose the desired
language.
3 Click Uninstall the Samsung Software on your PC.
4 Follow the on-screen instructions to complete uninstallation.
You must shut down and restart your computer before any
changes you have made will take affect.
2.16 INSTALLING SOFTWARE
3
PAPER HANDLING
This chapter introduces you to the basics of selecting print
media and loading print media into your product.
This chapter includes:
• Selecting Print Media
• Paper Guidelines
• Loading Paper in Cassette
• Using the Bypass Tray
• Setting the Paper Size for Copying
Selecting Print Media
Always use print media that meets the guidelines for use with
this product. Using a print media that is not recommended may
cause paper jams or print quality problems.
Media Size Input Sources and Capacities
Input Source/Capacitya
Media Size
Paper Cassette
Bypass Tray
YES/550
YES/550
YES/550
NO/0
YES/550
NO/0
NO/0
YES/100
YES/100
YES/100
YES/100
YES/100
YES/100
YES/100
NO/0
NO/0
NO/0
NO/0
NO/0
YES/10
YES/10
YES/10
YES/10
YES/10
NO/0
NO/0
YES/30
YES/30
Letter (8.5 x 11 in.)
A4 (210 x 297 mm)
NO/0
NO/0
YES/30
YES/30
Card stocksb
A6 (105 x 148 mm)
Post Card (4 x 6 in.)
Hagaki (100 x 148 mm)
NO/0
NO/0
NO/0
YES/10
YES/10
YES/10
Plain paper
Letter (8.5 x 11 in.)
Folio (8.5 x 13 in.)
Legal (8.5 x 14 in.)
Executive (7.25 x 10.5 in.)
A4 (210 x 297 mm)
B5 (182 x 257 mm)
A5 (148 x 210 mm)
Envelopes
No. 10 (4.12 x 9.5 in.)
C5 (162 x 229 mm)
DL (110 x 220 mm)
Monarch (3.87 x 7.5 in.)
B5 (176 x 250 mm)
Labelsb
Letter (8.5 x 11 in.)
A4 (210 x 297 mm)
Transparency filmsb
a. Depending on paper thickness, maximum capacity may be
reduced.
b. If you are experiencing excessive jamming, feed one sheet at a
time through the Bypass Tray.
3.2
PAPER HANDLING
Paper Guidelines
When selecting or loading paper, envelopes, or other special
media, keep these guidelines in mind:
• Attempting to print on damp, curled, wrinkled, or torn paper
can cause paper jams and poor print quality.
• Use only high quality copier grade paper. Avoid paper with
embossed lettering, perforations, or texture that is too
smooth or too rough.
• Store paper in its ream wrapper until ready to use. Place
cartons on pallets or shelves, not on the floor. Do not place
heavy objects on top of the paper, whether it is packaged or
unpackaged. Keep it away from moisture, or other conditions
that can cause it to wrinkle or curl.
• During storage, moisture-proof wrap (any plastic container or
bag) should be used to prevent dust and moisture from
contaminating your paper.
• Always use paper and other media that conform with those
listed under “General Specifications” on page 9.2.
• Use only well-constructed envelopes with sharp, well creased
folds.
- DO NOT use envelopes with clasps and snaps.
- DO NOT use envelopes with windows, coated lining,
self-adhesive seals, or other synthetic materials.
- DO NOT use damaged or poorly made envelopes.
• It is recommended that you feed special paper types one
sheet at a time.
• Only use the special media recommended for use in laser
printers.
• To prevent special media such as transparencies and label
sheet sticking together, remove them from the exit tray as
they are printed.
• Place transparencies on a flat surface after removing them
from the product.
• Do not leave the film in the paper tray for long periods of
time. Dust and dirt may accumulate on the film resulting in
spotty printing.
• To avoid smudging caused by fingerprints, handle
transparency film and coated paper carefully.
• To avoid fading, do not expose the printed film to prolonged
sunlight.
PAPER HANDLING
3.3
3
• Store unused media at temperatures between 59oF and 86oF
(15oC to 30oC). The relative humidity should be between 10%
and 70%.
• Do not load more than 10 sheets of special media into the
Bypass Tray at a time.
• Verify that the labels’ adhesive material can tolerate fusing
temperature of 200oC (392oF) for 0.1 second.
• Make sure that there is no exposed adhesive material
between the labels. Exposed areas can cause labels to peel
off during printing, which can cause paper jams. Exposed
adhesive can also cause damage to product components.
• Do not feed a sheet of labels through the product more than
once. The adhesive backing is designed for one pass through
the product.
• Do not use labels that are separating from the backing sheet
or are wrinkled, bubbled, or otherwise damaged.
Loading Paper in Cassette
The paper cassette can hold a maximum of 550 sheets of 20lb
plain paper. For copying or faxing, you can use A4-, letter-, or
legal-size paper only.
To load paper, pull open the paper cassette and load paper with
the print side facing up.
3.4
PAPER HANDLING
You can load letterhead paper with the design side facing up.
The top edge of the sheet with the logo should be placed at the
right side.
3
For details on loading paper in the cassette, see page 1.17.
After loading paper in the cassette, you have to set the correct
paper size using the control panel buttons. See page 1.20.
NOTES:
• When you print a file from your PC using the paper cassette,
make sure that you select the Paper source and the correct
paper size from your software application before starting your
print job.
• If you experience problems feeding paper, place the paper in the
Bypass tray.
• When printing on the used
paper from the cassette, you
can load up to 300 sheets. The
printed side should be facing
down and the edge without curl
at the right side. If you
experience problems feeding
paper, turn the paper around.
Note that the print quality is
not guaranteed.
PAPER HANDLING
3.5
Using the Bypass Tray
The Bypass tray is located at the right side of your product. It
can be closed when you are not using it, making the product
more compact.
Use the bypass tray to print transparencies, labels, envelopes or
postcards in addition to making quick runs of paper types or
sizes that are not currently loaded in the paper cassette.
Acceptable print media are plain paper with sizes ranging from
3.9x5.8, to Legal 8.5 x 14 inch, the largest size acceptable, and
weighing between 16lb and 32lb.
The following table summarizes the print media allowed as well
as their stacking height limit.
Paper Type
Stacking Height Limit
Plain Paper
100 sheets or 9mm (max)a
Envelope
10 envelopes or 9mm (max)a
Transparency
30 sheets or 9mm (max)a
Label
30 sheets or 9mm (max)a
Cardstock
10 sheets or 9mm (max)a
a. The height is measured with the stack of sheets laid, without
being touched by hands, on a flat surface.
Notes:
• Always load only the print media specified in Specifications to
avoid paper jams and print quality problems.
• Do not hit the bypass tray or rest your hands on it; otherwise the
tray may be damaged or detached from the product.
• Remove any curl on postcards, envelopes, and labels before
loading them into the multi-sheet bypass feeder.
3.6
PAPER HANDLING
To load print media in the Bypass tray:
1 Lower the Bypass tray, located on the right side of the
product. Unfold the paper support extension as shown.
Paper support
Bypass tray
2 Prepare a stack of paper or envelope for loading by flexing
or fanning them back and forth. Straighten the edges on a
level surface.
For transparencies; hold the transparencies by the edges
and avoid touching the print side. Oils from your fingers
that are deposited on the transparency can cause print
quality problems. If you are using the transparencies with
paper backing, insert a sheet of plaing paper on the tray
before loading transparencies. Doing so prevents paper
jams while feeding.
3 Load the print material with the print side facing down and
against the right edge of the tray.
PAPER HANDLING
3.7
3
4 Adjust the paper guide to the width of the stack of print
material.
Make sure that you have not loaded too much print media.
The stack should be under the max. fill line. The print media
buckles if you load a stack that is too deep, or push it in too
far.
Max. fill line
NOTES: When printing on the
used paper from the bypass tray,
the printed side should be facing
up and the edge without curl at
the left side. If you experience
problems feeding paper, turn the
paper around.
3.8
PAPER HANDLING
Setting the Paper Size for Copying
After loading paper in the paper cassette or the bypass tray, you
have to set the correct paper size using the control panel
buttons. These settings will apply to the Copy mode, and the Fax
mode (SCX-5312F only). In PC printing mode, you have to
select the paper size in the application program you use.
To set the paper size for cassette, take the following steps:
1 Press Menu/Exit and then System Data from the onetouch dial keypad. SCX-5112 users should press Menu and
then Enter.
The display shows “CASSETTE PAPER” on the top line and
the available options on the bottom line. The current setting
blinks.
2 Use
or to select the paper size you are using, and press
Mode/Enter (Enter for SCX-5112) to save the selection.
You can press the corresponding number shown on the
display to select the paper size.
3 To return to Standby mode, press Stop/Clear.
To set the paper size for the bypass tray, take the following
steps:
1 Press Menu/Exit and then System Data from the onetouch dial keypad. SCX-5112 users should press Menu and
then Enter.
The display shows “CASSETTE PAPER” on the top line and
the available options on the bottom line.
2 Use
to display “BYPASS TRAY” on the top line. The
available options appears on the bottom line and the
current setting blinks.
3 Use
or to select the paper size you are using, and press
Mode/Enter (Enter for SCX-5112) to save the selection.
You can press the corresponding number shown on the
display to select the paper size.
4 To return to Standby mode, press Stop/Clear.
PAPER HANDLING
3.9
3
NOTE
3.10 PAPER HANDLING
4
COPYING
This chapter provides step-by-step instructions for copying
documents.
This chapter includes:
• Loading Paper for Copy Output
• Selecting Paper Tray
• Making Copies from the Automatic Document
Feeder
• Making Copies on the Document Glass
• Setting Copy Options
• Auto Fit
• Clone
• Duplex Copy
• Collation Copy
Loading Paper for Copy Output
You can copy to a size of media as small as an index card (3.9
by 5.8 inch) or as large as a sheet of legal-sized (8.5 by 14 inch)
paper.
The instructions for loading the print media are the same
whether you are printing, faxing, or copying. For details, see
page 1.17 and 3.6.
Selecting Paper Tray
After loading print media for copy output, you have to select the
paper tray you will use for the copy job, and the fax job
(SCX-5312F only).
1 Press Paper Tray. The current setting appears on the
bottom line of the display.
2 Select “CASSETTE” or “BYPASS” by pressing Paper Tray
repeatedly or using the navigation buttons, and press
Mode/Enter (Enter on SCX-5112) to save the selection.
3 If you selected “BYPASS” at the step 2, the display prompts
you to select the PAPER TYPE for the bypass tray.
Use the navigation buttons to select the paper type you are
using in the bypass tray.
4 Press Mode/Enter (Enter on SCX-5112) to save the
selection.
4.2
COPYING
Making Copies from the Automatic
Document Feeder
Using the ADF(Automatic Document Feeder), you can load up to
30 documents (20lb, 75 g/m2) in one job. Ensure documents are
in good condition, have the same thickness and weight, and that
all staples and paper clips have been removed.
1 Feed the documents (up to 30 pages) face up into the ADF
and adjust the document guides to the document size.
Make sure that the bottom of the document stack matches
the paper size marked on the ADF.
4
Document guides
2 SCX-5312F users should verify that the product is in the
Copy mode. If necessary, press Mode/Enter to change the
mode into the Copy mode. In the Copy mode, the LCD
display shows:
Copy size
Number of copies
Note that you cannot make copies in the Fax mode. The
product will only sound an error beep.
3 Make sure that you have selected the required paper tray.
See page 4.2.
4 Customise the copy settings incluing the number of copies,
copy size, contrast and image type using the control panel
buttons. See “Setting Copy Options” on page 4.6.
To clear the settings, use the Stop/Clear button.
5 If necessary, you can use special copy features such as
collation and duplex copy.
COPYING
4.3
6 Press Copy/Start to begin copying. The display shows the
copy processing.
NOTE: Dust on the ADF glass may cause the black lines on the
printout, so keep it always clean.
Making Copies on the Document
Glass
If you want to make copies from booklet, pamphlet,
transparencies, or documents having other unusual
characteristics, use the document glass to load document.
1 Lift the document cover.
2 Place the document face down on the glass and align it
with registration guide on the left top corner of the
document glass.
4.4
COPYING
NOTE: Make sure that no other documents are in the ADF. If a
document is detected in the ADF, the document has a priority than
the document on the glass.
3 Close the document cover.
NOTE:
• Leaving the cover open while copying will affect the copy quality
and toner consumption.
• If you are copying a page from a book or magazine, close the
cover flat. The slanted cover may cause heavy exposure of the
light when scanning.
4 SCX-5312F users should verify that the product is in the
Copy mode. If necessary, press Mode/Enter to change the
mode into the Copy mode. In the Copy mode, the LCD
display shows:
Copy size
Number of copies
Note that you cannot make copies in the Fax mode. The
product will only sound an error beep.
5 Make sure that you have selected the required paper tray.
See page 4.2.
6 Customise the copy settings incluing the number of copies,
copy size, contrast and image type using the control panel
buttons. See “Setting Copy Options” on page 4.6.
To clear the settings, use the Stop/Clear button.
7 If necessary, you can use special copy features such as
Auto Fit and Clone.
8 Press Copy/Start to begin copying. The display shows the
copy processing.
NOTES:
• You can cancel the copy job during operation, press Stop/Clear,
the copying will be stopped.
• Dust on the document glass may cause the black spots on the
printout, so keep it always clean.
COPYING
4.5
4
Setting Copy Options
The following buttons on the control panel let you make all the basic
copy options: contrast, image type, number of copies and copy size.
Use the buttons before pressing Copy/Start when you make copies.
Image
Image setting is used to improve the copy quality. To select the
image type, take the following steps:
1 Press Image. You can see the current setting on the
bottom line of the display.
2 Press Image repeatedly or use the navigation buttons until
the desired mode appears. You can choose from:
TEXT: Use for documents containing mostly text.
MIXED: Use for documents with mixed text and graphics.
PHOTO: Use when the originals are photographs.
HIGH QUALITY: Use for documents with fine details. Copy
quality is good but the copy speed is low.
3 Press Mode/Enter (Enter on SCX-5112) to save the
selection.
NOTE: If you select the MIXED mode when you copy the document with
dark background, such as a newspaper or a catalogue, from the document
glass using the normal contrast, the machine will automatically remove the
background colour. This will make the copy lighter than the original
document. To include the background colour in your copy, load the
document about 5 mm away from the guideline on the document glass or
change the Contrast setting.
Contrast
You can adjust the contrast for an original document containing
paint markings or dark images.
To adjust the contrast, take the following steps:
1 Press Contrast.
2 Press Contrast repeatedly or use the navigation buttons
until you select the desired level. You can choose from 5
contrast settings.
Each time you press the button, the selection block on the
LCD display moves to the left or to the right. As the
selection block moves to the right, the contrast becomes
darker.
Selection block
3 Press Mode/Enter (Enter on SCX-5112) to save the
4.6
COPYING
selection.
Set
Using the Set ( ) button, you can select the number of copies,
from 1 to 999.
1 Press Set ( ). The triangle symbol on the middle of the top
line heads for the number of copies.
2 Enter the number of copies using the number keypad. The
selected number appears on the display.
You can also use Increase ( ) or Decrease ( ) to change
the number of copies. Press Increase ( ) or Decrease
( ) to increase or decrease the number by 1. If you press
and hold the buttons, the number increases or decreases
rapidly.
3 Press Mode/Enter (Enter on SCX-5112) to save the
selection.
Zoom
Using the Zoom ( ) button, you can reduce or enlarge the size
of a copied image from 25% to 400% when you copy original
from the document glass, from 25% to 100% from the ADF.
Note that the zoom rate available is different according to the
document loading method.
1 Press Zoom ( ). The triangle symbol on the middle of the
top line heads for the zoom rate.
2 Enter the desired size using the number keypad. The
selected number appears on the display.
You can also use Increase ( ) or Decrease ( ) to change
the zoom rate. Press Increase ( ) or Decrease ( ) to
increase or decrease the number by 1. If you press and hold
the buttons, the number increases or decreases rapidly.
3 Press Mode/Enter (Enter on SCX-5112) to save the
selection.
NOTES:
• If you press Stop/Clear while you set the copy options before
starting copy, all the copy options you have set for the current
copy job will be cancelled and returned to their default status.
• When you make a reduced copy, black lines may appear at the
bottom of the printout.
COPYING
4.7
4
Auto Fit
This feature automatically reduces or enlarges the original
image to fit on the paper currently loaded in the prodcut, so you
cannot adjust the copy size.
This special copy mode can be applied when you load document
only using the document glass. So if a document is detected in
the ADF, the Auto Fit does not work.
1 Load the document to be copied on the document glass,
and close the cover.
2 Make sure that you have selected the required paper tray.
See page 4.2.
3 To enter the special copy mode, SCX-5312F users should
press Special Copy in the Copy mode (see page 4.5) and
SCX-5112 users should press Autofit/Clone.
4 Press Special Copy (Autofit/Clone on SCX-5112)
repeatedly or use the navigation buttons until “AUTO FIT”
appears on the bottom line of the display.
5 Press Mode/Enter (Enter for SCX-5112) to save the
selection.
6 If necessary, customise the copy settings incluing the
number of copies, contrast and image type using the
control panel buttons. See “Setting Copy Options” on
page 4.6.
NOTE: You cannot adjust the copy size by using the Zoom button
while the Auto Fit printing is enabled.
7 Press Copy/Start to begin copying.
8 When the copying is completed, press Stop/Clear to
cancel the Auto Fit mode.
4.8
COPYING
Clone
The Clone feature prints multiple image copies from original
document on a single page. The number of images is
automatically determined by the original image size, so you
cannot adjust the copy size.
This special copy mode can be applied when you load document
only using the document glass. So if a document is detected on
the ADF, the Clone does not work.
1 Load the document to be copied on the document glass,
and close the cover.
2 Make sure that you have selected the required paper tray.
See page 4.2.
3 To enter the special copy mode, SCX-5312F users should
press Special Copy in the Copy mode (see page 4.5) and
SCX-5112 users should press Autofit/Clone.
4 Press Special Copy (Autofit/Clone on SCX-5112)
repeatedly or use the navigation buttons until “CLONE”
appears on the bottom line of the display.
5 Press Mode/Enter (Enter on SCX-5112) to save the
selection.
6 If necessary, customise the copy settings incluing the
number of copies, contrast and image type using the
control panel buttons. See “Setting Copy Options” on
page 4.6.
NOTE: You cannot adjust the copy size by using the Zoom button
while making a clone.
7 Press Copy/Start to begin copying.
8 When the copying is completed, press Stop/Clear to
cancel the Clone mode.
COPYING
4.9
4
Duplex Copy
Duplex copy allows you to print on both sides of the paper.
Duplex copy is available only when you load documents in the
ADF.
Before printing in the duplex mode, decide on which edge you
will bind your finished document. The binding options are:
LONG EDGE, which is the conventional layout used in book
binding.
SHORT EDGE, which is the type often used with calendars.
Long Edge
Short Edge
1 Load the documents to be copied in the ADF.
Make sure that the original document is single sided.
2 Make sure that you have selected the required paper tray.
See page 4.2.
3 Press Duplex Copy. The current setting appears on the
bottom line of the display.
4 Press Duplex Copy or use the navigation buttons to select
the binding orientation. If you select “OFF”, you cannot use
duplex copying.
5 Press Mode/Enter (Enter on SCX-5112) to save the
selection.
6 If necessary, customise the copy settings incluing the
number of copies, copy size, contrast and image type using
the control panel buttons. See “Setting Copy Options” on
page 4.6.
NOTE: In the duplex copy mode, PHOTO or HIGH QUALITY setting
by using the Image button is not enabled.
7 Press Copy/Start to begin copying.
8 When the copying is completed, press Stop/Clear to
cancel the duplex copy mode.
4.10
COPYING
Collation Copy
When the Collation Copy feature is on, your product sorts the
copy job. For example, 2 copies of a 3 page job will print one
complete document followed by the second complete document
(e.g. 1, 2, 3, then 1, 2, 3). Collation copy is available only when
you load documents in the ADF.
1 Load the documents to be copied in the ADF.
2 Make sure that you have selected the required paper tray.
See page 4.2.
3 To enter the collation copy mode, SCX-5312F users should
press Special Copy in the Copy mode (see page 4.3).
Press Special Copy repeatedly or use the navigtion buttons
until “COLLATION” appears on the bottom line of the
display.
SCX-5112 users should press Collation Copy, and press
Collation Copy or the navigation buttons to select “ON” to
turn the feature on.
4 Press Mode/Enter (Enter on SCX-5112) to save the
selection.
5 If necessary, customise the copy settings incluing the
number of copies, copy size, contrast and image type using
the control panel buttons. See “Setting Copy Options” on
page 4.6.
6 Press Copy/Start to begin copying.
NOTE: In the duplex copy mode, PHOTO or HIGH QUALITY setting
by using the Image button is not enabled.
7 When the copying is completed, press Stop/Clear to
cancel the collation copy mode.
COPYING
4.11
4
NOTE
4.12
COPYING
5
PRINTING
Read this chapter to learn how to select and load print
media and how to use the print settings.
This topics included in this chapter are:
• Printing a Document
• Printer Settings
Printing a Document
This procedure describes the general steps required for printing
from various Windows applications. The exact steps for printing
a document may vary depending on the application program you
are using. Refer to your software application’s documentation
for the exact printing procedure.
The following steps describe the typical process to print from a
Windows environment:
1 Ensure that your product is properly connected to the
computer, the product is powered on, and there is paper in
the paper tray.
2 Verify that you have installed the Samsung software for
your computer. For details, see “Installing Samsung
Software” on page 2.4.
3 Start the program you are using to create the document,
and create or open the document you want to print.
4 Choose Print or Print Setup from the File menu. Make
sure that Samsung SCX-5x12 Series PCL 6 is selected as
your default printer. Click Properties or Setup if you want
to make any adjustments that are appropriate for printing
your document. (For details, see “Printer Settings” on
page 5.3.)
5.2 PRINTING
5 Click OK to close the Properties dialog box.
6 After making any necessary changes to the printing
parameters, click OK to start the print job.
Printer Settings
You can use the product with all your Windows 95/98/Me/2000/
XP or Windows NT 4.0 applications. Be sure to set Samsung
SCX-5x12 Series PCL 6 as the default printer for all your
Windows operations.
Most Windows software applications allow you to make changes
to the printer settings. This includes settings that determine
how a print job looks such as paper size, paper orientation, and
margins. Settings made in the application to create the
document will usually override settings made in the printer
driver.
NOTE: You do not need to use any of the operation panel buttons
to use the product as a PC printer. For example, if you want to
adjust the printing contrast you do not have to press Contrast on
the control panel. The control panel buttons are used primarily for
copying.
Accessing Printer Settings
You can access printer settings by using either of these
methods.
Windows 95/98/Me
• Select the File > Print > Properties or File > Print Setup
command from within any Windows application.
Or
• Select Samsung SCX-5x12 Series PCL 6 printer from the
Printers folder, then select File > Properties (or select the
printer icon in the Printers folder, and click the right mouse
button).
PRINTING
5.3
5
Windows NT 4.0
• Select the File > Print > Properties or File > Print Setup
command from within any Windows application.
Or
• Select Samsung SCX-5x12 Series PCL 6 printer from the
Printers folder, click the right mouse button, then select
Document Defaults from the drop-down list.
Windows 2000
• Select the File > Print command from within any Windows
application.
Or
• Select Samsung SCX-5x12 Series PCL 6 printer from the
Printers folder, click the right mouse button, then select
Properties and Printing Preferences from the drop-down
list.
Windows XP
• Select the File > Print > Preferences command from
within any Windows application.
• Select Samsung SCX-5x12 Series PCL 6 printer from the
Printers and Faxes folder, click the right mouse button,
then select Printing Preferences from the drop-down list.
Printer Properties Tabs
When the Printer Properties are displayed, you can review and
change whatever settings are needed for your printer job.
Your printer’s Properties window consists of 5 tabs: Paper,
Graphic, Output, Watermark and About.
If you access the Printer Properties through the Printers folder,
you can view more Windows-based tabs, as well as these 5 tabs.
For information on the Windows-based tabs, refer to your
Windows User Guide.
The printer’s Properties window may differ depending on the
operating system used. This User Guide shows the Properties
window on Windows unless otherwise specified.
NOTE: If you access the Printer Properties through the Printers
folder, any settings made will become the default settings for the
printer. Settings made when the Printer Properties are accessed
through an application File menu and Print or Print Setup will
remain active until the application you are printing from is closed.
5.4 PRINTING
Paper Tab
Use the Paper tab to select what size of paper you have in your
printer, the orientation, the number of copies to print, etc.
1
2
3
4
1
2
Click on the box to put a check
mark to use the different paper
source for the first page. Select the
desired paper source for the first
page and other pages
independently.
5
Select the desired paper
source. Select Cassette if
you load media in the paper
cassette, Bypass if you load in the bypass tray.
Select the size of paper you
are using.
3
Select the type of paper you
are using.
4
PRINTING
5.5
Graphic Tab
The Graphic tab allows you to adjust print quality for your
specific printing needs.
1
3
2
4
5.6 PRINTING
1
You can select the printing resolution. The higher setting,
the sharpen the clarity of printed image. Higher settings
may increase the time it takes to print a document.
2
When you print with the resolution of 300, 600, 1200 dpi
class, some printed characters or images can appear they
have jagged or uneven edges. Set this Samsung
Resolution enhancement Technology (SRT) option to
improve the print quality of you text and image and make
the characters and images appear smoother.
• Printer Default - Choose this setting to use SRT that your
printer provides.
• Normal - Choose to disable SRT mode.
• Text Enhance - Choose to refine the print quality of
characters by smoothing out jagged edges that can occur
on the angles and curves of each character.
• Image Enhance - Choose to refine the print quality of
photo image using SRT.
3
With this option checked all text in your document will be
printed in solid black. When it is not checked, colored text
is printed in shades of gray.
4
Toner Save Mode allows the printer to use less toner on
each page. Using this mode will extend the life of your
toner cartridge and reduce your cost per page, but will
reduce print quality. Click to put a check mark to enable
the mode.
Output Tab
The Output tab provides options for you to adjust how the
document will appear on the printed page. The Output Mode
Type options includes Multiple Pages per Side, Booklet
Printing, Fit to Page, Poster and Duplex printing.
Multiple Pages per Side
Choose the Multiple Pages per Side option to print multiple
pages on a single sheet of paper
1
2
5
1
Select the number of page you want to print per sheet
(1,2,4,6,9 or 16) in the Pages per Sheet drop-down list.
2
Click on the box to put a check mark to print a border
around each page on the sheet.
PRINTING
5.7
Booklet Printing
The Booklet Printing option allows you to print a document out
as a booklet.
Once your document prints, fold the
pages in half and staple the pages.
7
Fit to Page
Choose this option to scale your print job to any selected paper
size regardless of the logical document size.
5.8 PRINTING
Poster
Choose the Poster option to enlarge the printed document.
1
To determine the scaling factor, select the style. You can
choose from: 2x2, 3x3, or 4x4.
1
For example, if you select 2x2, the output will be
automatically stretched to cover 4 physical pages.
PRINTING
5
5.9
Duplex Printing
Choose the Duplex option from the Output tab to print the
document on both sides of the paper.
1
Choosing Long Edge lets you have the binding orientation
along the long edge of the paper as in a megazine.
1
5.10 PRINTING
Choosing Short Edge lets you have the binding
orientation along the short edge of the paper as in a
calendar.
Watermartk Tab
The Watermark tab allows you to create a background image
of text to print on each page of your document.
Watermarks are useful for printing identifying information on a
document, information such as “DRAFT” or “CONFIDENTIAL”, or
perhaps the name of your company or department. By changing
the watermark settings, you can create faint watermarks that
are not intrusive to a document, or bold watermarks to call
attention to specific information.
5
To create a watermark, enter the desired text message in the
Text field, and select the desired watermark options. You can
select the font type and size, color, position, and angle.
To add a new watermark to the list, click Add.
PRINTING 5.11
About Tab
The About tab gives you the program version number. If you
click on the globe image on the window, you will be connected
to the Samsung web site provided you are an internet user.
Printer Properties Buttons & Icons
• Click OK when done reviewing or making changes.
• Click Cancel if you want to exit the tab menus without
applying any changes.
• Click Help to view the online Help feature and tab menu
details.
• Click the ? icon in the title bar. Position the ? pointer over the
parameter in question and click to see a pop-up window
explaining that parameter.
5.12 PRINTING
6
SCANNING
Scanning with your product lets you turn pictures and text
into digital files on your computer. Then you can fax or
e-mail the files, display them on your web site, or use them
to create projects that you can print out using Samsung
SmarThru software which came with your product.
This chapter includes:
• Scanning using the Samsung SmarThru
• Scanning Process with TWAIN-enabled Software
Scanning using the Samsung
SmarThru
SmarThru is the accompanying software for your product. With
the SmarThru, scanning becomes a pleasure.
Take the following steps to start scanning using the SmarThru:
1 Feed the document(s) to be scanned face up into the ADF.
Or
Place a single document on the document glass face down
then close the cover.
2 Once you installed Samsung software, you see the
SmarThru icon on the desktop window. Double-click the
SmarThru 3 icon.
Double click.
The SmarThru 3 window opens.
6.2 SCANNING
3 To open the Scan Wizard, click the Scan Wizard icon in the
plugin bar on the left of the SmarThru 3 window.
Scan Wizard
icon.
The Scan Wizard lets you use the following services:
•Scan
Lets you scan the original documents and save them in the
Image Manager of the Samsung SmarThru system. The
Image Manager is an image database manager and image
editor program.
•Copy
Lets you use your product to produce professional quality
copies. You can adjust the image size and make advanced
settings.
•Scan to Email
Lets you scan the original document then launches a New
Message form to send the just scanned image attached to
a new mail. The email account must be configured in the
Samsung SmarThru system to enable e-mail service.
•Scan to FAX
Lets you scan the original documents then launches a New
Fax form which helps you send them as a fax image.
•Scan to WEB
Lets you scan the original documents for further publishing
to the Web.
•Scan to OCR
Lets you scan the original documents and pass them to the
OCR program. OCR (Optical Character Recognition) is the
process of converting a scanned image into text that you
can edit in a word processing program. After you scan
your document, the software processes or “recognizes” it.
Then you can edit it and either save the file or open it in
any word processing program on your computer.
SCANNING
6.3
6
4 Click the desired service.
5 The Samsung Scan Manager for the selected service opens.
Adjust the scan settings. You can use the Help button to
get on-line help.
6 To start scanning, click Scan.
For further information, please refer to the SmarThru User’s
Guide which came with your product.
Scanning Process with TWAINenabled Software
If you want to scan documents using another software, you will
have to use TWAIN-compliant software such as Adobe
PhotoDeluxe or Adobe Photoshop. The first time you scan with
your product, you will need to select it as your TWAIN source on
the application you will use.
The basic scanning process involves a number of steps:
• Placing your photograph or page on the document glass.
• Opening an application (such as PhotoDeluxe or Photoshop).
• Opening the TWAIN window and setting scan options.
• Scanning and saving your scanned image.
You have to follow the program’s instructions for acquiring an
image. Please refer to the application User’s Guide.
6.4 SCANNING
7
MAINTENANCE
This chapter provides information for maintaining the
cartridge and your product.
This chapter includes:
• Cleaning the Scan Unit
• Expected Cartridge Life
• Replacing the Toner Cartridge
• Setting to Notify Toner Low
(Available in SCX-5312F only)
• Cleaning the Drum
• Replacing the Drum Cartridge
• Consumables and Replacement Parts
Cleaning the Scan Unit
Keeping the scan unit clean helps ensure the best possible
copies. We suggests that you clean the scan unit at the start of
each day and during the day as needed.
CAUTION: Do not pour or spray water directly onto any part of
the product. Do not use ammonia-based cleaner or volatile
solvents such as thinner, on or around your product. They may
damage the product.
1 Slightly dampen a soft lint-free cloth or paper towel with
water.
2 Open the document cover.
3 Wipe the surface of the document glass and ADF glass until
it is clean and dry.
White sheet
Document cover
ADF glass
Document Glass
4 Wipe the underside of the white document cover and white
sheet until it is clean and dry.
5 Close the document cover.
7.2
MAINTENANCE
Expected Cartridge Life
The life of your toner cartridge depends on the amount of toner
used in each print job. For instance, when you print a typical
business letter with about 5% page coverage, you can expect a
toner cartridge life of approximately 6,000 pages. The actual
number may vary according to the print density of the page you
print. If you print a lot of graphics, you may need to change the
cartridge more often.
Replacing the Toner Cartridge
When the toner cartridge is near the end of its life, white streaks
or hue change will occur. The LCD displays warning message
“TONER LOW”. You can temporarily re-establish the print quality
by re-distributing the remaining toner in the cartridge.
1 Pull the release lever to open the side cover.
7
MAINTENANCE
7.3
2
Open the front cover.
3 Turn the cartridge locking lever upwards to release the
toner cartridge.
4 Pull the toner cartridge out and gently shake the cartridge
to distribute the toner evenly inside the cartridge.
NOTE: If the toner gets on your clothing, wipe it off with a dry
cloth and wash clothing in cold water. Hot water sets toner into
fabric.
7.4
MAINTENANCE
5 Reinstall the cartridge and turn the cartridge locking lever
downwards.
6 Close the front cover, then the side cover. The display shows
“NEW TONER? 1.YES 2.NO”.
7 Select “NO” by pressing 2. The product returns to Standby
mode. This is typically successful one time only.
When the toner eventually runs out, only blank pages will print
when a print job is sent, or when a fax is received. At this stage,
the toner cartridge needs to be replaced. The display shows
warning message “TONER EMPTY”.
Take the following steps to replace the toner cartridge:
1 Open the side cover, then the front cover.
Make sure that the side cover must be open to open the
front cover.
2 Turn the cartridge locking lever upwards to release the
toner cartridge.
7
MAINTENANCE
7.5
3 Pull the used cartridge out.
NOTE: Help the environment by recycling your used toner
cartridge. Refer to the recycling brochure packed with the toner
cartridge for details.
4 Shake the new toner cartridge horizontally four or five
times.
Save the box and the cover for shipping.
5 Slide the new toner cartridge in until it locks in place.
6 Turn the cartridge locking lever downwards until it locks in
place.
7 Close the front cover, then the side cover. The display shows
“NEW TONER? 1.YES 2.NO”.
8 Select “YES” by pressing 1. The product returns to Standby
mode.
7.6
MAINTENANCE
Setting to Notify Toner Low
(Available in SCX-5312F only)
If you have set this NOTIFY TONER LOW menu option to “ON”,
when the toner cartridge needs to be replaced, your product
automatically sends a fax to your service company or the dealer
to notify them that your product requires a new toner cartridge.
1 Press Menu/Exit and then Maintenance from the onetouch dial keypad.
2 Use
or
until “NOTIFY TONER” appears on the bottom
line of the display, and press Mode/Enter.
“NOTIFY TONER LOW” appears on the top line and the
current setting appears on the bottom line.
3 Press
or to change the setting. Select “ON” to enable
this feature, then press Mode/Enter.
If you select “OFF”, you can not use this feature.
4 Enter your fax number, then press Mode/Enter.
5 Enter your name (up to 20 digits), then press Mode/Enter.
6 Enter the service fax number to which your product sends
the Notification fax message, then press Mode/Enter.
7 Enter the serial number of your product, then press Mode/
Enter.
7
MAINTENANCE
7.7
Cleaning the Drum
If you are getting streaks or spots on your print, you may set
the product to clean the drum cartridge.
1 Before setting the cleaning procedure, make sure that
paper is loaded in the product.
2 SCX-5312F users should press Menu/Exit then
Maintenance from the one-touch dial keypad.
SCX-5112 users should press Menu then press
“MAINTENANCE” appears on the top line.
or
until
3 “CLEAN DRUM” appears on the bottom line of the display.
Press Mode/Enter (Enter on SCX-5112).
4 The product prints out a cleaning page. Toner particles on
the drum surface are fixed to the paper. Repeat printing
three or four times.
Replacing the Drum Cartridge
The useful life of the drum cartridge is approximately 15,000
copies. The LCD displays “DRUM WARNING” when the drum is
near the end of life. Approximately 1,000 more copies can be
made, but you should have a replacement cartridge in stock.
When “DRUM EMPTY” is displayed, the product will stop
operating until the drum cartridge is replaced.
To replace the drum cartridge:
1 Open the side cover, then the front cover.
Make sure that the side cover must be open to open the
front cover.
7.8
MAINTENANCE
2 Turn the cartridge locking lever upwards to unlock the toner
cartridge, then pull the toner cartridge out.
NOTE: The toner cartridge must be removed to replace the drum
cartridge.
3 Pull the used drum cartridge.
NOTE: Help the environment by recycling your used drum
cartridge. Refer to the recycling brochure packed with the drum
cartridge for details.
4 Unpack the new drum cartridge and slide it in place, making
sure not to touch the surface of the drum.
MAINTENANCE
7
7.9
5 Reinstall the toner cartridge, then lock the lever.
NOTE: If your machine automatically recognises the replaced
cartridge, you can skip following 6 and 7 steps.
6 Close the front cover and the side cover. The LCD displays
“NEW DRUM? 1.YES 2.NO”.
7 Select “YES” by pressing 1. The product returns to Standby
mode.
If the drum cartridge does not work properly and it is required
to replace with a new one before “DRUM WARNING” or “DRUM
EMPTY” appears on the display, replace the drum cartridge as
described above then take the following steps to reset the drum
counter:
1 Press Menu/Exit then Maintenance from the one-touch
dial keypad.
SCX-5112 users should press Menu then press
“MAINTENANCE” appears on the top line.
or
until
2 Use
or
until “NEW DRUM” appears on the bottom line
of the display, and press Mode/Enter (Enter on SCX5112).
3
“NEW DRUM UNIT?” appears on the top line and “1.YES
2.NO” appears on the bottom line. Press 1 to select “1.YES.”
NOTE: If you do not reset the counter, “DRUM WARNING” or
“DRUM ENPTY” may appear before the time is up.
7.10 MAINTENANCE
Consumables and Replacement
Parts
From time to time, you will need to replace the toner and drum
cartridges, roller, and fuser unit to mainatin top performance
and avoid print quality problems and paper feed problems
resulting from worn parts.
The following items should be replaced after you have printed a
specified number of pages. See the table below.
Items
Yield(Average)
ADF Rubber Pad
20,000
ADF Roller
50,000
Paper Feeding Roller
75,000
Transfer Roller
75,000
Fuser Unit
75,000
The purchase the consumables and replacement parts, contact
Samsung dealer or the place where you bought your product.
We strongly recommed that items (expect for the print
cartridge) be installed by a trained servicer.
7
MAINTENANCE
7.11
NOTE
7.12 MAINTENANCE
8
‘
TROUBLESHOOTING
This chapter gives helpful information for what to do if you
encounter an error.
This chapter includes:
• Document Jams
• Paper Jams
• LCD Error Messages
• Solving Problems
Document Jams
If a document jams while it is feeding through the ADF,
“DOCUMENT JAM” appears in the display.
Details for clearing the three types of document misfeeds are
given below.
Input Misfeed
1 Open the ADF top cover.
2 Pull the document gently to the right and out of the ADF.
3 Close the ADF top cover. Then feed the documents back into
the ADF.
NOTE: To prevent document jams, use the document glass for the
thick, thin or mixed documents.
8.2
TROUBLESHOOTING
Exit Misfeed
1 Open the document cover and turn the release knob to
remove the misfeed documents from the exit area.
2 Close the document cover. Then feed the documents back
into the ADF.
Roller Misfeed
1 Open the document cover.
2 Turn the release knob so that you can easily seize the
misfed document, and remove the document from the ADF
or the feed area by carefully pulling it rightwards using both
hands.
8
3 Close the document cover. Then feed the documents back
into the ADF.
TROUBLESHOOTING
8.3
Paper Jams
If paper jams occur, “PAPER JAM” appears in the display. Follow
the steps below to clear jam. To avoid tearing paper, pull the
jammed paper out gently and slowly.
Paper Feed Area
If jammed in the paper feed area, “PAPER JAM0” appears in the
display.
1 Remove the paper cassette. After you pull it out completely,
lift the front part of the cassette slightly up to release the
cassette from the product.
2 Remove the jammed paper by gently pulling it straight out.
If you remove the jammed paper here, open the side cover
then close it to clear “PAPER JAM” message on the display.
8.4
TROUBLESHOOTING
If there is any resistance, and the paper does not move
immediately when you pull, stop pulling. Then:
3 Pull the release lever to open the side cover.
NOTE: Do not touch the shiny drum cartridge surface. Scratches
or smudges will result in poor copy quality.
4
Carefully remove the misfeed paper in the direction shown.
5 Close the cover and insert the paper cassette. Lower the
rear part of the cassette to align the rear edge to the
corresponding slot of the machine, then insert it completely.
8
TROUBLESHOOTING
8.5
Fuser Area
If jammed in the fuser area, “PAPER JAM 1” appears in the
display.
NOTE: The fuser area is hot. Take care when removing paper from
the product.
1 Press the release lever to open the side cover.
2 Pull down on the fuser lever as shown below.
This will release pressure on the paper.
If paper is not seen in this area, skip to the Exit Area.
NOTE: Do not pull paper up through the fusing unit. Unfused
toner may adhere in the area, resulting in smudged copies.
3 Remove the jammed paper, in the direction shown.
8.6
TROUBLESHOOTING
4 Push up on the fuser lever, then close the side cover.
Paper Exit Area
If jammed in the paper exit area, “PAPER JAM 2” appears in the
display.
1 Press the release lever to open the side cover.
2 Open the front cover.
8
TROUBLESHOOTING
8.7
3 Pull down on the fuser lever. This will release pressure on
the paper.
4 Turn the jam remove lever in the direction of the arrow to
move the paper to the exit area, then gently pull the paper
out through the exit area.
5 Push up on the fuser lever.
8.8
TROUBLESHOOTING
6 Turn the jam remove lever back to the original position.
7 Close the front cover
1
and the side cover
2
.
2
1
Duplex Jam
If paper jam occurs in the duplexer, “DUPLEX JAM” appears in
the display.
1 Press the release lever to open the side cover.
8
2 Remove the jammed paper. Then close the side cover.
TROUBLESHOOTING
8.9
Bypass Jam
“BYPASS JAM” appears in the display when the machine does
not detect paper in the bypass tray due to no paper or improper
paper loading when you try to print using the bypass tray.
“BYPASS JAM” also may occur when the paper is not properly fed
into the machine through the bypass tray. In that case, pull the
paper out of the product.
8.10 TROUBLESHOOTING
LCD Error Messages
Display
Meaning
Solution
BYPASS JAM
The product detects non
feeding from the bypass
tray.
Load paper in the bypass tray.
DOCUMENT JAM
The loaded document
has jammed in the ADF.
Clear the document jam. See
page 8.2.
DOOR OPEN
The side cover is not
securely latched.
Close the side cover until it locks
in place.
DRUM WARNING
The drum cartridge is
near the end of life.
You should have a replacement
cartridge in stock.
DUPLEX JAM
Paper has jammed in the
middle of 2-sided
printing.
Clear the jam. See page 8.9.
DRUM EMPTY
The drum cartridge is out
of life.
Replace the drum cartridge. See
page 7.8.
There is a problem in the
fuser unit.
Unplug the power cord and plug it
back in. If the problem still
persists, please call for service.
You have used
unauthorised cartridge.
You must use a Samsungapproved cartridge.
FUSER ERROR
OPEN HEAT ERROR
HEATTING ERROR
OVER HEAT
INVALID
CARTRIDGE
LINE ERROR
(for SCX-5312F only)
LSU ERROR
Your product cannot
connect with the remote
machine, or has lost
contact because of a
problem on the phone
line.
A problem has occurred
in the LSU (Laser
Scanning Unit).
Try again. If failure persists, wait
an hour or so for the line to clear,
then try again.
Or, turn the ECM mode on. See
‘System Data Options’ in the
Facsimile User’s Guide.
Unplug the power cord and plug it
back in. If the problem still
persists, please call for service.
TROUBLESHOOTING 8.11
8
Display
Meaning
Solution
The memory is full.
Either delete unnecessary
documents, or retransmit after
more memory becomes available,
or split the transmission into more
than one operation.
The remote fax mahine
has not answered after
all the redial attempts.
Try again. Make sure the remote
machine is operational.
The remote fax machine
you want to poll is not
ready to respond to your
poll.
The remote operator should know
in advance that you are polling
and have their fax machine
loaded with the orginal document.
(for SCX-5312F only)
Or, when setting up to
poll another fax mahine,
you have used an
incorrect poll code.
Enter the correct poll code.
NO DEVELOPER
CARTRIDGE
The drum cartridge is not
installed.
Install the drum cartridge.
NO PAPER
The paper in the paper
cassette has run out.
Load the paper in the paper
cassette.
RX TRAY FULL
Paper is overstacked in
the output bin.
Remove paper.
PAPER JAM 0
Paper has jammed in the
paper feeding area of the
cassette.
Clear the jam. See page 8.4.
PAPER JAM 1
Paper has jammed in the
fuser area.
Clear the jam. See page 8.6.
PAPER JAM 2
Paper has jammed in the
paper exit area.
Clear the jam. See page 8.7.
The product is waiting
for a specified time
interval to redial a
previously busy station.
You can press Mode/Enter to
immediately redial, or Stop/
Clear to cancel the redial
operation.
The scan module is
locked.
Unlock the scanner (see
page 1.2) and press Stop/Clear.
MEMORY FULL
(for SCX-5312F only)
NO ANSWER
(for SCX-5312F only)
POLLING ERROR
RETRY REDIAL?
(for SCX-5312F only)
SCANNER LOCKED
8.12 TROUBLESHOOTING
Display
Meaning
Solution
TONER EMPTY
The toner cartridge has
run out. The product
stops.
Replace with a new toner
cartridge. See page 7.3.
TONER LOW
The toner is almost
empty.
Take out the toner cartridge and
gently shake it. By doing this, you
can temporarily re-establish
printing operations.
Solving Problems
The following chart lists some conditions that may occur and the
recommended solutions. Follow the suggested solutions until
the problem is corrected. If the problem persists, please call for
service.
Copier Problem Solution Chart
Condition
Suggested solutions
The LCD does not turn on.
Check that the product is plugged into an electrical
receptacle.
Ensure that there is power to the receptacle and that
the product power switch is in the ON position.
The product beeps an error
sound and does not make a
copy.
Make sure that the product is in the Copy mode. If
not, chagne the mode into the Copy mode by
pressing Mode/Enter.
Copies are too light or too
dark.
Smears, lines, marks, or
spots on copies.
If the original is light, use the Contrast button to
darken the background of the copies.
If the original is dark, use the Contrast button to
lighten the background of the copies.
If detects are on the original, press the Contrast
button to lighten the background of your copies.
If no defects are on the original, clean the document
glass and underside of the document cover.
TROUBLESHOOTING 8.13
8
Condition
Copy image is skewed.
Suggested solutions
Ensure that original is positioned correctly on
document glass.
Check that copy paper is loaded correctly.
Blank copies.
Image rubs off the copy
easily.
Ensure that the original is face down on the
document glass or face up in the ADF.
Replace the paper in the cassette with paper from a
new package.
In high humidity areas do not leave paper in the
product for extended periods of time.
Fan the stack of paper, then turn it over in the
cassette. Replace paper in paper cassette with a fresh
supply. Check/adjust paper guides.
Frequent copy paper jams.
Ensure that the paper is the proper paper weight. 20
lb (75 g/m2) bond paper is recommended.
Check for copy paper or pieces of copy paper
remaining in the product after a paper jam has been
cleared.
Toner yield is lower than
expected and TONER LOW
message appears in the LCD.
Toner may be lodged in the cartridge. Remove the
toner cartridge. Shake the toner cartridge and tap
along the top of the toner cartridge over a waste
receptacle. Take care not to touch the exposed toner
on the left side of the cartridge.
Fewer copies from the toner
cartridge than expected.
Originals contain pictures, solids, or heavy lines.
Originals are forms, newsletters, books etc. The
product is being turned on and off frequently. The
document cover is being left open while copies are
being made.
The following message appears
on the computer screen:
Scanner is busy receiving or
printing data. When the current
job is completed, try again.
There may be a copying or printing job in progress.
When the current job is completed, try the job again.
8.14 TROUBLESHOOTING
Printing Problem Solution Chart
Condition
Probable cause
The IEEE-1284 parallel
cable or USB cable is
not connected properly..
Your product does
not print.
Your product does
not print.
(continued)
Half of the page is
blank.
The IEEE-1284 parallel
cable or USB cable is
defective.
Suggested solutions
Check the cable connection..
Check the cable with a computer
and printer that work. If printing is
still not possible, replace the cable.
The port setting is
incorrect.
Check the printer settings in the
Windows Control Panel to make
sure that the print job is being sent
to the correct port. (For Example:
LPT1.)
The toner and drum
cartridges are not
installed properly.
Check that the toner and drum
cartridges are installed properly.
The printer driver may
not be installed
properly.
Reinstall the software.
The parallel port cable
specifications may not
be correct.
Use the IEEE-1284 parallel port
cable supplied with the machine or
replace it with an IEEE-1284
compliant cable.
The page layout is too
complex.
Reduce the resolution setting from
600 dpi to 300 dpi. Install more
RAM in the computer.
The page orientation
may be incorrect.
Change the page orientation in the
printer setup dialogue.
8
TROUBLESHOOTING 8.15
Condition
Probable cause
Suggested solutions
Change the USB mode to “SLOW.”
To do so, take the following steps:
1. Press Menu/Exit then
System Setup from the onetouch dial keypad. SCX-5112
users should press Menu then
Enter.
When printing
using the USB
connection, an
error occurs
repeatedly.
When the USB mode is
set to “FAST” some PC
users may experience
poor USB
communication.
2. Use
or
until “USB MODE”
appears on the top line of the
display. The current setting
appears on the bottom line.
3. Press
or
to select “SLOW.”
4. Press Mode/Enter (Enter on
SCX-5112) to save the
selection.
5. Press Stop/Clear to return to
Standby mode.
Printing is too
slow.
The computer parallel
port may not be set for
high speed
communications.
If your computer is equipped with
an ECP parallel port, enable this
mode of operation. Refer to the
Enabling High Speed Printer
Communications section and your
PC’s user guide.
If using Windows 95,
the spool setting may
be set incorrectly.
Point to the Start and then click
Settings then Printers. Click
your product icon with the right
mouse button. Click Properties
and then spool settings on the
Details tab. Select the desired
setting from the available choices.
Computer may not have
enough memory (RAM).
Install more RAM in your computer.
The print job is large.
Reduce resolution from 600 dpi to
300 dpi.
8.16 TROUBLESHOOTING
Condition
Probable cause
Suggested solutions
There is a paper quality
problem.
Use only paper that meets the
specifications required by the
product.
Toner may be unevenly
distributed.
Remove the toner cartridge and
shake it gently to evenly distribute
the toner. Then reinstall the toner
cartridge.
Black staining
There is a paper quality
problem.
Use only paper that meets the
specifications required by your
product.
Character voids
The paper may be too
dry.
Try printing with a different batch
of paper.
The paper may be too
damp.
Try printing with a different batch
of paper. Do not open packages of
paper until necessary so that the
paper does not absorb too much
moisture from the air.
Printing over uneven
surfaces.
If printing onto envelopes, change
your printing layout to avoid
printing over areas that have
overlapping seams on the reverse
side.
Missing characters
The paper may be too
damp.
Try printing with a different batch
of paper. Do not open packages of
paper until necessary so that the
paper does not absorb too much
moisture from the air.
Back of printout is
dirty
The transfer roller may
be dirty.
Print a few blank pages to clean
the transfer roller.
Toner may be low.
Remove the toner cartridge and
shake it gently to evenly distribute
the toner. Then reinstall the toner
cartridge.
Irregular faded
patches of print.
Background
scatter
Faded graphics
Ensure that you have a spare toner
cartridge.
TROUBLESHOOTING 8.17
8
Fax Problem Solution Chart
(Available in SCX-5312F only)
Condition
The product is not
working, there is no
display and the buttons
are not working.
Suggested solutions
Unplug the power cord and plug it in again.
Check that your socket is active.
Check that the phone line is connected properly.
No dial tone
The numbers stored in
the memory do not dial
correctly.
The document does not
feed into the product.
Check that the phone socket in the wall by plugging in
another phone.
Make sure that the numbers are stored in the memory
correctly. Print a Phone Book list referring to the
Facsimile User’s Guide.
Make sure that the document is not wrinkled and you
are putting it in correctly. Check the document is the
right size, not too thick or thin.
Make sure that the ADF top cover is firmly closed.
The FAX mode should be selected.
You cannot receive faxes
automatically.
Is there paper in the cassette?
Check if the display shows “MEMORY FULL”.
Your product cannot
receive faxes manually.
Did you hang up the handset of the external telephone
before you start faxing?
Make sure that the document is loaded face down.
Your product will not
send anything.
“TX” should show up on the display.
Check the other fax machine you are sending to, to see
if it can receive your fax.
You cannot poll another
machine.
8.18 TROUBLESHOOTING
The fax machine you are polling may be using a poll
code. Contact the remote opeator.
Condition
Suggested solutions
The fax machine sending you the fax may be faulty.
The incoming fax has
blank spaces or you
received a poor-quality
copy.
The fax machine sending you a fax may have a dirty
document glass. Clean the document glass, referring to
page 7.2.
A noisy phone line can cause line errors.
Check your machine by making a copy.
The toner cartridge may be empty. Replace the toner
cartridge, referring to page 7.3.
Are some of the words
on the incoming fax
stretched?
The fax machine sending you the fax had a temporary
document jam.
There are lines on the
copies or documents you
send.
Check your scan glass for marks, and clean it. See
page 7.2.
The product dials a
number, but fails to
make a connection with
another fax machine.
The other fax machine may be turned off, out of paper,
or cannot answer incoming calls. Speak with the other
machine operator and ask them to sort out the
problem.
You cannot store a
document in the
memory.
There may not be enough memory to store the
document. If the display shows a ‘MEMORY FULL’
message, delete any documents you no longer need
from the memory, then restore the document.
Blank areas appear at
the bottom of each page
or on other pages, with
only a small strip of text
printed at the top.
You may have chosen the wrong paper settings in the
user option setting. Refer to the Facsimile User’s Guide
to choose a proper paper size.
8
TROUBLESHOOTING 8.19
NOTE
8.20 TROUBLESHOOTING
9
APPENDIX
This chapter includes:
• General Specifications
• Scanner and Copy Specifications
• Printer Specifications
• Facsimile Specifications (SCX-5312F only)
General Specifications
Item
Description
Printing method
Laser scanning unit
Scanning method
Sheet-fed and Flat-bed CCD(charge coupled device)
module
Effective scanning width
8.2 inches (208 mm)
Width
ADF Document size
6.9 to 8.5 inches (174 to 216 mm)
Length Single page: 5 to 59 inches (128 to 1500 mm)
Multi pages: 5 to 14 inches (128 to 356 mm)
for Cassette : Letter, A4, Legal
(weight: 60~90 g/m2, 16 ~ 24 lb)
Recording paper type
for By pass Tray: Letter, Legal, JIS B5, A4, Executive, A5,
A6 card, Post Card 4x6, HagaKi, Envelope 7-3/4,
Envelope COM-10, Envolope DL, Envelope C5
* Min.: 3.9 x 5.8 inches (98 x 148 mm),
(weight: 60~120 g/m2, 16 ~ 32 lb)
Recording paper capacity
for Cassette : 550 sheets (weight: 75 g/m2, 20 lb)
for By pass Tray: 100 sheets (weight: 75 g/m2, 20 lb)
Automatic document
feeder
Up to 30 pages (20 lb or 75 g/m2)
Consumables
2-piece Toner/Drum cartridge system
Compatibility
Win 95, 98, 2000, NT 4.0, Win-Me, Win XP
PC Interface
IEEE 1284 Parallel, USB
Power requirements
100 ~ 127 VAC, 50/60 Hz, 4A
220 ~ 240 VAC, 50/60 Hz, 2.5A
Sleep mode: 35 W
Power consumption
Standby mode: 90 W
Average: 320 W
Operating conditions
Temperature: 50 oF to 89 oF (10 oC to 32 oC)
Humidity: 20% to 80% RH
9.2 APPENDIX
LCD
16 Characters x 2 lines
Toner cartridge life
6,000 sheets @ 5% coverage (A4, Basic data)
Drum cartridge life
15,000 sheets @ 5% coverage (A4, Basic data)
SET Dimension (WxDxH)
22.0 x 17.0 x 18.1 inches (560 x 433 x 459 mm)
Net: 22.5 Kg (including consumables)
Weight
Gross: 26.5 Kg (including consumables, accessories and
package)
Package Weight
Paper: 2.7 Kg
Plastic: 0.7 Kg
Scanner and Copy Specifications
Item
Description
Compatibility
TWAIN standard
Resolution
Optical 600 dpi resolution (Mono and Color)
Color bit depth
Mono bit depth
Internal: 32 bit
External: 24 bit
1 bit for text mode
8 bit for Gray mode
Copy speed
12 copies per minute
Copy resolution
1,200 dpi enhanced
Zoom Rate
by platen 25 ~ 400 %
by ADF
25 ~ 100 %
9
APPENDIX
9.3
Printer Specifications
Item
Description
Printing method
Laser Scanning Unit
Printing speed
12 pages per minute/A4
Print resolution
1200 dpi class
Emulation language
PCL 6
Facsimile Specifications
(SCX-5312F only)
Item
Description
Compatibility
ITU-T Group 3, ECM
Applicable line
Public Switched Telephone Network(PSTN) or behind PABX
Data coding
MH/MR/MMR (ECM Mode) and JPEG for color fax
transmission
Modem speed
33600/28800/21600/19200/14400/12000/9600/7200/
4800/2400 bps with fall back
Approx. 3 seconds/page
Transmission speed
Scanning speed
* Transmission time applies to memory transmission of text
data with ECM compression using only ITU-T No.1 Chart.
Platen: approx. 3 seconds/letter (at standard fax resolution
mode)
ADF: approx. 5 seconds/letter (at standard fax resolution
mode)
Resolution
Standard(203x98 dpi), Fine(203x196 dpi),
Superfine(300x300 dpi), Photo(203x196 dpi/300x300 dpi),
Color(203x196 dpi)
User Memory
4 MB (320 pages)
Halftone
256 levels
Auto dialer
9.4 APPENDIX
One-touch dialling (registration for 40 numbers)
Speed dialling (registration for 80 numbers)
INDEX
A
E
ADF load 4.3
error 8.11
extension phone, connect 1.12
B
booklet print 5.8
F
C
fit to page print
in copy mode 4.8
in print mode 5.8
cartridge locking lever 1.16
clone
in copy mode 4.9
in print mode 5.7
collation for copying 4.11
consumables 7.11
contrast
for copying 4.6
copy size 4.7
D
default printer 5.2
display language 1.20
document
jam, clear 8.2
load in ADF 4.3
load on document glass 4.4
document glass
clean 7.2
load 4.4
drum
clean 7.8
install 1.14
replace 7.8
J
jam, clear
document 8.2
paper 8.4
M
MFP driver
install 2.4
uninstall 2.12
P
paper jame, clear 8.4
paper load
in bypass tray 3.6
in cassette 1.17
paper load capacity 3.2
paper save 1.21
paper size, set
in bypass tray 3.9
in cassette 1.20
in print mode 5.5
paper source
in copy mode 4.2
in print mode 5.5
paper type 3.2
parallel, connect 1.13
poster print 5.9
power save 1.22
printer driver
install 2.4
uninstall 2.12
printer driver window 5.3
R
resolution, print 5.6
S
scan driver
install 2.4
uninstall 2.12
scanner lock 1.2
SmarThru
install 2.4
uninstall 2.14
software
install 2.4
uninstall 2.16
T
tel line, connect 1.11
toner cartridge
install 1.14
life 7.3
replace 7.5
toner save 1.21
two-sided print
in copy mode 4.10
in print mode 5.10
U
USB, connect 1.13
W
watermark print 5.11