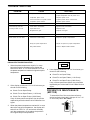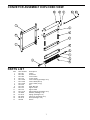
1
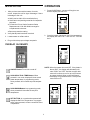
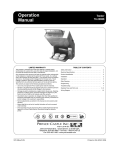
OPERATING INSTRUCTIONS High-Speed Contact Griller TX Series TABLE OF CONTENTS PAGE Installation / Set-Up ..................................................... 2 Overlay Glossary .......................................................... 2 Operation & Programming ........................................ 2-3 Maintenance ................................................................. 4 Cleaning ........................................................................ 4 Diagnostic Troubleshooting ......................................... 5 Troubleshooting ............................................................ 5 Exploded View & Parts List ..................................... 6-7 Wiring Diagram ............................................................. 8 LIMITED WARRANTY This product is warranted to be free from defects in material and/or workmanship for a period of two (2) years from date of original installation, not to exceed 30 months from date of shipment from our factory. On location service will be covered for a period of (1) one year from date of original installation. Customer must provide proof of purchase. (Travel charges are limited to 2 hours travel time, 100 miles round trip. One trip per repair) After one year the customer is responsible for all trip charges, mileage, etc. PRODUCT SPECIFICATION Electrical 208 Volt 60 Hz. Single Phase 19.2 Amps 4000 Watts Max. Any component which proves to be faulty in material and/or workmanship will be replaced or repaired (at the option of Prince Castle, Inc.) without cost to the customer for parts or labor. This warranty is subject to the following exceptions/ conditions: l Any use of non genuine Prince Castle spare parts voids this warranty. All service should be performed by an Authorized Prince Castle Sevice Agency, failure to do so will void this warranty. l Damage caused by carelessness, neglect, and/ or abuse (e.g., dropping, tampering or altering parts), equipment damaged in shipment, by fire, flood or an act of God is not covered under this warranty. 240 Volt 60 Hz. Single Phase 22.2 Amps 5325 Watts Max. Printed in 2000 Prince Castle Inc. 355 East Kehoe Blvd. l Carol Stream, IL 60188 Tel: (630) 462-8800 l Fax: (630) 462-1460 Toll Free: 1-800-PCASTLE 537-504 INSTALLATION OPERATION 1. 1. Press On/Off Button, conveyor will begin to turn and the display will read LO. After you have removed the toaster from the carton, inspect the unit for signs of damage. If there is damage to the unit: l l l l PROG Notify carrier within 24 hours after delivery. Save carton and packing materials for inspection purposes. Contact the Prince Castle Customer Sales Department at 1-630-462-8800 to arrange for a replacement to be sent. LO ACT SET Remove protective coating. 2. Verify that all parts have been received. 2. Once the toaster reaches its Set Point temperature the display will read R D Y and the ACT LED will be lit. 3. Locate toaster on a flat surface 4. Plug unit into the proper voltage receptacle. OVERLAY GLOSSARY PROG R D Y ACT SET NOTE: When the toaster is turned OFF, if the platen is above 450°F, the display will alternately indicate COOL and OFF and the conveyor belt motor will continue to run for up to 45 minutes to protect the belt. When cooled sufficiently, the display will go blank and the conveyor belt motor will turn off. ON/OFF Button: Turns Unit on and off. SCAN UP/ACTUAL TEMP Button: When pressed in run mode, display will show actual platen temperature. In programming mode, when pressed, will increase set point temperature. PROG SCAN DOWN Button: In programming mode, when pressed will decrease the set point temperature. SET BUTTON: In run mode when pressed will display the Set Point Temperature. In program mode, when pressed, will store a new Set Point Temperature. 2 COOL ACT SET PROG O F F ACT SET 2. Use the UP or DOWN buttons to adjust to the desired setting. Press and release the SET button to save the new setting and return to the operation mode. VIEW ACTUAL TEMPERATURE 1. When the toaster is at the proper operating temperature, the display will always show RDY. To view the actual temperature, press and release either the UP ARROW or DOWN ARROW. The display will show the actual platen temperature for 5 seconds, then switch back to RDY. PROG RDY ACT SET PROG 500 ACT SET PROG RDY PROG 500 ACT SET PROG RDY ACT SET ACT SET FAHRENHEIT AND CELSIUS SETTINGS 1. To switch the unit from Fahrenheit to Celsius, press and hold the DOWN ARROW once you release it the unit will switch to Celsius. To switch from Celsius to Fahrenheit press and holdand release the UP ARROW when you turn the unit on. VIEW SET POINT TEMPERATURE 1. To view the Set Point Temperature, press and release the SET Button. The LED next to the ACT goes off and the LED next to SET comes on, and the set point temperature will be displayed for 5 seconds, then the display will change back to RDY. PROG RDY ACT SET PROG 500 ACT SET PROG RDY BUN CRUSH SETTINGS 1. The toaster is designed to adjust for different cuts of buns. The bun crush adjustment knobs are located on both sides of the toaster. Right side adjustment is for HEELS, and left side adjustment is for CROWNS. ACT SET PROGRAMMING SET POINT TEMPERATURE 1. To change the set point temperature, press and hold the SET button for 6 seconds. The LEDs next to SET and PROG will flash and the current set point temperature will be displayed. PROG 505 ACT SET 3 1=Thinnest Cut Crowns A=Thinnest Cut Heels 6=Thickest Cut Crowns F=Thickest Cut Heels CLEANING 6. Place belt on a flat surface, being careful not to crease the loops. DAILY 7. Clean with hot soapy water and sponge, then let air dry. 1 Teflon sheets should be rotated and cleaned on a daily basis. NOTE: Do not use sharp objects to clean Teflon sheets. 8. Reverse steps 2-5 to replace conveyor belt. 2. Wipe conveyor belt with a damp cloth on a daily basis. Remove front cover/bun chute assembly to access the conveyor belt. NOTE: Do not use sharp objects to clean the conveyor belt. CONVEYOR BELT TRACKING ADJUSTMENT The Conveyor belt tracking adjustment allows for adjusting the conveyor belt if it slides too far to either side of the conveyor. Adjustment screw is located on the left side of the unit by the upper locking latch. MONTHLY 1. Conveyor belt should be removed and cleaned thoroughly on a monthly basis. 2. Remove front cover/Bun Chute Assembly by pulling up and off of the toaster and set aside. 1. If the conveyor belt slides too far to the right, loosen the nut, then turn the adjustment screw clockwise to tighen, this will move the belt back to the center. Tighten the nut to lock the adjustment screw into place. 3. Loosen thumbscrews and remove left side panel. 4. Press down on conveyor belt upper roller and lock into position. 5. Release upper and lower locking latches from the conveyor rollers. 2. If the conveyor belt slides too far to the left, loosen the nut, then turn the adjustment screw counter clockwise to loosen, this will move the belt back to the center. Tighten the nut to lock the adjustment screw into place. 6. Remove conveyor belt from the unit. It is easier to remove the belt by turning it as you pull it from the side. 4 TROUBLE SHOOTING PROBLEM CAUSE Unit will not heat up. SOLUTION No power to unit. Ensure power cord is connected to Inoperable power cord. Loose connection on power switch. Inoperable power switch. proper Receptacle and the power inlet. Replace power cord. Tighten power switch connections. Replace power switch. Unit heats up, but the conveyor does not run. Loose motor connection. Inoperable motor. Stripped drive gear. Tighten motor connection. Replace motor. Replace drive gear. Buns under or over done. Check bun crush setting Adjust for proper compression Verify set point temperature. Adjust set point for proper temperature. Dirty Teflon Sheet. Clean or Replace Teflon Sheet. DIAGNOSTIC TROUBLESHOOTING PROG 1. When the platen temperature drops 24° or more below the set point temperature the display will switch from RDY to LO and remain at LO until the platen temperature reaches it original set point temperature. PROG LO SET l Check For an Open Platen (11.8 Ohms) l Check For an Open Probe (1000 Ohms) l Check For an Open Relay. l Check For an Open Platen (11.8 Ohms) l Check For an Open Probe (1000 Ohms) PREVENTIVE MAINTENANCE (MOTOR) To extend the life of the motor have a factory authorized technician add 2-3 drops of 3 in 1 oil on a monthly basis. OIL HOLE If any of these parts have failed, they should be replaced by an Authorized Prince Castle Service Agent. 3. When the platen temperature reaches 36°or more above the set point temperature, the display will switch from RDY to HI and remain that way until the temperature of the platen drops within the original set point temperature. SET If any of these parts have failed, they should be replaced by an Authorized Prince Castle Service Agent. 2. If the display remains at LO for 30 minutes you should do the following: Check For an Open Relay. ACT 4. If the display remains at HI for 30 minutes you should do the following: ACT l HI 5 EXPLODED VIEW AND PARTS LIST 28 27 29 26 13 14 15 12 16 17 19 20 25 18 36 35 11 21 37 9 23 10 8 22 42 24 7 41 3 2 34 14 15 38 39 40 30 31 33 6 5 1 PARTS LIST Item 1 2 3 4 5 6 7 8 9 10 11 12 13 14 15 16 17 18 19 20 21 22 Part Number 537-324 537-394 537-330S 537-338 537-320 537-373 87-028S 537-383 537-398 537-377S 537-333 537-395 537-355 537-298 537-379 537-329 537-300 537-386 537-385 537-382 537-381 537-319 4 Description Front Cover Bun Chute Conveyor Assy. Base Pad Bottom Plate Ramp Baffle Motor Retainer Bar Lower Retainer Bar Upper Teflon Sheet (Pkg. of 2) LH Cover Bun Crush Overlay Bun Crush Adjustment Knob Cam Bracket Guide Bracket LH Cam Shaft LH Slide Plate Adjustment Knob Adjustment Nut Conveyor Bracket Conveyor Bracket Ramp Item 23 24 25 26 27 28 29 30 31 32 33 34 35 36 37 38 39 40 41 42 * * * * * 6 Part Number 537-336 537-335 537-295S 537-337 537-296 537-366 537-321 537-332 537-396 537-355 537-343S 537-328 537-299 65-048S 537-341S 537-340S 421-072S 537-348S 537-347 66-034 72-190S 537-312 65-056S 537-388S Not Shown Description LH Upright RH Upright Platen Insulation Heater Housing Heater Housing Plate Rear Panel RH Cover Bun Thickness Overlay Knob PC Board & Overlay Assy. RH Cam Shaft RH Slide Plate Heater Relay Heater Sprocket (14 Tooth) Idler Sprocket Sprocket (32 Tooth) Idler Bracket Strain Relief Line Cord Rubber Belt Power Relay Transformer Assy. 32 CONVEYOR ASSEMBLY EXPLODED VIEW PARTS LIST Item 1 2 3 4 5 6 7 8 9 10 11 12 13 14 15 16 17 Part Number 537-351 537-354 537-349 537-314 537-370S 537-318S 537-316S 197-279 537-334 537-313 537-315 537-317S 79-055S 81-017S 86-272S 69-011S 76-640 Description Frame Air Shield Cross Brace Lower Roller Lower Bearing (Package of 2) Lower Shaft (Short) Lower Shaft (Long) Pin Slide Bracket Upper Roller Upper Shaft Upper Bearing (Package of 2) Washer (Package of 2) Spring (Package of 2) Cotter Pin (Package of 2) Rivet (Package of 4) Screw 7 WIRING DIAGRAM