1
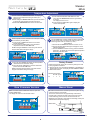
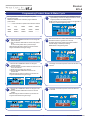
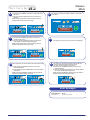
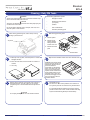
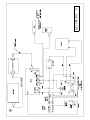
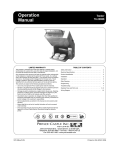
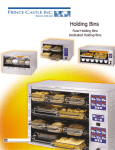
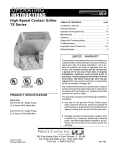
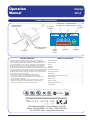
Operation
Manual
Steamer
625-A
Product Identification
Temperature &
On/Off Rocker Switch
(left-side of unit)
UP Arrow Button
Celsius/Fahrenheit &
DOWN Arrow Button
Prince Castle
Logo Button
Steamer
Logo Button
Spatula
External Meter Plug Inlet
(for calibration)
Control Panel
Product
Buttons
(1 thru 4)
Start Button
LED Display
TABLE OF CONTENTS
LIMITED WARRANTY
This product (with the exception of the water tube, part no. 625-197S) is
warranted to be free from defects in material and/or work- manship for a period
of two (2) years from date of original installation, not to exceed 30 months
from date of shipment from our factory. P.C. Boards and Heater Assemblies
are warranted for three (3) years from date of installation, not to exceed 42
months from date of shipment. Any component which proves to be faulty in
material and/or workmanship will be replaced or repaired (at the option of Prince
Castle, Inc.) without cost to the customer for parts or labor. This warranty covers
on location service (i.e. trip charges and/or mileage). Travel mileage is limited
to 100 miles (200 kilometers) round trip (one trip warranty) from an authorized
service agency or its sub-service agency.
This warranty is subject to the following exceptions/conditions:
• Use of any non-genuine Prince Castle parts voids this warranty.
• All labor shall be performed during regular work hours. Overtime premium will be charged to the buyer.
• Damage caused by carelessness, neglect, and/or abuse (e.g., dropping,
tampering or altering parts, equipment damaged in shipment, by fire,
flood or an act of God) is not covered under this warranty.
Product Identification . . . . . . . . . . . . . . . . . . . . . . . . . . . . . . . . . . . . . . . . . .1
Safety Information . . . . . . . . . . . . . . . . . . . . . . . . . . . . . . . . . . . . . . . . . . . .2
General . . . . . . . . . . . . . . . . . . . . . . . . . . . . . . . . . . . . . . . . . . . . . . . . . . . .2
Installation . . . . . . . . . . . . . . . . . . . . . . . . . . . . . . . . . . . . . . . . . . . . . . . . . .2
Operation . . . . . . . . . . . . . . . . . . . . . . . . . . . . . . . . . . . . . . . . . . . . . . . . . . .2
Temperature Adjustment . . . . . . . . . . . . . . . . . . . . . . . . . . . . . . . . . . . . . . .3
View Firmware Version . . . . . . . . . . . . . . . . . . . . . . . . . . . . . . . . . . . . . . . .3
Manual Reset . . . . . . . . . . . . . . . . . . . . . . . . . . . . . . . . . . . . . . . . . . . . . . . .3
Programming Product Name & Water Cycle . . . . . . . . . . . . . . . . . . . . . . . .4
Error Messages . . . . . . . . . . . . . . . . . . . . . . . . . . . . . . . . . . . . . . . . . . . . . .5
Cleaning - Daily
. . . . . . . . . . . . . . . . . . . . . . . . . . . . . . . . . . . . . . . . . . . . .6
Cleaning - Monthly . . . . . . . . . . . . . . . . . . . . . . . . . . . . . . . . . . . . . . . . . . . .7
Exploded View and Parts List . . . . . . . . . . . . . . . . . . . . . . . . . . . . . . . . . . .8
Wiring Diagram . . . . . . . . . . . . . . . . . . . . . . . . . . . . . . . . . . . . . . . . . . . . . .9
SANITATION
355 East Kehoe Blvd. • Carol Stream, IL 60188
Phone: 630-462-8800 • Toll Free: 1-800-PCASTLE
Fax: 630-462-1460 • www.princecastle.com
Steamer 625-502revA
Printed in USA 0910 © 2003
Steamer
625-A
Safety Information
Important
Prince Castle reserves the right to change
specifications and product design without
notice. Such revisions do not entitle the buyer
to corresponding changes, improvements,
additions or replacements for previously purchased equipment.
WARNING
Indicates information important to the proper operation of the unit. Failure to observe may result in damage to the equipment and/or severe bodily injury or
death.
CAUTION
Indicates information important to the operation of
the unit. Failure to observe may result in damage to
the equipment.
Installation
Remove the unit from the carton and inspect for signs of damage. If
there is damage to the unit:
NOTE: When installing this unit, the ambient temperature at the
mounting site should not exceed 37.8°C (100°F) .
• notify the carrier within 24 hours of delivery
CAUTION
All electrical connections must be in accordance with local electrical
codes and any other applicable codes.
• save carton and packaging materials for inspection purposes
• contact your local dealer, or if purchased directly, the Prince Castle
Sales Department at 800-722-7853 or 1-630-462-8800 to arrange for a
Plug the unit into an applicable electrical receptacle.
Connect the water line to the back of the unit.
replacement unit.
WATER CONNECTION REQUIREMENTS
If this is a new installation, accessory - 625-104 Regulatory Assembly Kit
is required. You may also need accessory part #625-103 Coil Hose Kit
Assembly. Always use area codes for determination.
CAUTION
Water connection must provide maximum water pressure of
20-30 psi (138-207 kPa).
Operation
1
A. Turn unit power On/Off switch to ON position. The display
flashes PRINCE CASTLE for ten seconds.
B. After ten seconds the display will show PR.E-HEAT.
2
NOTE: The next-to-left most decimal point appears
indicating power is applied to the platen. Platen will heat to the
setpoint temperature.
A. When the unit reaches the setpoint temperature, display will
show the product name assigned to button 1.
B. If 1 is the desired product to be steamed, pull out the
spatula and place the product onto the spatula, cut side
down.
Or
press product buttons 2, 3 or 4, then place product on the
spatula, cut side down.
pr.e-heat
prince castle
filet
3
Place the spatula fully into the unit and press the START button.
4
The display will start to count down the steam cycle.
Pull out the spatula and remove the finished product.
8
Steamer 625-502revA
When steam cycle is complete, the unit will sound a tone and
the display will flash REMOVE.
remove
2
Printed in USA 0910 © 2003
Steamer
625-A
Temperature Adjustment
1
A. Press and hold the TEMPERATURE button. The display will
show the current temperature setting for Celsius (C) or
Fahrenheit (F).
B. While holding the TEMPERATURE button, press the C/F button
to change the setting between Fahrenheit and Celsius.
C. Release the TEMPERATURE button to store the new value.
129 C
3
2
set temp
255 F
Platen temperature can be set between 129°-152°C (265°- 305°F).
4
Pre-set at factory to 140°C (285°F) .
A. Press the UP or DOWN Arrow buttons to scroll to the
desired temperature.
B. Press the Steamer LOGO button to store the desired
temperature and exit the SET TEMP mode.
5
255
The CAL TEMP mode is used to calibrate the platen temperature
with an external meter connected to the meter plug inlet on the
bottom right side of the unit. Add ± 5°C (± 10°F) .
Repeat Step 2A
A. Press the UP and DOWN Arrow buttons to scroll to CAL TEMP.
B. Press the Steamer LOGO button again to display the current
calibration temperature.
C. Press the PRODUCT 2 button to zero any previous calibration
offset value. The display will now show the platen temperature
without any calibration offset.
NOTE: Pressing the PRODUCT 3 button at any time exits the
Program mode without storing the change.
TEMP 275
A. Press and hold the Steamer LOGO button first, then
press and hold TEMPERATURE button for approximately
6 seconds.
The display will show SET TEMP.
B. Press the Steamer LOGO button again to display the
current set temperature.
TEMP 275
CAL TEMP
CAL 245
Factory Presets
A. Press the UP or DOWN Arrow buttons until the temperature
readout matches the calibration reading.
B. Press the Steamer LOGO button to store the desired temperature and exit CAL TEMP mode.
Loading factory presets restores the unit to factory settings and voids
all user programmed information.
A. During power up, press and hold both PRODUCT 1 and PRODUCT 4
buttons within 3 seconds. The display will flash PRESETS LOADED.
B. Release both buttons.
NOTE: Pressing the Product 3 button at any time exits the
Program mode without storing the change.
Default Factory Presets:
ON OFF Cycles
All
1
3
2
presets loaded
CAL 265
CAL 265
View Firmware Version
Manual Reset
Press and hold the Seamer LOGO button first, then press and
hold the START button.
The display will show the current firmware version.
A hi-limit thermostat will turn off electrical power to the platen and
control circuits if the unit overheats.
Turn the unit off and allow to cool (approximately 10-15 minutes).
A manual reset is located on the back of the unit. Once the unit has
cooled sufficiently, press the manual reset and restart the unit.
NOTE: If the unit continues to shut-off due to overheating, contact your
authorized Prince Castle Service Agency.
Manual Reset
. VERS XX.XX
Steamer 625-502revA
3
Printed in USA 0910 © 2003
Steamer
625-A
Programming Product Name & Water Cycle
The Program button menus can be changed to any of the
following menu items.
1
PROD1 thru PROD12 can be selected to program additional
product names.
NOTE: A decimal point will appear and flash on the right side of
the display to indicate Programming mode.
“– – – –” can be used when no product name selection is desired.
Filet
Large
PROD1
PROD2
PROD3
PROD4
PROD5
PROD6
PROD7
PROD8
PROD9
PROD10
PROD11
PROD12
––––
A. Press and hold the LOGO button and a PRODUCT button for
approximately 6 seconds. The display will show the current
assigned product for the button pressed.
FILET
2
B. Press the UP or DOWN Arrow button to scroll through the
product selections.
C. Press the Steamer LOGO button to store the new product
name.
To enter custom product names, proceed to step 3.
3
The display will show the product name with the left-most
character display or decimal point flashing.
NOTE: Must be in Programming mode.
NOTE: Pressing the Product 3 button at any time exits the
Program mode without storing the change.
PROD 1
4
Press and hold the Prince Castle LOGO button first, then press
and hold the Steamer Logo button for 6 seconds.
PROD 1
PROD 1
A. Press the UP or DOWN Arrow buttons to change the
left-most character.
B. Press the Product 1 or Product 4 button to move the cursor
to the next character.
C. Repeat steps A and B for each character.
D. Press the Steamer LOGO button to store the new
product name.
NOTE: Pressing the Product 3 button at any time exits the
Program mode without storing the change.
5
The display now shows the product’s water valve ON time in
seconds.
ON
CROD 1
6
1.1
CHKN 1
A. Press the UP or DOWN Arrow buttons to change the valve
ON time.
B. Press the Steamer LOGO button to store the new valve
ON time.
7
The display now shows the product’s water valve OFF time
in seconds.
NOTE: Pressing the Product 3 button at any time exits the
Program mode without storing the change.
ON 1.1
Steamer 625-502revA
OFF 2.5
ON 1.1
4
Printed in USA 0910 © 2003
Steamer
625-A
8
A. Press the UP or DOWN Arrow buttons to change the valve
OFF time.
B. Press the Steamer LOGO button to store the new valve
OFF time.
The display now shows the product’s number of on-off water
valve cycles.
9
NOTE: Pressing the Product 3 button at any time exits the
Program mode without storing the change.
CYCLES 2
OFF 3.0
10
OFF 3.0
A. Press the UP or DOWN Arrow buttons to change the
number of water cycles.
B. Press the Steamer LOGO button to store the new water
cycle number and exit the Programming mode.
11
The display now shows the current product set temperature.
NOTE: Pressing the Product 3 button at any time exits the
Program mode without storing the change.
CYCLES 3
12
255
CYCLES 3
Platen temperature can be set between 129°-176°C (265°- 350°F).
A. Press the UP or DOWN Arrow buttons to scroll to the
desired temperature.
B. Press the Rapids Steamer LOGO button to store the desired
temperature.
The display now shows the time delay between when the
product is finished and when the alarm sounds.
The delay can be set for 0.0 to 10.0 seconds.
A. Press the UP or DOWN Arrow buttons to scroll to the
desired time delay.
B. Press the Rapid Steamer LOGO button to store the desired
time and to exit the Programming mode. .
NOTE: Pressing the PRODUCT 3 button at any time exits the
Program mode without storing the change.
NOTE: Pressing the PRODUCT 3 button at any time exits the
Program mode without storing the change.
TEMP 275
13
TEMP 275
AL DLY 2.5
5
Error Messages
Steamer 625-502revA
5
ERROR MESSAGES
ACTION
No Heat Error.
Call service technician.
Printed in USA 0910 © 2003
Steamer
625-A
Cleaning - Daily PM Tasks
The following equipment is required:
WARNING
Turn the unit off and unplug the power cord from the electrical receptacle. Proceed with caution, unit is still hot!
•
•
CAUTION
This unit is not watertight. Do not clean with a water jet/jet spray. Do
not immerse the unit in water.
Delimer/Lime Scale Remover
(as required)
Do not use abrasive materials such as scrapers, steel wool, etc. to
clean the spatula or steam chamber.
1
Detergent or Cleaner
While wearing protective gloves, remove the top cover by
pulling up and off the unit.
•
Sanitizer
•
Clean sanitized towel
•
Protective (insulated) gloves
2
Top Cover
While wearing protective gloves:
A.
Remove spatula.
B.
Remove the top
plate by carefully
sliding it forward
and out of the unit.
C.
Remove the venturi
plate.
Top Plate
Spatula
Venturi Plate
3
A. Wash top cover, top plate, and venturi plate in a solution of
detergent and water.
4
B. Rinse with clean water, and then sanitize in a solution of
sanitizer.
OPTIONAL: If the surface shows
signs of excessive calcium and
lime buildup, dissolve two teaspoons of delimer in a
small coffee cup with 100mI of
water. Pour half on each side.
Using a clean sanitized towel,
wipe the internal surfaces of the
steam chamber. Allow to sit for
5 minutes. Using a clean sanitized towel,thoroughly rinse and
wipe, the internal surfaces of
the steam chamber.
C. Let air dry.
5
Wipe the steam chamber surface with a clean sanitized cloth.
Wash all external surfaces of the steamer with a solution of
detergent and water. Using the solution in a spray bottle,
spray directly onto a clean sanitized towel and wipe the unit
clean.
6
Reassemble the unit.
Turn the unit on. When unit is preheated, run a minimum of
four cycles to prime the unit and remove any residual cleaner.
It is recommended that the steamers go through a deliming
procedure at least once a month. Some hard water areas may
require increased deliming based upon actual buildup.
CAUTION
Do not spray directly on the unit or use abrasive cleaners!
Steamer 625-502revA
6
Printed in USA 0910 © 2003
Steamer
625-A
Cleaning - Monthly PM Tasks
The following equipment is required:
WARNING
Turn the unit off and unplug the power cord from the electrical receptacle. Proceed with caution, unit is still hot!
•
•
CAUTION
This unit is not watertight. Do not clean with a water jet/jet spray. Do
not immerse the unit in water.
Delimer/Lime Scale Remover
(as required)
Do not use abrasive materials such as scrapers, steel wool, etc. to
clean the spatula or steam chamber.
1
Detergent or Cleaning Solution
While wearing protective gloves, remove the top cover by
pulling up and off the unit.
•
Sanitizer
•
Clean sanitized towel
•
Protective (insulated) gloves
2
Top Cover
While wearing protective gloves:
A.
Remove spatula.
B.
Remove the top
plate by carefully
sliding it forward
and out of the unit.
C.
Remove the
venturi plate.
Top Plate
Spatula
Venturi Plate
3
A. Wash top cover, top plate, spatula, and venturi plate in a
solution of detergent and water.
4
Pour a solution of Delimer into the steam chamber.
Let solution soak for at least 15 minutes.
B. Rinse with clean water, and then sanitize in a solution of
sanitizer.
C. Let air dry.
IMPORTANT. It is not recommended
to leave open container of delimer around
5
A. Clean stem injection ports with a paper clip or small wire.
B. Rinse with clean water.
C. Wash all external surfaces of the steamer with a solution of
detergent and water in a spray bottle.
Spray directly onto a clean sanitized towel and wipe
the unit clean.
D. Reassemble the unit.
CAUTION
Do not spray directly on the unit or use abrasive cleaners!
Steamer 625-502revA
7
Printed in USA 0910 © 2003
Steamer
625-A
Exploded View and Parts List
Description
1
2
3
Spatula Assembly
Switch, Rocker, 20A
Membrane Switch Assembly
Display PC Board
Cover, Top
Gasket, Silicone
Legs (Pkg. of - 4)
Strain Relief
Tube, Water
Mini-Jack, K-Type
Top Plate
Manual Reset
Water Valve Assembly
Fitting, Water Valve
Relay, 40A
Main PC Board
Venturi Plate
Probe, 1000 ohm RTD
Line Cord Assembly
Plug included in 18
1
1
1
1
1
1
1
1
1
1
1
1
1
1
1
1
1
1
1
Legs, 1" High (Pkg. of 4)
Strain Relief
Line Cord Assembly
1
1
1
4
5
6
7
8
9
10
11
12
13
14
15
16
17
18
19
4
17
10
1
Ref. Part No.
5
16
625-129S
78-233S
625-193S
625-205S
625-145S
625-130S
197-232S
66-045S
625-071S
88-497S
625-064S
625-085S
625-083S
625-077S
65-059S
625-154S
625-065S
625-082S
72-365S
6 86-255S
7 66-061S
18 72-379S
3
Qty.
625 Accessories (not shown)
625-253S
Regulator Assembly Kit
1
19
7
15
11
18
2
12
8
13
6
9
14
Steamer 625-502revA
8
Printed in USA 0910 © 2003
Steamer
625-A
Notes
Steamer 625-502revA
10
Printed in USA 0910 © 2003
Steamer
625-A
Notes
Steamer 625-502revA
11
Printed in USA 0910 © 2003
Steamer
625-A
Notes
Steamer 625-502revA
12
Printed in USA 0910 © 2003