Transcript
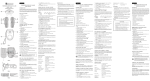
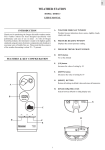
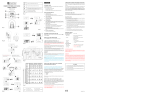
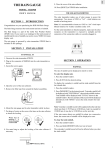
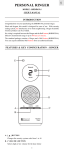
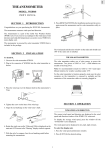
PEDOMETER WITH PANIC ALARM
PEDOMETER WITH PANIC ALARM
MODEL : PE319
INSTRUCTION MANUAL
INTRODUCTION
STRIDE DISTANCE AND BODY WEIGHT
Congratulations on your purchasing the Pedometer, a handy, multifunctional
device that complements your active life by letting you count the steps
taken in a walk or run, distance covered, calories burnt and time elapsed.
What is more, the pedometer is equipped with a built-in 120-decibel panic
alarm, which helps you summon attention loud and quick in time of need.
The stride distance is used to measure the total distance covered in a run
or walk. Depending on the person, you can set the stride distance between
30 to 150cm (11 to 60 inches for imperial version). To check your own
stride distance, walk 10 steps and divide by 10 the total distance covered.
[FG. C]
2. Do not clean the unit with abrasive or corrosive materials. Abra sive
cleaning agents may scratch the plastic parts and corrode the eletronic
circuit.
1. Step counter
2. 12/24hour format real-time clock
3. Total distance counter
60 cm
(24 inch)
6 m
(20 feet)
60 cm
(24 inch)
4. Total calorie counter
The body weight is used to calculate the calories burnt. You can set it
between 30 to 150kg (60 to 340 pounds for imperial version).
5. Stride distance adjustment
To enter the stride distance and body weight,
6. Count-up timer
1. Press [MODE] for distance/timer or calories/timer display.
7. Panic alarm
2. Hold [MODE] for two seconds. The weight and stride distance will be
displayed with the stride distance blinking.
8. EL backlight
9. Low-battery indicator
10. Motion sensitivity adjustment
CONTROL BUTTONS AND PHYSICAL
FEATURES [FIG. A]
A. LCD
Two-line display for easy dissemination of data
B. [MODE] button
Changes display modes
U] button
C. [RESET/U
Resets a value to zero in normal mode or increases a value in
setting mode
5. Use [U
U] to enter the desired value.
Due to printing limitation, the displays shown in this manual
may differ from the actual display.
—
The manufacturer and its suppliers held no responsibility to
you or any other person for any damage expenses, lost profits,
or any other claim arise by using this product.
—
The contents of this manual may not be reproduced without the
permission of the manufacturer.
6. Press [MODE] to confirm and exit.
Note: the pedometer will automatically return to the distance/timer
display if no setting is made for seven seconds.
STEPS, DISTANCE AND CALORIES
To check the total number of steps taken, distance covered or calories
burnt, press [MODE] for their respective displays.
To check the values over a certain distance or time,
1. Press [MODE] for step display.
5. Press [ST/SP] to start the timer when ready. The timer will count up to
99 hours, 59 minutes and 59 seconds before restarting from zeros
again.
4. Press [RESET] to clear the timer.
J. BATTERY COMPARTMENT
Accommodates 2 x LR43 size & 1 x 12V alkaline batteries
FITNESS TIPS
The low-battery indicator will light up when LR43 batteries are drying up.
Replace batteries accordingly.
Note: If not disposed of properly, batteries can be
harmful.Protect the environment by taking exhausted
batteries to authorized disposal stations.
HOW TO USE THE PANIC ALARM
The alarm will be activated when the panic alarm pin is detached from its
socket. Pull the chord and detach the pin when the situation arises.
To stop the alarm, simply reconnect the pin to its socket.
Note : One new 12V battery can last for approx. 15 minutes if the panic
alarm activate. It is suggested to test the alarm function every time before
you use the pedometer.
SPECIFICATIONS
Operating Modes
: STEP, DIST/TIMER, CAL/TIMER
Real time clock
Use the belt clip and fastening clip to secure the pedometer horizontally
to your belt, slacks or training attire. [FIG. C]
: 12/24 hour option with hour : minute :
second display
Step counter
: 0 to 99,999 steps
Distance traveled
: 0 to 999.99km (or 0 to 999.99 miles for
imperial version)
Calorie consumption
: 0 to 99999 kcal.
FIG. B
DISPLAY MODES
The pedometer has three display modes: step, distance/timer, and calories/
timer. To select a display mode, press [MODE]. An indicator will light up
for the active mode in display.
Count up timer
: 99 hours, 59 minutes, 59 seconds
Stride distance
: 30 to 150 cm (or 11 to 60 inches for
imperial version)
Weight range
: 30 to 150 kg (or 60 to 340 lbs. for imperial
version)
Panic alarm
: around 110-115 dB measured at 5 cm
distance
HOW TO USE THE BACKLIGHT
The backlight facilitates display reading in dim lights. To use it, press the
backlight button to light up the display for five seconds.
Defective returns should be directed to the place of retail purchase.
To keep fit, it generally takes a person weighing 60kg to walk 10,000 steps
to burn approximately 300 calories. The following diagram will give you
some basic reference to the calorie consumption for people of various
weights. [FIG. D]
HOW TO ATTACH THE PEDOMETER
Note: That improper positioning of the pedometer may result in incorrect
measurements.
If you have any questions about this product, please call Oregon
Scientific at (800) 853-8883 or e-mail us at helpme @ oscientific.com
7. Press [ST/SP] to stop the timer when done.
Note on motion sensitivity: To make the unit more or less sensitive to
motion, reposition the motion sensitivity slide switch. To determine the
proper amount of motion sensitivity for an individual walking pattern,
experiment with different settings.
3. Replace the compartment door.
WARRANTY
Oregon Scientific products are warranted to free of defects in
manufacturing for 90 days after purchase. This warranty does not
cover a product subjected ti abuse, misuse or accidental damage.
6. Go! The pedometer will start registering the data if any motion is
detected afterwards.
I. FASTENING CLIP AND CHORD
For further securing the unit to clothing and acts as a pull chord for the
panic alarm
2. Insert two LR43 size + one 12V alkaline batteries. [FIG. B]
CAUTION
—
F. SENSITIVITY SWITCH
Adjusts the sensitivity of the unit to motion
1. Open the battery compartment door.
Read this instruction manual thoroughly before operating the unit.
4. Press [MODE]. The weight value will blink.
3. Press [MODE] for distance/timer or calories/timer display.
Two types of battery are required. Pedometer function is powered by 2
pcs LR43 battery. Panic alarm is powered by one 12V alkaline battery.
5. Only use new batteries as specified in this instruction manual. Do not
mix new and old batteries as the old batteries may leak.
3. Use [U
U] to enter the desired value for stride.
E. [ST/SP] (START/STOP) button
Starts or stops the count-up timer
BATTERY INSTALLATION
4. Do not tamper with the unit’s internal components. Doing so will
terminate the unit’s warranty and may cause damage. The
unit contains no user-serviceable parts.
The content of this manual is subject to change without further
notice.
2. Press [RESET] to clear the value. Note the total distance and calories
will be cleared alongside with the total steps.
H. PANIC ALARM PIN
Activates the panic alarm when detached from the unit
3. Do not subject the unit to excessive: force, shock, dust, temperature, or
humidity. Such treatment may result in malfunction, a shorter eletronic
life span, damaged batteries, or distorted parts.
—
D. BELT CLIP
For attaching to a belt or clothing
G. BACKLIGHT [
] button
Turns on the backlight
FIG. C
MAINTENANCE
1. Do not immerse the unit in water. If the unit comes in contact with
water, dry it immediately with a soft lint-free cloth.
BUILT-IN FEATURES
FIG. A
U] to reset the digits to zeros or wait for the desired value to
9. Use [U
appear.
10. Press [MODE] to confirm and exit.
USER’S MANUAL
Power source
: 2 x LR43 1.5V battery + 1 x 12V alkaline
HOW TO SET THE REAL-TIME CLOCK
Operation temperature
: -10°C to 40°C
1. Press [MODE] for step display.
Storage temperature
: -20°C to 60°C
2. Hold [MODE] for two seconds. The 12-hour value will blink.
Product size
: 52 x 70 x 23 mm (W x H x T)
3. Use [U
U] to select between 12-hour and 24-hour clock format.
Weight
: 54g (battery included)
4. Press [MODE]. The hour digits will blink.
U] to enter the desired value. Hold down the button for fast
5. Use [U
advancement.
6. Press [MODE]. The minute digits will blink.
7. Use [U
U] to enter the desired value.
8. Press [MODE]. The second digits will blink.
FIG. D
P/N.: 086-002083-03