1
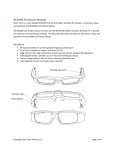
Pairing Mode – Optoma 3D-RF System: Optoma 3D-RF Glasses and Optoma 3D-RF
Emitter for Optoma 3D-XL Converter Box and 3D ready projector models HD83, HD33,
GT750.
Contains Patent Pending software and technology from Bit Cauldron
Contient les logitiels de brevet en instance et la technologie de la compagnie Bit Cauldron
Connections
Optoma 3D-XL converter box with 3D Emitter Port
Connect the Optoma 3D-RF emitter to the Optoma 3D-XL converter box using the IR Emitter Port as shown below.
LED Indicators
After cable connection the LEDs will display a red moving pattern while the emitter is attempting to acquire a 3D signal and until a
3D sync signal is found. The joystick of Optoma 3D-RF Emitter can be moved in any direction to enable pairing mode. If any
Green LEDs are on, push the joystick in any direction for a second until all LEDs are off. Then push the joystick in any direction for
3 seconds until 3 green LEDs turn ON. Release the joystick when 3 green LEDs turn ON. You can always remove the cable and
start over if you end up in wrong move.
Copyright 2011 Bit Cauldron Corporation
Page 1 of 2
After placing the Optoma 3D-RF Emitter in pairing mode, you will see the red “in-search-of-a-pair light sequence” heartbeat. The
Optoma 3D-RF Emitter will remain in pairing mode for one minute. During that time, multiple glasses may be paired with the
Optoma 3D-RF Emitter. The only indication that pairing is successful will occur at the glasses. When the Optoma 3D-RF Emitter
cannot pair to any more devices, it will display the “all available pairs already memorized” signal indicated by five red LED’s
blinking all-on and all-off for ten seconds. The emitter will then return to normal operation. The device must be reset to factory
defaults to clear the memorized pair list.
Button and LED Indicator Function
The top of the left earpiece of the frames contains a button. Inside the left earpiece is a red LED.
Pairing to an emitter
With the device off, press and hold the power button. After 1-2 seconds the red LED will come on. (Normally, you would release
the button at this point to power on the glasses.) Do not release the button after the red LED comes on, keep holding down the
button. After about 10 seconds of the LED on solid the LED will start to pulse with the same “heartbeat” pattern used by the
emitter in pairing mode. (When you see the heartbeat pattern, you must release the button within 10 seconds or the device will
go into Restore Factory Defaults mode.)
The glasses will stay in pairing mode until they successfully pair with an emitter, or until one minute expires. While in pairing
mode, the LED will display the “heartbeat” pattern. If the glasses find an emitter in pairing mode, then the glasses will pair with
the emitter and resume normal operation as described in Error! Reference source not found.. If an emitter is not found in pairing
mode, the glasses will not operate but will continue to display the “heartbeat” pattern until the emitter is placed into pairing
mode, at which point the glasses will pair and begin normal operating mode immediately. If the emitter is not placed in pairing
mode, the glasses will stay in pairing mode for one minute and then will power down.
Unpaired mode
Follow steps below to put the glasses in the unpaired mode.
• Start with the glasses turned off.
• Press and hold down the button
• The LED will go on solid after 1 second; keep holding down the button
• After about 10 more seconds the LED will start pulsing indicating that the glasses are ready to pair; keep holding down the
button.
• After about 20 more seconds the LED will start blinking rapidly. Release the button now. The glasses will restore the
factory default settings and firmware. This can take several seconds. After the process is complete, the glasses will
resume normal operation.
If you do not release the button within 20 seconds after the LED begins rapidly blinking, the glasses will power off.
Copyright 2011 Bit Cauldron Corporation
Page 2 of 2