1
[Standard Level - Nortel Networks Confidential]
Version MCP 1.1 FP1 (02.02)
Part No. NN10043-113
April 2003
SIP Provisioning Client User
Guide
[Standard - Nortel Networks Confidential]
ii
Copyright © 2003 Nortel Networks
All rights reserved. April 2003.
The information in this document is subject to change without notice. The statements, configurations, technical data, and
recommendations in this document are believed to be accurate and reliable, but are presented without express or implied
warranty. Users must take full responsibility for their applications of any products specified in this document. The
information in this document is proprietary to Nortel Networks Inc.
The software described in this document is furnished under a license agreement and may be used only in accordance
with the terms of that license. The software license agreement is included in this document.
Trademarks
Nortel Networks, the Nortel Networks logo, the Globemark, Unified Networks, CallPilot, and i2004 Internet Telephone
are trademarks of Nortel Networks.
Adobe and Acrobat Reader are trademarks of Adobe Systems Incorporated.
Microsoft, Windows, Windows NT, Internet Explorer and Outlook are trademarks of Microsoft Corporation.
Netscape is a trademark of Netscape Communications Corporation.
The asterisk after a name denotes a trademarked item.
Restricted rights legend
Use, duplication, or disclosure by the United States Government is subject to restrictions as set forth in subparagraph
(c)(1)(ii) of the Rights in Technical Data and Computer Software clause at DFARS 252.227-7013.
Notwithstanding any other license agreement that may pertain to, or accompany the delivery of, this computer software,
the rights of the United States Government regarding its use, reproduction, and disclosure are as set forth in the
Commercial Computer Software-Restricted Rights clause at FAR 52.227-19.
Statement of conditions
In the interest of improving internal design, operational function, and/or reliability, Nortel Networks Inc. reserves the
right to make changes to the products described in this document without notice.
Nortel Networks Inc. does not assume any liability that may occur due to the use or application of the product(s) or
circuit layout(s) described herein.
Portions of the code in this software product may be Copyright © 1988, Regents of the University of California. All
rights reserved. Redistribution and use in source and binary forms of such portions are permitted, provided that the
above copyright notice and this paragraph are duplicated in all such forms and that any documentation, advertising
materials, and other materials related to such distribution and use acknowledge that such portions of the software were
developed by the University of California, Berkeley. The name of the University may not be used to endorse or promote
products derived from such portions of the software without specific prior written permission.
SUCH PORTIONS OF THE SOFTWARE ARE PROVIDED “AS IS” AND WITHOUT ANY EXPRESS OR IMPLIED
WARRANTIES, INCLUDING, WITHOUT LIMITATION, THE IMPLIED WARRANTIES OF MERCHANTABILITY
AND FITNESS FOR A PARTICULAR PURPOSE.
In addition, the program and information contained herein are licensed only pursuant to a license agreement that contains
restrictions on use and disclosure (that may incorporate by reference certain limitations and notices imposed by third
parties).
NN10043-113
[Standard - Nortel Networks Confidential]
iii
Nortel Networks Inc. software license agreement
This Software License Agreement (“License Agreement”) is between you, the end-user (“Customer”) and Nortel
Networks Corporation and its subsidiaries and affiliates (“Nortel Networks”). PLEASE READ THE FOLLOWING
CAREFULLY. YOU MUST ACCEPT THESE LICENSE TERMS IN ORDER TO DOWNLOAD AND/OR USE THE
SOFTWARE. USE OF THE SOFTWARE CONSTITUTES YOUR ACCEPTANCE OF THIS LICENSE
AGREEMENT. If you do not accept these terms and conditions, return the Software, unused and in the original shipping
container, within 30 days of purchase to obtain a credit for the full purchase price.
“Software” is owned or licensed by Nortel Networks, its parent or one of its subsidiaries or affiliates, and is copyrighted
and licensed, not sold. Software consists of machine-readable instructions, its components, data, audio-visual content
(such as images, text, recordings or pictures) and related licensed materials including all whole or partial copies. Nortel
Networks grants you a license to use the Software only in the country where you acquired the Software. You obtain no
rights other than those granted to you under this License Agreement. You are responsible for the selection of the
Software and for the installation of, use of, and results obtained from the Software.
1. Licensed Use of Software. Nortel Networks grants Customer a nonexclusive license to use a copy of the Software
on only one machine at any one time or to the extent of the activation or authorized usage level, whichever is applicable.
To the extent Software is furnished for use with designated hardware or Customer furnished equipment (“CFE”),
Customer is granted a nonexclusive license to use Software only on such hardware or CFE, as applicable. Software
contains trade secrets and Customer agrees to treat Software as confidential information using the same care and
discretion Customer uses with its own similar information that it does not wish to disclose, publish or disseminate.
Customer will ensure that anyone who uses the Software does so only in compliance with the terms of this Agreement.
Customer shall not a) use, copy, modify, transfer or distribute the Software except as expressly authorized; b) reverse
assemble, reverse compile, reverse engineer or otherwise translate the Software; c) create derivative works or
modifications unless expressly authorized; or d) sublicense, rent or lease the Software. Licensors of intellectual property
to Nortel Networks are beneficiaries of this provision. Upon termination or breach of the license by Customer or in the
event designated hardware or CFE is no longer in use, Customer will promptly return the Software to Nortel Networks
or certify its destruction. Nortel Networks may audit by remote polling or other reasonable means to determine
Customer’s Software activation or usage levels. If suppliers of third party software included in Software require Nortel
Networks to include additional or different terms, Customer agrees to abide by such terms provided by Nortel Networks
with respect to such third party software.
2. Warranty. Except as may be otherwise expressly agreed to in writing between Nortel Networks and Customer,
Software is provided “AS IS” without any warranties (conditions) of any kind. NORTEL NETWORKS DISCLAIMS
ALL WARRANTIES (CONDITIONS) FOR THE SOFTWARE, EITHER EXPRESS OR IMPLIED, INCLUDING,
BUT NOT LIMITED TO THE IMPLIED WARRANTIES OF MERCHANTABILITY AND FITNESS FOR A
PARTICULAR PURPOSE AND ANY WARRANTY OF NON-INFRINGEMENT. Nortel Networks is not obligated to
provide support of any kind for the Software. Some jurisdictions do not allow exclusion of implied warranties, and, in
such event, the above exclusions may not apply.
3. Limitation of Remedies. IN NO EVENT SHALL NORTEL NETWORKS OR ITS AGENTS OR SUPPLIERS BE
LIABLE FOR ANY OF THE FOLLOWING: a) DAMAGES BASED ON ANY THIRD PARTY CLAIM; b) LOSS OF,
OR DAMAGE TO, CUSTOMER’S RECORDS, FILES OR DATA; OR c) DIRECT, INDIRECT, SPECIAL,
INCIDENTAL, PUNITIVE, OR CONSEQUENTIAL DAMAGES (INCLUDING LOST PROFITS OR SAVINGS),
WHETHER IN CONTRACT, TORT OR OTHERWISE (INCLUDING NEGLIGENCE) ARISING OUT OF YOUR
USE OF THE SOFTWARE, EVEN IF NORTEL NETWORKS, ITS AGENTS OR SUPPLIERS HAVE BEEN
ADVISED OF THEIR POSSIBILITY. The forgoing limitations of remedies also apply to any developer and/or supplier
of the Software. Such developer and/or supplier is an intended beneficiary of this Section. Some jurisdictions do not
allow these limitations or exclusions and, in such event, they may not apply.
4.
General
a. If Customer is the United States Government, the following paragraph shall apply: All Nortel Networks
Software available under this License Agreement is commercial computer software and commercial computer
software documentation and, in the event Software is licensed for or on behalf of the United States
SIP Provisioning Client User Guide
[Standard - Nortel Networks Confidential]
iv
Government, the respective rights to the software and software documentation are governed by Nortel
Networks standard commercial license in accordance with U.S. Federal Regulations at 48 C.F.R. Sections
12.212 (for non-DoD entities) and 48 C.F.R. 227.7202 (for DoD entities).
b. Customer may terminate the license at any time. Nortel Networks may terminate the license if Customer fails to
comply with the terms and conditions of this license. In either event, upon termination, Customer must either
return the Software to Nortel Networks or certify its destruction.
c. Customer is responsible for payment of any taxes, including personal property taxes, resulting from Customer’s
use of the Software. Customer agrees to comply with all applicable laws including all applicable export and
import laws and regulations.
d. Neither party may bring an action, regardless of form, more than two years after the cause of the action arose.
e. The terms and conditions of this License Agreement form the complete and exclusive agreement between
Customer and Nortel Networks.
f.
This License Agreement is governed by the laws of the country in which Customer acquires the Software. If the
Software is acquired in the United States, then this License Agreement is governed by the laws of the state of
New York.
NN10043-113
[Standard - Nortel Networks Confidential]
v
Contents
Welcome . . . . . . . . . . . . . . . . . . . . . . . . . . . . . . . . . . . . . . . . . . . . . . . . . . . . .xix
Overview . . . . . . . . . . . . . . . . . . . . . . . . . . . . . . . . . . . . . . . . . . . . . . . . . . . . . . . . . . .xix
Audience . . . . . . . . . . . . . . . . . . . . . . . . . . . . . . . . . . . . . . . . . . . . . . . . . . . . . . . . . . .xix
What is not covered . . . . . . . . . . . . . . . . . . . . . . . . . . . . . . . . . . . . . . . . . . . . . . . . . . .xix
Text and graphic conventions . . . . . . . . . . . . . . . . . . . . . . . . . . . . . . . . . . . . . . . . . . . . xx
Acronyms . . . . . . . . . . . . . . . . . . . . . . . . . . . . . . . . . . . . . . . . . . . . . . . . . . . . . . . . . . . xx
Related publications . . . . . . . . . . . . . . . . . . . . . . . . . . . . . . . . . . . . . . . . . . . . . . . . . . .xxi
How to get help . . . . . . . . . . . . . . . . . . . . . . . . . . . . . . . . . . . . . . . . . . . . . . . . . . . . . xxii
Chapter 1
Getting Started . . . . . . . . . . . . . . . . . . . . . . . . . . . . . . . . . . . . . . . . . . . . . . . . . 1
SIP Provisioning Client overview . . . . . . . . . . . . . . . . . . . . . . . . . . . . . . . . . . . . . . . . . . 1
SIP Provisioning Client features . . . . . . . . . . . . . . . . . . . . . . . . . . . . . . . . . . . . . . . . . . . 2
System requirements . . . . . . . . . . . . . . . . . . . . . . . . . . . . . . . . . . . . . . . . . . . . . . . . . . . 2
Minimum hardware and software requirements . . . . . . . . . . . . . . . . . . . . . . . . . . . . 2
Recommended hardware and software requirements . . . . . . . . . . . . . . . . . . . . . . . 3
Starting the SIP Provisioning Client . . . . . . . . . . . . . . . . . . . . . . . . . . . . . . . . . . . . . . . . 3
Using the online help . . . . . . . . . . . . . . . . . . . . . . . . . . . . . . . . . . . . . . . . . . . . . . . . . . . 5
Setting up time zones . . . . . . . . . . . . . . . . . . . . . . . . . . . . . . . . . . . . . . . . . . . . . . . . . . . 5
Setting up times zones in the United States . . . . . . . . . . . . . . . . . . . . . . . . . . . . . . 6
Selecting a time zone . . . . . . . . . . . . . . . . . . . . . . . . . . . . . . . . . . . . . . . . . . . . . . . 6
Creating a new time zone . . . . . . . . . . . . . . . . . . . . . . . . . . . . . . . . . . . . . . . . . . . . 8
Modifying or Deleting a time zone . . . . . . . . . . . . . . . . . . . . . . . . . . . . . . . . . . . . . . 8
Changing the admin password . . . . . . . . . . . . . . . . . . . . . . . . . . . . . . . . . . . . . . . . . . . . 9
Exiting the SIP Provisioning Client . . . . . . . . . . . . . . . . . . . . . . . . . . . . . . . . . . . . . . . . . 9
SIP Provisioning Client User Guide
[Standard - Nortel Networks Confidential]
vi
Contents
Chapter 2
Administration Overview. . . . . . . . . . . . . . . . . . . . . . . . . . . . . . . . . . . . . . . . 11
Introduction . . . . . . . . . . . . . . . . . . . . . . . . . . . . . . . . . . . . . . . . . . . . . . . . . . . . . . . . . 11
SIP Provisioning roles, rights, and tasks . . . . . . . . . . . . . . . . . . . . . . . . . . . . . . . . . . . 12
Understanding provisioning roles and rights . . . . . . . . . . . . . . . . . . . . . . . . . . . . . . . . 15
Limiting access to a domain . . . . . . . . . . . . . . . . . . . . . . . . . . . . . . . . . . . . . . . . . 15
System administrator provisioning role . . . . . . . . . . . . . . . . . . . . . . . . . . . . . . . . . 16
Creating a new provisioning role . . . . . . . . . . . . . . . . . . . . . . . . . . . . . . . . . . . . . . . . . 16
Listing provisioning roles . . . . . . . . . . . . . . . . . . . . . . . . . . . . . . . . . . . . . . . . . . . . . . . 17
Creating a new administrator . . . . . . . . . . . . . . . . . . . . . . . . . . . . . . . . . . . . . . . . . . . . 19
Listing administrators . . . . . . . . . . . . . . . . . . . . . . . . . . . . . . . . . . . . . . . . . . . . . . . . . . 20
Chapter 3
Domain Management . . . . . . . . . . . . . . . . . . . . . . . . . . . . . . . . . . . . . . . . . . . 23
Introduction to domains . . . . . . . . . . . . . . . . . . . . . . . . . . . . . . . . . . . . . . . . . . . . . . . . 23
Domain types . . . . . . . . . . . . . . . . . . . . . . . . . . . . . . . . . . . . . . . . . . . . . . . . . . . . . . . . 24
Root domain . . . . . . . . . . . . . . . . . . . . . . . . . . . . . . . . . . . . . . . . . . . . . . . . . . . . . 24
Subdomain . . . . . . . . . . . . . . . . . . . . . . . . . . . . . . . . . . . . . . . . . . . . . . . . . . . . . . 24
Foreign domain . . . . . . . . . . . . . . . . . . . . . . . . . . . . . . . . . . . . . . . . . . . . . . . . . . . 25
Adding a local root domain . . . . . . . . . . . . . . . . . . . . . . . . . . . . . . . . . . . . . . . . . . . . . . 26
Adding a subdomain . . . . . . . . . . . . . . . . . . . . . . . . . . . . . . . . . . . . . . . . . . . . . . . . . . 31
Adding a foreign domain . . . . . . . . . . . . . . . . . . . . . . . . . . . . . . . . . . . . . . . . . . . . . . . 33
Listing/modifying a local or foreign domain . . . . . . . . . . . . . . . . . . . . . . . . . . . . . . . . . 33
Deleting a local domain . . . . . . . . . . . . . . . . . . . . . . . . . . . . . . . . . . . . . . . . . . . . . . . . 35
Deleting a foreign domain . . . . . . . . . . . . . . . . . . . . . . . . . . . . . . . . . . . . . . . . . . . . . . 36
Banning a user . . . . . . . . . . . . . . . . . . . . . . . . . . . . . . . . . . . . . . . . . . . . . . . . . . . . . . . 36
Setting up ban list . . . . . . . . . . . . . . . . . . . . . . . . . . . . . . . . . . . . . . . . . . . . . . . . . 36
Viewing a list of banned users . . . . . . . . . . . . . . . . . . . . . . . . . . . . . . . . . . . . . . . . 37
Defining user device status reasons . . . . . . . . . . . . . . . . . . . . . . . . . . . . . . . . . . . . . . 38
Adding a status reason . . . . . . . . . . . . . . . . . . . . . . . . . . . . . . . . . . . . . . . . . . . . . 38
Viewing status reasons . . . . . . . . . . . . . . . . . . . . . . . . . . . . . . . . . . . . . . . . . . . . . 39
Chapter 4
IPCMs . . . . . . . . . . . . . . . . . . . . . . . . . . . . . . . . . . . . . . . . . . . . . . . . . . . . . . . 41
What is an IPCM? . . . . . . . . . . . . . . . . . . . . . . . . . . . . . . . . . . . . . . . . . . . . . . . . . . . . 41
NN10043-113
[Standard - Nortel Networks Confidential]
Contents
vii
Adding an IPCM cluster . . . . . . . . . . . . . . . . . . . . . . . . . . . . . . . . . . . . . . . . . . . . . . . . 42
Assigning and modifying IPCMs to a domain . . . . . . . . . . . . . . . . . . . . . . . . . . . . . . . . 44
Deleting an IPCM cluster . . . . . . . . . . . . . . . . . . . . . . . . . . . . . . . . . . . . . . . . . . . . . . . 46
Listing physical IPCMs . . . . . . . . . . . . . . . . . . . . . . . . . . . . . . . . . . . . . . . . . . . . . . . . . 47
Chapter 5
Voice Mail Servers . . . . . . . . . . . . . . . . . . . . . . . . . . . . . . . . . . . . . . . . . . . . . 49
Introduction . . . . . . . . . . . . . . . . . . . . . . . . . . . . . . . . . . . . . . . . . . . . . . . . . . . . . . . . . 49
Voice mail server types . . . . . . . . . . . . . . . . . . . . . . . . . . . . . . . . . . . . . . . . . . . . . . . . 50
Provisioning a SIP-based voice mail server . . . . . . . . . . . . . . . . . . . . . . . . . . . . . . . . . 50
Adding a SIP-based voice mail server . . . . . . . . . . . . . . . . . . . . . . . . . . . . . . . . . . 51
Adding a phantom voice mail server user . . . . . . . . . . . . . . . . . . . . . . . . . . . . . . . 53
Provisioning a Trunk-based voice mail server . . . . . . . . . . . . . . . . . . . . . . . . . . . . . . . 54
Adding a Trunk-based voice mail server . . . . . . . . . . . . . . . . . . . . . . . . . . . . . . . . 55
Provisioning a Line-based voice mail server . . . . . . . . . . . . . . . . . . . . . . . . . . . . . . . . 60
Adding a Line-based voice mail server . . . . . . . . . . . . . . . . . . . . . . . . . . . . . . . . . 61
Assigning a user to a provisioned voice mail server . . . . . . . . . . . . . . . . . . . . . . . . . . 67
Listing/modifying/deleting a voice mail server . . . . . . . . . . . . . . . . . . . . . . . . . . . . . . . 68
Using CPL scripts with voice mail . . . . . . . . . . . . . . . . . . . . . . . . . . . . . . . . . . . . . . . . 69
Chapter 6
Defining and Assigning Services . . . . . . . . . . . . . . . . . . . . . . . . . . . . . . . . . 71
Defining service parameters . . . . . . . . . . . . . . . . . . . . . . . . . . . . . . . . . . . . . . . . . . . . 71
Assigning services to a domain . . . . . . . . . . . . . . . . . . . . . . . . . . . . . . . . . . . . . . . . . . 75
Chapter 7
Assigning Services and Creating Service Packages . . . . . . . . . . . . . . . . . 79
Understanding service packages . . . . . . . . . . . . . . . . . . . . . . . . . . . . . . . . . . . . . . . . . 79
Listing available services . . . . . . . . . . . . . . . . . . . . . . . . . . . . . . . . . . . . . . . . . . . . . . . 79
Assigning services to a service package . . . . . . . . . . . . . . . . . . . . . . . . . . . . . . . . . . . 83
Creating a service package . . . . . . . . . . . . . . . . . . . . . . . . . . . . . . . . . . . . . . . . . . . . . 86
Listing/modifying/deleting service packages . . . . . . . . . . . . . . . . . . . . . . . . . . . . . . . . 87
Assigning service packages to domains and subdomains . . . . . . . . . . . . . . . . . . . . . . 89
Upgrading and downgrading service packages . . . . . . . . . . . . . . . . . . . . . . . . . . . . . . 90
SIP Provisioning Client User Guide
[Standard - Nortel Networks Confidential]
viii
Contents
Chapter 8
User Management . . . . . . . . . . . . . . . . . . . . . . . . . . . . . . . . . . . . . . . . . . . . . 91
Managing user functions . . . . . . . . . . . . . . . . . . . . . . . . . . . . . . . . . . . . . . . . . . . . . . . 91
Adding a user to a domain or subdomain . . . . . . . . . . . . . . . . . . . . . . . . . . . . . . . . . . 92
Adding a blended user . . . . . . . . . . . . . . . . . . . . . . . . . . . . . . . . . . . . . . . . . . . . . . . . . 95
Adding i2004 Internet Telephone capability for a user . . . . . . . . . . . . . . . . . . . . . . . . . 99
Adding a conference server user and route . . . . . . . . . . . . . . . . . . . . . . . . . . . . . . . . 101
Adding a conference server user and route using the SIP Provisioning Client . . 101
Adding conference server routes using the SIP Personal Agent . . . . . . . . . . . . . 103
Setting up rules for the conference server route . . . . . . . . . . . . . . . . . . . . . . . . . 104
Customizing service packages . . . . . . . . . . . . . . . . . . . . . . . . . . . . . . . . . . . . . . . . . . 104
Listing/modifying/deleting users . . . . . . . . . . . . . . . . . . . . . . . . . . . . . . . . . . . . . . . . . 105
Listing/modifying/deleting aliases . . . . . . . . . . . . . . . . . . . . . . . . . . . . . . . . . . . . . . . . 107
Listing/modifying/deleting blended aliases . . . . . . . . . . . . . . . . . . . . . . . . . . . . . . . . . 109
Chapter 9
Managing i2004 Internet Telephones . . . . . . . . . . . . . . . . . . . . . . . . . . . . . 111
Introduction . . . . . . . . . . . . . . . . . . . . . . . . . . . . . . . . . . . . . . . . . . . . . . . . . . . . . . . . 111
Adding an i2004 Internet Telephone . . . . . . . . . . . . . . . . . . . . . . . . . . . . . . . . . . . . . 111
Listing an i2004 Internet Telephone . . . . . . . . . . . . . . . . . . . . . . . . . . . . . . . . . . . . . . 116
Deleting an i2004 Internet Telephone . . . . . . . . . . . . . . . . . . . . . . . . . . . . . . . . . . . . 119
Chapter 10
Telephony Routes . . . . . . . . . . . . . . . . . . . . . . . . . . . . . . . . . . . . . . . . . . . . 121
Adding Class of Service (COS) information . . . . . . . . . . . . . . . . . . . . . . . . . . . . . . . . 122
Adding a telephony route . . . . . . . . . . . . . . . . . . . . . . . . . . . . . . . . . . . . . . . . . . . . . . 124
Listing a telephony route . . . . . . . . . . . . . . . . . . . . . . . . . . . . . . . . . . . . . . . . . . . . . . 128
Adding a route list . . . . . . . . . . . . . . . . . . . . . . . . . . . . . . . . . . . . . . . . . . . . . . . . . . . 128
Listing a route list . . . . . . . . . . . . . . . . . . . . . . . . . . . . . . . . . . . . . . . . . . . . . . . . . . . . 130
Using the translation verification tool . . . . . . . . . . . . . . . . . . . . . . . . . . . . . . . . . . . . . 131
Setting up an interworking profile with the Communications Server 2000 (CS2000) . 133
Chapter 11
Gateways . . . . . . . . . . . . . . . . . . . . . . . . . . . . . . . . . . . . . . . . . . . . . . . . . . . 135
Introduction to gateways . . . . . . . . . . . . . . . . . . . . . . . . . . . . . . . . . . . . . . . . . . . . . . 135
NN10043-113
[Standard - Nortel Networks Confidential]
Contents
ix
Adding a gateway . . . . . . . . . . . . . . . . . . . . . . . . . . . . . . . . . . . . . . . . . . . . . . . . . . . . 136
Listing a gateway . . . . . . . . . . . . . . . . . . . . . . . . . . . . . . . . . . . . . . . . . . . . . . . . . . . . 137
Adding a gateway route . . . . . . . . . . . . . . . . . . . . . . . . . . . . . . . . . . . . . . . . . . . . . . . 138
Listing a gateway route . . . . . . . . . . . . . . . . . . . . . . . . . . . . . . . . . . . . . . . . . . . . . . . 140
Adding a gateway trunk group . . . . . . . . . . . . . . . . . . . . . . . . . . . . . . . . . . . . . . . . . . 141
Listing a gateway trunk group . . . . . . . . . . . . . . . . . . . . . . . . . . . . . . . . . . . . . . . . . . 142
Appendix A
Provisioning Sequence . . . . . . . . . . . . . . . . . . . . . . . . . . . . . . . . . . . . . . . . 145
Sequence of tasks . . . . . . . . . . . . . . . . . . . . . . . . . . . . . . . . . . . . . . . . . . . . . . . . . . . 145
Appendix B
Understanding Telephony Routing and Translations . . . . . . . . . . . . . . . . 149
Telephony routing concepts . . . . . . . . . . . . . . . . . . . . . . . . . . . . . . . . . . . . . . . . . . . . 149
Subdomains . . . . . . . . . . . . . . . . . . . . . . . . . . . . . . . . . . . . . . . . . . . . . . . . . . . . . 149
Class of Service . . . . . . . . . . . . . . . . . . . . . . . . . . . . . . . . . . . . . . . . . . . . . . . . . . 150
SIP Application Module routing stages . . . . . . . . . . . . . . . . . . . . . . . . . . . . . . . . 151
Telephony routing terminology . . . . . . . . . . . . . . . . . . . . . . . . . . . . . . . . . . . . . . . . . . 152
Route lists . . . . . . . . . . . . . . . . . . . . . . . . . . . . . . . . . . . . . . . . . . . . . . . . . . . . . . 152
Example of telephony route redirection between domains . . . . . . . . . . . . . . 153
Example of telephony route redirection between subdomains . . . . . . . . . . . 153
Routes . . . . . . . . . . . . . . . . . . . . . . . . . . . . . . . . . . . . . . . . . . . . . . . . . . . . . . . . . 154
Private telephony routes . . . . . . . . . . . . . . . . . . . . . . . . . . . . . . . . . . . . . . . . 155
SIP and gateway routes . . . . . . . . . . . . . . . . . . . . . . . . . . . . . . . . . . . . . . . . 155
Sample dial plan for telephony routes . . . . . . . . . . . . . . . . . . . . . . . . . . . . . . . . . . . . 155
Provisioning domains, subscribers, and COS . . . . . . . . . . . . . . . . . . . . . . . . . . . 155
Example dial plan assignments . . . . . . . . . . . . . . . . . . . . . . . . . . . . . . . . . . . . . . 157
Dial plan description . . . . . . . . . . . . . . . . . . . . . . . . . . . . . . . . . . . . . . . . . . . . . . 157
Associating COS and the route . . . . . . . . . . . . . . . . . . . . . . . . . . . . . . . . . . . . . . 158
Telephony route provisioning scenario and examples . . . . . . . . . . . . . . . . . . . . . . . . 158
Step 1: Create the parent and subdomains . . . . . . . . . . . . . . . . . . . . . . . . . . . . . 159
Step 2: Create the COS . . . . . . . . . . . . . . . . . . . . . . . . . . . . . . . . . . . . . . . . . . . . 161
Step 3: Create the subscribers and assign the COS . . . . . . . . . . . . . . . . . . . . . . 162
Step 4: Create gateways, gateway routes and trunk groups . . . . . . . . . . . . . . . . 165
Step 5: Create the telephony routes . . . . . . . . . . . . . . . . . . . . . . . . . . . . . . . . . . 166
SIP Provisioning Client User Guide
[Standard - Nortel Networks Confidential]
x
Contents
Adding a private route to subdomain rich.abc.com . . . . . . . . . . . . . . . . . . . . 167
Adding SIP routes to abc.com and xyz.com . . . . . . . . . . . . . . . . . . . . . . . . . 169
Adding a gateway route to abc.com . . . . . . . . . . . . . . . . . . . . . . . . . . . . . . . 172
Step 6: Create the telephony route lists and assign COS . . . . . . . . . . . . . . . . . . 174
Step 7: Test the telephony routing configuration . . . . . . . . . . . . . . . . . . . . . . . . . 178
Appendix C
911 Emergency Notification . . . . . . . . . . . . . . . . . . . . . . . . . . . . . . . . . . . . 181
911 emergency notification terms and concepts . . . . . . . . . . . . . . . . . . . . . . . . . . . . 181
Setting up Instant Message Notifications . . . . . . . . . . . . . . . . . . . . . . . . . . . . . . . . . . 182
Using the SIP Provisioning Client to add emergency subscribers and telephony routes .
183
Creating a COS for the 911 notification . . . . . . . . . . . . . . . . . . . . . . . . . . . . . . . . 184
Adding a gateway, gateway route, and trunk group . . . . . . . . . . . . . . . . . . . . . . . 185
Adding a private telephony route . . . . . . . . . . . . . . . . . . . . . . . . . . . . . . . . . . . . . 187
Adding a gateway telephony route . . . . . . . . . . . . . . . . . . . . . . . . . . . . . . . . . . . 189
Adding an emergency subscriber . . . . . . . . . . . . . . . . . . . . . . . . . . . . . . . . . . . . 190
Adding an OSN subscriber . . . . . . . . . . . . . . . . . . . . . . . . . . . . . . . . . . . . . . . . . 192
Using the SIP Personal Agent to route 911 emergency notifications . . . . . . . . . . . . . 192
Setting up a route list for the emergency subscriber . . . . . . . . . . . . . . . . . . . . . . 192
Setting up a rule for the emergency notification route . . . . . . . . . . . . . . . . . . . . . 193
Index . . . . . . . . . . . . . . . . . . . . . . . . . . . . . . . . . . . . . . . . . . . . . . . . . . . . . . . 195
NN10043-113
[Standard - Nortel Networks Confidential]
xi
Figures
Figure 1
SIP Provisioning Client login window. . . . . . . . . . . . . . . . . . . . . . . . . . . . . . 4
Figure 2
SIP Provisioning Client welcome window . . . . . . . . . . . . . . . . . . . . . . . . . . 4
Figure 3
Session inactivity message . . . . . . . . . . . . . . . . . . . . . . . . . . . . . . . . . . . . 5
Figure 4
Time Zone details window . . . . . . . . . . . . . . . . . . . . . . . . . . . . . . . . . . . . . 7
Figure 5
Add new time zone . . . . . . . . . . . . . . . . . . . . . . . . . . . . . . . . . . . . . . . . . . . 8
Figure 6
Add a New Role window . . . . . . . . . . . . . . . . . . . . . . . . . . . . . . . . . . . . . . 17
Figure 7
List System Roles window . . . . . . . . . . . . . . . . . . . . . . . . . . . . . . . . . . . . 18
Figure 8
Role details window . . . . . . . . . . . . . . . . . . . . . . . . . . . . . . . . . . . . . . . . . 19
Figure 9
Create new admin . . . . . . . . . . . . . . . . . . . . . . . . . . . . . . . . . . . . . . . . . . 20
Figure 10
Admins window . . . . . . . . . . . . . . . . . . . . . . . . . . . . . . . . . . . . . . . . . . . . . 21
Figure 11
Admin Details window . . . . . . . . . . . . . . . . . . . . . . . . . . . . . . . . . . . . . . . . 22
Figure 12
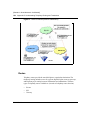
Domains and subdomains . . . . . . . . . . . . . . . . . . . . . . . . . . . . . . . . . . . . 25
Figure 13
Create new domain window . . . . . . . . . . . . . . . . . . . . . . . . . . . . . . . . . . . 27
Figure 14
Create new subdomain window . . . . . . . . . . . . . . . . . . . . . . . . . . . . . . . . 32
Figure 15
Create new domain window . . . . . . . . . . . . . . . . . . . . . . . . . . . . . . . . . . . 33
Figure 16
List Domains window - step 1 . . . . . . . . . . . . . . . . . . . . . . . . . . . . . . . . . . 34
Figure 17
List domains - step 2 . . . . . . . . . . . . . . . . . . . . . . . . . . . . . . . . . . . . . . . . 35
Figure 18
Add a party to Domain Ban List window . . . . . . . . . . . . . . . . . . . . . . . . . . 37
Figure 19
Domain Ban List window . . . . . . . . . . . . . . . . . . . . . . . . . . . . . . . . . . . . . 38
Figure 20
Add Status Reason window . . . . . . . . . . . . . . . . . . . . . . . . . . . . . . . . . . . 39
Figure 21
Status Reasons window . . . . . . . . . . . . . . . . . . . . . . . . . . . . . . . . . . . . . . 40
Figure 22
Modify status reason window . . . . . . . . . . . . . . . . . . . . . . . . . . . . . . . . . . 40
Figure 23
Create new IPCM window . . . . . . . . . . . . . . . . . . . . . . . . . . . . . . . . . . . . 43
Figure 24
List IPCM Clusters window . . . . . . . . . . . . . . . . . . . . . . . . . . . . . . . . . . . . 44
Figure 25
Modify IPCM window . . . . . . . . . . . . . . . . . . . . . . . . . . . . . . . . . . . . . . . . 45
Figure 26
IPCM Domain Relation window . . . . . . . . . . . . . . . . . . . . . . . . . . . . . . . . 46
Figure 27
IPCM Delete confirmation dialog box . . . . . . . . . . . . . . . . . . . . . . . . . . . . 47
Figure 28
Listing physical IPCMs . . . . . . . . . . . . . . . . . . . . . . . . . . . . . . . . . . . . . . . 48
Figure 29
Delete physical IPCM confirmation dialog box . . . . . . . . . . . . . . . . . . . . . 48
SIP Provisioning Client User Guide
[Standard - Nortel Networks Confidential]
xii
Figures
Figure 30
Create new voice mail server window (SIP) - step
. . . . . . . . . . . . . . . . . 51
Figure 31
Create new voice mail server window (SIP) - step 2 . . . . . . . . . . . . . . . . 52
Figure 32
Voice Mail Servers window (SIP) . . . . . . . . . . . . . . . . . . . . . . . . . . . . . . . 53
Figure 33
User routes window . . . . . . . . . . . . . . . . . . . . . . . . . . . . . . . . . . . . . . . . . 54
Figure 34
Create new voice mail server window (Trunk-based) - step 1 . . . . . . . . . 55
Figure 35
Create new voice mail server window (Trunk-based) - step 2 . . . . . . . . . 56
Figure 36
Create new voice mail server window (Trunk-based) - step 3 . . . . . . . . . 58
Figure 37
Voice Mail Servers window (Trunk-based) . . . . . . . . . . . . . . . . . . . . . . . . 60
Figure 38
Create a new voice mail server window (Line-based) - step 1 . . . . . . . . . 61
Figure 39
Create new voice mail server window (Line-based) - step 2 . . . . . . . . . . 62
Figure 40
Create new voice mail server window (Line-based) - step 3 . . . . . . . . . . 64
Figure 41
Create new voice mail server window (Line-based) - step 4 . . . . . . . . . . 66
Figure 42
Voice Mail Servers window (Line-based) . . . . . . . . . . . . . . . . . . . . . . . . . 67
Figure 43
List of voice mail servers . . . . . . . . . . . . . . . . . . . . . . . . . . . . . . . . . . . . . 68
Figure 44
List of available services window . . . . . . . . . . . . . . . . . . . . . . . . . . . . . . . 72
Figure 45
Add new parameter values window . . . . . . . . . . . . . . . . . . . . . . . . . . . . . 75
Figure 46
Assign services window . . . . . . . . . . . . . . . . . . . . . . . . . . . . . . . . . . . . . . 76
Figure 47
Assign services to a domain window . . . . . . . . . . . . . . . . . . . . . . . . . . . . 77
Figure 48
List of available services . . . . . . . . . . . . . . . . . . . . . . . . . . . . . . . . . . . . . . 80
Figure 49
Assign services window . . . . . . . . . . . . . . . . . . . . . . . . . . . . . . . . . . . . . . 84
Figure 50
Assign services to domains window . . . . . . . . . . . . . . . . . . . . . . . . . . . . . 85
Figure 51
Create new package window . . . . . . . . . . . . . . . . . . . . . . . . . . . . . . . . . . 86
Figure 52
List of packages domain window . . . . . . . . . . . . . . . . . . . . . . . . . . . . . . . 88
Figure 53
Assign package to domains window . . . . . . . . . . . . . . . . . . . . . . . . . . . . . 89
Figure 54
Add new user . . . . . . . . . . . . . . . . . . . . . . . . . . . . . . . . . . . . . . . . . . . . . . 92
Figure 55
Add new user - blended . . . . . . . . . . . . . . . . . . . . . . . . . . . . . . . . . . . . . . 96
Figure 56
Blended User added successfully confirmation . . . . . . . . . . . . . . . . . . . . 97
Figure 57
Service package customization for a blended user . . . . . . . . . . . . . . . . . 98
Figure 58
User details window (i2004) . . . . . . . . . . . . . . . . . . . . . . . . . . . . . . . . . . . 99
Figure 59
Conference user - add route . . . . . . . . . . . . . . . . . . . . . . . . . . . . . . . . . . 102
Figure 60
Conference user - route added . . . . . . . . . . . . . . . . . . . . . . . . . . . . . . . . 103
Figure 61
Customize service package link . . . . . . . . . . . . . . . . . . . . . . . . . . . . . . . 105
Figure 62
List Users window . . . . . . . . . . . . . . . . . . . . . . . . . . . . . . . . . . . . . . . . . . 106
Figure 63
List users search results . . . . . . . . . . . . . . . . . . . . . . . . . . . . . . . . . . . . . 106
Figure 64
User details window . . . . . . . . . . . . . . . . . . . . . . . . . . . . . . . . . . . . . . . . 107
NN10043-113
[Standard - Nortel Networks Confidential]
Figures
xiii
Figure 65
List aliases window . . . . . . . . . . . . . . . . . . . . . . . . . . . . . . . . . . . . . . . . . 108
Figure 66
List aliases search results . . . . . . . . . . . . . . . . . . . . . . . . . . . . . . . . . . . . 109
Figure 67
Blended Aliases search results window . . . . . . . . . . . . . . . . . . . . . . . . . 110
Figure 68
Adding a device . . . . . . . . . . . . . . . . . . . . . . . . . . . . . . . . . . . . . . . . . . . 112
Figure 69
Add device - IPCM device created . . . . . . . . . . . . . . . . . . . . . . . . . . . . . 115
Figure 70
Device Users - assigning users . . . . . . . . . . . . . . . . . . . . . . . . . . . . . . . 116
Figure 71
List Devices window . . . . . . . . . . . . . . . . . . . . . . . . . . . . . . . . . . . . . . . . 117
Figure 72
List devices search results . . . . . . . . . . . . . . . . . . . . . . . . . . . . . . . . . . . 118
Figure 73
Modifying a device in a domain window . . . . . . . . . . . . . . . . . . . . . . . . . 118
Figure 74
Devices in Domain window (search results) . . . . . . . . . . . . . . . . . . . . . . 119
Figure 75
Class of Service information for domain window . . . . . . . . . . . . . . . . . . 123
Figure 76
Create New Telephony Route window . . . . . . . . . . . . . . . . . . . . . . . . . . 124
Figure 77
Telephony Route Listing window . . . . . . . . . . . . . . . . . . . . . . . . . . . . . . 126
Figure 78
Telephony route listing window . . . . . . . . . . . . . . . . . . . . . . . . . . . . . . . . 128
Figure 79
Create a New Route List window . . . . . . . . . . . . . . . . . . . . . . . . . . . . . . 129
Figure 80
List route lists window . . . . . . . . . . . . . . . . . . . . . . . . . . . . . . . . . . . . . . . 131
Figure 81
Translation Verification Tool window . . . . . . . . . . . . . . . . . . . . . . . . . . . . 132
Figure 82
Translation tool results window . . . . . . . . . . . . . . . . . . . . . . . . . . . . . . . . 133
Figure 83
Set Profile for Domain window . . . . . . . . . . . . . . . . . . . . . . . . . . . . . . . . 133
Figure 84
Create new gateway window . . . . . . . . . . . . . . . . . . . . . . . . . . . . . . . . . 136
Figure 85
Gateways window . . . . . . . . . . . . . . . . . . . . . . . . . . . . . . . . . . . . . . . . . . 137
Figure 86
Gateways window (List Gateways) . . . . . . . . . . . . . . . . . . . . . . . . . . . . . 138
Figure 87
Create new gateway route window . . . . . . . . . . . . . . . . . . . . . . . . . . . . . 139
Figure 88
Gateway routes window . . . . . . . . . . . . . . . . . . . . . . . . . . . . . . . . . . . . . 139
Figure 89
Gateway routes window (List Routes) . . . . . . . . . . . . . . . . . . . . . . . . . . 140
Figure 90
Reorder trunk groups window . . . . . . . . . . . . . . . . . . . . . . . . . . . . . . . . . 141
Figure 91
Create new trunkgroup window . . . . . . . . . . . . . . . . . . . . . . . . . . . . . . . 142
Figure 92
TrunkGroups window . . . . . . . . . . . . . . . . . . . . . . . . . . . . . . . . . . . . . . . 142
Figure 93
TrunkGroups window (List TrunkGroup) . . . . . . . . . . . . . . . . . . . . . . . . . 143
Figure 94
Example domain tree . . . . . . . . . . . . . . . . . . . . . . . . . . . . . . . . . . . . . . . 150
Figure 95
SIP Application Module routing stages . . . . . . . . . . . . . . . . . . . . . . . . . . 152
Figure 96
Route list redirect (domain to domain) . . . . . . . . . . . . . . . . . . . . . . . . . . 153
Figure 97
Route list redirect (between subdomains) . . . . . . . . . . . . . . . . . . . . . . . 154
Figure 98
Domains/subscribers used for the sample dial plan . . . . . . . . . . . . . . . . 156
Figure 99
Parent domain provisioning menu . . . . . . . . . . . . . . . . . . . . . . . . . . . . . 160
SIP Provisioning Client User Guide
[Standard - Nortel Networks Confidential]
xiv
Figures
Figure 100 Subdomain provisioning . . . . . . . . . . . . . . . . . . . . . . . . . . . . . . . . . . . . . 161
Figure 101 Creating COS . . . . . . . . . . . . . . . . . . . . . . . . . . . . . . . . . . . . . . . . . . . . . 162
Figure 102 Assigning service packages to subdomains . . . . . . . . . . . . . . . . . . . . . . 163
Figure 103 Adding a subscriber with COS . . . . . . . . . . . . . . . . . . . . . . . . . . . . . . . . 164
Figure 104 Adding a gateway to abc.com . . . . . . . . . . . . . . . . . . . . . . . . . . . . . . . . 165
Figure 105 Adding a gateway route . . . . . . . . . . . . . . . . . . . . . . . . . . . . . . . . . . . . . 166
Figure 106 Adding a trunk group to a gateway route . . . . . . . . . . . . . . . . . . . . . . . . 166
Figure 107 Menu to add routes in subdomain . . . . . . . . . . . . . . . . . . . . . . . . . . . . . 167
Figure 108 Adding a private route to rich.abc.com . . . . . . . . . . . . . . . . . . . . . . . . . . 168
Figure 109 Private route created . . . . . . . . . . . . . . . . . . . . . . . . . . . . . . . . . . . . . . . 168
Figure 110 Setting the Subscriber Not Found option . . . . . . . . . . . . . . . . . . . . . . . . 168
Figure 111 Listing a private route . . . . . . . . . . . . . . . . . . . . . . . . . . . . . . . . . . . . . . . 169
Figure 112 Adding a SIP route to abc.com . . . . . . . . . . . . . . . . . . . . . . . . . . . . . . . . 170
Figure 113 SIP route change parameters . . . . . . . . . . . . . . . . . . . . . . . . . . . . . . . . . 170
Figure 114 SIP route options . . . . . . . . . . . . . . . . . . . . . . . . . . . . . . . . . . . . . . . . . . 171
Figure 115 Listing SIP routes in abc.com . . . . . . . . . . . . . . . . . . . . . . . . . . . . . . . . . 171
Figure 116 SIP route to abc.com . . . . . . . . . . . . . . . . . . . . . . . . . . . . . . . . . . . . . . . 171
Figure 117 Adding a gateway route . . . . . . . . . . . . . . . . . . . . . . . . . . . . . . . . . . . . . 172
Figure 118 Gateway change parameters . . . . . . . . . . . . . . . . . . . . . . . . . . . . . . . . . 173
Figure 119 Gateway route options . . . . . . . . . . . . . . . . . . . . . . . . . . . . . . . . . . . . . . 173
Figure 120 Listing abc.com routes . . . . . . . . . . . . . . . . . . . . . . . . . . . . . . . . . . . . . . 174
Figure 121 Adding a route list to abc.com . . . . . . . . . . . . . . . . . . . . . . . . . . . . . . . . 175
Figure 122 Adding a route list with PSTN route to abc.com . . . . . . . . . . . . . . . . . . . 175
Figure 123 Listing of abc.com route lists . . . . . . . . . . . . . . . . . . . . . . . . . . . . . . . . . 176
Figure 124 Listing of xyz.com route lists . . . . . . . . . . . . . . . . . . . . . . . . . . . . . . . . . . 176
Figure 125 Adding a route list to rich.abc.com . . . . . . . . . . . . . . . . . . . . . . . . . . . . . 177
Figure 126 Listing of rich.abc.com route lists . . . . . . . . . . . . . . . . . . . . . . . . . . . . . . 177
Figure 127 Subdomain 5 digit translations trace . . . . . . . . . . . . . . . . . . . . . . . . . . . 178
Figure 128 Gateway route translations trace . . . . . . . . . . . . . . . . . . . . . . . . . . . . . . 179
Figure 129 SIP route trace from abc.com to xyz.com . . . . . . . . . . . . . . . . . . . . . . . . 180
Figure 130 Restricted route trace . . . . . . . . . . . . . . . . . . . . . . . . . . . . . . . . . . . . . . . 180
Figure 131 Creating a COS for the 911 notification . . . . . . . . . . . . . . . . . . . . . . . . . 185
Figure 132 Adding a new gateway . . . . . . . . . . . . . . . . . . . . . . . . . . . . . . . . . . . . . . 186
Figure 133 List of gateways . . . . . . . . . . . . . . . . . . . . . . . . . . . . . . . . . . . . . . . . . . . 186
Figure 134 Creating a new gateway route . . . . . . . . . . . . . . . . . . . . . . . . . . . . . . . . 186
NN10043-113
[Standard - Nortel Networks Confidential]
Figures
xv
Figure 135 Creating a new trunkgroup . . . . . . . . . . . . . . . . . . . . . . . . . . . . . . . . . . . 187
Figure 136 Create new telephony route window . . . . . . . . . . . . . . . . . . . . . . . . . . . 188
Figure 137 Change parameters . . . . . . . . . . . . . . . . . . . . . . . . . . . . . . . . . . . . . . . . 188
Figure 138 Creating a new route list . . . . . . . . . . . . . . . . . . . . . . . . . . . . . . . . . . . . . 189
Figure 139 Create gateway telephony route to PSAP . . . . . . . . . . . . . . . . . . . . . . . 190
Figure 140 Gateway route options . . . . . . . . . . . . . . . . . . . . . . . . . . . . . . . . . . . . . . 190
Figure 141 Add user - emergency subscriber . . . . . . . . . . . . . . . . . . . . . . . . . . . . . . 191
SIP Provisioning Client User Guide
[Standard - Nortel Networks Confidential]
xvi
Figures
NN10043-113
[Standard - Nortel Networks Confidential]
xvii
Tables
Table 1
SIP Provisioning tasks overview . . . . . . . . . . . . . . . . . . . . . . . . . . . . . . . . 12
Table 2
Example of roles and rights . . . . . . . . . . . . . . . . . . . . . . . . . . . . . . . . . . . 15
Table 3
Create new domain name restrictions . . . . . . . . . . . . . . . . . . . . . . . . . . . 28
Table 4
Create new domain parameters . . . . . . . . . . . . . . . . . . . . . . . . . . . . . . . . 28
Table 5
Create new IPCM parameters . . . . . . . . . . . . . . . . . . . . . . . . . . . . . . . . . 43
Table 6
Voice mail server types . . . . . . . . . . . . . . . . . . . . . . . . . . . . . . . . . . . . . . . 50
Table 7
SIP-based voice mail parameters . . . . . . . . . . . . . . . . . . . . . . . . . . . . . . . 52
Table 8
SMDI parameters . . . . . . . . . . . . . . . . . . . . . . . . . . . . . . . . . . . . . . . . . . . 57
Table 9
PRI Gateway connection parameters . . . . . . . . . . . . . . . . . . . . . . . . . . . . 59
Table 10
Line-based voice mail server SMDI parameters . . . . . . . . . . . . . . . . . . . . 63
Table 11
Line-based voice mail server general parameter information . . . . . . . . . . 65
Table 12
Line-based voice mail server parameters . . . . . . . . . . . . . . . . . . . . . . . . . 67
Table 13
Services parameters and options . . . . . . . . . . . . . . . . . . . . . . . . . . . . . . . 73
Table 14
Services parameters and options
. . . . . . . . . . . . . . . . . . . . . . . . . . . . . . 81
Table 15
Add user parameter descriptions . . . . . . . . . . . . . . . . . . . . . . . . . . . . . . . 93
Table 16
i2004 properties . . . . . . . . . . . . . . . . . . . . . . . . . . . . . . . . . . . . . . . . . . . 100
Table 17
i2004 Internet Telephone parameters . . . . . . . . . . . . . . . . . . . . . . . . . . . 113
Table 18
Click Save. The IPCM Device Created window appears (Figure 69). . . 115
Table 19
Telephony route parameter information . . . . . . . . . . . . . . . . . . . . . . . . . 125
Table 20
Telephony route parameters window (Private, SIP, Gateway) . . . . . . . . 127
Table 21
Call routing options . . . . . . . . . . . . . . . . . . . . . . . . . . . . . . . . . . . . . . . . . 130
Table 22
SIP Provisioning Client provisioning sequence . . . . . . . . . . . . . . . . . . . 145
Table 23
Example dial plan data . . . . . . . . . . . . . . . . . . . . . . . . . . . . . . . . . . . . . . 157
Table 24
Dial plan for abc.com and xyz.com . . . . . . . . . . . . . . . . . . . . . . . . . . . . . 157
Table 25
Association between COS and Routes . . . . . . . . . . . . . . . . . . . . . . . . . 158
Table 26
Subscribers in rich.abc.com . . . . . . . . . . . . . . . . . . . . . . . . . . . . . . . . . . 166
Table 27
Data for SIP routes . . . . . . . . . . . . . . . . . . . . . . . . . . . . . . . . . . . . . . . . . 169
SIP Provisioning Client User Guide
[Standard - Nortel Networks Confidential]
xviii
Tables
NN10043-113
[Standard - Nortel Networks Confidential]
xix
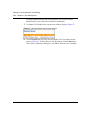
Welcome
The Session Initiation Protocol (SIP) Provisioning Client is a web-based
Graphical User Interface (GUI) for service providers to complete administrative
tasks, for example, provisioning administrators, domains, IP Client Managers
(IPCMs) and IPCM clusters.
Overview
Service providers access the SIP Provisioning Client with any web browser. Being
a web-based system, the SIP Provisioning Client provides the service providers
with an highly efficient access from anywhere capability.
Note: The provisioning abilities visible to an administrator in the SIP
Provisioning Client GUI depends on the level of authority assigned to
their account.
Audience
This guide is intended for service providers and administrators (with varying
levels of privileges) assigned to manage customer domains.
What is not covered
This document does not cover
•
•
Configuration
System Management Console
SIP Provisioning Client User Guide
[Standard - Nortel Networks Confidential]
xx
Welcome
Text and graphic conventions
This guide uses the following text and graphic conventions:
bold text
Indicates a menu option, link, or command key you
need to click. Example: Click Ok.
italic text
Indicates
•
•
•
separator ( > )
a domain name or subdomain name
a document title
a variable name
Shows menu paths.
Example: Gateway > Add Gateway
Indicates a top level menu item in the SIP Provisioning
Client menu hierarchy.
Indicates a sub menu item in the SIP Provisioning
Client menu hierarchy.
Indicates a form in the SIP Provisioning Client menu
hierarchy.
Acronyms
This guide uses the following acronyms
NN10043-113
CAS
Channel Associated Signalling
CPL
Call Processing Language
COS
Class of Service
CS2000
Communication Server 2000
DSL
Digital Subscriber Line
GMT
Greenwich Mean Time
[Standard - Nortel Networks Confidential]
Welcome
DHCP
Dynamic Host Configuration Protocol
DIGMAN
Digit Manipulation
GUI
Graphical User Interface
IP
Internet Protocol
IPCM
Internet Protocol Client Manager
MAddr
Media Access Control Address
MCP
Multimedia Communications Portfolio
MSD
Most Significant Digit
MWI
Message Waiting Indicator
PDIL
Partial Dial
PRI
Primary Rate Interface
PSEIZ
Permanent Seizure
PSTN
Public Switched Telephone Network
SA
System Administrator
SIP
Session Initiation Protocol
SMDI
Simplified Message Desk Interface
TDM
Time Division Multiplex
UNIStim
Unified Network IP Stimulus
URI
Uniform Resource Identifier
URL
Uniform Resource Locator
VMS
Voice Mail Server
VPN
Virtual Private Network
xxi
Related publications
•
•
•
•
SIP Personal Agent Getting User Guide (Part No. NN10039-112)
SIP Multimedia Web Client User Guide (Part No. NN10040-112)
SIP Multimedia PC Client User Guide (Part No. NN10041-112)
i2004 Internet Telephone User Guide (Part No. NN10042-113)
SIP Provisioning Client User Guide
[Standard - Nortel Networks Confidential]
xxii
Welcome
You can print selected technical manuals and release notes free, directly from the
Internet. Go to the www.nortelnetworks.com/documentation URL. Find the
product for which you need documentation. Then locate the specific category and
model or version for your hardware or software product. Use Adobe* Acrobat
Reader* to open the manuals and release notes, search for the sections you need,
and print them on most standard printers. Go to Adobe Systems at the
www.adobe.com URL to download a free copy of the Adobe Acrobat Reader.
How to get help
If you purchased a service contract for your Nortel Networks product from a
distributor or authorized reseller, contact the technical support staff for that
distributor or reseller for assistance.
If you purchased a Nortel Networks service program, contact Nortel Networks
Technical Support. To obtain contact information online, go to the
www.nortelnetworks.com/cgi-bin/comments/comments.cgi URL, then click on
Technical Support.
From the Technical Support page, you can open a Customer Service Request
online or find the telephone number for the nearest Technical Solutions Center.
If you are not connected to the Internet, you can call 1-800-4NORTEL
(1-800-466-7835) to learn the telephone number for the nearest Technical
Solutions Center.
An Express Routing Code (ERC) is available for many Nortel Networks products
and services. When you use an ERC, your call is routed to a technical support
person who specializes in supporting that product or service. To locate an ERC for
your product or service, go to the http://www.nortelnetworks.com/help/contact/
erc/index.html URL.
NN10043-113
[Standard - Nortel Networks Confidential]
1
Chapter 1
Getting Started
Topics in this section:
•
•
•
•
•
•
•
“SIP Provisioning Client overview” on page 1
“SIP Provisioning Client features” on page 2
“System requirements” on page 2
“Using the online help” on page 5
“Setting up time zones” on page 5
“Changing the admin password” on page 9
“Exiting the SIP Provisioning Client” on page 9
SIP Provisioning Client overview
The SIP Provisioning Client is a web-based GUI that you use to perform the
following administrative and provisioning tasks:
•
•
•
•
•
•
•
•
define administration roles and privileges
manage (list add, modify, or delete) users and devices
define multiple service packages
assign services to service packages
assign service packages to domains
assign translation information specific to a domain or subdomain
provision voice mail servers
provision 911 emergency notification
SIP Provisioning Client User Guide
[Standard - Nortel Networks Confidential]
2
Chapter 1 Getting Started
SIP Provisioning Client features
The SIP Provisioning Client gives service providers the capability to create and
set security, access, and permissions for the following components and roles of the
user framework:
•
•
•
•
•
•
•
administration
domains and subdomains (users, devices, telephony routes)
gateways
IPCM clusters
voice mail servers
services
system
Note: The provisioning capabilities visible to an administrator in the SIP
Provisioning Client menu depend on the level of authority (rights)
assigned to their account.
System requirements
The following section describes the minimum and recommended hardware and
software requirements for the SIP Provisioning Client.
Minimum hardware and software requirements
•
•
•
•
•
NN10043-113
200MHz Pentium class or equivalent processor
No additional free RAM is required. (The minimum memory requirements of
your browser must be met. See your browser documentation for more
information.)
No additional harddrive space is required. (Local caching of web pages is
performed by your web browser. See your browser documentation for
information on the minimum disk space requirements.)
Mouse (optional)
640x480 @8bpp (256 colors) VGA graphics card
[Standard - Nortel Networks Confidential]
Chapter 1 Getting Started
•
•
•
•
3
Microsoft* Windows* 98 Second Edition (SE), Microsoft Windows
Millennium Edition (Me), Microsoft Windows 2000, Microsoft XP, or
Microsoft Windows NT* 4.0 with Service Pack 5 (SP5)
28.8Kbps modem
Netscape* Communicator 4.77 or Internet Explorer 5.0
Cookies and javascript enabled
Recommended hardware and software requirements
•
•
•
•
•
•
•
•
•
300MHz (or higher) Pentium class
No additional free RAM is required. (The minimum memory requirements of
your browser must be met. See your browser documentation for more
information.)
No additional harddrive space is required. (Local caching of web pages is
performed by your web browser. See your browser documentation for more
information on the minimum disk space requirements.)
Mouse (required)
800x600 or higher @16bpp (65,536 colors) VGA or better video graphics
card
Microsoft Windows 98 Second Edition (SE), Microsoft Windows 2000,
Microsoft XP, or Microsoft Windows NT 4.0 with Service Pack 5 (SP5)
56Kbps modem or other high speed connection (For example, cable modem,
Digital Subscriber Line (DSL) modem, 10baseT ethernet, an so forth)
Netscape Communicator 4.77 or greater, or Internet Explorer 5.0 or greater
Cookies and javascript enabled
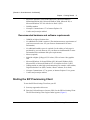
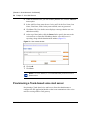
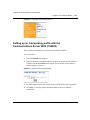
Starting the SIP Provisioning Client
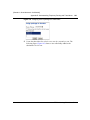
To start the SIP Provisioning Client from your PC
1
Start any supported web browser.
2
Enter the Uniform Resource Locator (URL) for the SIP Provisioning Client.
The SIP Provisioning Client Login window appears (Figure 1).
SIP Provisioning Client User Guide
[Standard - Nortel Networks Confidential]
4
Chapter 1 Getting Started
Figure 1 SIP Provisioning Client login window.
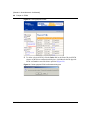
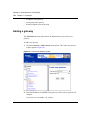
3
Enter your username and password in the respective fields.
4
Click LOG IN NOW to log in. Upon a successful login, the SIP Provisioning
Client Welcome window appears.
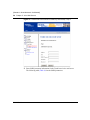
Figure 2 SIP Provisioning Client welcome window
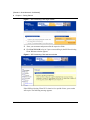
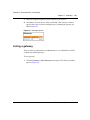
If the SIP Provisioning Client GUI is inactive for a period of time, your session
will expire. The following message appears:
NN10043-113
[Standard - Nortel Networks Confidential]
Chapter 1 Getting Started
5
Figure 3 Session inactivity message
To restart the SIP Provisioning Client, click on the link to login again. Contact
your service provider to request a change to the session expiration time limit.
Using the online help
There are several ways that you can access SIP Provisioning Client help:
•
•
online help - from the SIP Provisioning Client screen, click the Help button to
view a task-based help system. The online help provides:
— help pages containing forward and backward navigation icons
— procedures that help you use the SIP Provisioning Client
— a Table of Contents with hypertext links
— an Index with hypertext links
question mark help. Click the question mark icon to display a description and
possible values for parameter fields on a form.
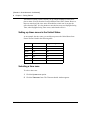
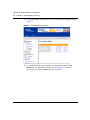
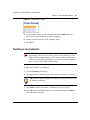
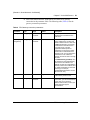
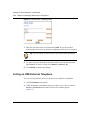
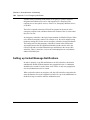
Setting up time zones
The SIP Provisioning Client allows you to define and manage as many time zones
as you require to meet your needs, and to create your own time zones for easy
reference. Time zones define the time zone from which a subscriber normally
accesses the system (that is, the subscribers’s local time zone). Time zones are
used in the SIP Personal Agent Call Manager function to set a screening rule that
applies during a certain time. This time is dependent on the time zone selected.
SIP Provisioning Client User Guide
[Standard - Nortel Networks Confidential]
6
Chapter 1 Getting Started
The SIP Provisioning Client is initially set up with the standard 24 time zones:
plus or minus 12 hours from the Greenwich Mean Time (GMT) format. However,
there are more than 300+ time zones. What defines a time zone is not just the
offset from the GMT. It is also whether or not the time zone uses Daylight Saving
Time, when Daylight Saving Time occurs, and what the offset is.
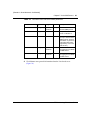
Setting up times zones in the United States
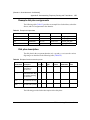
As an example, the time zones you would set up across the United States from
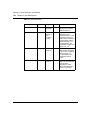
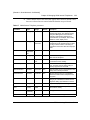
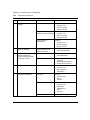
East to West are listed in the following table:
Zone
Standard Time
Daylight Saving Time
Atlantic
AST
ADT
Eastern
EST
EDT
Central
CST
CDT
Mountain
MST
MDT
Pacific
PST
PDT
Alaska
AKST
AKDT
Hawaii
HST
Not Observed
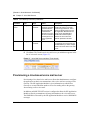
Selecting a time zone
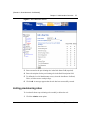
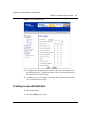
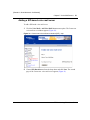
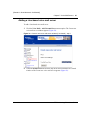
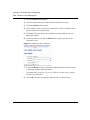
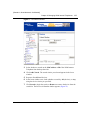
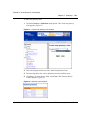
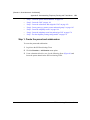
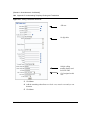
To select a time zone
NN10043-113
1
Click the System menu option.
2
Click the Timezones form. The Timezone details window appears.
[Standard - Nortel Networks Confidential]
Chapter 1 Getting Started
7
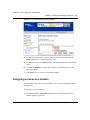
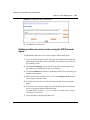
Figure 4 Time Zone details window
3
Select a zone from the list of time zones.
4
From the drop down list, select a time zone.
SIP Provisioning Client User Guide
[Standard - Nortel Networks Confidential]
8
Chapter 1 Getting Started
5
Click Save.
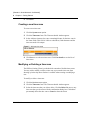
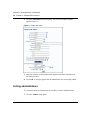
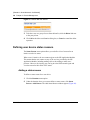
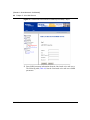
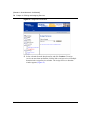
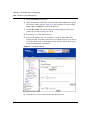
Creating a new time zone
To create a new time zone
1
Click the System menu option.
2
Click the Timezones form. The Timezone details window appears.
3
In the Add new timezone box, enter a meaningful name for the time zone in
the Name field. (This field is visible to subscribers.) Both the name and the
time zone need to be unique.
Figure 5 Add new time zone
4
Click Save to save the new time zone. Click View details to see the list of
time zones.
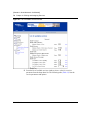
Modifying or Deleting a time zone
The SIP Provisioning Client is preloaded with a number of default times zones.
You may wish to modify or delete a time zone to prevent the time zone from
showing up in the drop down list that is available when creating or modifying a
user.
To modify or delete a time zone
NN10043-113
1
Click the Services menu option.
2
Click the Timezones form. The Timezone details window appears.
3
Select the time zone that you wish to delete. Click the Delete link next to any
time zone that you do not need. In the confirmation dialog box, Click Ok to
permanently delete the time zone or Cancel to abort the action.
[Standard - Nortel Networks Confidential]
Chapter 1 Getting Started
9
Tip: You cannot modify or delete a time zone that is currently in use.
Changing the admin password
To change the admin password
1
Click the System menu option.
2
Click the icon for the Change Password form. The Change Admin Password
window appears.
3
Enter your new password.
4
Confirm your new password.
5
Enter your current password.
6
Click Save. Your new password is activated upon your next login.
Exiting the SIP Provisioning Client
To close the SIP Provisioning Client window and exit the SIP Provisioning Client,
click the Logout menu option.
SIP Provisioning Client User Guide
[Standard - Nortel Networks Confidential]
10
Chapter 1 Getting Started
NN10043-113
[Standard - Nortel Networks Confidential]
11
Chapter 2
Administration Overview
Topics in this section:
•
•
•
“Introduction” on page 11
“SIP Provisioning roles, rights, and tasks” on page 12
“Understanding provisioning roles and rights” on page 15
Introduction
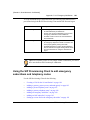
In the SIP Provisioning Client, a provisioning role is defined as a collection of
access rights and privileges that allow an administrator to perform various
provisioning tasks. As a System Administrator, you can create any number of
administrator roles, depending on your particular needs. For example, you can add
a provisioning role to allow an administrator to perform multiple tasks, however,
giving them the rights to only a subset of everything available.
After logging in to the SIP Provisioning Client, you will see a menu list on the left
side of your screen. This list varies based on the privileges available to you. The
types of tasks you can perform as an administrator is based on the scope of your
defined role.
Note: The provisioning abilities visible to an administrator in the SIP
Provisioning Client GUI depends on the rights assigned to their
provisioning role.
SIP Provisioning Client User Guide
[Standard - Nortel Networks Confidential]
12
Chapter 2 Administration Overview
SIP Provisioning roles, rights, and tasks
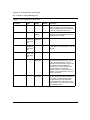
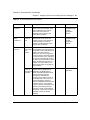
The following table provides an overview of the SIP Provisioning tasks.
Table 1 SIP Provisioning tasks overview
If you have the right
for
Use this Provisioning menu option...
To perform these tasks...
Full domain access
Administer all current domains and
future domains regardless of initial
provisioning. This allows the
administrator with this role to see all
domains, versus other administrators
that can see only a subset of
domains.
Domain management
List, add, modify, or delete domains
and subdomains.
IPCM cluster
provisioning
Add, list, modify, or delete an IPCM or
IPCM cluster. If you add an IPCM
through the SIP Provisioning Client,
the Management Console GUI will not
know that the IPCM exists. It is
recommended that you deploy an
IPCM through the System
Management Console.
Service Package
Creation
Add, list, modify, or delete services
and service packages to a particular
domain or all domains. If you have the
administrator privileges to add a
domain or multiple domains, then you
can add or create service packages
within that domain.
Device Management
Add, list, modify, or delete i2004
devices.
NN10043-113
[Standard - Nortel Networks Confidential]
Chapter 2 Administration Overview
13
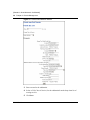
Table 1 SIP Provisioning tasks overview
If you have the right
for
Use this Provisioning menu option...
To perform these tasks...
Telephony Route/Digit
Manipulation
Add, list, modify, or delete telephony
routes
Admin
Add, list, modify, or delete
administrators and roles.
Gateway Management
Add, list, modify, remove, reorder, new
or existing gateways, routes, and
trunk groups. When you deploy and
provision a gateway through the
management console, you must
provision the gateway with the similar
trunk groups and routes through the
SIP Provisioning Client to ensure that
the information is saved into the
database that the SIP Application
Module uses.
SIP Provisioning Client User Guide
[Standard - Nortel Networks Confidential]
14
Chapter 2 Administration Overview
Table 1 SIP Provisioning tasks overview
If you have the right
for
Use this Provisioning menu option...
To perform these tasks...
Voice Mail Management
Add, list, modify, or remove new or
existing voice mail servers. If voice
mail is enabled in a service package,
a customer can select from the
following voice mail server types:
• SIP based - a forward to your
voice mail system using SIP.
• Trunk based - a Primary Rate
Interface (PRI) or Channel
Associated Signalling (CAS) trunk
is associated with the line.
• Line based - a particular phone
number is associated to the line.
User Management
Add, list, modify, or delete users,
aliases, blended aliases, and i2004
Internet Telephone properties
(available from the domain or
subdomain menu option).
NN10043-113
[Standard - Nortel Networks Confidential]
Chapter 2 Administration Overview
15
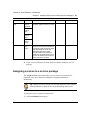
Understanding provisioning roles and rights
Administrators can create, or define, all the necessary provisioning roles to
support their system. They can allow or restrict provisioning roles to carry out
specific actions. The following table provides examples of several administrator
provisioning roles and the rights based restrictions associated with various
provisioning tasks.
Table 2 Example of roles and rights
Provisioning
Role example
User
administrator
Rights given
Allowed tasks
•
Can view domain details, and add,
delete, or modify users. Does not
have access to other parts of the
system, for example voice mail,
service packages, and so forth.
•
Device
administrator
•
•
System
Administrator
•
User management with read,
write, and delete access
Domain management with
read access only
Domain management with
Cannot add or modify users.
read access
Allowed to add, modify or delete
Device management with read, devices.
write, and delete access
Full domain access
Can see all domains, regardless of
who created the domain, or the list
of domains provisioned against the
administrator.
Limiting access to a domain
Complementing the rights-based restrictions, administrators can be provisioned
against certain domains in order to limit access to within those domains. This
prevents an administrator from domain xyz from viewing or modifying details in
domain abc, even though they are hosted from the same system. Administrators
can then delegate work for subdomains to other administrators without giving
them access to their own data.
SIP Provisioning Client User Guide
[Standard - Nortel Networks Confidential]
16
Chapter 2 Administration Overview
For example, if an administrator assigned to the User Administrator provisioning
role was given access to suba.xyz (a subdomain of domain xyz), this administrator
can add, modify, and delete users in the subdomain, but does not have access to
the parent domain, domain xyz. This allows for the delegation of task on both the
rights-level and the domain-level.
Note: Access to any domain implies access to all of its descendant
subdomains. For example, access to domain xyz implies access to
suba.xyz. Full domain access will override this domain allocation and
allow any administrator assigned with a provisioning role that includes
this right, to see all domains regardless of what the administrator is
provisioned against.
System administrator provisioning role
The System Administrator (SA) is the highest level administrator and is the only
provisioning role that is preloaded when the SIP Provisioning Client is deployed.
The SA has full access and rights to all provisioning features and functions.
The SA can designate someone as an Administrative user with the Add Admin
menu option, and grant specific administrator rights to that administrative user
with the Add Roles menu option.
Note: The System Administrator role is the only role that cannot be
changed.
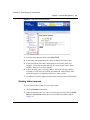
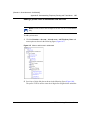
Creating a new provisioning role
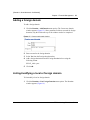
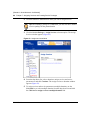
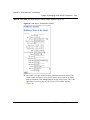
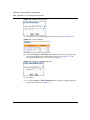
To create a new provisioning role
NN10043-113
1
Click the Admins menu option.
2
Click the Add Roles sub menu option. The Add a New Role window appears
(Figure 6).
[Standard - Nortel Networks Confidential]
Chapter 2 Administration Overview
17
Figure 6 Add a New Role window
3
Enter a name for the provisioning role in the Role Name field (required).
4
Enter a description for the provisioning role in the Role Description field.
5
To define the level of administrator access, select the checkboxes for Read,
Write, or Delete next to each privilege.
6
Click Add. A message appears that the role has been successfully created.
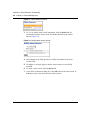
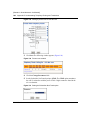
Listing provisioning roles
To view details about a provisioning role to modify or delete the role
1
Click the Admins menu option.
SIP Provisioning Client User Guide
[Standard - Nortel Networks Confidential]
18
Chapter 2 Administration Overview
2
Click the List Roles sub menu option. The List System Roles window appears
(Figure 7).
Figure 7 List System Roles window
3
NN10043-113
To view details about a provisioning role or description, click the View
Details link. The Role Details window appears (Figure 8). To delete a
provisioning role, click the Delete link next to the role.
[Standard - Nortel Networks Confidential]
Chapter 2 Administration Overview
19
Figure 8 Role details window
4
To change the provisioning role description, enter a new description in the
Role Description box. To modify privileges, select or deselect privileges in
the checkbox next to the privilege.
5
Click Save to save your changes. A message appears that the provisioning
role was modified successfully.
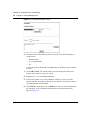
Creating a new administrator
To add an administrator
1
Click the Admins menu option.
SIP Provisioning Client User Guide
[Standard - Nortel Networks Confidential]
20
Chapter 2 Administration Overview
2
Click the Add Admin sub menu option. The Create new admin window
appears (Figure 9).
Figure 9 Create new admin
3
Enter the username of the administrator (required) and other information in
the fields provided.
4
Click Add. A message appears that the administrator was successfully added.
Listing administrators
To view details about an administrator or to modify or delete an administrator
1
NN10043-113
Click the Admins menu option.
[Standard - Nortel Networks Confidential]
Chapter 2 Administration Overview
2
21
Click the List Admins sub menu option. The Admins window appears
(Figure 10). To delete an administrator, click the Delete link next to the
administrator username.
Figure 10 Admins window
3
To modify administrator information, enter the changes in the fields provided
(Table 11).
SIP Provisioning Client User Guide
[Standard - Nortel Networks Confidential]
22
Chapter 2 Administration Overview
Figure 11 Admin Details window
4
NN10043-113
Click Save to save your changes. A message appears that the administrator
was modified successfully.
[Standard - Nortel Networks Confidential]
23
Chapter 3
Domain Management
Topics in this section:
•
•
•
•
•
•
•
•
•
“Introduction to domains” on page 23
“Domain types” on page 24
“Adding a local root domain” on page 26
“Adding a subdomain” on page 31
“Adding a foreign domain” on page 33
“Listing/modifying a local or foreign domain” on page 33
“Deleting a local domain” on page 35
“Banning a user” on page 36
“Defining user device status reasons” on page 38
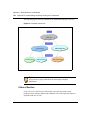
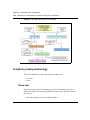
Introduction to domains
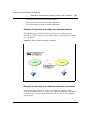
A domain is used as a control mechanism of users, services, devices and
translation. The SIP Provisioning Client is used to provision a domain. The
provisioning of domains allows service providers to define a domain and service
packages available for the domain.
Once the domain and service packages are defined, service providers can define
subdomains and assign the following:
•
•
•
•
services to service packages
service packages to domain and users
translation information specific to a domain or a subdomain
devices for users to an IPCM (IP Client Manager)
SIP Provisioning Client User Guide
[Standard - Nortel Networks Confidential]
24
Chapter 3 Domain Management
If you have full domain access, you can see all provisioned domains. Otherwise,
you will only be able to see the domains/subdomains you are provisioned against.
The management rights assigned to a domain administrator dictates what you can
do with the domains.
Domain types
There are three types of domains:
•
•
•
root domain
subdomain
foreign domain
Root domain
A root domain is the highest level domain. A service provider can create a root
domain for each of their customers. An example of a root domain is
nortelnetworks.com.
Subdomain
A subdomain is a category of domains. Subdomains allow you to divide
subscribers under a domain into smaller groups. The groups can be used to control
routing and access to services by members of the group.
Under each subdomain, you can add subdomains, service packages, users,
devices, and telephony routes. There are no limits to the levels of nesting of
subdomains. Each subdomain inherits the parameter values from the root domain.
A typical application of subdomains is based on geographical divisions. For
example, using Nortel Networks, you could have nortelnetworks.com as the root
domain, with subdomains of Richardson and Ottawa. Under each of these
subdomains there could be further subdomains as shown in the following
illustration (Figure 12).
NN10043-113
[Standard - Nortel Networks Confidential]
Chapter 3 Domain Management
25
Figure 12 Domains and subdomains
Foreign domain
A foreign domain is a domain that is not served by any SIP Application Modules
in your system. When adding a domain, you must determine whether or not the
domain is a foreign domain or not. A foreign domain uses foreign routes, while a
local domain uses SIP routing or telephony routes.
A domain that is not local is considered foreign. Usually, a foreign domain is
resolved through DNS and would not need to be provisioned. However, since
some deployment scenarios may not involve a DNS server, you (as the system
administrator) can datafill routes for a foreign domain.
SIP Provisioning Client User Guide
[Standard - Nortel Networks Confidential]
26
Chapter 3 Domain Management
For example, if the SIP Application Module serving nortelnetworks.com does not
have a DNS server, and there is a need for users to be able to make calls to the
xyz.com domain, then you could add the abc.com domain as a foreign domain and
provide a route to abc’s proxy.
Note: A foreign domain is not controlled by the system. Therefore it
will not be displayed under the domain folder in the menu area, and the
you will not be able to provision users, service packages, devices, and so
forth to these domains.
Adding a local root domain
To add a local root domain
NN10043-113
1
Click the Domains menu option.
2
Click Add Domain. The Create new domain window appears (Figure 13).
[Standard - Nortel Networks Confidential]
Chapter 3 Domain Management
27
Figure 13 Create new domain window
SIP Provisioning Client User Guide
[Standard - Nortel Networks Confidential]
28
Chapter 3 Domain Management
3
Enter the name of the new local domain. The domain name must not be more
then 60 chars in length and cannot contain the following symbols or
characters as described in the following table:
Table 3 Create new domain name restrictions
‘
$
()
|
;
~
%
_
[]
/
!
^
{}
?
@
&
+
“
,
#
*
=
:
<>
4
Select No. There may be times when you want two domains on different
systems to communicate with each other. If Yes, enter the URL destination (IP
address) of where the domain is located in the Foreign Dest: field.
Tip: Domain parameters are not necessary for foreign domains. When
adding a foreign domain, the parameters can be ignored.
5
Enter parameter information in the fields provided. See the following table for
parameter values and descriptions (Table 4).
Table 4 Create new domain parameters
Parameter
Type
Range
Default
Description
i2004 Locale
String;
select from
drop-down
list
Restricted
to English
in the
current
release.
N/A
Indicates the language in which the i2004
Internet Telephone will display. Future
releases will include more supported
languages.
Location
String
0-50
characters
N/A
Text describing location of device. A specific
format of this string is scheduled for a future
release.
Idle Display
String
Up to 30
characters
N/A
Idle telephone display heading.
NN10043-113
[Standard - Nortel Networks Confidential]
Chapter 3 Domain Management
29
Table 4 Create new domain parameters
Parameter
Type
Range
Default
Description
WD Phone Timer
Integer
13-10000
150
Length of time the i2004 Internet Telephone
waits before determining that is has lost
connection to the IPCM. Should be greater
than WD_Timer by X amount. Where X is
difference between MAX expected network
latency and MIN expected network.
WD Timer
Integer
30-10000
15
How often (in seconds) the IPCM will send
a “reset watchdog timer” message to a
connected I2004 device. When the I2004
receives this watch dog message, it knows
that it is still connected to the IPCM.
Time FMT
Select from 0,1,2
drop down
list:
• 12-hour
• French
• 24-hour
0
The time format of the proxy used as default
for the i2004 Internet telephone 0-> 12 hour
clock
Date FMT
Numeric
Standard
MM/DD or
Numeric
Inverse:
DD/MM
2,3
2
2-numeric standard (09/16); 3-numeric
inverse (16/09).
PSEIZ Timer
Integer
N/A
15
Time-out for first dialed digit.
PDIL Timer
Integer
(seconds)
N/A
4
Interdigit time-out (seconds).
Alpha
Boolean
True/False
False
Enables alphanumeric dialing as the default
dialing style. If disabled, I2004 defaults
dialing style to numeric.
Default Proxy Port
5060
Any valid
port
5060
Default proxy SIP port.
No validation is done on this field to ensure
validity.
Behind Firewall
Boolean
True/False
True
Boolean indicating whether there is a
firewall between the IPCM and the i2004
Internet Telephone.
Allow All Codecs
Boolean
True/False
False
Allow all codecs (true) or only selected
codec (false). See Vocoder parameter
(below).
SIP Provisioning Client User Guide
[Standard - Nortel Networks Confidential]
30
Chapter 3 Domain Management
Table 4 Create new domain parameters
Parameter
Type
Range
Default
Description
Active Proxy
Boolean
True/False
True
Determines if default proxy is used. Used
for SIP messaging. If yes, calls will route
through the default proxy. No other routing
is currently supported for the IPCM.
Default Proxy Host
String (30)
Any valid IP N/A
address
IP Address of proxy used as default for the
i2004 telephone. No validation is done on
this field to ensure validity.
Time Zone
Integer;
select from
drop down
list
Up to 30
characters
N/A
Time zone of the user.
Vocoder:PacketTime Integer;
select from
drop down
list
0,4,8,10,18
0
Default Codec Setting: 0 – G711 Mulaw; 4 –
G723\6.3kbps; 8 – G711\Alaw; 10 – L16; 18
– G729A.
Contrast
Integer;
select from
drop down
list
0 - 15
8
i2004 display contrast setting.
Server Home
String(60)
Up to 60
characters
N/A
Specifies the SIP Application Module that
will host the users in this domain. This is
used in an N+M environment. All SIP
Application Modules that are not the home
SIP Application Module will forward
requests for users in this domain to the
specified address as appropriate.
(Example: 10.0.0.8) If no host address is
supplied, or the host address is 0.0.0.0., no
homing is performed.
Realm for a domain
String (120) Up to 120
characters
Realm
Identifies the domain for subscribers when
they are being authenticated. Subscribers
may register in multiple domains. When
they are required to enter a password
during authentication, they need to know
which domain it is so that they can enter the
appropriate password.
NN10043-113
[Standard - Nortel Networks Confidential]
Chapter 3 Domain Management
31
Table 4 Create new domain parameters
Parameter
Type
Range
Default
Description
Always Use Media
Portal
String
True/False
False
Directs the Application Server to use the
RTP Media Portal when set to true. The
purpose is to use the RTP Media Portal
function in dealing with special SIP
scenarios. For example, a domain that
straddles multiple sites contains users who
do not have Internet Protocol (IP)
connectivity between them due to firewalls
at different sites. This domain requires the
Always Use Media Portal to be set to True
to negotiate between the firewalls to set up
SIP sessions.
N/A
0
Maximum number of inbound subscriptions
to any given user in this domain.The SIP
Personal Agent, the SIP Multimedia PC
Client, and the SIP Multimedia Web Client
will use this limit when allowing a particular
username to be added to a subscriber's list
of buddies.
Maximum Number of Integer
Presence
Subscriptions
Accepted
6
Click Add.
Tip: In order to see the new root domain added to the list of domains,
you must close and reopen the domains folder to refresh the list of
domains.
Adding a subdomain
To add a subdomain
1
Click the Domains menu option
2
Under the root domain where you want to add a subdomain, click the
Sub-Domains > Add Sub Domain menu option. The Create new subdomain
window appears with a list of parameters inherited from the parent domain
(Figure 14).
SIP Provisioning Client User Guide
[Standard - Nortel Networks Confidential]
32
Chapter 3 Domain Management
Figure 14 Create new subdomain window
NN10043-113
3
Enter a name for the subdomain.
4
Select a COS (Class of Service) for the subdomain from the drop down list of
routing services.
5
Click Save.
[Standard - Nortel Networks Confidential]
Chapter 3 Domain Management
33
Adding a foreign domain
To add a foreign domain
1
Click the Domain > Add Domain menu option. The Create new domain
window appears (Figure 15). Since parameter fields are not used for foreign
domains, only the fields at the top of the window need to be completed.
Figure 15 Create new domain window
2
Enter a name for the foreign domain.
3
Select Yes from the Foreign drop down box.
4
Add a foreign destination into the Foreign Destination box using the
following format
SIP<IP_Addr>:port
5
Click Add.
Listing/modifying a local or foreign domain
To list/modify a local or foreign domain
1
Click the Domains > List Foreign Domains menu option. The Domains
window appears (Figure 16).
SIP Provisioning Client User Guide
[Standard - Nortel Networks Confidential]
34
Chapter 3 Domain Management
Figure 16 List Domains window - step 1
2
From the Criteria Selection drop down list, select one of the following as a
search criteria:
— Domain Name
— Is a Foreign domain
— ID
or enter the name of the domain, foreign domain, or ID in the criteria selection
text box.
NN10043-113
3
Click Add Criteria. The search criteria you selected appears in the lower
window and is used to refine your search.
4
Repeat steps 1 -3 to list additional domains.
5
In the lower window area, select whether to search by All or Any of the
criteria specified. Note that you do not have to add any criteria if you want to
see all the domains in the network.
6
Click Search to begin the search, or Remove to remove a search criteria from
the search list. A list of domains (based on the search criteria specified)
appears (Figure 17).
[Standard - Nortel Networks Confidential]
Chapter 3 Domain Management
35
Figure 17 List domains - step 2
7
In the Domains window, select a domain and click the Details link. The
details for the selected domain, or domains, displays.
8
Modify domain information in the parameter fields.
9
Click Save.
Deleting a local domain
Caution: Exercise extreme caution when deleting a domain as this will
permanently remove all users, devices, routes, service packages, and so
forth, associated with the domain. This is an irreversible operation that
could be a service-affecting change. For example, any calls in progress to
users or devices in the domain will terminate.
To delete a local domain or subdomain
1
Click the Domains menu option.
2
Click the domain or subdomain you want to delete from the list of domains.
Tip: In order to delete a domain or subdomain you must first delete all of
its children subdomains.
3
Click Delete to delete the domain or subdomain you want to delete.
4
Click OK in the confirmation dialog box to delete the domain, or Cancel to
cancel the delete operation.
SIP Provisioning Client User Guide
[Standard - Nortel Networks Confidential]
36
Chapter 3 Domain Management
Deleting a foreign domain
Caution: Exercise extreme caution when deleting a foreign domain as
this will permanently remove all users, devices, routes, service packages,
and so forth, associated with the domain.This is an irreversible operation
that could be a service affecting change. For example, any calls in
progress to users or devices in the domain will terminate.
To delete a foreign domain
1
Click the Domains > List Foreign Domains menu option.
2
Click the Delete link for the foreign domain you want to delete.
3
Click OK in the confirmation dialog box to delete the foreign domain, or
Cancel to cancel the delete operation.
Banning a user
You can ban an individual user or a group of users in a domain or from viewing
the presence information (online status) of a user or group of users in a domain.
The banning takes effect for all subdomains under the domain.
Setting up ban list
To ban a user or a group of users
NN10043-113
1
Click the Domains menu option.
2
Under the domain where you want to ban a user or users, click the Banned
Users > Ban User menu option. The Add a party to Domain Ban List window
appears (Figure 18).
[Standard - Nortel Networks Confidential]
Chapter 3 Domain Management
37
Figure 18 Add a party to Domain Ban List window
3
Enter the party to ban in the text boxes provided. To ban an individual user,
use the following format:
<username>@<domain_name.com>
To ban a group of users in a domain, use the following wildcard format:
<*>@<domain_name.com>
4
Enter a reason for banning the user or group of users to the domain list in the
Description text box.
5
Click Save. A message displays that the party was successfully added to the
ban list.
Viewing a list of banned users
To view a list of users banned from viewing the presence information (online
status) of a user or a group of users in a domain
1
Click the Domains menu option.
2
Under domain where you want to view a list of banned users, click the
Banned Users > List Banned User menu option. The Domain Ban List
window appears (Figure 19).
SIP Provisioning Client User Guide
[Standard - Nortel Networks Confidential]
38
Chapter 3 Domain Management
Figure 19 Domain Ban List window
3
To delete a user or a group of users from the ban list, click the Delete link next
to the party to ban.
4
Click OK at the delete confirmation dialog box, or Cancel to cancel the delete
operation.
Defining user device status reasons
The Status Reason menu option allows you to define a list of reasons for an
inactive user device status.
When a user is inactive, the user cannot register to the SIP Application Module.
This means that the user cannot use any of the services provided by the SIP
Application Module, including making calls or subscribing to other users'
presence. However, the inactive user can log in to the SIP Personal Agent and
view the reason for their INACTIVE status.
Adding a status reason
To define a status reason for a user device
NN10043-113
1
Click the Domains menu option.
2
Under the domain where you want to define a status reason, click Status
Reason > Add Reason. The Add Status Reason window appears (Figure 20).
[Standard - Nortel Networks Confidential]
Chapter 3 Domain Management
39
Figure 20 Add Status Reason window
3
From the Status drop down list, select INACTIVE.
4
In the Name field (required) enter a name to identify the status reason.
5
In the Description field, enter a description for the inactive status. For
example, if a user has not paid their bill, the reason for the inactive status
could be “Inactive for at least 6 months”.
6
In the URL field, enter a web page address. This is the web page that the
originator of a call to the user will be presented with, along with the status
reason description, to explain the called user’s inactive status.
7
Click Save. A message displays that the status reason was successfully added.
Viewing status reasons
To view a list of status reasons for a user device status
1
Click the Domains menu option.
2
Under the domain where you want to view the status reasons, click the Status
Reason > List Reasons menu option. The List Reasons window appears
(Figure 21).
SIP Provisioning Client User Guide
[Standard - Nortel Networks Confidential]
40
Chapter 3 Domain Management
Figure 21 Status Reasons window
3
To view or modify status reason information, click the Details link for
information about the status reason. The Modify Status Reason window
appears (Figure 22).
Figure 22 Modify status reason window
NN10043-113
4
Enter changes in the fields provided to modify information in the status
reasons fields.
5
Click Save. A message displays that the status reason was successfully
modified.
6
To delete a status reason, click the Delete link.
7
At the delete confirmation dialog box, click OK to delete the status reason, or
Cancel to return to the Status Reasons details window.
[Standard - Nortel Networks Confidential]
41
Chapter 4
IPCMs
Note: You must have IPCM provisioning rights to perform the tasks in
this section.
Topics in this section:
•
•
•
•
•
“What is an IPCM?” on page 41
“Adding an IPCM cluster” on page 42
“Assigning and modifying IPCMs to a domain” on page 44
“Deleting an IPCM cluster” on page 46
“Listing physical IPCMs” on page 47
What is an IPCM?
The IP Client Manager (IPCM) is a network application capable of managing
many internal i2004 Internet Telephones while maintaining the call state and
phone settings. The IPCM also implements features (for example, stock queries
and personal directory) on the i2004 Internet Telephones. An IPCM Cluster may
span multiple domains and/or contain multiple domains.
Note: Users and devices are linked to IPCM Clusters, and not to
individual IPCMs. An IPCM Cluster may contain a single IPCM or a pair
of IPCMs. The IPCM cluster contains a primary and standby IPCM for
each i2004 Internet Telephone. Clustering of IPCMs ensures that each
IPCM retrieves the same user and device data from the database and that
each receives notification of database modifications.
SIP Provisioning Client User Guide
[Standard - Nortel Networks Confidential]
42
Chapter 4 IPCMs
In order for the IPCM to manage i2004 Internet Telephones, information
pertaining to the IPCM in general, the i2004 telephones, and users that will use
i2004s, must be provisioned. For more information, see the SIP IP Client
Manager Basics documentation.
i2004 Internet Telephone information can be provisioned in the following ways:
•
•
Provision each individual i2004 using the SIP Provisioning Client.
Set up default device properties for a domain, assign an activation key to the
domain, and then use the IPCM to auto-provision each i2004 device whenever
a user enters the desired activation key. (See the SIP IP Client Manager
Basics documentation and the i2004 Internet Telephone User Guide for more
information.)
Note: Normally, the IPCM is deployed prior to provisioning the IPCM.
If this is the case, it is still necessary to assign domains to the IPCM
cluster and to assign a provisioned capacity for the IPCM cluster and
domain. If the IPCM has been deployed, see “Assigning and modifying
IPCMs to a domain.” If the IPCM has not been deployed, and it is
desired to pre-provision the IPCM, see “Adding an IPCM cluster.”
Adding an IPCM cluster
Adding an IPCM cluster creates a virtual IPCM to which users, i2004 devices, and
domains may be assigned. It does not actually create a physical IPCM, nor does it
deploy IPCM software onto a server. The association of the physical IPCM to this
IPCM cluster is performed when the physical IPCM is deployed and configured.
To add an IPCM cluster
1
NN10043-113
Click the IPCM Cluster > Add IPCM Cluster menu option. The Create new
IPCM window displays. The following figure (Figure 23) shows an example
of creating an IPCM named LAB IPCM. The maximum provisioned capacity
is 1000, i2004 Internet Telephones. Note that the IPCM name is case
sensitive.
[Standard - Nortel Networks Confidential]
Chapter 4 IPCMs
43
Figure 23 Create new IPCM window
The following table (Table 5) lists the Create new IPCM parameters and values to
use when creating a new IPCM.
Table 5 Create new IPCM parameters
Parameter
Type
Range
Default
Description
IPCM Name
String(100)
Up to 100
characters
None
The name of this IPCM.
The name of the IPCM
must be a unique name.
Prov. Capacity
Integer
Maximum
of 10,000
per IPCM
None
The number of i2004
Internet Telephones that
are allowed to be
provisioned for this IPCM
(across all domains).
2
Click Save.
SIP Provisioning Client User Guide
[Standard - Nortel Networks Confidential]
44
Chapter 4 IPCMs
Assigning and modifying IPCMs to a domain
An IPCM is not usable until it is assigned to a domain. To assign an IPCM to a
domain
1
Click the IPCM Clusters > List IPCM Clusters menu option. A list of
deployed IPCMs appears (Figure 24).
Note: Upon first assignment of an IPCM, the list of deployed IPCMS
may be empty. However, in many cases, the IPCM would have already
been deployed using the System Management Console and will appear in
the list.
Figure 24 List IPCM Clusters window
2
NN10043-113
Click the Details link for the IPCM you want to assign to a domain. The
Modify IPCM window appears (Figure 25).
[Standard - Nortel Networks Confidential]
Chapter 4 IPCMs
45
Figure 25 Modify IPCM window
3
If necessary, modify the IPCM Name or Prov. Capacity parameters and click
Save.
Tip: The Avail Capacity field is a read only field calculated by adding
the Assigned Capacity of domains to which this IPCM is assigned and
subtracting that value from the Prov. Capacity of the IPCM.
4
Select a domain from the list of available domains in the Assign New Domain
area of the window. Enter information in the following fields for the domain
you are assigning to the IPCM:
Field
Description
Assigned Capacity:
The number of i2004 Internet Telephones you want
to allow in this assigned domain.
Activation Key:
A unique string (number) per IPCM/domain
combination that associates default device
properties with this particular domain. The
administrator must pick a unique string (number) for
each domain. If the IPCM is used to auto-provision
i2004 devices, the installer will be prompted for this
activation key during the installation process.
SIP Provisioning Client User Guide
[Standard - Nortel Networks Confidential]
46
Chapter 4 IPCMs
5
Click Save. The IPCM Domain Relation window appears (Figure 26).
Figure 26 IPCM Domain Relation window
6
Enter your changes and click Save. A confirmation messages displays
confirming your changes.
7
To assign another domain to the IPCM, select a domain from the list in the
Assign New Domain area. Enter information in the parameter fields and click
Save.
Deleting an IPCM cluster
Caution: Exercise extreme caution when deleting an IPCM as this will
permanently remove all i2004 Internet Telephones and users' i2004
capabilities associated with the IPCM that you are deleting.
To delete an IPCM cluster
1
NN10043-113
Click the IPCM Clusters > List IPCM Clusters menu option.
[Standard - Nortel Networks Confidential]
Chapter 4 IPCMs
2
Click the Delete link for the IPCM cluster you want to delete.
3
Click OK in the confirmation dialog box to delete the IPCM cluster, or
Cancel to cancel the delete operation (Figure 27).
47
Figure 27 IPCM Delete confirmation dialog box
Listing physical IPCMs
The List Physical IPCMs menu option allows you to view the physical IP Address
of the server on which the IPCM resides.
To list the physical IP address of the IPCM
1
Click the IPCM Clusters > List Physical IPCMs menu option. The Physical
IPCMs window appears (Figure 28) listing the following fields:
Field
Description
IPCM Cluster:
The name that identifies the virtual IPCM
cluster.
Physical IPCM:
The physical IP Address of the server on
which the IPCM resides.
Delete Physical IPCM:
Allows you to delete the mapping of the
physical IPCM to the IPCM Cluster.
SIP Provisioning Client User Guide
[Standard - Nortel Networks Confidential]
48
Chapter 4 IPCMs
Figure 28 Listing physical IPCMs
2
To delete a physical IPCM, click the Delete link in the Delete Physical IPCM
column. At the delete confirmation dialog box, click Ok to delete the physical
IPCM or Cancel to cancel the delete operation (Figure 29).
Figure 29 Delete physical IPCM confirmation dialog box
NN10043-113
[Standard - Nortel Networks Confidential]
49
Chapter 5
Voice Mail Servers
Note: You must have Voice Mail provisioning rights to perform the tasks
in this section.
Topics in this section:
•
•
•
•
•
•
•
•
“Introduction” on page 49
“Voice mail server types” on page 50
“Provisioning a SIP-based voice mail server” on page 50
“Provisioning a Trunk-based voice mail server” on page 54
“Provisioning a Line-based voice mail server” on page 60
“Assigning a user to a provisioned voice mail server” on page 67
“Listing/modifying/deleting a voice mail server” on page 68
“Using CPL scripts with voice mail” on page 69
Introduction
The SIP Provisioning Client allows you to provision third-party voice mail server
information to:
•
•
•
set up and route calls to voice mail
associate users to a voice mail server
set up a voice mail server to receive message waiting indication (MWI)
notifications
SIP Provisioning Client User Guide
[Standard - Nortel Networks Confidential]
50
Chapter 5 Voice Mail Servers
Voice mail server types
The following voice mail server types are supported as described in the following
table (Table 6).
Table 6 Voice mail server types
Voice mail server type
Description
SIP-based
An IP based voice mail server that uses the SIP protocol.
This server type does not need a PSTN gateway.
Line-based
A voice mail server with multiple lines, each identified by
a 10 digit phone number that goes into the voice mail
server. When people leave messages, the individual
lines are used in a round robin manner to connect to the
voice mail server to allow someone to leave a message.
The SIP Application Module sends an SMDI message to
the voice mail server to help establish the connection to
the SIP Application Module that uses SMDI to obtain
Message Waiting Indication (MWI) information from the
voice mail server.
Trunk-based
A legacy Public Switched Telephone Network (PSTN)
based voice mail server that uses a Primary Rate
Interface (PRI) or Channel Associated Signalling (CAS)
gateway.The SIP Application Module uses SMDI to send
call setup information using a Call Detail Message to get
Message Waiting Indication (MWI) information from the
voice mail server.
Provisioning a SIP-based voice mail server
Provisioning a SIP-based voice mail server allows the administrator to configure
the SIP Application Module to communicate with a voice mail server using the
SIP protocol.
The SIP Application Module is given information on what to query to find the
location of the voice mail server. The SIP Application Module will use this
information to send SIP calls to the voice mail server when calls are routed to
voice mail.
NN10043-113
[Standard - Nortel Networks Confidential]
Chapter 5 Voice Mail Servers
51
Adding a SIP-based voice mail server
To add a SIP-based voice mail server
1
Click the Voice Mail > Add Voice Mail Server menu option. The Create new
voice mail server window appears (Figure 30).
Figure 30 Create new voice mail server window (SIP) - step
2
Choose SIP-Based Server from the drop down and click Next. The second
page of the Create new voice mail server appears (Figure 31).
SIP Provisioning Client User Guide
[Standard - Nortel Networks Confidential]
52
Chapter 5 Voice Mail Servers
Figure 31 Create new voice mail server window (SIP) - step 2
3
Enter information about the SIP-based voice mail server in the parameter
fields. The following table (Table 7) lists the SIP-based voice mail
parameters.
Table 7 SIP-based voice mail parameters
Parameter
Type
Range
Default
Description
Description
String(100)
Up to 100
characters
None
The description for the server that
identifies the SIP-based voice
mail server.
URI to query to find
Voice Mail Server
String(100)
Up to 100
characters
None
The SIP address of the user that
the SIP Application Module will
look up to find the address of the
voice mail server.
NN10043-113
[Standard - Nortel Networks Confidential]
Chapter 5 Voice Mail Servers
53
Table 7 SIP-based voice mail parameters
Parameter
Type
Range
Default
Description
Client contact
String(100)
Up to 100
characters
Voice mail
The field used to route voice mail.
In most cases, you will use the
default (voice mail). If you require
a different client contact, contact
your Nortel Networks support
representative.
Application Server
String(60)
Up to 60
characters
ServerHome. With
this default, each
SIP Application
Module will ignore
this field and forward
SIP requests to the
voice mail server
instead of forwarding
them to a "home"
Application Server.
Specifies the SIP Application
Module will host the voice mail
server being provisioned. This is
used in an N+M environment. All
SIP Application Modules that are
not the home SIP Application
Module will forward requests
destined to voice mail to the
address specified in this field.
Domains
String(60)
characters
Up to 60
characters
None
The domains that will use this
voice mail server. Use the
Ctrl-click key to select multiple
domains to use the same voice
mail server.
4
Click Save. The SIP-based voice mail server you added now appears in a list
of voice mail servers (Figure 32).
Figure 32 Voice Mail Servers window (SIP)
Adding a phantom voice mail server user
After you add a voice mail server, you then need to create a phantom user named
voicemail for the domain that will use the SIP-based voice mail server.
To create a phantom user for the SIP-based voice mail server
1
Click the Domains menu option.
SIP Provisioning Client User Guide
[Standard - Nortel Networks Confidential]
54
Chapter 5 Voice Mail Servers
2
Under the domain where you want to add a phantom user, click the Add User
menu option.
3
In the Add User form, enter the text "voice mail" for the User Name, Last
Name, First Name, fields. In the password field, enter any password.
4
Click Save. The User details screen displays a message that the user was
added successfully.
5
At the top of the window, click the Routes link to specify the route to the
voice mail server. Enter the SIP address that the voice mail server is
expecting, along with the domain and IP address (Figure 33).
Figure 33 User routes window
6
Click Add.
7
Click Save.
Note: For CAS/CallPilot, it is recommended that you do not create a
phantom user.
Provisioning a Trunk-based voice mail server
Provisioning a Trunk-based voice mail server allows the administrator to
configure the SIP Application Module so that it can communicate with a voice
mail server using a PRI or CAS gateway.
NN10043-113
[Standard - Nortel Networks Confidential]
Chapter 5 Voice Mail Servers
55
The SIP Application Module is given information on what to query to find the
correct gateway to send SIP calls to the voice mail server when calls are routed to
voice mail. An SMDI TELNET session is configured to allow the SIP Application
Module to send call setup information using a SMDI Call Detail Message to
receive SMDI MWI messages.
Adding a Trunk-based voice mail server
To add a Trunk-based voice mail server
1
Click the Voice Mail > Add Voice Mail Server menu option. The Create new
voice mail server window appears (Figure 34).
Figure 34 Create new voice mail server window (Trunk-based) - step 1
2
Choose Trunk-Based Server from the drop down and click Next. The second
page of the Create new voice mail server appears (Figure 35).
SIP Provisioning Client User Guide
[Standard - Nortel Networks Confidential]
56
Chapter 5 Voice Mail Servers
Figure 35 Create new voice mail server window (Trunk-based) - step 2
3
NN10043-113
Enter SMDI parameter information for the Trunk-based voice mail server.
The following table (Table 8) lists the SMDI parameters.
[Standard - Nortel Networks Confidential]
Chapter 5 Voice Mail Servers
57
Table 8 SMDI parameters
Parameter
Type
Range
Default
Description
Address
String(100)
Up to 100
characters
N/A
The IP address of the
terminal (SMDI) server.
Port
Integer
None
None
The port for the SMDI
server to TELNET to.
SMDI Version
Float
None
None
The SMDI version. There
are only 2 versions of the
SMDI protocol (Version 1
and Version 2). Version 2
is the latest draft and is
supported by most voice
mail servers.
Username
String(60)
Up to 60
characters
N/A
The TELNET username
for logging in to the SMDI
TELNET server. Used by
the SIP Application
Module to login in to the
terminal server.
Password
String(20)
Up to 20
characters
N/A
The TELNET password
for logging in to the SMDI
TELNET server.
4
Click Next to enter information about the gateway connection. The Create
new voice mail server window appears (Figure 36).
SIP Provisioning Client User Guide
[Standard - Nortel Networks Confidential]
58
Chapter 5 Voice Mail Servers
Figure 36 Create new voice mail server window (Trunk-based) - step 3
NN10043-113
[Standard - Nortel Networks Confidential]
Chapter 5 Voice Mail Servers
5
59
Enter information about the Trunk-based voice mail server gateway
connection in the parameter fields. The following table (Table 9) lists the
gateway connection parameters.
Table 9 PRI Gateway connection parameters
Parameter
Type
Range
Default
Description
Description
String(100)
Up to 100
characters
None
The description for the server that
identifies the Trunk-based voice
mail server.
URI to query to String(100)
find gateway
Up to 100
characters
None
For PRI Gateway: The address (in
either 10 digit phone number and
domain name format or in SIP:voice
[email protected] format)
of the machine that will host this
voice mail server. The SIP
Application Module performs
translations on the phone number
and domain to understand which
gateway to use. You can change the
translations to use a different
gateway, and do not have to change
this field.
For CAS Gateway (CallPilot): The
SIP address for the CAS Gateway
that routes to the CallPilot. The
address is made up of a DN that the
gateway routes to the CallPilot, and
an maddr specification for the CAS
Gateway. (For example,
sip:[email protected];ma
ddr=46.10.11.219).
Type of Trunk
Drop List
NA
PRI_TRUNK
A specification of whether the voice
mail Gateway is PRI or CAS.
Client contact
String(100)
Up to 100
characters
Voice mail
The field used to route voice mail. In
most cases, you will use the default
(voice mail). If you require a
different client contact, contact your
Nortel Networks support
representative.
SIP Provisioning Client User Guide
[Standard - Nortel Networks Confidential]
60
Chapter 5 Voice Mail Servers
Table 9 PRI Gateway connection parameters
Parameter
Type
Range
Default
Description
Application
Server
String(60)
Up to 60
characters
ServerHome. With
this default, each SIP
Application Module
will ignore this field
and forward SIP
requests to the voice
mail server instead of
forwarding them to a
"home" Application
Server.
Specifies the SIP Application
Module will host the voice mail
server being provisioned. This is
used in an N+M environment. All
SIP Application Modules that are
not the home SIP Application
Module will forward requests
destined to voice mail to the
address specified in this field.
Domain name
String(60)
Up to 60
characters
None
The domains that will use this
Trunk-based voice mail server.Use
the Ctrl-click key to select multiple
domains to use the same voice mail
server.
6
Click Save. The Trunk-based voice mail server you added now appears in the
list of voice mail servers (Figure 37).
Figure 37 Voice Mail Servers window (Trunk-based)
Provisioning a Line-based voice mail server
Provisioning a Line-based voice mail server allows the administrator to configure
the application so that it can communicate with a voice mail server using a Lines
Gateway. The SIP Application Module is given information on which Lines
Gateway to use and which line numbers to use for sending calls to the gateway
when routing a call to voice mail.
In addition, an SMDI TELNET session is configured to allow the SIP Application
Module to directly communicate call setup information to the voice mail server.
The SMDI link is also used by the SIP Application Module to receive SMDI MWI
messages.
NN10043-113
[Standard - Nortel Networks Confidential]
Chapter 5 Voice Mail Servers
61
Adding a Line-based voice mail server
To add a Line-based voice mail server
1
Click the Voice Mail > Add Voicemail Server menu option. The Create new
voice mail server window appears (Figure 38).
Figure 38 Create a new voice mail server window (Line-based) - step 1
2
Choose Line-Based Server from the drop down and click Next. The second
window of the Create new voice mail server appears (Figure 39).
SIP Provisioning Client User Guide
[Standard - Nortel Networks Confidential]
62
Chapter 5 Voice Mail Servers
Figure 39 Create new voice mail server window (Line-based) - step 2
3
NN10043-113
Enter SMDI parameter information about the Line-based voice mail server.
The following table (Table 10) lists the Line-based voice mail server SMDI
parameters.
[Standard - Nortel Networks Confidential]
Chapter 5 Voice Mail Servers
63
Table 10 Line-based voice mail server SMDI parameters
Parameter
Type
Range
Default
Description
Address
String(100)
Up to 100
characters
N/A
The IP address of the
terminal (SMDI) server.
Port
Integer
None
None
The port for the SMDI
server to TELNET to.
SMDI Version
Float
None
None
The SMDI version. There
are only 2 versions of the
SMDI protocol: Version 1
and Version 2. (Version 2
is the latest draft and is
supported by most voice
mail servers.)
Username
String(60)
Up to 60
characters
N/A
The TELNET username
for logging in to the SMDI
TELNET server.
Password
String(20)
Up to 20
characters
N/A
The TELNET password
for logging in to the SMDI
TELNET server.
4
Click Next to enter general information about the Line-based server
(Figure 39).
SIP Provisioning Client User Guide
[Standard - Nortel Networks Confidential]
64
Chapter 5 Voice Mail Servers
Figure 40 Create new voice mail server window (Line-based) - step 3
NN10043-113
[Standard - Nortel Networks Confidential]
Chapter 5 Voice Mail Servers
5
65
Enter general information about the Line-based voice mail server in the
parameter fields. The following table lists the Line-based parameter
information.
Table 11 Line-based voice mail server general parameter information
Parameter
Type
Range
Default
Description
Description
String(100)
Up to 100
characters
None
The description for the server that
identifies the Line-based voice
mail server.
Client contact
String(100)
Up to 100
characters
Voice mail
The field used to route voice mail.
In most cases, you will use the
default (voice mail). If you require
a different client contact, contact
your Nortel Networks support
representative.
Application Server
String(60)
Up to 60
characters
ServerHome. With
this default, each SIP
Application Module
will ignore this field
and forward SIP
requests to the voice
mail server instead of
forwarding them to a
"home" Application
Server.
Specifies the SIP Application
Module will host the voice mail
server being provisioned. This is
used in an N+M environment. All
SIP Application Modules that are
not the home SIP Application
Module will forward requests
destined to voice mail to the
address specified in this field.
Maximum Call
Duration
Digit
1-99
None
The period of time that the SIP
Application Module allows a
caller to stay connected to the
Line-based voice mail server
when someone is trying to leave
a voice mail message.
Domain name
String(60)
Up to 60
characters
None
The domains that will use this
voice mail server. Use the
Ctrl-click key to select multiple
domains to use the same voice
mail server.
6
Click Next to provision the lines for the gateway (Figure 41).
SIP Provisioning Client User Guide
[Standard - Nortel Networks Confidential]
66
Chapter 5 Voice Mail Servers
Figure 41 Create new voice mail server window (Line-based) - step 4
7
NN10043-113
Enter the Line-based parameter information to provision the lines for the
gateway. The following table (Table 12) lists the Line-based voice mail server
parameters.
[Standard - Nortel Networks Confidential]
Chapter 5 Voice Mail Servers
67
Table 12 Line-based voice mail server parameters
Parameter
Type
Range
Default
Description
Gateway
String
1-100
characters
domain.com;
norteltrkgrp=1;ma
ddr=0.0.0.0
The trunk group, domain
name and IP address of
the gateway.
Line
Digit
0-38 digits
None
The 10-digit telephone
number that identifies the
line from the gateway’s
point of view.
Message
Desk
3 digits 000-999
None
A 3-digit number used by
the SMDI protocol to
determine where to store
an incoming message.
Position
Number
4 digits 0000-9999
None
A 4-digit number used to
determine where to put
an incoming message.
8
Click Add Line. To add multiple lines, continue to enter the gateway
parameter information and click Add Line.
9
When you are finished adding lines for this gateway, click Set New Line to
have more than one gateway with lines going into the same voice mail server.
10 Click Save. The Line-based voice mail server you added now appears in the
list of voice mail servers (Figure 42).
Figure 42 Voice Mail Servers window (Line-based)
Assigning a user to a provisioned voice mail server
In order for a user to have voice mail, you must associate a voice mail server and
mail box for that user.
SIP Provisioning Client User Guide
[Standard - Nortel Networks Confidential]
68
Chapter 5 Voice Mail Servers
To associate a user with a voice mail server that has been previously provisioned
1
Click the Domains menu option
2
Click the domain for the user.
3
Click the Users > List Users menu option.
4
Click Search at the bottom of the screen to display a list of users in the
domain.
5
Click the Details link for the user you want to associate with a voice mail
server.
6
Scroll down the screen to the voice mail server field. Select a voice mail
server to use when sending calls for this user to voice mail from the drop
down list of provisioned voice mail servers for this domain.
7
Enter the information for the user’s voice mail box in the Voice mail field.
8
Click Save.
Listing/modifying/deleting a voice mail server
To view details of a provisioned SIP, Trunk, or Line-based voice mail server
1
Click the Voice Mail > List Voice Mail Servers menu option. The Voice Mail
Server window appears (Figure 43).
Figure 43 List of voice mail servers
NN10043-113
2
To view the details of a voice mail server, click the link of the voice mail
server in the Description column. The Create new voice mail server form
appears where you can modify information.
3
Click Save to save your changes or Back to return to the list of voice mail
servers.
[Standard - Nortel Networks Confidential]
Chapter 5 Voice Mail Servers
4
69
To delete a voice mail server, click the Delete link for the voice mail server
you wish to delete. At the confirmation dialog box, click OK to delete the
voice mail server, or Cancel to cancel the operation.
Using CPL scripts with voice mail
A user will only have voice mail service if there is a Call Processing Language
(CPL) script that specifies a route to sip:[email protected] (usually the last
route).
To specify a route, you need to provision the following voice mail parameters in
the SIP Provisioning Client:
Voice mail parameter
Description
Client Contact
Must match the username in the CPL script and
should always be set to voicemail (unless you are
working with Nortel Networks technical support).
If this parameter is set to something else, properties
in the IPCM and Web Client will require changes.
URI to Query to Find
Gateway
Point to a static route, a user with a static route, or
have a number that can be translated by the
Telephony routing to go to the correct gateway.
To create a CPL script that has sip:[email protected] as the last route
1
Log in to the SIP Personal Agent.
2
Click the Call Manager icon.
3
In the Default Behavior window, select the Try to Find Me option.
4
Click Save
Tip: Unless a user logs into the SIP Personal Agent and clicks Save in the
Call Manager window, they will not have a CPL Script and thus calls to
them will never route to voice mail as a final route.
SIP Provisioning Client User Guide
[Standard - Nortel Networks Confidential]
70
Chapter 5 Voice Mail Servers
NN10043-113
[Standard - Nortel Networks Confidential]
71
Chapter 6
Defining and Assigning Services
Note: You must have Services provisioning rights to perform the tasks in
this section.
Topics in this section:
•
•
“Defining service parameters” on page 71
“Assigning services to a domain” on page 75
Defining service parameters
The SIP Provisioning Client allows you to define and assign services to domains.
You can assign all or a subset of the pre-defined services to a domain.
When you define the service parameters for service package, you are essentially
defining its contents. Services are set up much like convenience packages for the
domain. The service provider then has the flexibility to set up services and create
a standard set of services for their customers according to their own
specifications.
To define service parameters
1
Click the Services > Define Service Parameters menu option.
The list of available services window appears (Figure 44).
SIP Provisioning Client User Guide
[Standard - Nortel Networks Confidential]
72
Chapter 6 Defining and Assigning Services
Figure 44 List of available services window
2
NN10043-113
From the list of available services window, select a value for a service
parameter from the drop down list. The following table (Table 13) lists the
service parameters and options.
[Standard - Nortel Networks Confidential]
Chapter 6 Defining and Assigning Services
73
Table 13 Services parameters and options
Service Option Parameter
Description
Client enforced Server enforced
Enable/disable
Voicemail
None
Retrieve voice mail or for other
subscribers, to leave a voice mail
message. Voice mail is retrieved
from a network server.The user is
aware of deposited voice mail since
their client's MWI (message waiting
indicator) is enabled.
Yes.
Optional.
Enabled through
the SIP
Application
Module.
Enable/disable
Audio
Conference
Maximum
number of
ports
Initiate an audio conference call
utilizing a SIP audio server. The
number of users in the conference
call is limited by the maximum
number of ports assigned. Values
beyond above thirty two are not
allowed.
Yes.
Optional.
Enabled through
the SIP
Application
Module.
Enable/disable
Presence
Maximum
size of client
list of
buddies
Specifies the number of people in a Yes
list of buddies. This is the number of
people that a user is subscribing to in
order to view their presence.
Although a user can be logged into
numerous devices, the list of buddies
is a shared resource. For example, if
the max list of buddies size is set to
10, there can be 10 buddies on each
of the client devices (the same 10
buddies, not 10 per device). The
client has the option of sending any
of the buddies.
Maximum
number of
subscriptions
generated
Allows a user to be logged into
multiple devices (i2004 Internet
Telephone, SIP Multimedia PC
Client, SIP Multimedia Web Client).
Each such device performs
messaging to determine the
presence (online status) of each of
the buddies in the list. There is a
need for limiting the number of
devices and buddies to limit resource
contention issues. The maximum
number of presence subscriptions is
defined by the following formula:
maximum number of subscriptions
generated = (maximum # of clients) *
(maximum number of allowed
buddies).
Yes.
Mandatory.
SIP Provisioning Client User Guide
[Standard - Nortel Networks Confidential]
74
Chapter 6 Defining and Assigning Services
Service Option Parameter
Description
Client enforced Server enforced
Enable/disable
Video
None
Use of point to point video service
between web clients and PC clients.
Yes.
Simultaneous
Network Call
Restriction
Maximum
number of
ringlist
entries
Specifies the maximum number of
users that are defined in a route in
the Call Manager portion of the SIP
Personal Agent. The users in the
ringlist are simultaneously rung.
Yes.
Enable/disable
Advanced
Screening
-
Enables the ability to perform
Yes.
address screening (based on the
user’s current address book entries)
and time screening (time of day, day
of week) in the Call Manager area of
the SIP Personal Agent.
Enable/disable
QoS
QoS DiffServ Specifies quality of service for client Yes.
Code for
signaling, audio and video (up to 64).
Signalling
QoS DiffServ
Code for
Audio
QoS DiffServ
Code for
Video
QoS 802.1p
Service
Priority
Enable/disable
Blended User
None
3
Enables the use of a traditional
phone for voice calls and the SIP
Multimedia PC for multimedia
communication and collaboration.
Yes
To create new values for the service parameter, click [Edit].
The Add new parameter values window appears (Figure 45).
NN10043-113
[Standard - Nortel Networks Confidential]
Chapter 6 Defining and Assigning Services
75
Figure 45 Add new parameter values window
4
For the selected parameter, select a value from the list, using the UP and
DOWN buttons to set the priority of the value.
5
To add a new value, click Add. The new value appears in the list of parameter
values.
6
Click Set as Default to set the value in the list as the default value for the
service parameter.
7
Click Save to save your service parameter changes.
Assigning services to a domain
Once you add a value for a service parameter, you can select a domain to assign
the services to.
To assign services to a domain
1
Click the Services > Assign Services menu option. The Assign Services
window appears (Figure 46).
SIP Provisioning Client User Guide
[Standard - Nortel Networks Confidential]
76
Chapter 6 Defining and Assigning Services
Figure 46 Assign services window
2
NN10043-113
Select a domain from the drop down list and click Continue. To assign
services to more than one domain, click the link to assign services to multiple
domains in the Assign Services window. The Assign services to domains
window appears (Figure 47).
[Standard - Nortel Networks Confidential]
Chapter 6 Defining and Assigning Services
77
Figure 47 Assign services to a domain window
3
Select the services and service parameter values you want to assign to the
selected domain or multiple domains (Use the Ctrl-click key to choose
multiple domains.) To enable all services, check the Enable all Services
checkbox.
4
Click Save. A confirmation message displays that your service was assigned
successfully.
Once services have been defined and assigned to domains, you can list all the
services that are available for a domain (or multiple domains) and create and
assign packages accordingly. For a subdomain, services are assigned from the root
domain.
SIP Provisioning Client User Guide
[Standard - Nortel Networks Confidential]
78
Chapter 6 Defining and Assigning Services
NN10043-113
[Standard - Nortel Networks Confidential]
79
Chapter 7
Assigning Services and Creating Service
Packages
Topics in this section:
•
•
•
•
•
•
•
“Understanding service packages” on page 79
“Listing available services” on page 79
“Assigning services to a service package” on page 83
“Creating a service package” on page 86
“Listing/modifying/deleting service packages” on page 87
“Assigning service packages to domains and subdomains” on page 89
“Upgrading and downgrading service packages” on page 90
Understanding service packages
Once services are provisioned for a domain, you then have the flexibility to create
service packages for a domain or subdomain based on a set of predefined services.
Each service package is a collection of predefined services. Including a service in
a service package enables the service, or feature, for the domains associated with
the package. You can assign packages that are currently created in the domain
down to a subdomain.
Listing available services
To view a list of all services and parameters available in a service package
1
Click the Domains menu option.
SIP Provisioning Client User Guide
[Standard - Nortel Networks Confidential]
80
Chapter 7 Assigning Services and Creating Service Packages
2
Under the domain or subdomain for which you wish to list services, click the
Service Package > List Services sub menu option. The List of available
services window appears (Figure 48).
Figure 48 List of available services
3
NN10043-113
Review the list of services and service parameters. The following table
(Table 14) lists service packages, service parameters, and the values available
for each service parameter.
[Standard - Nortel Networks Confidential]
Chapter 7 Assigning Services and Creating Service Packages
81
Table 14 Services parameters and options
Service Option Parameter
Description
Client enforced Server enforced
Enable/disable
Voicemail
None
Retrieve voice mail or for others, to
leave a voice mail message. Voice
mail is retrieved from a network
server.The user is aware of
deposited voice mail since their
client's MWI is enabled.
Yes.
Optional.
Enabled through
the SIP
Application
Module.
Enable/disable
Audio
Conference
Maximum
number of
ports
Initiate an audio conference call
utilizing a SIP audio server. The
number of users in the conference
call is limited by the maximum
number of ports assigned. Values
beyond 32 is not allowed.
Yes.
Optional.
Enabled through
the SIP
Application
Module.
Enable/disable
Presence
Maximum
size of client
list of
buddies
Specifies the number of people in a Yes. Mandatory
list of buddies. This is the number of
people that a user is subscribing to in
order to view their presence.
Although a user can be logged into
numerous devices, the list of buddies
is a shared resource. For example, if
the max list of buddies size is set to
10, there can be 10 buddies on each
of the client devices (the same 10
buddies, not 10 per device). The
client has the option of sending any
of the buddies.
No.
Maximum
number of
subscriptions
generated
Allows a user to be logged into
No.
multiple devices (i2004 Internet
Telephone, SIP Multimedia PC
Client, SIP Multimedia Web Client).
Each such device performs
messaging to determine the
presence (online status) of each of
the buddies in the tree. There is a
need for limiting the number of
devices and buddies to limit resource
contention issues. The maximum
number of presence subscriptions is
defined by the following formula:
maximum number of subscriptions
generated = (maximum # of clients) *
(maximum number of allowed
buddies)
Yes.
Mandatory.
SIP Provisioning Client User Guide
[Standard - Nortel Networks Confidential]
82
Chapter 7 Assigning Services and Creating Service Packages
Service Option Parameter
Description
Client enforced Server enforced
Report when A checkbox to report a user’s
Yes.
inactive
inactivity (a user is inactive when
they do not move their mouse or type
on their keyboard within a
configurable amount of time.)
No.
Inactivity
Timer (in
minutes)
Yes/No (Enabled
as a privilege,
lower bound of
what a user can
select is
determined in the
SIP Provisioning
Client.)
If enabled, an inactivity timer (in
Yes.
minutes) that PC-based clients will
observe before reporting "Inactive" to
the Presence Module. Values range
from 10 to 600, with 15 being
recommended. If this service
package parameter is enabled, then
the user must explicitly enable the
feature on the client itself.
Report when If enabled, then every call made by
on the phone subscribers can have "On the
Phone" presence reported to the
Presence Module. If this service
package parameter is enabled, then
the user must explicitly enable the
feature on the client itself.
Yes.
Enable/disable
Video
None
Use of point to point video service
between web clients and PC clients.
Yes.
Simultaneous
Network Call
Restriction
Maximum
number of
ringlist
entries
Specifies the maximum number of
users that are defined in a route in
the Call Manager portion of the SIP
Personal Agent. The users in the
ringlist are simultaneously rung.
Yes.
Enable/disable
Advanced
Screening
-
Enables the ability to perform
Yes.
address screening (based on the
user’s current address book entries)
and time screening (time of day, day
of week) in the Call Manager portion
of the SIP Personal Agent.
NN10043-113
Yes/No. (Enabled
as a privilege in
the SIP
Provisioning
Client.)
[Standard - Nortel Networks Confidential]
Chapter 7 Assigning Services and Creating Service Packages
Service Option Parameter
Enable/disable
QoS
Description
83
Client enforced Server enforced
QoS DiffServ Specifies quality of service for client Yes.
Code for
signaling, audio and video (up to 64).
Signalling
QoS DiffServ
Code for
Audio
QoS DiffServ
Code for
Video
QoS 802.1p
Service
Priority
Blended user
Preferred
Audio
Device
4
If the Blended User service option is
checked, the Preferred Audio Device
is required so that the regular clients
(SIP Multimedia PC Client, SIP
Multimedia Web Client, i2004
Internet Telephone controlled via
IPCM) can call a Blended PC Client
by their SIP address (not just by the
PSTN equivalence number).
Yes.
Select a Service Package sub menu option to continue setting up a service
package.
Assigning services to a service package
The Assign Services menu option allows you to select services and service
parameter values for a domain or subdomain (or multiple domains or
subdomains).
Tip: Changes to service package services and parameter values will take
effect immediately or upon the next login, depending on the client.
To assign services to a domain or subdomain
1
Click the Domains menu option.
SIP Provisioning Client User Guide
[Standard - Nortel Networks Confidential]
84
Chapter 7 Assigning Services and Creating Service Packages
2
Click the domain or subdomain for which you wish to assign services.
Tip: When adding a package to a subdomain, you must first have defined
a service package for the parent domain.
3
Click the Service Package > Assign Services sub menu option. The Assign
Services window appears (Figure 49).
Figure 49 Assign services window
NN10043-113
4
From the drop down list, select a domain to assign services and service
parameters to and click Continue. The Assign services to domains window
appears (Figure 50).
5
To assign services and service parameters to multiple domains, use the
Ctrl-click key to select multiple domains from the drop down list and click
the Click here to assign services to multiple domains link.
[Standard - Nortel Networks Confidential]
Chapter 7 Assigning Services and Creating Service Packages
85
Figure 50 Assign services to domains window
6
To assign services for the selected domain, subdomain, or multiple domains or
subdomains, select the checkbox next to the service option (see Table 14 on
page 81 for service and parameter descriptions).
7
To modify a service parameter, select a value from the drop down list.
8
To select all services, check the Choose All Services checkbox.
9
To select particular services for a domain, select the checkbox next to the
service.
10 Click Save to assign the services.
SIP Provisioning Client User Guide
[Standard - Nortel Networks Confidential]
86
Chapter 7 Assigning Services and Creating Service Packages
Creating a service package
Domains, subdomains, and users are assigned service packages to control their
access to network services.
To create a service package
1
Click the Domains menu option.
2
Under the domain or subdomain for which you wish to assign services, click
the Service Package > Create Package menu option. The Create new
package window appears (Figure 51).
Figure 51 Create new package window
NN10043-113
[Standard - Nortel Networks Confidential]
Chapter 7 Assigning Services and Creating Service Packages
3
Enter a name for the service package in the text box.
4
Select whether or not to make this package the default for the domain or
subdomain. The default is NO.
5
Create the service package by selecting:
6
87
a
the checkbox next to the service option to select services for the service
package (see Table 14 on page 81 for service and parameter descriptions).
b
a service parameter value from the drop down list.
c
the Choose All Services checkbox to select all services.
d
the checkbox next to the service to select particular services.
Click Save to create the service package. A message displays stating that the
package was successfully created.
Listing/modifying/deleting service packages
To view a list of all service packages provisioned in a domain or subdomain
1
Click the Domains menu option.
2
Under the domain or subdomain for which you wish to view the service
package details, click the Service Package > List Packages menu option.
The Details of the package window appears (Figure 52).
SIP Provisioning Client User Guide
[Standard - Nortel Networks Confidential]
88
Chapter 7 Assigning Services and Creating Service Packages
Figure 52 List of packages domain window
3
4
NN10043-113
From the list of packages
a
Click the Details-Modify link to view service package details and modify
service parameters and values (see Table 14 on page 81 for service and
parameter descriptions). If a service package is modified, then all users
who currently have this service package are affected. If service attributes
are modified for a domain, then existing packages utilizing this service
remain as is. Any new packages created for this domain utilize the new
parameters.
b
Click the Delete link to delete the service package from the domain. A
service package can only be deleted if no users are associated with the
service package.
c
Click the Make default link to make the selected package the default
package for the domain.
Click Save from the Details screen to save your changes, or click a menu
option on the left side of your screen to continue with another operation.
[Standard - Nortel Networks Confidential]
Chapter 7 Assigning Services and Creating Service Packages
89
Assigning service packages to domains and
subdomains
To assign a service package to a domain or subdomain
1
Click the Domains menu option.
2
Under the domain or subdomain for which you wish to assign a service
package, click the Service Package > Assign Packages sub menu option.
The Assign package to domains window appears (Figure 53).
Figure 53 Assign package to domains window
3
From the drop down list, select a service package.
4
To make the selected package the default, check the Make package the
default for selected domains checkbox.
5
Select the domain from the list of domains in the display area. Use the
Ctrl-click key to select multiple domains.
6
Click Assign.
SIP Provisioning Client User Guide
[Standard - Nortel Networks Confidential]
90
Chapter 7 Assigning Services and Creating Service Packages
Upgrading and downgrading service packages
Upgrading a service package is allowed (as in the case when you want to add
services) as long as the service is available at the domain. Upgrading a service
package to update parameter values is also allowed, but only to the limit assigned
to the domain.
Downgrading a service package (for services with parameters) is allowed only to
the upper limit of the parameter values for the user and subdomains.
NN10043-113
[Standard - Nortel Networks Confidential]
91
Chapter 8
User Management
Topics in this section:
•
•
•
•
•
•
•
•
•
“Managing user functions” on page 91
“Adding a user to a domain or subdomain” on page 92
“Adding a blended user” on page 95
“Adding i2004 Internet Telephone capability for a user” on page 99
“Adding a conference server user and route” on page 101
“Customizing service packages” on page 104
“Listing/modifying/deleting users” on page 105
“Listing/modifying/deleting aliases” on page 107
“Listing/modifying/deleting blended aliases” on page 109
Managing user functions
Once a domain or subdomain is provisioned, an administrator is responsible for
managing the following user functions:
•
•
•
•
•
adding, viewing, modifying, or deleting users (including blended users) from
the domain or subdomain
adding, viewing, modifying, or deleting i2004 Internet Telephone device
properties
assigning users to i2004 Internet Telephones
customizing service packages (for example, to add a blended user if available
as a service package option)
viewing, modifying, or deleting aliases and/or blended aliases
SIP Provisioning Client User Guide
[Standard - Nortel Networks Confidential]
92
Chapter 8 User Management
Adding a user to a domain or subdomain
To add a user to a domain or subdomain
1
Click the Domains option.
2
Under the domain or subdomain, click the User > Add User menu option.
The Add new user window appears (Figure 54).
Figure 54 Add new user
NN10043-113
[Standard - Nortel Networks Confidential]
Chapter 8 User Management
3
93
Enter information about the new user in the parameter fields as described in
the following table (Table 15).
Table 15 Add user parameter descriptions
Parameter
Type
Range
Default
Description
User Name
String (60))
Up to 60
characters
N/A
Username of this user. Use lowercase. Does
not have to be the same name as the First
Name.
First Name
String (30)
Up to 30
characters
N/A
First name of the user. Case sensitive.
Last Name
String (30)
Up to 30
characters
N/A
Last name of this user. Case sensitive.
Password
String (200) Up to 200
characters
N/A
Password of this user.
Confirm Password
String (200) Up to 200
characters
N/A
Password of this user.
Service package
Select from drop down
list
N/A
The list of service packages assigned to the
user’s domain or subdomain.
Aliases
String (40)
-
N/A
The list of aliases for this user. Aliases
associate a PSTN phone number to a
username.
Blended Aliases
String
-
N/A
Alias for a blended user, a person who uses
the traditional phone but is equipped with
multimedia services at the desktop.
Status Reason
Select from N/A
drop down
list
N/A
The status value of this user.
email
String (60)
Up to 60
characters
N/A
Email address of this user.
Business Phone
String (60)
Up to 60
characters
N/A
Business phone number.
Home Phone
String (30)
Up to 30
characters
N/A
Home phone number.
Cell Phone
String (30)
Up to 30
characters
N/A
Cell phone number.
Pager
String (30)
Up to 30
characters
N/A
Pager number.
Fax
String (30)
Up to 30
characters
N/A
Fax number of this user.
SIP Provisioning Client User Guide
[Standard - Nortel Networks Confidential]
94
Chapter 8 User Management
Table 15 Add user parameter descriptions
Parameter
Type
Voicemail Server
Default
Description
Select from drop down
list
None
selected
The voice mail server available to this user.
Private Charge ID
String (30)
Up to 30
characters
N/A
The Private Charge ID of this user.
Public Charge ID
String (30)
Up to 30
characters
N/A
The 10-digit national dial plan number
associated with the subscriber. This is
required for the interworking with Public
Switched Telephone Network (PSTN)
switches in the Time Division Multiplex (TDM)
network.
Voicemail
String (30)
Up to 30
characters
N/A
The voice mail address of this user.
Class of Service
Select from Up to 30
drop down characters
list
None
selected
The name of the class of service assigned to
the domain and user. This is displayed to the
administrator when modifying or assigning
the COS to a domain/subdomain/user.
Time Zone
Select from drop down
list
N/A
The time zone that this user belongs to.
Locale
Select from drop down
list
N/A
The location of this user.
4
NN10043-113
Click Save.
Range
[Standard - Nortel Networks Confidential]
Chapter 8 User Management
95
Adding a blended user
Setting up a user as a blended user allows the end user to use their PCs for the
multimedia portion of their communication, while using their existing telephony
system for voice.
Note: When a user receives their service package (at SIP Multimedia PC
Client startup and on any changes to the subscriber data made by the
administrator), and that service package contains Blended User, then that
PC Client becomes a SIP Multimedia Blended PC Client.
To add a user as a blended user to a domain or subdomain
1
Click the Domains menu option.
2
Under the domain or subdomain where you wish to set up a blended user,
click the User > Add User menu option. The Add new user window appears.
SIP Provisioning Client User Guide
[Standard - Nortel Networks Confidential]
96
Chapter 8 User Management
Figure 55 Add new user - blended
NN10043-113
3
Complete the fields on the Add new user form.
4
Add a blended alias for the user. This alias is used to identify calls that come
from the SimRing feature that is assigned to the user on an existing switching
[Standard - Nortel Networks Confidential]
Chapter 8 User Management
97
system. It must match the called party number that will be sent to the SIP
Application Module on these SimRing calls.
Note: Blended aliases are per subscriber data and are entered as list of
telephony numbers into the Blended Aliases text box. The blended aliases
must not match any of the normal aliases entered into the Aliases text box
on the same screen.
5
Add an alias (not blended alias) that matches the calling party number that
will be sent to the SIP Application Module when the user calls another
blended user. This is the calling party number that is sent to the SIP
Application Module on the SimRing call.
6
If calls from users (non-blended) to blended users are routed to the existing
switching system over a public route, add an alias (not blended alias) that
matches the public charge ID that you intend to provision for the user. If calls
from users (non-blended) to blended users are routed to the existing switching
system over a private route, add an alias (not blended alias) that matches the
private charge ID you intend to provision for the user.
Adding these aliases allows the SIP Application Module to identify the
calling party on SimRing calls that are the result of a call origination, transfer
or redirect from the SIP Application Module back to a blended user's
Preferred Audio Device on the existing switching system.
Note: This step should also be done for all non-blended users that may
call a blended user in order to identify SimRing calls that were originated
by non-blended users.
7
Click Save. A User added successfully message appears.
Figure 56 Blended User added successfully confirmation
8
Click the Customize service package link at the top of the form to create a
service package containing specific services for the blended user. The Service
package customization window appears (Figure 57).
SIP Provisioning Client User Guide
[Standard - Nortel Networks Confidential]
98
Chapter 8 User Management
9
Enter the Preferred Audio Device for the user. The number entered here must
be the number that is required to route a call to the user's phone and trigger the
user's SimRing feature. This number should be unique for each user. This
number is required so that regular clients (SIP Multimedia PC Client, SIP
Multimedia Web Client, and the i2004 Internet Telephone controlled through
the IPCM) can call a Blended PC Client by their SIP address (and not only by
the PSTN equivalence number).
Figure 57 Service package customization for a blended user
10 Click Save. A message displays that the user was added successfully.
NN10043-113
[Standard - Nortel Networks Confidential]
Chapter 8 User Management
99
Adding i2004 Internet Telephone capability for a user
The IP Client Manager requires the i2004 properties of a user to enable that user
to log into, receive calls on, or make calls from an i2004 Internet Telephone.
To add i2004 Internet Telephone capability
1
After successfully adding a new user, click the i2004 properties link at the
top of the User details window. The i2004 User details window appears
(Figure 58).
Figure 58 User details window (i2004)
2
Enter i2004 Internet Telephone properties in the parameter fields as described
in the following table.
SIP Provisioning Client User Guide
[Standard - Nortel Networks Confidential]
100
Chapter 8 User Management
Table 16 i2004 properties
NN10043-113
Parameter
Type
Range
Default
Description
Display Name
String (30)
Up to 30
characters
N/A
The display string that is
displayed on the i2004
Internet Telephone.
Registration Length
Integer
Max 86400
seconds or
1440
minutes or
24 hours
3600
This value, along with the
Registration Unit
parameter value, is used
to determine when the
i2004 Internet Telephone
should register with the
IPCM (see Note). It is
recommended to use
Registration Length in the
range of 24 - 48.
Registration Unit
String (10)
Up to 10
characters
Seconds The unit used by the
i2004 Internet Telephone
to know when to register
with the IPCM. It is
recommended to use
Registration Unit as
Hours.
IPCM
String (100) Up to 100
characters
N/A
Drop down list of IPCM
names to which this user
belongs.Varies
depending on which
IPCMs are associated
with the root domain.
[Standard - Nortel Networks Confidential]
Chapter 8 User Management
101
Note: The Registration Length and Registration Unit fields combined
together make up the registration expiration time. The smaller the value,
the more SIP traffic generated. If you were to select a registration
expiration of every 2 minutes, then the IPCM would only register the user
for 2 minute time periods and would have to re-register the user every 2
minutes.
For security reasons, it is recommended to not keep the registration
expiration time too high. If you selected a registration expiration of 10
days, then the registration authentication process is only going to occur
every 10 days. If the user changes a password, the change would not be
noted for up to 10 days (if only registration on authentication is being
used). Also, in the unlikely event that the registration is somehow lost, a
reasonable length registration expiration would allow the IPCM to
re-register the user.
3
Click Save.
Adding a conference server user and route
To enable conferencing capability, a conference user and route must be
provisioned using the SIP Provisioning Client or the SIP Personal Agent.
Use this client...
To set up...
SIP Provisioning Client
a conference user, and, if there is only one conference
server, a route to the conference server. (Routes
added through the SIP Provisioning Client are always
attempted simultaneously.)
SIP Personal Agent
sequential routes and rules for multiple conference
servers that include each conference server listed in a
separate ringlist.
Adding a conference server user and route using the SIP
Provisioning Client
To add a single conference server user and route using the SIP Provisioning Client
SIP Provisioning Client User Guide
[Standard - Nortel Networks Confidential]
102
Chapter 8 User Management
1
Click the Domains menu option.
2
Click the domain where you want to add a conference server user.
3
Click the Add User menu option.
4
In the Add User form, enter the text “conference” for the User Name. In the
password field, enter any password.
5
Click Save. The User details screen displays a message that the user was
added successfully.
6
At the top of the screen, click the Routes link to specify the route to the
conference server.
Figure 59 Conference user - add route
7
In the User Routes text box, enter the SIP address that the conference server
is expecting using the following format:
sip:conference@<conference_server_IP_address>;nt_info=proxy_foreign;
nortelservice=conference
8
NN10043-113
Click Add. The route now appears in the window of selected routes.
[Standard - Nortel Networks Confidential]
Chapter 8 User Management
103
Figure 60 Conference user - route added
9
Click Save to save the route.
Adding conference server routes using the SIP Personal
Agent
To add multiple conference server routes using the SIP Personal Agent
1
Log in to the SIP Personal Agent. (The login name and password is the user
name and password that was provisioned for the conference user in the SIP
Provisioning Client.)
2
Click the Call Manager icon on the left of the SIP Personal Agent screen.
The Welcome to Call Manager home screen displays.
3
Click the ListRoutes tab from the Call Manager Home screen. The Ring List
Details screen displays.
4
Enter a name for the conference server route in the Ring list name text box
(for example, conference route).
5
From the drop down list, select the maximum number of times to ring the
phone.
6
In the first text box in the column, enter the SIP address that the conference
server is expecting using the following format:
sip:conference@<conference_server_IP_address>;nt_info=proxy_foreign;
nortelservice=conference
7
Select SIP address from the drop down list.
SIP Provisioning Client User Guide
[Standard - Nortel Networks Confidential]
104
Chapter 8 User Management
8
To set up routes for multiple conference servers, repeat steps 6 and 7 for each
sequential ring list in columns 2 and 3.
9
Click Add Route. The Add Route button updates the online user database
with the conference server routing information.
Setting up rules for the conference server route
Once a route has been set up, a screening rule must be created to define the
activation of the conference servers. The conference server route is not activated
until a rule has been applied.
To set up a screening rule for the first time in the SIP Personal Agent
1
Click ListRules from the Call Manager screening and routing screen. The
Welcome to Call Manager screen displays.
2
Click the link, create a screening rule. The Call Manager Rule Details screen
displays.
3
Enter a name for the conference server rule in the Rule name text box (for
example, conference rule).
4
Click the Active check box to select that the rule should appear in the Active
Rules window.
5
Select the conference route from the pull-down menu next to the Active route
field.
6
Click Save Rule.
Customizing service packages
Once a user is added, you may want to customize the service package on a per
user basis.
To customize a user’s service package
1
NN10043-113
After adding or listing details for a user, click the Customize service package
link.
[Standard - Nortel Networks Confidential]
Chapter 8 User Management
105
Figure 61 Customize service package link
2
Customize the options in the user’s service package by completing the
available selections.
3
Click Save to save the changes to the service package. A message appears that
the user package was customized successfully.
Listing/modifying/deleting users
To list, modify, or delete users (including blended users)
1
Click the Domains menu option.
2
Under the domain or subdomain, click the User > List User menu option. The
Users window appears (Figure 62). Select whether to search on Phone
Number, Last Name, User Name, or First Name from the drop down list
3
Click Add Criteria. The search criteria you selected appears in the lower
window and is used to refine your search.
4
Repeat steps 2 and 3 to list additional users.
5
In the lower window area, select whether to search by All or Any of the
criteria specified. Note that you do not have to add any criteria if you want to
see all the users in the selected domain. This will also find all users in any of
the selected domain's subdomains.
SIP Provisioning Client User Guide
[Standard - Nortel Networks Confidential]
106
Chapter 8 User Management
Figure 62 List Users window
6
Define the size of your search list from the drop down list.
7
Click Search to begin the search, or Remove to remove search criteria from
the search list. A list of users appears.
Figure 63 List users search results
8
NN10043-113
Click the Details link to modify user information. The User details window
appears (Figure 64). To delete the user from the domain, click the Delete link.
At the delete confirmation dialog box, click OK to delete the user, or Cancel.
[Standard - Nortel Networks Confidential]
Chapter 8 User Management
107
Figure 64 User details window
9
Click Save. A User Updated Successfully message appears.
Listing/modifying/deleting aliases
To list all aliases in a domain
SIP Provisioning Client User Guide
[Standard - Nortel Networks Confidential]
108
Chapter 8 User Management
1
Click the Domains menu option.
2
Under the domain or subdomain, click the Users > List Aliases menu option.
The Aliases window appears (Figure 65). Select whether to search on Last
Name, Alias, or Domain from the drop down list
3
Click Add Criteria. The search criteria you selected appears in the lower
window and is used to refine your search.
4
Repeat steps 1-3 to list additional users.
5
In the lower window area, select whether to search by All or Any of the
criteria specified. Note that you do not have to add any criteria if you want to
see all the aliases in the selected domain. This will also find all aliases in any
of the selected domain's subdomains.
Figure 65 List aliases window
6
NN10043-113
Define the size of your search list from the drop down list.
[Standard - Nortel Networks Confidential]
Chapter 8 User Management
7
109
Click Search to begin the search, or Remove to remove the search criteria
from the search list.The Aliases search results window appears (Figure 66).
Figure 66 List aliases search results
8
Click the Details link to modify alias information. The User details window
appears. Click Save to save your changes.
9
To delete an alias, click the Delete link on the List aliases search results
screen to delete the user from the domain. At the delete confirmation dialog
box, click OK to delete the user, or Cancel.
10 Click Save.
Tip: If you delete an alias, the username associated with the alias is
deleted.
Listing/modifying/deleting blended aliases
To list all blended aliases in a domain
1
Click the Domains menu option.
2
Select a domain (or a subdomain of a domain).
3
Click the Users > List Blended Aliases menu option. The Blended Aliases
window appears. Select whether to search on Last Name, Alias, or Domain
from the drop down list
4
Click Add Criteria. The search criteria you selected appears in the lower
window and is used to refine your search.
5
Repeat steps 1-4 to list additional last names, aliases, or domains.
6
In the lower window area, select whether to search by All or Any of the
criteria specified. Note that you do not have to add any criteria if you want to
SIP Provisioning Client User Guide
[Standard - Nortel Networks Confidential]
110
Chapter 8 User Management
see all the blended aliases in the selected domain. This will also find all
blended aliases in any of the selected domain's subdomains.
7
Click Save. The Blended Alias search results window displays (Figure 67)
Figure 67 Blended Aliases search results window
8
NN10043-113
Click the Details link to modify alias information. The User details window
appears (Figure 64). To delete the user from the domain, click the Delete link.
At the delete confirmation dialog box, click OK to delete the user, or Cancel.
[Standard - Nortel Networks Confidential]
111
Chapter 9
Managing i2004 Internet Telephones
Topics in this section:
•
•
•
•
“Introduction” on page 111
“Adding an i2004 Internet Telephone” on page 111
“Listing an i2004 Internet Telephone” on page 116
“Deleting an i2004 Internet Telephone” on page 119
Introduction
i2004 Internet Telephones are provisioned by creating an i2004 device entity and
assigning this device to a domain or subdomain.
Devices are assigned to a domain based on the domain in which it is created. An
administrator can use the Devices menu option to add, view, modify or delete
i2004 Internet Telephones.
Adding an i2004 Internet Telephone
1
Click the Domains menu option.
2
Click the domain or subdomain for which you wish to provision an i2004
Internet Telephone.
SIP Provisioning Client User Guide
[Standard - Nortel Networks Confidential]
112
Chapter 9 Managing i2004 Internet Telephones
3
Click the Devices > Add Device sub menu option. The Adding a Device
window appears (Figure 68)
Tip: Several fields in the Adding a Device window are populated with the
default property values that have been previously set up for the domain or
subdomain.
Figure 68 Adding a device
4
NN10043-113
Enter device parameters as described in the following table (Table 17).
[Standard - Nortel Networks Confidential]
Chapter 9 Managing i2004 Internet Telephones
5
113
Notice that the most of the values that appear on the form are default values
that are set from what was entered when the domain was provisioned.
Table 17 i2004 Internet Telephone parameters
Parameter
Type
Range
Default
Description
Label
String (30)
N/A
N/A
User defined text label that uniquely
describes this device. This label is used by
the System Management Console when
performing maintenance operations on
queried devices (for example, Tom's Desk).
Defaults to owner display name.
MAC Address
String (100) Up to 100
characters
N/A
12 Digit Hex string. Permanently burned into
the i2004 device at manufacture time. Read
from tag on back of device. This string is
converted to lower case. Must be unique per
IPCM.
Available IPCM List
Select from N/A
drop down
list
N/A
Drop down list of named IPCMs.
Def Proxy Host
String (30)
N/A
N/A
IP Address of Proxy used as default for the
i2004 Internet Telephone.
Def Proxy Port
Integer
Any valid
port
5060
Default Proxy SIP Port. No validation is done
on this field to ensure validity.
Active Proxy
Boolean
True/False
True
If True, calls will route through the default
proxy. For future use. No other routing is
currently supported for the IPCM.
Allow All Codecs
Boolean
True False
True
Allow all codecs (True) or only selected codec
(False). See Vocoder parameter.
Behind Firewall
Boolean
True/False
True
Indicates whether there is a firewall/NAT
between the i2004 Internet Telephone and
the system.
Alpha
Boolean
True/False
True
Enables alphanumeric dialing as the default
dialing style. If disabled, the I2004 Internet
Telephone dialing style defaults to numeric.
Contrast
Integer
0-15
8
Telephone display contrast setting.
Vocoder:Packet
Time
Integer
(msec)
10/20/30/
40/60
20
Packet time in milliseconds {10\ms, 20\ms,
30\ms, 40\ms, 60\ms}.
PDIL Timer
Integer
(seconds)
N/A
4
Interdigit time-out.
PSEIZ Timer
Integer
N/A
15
Time-out for first dialed digit.
SIP Provisioning Client User Guide
[Standard - Nortel Networks Confidential]
114
Chapter 9 Managing i2004 Internet Telephones
Table 17 i2004 Internet Telephone parameters
Parameter
Type
Range
Default
Description
DATE FMT
Numeric
Standard
MM/DD or
Numeric
Inverse
DD/MM
2,3
2
Only formats 2 and 3 are supported.
2-numeric standard (09/16); 3-numeric
inverse (16/09).
TIME FMT
Select from 0,1,2
drop down
list:
• 12-hour
• French
• 24-hour
0
The time format of the proxy used as the
default for the I2004 Internet Telephone 0 >
12 hour clock.
Location
String (50)
Up to 50
characters
Idle Display
String (30)
Up to 30
characters
Time Zone
String (20)
Any valid
N/A
entry in
table
TIMEZONE
INFO
Locale
String (20)
N/A
NN10043-113
Text describing location of device. A specific
format of this string is scheduled for a future
release
N/A
Idle telephone display heading.
The time zone that this user belongs to.
The location of this user.
[Standard - Nortel Networks Confidential]
Chapter 9 Managing i2004 Internet Telephones
115
Table 18 Click Save. The IPCM Device Created window appears (Figure 69).
Figure 69 Add device - IPCM device created
6
The i2004 is now provisioned with the parameters that were entered. The
i2004 is ready for login. If you want to remotely place a user on an i2004
Internet Telephone, click Assign Users at the top of the screen. (This is the
equivalent to a user logging in.) The Device Users window appears
(Figure 70).
SIP Provisioning Client User Guide
[Standard - Nortel Networks Confidential]
116
Chapter 9 Managing i2004 Internet Telephones
Figure 70 Device Users - assigning users
.
7
Enter the user name in the text field and click Add. (If you do not add a
domain name for the user, the domain or subdomain of the device is assumed.
Tip: You can add up to 6 different users per i2004 Internet Telephone.
8
To move users up or down in the selected window, select the user and click
Up or Down. To remove a name, click Remove or Remove All.
9
Click Modify to submit your changes.
Listing an i2004 Internet Telephone
To view, or list a particular device (or all devices) in a domain or subdomain
NN10043-113
1
Click the Domains menu option.
2
Under the domain or subdomain where you want to view a device, click the
Devices > List Device menu option. The Devices window appears
(Figure 71).
[Standard - Nortel Networks Confidential]
Chapter 9 Managing i2004 Internet Telephones
117
Figure 71 List Devices window
3
Select whether to search on the MACaddress or ID of the i2004 Internet
Telephone from the drop down list.
4
Click Add Criteria. The search criteria you selected appears in the lower
window.
5
Repeat to list additional devices.
6
In the lower window area, check whether to search by All (devices), or Any,
using the device criteria you specified.
7
Click Search to begin the search, or Remove to remove the device from the
search list. The Devices in Domain window appears (Figure 72).
SIP Provisioning Client User Guide
[Standard - Nortel Networks Confidential]
118
Chapter 9 Managing i2004 Internet Telephones
Figure 72 List devices search results
8
Click the Details link to modify device information. The Modifying a Device
in a domain window appears (Figure 73).
Figure 73 Modifying a device in a domain window
9
NN10043-113
Click Save.
[Standard - Nortel Networks Confidential]
Chapter 9 Managing i2004 Internet Telephones
119
Deleting an i2004 Internet Telephone
To delete an i2004 Internet Telephone
1
Click the Domains menu option.
2
Click the domain or subdomain for which you wish to delete an i2004 Internet
Telephone.
3
Click the Devices > List Devices sub menu option. The Devices window
appears. Select whether to search on the MACaddress or ID of the i2004
Internet Telephone from the drop down list.
4
Click Add Criteria. The search criteria you selected appears in the lower
window.
5
Repeat to list additional devices.
6
In the lower window area, select whether to search by All (devices), or Any,
using the criteria specified.
7
Click Search. The Devices in Domain window appears with the results of
your search (Figure 74).
Figure 74 Devices in Domain window (search results)
8
Click the Delete link to delete the i2004 Internet Telephone. At the delete
confirmation dialog box, click OK to delete the device, or Cancel.
SIP Provisioning Client User Guide
[Standard - Nortel Networks Confidential]
120
Chapter 9 Managing i2004 Internet Telephones
NN10043-113
[Standard - Nortel Networks Confidential]
121
Chapter 10
Telephony Routes
Note: Telephony routing enables customers to configure their dial plans
and to set Virtual Private Networks (VPNs). You must have telephony
routing and domain management provisioning rights to perform the tasks
in this section.
Topics in this section:
•
•
•
•
•
•
•
“Adding Class of Service (COS) information” on page 122
“Adding a telephony route” on page 124
“Listing a telephony route” on page 128
“Adding a route list” on page 128
“Listing a route list” on page 130
“Using the translation verification tool” on page 131
“Setting up an interworking profile with the Communications Server 2000
(CS2000)” on page 133
For more information and examples about telephony routing and translation plans,
see Appendix B, “Understanding Telephony Routing and Translations,” on page
149.
SIP Provisioning Client User Guide
[Standard - Nortel Networks Confidential]
122
Chapter 10 Telephony Routes
Adding Class of Service (COS) information
COS is assigned to users, domains, and routing lists. It is an integer value, and the
lower the number, the greater, or higher, the COS value. For example, if a user has
a COS value of 1, and a domain has a COS of 2, 3, and 4, the user with a COS of
1 can use all the domains to make a call. The lower the number, the higher access
to making calls.
To create a COS to associate with a domain, user, or route list
NN10043-113
1
Click the Domains menu option.
2
Under the domain for which you wish to add COS information, click the
Telephony Routes > Routing COS menu option. The Class of Service
information window for the domain appears (Figure 75).
[Standard - Nortel Networks Confidential]
Chapter 10 Telephony Routes
123
Figure 75 Class of Service information for domain window
3
Enter a name for the COS in the Name text box.
4
Enter a description for the COS in the Description text box.
5
Click Save.The COS now appears in the window below. Repeat this step for
each new COS you wish to create.
6
Click UP or DOWN to reorder the COS in the Current Choices Available
window.
Tip: The higher the position of the COS in the reorder list indicates that
the COS has a lower number, which means a higher COS value, or
service.
SIP Provisioning Client User Guide
[Standard - Nortel Networks Confidential]
124
Chapter 10 Telephony Routes
7
To delete a COS from the Current Choices window, click Delete.
Adding a telephony route
To add a new telephony route
1
Click the Domains menu option.
2
Under the domain or subdomain for which you wish to add a new telephony
route, click the Telephony Routes > Add Telephony Routing menu option.
The Create New Telephony Route window appears (Figure 76).
Figure 76 Create New Telephony Route window
3
NN10043-113
Enter telephony route parameter information and values in the fields
provided. Note that the Route List window will be empty the first time you
[Standard - Nortel Networks Confidential]
Chapter 10 Telephony Routes
125
create a telephony route. The following table (Table 19) lists the telephony
route list parameter values and descriptions.
Table 19 Telephony route parameter information
Parameter
Type
Range
Default
Description
Name
String (20)
N/A
N/A
The name of this telephony route.
Description
String (100) N/A
N/A
A description for this telephony route.
From Digits
String (32)
N/A
N/A
If you take out the most significant digits
(MSD) from the number to be translated, its
value should be equal to or greater than this
field's value. The number of MSDs to be
compared is the number of digits you have
entered in this field.
To Digits
String (32)
N/A
N/A
If you take out the MSDs from the number to
be translated, its value should be equal to or
less than this field's value. The number of
MSDs to be compared is the number of digits
you have filled in this field.
Min Number of Digits Integer
N/A
N/A
The number to be translated should have
digits equal to or more than the Min Number
of Digits parameter value.
Max Number of
Digits
Integer
N/A
N/A
The number to be translated should have
digits equal to or less than the Max Number
of Digits parameter value.
Route Type
Integer
Remove
Integer
N/A
0
This is the number of MSDs, which will be
removed while performing digit manipulation/
translation.
Prefix
String (24)
N/A
N/A
This is the number that would be prefixed to
the number coming in for translation.
Recursive
Boolean
True
False
If set to Y, the digit manipulation process is
carried out recursively after each iteration.
Select one of the following route types
• Private (for example, a private dial plan
not going out to a gateway)
• SIP (does not have to go through a
gateway, but can go to a different
application module or domain)
• Gateway
SIP Provisioning Client User Guide
[Standard - Nortel Networks Confidential]
126
Chapter 10 Telephony Routes
4
Click Save to create the telephony route. The Telephony Route Listing
window appears with the new route listed added to the domain and parameter
options based on the telephony route type (Figure 77).
Figure 77 Telephony Route Listing window
5
NN10043-113
Click the Change Parameters link.
[Standard - Nortel Networks Confidential]
Chapter 10 Telephony Routes
6
127
Provision the parameters for the new telephony route based on the whether
the route is a Private, SIP, or Gateway route. The following telephony route
parameters windows appear as described in the following table (Table 20).
Table 20 Telephony route parameters window (Private, SIP, Gateway)
Telephony route parameters
Description
For a Private Route:
From the drop down list, specify what to do if the
subscriber is not found:
Stop: Stop at the private route. Do not go to SIP or
Gateway. The call is dropped, since subscriber does not
exist.
Continue: Continue to search for SIP or gateway route
without translating the number.
Pre Translate: Continue to SIP or gateway route with
translating the numbers.
Click Save.
For a SIP Route:
From the drop down list, specify a route name and what to
do if the subscriber is not found:
Stop: Stop at the SIP route. Do not go to gateway route.
Since the subscriber does not exist, the call is dropped.
Continue: Continue to gateway route without translating
the number.
Pre Translate: Continue to gateway route and translate
the numbers.
SIP Route: Specify the domain you want the call to go to
or a different appserver address.
Click Save.
For a Gateway Route
OverRide Charge ID: If set to Yes then the charge ID
described in the OverRide Charge Value field is used
instead of either public or private.
Gateway Route: Select the name of the gateway route
from the list to which you want to route the call to.
Gateway RouteType Option: Specifies what charge ID to
be used: Public or Private. If OverRide Charge ID is set to
Yes, then this is not used.
OverRide Charge Value: The value of the charge ID to be
overriden with.
Click Save.
SIP Provisioning Client User Guide
[Standard - Nortel Networks Confidential]
128
Chapter 10 Telephony Routes
Listing a telephony route
To view details about a telephony route
1
Click the Domains menu option.
2
Under the domain or subdomain for which you wish to view telephony route
details, click the Telephony Routes > List Telephony Routing menu option.
The Telephony Route Listing for the domain window appears (Figure 78).
Figure 78 Telephony route listing window
3
To view or modify a telephony route, click the telephony route name. The
Create New Telephony Route window appears.
4
Modify the fields. Click Save to return to the Telephony Route Listing
window.
5
To change the telephony route parameter, click the Change Parameters link
for the telephony route. The telephony parameters window appears. Based on
the whether the route is a Private, SIP, or Gateway route, modify the
telephony parameters (Table 20).
Adding a route list
To add a new telephony route list
NN10043-113
[Standard - Nortel Networks Confidential]
Chapter 10 Telephony Routes
129
1
Click the Domains menu option.
2
Under the domain or subdomain for which you wish to add a route list, click
the Telephony Routes > Add RouteList menu option. The Create a new
route list window appears (Figure 79).
Figure 79 Create a New Route List window
3
Enter a name for the new route list in the text field provided.
4
Enter a text description of the route list in the text filed provided.
5
From the drop down list next to the Incoming Foreign Domain Call Routing
(from another domain or subdomain) and Incoming Local Domain Call
SIP Provisioning Client User Guide
[Standard - Nortel Networks Confidential]
130
Chapter 10 Telephony Routes
Routing (coming from the same domain) fields, choose one of the following
call routing options as described in the following table (Table 21).
Table 21 Call routing options
Call routing option
Description
Allow
Allow all incoming sessions from other domains and
subdomains.
Block
Block all incoming calls from other domains and
subdomains.
Redirect
Redirect sessions to the originator’s domain. Use this
option to redirect an incoming session from another
domain that is routing to a restricted route list.
6
From the drop down list, select a Class of Service for the new route list.
7
In the Telephony Route(s) window, highlight and select one or more
telephony routes to add to the route list (each telephony route must go in a
route list). To select multiple telephony routes, use the Ctrl-click key.
Listing a route list
To view details about a route list
NN10043-113
1
Click the Domains menu option.
2
Under the domain or subdomain you wish for which you wish to view route
list details, click the Telephony Routes > List RouteLists menu option. The
List of RouteLists for the domain window appears (Figure 80).
[Standard - Nortel Networks Confidential]
Chapter 10 Telephony Routes
131
Figure 80 List route lists window
3
Click the link for the route list name to modify the route list. The Create New
Route List window appears. Modify route list information and click Save.
4
To delete an existing route list, click the Delete link in the Delete column next
to the route list you wish to delete.
5
To delete a telephony route associated with a route list, click the Delete link in
the Remove column.
Using the translation verification tool
The translation tool allows you to verify that a call is provisioned correctly.
To use the translation verification tool
SIP Provisioning Client User Guide
[Standard - Nortel Networks Confidential]
132
Chapter 10 Telephony Routes
1
Click the Domains menu option.
2
Under the domain or subdomain, click the Telephony Routes > Translation
Tool menu option. The Translation Verification Tool window appears
(Figure 81).
Figure 81 Translation Verification Tool window
3
In the Request URI field, enter a number to call using the following format
<number>@<domain_or_subdomain_name>.com
4
In the To field, enter the same name as in the Request URI field, or leave
blank.
5
In the From field, enter the calling person’s number using one of the following
formats
<name>@<domain_or_subdomain_name>.com
<number>@<domain_or_subdomain_name>.com
6
NN10043-113
Click Execute. The following window appears and lists the translation (read
only) verification results (Figure 82). If the window displays some, or all, null
fields, then the route has been misprovisioned and must be provisioned again.
[Standard - Nortel Networks Confidential]
Chapter 10 Telephony Routes
133
Figure 82 Translation tool results window
Setting up an interworking profile with the
Communications Server 2000 (CS2000)
The Set Profile menu option is for interworking with the CS2000.
To set the profile
1
Click the Domains menu option.
2
Under the domain or subdomain that you want to set up to interwork with the
CS2000, click the Set Profile menu option. The Set Profile for the domain
window appears (Figure 83).
Figure 83 Set Profile for Domain window
3
For the domain selected, enter a name for the profile in the text box provided.
4
Click Save. A message appears that the domain profile was modified
successfully.
SIP Provisioning Client User Guide
[Standard - Nortel Networks Confidential]
134
Chapter 10 Telephony Routes
NN10043-113
[Standard - Nortel Networks Confidential]
135
Chapter 11
Gateways
Note: You must have gateway management rights to perform the tasks in
this section.
Topics in this section:
•
•
•
•
•
•
•
“Introduction to gateways” on page 135
“Adding a gateway” on page 136
“Listing a gateway” on page 137
“Adding a gateway route” on page 138
“Listing a gateway route” on page 140
“Adding a gateway trunk group” on page 141
“Listing a gateway trunk group” on page 142
Introduction to gateways
A gateway is a server that connects the SIP network with the PSTN. The gateway
handles the negotiation for calls between PRI signaling and SIP signalling. The
Gateways menu option is used by an administrator to provision a PRI gateway or
the gateway’s translations. The data submitted is validated by the provisioning
system before being stored in the database.
The data entered in the SIP Provisioning Client should match the data entered of
the gateway itself done in the System Management Console. For the PRI
Gateway, the following items need to match:
SIP Provisioning Client User Guide
[Standard - Nortel Networks Confidential]
136
Chapter 11 Gateways
•
•
•
IP address of the gateway
trunk group on the gateway
domain assigned to the trunk group
Adding a gateway
The Add Gateway menu option allows an administrator to provision a new
gateway.
To add a new gateway
1
Click the Gateways > Add Gateway menu option. The Create new gateway
window appears (Figure 84).
Figure 84 Create new gateway window
2
Enter the IP address or MADDR of the gateway in the text box (required). For
example:
nortelnetworks.com;maddr=<IP_address>
NN10043-113
[Standard - Nortel Networks Confidential]
Chapter 11 Gateways
3
Enter a description the gateway in the Gateway Type text box.
4
Click Save. (To clear the text fields, click Clear.) The Gateways window
appears with a list of all provisioned gateways, including the gateway just
added (Figure 85).
137
Figure 85 Gateways window
Listing a gateway
The List Gateway option allows an administrator to view information of all the
available provisioned gateways.
To list a gateway
1
Click the Gateways > List Gateways menu option. The Gateways window
appears (Figure 86).
SIP Provisioning Client User Guide
[Standard - Nortel Networks Confidential]
138
Chapter 11 Gateways
Figure 86 Gateways window (List Gateways)
2
Click the gateway host name to view the details corresponding to that
particular gateway.
3
To modify gateway information, enter the IP address or MADDR of the
gateway in the textbox (required). For example,
nortelnetworks.com;maddr=<IP_address>
4
To modify gateway description, enter changes in the Gateway Type text box.
5
Click Save. (To clear the text fields, click Clear.) The Gateways window
appears with a list of all provisioned gateways, including the gateway
modified.
6
To delete a gateway, click the Delete link next to the gateway. This removes
the provisioned gateway from the database and the system.
Adding a gateway route
This option allows an administrator to add gateway route information to associate
the route with a domain.
NN10043-113
[Standard - Nortel Networks Confidential]
Chapter 11 Gateways
139
To add a new gateway route
1
Click the Gateways > Add Route menu option. The Create new gateway
route appears (Figure 87).
Figure 87 Create new gateway route window
2
Enter a description for the new route in the Description text box.
3
From the drop down list, select a domain to associate with the route.
4
Click Save. (To clear the text fields, click Clear.) The Gateway Routes
window appears (Figure 88).
Figure 88 Gateway routes window
SIP Provisioning Client User Guide
[Standard - Nortel Networks Confidential]
140
Chapter 11 Gateways
Listing a gateway route
The List Gateways menu option allows the administrator to view routing
information for a particular gateway.
To view details for a gateway route
1
Click the Gateways > List Routes menu option. The Gateway Routes
window appears (Figure 89).
Figure 89 Gateway routes window (List Routes)
NN10043-113
2
Click on a route to view gateway route information corresponding to that
particular route.
3
To modify the gateway route information, enter a description for the route in
the Description text box.
4
From the drop down list, select a domain to associate with the route.
5
Click Save. (To clear the domain field, click Clear.) The Gateway Routes
window appears.
6
A gateway can have multiple trunk groups. To reorder trunk groups associated
to a route, click the Re-Order link next to the gateway route. The Reorder
Trunk Groups window appears (Figure 90).
[Standard - Nortel Networks Confidential]
Chapter 11 Gateways
141
Figure 90 Reorder trunk groups window
7
In the Current Choices Available window, click UP or DOWN to reorder the
trunk group.
8
Click Reorder to submit the trunk group reorder to the database.
Adding a gateway trunk group
The AddTrunkGroup menu option allows an administrator to add gateway trunk
group information for a particular gateway. Multiple trunk groups can be assigned
to a gateway route. If the first trunk group is busy or not available, then the next
trunk group in the route is used.This option allows an administrator to view
information for all available gateway trunk groups for a particular gateway.
To add a new trunk group
1
Click the Gateways > AddTrunkGroup menu option. The Create new
trunkgroup window appears (Figure 91).
SIP Provisioning Client User Guide
[Standard - Nortel Networks Confidential]
142
Chapter 11 Gateways
Figure 91 Create new trunkgroup window
2
Select a gateway from the Gateway drop down list.
3
Select a route from the Route drop down list.
4
Enter a description for the new trunk group in the text box provided.
5
Click Save. (To clear information from any of the fields, click Clear.) The
TrunkGroups window appears (Figure 92).
Figure 92 TrunkGroups window
Listing a gateway trunk group
To view trunk group information
1
NN10043-113
Click Gateways > List TrunkGroups. The TrunkGroups window appears
(Figure 93).
[Standard - Nortel Networks Confidential]
Chapter 11 Gateways
143
Figure 93 TrunkGroups window (List TrunkGroup)
2
To delete a gateway trunk group, click the Delete link next to the gateway.
3
At the confirmation dialog box, click OK to delete the gateway trunk group
information from the database for that particular gateway, or Cancel to return
to the Trunk Groups window.
SIP Provisioning Client User Guide
[Standard - Nortel Networks Confidential]
144
Chapter 11 Gateways
NN10043-113
[Standard - Nortel Networks Confidential]
145
Appendix A
Provisioning Sequence
This section describes the sequence of provisioning tasks.
Sequence of tasks
The following table provides a step by step provisioning sequence.
Table 22 SIP Provisioning Client provisioning sequence
Step
Description
Task(s)
Menu option
1.
Define roles and rights and
use to create a new
Administrator
Add role and assign rights
Admins
Add Role
Add Admin
Admins
Add Admin
Add domain(s)
Domains
Add Domain
2.
Define new domain(s)
Add sub domain(s) if required Domains
domainxx.com
Add Sub-domain
3.
Define service parameters
and assign to domain(s)
Define service parameters
Services
Define Service Parameters
Assign services to primary
domain
Services
Assign Services
SIP Provisioning Client User Guide
[Standard - Nortel Networks Confidential]
146
Provisioning Sequence
Step
Description
Task(s)
Menu option
4.
Define domain service
package
Create service package
Domains
domainxx.com
Service Package
Create Package
Assign service package(s) to Domains
domain(s) and sub-domain(s)
domainxx.com
Service Package
Assign Package
Assign services to
subdomain(s)
Domains
domainxx.com
Service Package
Assign Services
5.
Define voice mail servers and Add voice mail server (SIP-/
assign to domain(s)
Trunk-/Line-based) and
assign to domain(s)
Voice Mail
Add Voice Mail Server
6.
If not deployed using the
System Management
Console, add IPCM cluster
and assign to domain
Add IPCM cluster
IPCM
Add IPCM Cluster
Assign IPCM to domain
IPCM
List IPCM
Cluster>Details>Assign to
Domain>Assign Domain
7.
Add domain status reason(s)
Add reason
Domains
domainxx.com
Status Reasons
Add Reason
8.
Add users to domain(s)
Add user(s)
Domains
domainxx.com
Users
Add User
Add user(s) to subdomains
Domains
domainxx.com
SubDomain
SubDomainYY
Users
Add User
Add i2004 device properties
NN10043-113
[Standard - Nortel Networks Confidential]
Provisioning Sequence
Step
Description
9.
If not autoprovisioning, assign Add device
devices to domain(s)
10.
11.
Define gateway, gateway
routes, and trunk groups
Define domain telephony
routes and parameters
Task(s)
147
Menu option
Domains
domainxx.com
Devices
Add Device
Assign users to a device
Domains
domainxx.com
Devices
List Device
Assign User
Add gateway
Gateways
Add Gateway
Add gateway route
Gateways
Add Route
Add trunkgroup
Gateways
Add TrunkGroup
Add routing Class of Service
(COS)
Domains
domainxx.com
Telephony Routes
Routing COS
Add telephony routes: Private, Domains
SIP, or Gateway
domainxx.com
Telephony Routes
Add Telephony Route
12.
Define banned users for a
domain
Change routing parameters
Domains
domainxx.com
Telephony Routes
List Telephony Route
Add route list
Domains
domainxx.com
Telephony Routes
RouteList
Ban users
Domains
domainxx.com
Banned Users
Ban User
SIP Provisioning Client User Guide
[Standard - Nortel Networks Confidential]
148
Provisioning Sequence
NN10043-113
[Standard - Nortel Networks Confidential]
149
Appendix B
Understanding Telephony Routing and
Translations
This section provides a basic understanding of how to provision telephony style
translations interworking with traditional circuit-switched network routing.
Topics in this section:
•
•
•
•
“Telephony routing concepts” on page 149
“Telephony routing terminology” on page 152
“Sample dial plan for telephony routes” on page 155
“Telephony route provisioning scenario and examples” on page 158
Telephony routing concepts
The basic function of any communication equipment is routing, and SIP-based
systems add additional requirements to routing when compared to traditional
circuit-switched network-based routing. Routing in the VoIP networks adds the
complexity of integrating with the traditional circuit-switched networks and
domain-based VoIP/SIP networks.
Subdomains
The concept of subdomains allows the domain administrator to group users into a
smaller routing groups. For example, Nortel Networks can have a single system
supporting a Richardson domain and an Ottawa domain. Users within Nortel
Networks are assigned to subdomains, but can be reached by just using the top
domain. The concept of SIP subdomains is similar to the email domains used
within an enterprise.
SIP Provisioning Client User Guide
[Standard - Nortel Networks Confidential]
150
Appendix B Understanding Telephony Routing and Translations
The following figure shows an example of the subdomain concept (Figure 94).
Figure 94 Example domain tree
Tip: Subscribers do not have to be aware of subdomains. Subdomains
are used only to group subscribers for partitioning telephony
translations.
Class of Service
Class of Service (COS) screens and restricts users from accessing certain
telephony routes within a domain and subdomain. The following restrictions are
imposed on the use of COS:
NN10043-113
[Standard - Nortel Networks Confidential]
Appendix B Understanding Telephony Routing and Translations
•
•
•
•
•
•
151
A single COS value can be assigned to a list of routes, domain, subdomain or
a subscriber.
A domain, subdomain or subscriber has access to the routes if the COS value
equal or higher is assigned to a list of routes.
The domain based COS value is used to determine the telephony routes for
incoming sessions from gateways or other SIP networks. In this scenario the
domain will not host the originator of the call so the domain’s routing
behavior is applied.
If the From: header and Request URI: do not have the same domain, then the
domain specified in the Request URI: is used to determine the telephony
routes.
If the From:, To:, and Request URI: domains are the same, then the
subscriber’s COS and the domain assigned to the subscriber is used to
determine the telephony routes. If the user does not have any COS value then
the domain’s COS value in which the user actually exists is applied.
The same COS values can be assigned to a domain, subdomain and a
subscriber. This allows or restricts a subscriber in the subdomain to access
routes in the parent and other subdomains.
SIP Application Module routing stages
The following figure (Figure 95) shows the relationship between the telephony
routing stages provided by the SIP Application Module. If the COS value of the
subscriber and subdomain route do not match, then the parent and subsequent
subdomains are checked for routes with the same, or higher, COS value.
SIP Provisioning Client User Guide
[Standard - Nortel Networks Confidential]
152
Appendix B Understanding Telephony Routing and Translations
Figure 95 SIP Application Module routing stages
Telephony routing terminology
This section describes the following telephony routing terms:
•
•
route lists
routes
Route lists
Route lists consist of specific telephony routes for a local domain, gateways, or
another SIP domain. The following additional options can be applied to routes in
the route list:
•
NN10043-113
allow all incoming sessions from other domains
[Standard - Nortel Networks Confidential]
Appendix B Understanding Telephony Routing and Translations
•
•
•
153
block all incoming sessions from other domains
allow all incoming sessions from other subdomains
block all incoming sessions from other subdomains
Example of telephony route redirection between domains
The following figure (Figure 96) shows an example of a telephony redirect
imposed by a route list in the xyz.com domain when a session originates from the
abc.com domain.
Figure 96 Route list redirect (domain to domain)
Example of telephony route redirection between subdomains
The following figure (Figure 97) shows an example of a telephony redirect
between two subdomains. In this scenario the originating subscriber’s subdomain
is checked when a route list in the subdomain otta.abc.com sets the subdomain
redirect option.
SIP Provisioning Client User Guide
[Standard - Nortel Networks Confidential]
154
Appendix B Understanding Telephony Routing and Translations
Figure 97 Route list redirect (between subdomains)
Routes
Telephony routes provide the actual dial plan to a particular destination. The
telephony routing includes routes for a private digit dial plan, routes to gateways,
and telephony style routing between SIP domains and subdomains. The three
types of telephony routes available are (in order of telephony route selection):
•
•
•
NN10043-113
Private
SIP
Gateway
[Standard - Nortel Networks Confidential]
Appendix B Understanding Telephony Routing and Translations
155
Private telephony routes
Private telephony routes are used for abbreviated telephony style digit dial plans.
For example, private routes can be set up for a 5-digit dial plan between selected
subscribers in a domain.
SIP and gateway routes
SIP and gateway routes provide access to a gateway, and SIP routes pointing to
other SIP domains and subdomains for inter-SIP domain routing using telephony
style dial plans.
Sample dial plan for telephony routes
This section provides a sample dial plan for provisioning the following telephone
routes:
•
•
•
Private telephony route for using 5-digit translations between subscribers.
SIP telephony route for using PSTN style number plan to call between
different domains.
Gateway route to make local (PSTN) calls using 9+ prefix.
Provisioning domains, subscribers, and COS
Before implementing the dial plan a list of domains, subscribers, and COS must
be provisioned for the following domains in the example:
•
•
abc.com - (includes the rich.abc.com and otta.abc.com subdomains)
xyz.com
The following figure (Figure 98) shows the domains and subscribers in the sample
dial plan.
SIP Provisioning Client User Guide
[Standard - Nortel Networks Confidential]
156
Appendix B Understanding Telephony Routing and Translations
Figure 98 Domains/subscribers used for the sample dial plan
The domain abc.com defines the following three types of COS:
•
•
•
lobby_dial_plan (lowest COS)
local_dial_plan
company_dial_plan (highest COS)
A subscriber that has company_dial_plan COS will also have access to routes
defined for lobby_dial_plan and local_dial_plan. The domain xyz.com defines a
COS, all_dial_plans, that is available to all subscribers in this domain.
Tip: It is assumed that each subscriber is assigned a 10-digit alias in all
the domains.
NN10043-113
[Standard - Nortel Networks Confidential]
Appendix B Understanding Telephony Routing and Translations
157
Example dial plan assignments
The following table (Table 23) provides an example list of subscribers, subscriber
aliases, and COS assignments in the domains.
Table 23 Example dial plan data
Subscriber
Alias
Domain
Subdomain
COS
lobby
9726850000
abc.com
rich.abc.com
lobby_dial_plan
paul
9726851000
abc.com
rich.abc.com
local_dial_plan
john
9726852000
abc.com
otta.abc.com
company_dial_plan
fred
2146842000
xyz.com
all_dial_plans
Dial plan description
The dial plan for the two parent domains (abc.com and xyz.com) uses the various
digit ranges as described in the following table (Table 24).
Table 24 Dial plan for abc.com and xyz.com
Route Name Description
From To
Number
digits
Domain
Type of
Subdomain Route
5_digit_plan
5+4 digit to reach
subscribers in
rich.abc.com
5
5
5
abc.com
pstn_route
9+10 digits to reach a 9
PSTN subscriber. Strip
the 9 before reaching
the subscriber
9
11
abc.com
Gateway
route_to_xyz. 6+7 digits to reach
6
com
xyz.com from abc.com
6
8
abc.com
SIP
route_to_abc 6+7 digits to reach
6
.com
abc.com from xyz.com
6
8
xyz.com
SIP
rich.abc.co
m
Private
The following provides further description of the dial plans:
SIP Provisioning Client User Guide
[Standard - Nortel Networks Confidential]
158
Appendix B Understanding Telephony Routing and Translations
•
•
•
The 5+4 digit dial plan allows the subscribers in subdomain rich.abc.com to
reach other subscribers in the same subdomain using only 5 digit dial plan (for
example, 5+1000). Since the 5 digit dial plan is only required in the
subdomain, it is assigned as a private route.
The 9+10 digit dial plan is used to access the SIP PRI Gateway to terminate
calls to a PSTN network, so this is assigned a gateway route.
The 6+7 digit dial plan is used for communicating between two parent
domains, therefore this digit range is assigned to SIP routes.
Associating COS and the route
The COS and routes described earlier in this section are tied together to provide
the user restrictions in the following table (Table 25). This table shows that the
lobby_dial_plan COS will only have access to the 5+4 digit dialing, therefore,
restricting phones in a lobby to only 5 digit dialing only. The company_dial_plan,
having the highest COS, will have access to all three routes..
Table 25 Association between COS and Routes
COS
Routes
lobby_dial_plan
5+4 digit to reach subscribers in rich.abc.com
local_dial_plan
5+4 digit to reach subscribers in rich.abc.com
9+10 digits to reach a PSTN subscriber. Strip the 9 before
reaching the subscriber
company_dial_plan
5+4 digit to reach subscribers in rich.abc.com
9+10 digits to reach a PSTN subscriber. Strip the 9 before
reaching the subscriber
6+7 digits to reach xyz.com from abc.com
all_dial_plans
6+7 digits to reach abc.com from xyz.com
Telephony route provisioning scenario and examples
The steps in this section provide a scenario and sequence to follow when using the
sample dial plan to provision telephony routing.
NN10043-113
[Standard - Nortel Networks Confidential]
Appendix B Understanding Telephony Routing and Translations
•
•
•
•
•
•
•
159
“Step 1: Create the parent and subdomains” on page 159
“Step 2: Create the COS” on page 161
“Step 3: Create the subscribers and assign the COS” on page 162
“Step 4: Create gateways, gateway routes and trunk groups” on page 165
“Step 5: Create the telephony routes” on page 166
“Step 6: Create the telephony route lists and assign COS” on page 174
“Step 7: Test the telephony routing configuration” on page 178
Step 1: Create the parent and subdomains
To create the parent and subdomains
1
Login in to the SIP Provisioning Client.
2
Click the Domains > Add domain menu option.
3
Create a domain called abc.com. See the following figure (Figure 99) and
locate the parent domain in the SIP Provisioning Client.
SIP Provisioning Client User Guide
[Standard - Nortel Networks Confidential]
160
Appendix B Understanding Telephony Routing and Translations
Figure 99 Parent domain provisioning menu
parent domain
(abc.com)
menu option to create
subdomains
menu option to create
and reorder COS
menu option to add
telephony routes
menu option to add
a route list
4
Create the following subdomains:
— rich.abc.com
— otta.abc.com
— xyz.abc.com
The subdomains assume the default parameters from the parent domain. After
adding the subdomains, the SIP Provisioning Client will look similar to the
following figure (Figure 100).
NN10043-113
[Standard - Nortel Networks Confidential]
Appendix B Understanding Telephony Routing and Translations
161
Figure 100 Subdomain provisioning
subdomains
Step 2: Create the COS
To create the COS
1
Click the Domains > abc.com > Telephony Routes > Routing COS menu
option.
SIP Provisioning Client User Guide
[Standard - Nortel Networks Confidential]
162
Appendix B Understanding Telephony Routing and Translations
2
Add three COS to the parent domain abc.com, and re-order the COS as shown
in the following figure (Figure 101). The highest COS is company_dial_plan.
Tip: The COS list is only created in the parent domain.
Figure 101 Creating COS
3
Click Save.
Step 3: Create the subscribers and assign the COS
To create the subscribers and assign the COS to the subscribers
1
NN10043-113
Create a service package and assign the service package to the parent and
subdomains. An example service package assignment is shown in the
following figure (Figure 102).
[Standard - Nortel Networks Confidential]
Appendix B Understanding Telephony Routing and Translations
163
Figure 102 Assigning service packages to subdomains
2
Create the subscribers for rich.abc.com, otta.abc.com and xyz.com. The
following figure (Figure 103) shows a user called lobby added to the
subdomain rich.abc.com.
SIP Provisioning Client User Guide
[Standard - Nortel Networks Confidential]
164
Appendix B Understanding Telephony Routing and Translations
Figure 103 Adding a subscriber with COS
SIP user
10 digit alias
10 digit calling
number display used
for PSTN calls
COS assigned to this
user
NN10043-113
3
Click Save.
4
Add the remaining subscribers to rich.abc.com, otta.abc.com and xyz.com
domains.
5
Click Save.
[Standard - Nortel Networks Confidential]
Appendix B Understanding Telephony Routing and Translations
165
Step 4: Create gateways, gateway routes and trunk groups
Before a gateway route can be assigned to a dial plan, the gateway and trunk
groups must be created. A SIP PRI gateway is used with following parameters
provisioned on the gateway:
•
•
the gateway’s IP address is 192.12.12.12.
the trunk group assigned to domain abc.com is pstn_trunk_group for facing
with the PSTN network.
This example uses a gateway route to terminate 9+10 digits to PSTN subscribers.
To create a gateway, gateway route and trunk group
1
Click the Gateways > Add Gateway menu option to create a logical link to
the PRI Gateway. Use the data above to create the gateway as shown in the
following figure (Figure 104).
Figure 104 Adding a gateway to abc.com
2
Click the Gateways > Add Route menu option to provision a gateway route
for abc.com (for example, Route to abc.com). This addition is shown in the
following figure (Figure 105). Note that the route created here is used later in
the dial plan to route calls to this gateway.
SIP Provisioning Client User Guide
[Standard - Nortel Networks Confidential]
166
Appendix B Understanding Telephony Routing and Translations
Figure 105 Adding a gateway route
3
Click the Gateways > Add TrunkGroup menu option to assign the gateway
trunk group to this route as shown in the following figure (Figure 106).
Figure 106 Adding a trunk group to a gateway route
4
Click Save.
Step 5: Create the telephony routes
Using the dial plan defined earlier (Table 24), you can now create the telephony
routes. First, create the private routes so that subscribers in subdomain
rich.abc.com can reach each other using 5+xxxx digits.
Using the subscriber information in the following table (Table 26), a lobby phone
(user = lobby) can reach user the user named paul by dialing 51000.
Table 26 Subscribers in rich.abc.com
NN10043-113
Subscriber
Alias
Subdomain
COS
lobby
9726850000
rich.abc.com
lobby_dial_plan
paul
9726851000
rich.abc.com
local_dial_plan
[Standard - Nortel Networks Confidential]
Appendix B Understanding Telephony Routing and Translations
167
Adding a private route to subdomain rich.abc.com
Note: Privates routes in this example are for the rich.abc.com subdomain
only.
To add a private route
1
Click the Domains > abc.com > rich.abc.com > Add Telephony Route sub
menu option as shown in the following figure (Figure 107).
Figure 107 Menu to add routes in subdomain
2
Provision a 5 digit dial plan as shown in the following figure (Figure 108).
The prefix 97268 is used to create the 10 digit alias assigned to the subscriber.
SIP Provisioning Client User Guide
[Standard - Nortel Networks Confidential]
168
Appendix B Understanding Telephony Routing and Translations
Figure 108 Adding a private route to rich.abc.com
3
Click Save.The following window appears (Figure 109).
Figure 109 Private route created
4
Click the Change Parameters link.
5
Set the Subscriber Not Found option to STOP. The STOP option terminates
the call if a subscriber with the prefix 97268+5 digits cannot be found in the
abc.com domain.
Figure 110 Setting the Subscriber Not Found option
NN10043-113
[Standard - Nortel Networks Confidential]
Appendix B Understanding Telephony Routing and Translations
6
169
Click Save. The following window appears (Figure 111) indicating a 5-digit
private route is created for subdomain rich.abc.com.
Figure 111 Listing a private route
Adding SIP routes to abc.com and xyz.com
In this example, two SIP routes are added. The routes use the dial plan defined in
the previous sections to communicate between abc.com and xyz.com domains
using PSTN style dialing. The two SIP routes created to reach each domain are
described in the following table (Table 27).
Table 27 Data for SIP routes
Route Name
Description
From
To
Number
digits
Domain
Type of
Route
route_to_xyz.com
6+7 digits to reach
xyz.com from abc.com
6
6
8
abc.com
SIP
route_to_abc.com
6+7 digits to reach
abc.com from xyz.com
6
6
8
xyz.com
SIP
Tip: The SIP routes are added to the parent domains and not to the
subdomains. This option allows the subdomains to access the common
routes defined in the parent domain. For this example, rich.abc.com and
otta.abc.com can use the same route defined in abc.com.
To create a SIP route
1
Click the Domains > abc.com > Telephony Routing > Add Telephony
Route menu option. In this route, the 6 prefix is removed and 214 is prefixed
SIP Provisioning Client User Guide
[Standard - Nortel Networks Confidential]
170
Appendix B Understanding Telephony Routing and Translations
to determine the user alias in xyz.com. The following figure shows a SIP route
added to the abc.com domain (Figure 112).
Figure 112 Adding a SIP route to abc.com
2
Click the Change Parameters link to set the route list options (Figure 113).
Figure 113 SIP route change parameters
3
NN10043-113
Provision the SIP route to point to the xyz.com domain as shown in the
following figure (Figure 114). The STOP option terminates the call if a
subscriber with the prefix 214+7 digits cannot be found in xyz.com.
[Standard - Nortel Networks Confidential]
Appendix B Understanding Telephony Routing and Translations
171
Figure 114 SIP route options
4
Click Save.
5
Click the Domains > abc.com > Telephony Route > List TelephonyRoute
menu option to view a list of the telephony routes as shown in the following
figure (Figure 115).
Figure 115 Listing SIP routes in abc.com
6
Add a SIP route to xyz.com to point to abc.com using the data shown in the
following figure (Figure 116).
Figure 116 SIP route to abc.com
SIP Provisioning Client User Guide
[Standard - Nortel Networks Confidential]
172
Appendix B Understanding Telephony Routing and Translations
Adding a gateway route to abc.com
Add the dial plan to gateway route as shown in Table 24 to domain abc.com (9+
10 digits).
To add a gateway route to abc.com
1
Click the abc.com > Telephony Routing > Add Telephony Route menu
option to assign the gateway route to a dial plan, In this route the 9 prefix is
removed before sending the request to the PRI Gateway as shown in the
following figure (Figure 117).
Figure 117 Adding a gateway route
NN10043-113
2
Click Save.
3
Click the Change Parameters link on the route listing window (Figure 118).
[Standard - Nortel Networks Confidential]
Appendix B Understanding Telephony Routing and Translations
173
Figure 118 Gateway change parameters
4
Provision the gateway route and options as shown in the following figure
(Figure 119). By selecting the PUBLIC option, the public charge ID assigned
to a subscriber in abc.com is sent as the calling number to the PSTN.
Figure 119 Gateway route options
5
Click the List Telephony Routes menu option to view the list of telephony
routes. Notice that there are now two routes in this listing (Figure 120).
SIP Provisioning Client User Guide
[Standard - Nortel Networks Confidential]
174
Appendix B Understanding Telephony Routing and Translations
Figure 120 Listing abc.com routes
Step 6: Create the telephony route lists and assign COS
At this point, all the subscribers with COS and telephony routes have been
created. However, there is no association between the subscribers and telephony
routes. The route lists provide the association between subscribers COS and
telephony routes that can be used by the subscribers.
To create the telephony route lists and assign COS to each list
NN10043-113
1
Create a route list named abc_route_list using the COS company_dial_plan
and assign the two routes in abc.com to this route list.
2
Click the Domains > abc.com > Telephony Routes > Add RouteList menu
option.
3
Enter the data as shown in the following figure (Figure 121). The BLOCK
option blocks calls from other domains accessing the routes in this Route List.
For example, a subscriber in xyz.com will be blocked if
[email protected] is sent. Since the COS of this route list is
company_dial_plan, only the subscriber named john in the abc.com domain
will have access to this route list.
[Standard - Nortel Networks Confidential]
Appendix B Understanding Telephony Routing and Translations
175
Figure 121 Adding a route list to abc.com
block calls from other
domains accessing
this route
telephony route
selected
4
Create a route list for the local calling plan and assign it the local_dial_plan
COS. This route will be available to subscribers named john and paul in the
abc.com domain. Since local_dial_plan is a lower COS than
company_dial_plan, both route lists are available to the subscriber named
john (Figure 122).
Figure 122 Adding a route list with PSTN route to abc.com
5
Click the Domains > abc.com > Telephony Routes > List RouteLists menu
option to view the route list as shown in the following figure (Figure 123).
SIP Provisioning Client User Guide
[Standard - Nortel Networks Confidential]
176
Appendix B Understanding Telephony Routing and Translations
Figure 123 Listing of abc.com route lists
6
Create a route list in subdomain xyz.com and assign it the COS of
all_dial_plans. The Route List of xyz.com is shown in the following figure
(Figure 124).
Figure 124 Listing of xyz.com route lists
7
NN10043-113
Click the Domains > abc.com > rich.abc.com > Telephony Routes > Add
RouteList menu option to add a route list that contains the private route
[Standard - Nortel Networks Confidential]
Appendix B Understanding Telephony Routing and Translations
177
created earlier for the 5 digit dialing between the subscribers in the
rich.abc.com subdomain. The following figure (Figure 125) shows the new
route list.
This route will be available to subscribers named paul and lobby in the
subdomain rich.abc.com only. Since the COS for lobby_dial_plan is lower
than the COS for local_dial_plan, subscriber paul has access to this route list.
Figure 125 Adding a route list to rich.abc.com
8
Click Save. The following figure appears (Figure 126).
Figure 126 Listing of rich.abc.com route lists
SIP Provisioning Client User Guide
[Standard - Nortel Networks Confidential]
178
Appendix B Understanding Telephony Routing and Translations
Step 7: Test the telephony routing configuration
At this point all subscribers, COS, route, and route lists have been provisioned.
Before making any calls, telephony routing can be verified using the Translations
Tool menu option available in the domains and subdomains.
To check the telephony routing
1
Click the abc.com > rich.abc.com > TelephonyRoutes > Translations Tool
menu option. Verify that the subscriber named lobby can reach the subscriber
named paul by dialing 51000.
The data for translations trace and results are shown in the following figure
(Figure 127).
Figure 127 Subdomain 5 digit translations trace
Paul’s 5 digit
extension
Calling from
subscriber lobby
2
NN10043-113
Verify that the subscriber paul can reach the PSTN network using the 9+10
digit dial plan. The data for translations trace and results are shown in the
following figure (Figure 128).
[Standard - Nortel Networks Confidential]
Appendix B Understanding Telephony Routing and Translations
179
Figure 128 Gateway route translations trace
calling number
to PSTN
3
PRI gateway
trunk group
IP address of the PRI
gateway
Verify that subscriber named john in subdomain otta.abc.com can reach the
SIP domain xyz.com subscriber named fred with the 214684200 alias using
the 6+8 digit dial plan. The data and results are shown in the following figure
(Figure 128).
SIP Provisioning Client User Guide
[Standard - Nortel Networks Confidential]
180
Appendix B Understanding Telephony Routing and Translations
Figure 129 SIP route trace from abc.com to xyz.com
Fred’s 10 digit alias
4
Verify that subscriber named paul in subdomain rich.abc.com cannot reach
the SIP domain xyz.com subscriber named fred with the 214684200 alias
using the 6+8 digit dial plan.The data and results are shown in the following
figure (Figure 130). Paul only has a COS of local_dial_plan, therefore the
route_to_xyz route list is not available.
Figure 130 Restricted route trace
NN10043-113
[Standard - Nortel Networks Confidential]
181
Appendix C
911 Emergency Notification
Note: You must have telephony routing and domain management
provisioning rights to perform the tasks in this section.
This section describes how to set up 911 emergency notification using the SIP
Provisioning Client and the SIP Personal Agent.
Topics in this section:
•
•
•
•
“911 emergency notification terms and concepts” on page 181
“Setting up Instant Message Notifications” on page 182
“Using the SIP Provisioning Client to add emergency subscribers and
telephony routes” on page 183
“Using the SIP Personal Agent to route 911 emergency notifications” on
page 192
911 emergency notification terms and concepts
The SIP Application Module supports sending Instant Message (IM) notifications
to a specified On Site Notification (OSN) subscriber whenever a user makes a call
to an emergency number such as 911. This service is provided by using the same
mechanism that allows users to push web pages and/or email links back to the
originator of a call.
SIP Provisioning Client User Guide
[Standard - Nortel Networks Confidential]
182
Appendix C 911 Emergency Notification
A Public Safety Answering Point (PSAP) is an agency or group of agencies
designated and authorized to receive and respond to 911 emergency calls
requiring one or more public services: Police, Fire, Emergency Medical Service,
or all three.
The OSN is required so that the OSN staff can prepare for the arrival of the
emergency response team, and direct them to the location of the 911 caller when
they arrive on site.
An emergency subscriber is the logical representation of a PSAP/OSN pair. When
a user dials an emergency number (for example, 911), the call is mapped (using
telephony routing rules) to the correct emergency subscriber for that subdomain.
The routing rules for that emergency subscriber (created in the SIP Personal
Agent) then instruct the SIP Application Module to both route the call to the
correct PSAP and to send an Instant Message notification to the correct OSN
subscriber. There is, therefore, a one-to-one relationship between a subdomain
and the PSAP/OSN pair.
Setting up Instant Message Notifications
In order to properly set up IM notifications to an OSN subscriber, the domain
administrator should divide the domain into geographical areas. A subdomain
should then be created for each of these areas. If there is only one geographical
area, no subdomains need to be created.
When a subscriber places an emergency call, the OSN subscriber assigned to the
same subdomain (area) as the originator is notified. It is up to the administrator to
decide how large or small to make the subdomain (area).
NN10043-113
[Standard - Nortel Networks Confidential]
Appendix C 911 Emergency Notification
183
To set up Instant Message (IM) notifications, the following information must be
provisioned using both the SIP Provisioning Client and the SIP Personal Agent.
Use this client...
To set up...
SIP Provisioning Client
•
•
•
•
SIP Personal Agent
an emergency subscriber per subdomain
an OSN subscriber per subdomain
the 911 route in each subdomain to point to each
emergency subscriber for that subdomain
the PSAP route to route to the correct PSAP for
each subdomain
routing rules to the emergency subscriber for
• an emergency telephone number to route the call
to the proper gateway serving the PSAP.
• the OSN subscriber to receive the IM notification.
See the SIP Personal Agent Getting Started Guide
for more information on using the SIP Personal
Agent.
Tip: Since telephony routes are only unique within a subdomain, you cannot
have more than one OSN location per subdomain.
Using the SIP Provisioning Client to add emergency
subscribers and telephony routes
Use the SIP Provisioning Client for the following:
•
•
•
•
•
•
•
“Creating a COS for the 911 notification” on page 184
“Adding a gateway, gateway route, and trunk group” on page 185
“Adding a private telephony route” on page 187
“Adding a gateway telephony route” on page 189
“Adding an emergency subscriber” on page 190
“Adding an OSN subscriber” on page 192
“Setting up a route list for the emergency subscriber” on page 192
SIP Provisioning Client User Guide
[Standard - Nortel Networks Confidential]
184
Appendix C 911 Emergency Notification
•
“Setting up a rule for the emergency notification route” on page 193
Creating a COS for the 911 notification
As a first step, create a new COS for the 911 notification and assign it to the parent
domain.
To create the COS
NN10043-113
1
Click the Domains menu option. Click the subdomain for which you want to
set up the COS (for example, rich.abc.com)
2
Click the Telephony Routes > Routing COS menu option.
3
Enter a name and a description for the COS.
4
Click Save.The COS appears in the Current Choices Available window
(Figure 131).
[Standard - Nortel Networks Confidential]
Appendix C 911 Emergency Notification
185
Figure 131 Creating a COS for the 911 notification
5
Click UP or DOWN to reorder the COS in the Current Choices Available
window. The COS for 911 emergency notification should be the highest in the
reorder list. This indicates that the COS has a lower number, which means a
higher COS value, or service, and ensures that everyone will receive 911
emergency notification support.
Adding a gateway, gateway route, and trunk group
To create a PSAP gateway, gateway route, and trunk group per domain or
subdomain
1
Click the Gateways > Add Gateway menu option to create a logical link to
the PRI gateway.
2
Enter the IP address or MADDR (short address) of the gateway
(Figure 132).
SIP Provisioning Client User Guide
[Standard - Nortel Networks Confidential]
186
Appendix C 911 Emergency Notification
Figure 132 Adding a new gateway
3
Click Save. The new gateway appears in the list of gateways (Figure 133).
Figure 133 List of gateways
4
Click the Gateways > Add Route menu option to provision a gateway route
for the parent domain, for example, Route for abc.com (Figure 134). The
route created here will route 911 calls to this gateway.
Figure 134 Creating a new gateway route
NN10043-113
5
Click Save.
6
Click the Gateways > Add TrunkGroup menu option to assign the gateway
trunk group to this route (Figure 135).
[Standard - Nortel Networks Confidential]
Appendix C 911 Emergency Notification
187
Figure 135 Creating a new trunkgroup
Adding a private telephony route
An emergency telephony route must be set up that is based on the unique
emergency subscriber name provisioned per domain or subdomain.
To create a private telephony route for when a user dials 911
1
Click the Domains menu option.
2
Click the domain subdomain for which you want to set up the private
telephony route (for example, rich.abc.com)
3
Click the Telephony Routes > Add Telephony Route menu option.
Complete the fields for the new telephony route in the The Create New
Telephony Route window (Figure 136). The prefix field (this is the number
that goes in front of the 911) must be changed based on the username of the
pseudo emergency subscriber. The prefix field is only field that is different
between every telephony route in every subdomain.
SIP Provisioning Client User Guide
[Standard - Nortel Networks Confidential]
188
Appendix C 911 Emergency Notification
Figure 136 Create new telephony route window
4
Click Save. The Telephony Route Listing for the domain appears (for
example, abc.com domain).
5
Click the Change Parameters link and select PRE-TRANSLATE from the
drop down list. Click Save (Figure 137).
Figure 137 Change parameters
6
NN10043-113
Click the Telephony Routes > Add RouteList menu option. Complete the
fields for the new telephony route in the The Create New Telephony Route
window (Figure 138).
[Standard - Nortel Networks Confidential]
Appendix C 911 Emergency Notification
189
Figure 138 Creating a new route list
Adding a gateway telephony route
To add a gateway telephony route that routes to the proper gateway serving the
PSAP for the OSN location when a user dials 911
1
Click the abc.com > Telephony Routing > Add Telephony Route menu
option to assign the gateway telephony route for the PSAP route.
2
Complete the fields for the telephony gateway route to the PSAP in the Create
New Telephony Route window (Figure 139). The number in the From Digits
and To Digits fields (for example, 911) corresponds to the number that will be
provisioned in the SIP Personal Agent route list.
SIP Provisioning Client User Guide
[Standard - Nortel Networks Confidential]
190
Appendix C 911 Emergency Notification
Figure 139 Create gateway telephony route to PSAP
3
Click Save.
4
Click the Change Parameters link on the route listing window.
5
Provision the gateway route and options as shown in the following figure
(Figure 140). By selecting the PUBLIC option, the public charge ID assigned
to a subscriber in abc.com is sent as the calling number to the PSTN.
Figure 140 Gateway route options
6
Click the List Telephony Routes menu option to view the list of telephony
routes. Notice that there are now two routes in this listing.
Adding an emergency subscriber
To add an emergency subscriber to a domain or subdomain
1
NN10043-113
Click the Domains menu option.
[Standard - Nortel Networks Confidential]
Appendix C 911 Emergency Notification
2
Select a domain (or a subdomain of a domain).
3
Click the User > Add User sub menu option. The Add new user window
appears (Figure 141).
191
Figure 141 Add user - emergency subscriber
4
Enter a name for the emergency subscriber (for example, 55911).
5
Enter and confirm a password for the subscriber.
6
Enter additional information for the emergency subscriber (optional).
7
Select the COS for the subscriber that you created earlier.
SIP Provisioning Client User Guide
[Standard - Nortel Networks Confidential]
192
Appendix C 911 Emergency Notification
8
Click Save. A message appears that the user was added successfully.
Adding an OSN subscriber
To add an OSN subscriber to a domain or subdomain
1
Click the Domains option.
2
Select a domain (or a subdomain of a domain).
3
Click the User > Add User sub menu option. The Add new user window
appears.
4
Enter a name for the OSN subscriber (for example, guarddeskA).
5
Enter and confirm a password for the OSN subscriber (required).
6
Enter additional information for the OSN subscriber (optional).
7
Click Save. A message appears that the user was added successfully.
Using the SIP Personal Agent to route 911 emergency
notifications
The instant message sent to the Guard Desk is provisioned through the Personal
Agent just as you would if you wanted to push a web page back to the originator
while the terminator is being alerted.
Use the SIP Personal Agent to add a new rule to the emergency subscriber’s Call
Manager route list.
Setting up a route list for the emergency subscriber
To set up a route and ring list to send an IM to a specific OSN location and to call
an emergency number at the same time
NN10043-113
1
Log in to the SIP Personal Agent.
2
Click the Call Manager icon on the left of the SIP Personal Agent screen.
The Welcome to Call Manager home screen displays.
[Standard - Nortel Networks Confidential]
Appendix C 911 Emergency Notification
193
3
Click ListRoutes tab from the Call Manager Home screen. The Ring List
Details screen displays.
4
Enter a name for the emergency route in the Ring list name text box (for
example, Emergency notification).
5
From the drop down list, select the maximum number of times to ring the
phone.
6
In the first text box in the column, enter a unique emergency number. This
number must correspond to the number provisioned in the gateway telephony
route that routes to the proper gateway serving the PSAP for the OSN location
(for example, 6911).
7
Select SIP address from the drop down list.
8
In the second text box in the first column, enter the SIP address of the OSN
subscriber. This is name of the target user who receives the IM notification,
for example:
sip:[email protected].
9
Select Web address from the drop down list.
10 Click Add Route.The Add Route button updates the online user database
with your the emergency subscriber and routing information.
Setting up a rule for the emergency notification route
Once a route is set up, a screening rule must be created that uses the defined
emergency notification ring list to define the activation of 911 calls.
Tip: The 911 notification is not activated until a rule has been applied.
To set up a screening rule for the first time
1
Click ListRules from the Call Manager screening and routing screen. The
Welcome to Call Manager screen displays.
SIP Provisioning Client User Guide
[Standard - Nortel Networks Confidential]
194
Appendix C 911 Emergency Notification
2
Click the create a screening rule link. The Call Manager Rule Details screen
displays.
3
Enter a name for emergency rule in the Rule name text box (for example, 911
rule).
4
Click the Active check box to select that the rule should appear in the Active
Rules window.
5
Select the emergency route from the pull-down menu next to the Active route
field.
6
Click Save Rule.
Tip: If you selected the Active check box in the Call Manager Rule
Details screen, then the rules you just programmed now appear in the
Active rules window in the Call Manager Home screen. Every time 911
is called, the Call Manager checks the rules to match and route the 911
calls appropriately.
NN10043-113
[Standard - Nortel Networks Confidential]
195
Index
Numbers
B
911 emergency notification 181
adding a gateway telephony route 189
adding an emergency subscriber 190
adding an OSN subscriber 192
ban list
definition 36
setting up 36
viewing a ban list 36, 37
Behind Firewall parameter 29
A
Blended Aliases 93
Acronyms xx
blended user 92, 95
Activation 45
Business Phone parameter 93
activation key 45
Active Proxy parameter 30
C
adding a user 92, 105
CAS gateway 50
adding an administrator 19
Cell Phone parameter 93
Administration
overview 11
Channel Associated Signalling gateway 50
administrator
adding 19
deleting 21
viewing details 20
aliases
deleting 107, 109
listing 107, 109
modifying 107, 109
specifying search criteria 107, 109
Aliases parameter 93
Allow All Codecs parameter 29
Alpha parameter 29
Always Use Media Portal parameter 31
Application Server parameter 53
assigned capacity 45
Audience xix
Class of Service
adding 122
deleting 124
Class of Service parameter 94
Client contact parameter 53
conference server
adding 101
Confirm Password parameter 93
Contrast parameter 30
conventions
graphic xx
text xx
COS (Class of Service) 122
CPL scripts 69
Creating a new provisioning role 16
CS2000 133
SIP Provisioning Client User Guide
[Standard - Nortel Networks Confidential]
196
Index
modifying 33
CS2000 interworking profile 133
customer support xxii
From Digits parameter (telephony route) 125
D
G
Date FMTparameter 29
gateway
adding a route 138
adding a server 136
associating a domain 139
definition 135
listing 140
listing a server 137
modifying 138
trunk groups
adding 141
listing 142
reordering 140
Default Proxy Host parameter 30
Default Proxy Port parameter 29
deleting a user 105
Description parameter 52
Description parameter (telephony route) 125
domain
adding a telephony route 124
adding users 92
assigning service package 89
assigning services 71, 75, 77, 79, 83
foreign 25
listing 33
listing users 105
management 23
modifying 33
parameters 28
root 24
service packages 79
types 23
Domains parameter 53
E
email parameter 93
emergency notification 181
gateway connection parameters
Client contact 59
Description 59
URI to query to find gateway 59
H
Home Phone parameter 93
I
i2004 Internet Telephone
adding 99, 111
deleting 119
device parameters 111, 112, 113
listing 116
i2004 Locale parameter 28
F
i2004 properties 100
Fax parameter 93
Idle Display 28
First Name parameter 93
IMS interworking profile (CS2K) 133
foreign domain
adding 33
definition 25
deleting 36
example 26
listing 33
IPCM
adding 42
assigning to a domain 44
definition 41
deleting 46, 47
modifying 45
NN10043-113
[Standard - Nortel Networks Confidential]
Index
parameters 42, 43
IPCM Name parameter 43
197
N
Name parameter (telephony route) 125
IPCM parameter (i2004) 100
L
Last Name parameter 93
Line based voice mail server general parameters
Application Server 65
Client contact 65
Description 65
Domain name 65
Maximum Call Duration 65
Line based voice mail server parameters
Gateway 67
Line 67
Message Desk 67
Position Number 67
O
online help 5
how to use 5
question mark help 5
P
Pager parameter 93
parameters
services 81
user 93
password
changing the admin 9
Password parameter 57, 93
Line based voice mail server SMDI parameters
Address 63
Password 63
Port 63
SMDI Version 63
Username 63
PDIL Timer parameter 29
Listing 128
product support xxii
listing a user 105
Prov. Capacity parameter 43
listing administrators 20
provisioning
creating a new role 16
overview 11
rights 11
roles 11
sequence of tasks 22
tasks 11, 12
listing provisioning roles 17
Locale parameter 94
Location parameter 28
M
Managing 91
Max Number of Digits parameter (telephony
route) 125
Maximum Number of Presence Subscriptions
Accepted parameter 31
Min Number of Digits parameter (telephony
route) 125
modifying a user 105
phantom voice mail server 53
Prefix parameter (telephony route) 125
Primary Rate Interface (PRI) gateway 50
Private Charge ID parameter 94
provisioning rights
examples 15
task overview table 11
understanding 15
PSEIZ Timer parameter 29
Public Charge ID parameter 94
publications
hard copy xxii
SIP Provisioning Client User Guide
[Standard - Nortel Networks Confidential]
198
Index
R
Realm for a domain parameter 30
Recursive parameter (telephony route) 125
registration expiration time (i2004) 101
Registration Length parameter (i2004) 100
Registration Unit parameter (i2004) 100
related publications xxi
Remove parameter (telephony route) 125
Route Type parameter (telephony route) 125
Routes 154
S
defining 71
service parameters and options 73
SIP based voice mail server 50
adding 51
SIP Personal Agent
routing a 911 emergency notification 192
setting up routing rules 183
setting up rules for emergency notifications 193
SIP Provisioning Client xix
exiting 9
features 2
launching 3
overview 1
Status Reason parameter 93
Server Home parameter 30
subdomain 77
adding users 92
assigning service package 89
listing users 105
ServerHome parameter 65
support, Nortel Networks xxii
service pacakge
upgrading 90
System administrator provisioning role 16
search criteria
adding 105
removing 106
service package 79
assigning services 83
assigning to domain 89
assigning to subdomain 89
creating 86
definition 79
deleting 87
downgrading 90
listing 87
listing services 79
modifying 87
parameters and options 81
upgrading 90
Service Package paramter 93
service packages 104
assigning to subdomain 89
deleting 88
downgrading 90
modifying 88
service parameters
NN10043-113
System requirements
minimum hardware and software 2
recommended hardware and software 3
T
technical publications xxii
technical support xxii
Telephony 149, 158
telephony route
adding a new route 124
adding a route list 128
associating COS and the route 158
call routing options
allow 130
definition 121
dial plan description 157
example dial plan assignments 157
examples 158
gateway route 127
listing 126
[Standard - Nortel Networks Confidential]
Index
listing a route list 130
modifying 128
private route 127
redirection between subdomains 153
sample dial plan 154, 155
SIP route 127
Line based 50
listing 68
provisioning 50
SIP based 50
Trunk based 50
Voicemail parameter 94
Telephony routing concepts 149
Voicemail Server parameter 94
telephony routing concepts 149
Class of Service (COS) 150
subdomains 149
W
telephony routing terminology 152
route lists 152
telephony routing terms
routes 154
telephony redirect example 153
199
way 50
WD Phone Timer parameter 29
WD Timer parameter 29
Time FMT parameter 29
Time Zone parameter 30, 94
time zones 5, 7, 8
To Digits parameter (telephony route) 125
translation verification tool 131
Trunk based voice mail server
adding 55
U
URI to query to find Voice Mail Server
parameter 52
user management
adding a user 105
adding users 92
deleting a user 105
listing users 105
User Name parameter 93
Username parameter 57
V
Vocoder
PacketTime parameter 30
voice mail server types 50
adding a SIP based voice mail server 51
SIP Provisioning Client User Guide
[Standard - Nortel Networks Confidential]
200
Index
NN10043-113