1
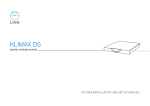
READYNAS
600 version B
Disk Installation Guide
Important instruction on how to install hard disks in your ReadyNAS
☼ Prepare for Installation
Read this Guide before you install the disks.
Prepare the follows for the disk installation:
ReadyNAS 600 disk-less system
Disk drive brackets and screw in accessory box
Ethernet cable and power cable
Hard disk drives (not included)
Screw driver (not included)
1 Remove the top cover to access disk cage
Remove the 3 screws in back.
ReadyNAS 600 case (version B)
Remove top cover
2 Install the hard disk mounting brackets
the connector end
the components
side
Install the bracket
to the new hard disk
4x
the Components Side
16 x
F
Disk installation Accessories
Prepare SATA hard disk drives
F
3 Install the hard disks into cage
1
2
3
4
Hard disks with
mounting bracket installed
1
2
3
System case with
easy access disk cage
4
2) Push the drives into SATA connector completely,
and secure the drives with screws.
1) Install the disks into the cage.
4 Re-install top cover and front panel
Done with disk installation.
Re-install top cover and screw on in the back.
Refer to the Getting Started Guide for further instruction.
Infrant Technologies Inc.
3065 Skyway Ct., Fremont CA 94539
Phone: (510)4 38-7982
Email: [email protected]
Web: www.infrant.com
© 2005 Infrant Technologies, Inc. All rights reserved.
ReadyNAS, RAIDar, RAIDiator, X-RAID and FrontView are trademarks
of Infrant Technologies, Inc. All other product names are the properties
of their respective owner.
Printed in U.S.A. P/N: IT-05-1-1066-U-01
10/2005