Transcript
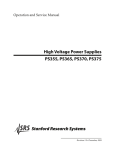
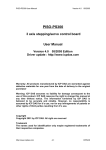
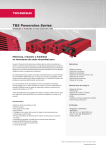
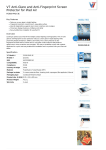
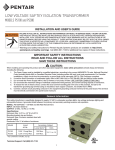
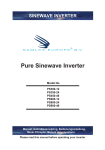
PS300 Series Oven Owners Operating and Installation Manual Supplement This supplement provides updated information for your PS300 Series Oven Owners Operating and Installation Manual. Any information provided in the manual that is NOT updated here is still current, and may be used normally. DESCRIPTION OF CHANGE PS300 Series Ovens now require the installation of TWO thermocouples, instead of the single thermocouple described in the Owners Operating Manual. The procedure below replaces the Thermocouple Installation portion of your Manuals Installation section. THERMOCOUPLE INSTALLATION 1. Install one thermocouple sensing bulb into each of the two holes in the rear panel of the oven, as shown in Figure 1. Fasten each thermocouple in place using one of the #10-32 x 3/8 screws supplied in the Installation Kit. Figure 1 - Thermocouple Installation Locations Thermocouples 2. Thread BOTH sets of thermocouple leads through the grommet and into the machinery compartment, as shown in Figure 1. 3. Remove the right-side panel of the machinery compartment. 4. Thread the thermocouple leads through the side of the machinery compartment as shown in Figure 2, and into the electrical box (at the right-front of the machinery compartment). 5. Connect BOTH sets of thermocouple leads to the temperature controller as shown in Figure 3. Note that the two thermocouples are now tied together at the temperature controller. Grommetprotected hole Figure 2 - Placing the Thermocouple Leads 6. Replace the right-side panel of the machinery compartment. 7. Repeat Steps 1-6 for any other oven cavities in the installation. Figure 3 - Thermocouple Lead Connections 8: White (positive) 7: Red (negative) Ground: Shielded cable P/N 43068 Rev. B V1 3/00